(ENG)
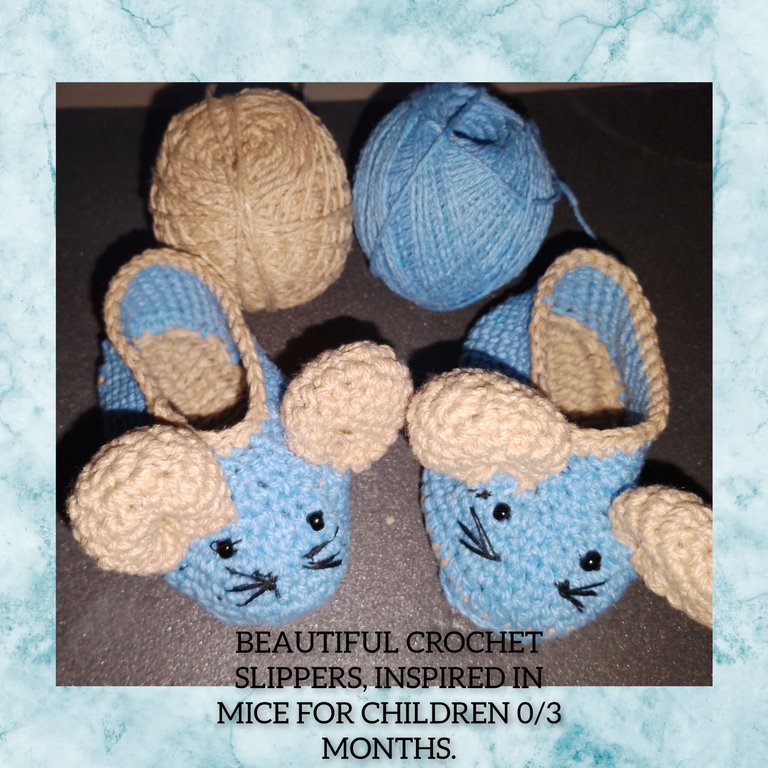
Hello everyone, at @hivediy, I'm pleased to be with you today. Let me show you a very simple step by step, on how to make some cute and very delicate slippers, for children, 0/3 months old, inspired by a delicate and sweet little mouse, ideal to wear in their first months of life, and look very tender and delicate their little feet. I invite you to follow me, I hope you enjoy the tour and it is to your liking.
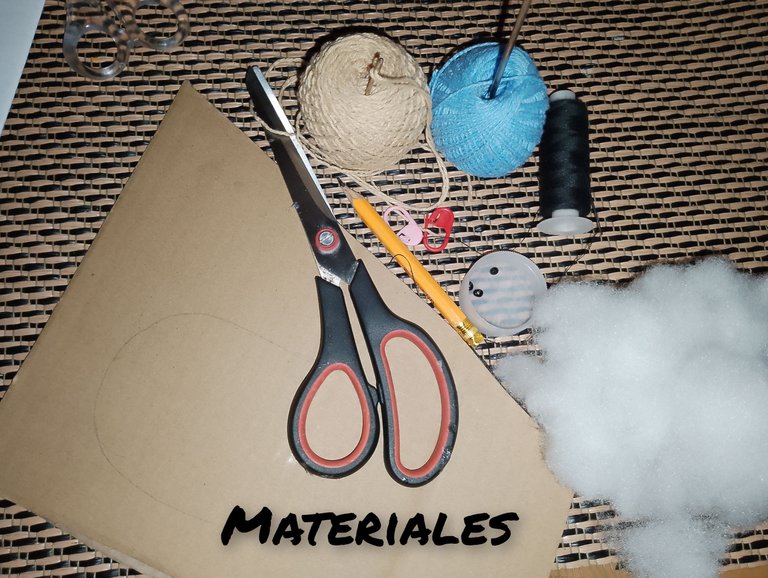
Materials:
. Knitting thread, colors (blue and light brown).
. Wool needle.
. Black sewing thread.
. Black beads.
. Stuffed.
. Cardboard cutout.
. Scissors. Pencil.
STEPS:
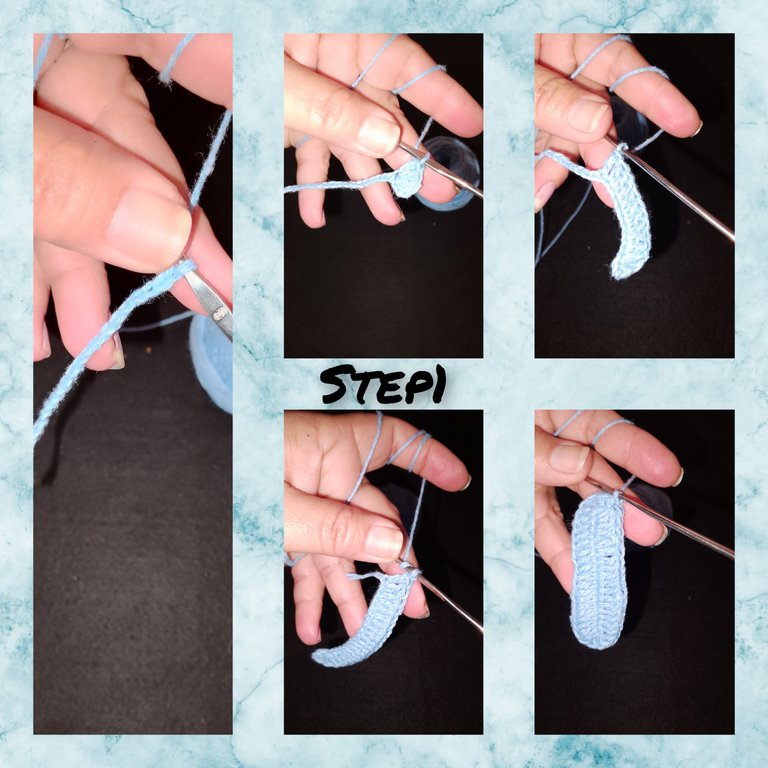
1.) I start by knitting, with the blue thread, 18 chain stitches, then I make an increase in chain stitch n18, and I go along the first side, knitting a dc in each st, when I reach the starting st, I knit 4 dc, increasing, then I go along the next side, until I reach the first one. Increase dc, I knit a dc. Having a total of 24 points.
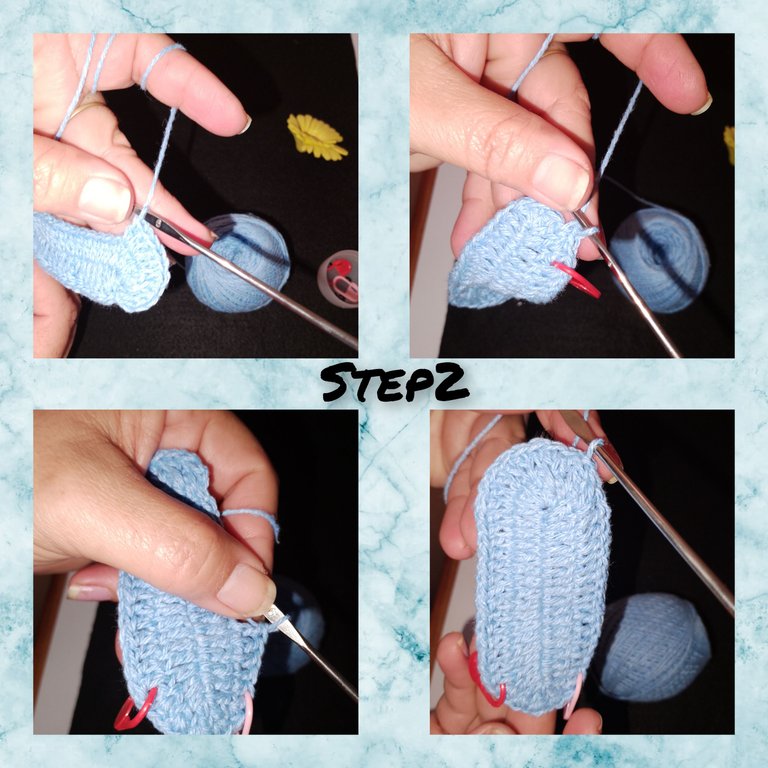
2.) for the next round, I make an increase of two dc, in each dc, of the previous round and I knit one more increase in the next dc, that is, in dc n5, I continue advancing along the route, and I knit one dc In each dc, from the previous round I make a rest at point n, 14 and begin to work an increase, but in dc. double, and in this way, I will work in the increases of the last round, but with double sc. -
3.) On this occasion, using the brown thread, I knit two templates, following the process of steps 1/2. Having a total of four templates, two blue, and two brown.
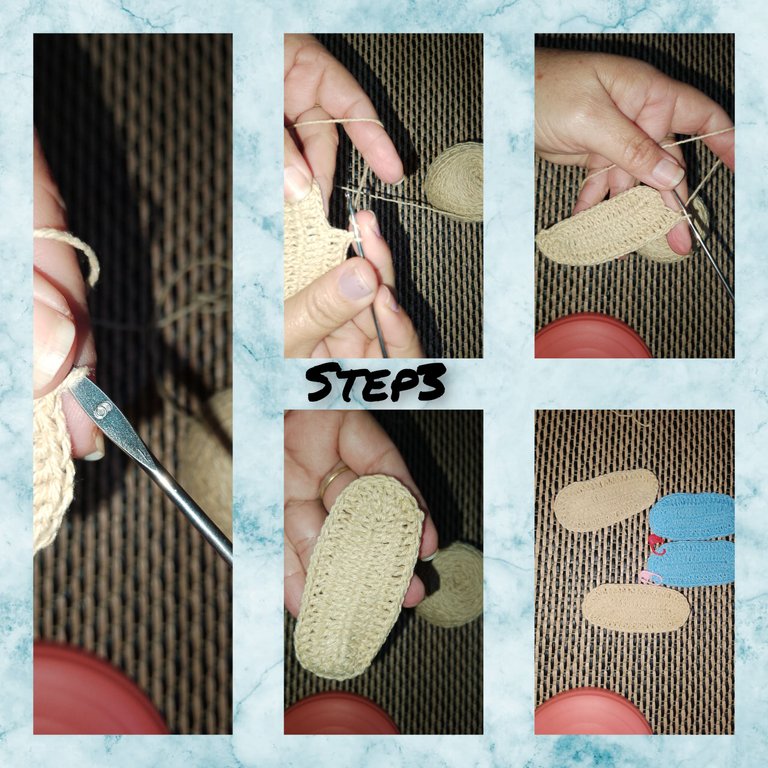
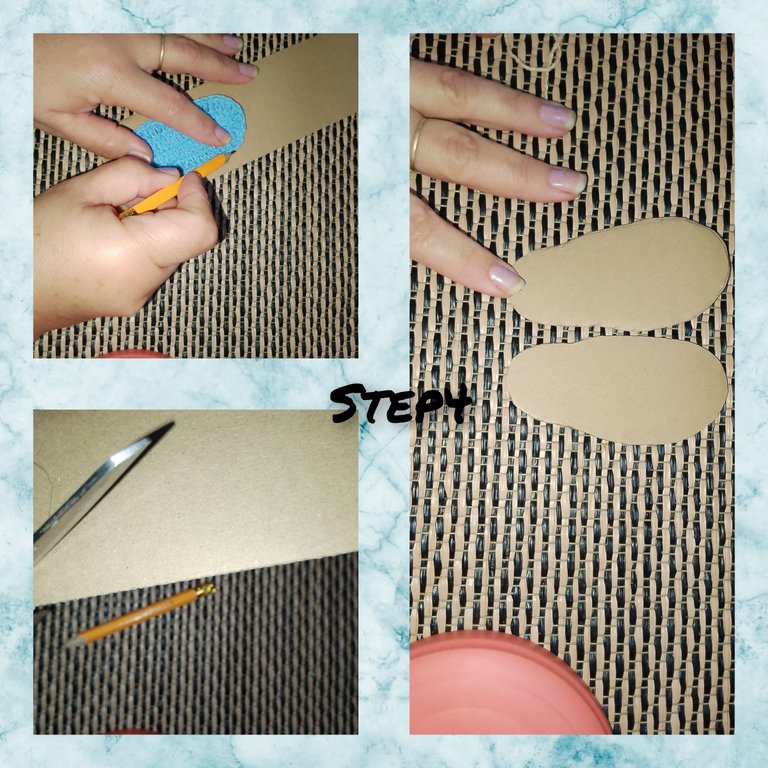
4.) Using the pencil, I marked on the cardboard, and cut out, two templates. Making the cut, cutting two centimeters smaller than the marking.
5.) With the wool needle, I begin to glue one brown template and one blue template, as you can see in the photo, before completely closing the templates, I insert the cardboard template. I finish off and cut the thread. In the same way, I repeat, to obtain the two templates.
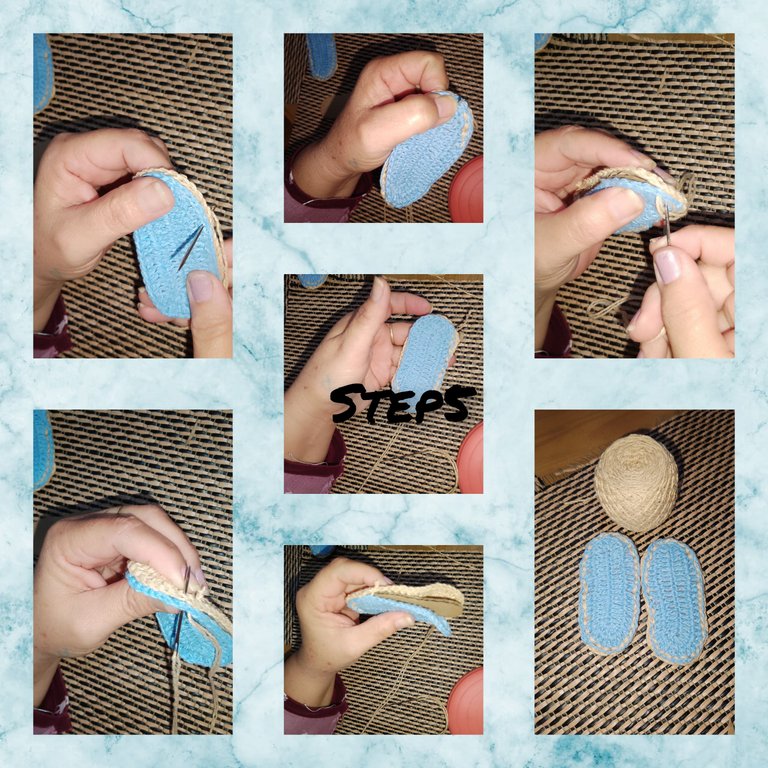
6.) I start knitting, double half stitches, around the template, leaving the brown side inside, once the route is done, I knit a slipped stitch, and I obtain a total of (52pts), continue and for the next 2/Rounds , I knit, a half stitch in each, double stitch from the previous pass.
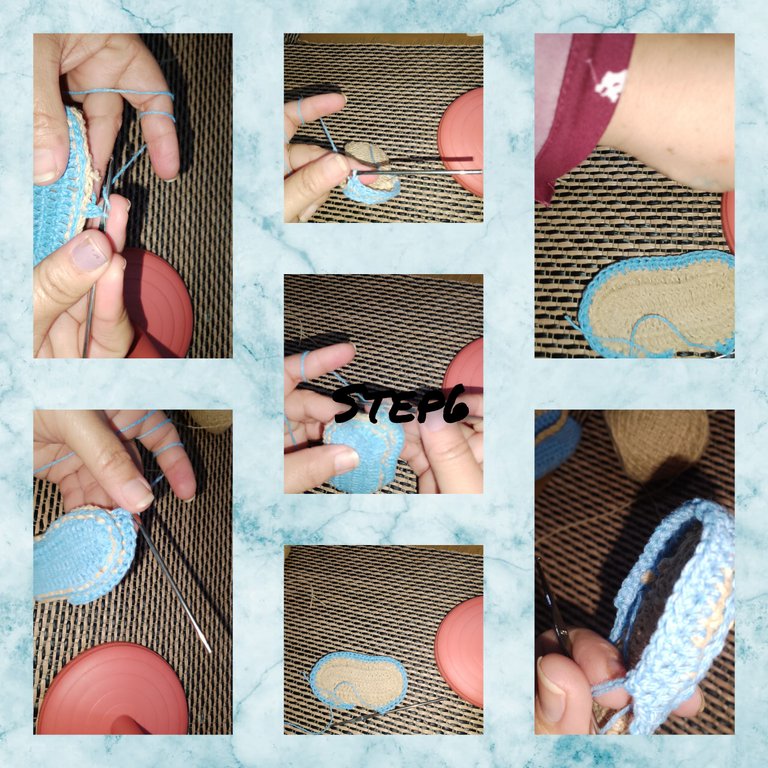
7.) arrived at turn n6. I take half for the front part of the shoes and the other pair for the back part. I use markers to avoid going over the point limits. I start in the front part, and knit, 2sc plus 1dis, so I will do the route only in the front part, I continue for therear, and I knit only p.m. and arrived at the starting point, I knit a p.s. Now I have (20p.) left on the front, and 26p.) on the back. I start the next round following the same process of decreasing, after two sc. and involving both parts of the shoes.
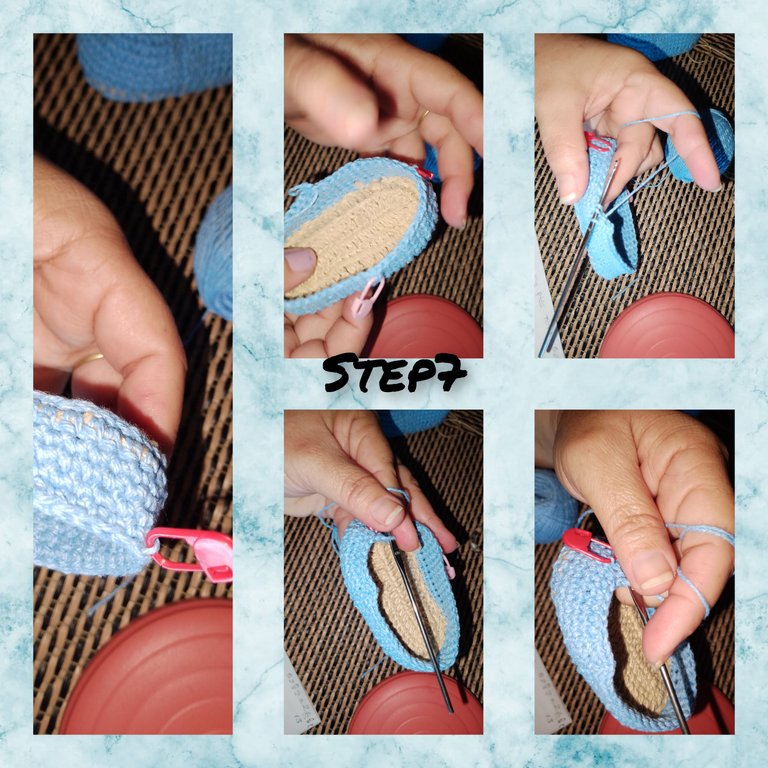
8.) for round n8, I continue, with the decrease, but this time only, I will take the front part, so I make my decrease, after two single crochets, reaching the route, I turn the fabric and knit for the last decrease. Now I just have to tie the brown thread and give the entire shoe a row of sc.

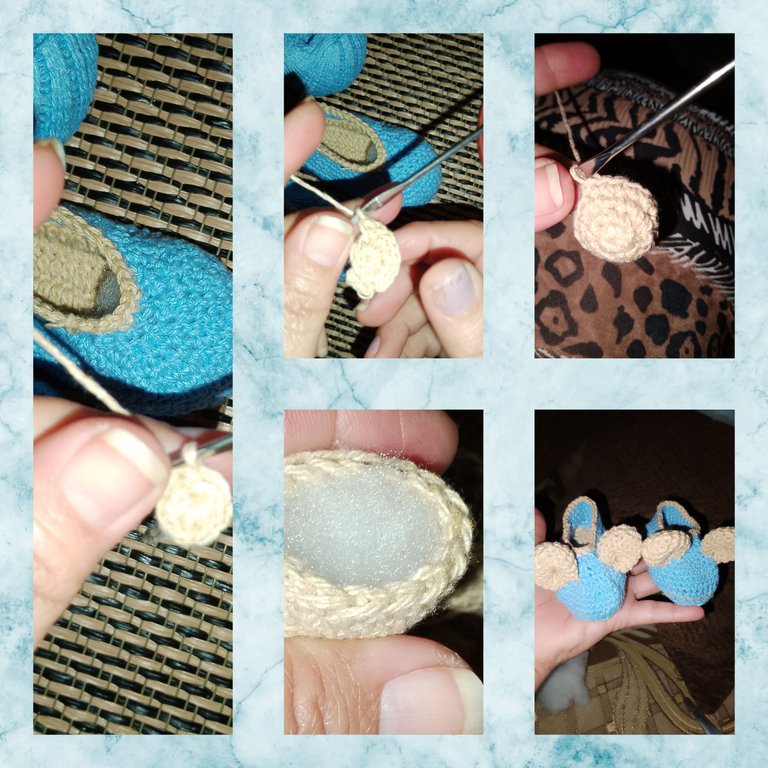
9.) Now I will knit, in a magic ring, 6sc, I close the ring, and I knit only increases, to obtain 12s) I knit 3/6 rows of only sc) I cast off, and cut the thread, leaving a considerable thread. I repeat, to make three more pieces. I get the pieces ready, I place a little filling, and I close with the wool needle. I make a small mark and sew the little ears to the shoes.
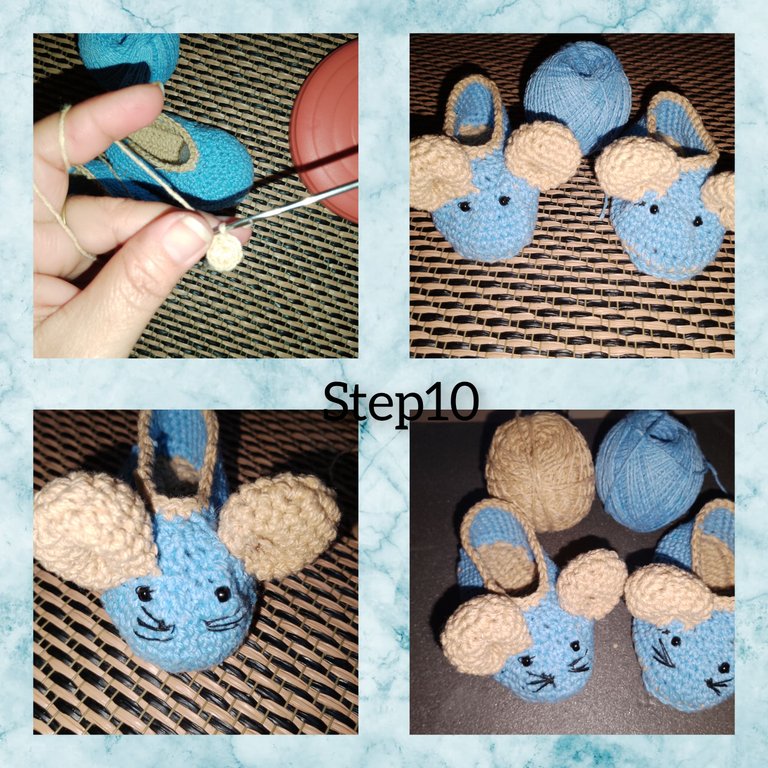
 10.) To finish, I glue the black beads for the mouse's eyes and embroider a striking mustache.
. All photos are my property, taken with my smartphone.
. Use incollage Use language translator.
Grateful for having followed me until the end, it will be until the next opportunity, it is a pleasure to have you on my blog, a big hug.
(ESP)
Hola a todos, en @hivediy, me complace estar hoy, con ustedes. Pase a mostrarles un muy sencillo paso a paso, de como hacer unas lindas y muy delicadas zapatillas, para niños, de 0/3 meses, inspiradas en un delicado y dulce ratoncito, ideal para usar en sus primeros meses de vida, y lucir muy tiernos y delicados sus piecitos. Les invito a seguirme, deseo disfruten el recorrido y sea de su grado.
Materiales:
. Hilo de tejer, colores ( azul y marrón claro).
. Aguja lanera.
. Hilo para coser color negro.
. Mostacillas color negro.
. Relleno.
. Recorte de cartón.
. Tijeras.
Lápiz.
PASOS:
1.) comienzo tejiendo, con el hilo de color azul, 18 puntos cadenas, luego hago un aumento en el punto cadena n18, y recorro un primer lado, tejiendo un p.a, en cada p.c, al llegar a el p.c, de inicio, tejo 4 p.a, de aumento, luego recorro el siguiente lado, hasta llegar a el primer. P.a de aumento, tejo un p.d.
Teniendo un total de 24 puntos.
2.) para la siguiente vuelta, hago un aumento de dos p.a, en cada p.a, de la vuelta anterior y tejo un aumento más en el siguiente p.a, es decir en el p.a n5, sigo avanzando en el recorrido, y tejo un p.a en cada p.a, de la vuelta anterior hago un descanso en el punto n, 14 y comienzo a tejer un aumento, pero en p.b. doble, y de esta manera, tejere en los aumentos de la vuelta pasada, pero con p.b.dobles.
3.) en esta oportunidad, usando el hilo de color marrón, tejo dos plantillas, siguiendo el proceso de los pasos 1/2. Teniendo un total de cuatro plantillas, dos de color azul, y dos de color marrón.
4.) usando el lápiz, marco sobre el cartón, y recortó, dos plantillas. Haciendo el corte, al recortar dos centímetros menor al marcado.
5.) con la aguja lanera, comienzo a pegar una plantillas de color marrón y un de color azul, tal como lo pueden apreciar, en la foto, antes de cerrar en su totalidad las plantillas, introduzco, la plantilla cartón. Remato y corto el hilo. De igual manera, repito, para obtener el las dos, plantillas.
6.) comienzo tejiendo, medios puntos dobles, por el alrededor de la plantilla, dejando el lado marrón por dentro, hecho el recorrido, tejo un punto deslizado, y obtengo un total de (52pts), continuo y para las siguientes 2/Vueltas, tejo, un medio punto en cada, punto doble de la pasada anterior.
7.) llegado a la vuelta n6. Tomo la mitad par la parte delantera de el zapaticos y la otra par al aparte tracera. Utilizo los marcadores, para evitar, sobre pasar los límites de los puntos. Comienzo en la parte delantera, y tejo, 2pb más 1dis, así haré el recorrido solo en la parte delantera, sigo para la tracera, y tejo sólo p.m. y llegó al punto de partida, tejo un p.d. ahora me quedan (20p.) parte delantera, y 26p) en la tracera. Inicio la siguiente vueltas siguiendo el mismo proceso de hacer disminución, luego de dos p.b. e involucrando ambas partes de el zapaticos.
8.) para la vuelta n8, sigo, con la disminución, pero está vez sólo, tomaré la parte delantera, así que hago mí disminución, luego de dos puntos bajos, alcanzado el recorrido, doy vueltas a el tejido y tejo para la última disminución. Ahora sólo, me quedé, atar el hilo de color marrón y dar a todo el zapato, una vuelta de p.b.
9.) ahora tejere, en un anillo mágico, 6p.b, cierro el anillo, y tejo sólo aumentos, par obtener 12p) tejo 3/6 pasadas de solo p.b) remato, y corto el hilo, dejando una hebra considerable. Repito, para hacer tres piezas más. Lista las piezas, coloco un poco de relleno,y cierro con la aguja lanera. Hago una pequeña marca y coso a el zapaticos, las orejitas.
10.) para terminar, pego las mostacillas de color negro, para los ojos de el ratoncito y bordo llamativo bigote.
. Todas las fotos son de mí propiedad,tomadas con mí teléfono inteligente.
. Use incollage
Use traductor lenguaje.
Agradecida me hayas seguido hasta el final, será hasta una próxima oportunidad, es un gusto tenerlos por mí blog, un fuerte abrazo.
Que ternurita estas zapatillas amiga, están muy cuchis con ese ratoncito, son una verdadera belleza 😍
Gracias amiga...que bueno le haya gustado...
Hola amiga. Están preciosos los zapatitos. Me encanta la combinación y el diseño. Ese bebé se verá muy coqueto.
¡¡¡Buen trabajo!!! Gracias por publicar tu excelente contenido en Hive Diy, me encantaron estas zapatillas, son tan lindas y tiernas, me imagino un bebe usándolas.
Tu comunidad artesana ahora es testigo

Muy agradecida por su apoyo, siempre es un gusto, estar por su comunidad