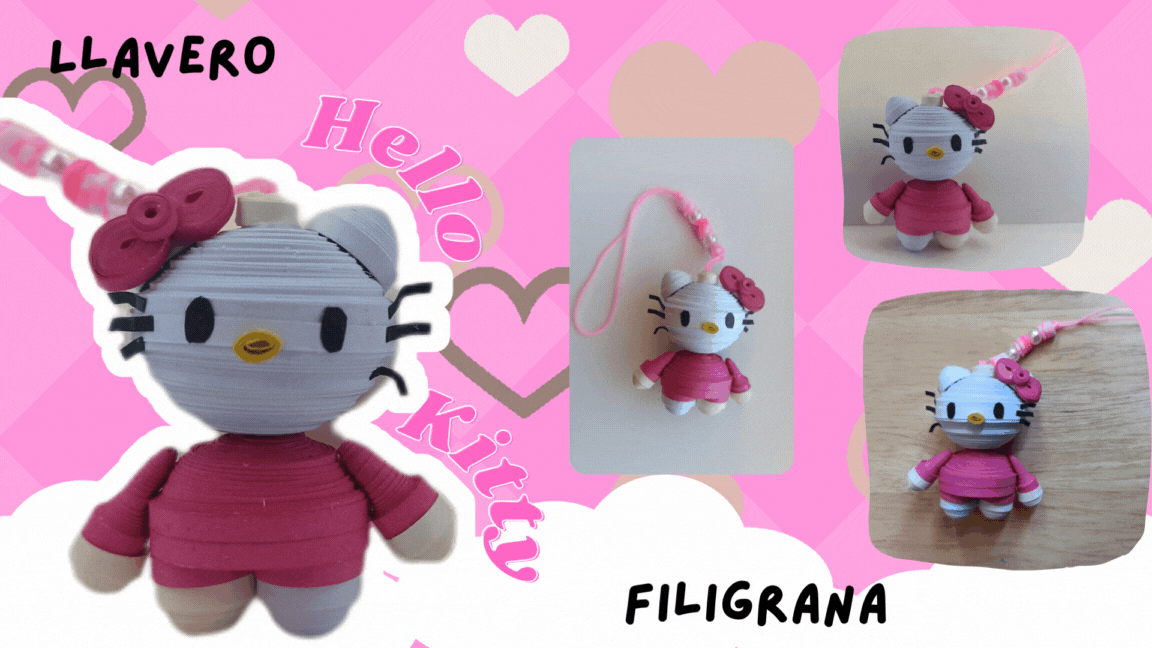
¡Hola gente guapa!
Estoy aquí para enseñarles cómo hacer un llavero tridimensional de Hello Kitty utilizando la técnica de la filigrana de papel.
Soy nueva en el uso de esta técnica, pero realmente me han encantado los dos trabajos que he hecho, siendo este Hello Kitty mi favorito por ahora.
Hello beautiful people!
I'm here to show you how to make a three-dimensional Hello Kitty keychain using the paper filigree technique.
I am new to using this technique, but I have really loved the two works I have done, being this Hello Kitty my favorite for now.
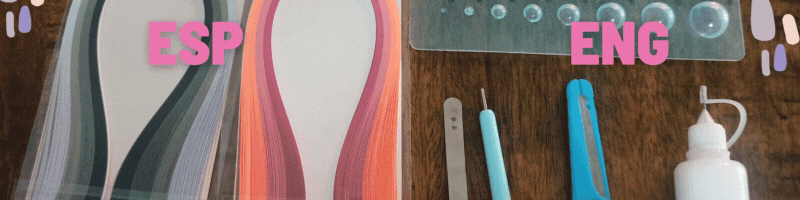
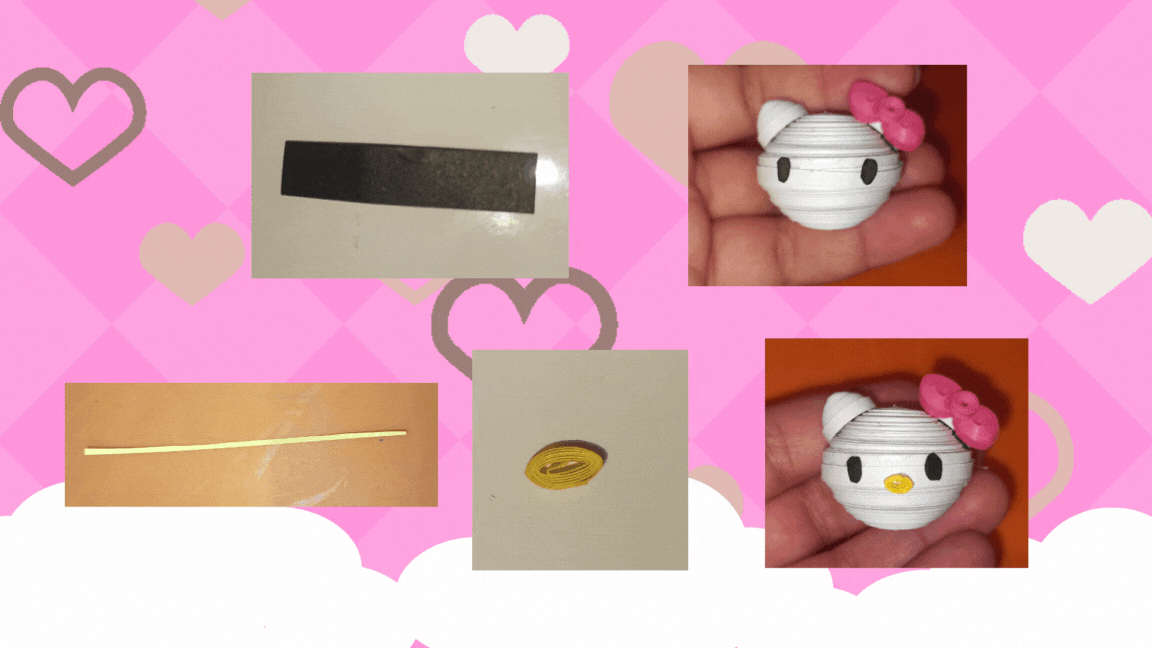
- Regla moldeadora
- Tiras de papel quiller :
Blanco 34 tiras (3 mm)
Rosa 30 tiras (3 mm)
Amarillo 1/5 tiras (1,5 mm)
Negro - Tijeras
- Bastoncillos de algodón
- Pegamento
- Pinza
- Lapiz Enrollador quilling
- Hilo chino rosado de 20 cm.
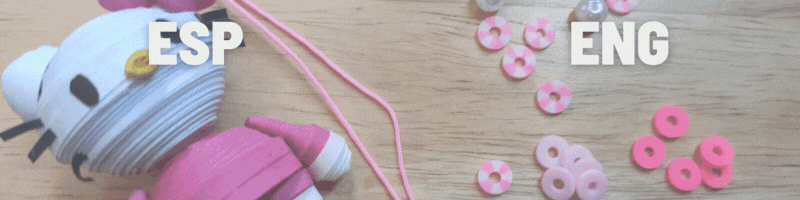
- 12 Cuentas heishi con tonos rosados
- 2 Perlas
- Mold. Half balt- Making board
- Strips of quiller paper :
White 34 strips (3 mm)
Pink 30 strips (3 mm)
Yellow 1/5 strip (1.5 mm)
Black - Scissors
- Cotton buds
- Glue
- Tweezers
- quilling pen
- 20 cm pink Chinese thread.
- 12 Heishi beads with pink tones
- 2 Pearls
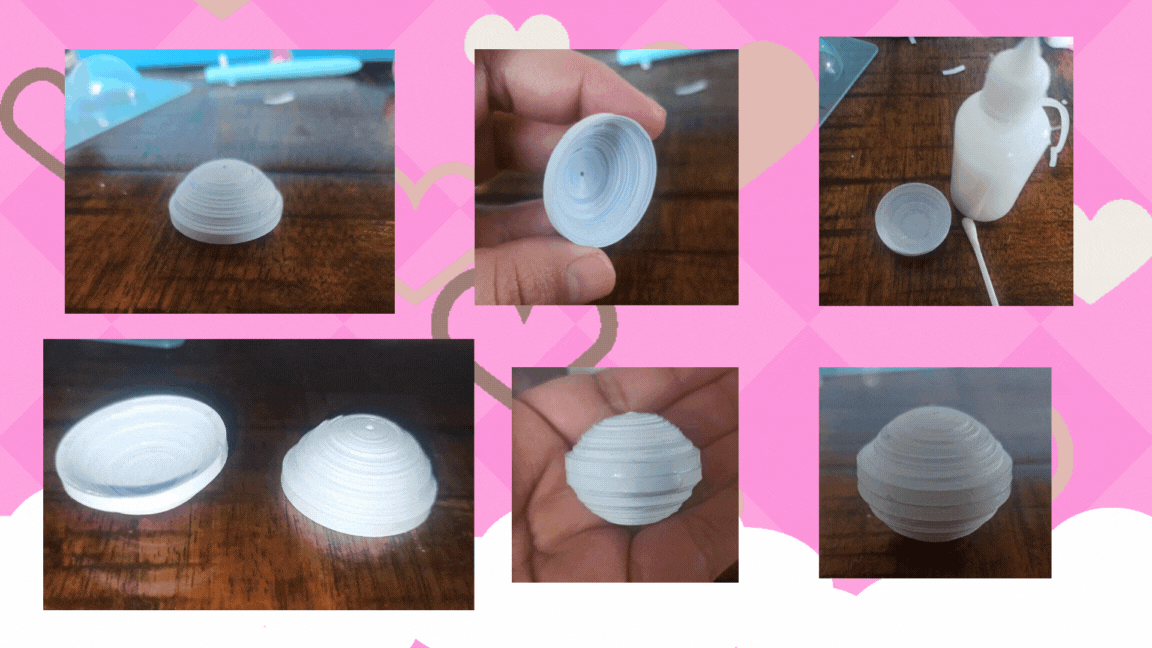
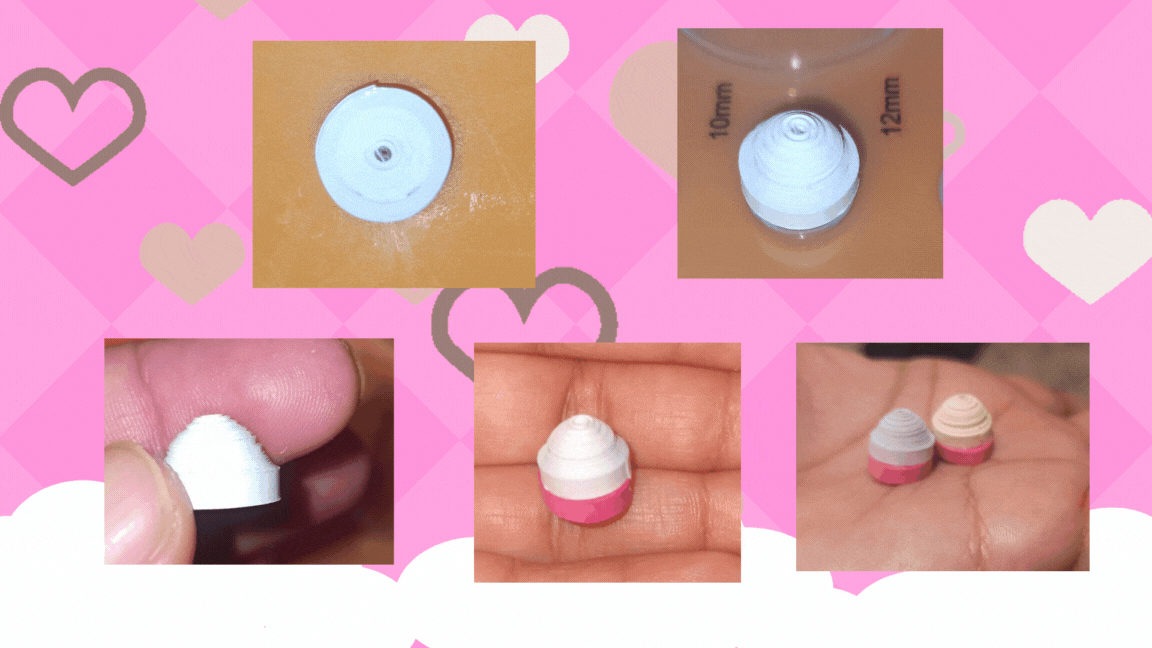
Cabeza:
- Uno 15 tiras color blanco de 3 mm.
- Enrollo y pego.
- Con el molde hago medio balón/ media pelota.
Head:
- I glue 15 strips white color of 3 mm.
- I roll and glue.
- With the mold I make half ball/half ball.
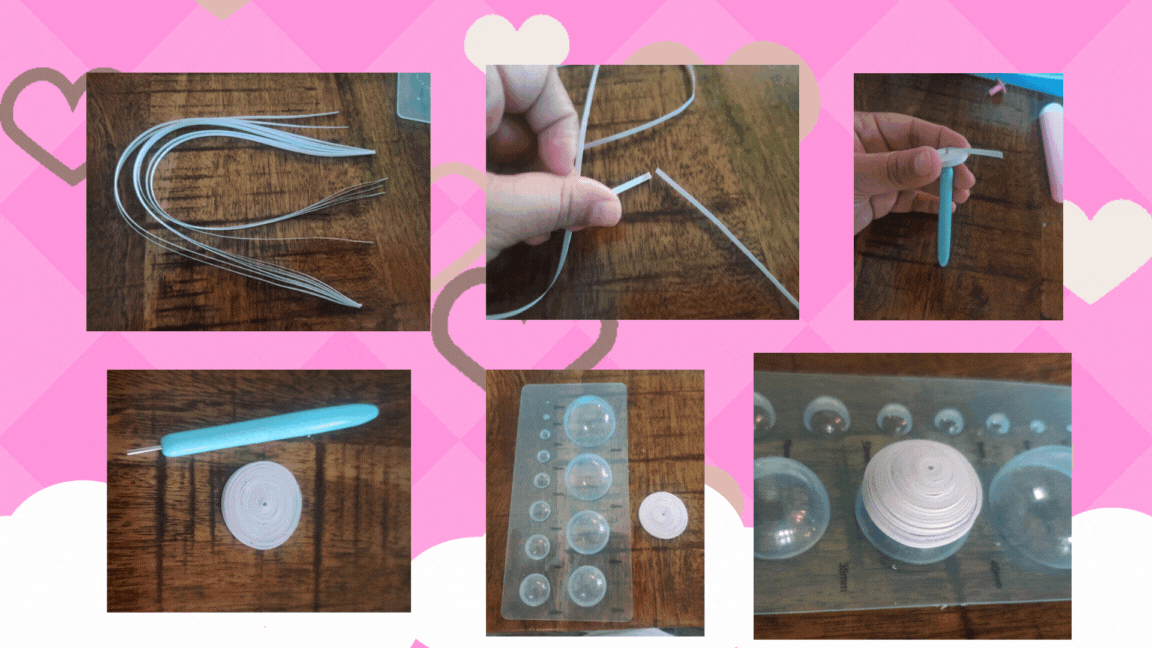
- Añado suficiente pegamento en la parte interior.
- Repito el mismo proceso para hacer una segunda media bola.
- Añado pegamento en el borde de las medias bolas y pego para formar una bola.
Si no tienes este molde, puedes usar los dedos y darle forma.
Yo utilizo el bastoncillo para extender el pegamento y limpiar cuando hay exceso de pegamento.
- I add enough glue on the inside.
- I repeat the same process to make a second-half ball.
- I add glue on the edge of the half balls and glue to form a ball.
If you don't have this mold, you can still use your fingers and shape it.
I use the swab to spread the glue and clean up when there is excess glue.
Orejas:.
- Uno 2 tiras blancas de 3 mm
- Enrollo y pego la punta para que no se desate.
- Le doy forma con el molde.
Ears:.
- I join 2 white strips of 3 mm
- I roll and glue the tip so that it does not come untied.
- I shape it with the mold.
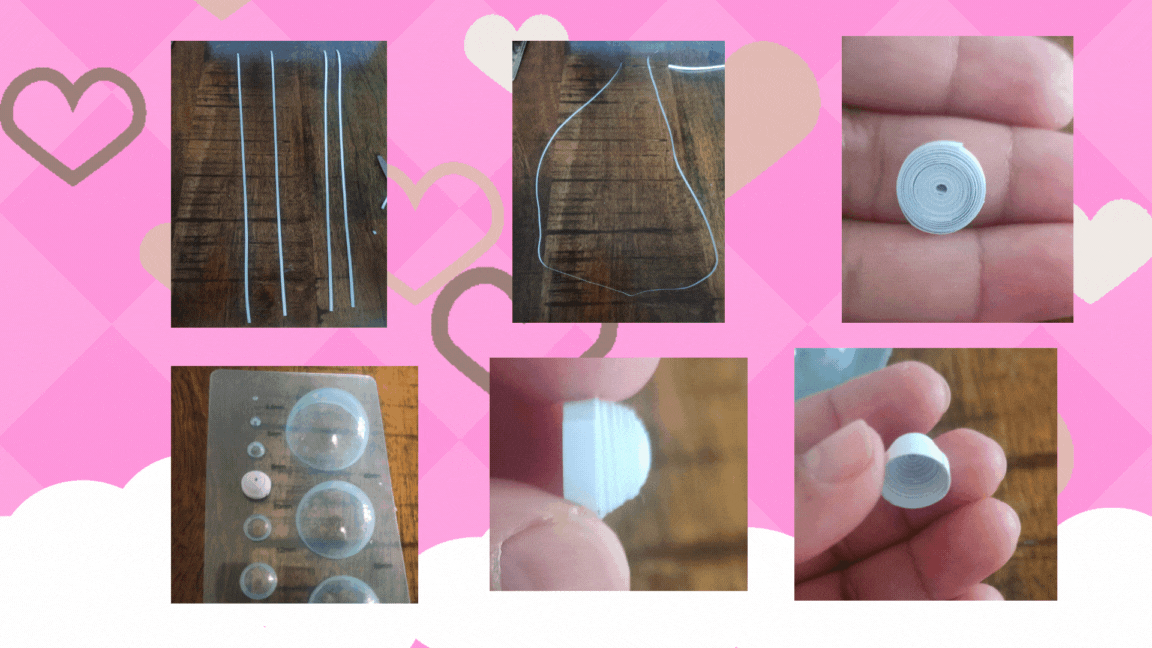
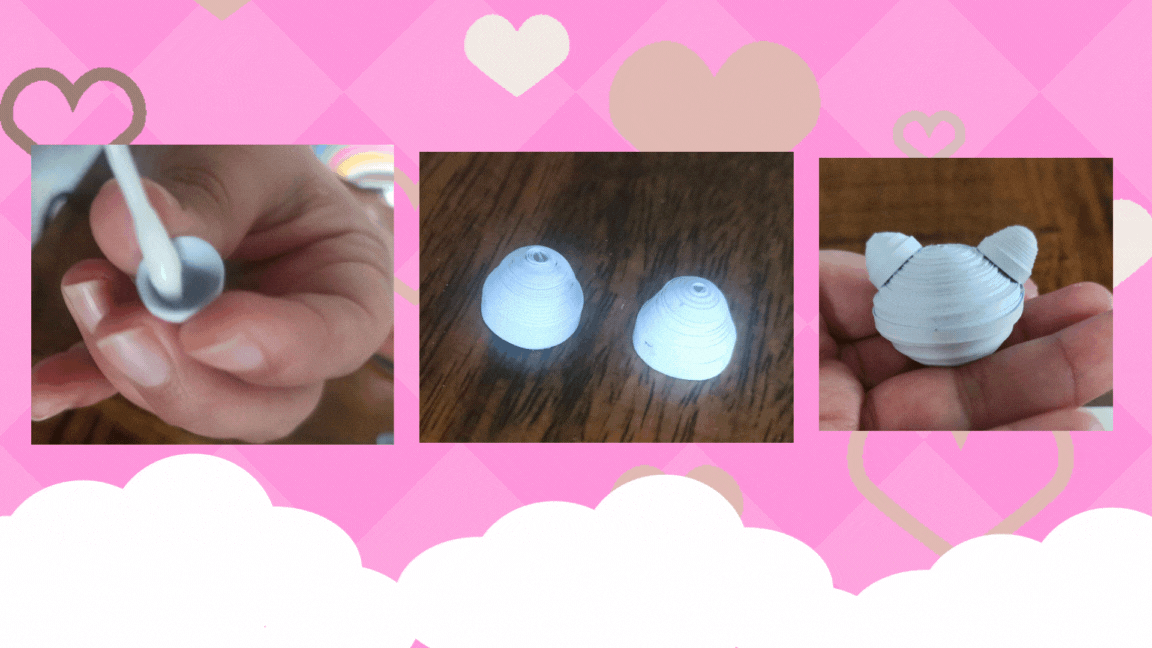
- Agrego suficiente pega en el interior.
- Repito el proceso y saco la otra oreja.
- Pego las piezas en la cabeza.
- I add enough glue on the inside.
- I repeat the process and take out the other ear.
- I glue the pieces on the head.
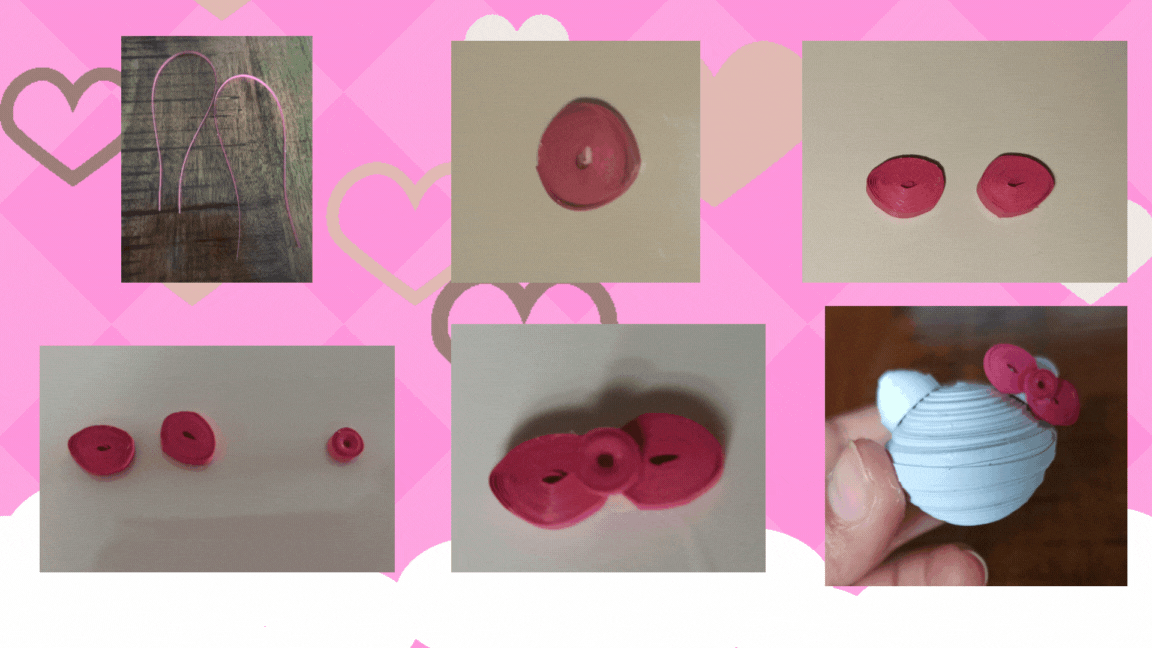
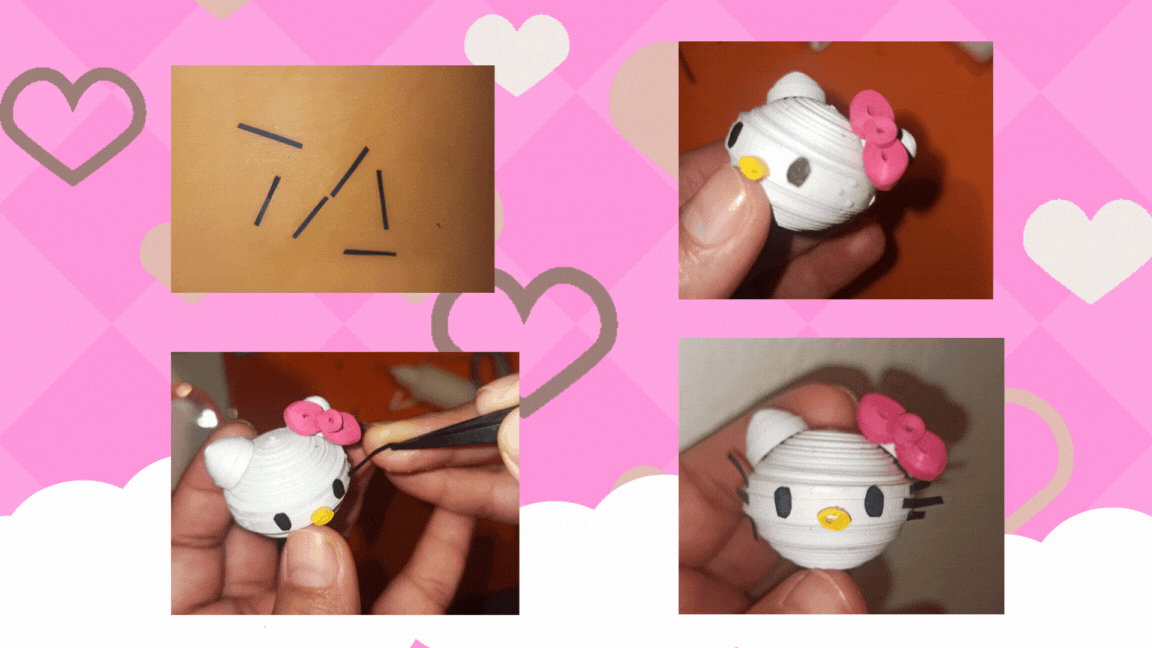
Lazo:
Con una tira rosada de 3 cm, enrollo y hago un círculo y luego le doy forma de óvalo.
Repito el proceso para una segunda pieza.
Para el centro del lazo, uso media tira rosada de 1.5 mm. Enrollo para hacer el círculo.
Formo el lazo y la pego en la oreja derecha.
Loop:
With a 3 cm pink strip, I roll and make a circle and then shape it into an oval.
I repeat the process for a second piece.
For the center of the loop, I use half a 1.5 mm pink strip. I roll to make the circle.
I form the loop and glue it to the right ear.
Ojos - nariz:
Con cartulina negra hago los ojos. Aquí también se puede utilizar rotulador. Hacer piezas tan pequeñas es realmente difícil a la hora de cortar.
Con media tira amarilla de 1.5 mm enrollo y hago forma de óvalo.
Eyes - nose:
With black cardboard I make the eyes. Here you can also use marker. Making such small pieces is really difficult when it comes to cutting.
With half a yellow strip of 1.5 mm I roll and make an oval shape.
Bigotes:
- Fácil los bigotes, hago 6 tiras finas de unos 2 cm y pego 3 de lado y lado en los cacheticos de esta bella Hello Kitty.
Whiskers:
- Easy the whiskers, I make 6 thin strips of about 2 cm and glue 3 on each side of the cheek of this beautiful Hello Kitty.
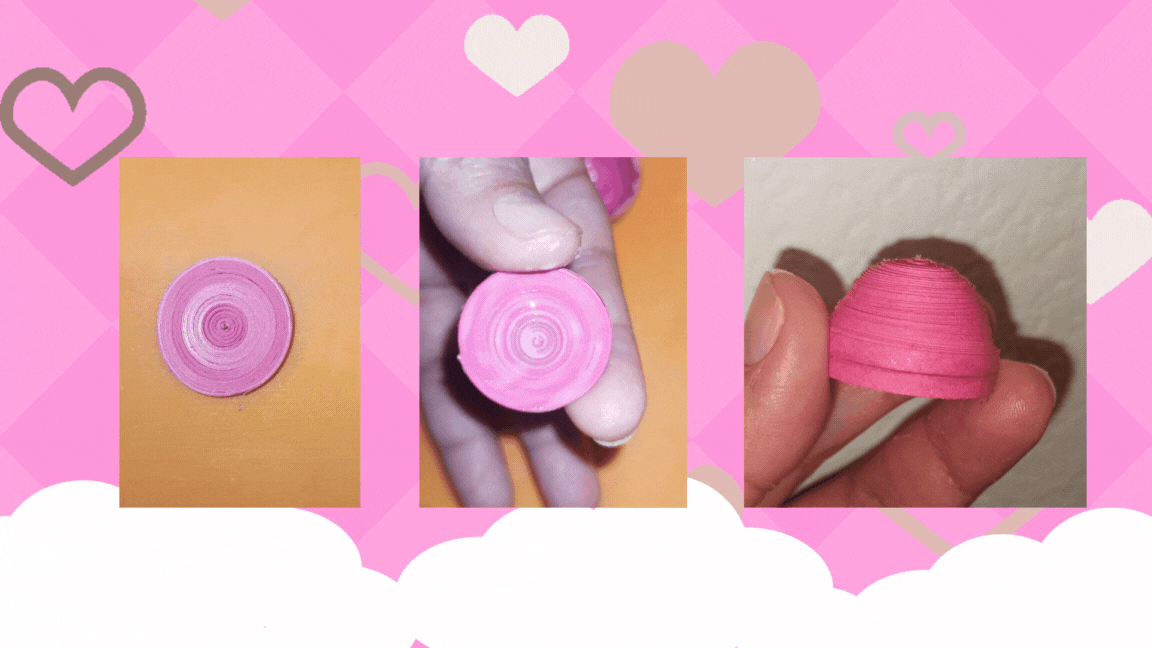
Tronco:
- Uno 10 tiras rosadas y enrollo hasta hacer un círculo apretado.
- Con el molde hago un medio balón.
- Agrego suficiente pega en la parte interna.
body:
- I put 10 pink strips together and roll into a tight circle.
- With the mold, I make a half ball.
- I add enough glue on the inside.
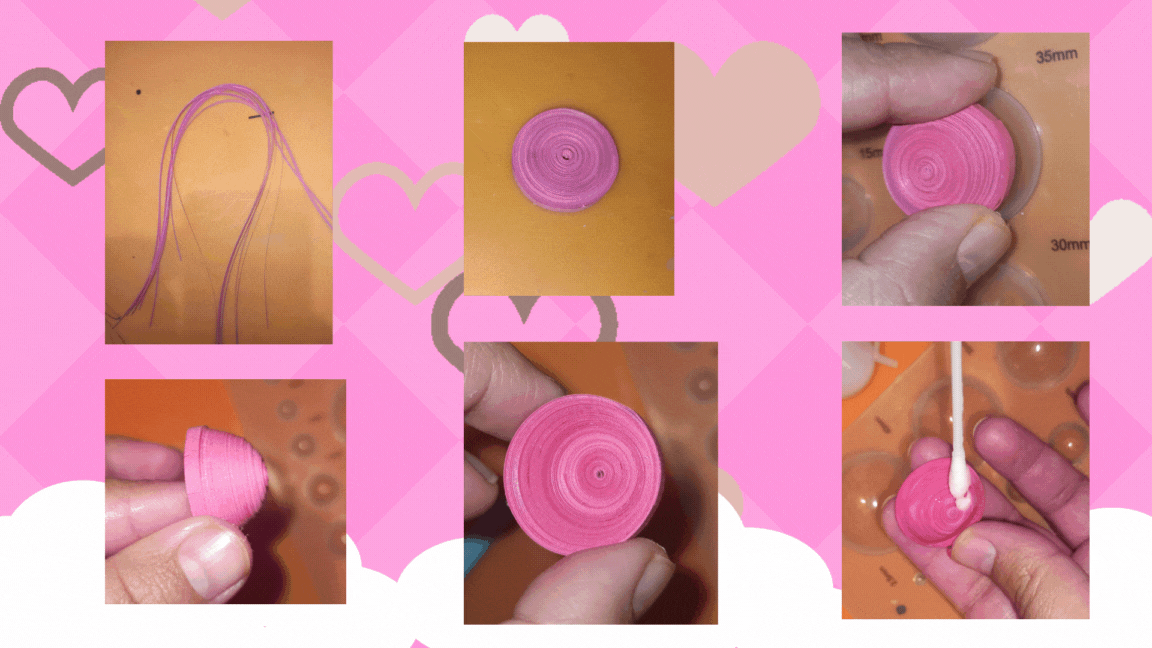
Con 10 tiras rosadas de 3 mm las uno y hago un circulo apretado.
Agrego pega en uno de los lados que será la parte interna.
Uno las dos piezas.
With 10 pink strips of 3 mm I join them and make a tight circle.
I add glue on one of the sides that will be the internal part.
I join the two pieces.
Piernas:
- Uno 3 tiras rosadas de 3 mm.
- Enrollo, hago un círculo apretado.
- Le doy forma de óvalo.
Legs:
- I put together 3 pink strips of 3 mm.
- I roll and make a tight circle.
- I shape it into an oval.

- Uno 2 tiras blancas de 3 mm y hago un círculo apretado.
- Con el molde doy forma.
- Agrego suficiente pega en la parte interna.
- Esta pieza la pego encima de la pieza rosada.
- Repito el proceso para sacar la segunda pierna.
- I join two 3 mm white strips and make a tight circle.
- I shape it with the mold.
- I add enough glue on the inside.
- I glue this piece on top of the pink piece.
- I repeat the process to make the second leg.
Brazos:
- Con una tira rosa de 3 mm hago un circulo apretado.
- Con la ayuda de la punta de un lápiz le di forma puntiaguda.
- Con los dedos, doblo un poco para hacer una curvatura.
- Añado pegamento en todas las partes interiores.
Uní dos tiras blancas de 3 mm
Hice un círculo apretado.
Le doy forma con el molde.
Añado pegamento en la parte interior.
Uno las dos piezas.
Repito el proceso para hacer el segundo brazo.
Arms:
- With a 3 mm pink strip I make a tight circle.
- With the help of the tip of a pencil I gave it a pointed shape.
- With my fingers, I bent a little to make a curvature.
- I add glue on all the inner parts.
I joined two white strips of 3 mm
I made a tight circle.
I shaped it with the mold.
I add glue on the inside.
I join the two pieces together.
I repeat the process to make the second arm.
Armar las piezas:
Pegué la cabeza al tronco con suficiente pega, lo sostuve por unos minutos hasta que se sostenía solo y deje secar toda la noche.
Luego pegue los brazos y piernas.
En el armado me di cuenta de un pequeño error, no me fije y use otro tono de blanco para los brazos y una de las piernas. A pesar de eso me encantó el resultado.
Putting the pieces together:
I glued the head to the trunk with enough glue, held it for a few minutes until it stood on its own, and let it dry overnight.
Then I glued the arms and legs.
During the assembly I made a small mistake, I didn't pay attention and used a different shade of white for the arms and one of the legs. Nevertheless, I loved the result.
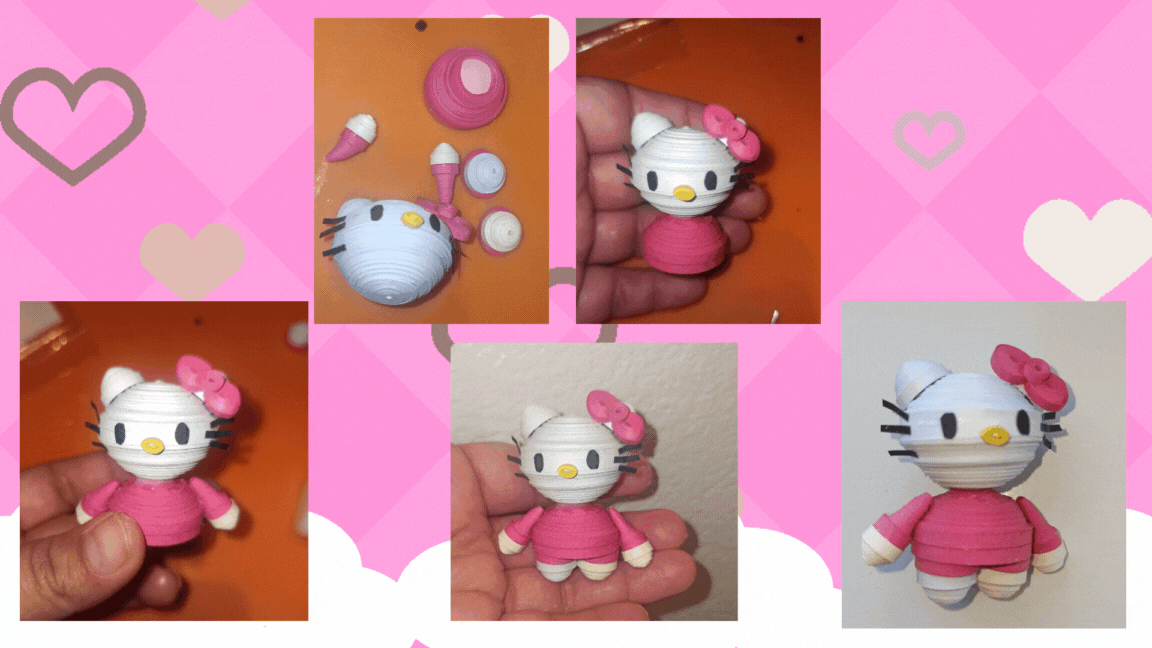
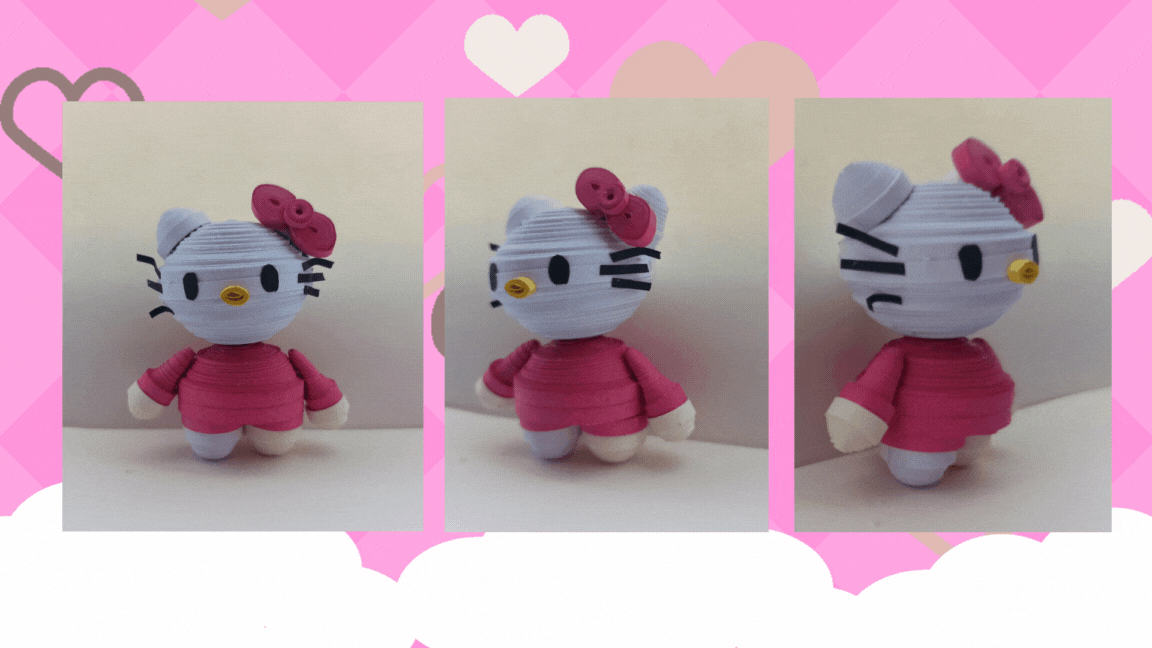
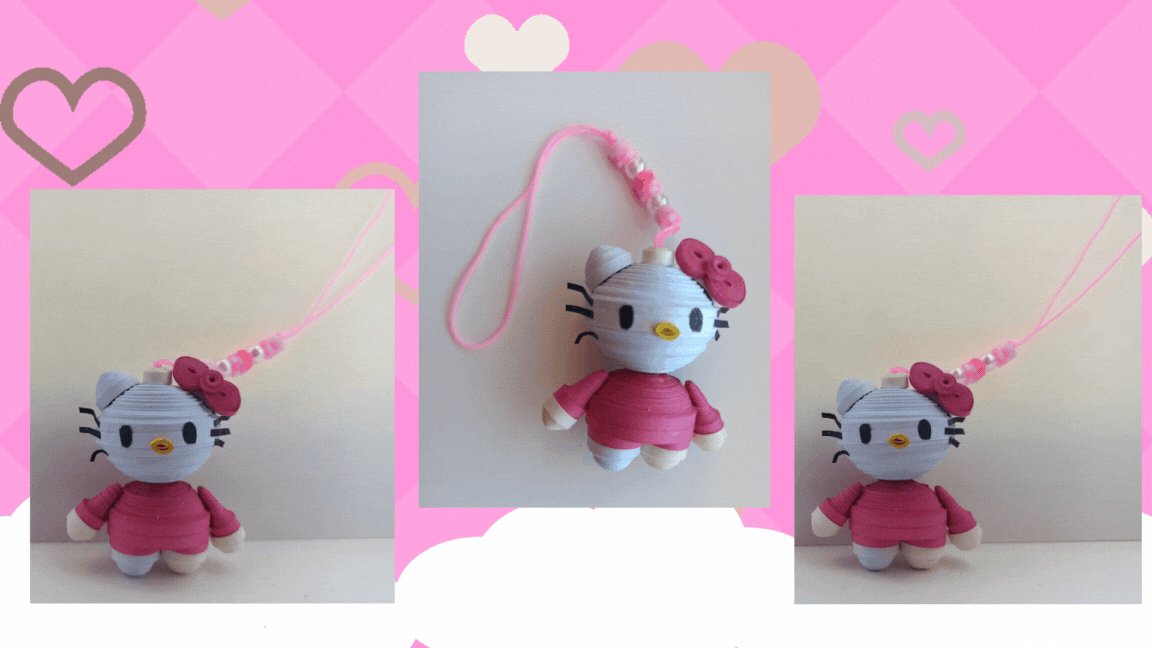
Aquí la pueden apreciar en diferentes ángulos. Se siente resistente, ya que el pegamento añadido en el interior de cada pieza hace que el papel sea duro.
Here you can see it from different angles. It feels sturdy, as the glue added to the inside of each piece makes the paper hard.
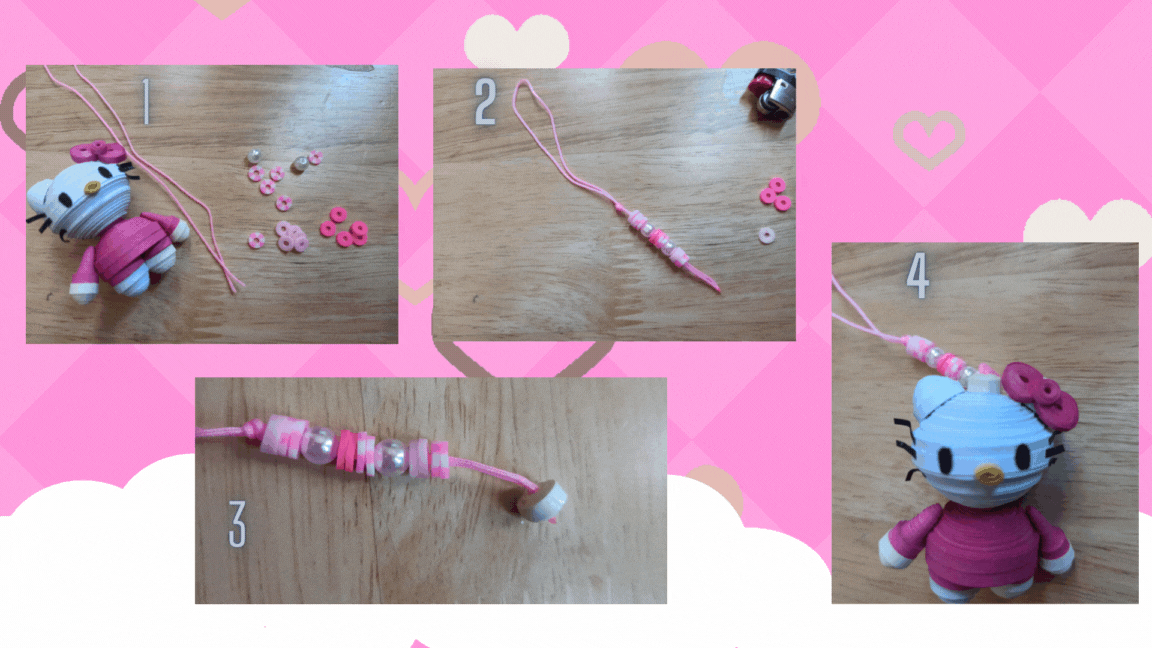
Para usarlo como llavero o cualquier lugar que lo quieras guindar.
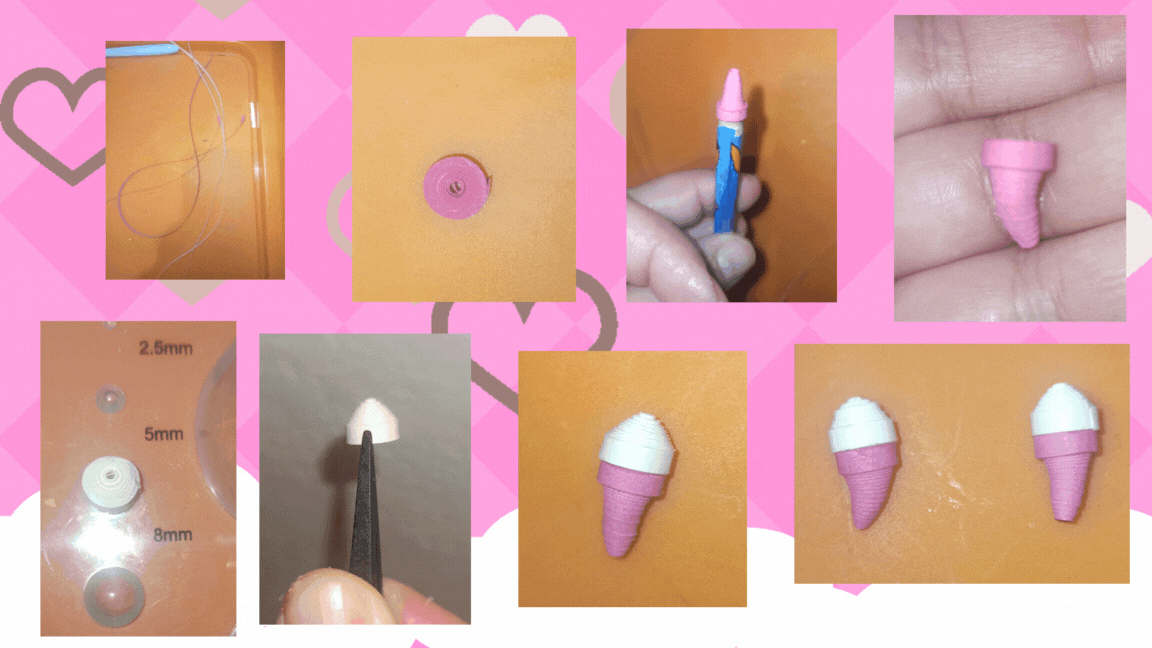
- Introduzco las cuencas en el hilo, hago un nudo para que estas no se salgan.
- Enrollo una tira blanca de 3 cm con la punta del hilo en el centro.
- Agrego suficiente pega para que esta se endurezca y se haga resistente.
- Pego en la cabeza.
For use as a keychain or anywhere you want to hang it.
- I introduce the sockets in the thread, I make a knot so that they do not come off.
- I roll a 3 cm white strip with the tip of the thread in the center.
- I add enough glue so that it hardens and becomes resistant.
- I glue on the head.
Resultado
Result
Estaré encantada de leer y responder a sus comentarios. Gracias totales a todos los que aprecian mi contenido, y que se toman el tiempo de leer y dejar un comentario, gracias, muchas gracias. Les deseo lo mejor.
Hasta pronto.
I will be happy to read and respond to your comments. Total thanks to all of you who appreciate my content, and who take the time to read and leave a comment, thank you, thank you very much. I wish you all the best.
See you soon.

Fotografías de mi propiedad tomadas con el celular Redmi note 8 pro, editadas en canva
Traducción realizada con la versión gratuita del
traductor DeepL
Todos los diseños fueron creados en canva
Photographs of my property taken with the Redmi note 8 pro cell phone, edited in canva
Translation made with the free version of
translator DeepL
All designs were created in canva
~~~ embed:1637830246354284550 twitter metadata:MTQ4NDE5NjQ1NTcxOTkxNTUyN3x8aHR0cHM6Ly90d2l0dGVyLmNvbS8xNDg0MTk2NDU1NzE5OTE1NTI3L3N0YXR1cy8xNjM3ODMwMjQ2MzU0Mjg0NTUwfA== ~~~
The rewards earned on this comment will go directly to the people( @kellyrsa ) sharing the post on Twitter as long as they are registered with @poshtoken. Sign up at https://hiveposh.com.
Seeing the thumbnail, I thought it's a recycled plastic work or something like that and then I was surprised knowing it's a paperwork. Well done, hats off to you.
Well done. @tipu curate 6
Upvoted 👌 (Mana: 0/55) Liquid rewards.
Te quedó muy linda esa técnica es especial y muy variable
Gracias amiga 😊 🐱
Que labor que hiciste, esto me podria llevar semanas hacerlo jajaja yo antes usaba esos llaveritos para celular pero las fundas ya no vienen con un agujero especial para colocarlos :c aun asi, este es muy bonito para usarlo en todas partes 😍
No es tan complicado 🙊 bueno , no tanto como se ve 😸. Me tarde un día, pero tomando largas pausas, ya que tengo muchas cosas que hacer durante el día y más la espera del secado de la pega.
No sabía que me iba a quedar tan bello jaja soy nueva con esta técnica.
Muchas gracias 🦉. Un gusto tenerte por aquí 😁
Hola amiga, que bonito todo este trabajo que nos compartes, donde se aprecian cada uno de esos detalles y sobre representar a ese personaje. Me gusto mucho el paso a paso, ya que lo explicas de una manera muy sencilla, aun si se necesita de concentración. Felicidades.
Amigo, un gusto tenerte por acá. Trato de explicar lo más entendible posible cada paso, hacer tutoriales a veces es complicado, ya que hay pasos o técnicas complicadas y trató lo más posible que puedan entender mi explicación. Muchas gracias, me alegra que te haya gustado.
waooo qué belleza, qué delicado, yo también estoy aprendiendo esta técnica, y bueno aquí me ganas, porque no tengo nada esas herramientas, solo mis manos y dedos jeje, pero sin duda es un lindo trabajo, este diseño te quedo genial, que bien, gracias por compartirlo, saludos.
No sabía que me iba a quedar tan bello jaja cómo lo dije, soy nueva con esta técnica.
Las herramientas son un plus, pero con los dedos y fabricando nuestras propias herramientas también se pueden hacer.
Saludos amiga, gracias por pasar por aquí 😸
Filigrana en 3d wow, hace poco empecé a crear con este arte claro, formas básicas esto sería la meta que quisiera alcanzar, esta precioso.
Que hermoso llavero, tiene un toque único y la técnica es fantástica, no estaba enterada de ella, gracias por compartir.💙💗
Congratulations @kellyrsa! You received a personal badge!
You can view your badges on your board and compare yourself to others in the Ranking
Check out our last posts:
Support the HiveBuzz project. Vote for our proposal!