¡Saludos gente creativa!
Les voy a enseñar a hacer una caja de regalo muy original. Su diseño es muy bonito y divertido para sorprender a la persona a la que se la regalamos. Ideal para cumpleaños, aniversarios, para la novia o el novio o simplemente para sorprender a esa persona especial. En mi caso la hice para mi hija que cumplía años, tuve la idea de regalarle algo diferente a los cumpleaños anteriores, y lo mejor, hecho con cariño con mis manitas.
Así que te invito a que aprendas, luego lo hagas y sorprendas a ese ser querido.
Greetings creative people!
I am going to teach you how to make a very original gift box. Its design is very nice and fun to surprise the person to whom we give it. Ideal for birthdays, anniversaries, for the girlfriend or boyfriend or just to surprise that special person. In my case I made it for my daughter's birthday, I had the idea of giving her something different from previous birthdays, and the best, made with love with my little hands.
So I invite you to learn, then do it and surprise that loved one.
🎁Cartulina
🎁Hojas blancas
🎁Lápiz
🎁Tijera
🎁Pega
🎁Colores
🎁Marcadores
🎁Card stock
🎁White sheets
🎁Pencil
🎁Scissors
🎁Paste
🎁Colors
🎁Markers


🎁La cartulina para la base de la caja mide 28 cm x 33 cm. Vamos a hacer unas líneas con un margen de 5 cm. Como puedes ver en la plantilla hay unas líneas que son guías por donde debes cortar.
🎁The cardboard for the base of the box measures 28 cm x 33 cm. We are going to make some lines with a margin of 5 cm. As you can see in the template there are some lines that are guides where you should cut.

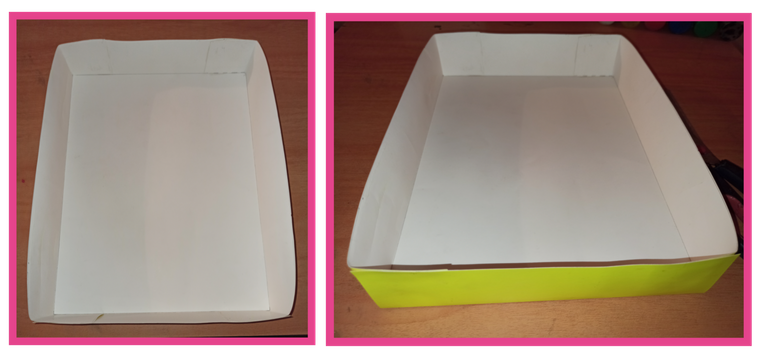
🎁Dobla por las líneas marcadas y pega las pestañas.
🎁Fold along the marked lines and glue the tabs.
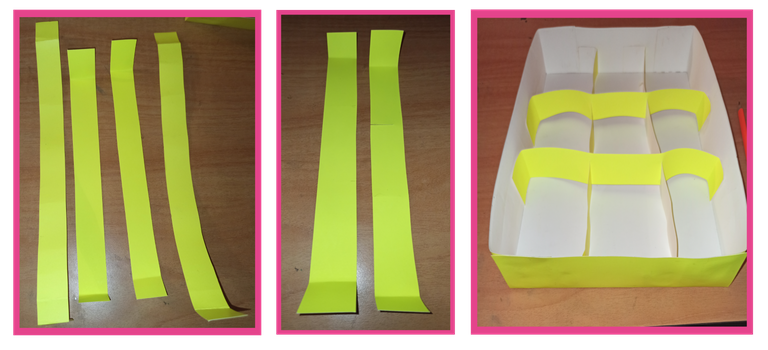
🎁Para terminar la base de la caja vamos a hacer las divisiones.
- Cortamos 2 tiras de 27 cm de largo por 3 cm de ancho y dos tiras de 22 cm de largo por 3 cm de ancho. Hacemos las pestañas para poder pegarlas dentro de la caja, doblando cada extremo a 2 cm .
Pegamos dentro de la caja horizontalmente las tiras más largas con una separación entre tiras de unos 6 cm aproximadamente.
Pegar dentro de la caja verticalmente las dos tiras más cortas con una separación entre tiras de unos 7 cm aproximadamente. En estas tiras vamos a hacer dos cortes para que entren las otras dos tiras que hemos pegado.
🎁To finish the base of the box we are going to make the divisions.
- We cut 2 strips of 27 cm long by 3 cm wide and two strips of 22 cm long by 3 cm wide. We make the tabs to be able to glue it inside the box, folding each end to 2 cm .
Glue inside the box horizontally the longest strips with a separation between strips of about 6 cm approximately.
Glue inside the box vertically the two shorter strips with a separation between strips of about 7 cm approximately. In these strips we are going to make two cuts so that the other two strips that we have glued fit.
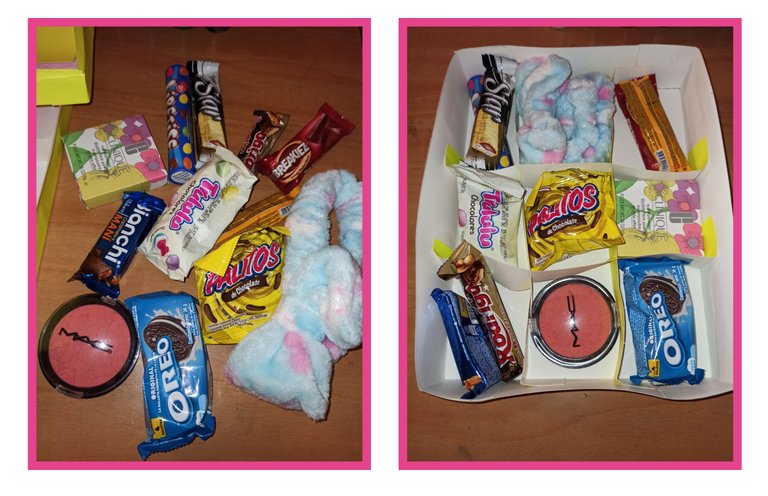
🎁De esta forma ya tenemos las divisiones de la caja, donde en cada una podemos añadir los regalos que queramos dar. En mi caso, como es un regalo para mi hija, añadí caramelos, algunos cosméticos y un lazo.
🎁This way we already have the divisions of the box, where in each one we can add the gifts we want to give. In my case, as it is a gift for my daughter, I added sweets, some cosmetics and a ribbon.
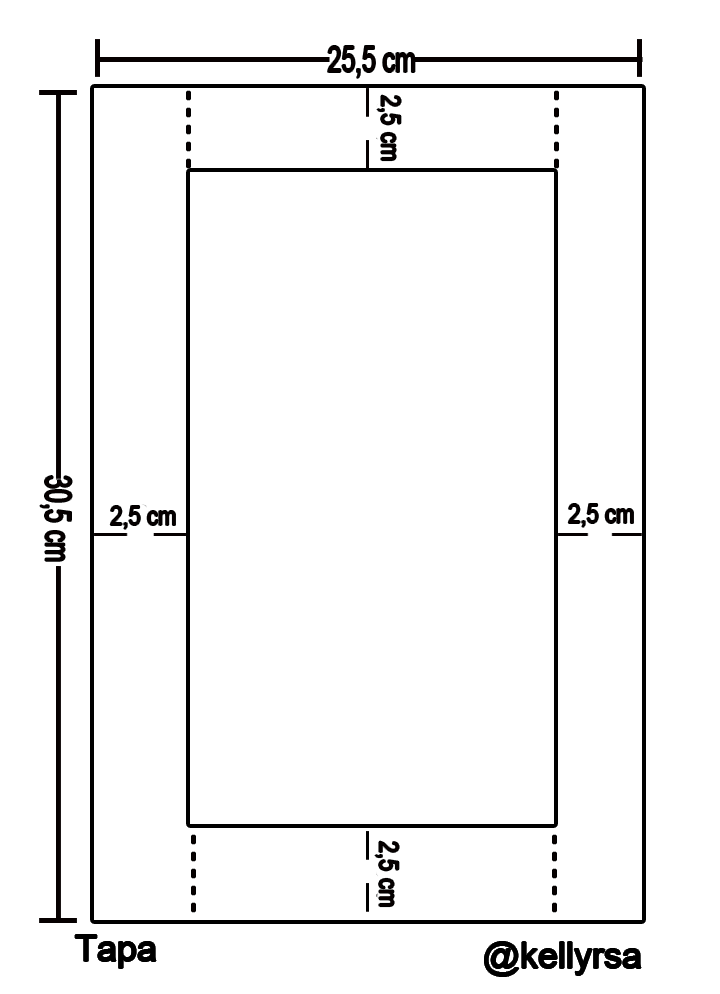
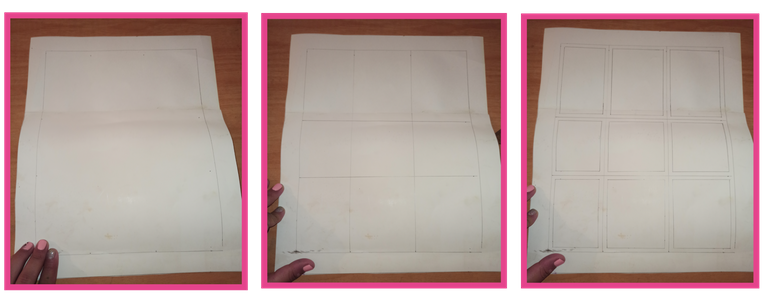
🎁Para la tapa de la caja necesitas una cartulina de 30,5 cm de largo x 25,5 cm de ancho. Dibujamos las líneas para hacer un margen de 2,5 cm. Luego dibujamos dos líneas más en horizontal con una separación entre líneas de unos 6 cm y dos líneas verticales con una separación entre líneas de unos 8 cm. Dentro de cada división que hemos dejado, vamos a hacer unos cuadrados de 0,5 cm de margen.
🎁For the cover of the box you need a cardboard 30.5 cm long x 25.5 cm wide. We draw the lines to make a margin of 2.5 cm. Then we draw two more lines horizontally with a separation between lines of approximately 6 cm and two vertical lines with a separation between lines of approximately 8 cm. Inside each division that we have left, we are going to make some squares of 0.5 cm of margin.
🎁Con la ayuda de un cúter recortaremos los lados y la parte inferior de cada cuadrado.
🎁With the help of a cutter we will cut out the sides and the bottom of each square.
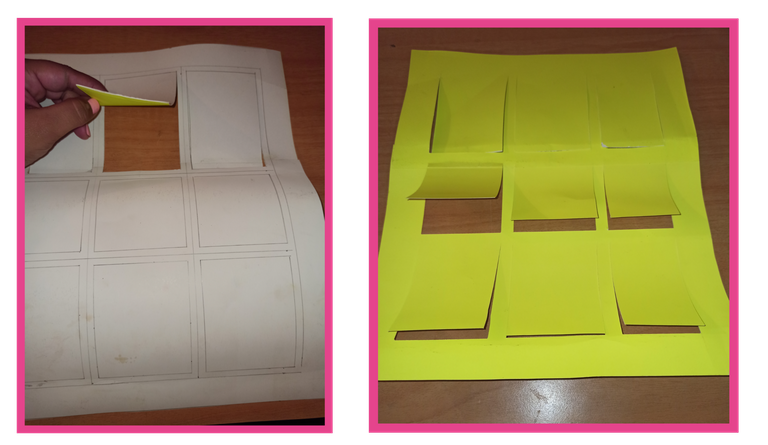
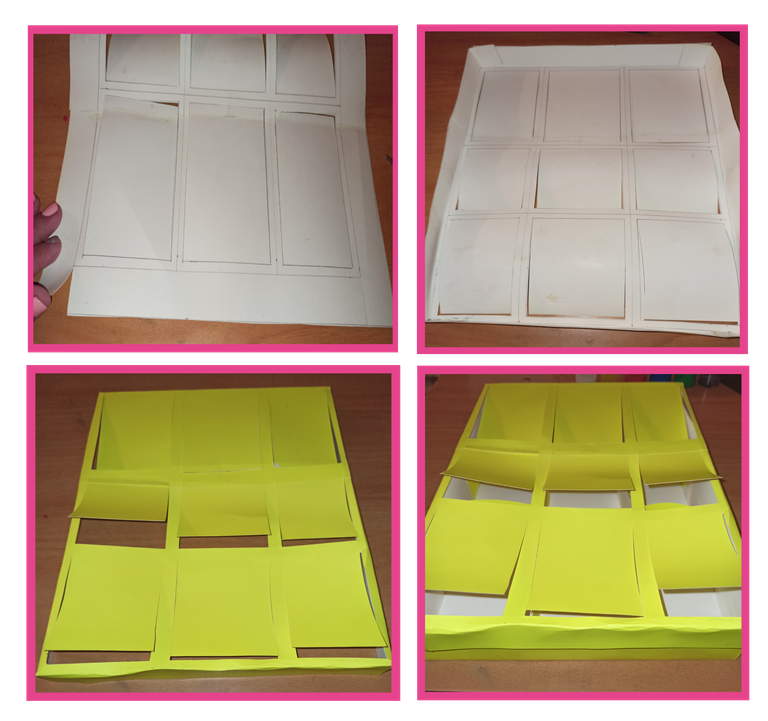
🎁Cortamos por las líneas de corte en cada extremo, doblamos por el margen trazado y pegamos las pestañas.
🎁We cut along the cutting lines at each end, fold along the traced margin and glue the tabs.
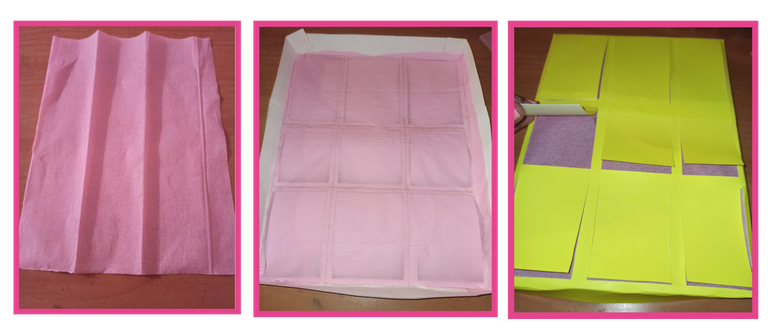
🎁Cortamos un trozo de papel de seda (papel chino) o papel crepé de 26 cm de largo x 21 cm de ancho. Pegaremos este papel en la parte trasera de la tapa, añadiendo cola por todo el borde de la tapa y en el borde de cada cuadrado. Pegamos la tapa a la base con los regalos dentro. El objetivo de este papel es que los regalos no sean visibles para que la persona pueda descubrir lo que hay dentro.
🎁Cut a piece of tissue paper (Chinese paper) or crepe paper 26 cm long x 21 cm wide. We will glue this paper to the back of the lid, adding glue all around the edge of the lid and on the edge of each square. We glue the lid to the base with the gifts inside. The purpose of this paper is that the gifts are not visible so that the person can discover what is inside.
🎁Ya tenemos la caja preparada, sólo falta decorarla. La decoración va al gusto, con dibujos, textos, puede ser del dibujo animado que le guste a la persona que vamos a regalar. Siguiendo el modelo de decoración que hice, utilizaremos:
- Lápiz
- Rotuladores
- Rotuladores
- Hojas blancas
- Cartulina fucsia
🎁We have the box ready, we just need to decorate it. The decoration goes to taste, with drawings, texts, it can be of the cartoon that the person we are going to give as a gift likes. Following the decoration model I made, we will use:
- Pencil
- Marker pens
- Highlighters
- White sheets
- Fuchsia cardboard
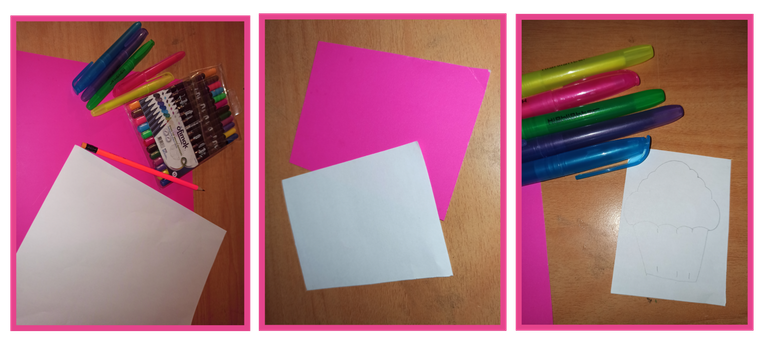
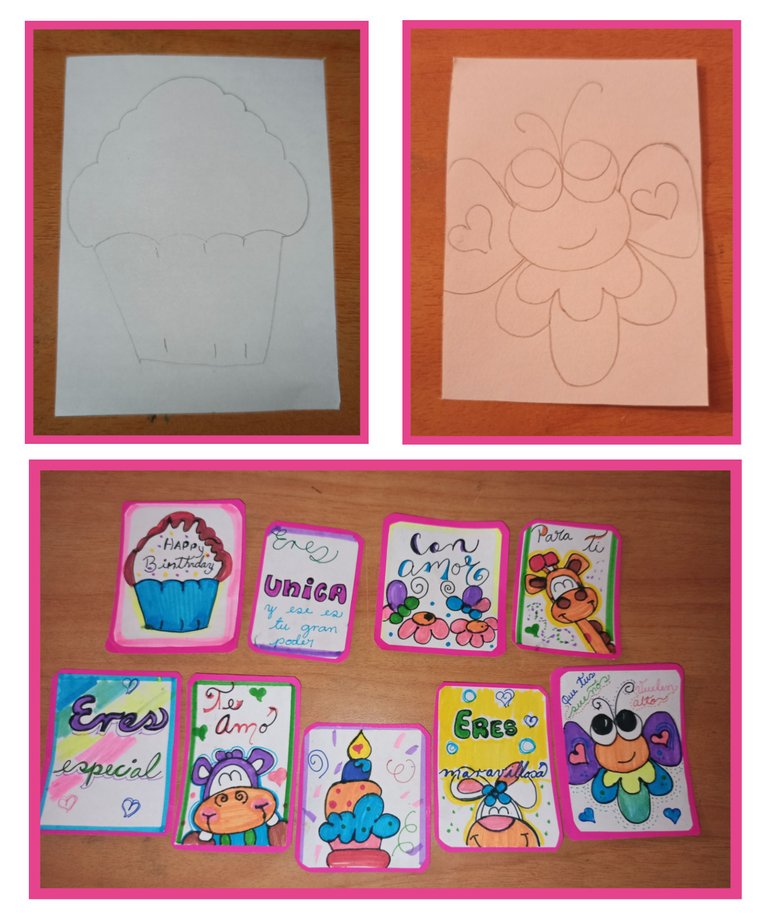
🎁Recorté la cartulina fucsia en 9 cuadros a medio centímetro menos que mide cada tapa de los recuadros y las hojas blancas a medio centímetros menos que la cartulina para que así se vea el borde de color. En cada cuadro de hoja hice un diseño, como pueden observar hice unos dibujos de una torta, jirafa, hipopótamo, conejo, mariposa, vela y textos que demuestran lo importante que significa para mí esa persona. Ya saben, aquí dejan fluir su creatividad.
🎁I cut the fuchsia cardboard into 9 squares at half a centimeter less than the size of each box top and the white sheets at half a centimeter less than the cardboard so that the colored border could be seen. On each sheet I made a design, as you can see I made some drawings of a cake, giraffe, hippopotamus, rabbit, butterfly, candle and texts that show how important this person means to me. You know, here you can let your creativity flow.
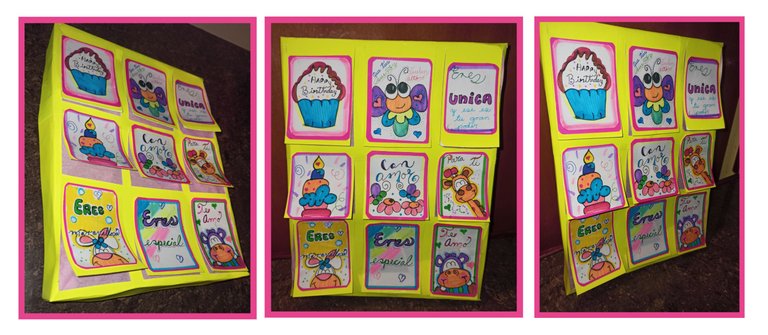
🎁Pego las imágenes en los cuadros de cartulina y luego en cada tapa de los recuadros de la caja. Quedando como resultado esta creativa caja sorpresa.
🎁I glue the images on the cardboard squares and then on each lid of the boxes. The result is this creative surprise box.
Mi hija quedó encantada y feliz cada vez que descubría cada obsequio . ¿Y ti que te pareció? ¿Te animas a hacerla?
My daughter was delighted and happy every time she discovered each gift. What do you think? Would you like to make it?

Fotografías de mi propiedad tomadas con el celular Redmi note 8 pro, editadas en canva
Traducción realizada con la versión gratuita del
traductor DeepL
Todos los diseños fueron creados en canva
Photographs of my property taken with the Redmi note 8 pro cell phone, edited in canva
Translation made with the free version of
translator DeepL
All designs were created in canva
muy original creativa esta caja amiga, es la primera vez que veo una asi, me encanto y la explicación del paso a paso, muy buena, te felicito, saludos
Holaaa 🤸🎉🎈un gusto tenerte por aquí ¡¡muchas gracias!! Me contenta que te haya gustado 😊
The rewards earned on this comment will go directly to the person sharing the post on Twitter as long as they are registered with @poshtoken. Sign up at https://hiveposh.com.
Me contenta mucho que le hayas hecho ese tremendo regalo a tu niña,se ve que le encantó por esa sonrisota que tiene.
Es un hermoso regalo, es uno que le diste con mucha alegría y amor, eso lo hace muy valioso y como lo hiciste tu, lo es mucho mas.
Debo comentar que la plantilla que dejaste es genial y el paso a paso muy descriptivo. Muchas gracias por compartir este trabajo con nosotros.
Que Dios te llene de bendiciones a ti y a tu niña. Un abrazo ✌😁
Hola Gabo! Si le gustó mucho, muchísimo . Quedó muy sorprendida. Muchas gracias por tu comentario 🤸🎉👋
Thank you for sharing this amazing post on HIVE!
Your content got selected by our fellow curator @rezoanulvibes & you just received a little thank you via an upvote from our non-profit curation initiative!
You will be featured in one of our recurring curation compilations and on our pinterest boards! Both are aiming to offer you a stage to widen your audience within and outside of the DIY scene of hive.
Join the official DIYHub community on HIVE and show us more of your amazing work and feel free to connect with us and other DIYers via our discord server: https://discord.gg/mY5uCfQ !
If you want to support our goal to motivate other DIY/art/music/homesteading/... creators just delegate to us and earn 100% of your curation rewards!
Stay creative & hive on!
Wow éste proyecto está increíble, muy bueno para jugarlo en casa para cada miembro de la familia, y con amigos. Muy creativo y didáctico, un detalle muy bonito
Creativity to the maximum over here! The receiver might just think of it as a beautiful hand made artwork, but less does he/she know that a world of surprises has been hidden under those covers!
Top notch @kellysra! <3
You have been manually curated by Brotherhood Community for sharing this awesome work.
Brotherhood community will support 5 bloggers on daily basis.
For more information about how to get curated by Brotherhood Community, check this Hive Blog.
Delegate your Hive Power to @brotherhood for supporting more such blogs and also receive curation rewards.