Saludos a todos reciban de parte de esta abuelita una lluvia de bendiciones para todos los que hacen vida en esta comunidad, pero que se extienda a todos aquellos apreciadores de las manualidades que hacen vida en esta blockchain única.
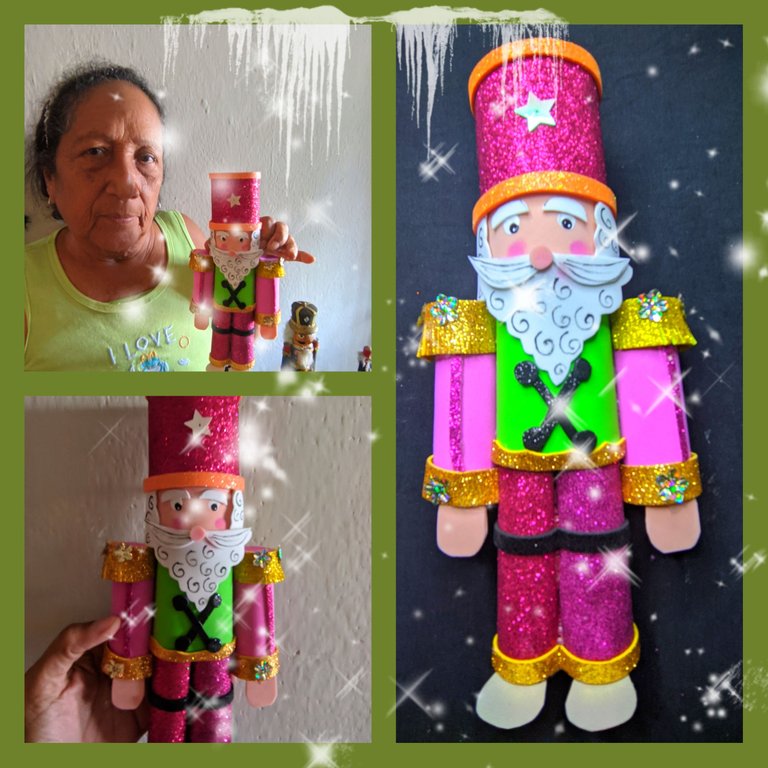
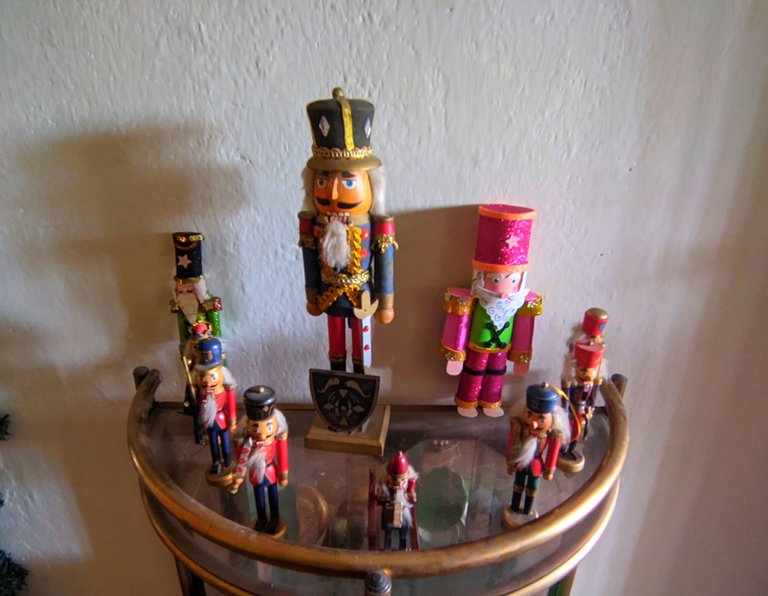
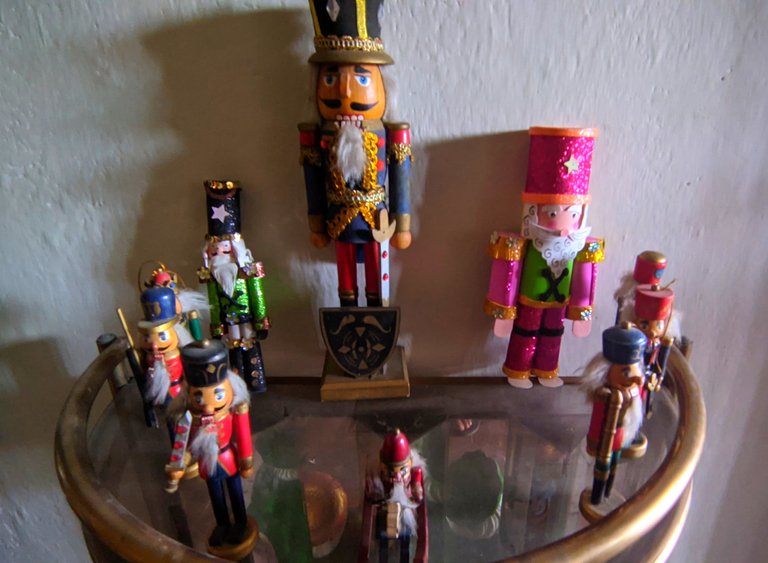
Llego la navidad la época más bonita del año y quizás la que más me gusta, porque es infinito la cantidad de decoraciones que podemos elaborar, y de eso es mi post el día de hoy, de unos de los personajes más hermosos de esta época, los cascanueces, y déjenme decirles que realmente siento una pasión increíble por estos personajes, tanto que tengo una pequeña colección de ellos y cada año que pasa voy colocando uno nuevo.
Hoy vamos a elaborar uno con colores bastante diferentes, a los acostumbrados, a los clásicos, ya que ellos permiten jugar con sus colores y decoraciones, y como es poco habitual trabajar a este personaje en colores fucsia, decidí hacerlo así y el resultado final me gusto muchísimo, acá les dejaré el paso a paso y las fotos finales, espero que les guste tanto como me gusto a mi.
❄️💂♀️❄️ Materiales ❄️💂♀️❄️
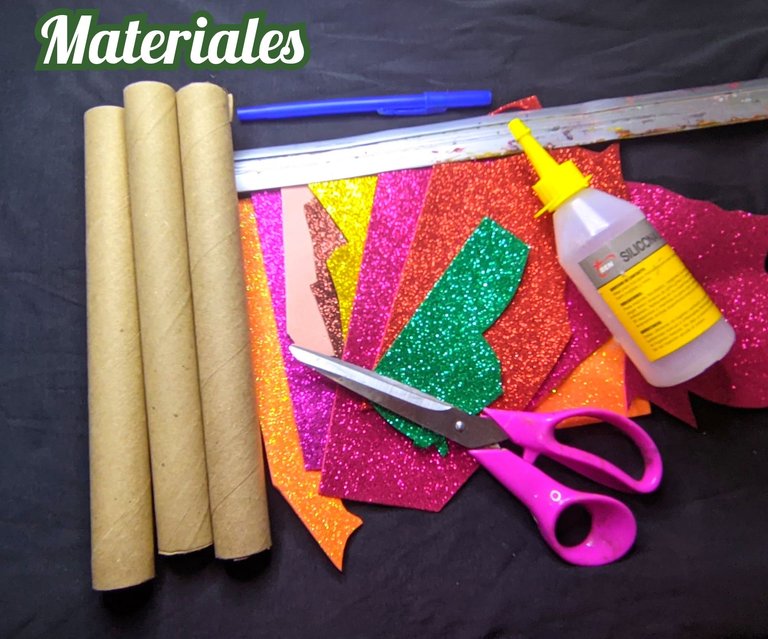
💂♀️ Foami de diferentes colores.
❄ ️ 2 tubos del empaque del incienso.
💂♀️ dos tubos de rollo de papel higiénico.
❄ ️ Silicón líquido.
💂♀️ Tijera.
❄ ️ Regla.
💂♀️ Lápiz.
❄ ️ Pintura blanca y negra.
💂♀️ Rubor.
❄ ️ Cartulina.
💂♀️ Pincel fino.
❄️💂♀️❄️ Paso a paso ❄️💂♀️❄️
❄️💂♀️❄️Paso 1:
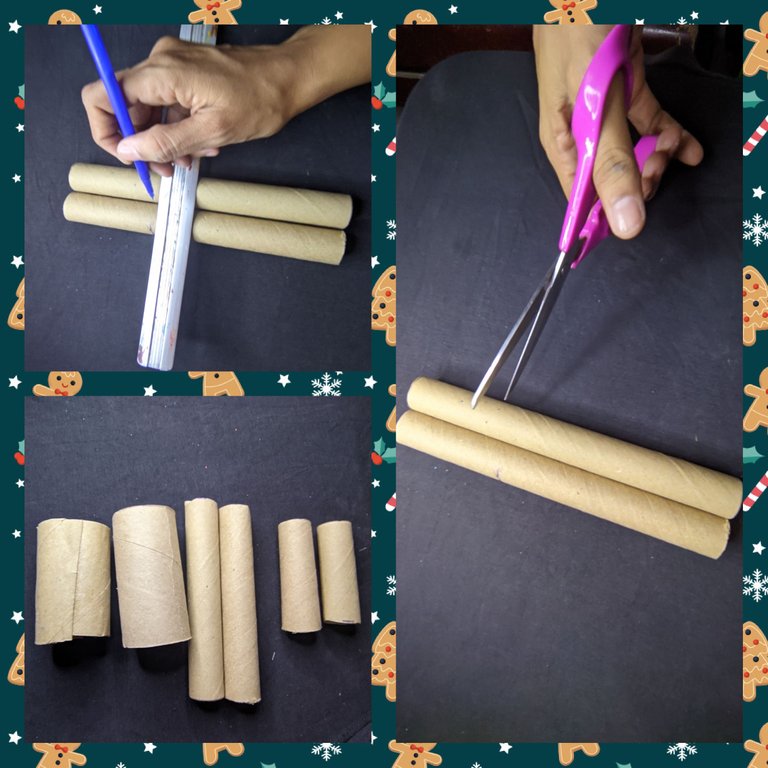
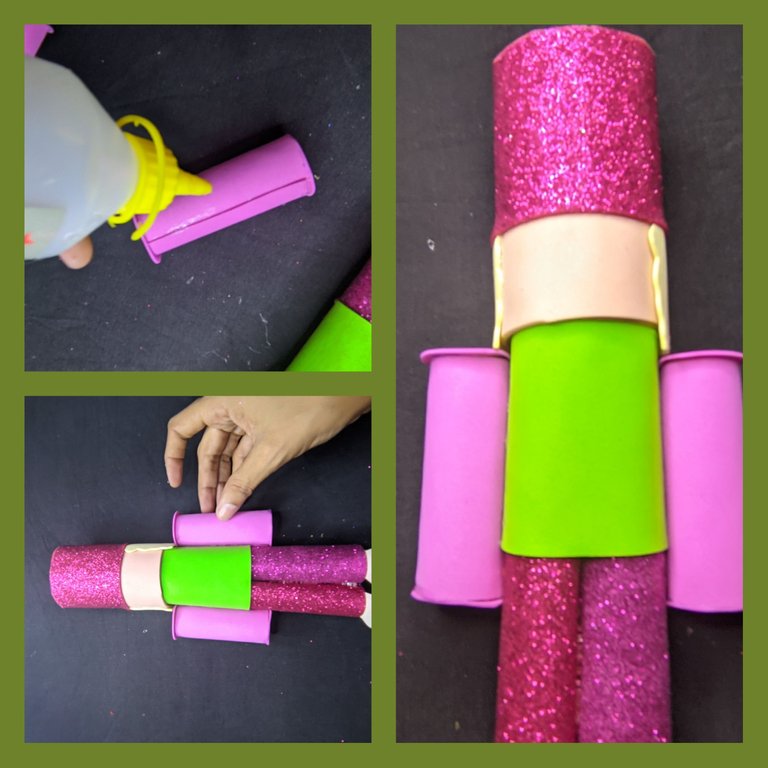
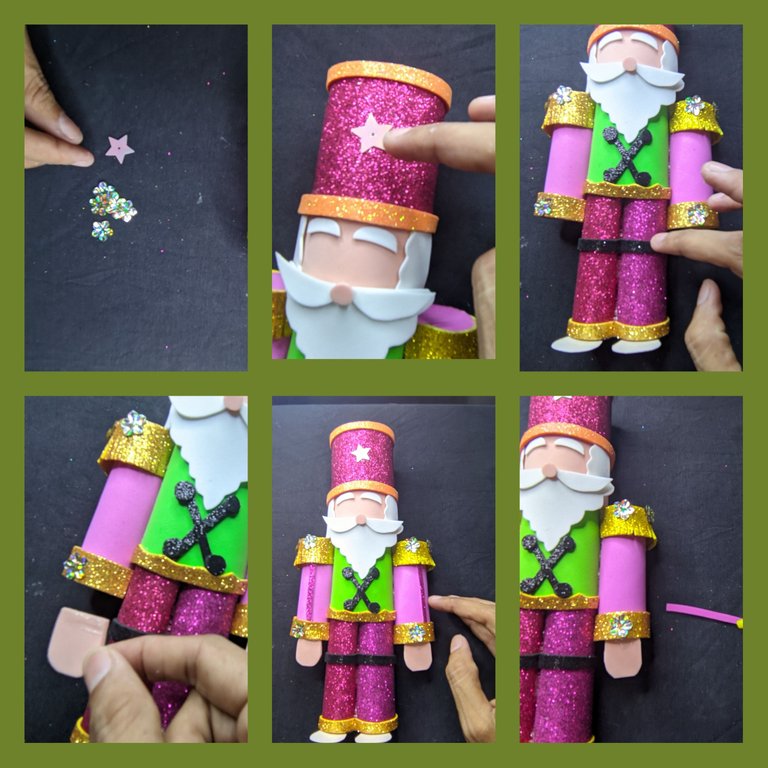
Primero tomé los tubos delgados y con la regla y el lápiz marcamos para sacar de allí los brazos y las piernas.
❄️💂♀️❄️ Paso 2:
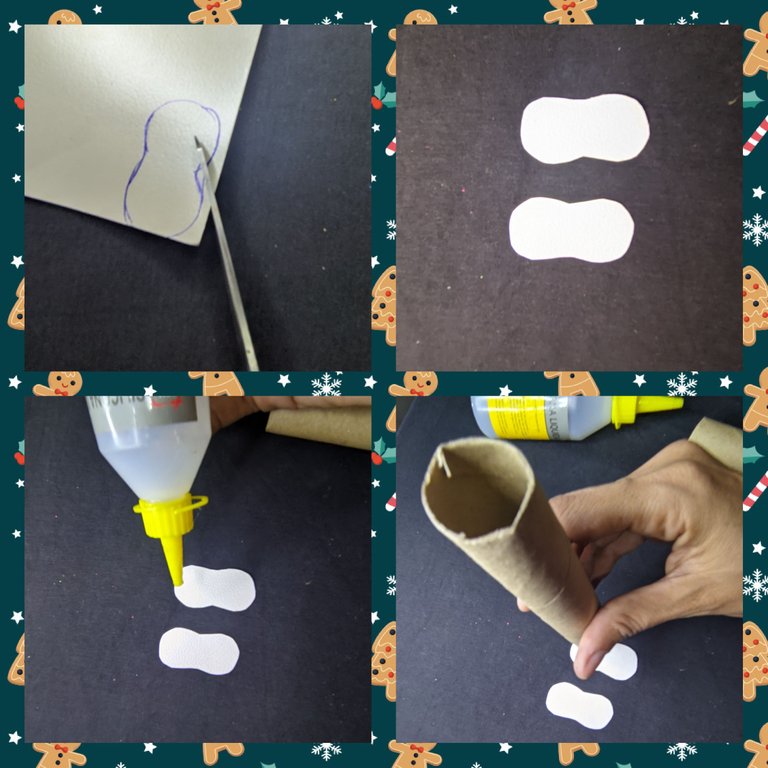
Ahora en un trocito de cartulina dibuje y luego recorté los pies del muñeco, le aplicó silicón líquido al tubo y pegamos la pieza en la cartulina.
❄️💂♀️❄️ Paso 3:
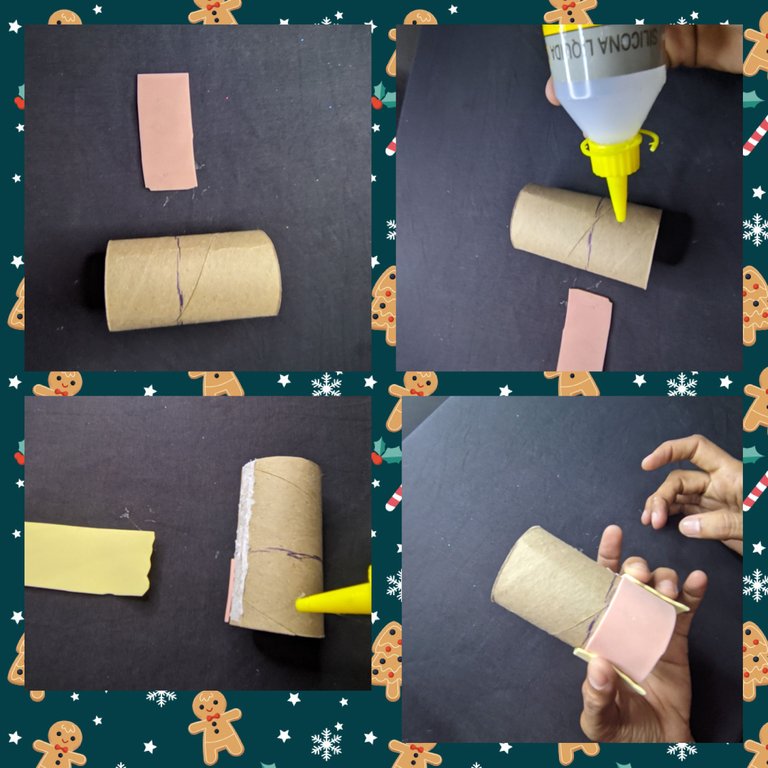
Uno de los tubos de papel higiénico, lo dividimos en dos partes una mucho más pequeña que la otra y marcamos, después agarre el foami color piel y recorte un rectángulo que cubra la cara del muñeco, también recorté otro rectángulo de foami de color beige y pegamos, y dejamos secar.
❄️💂♀️❄️ Paso 4:
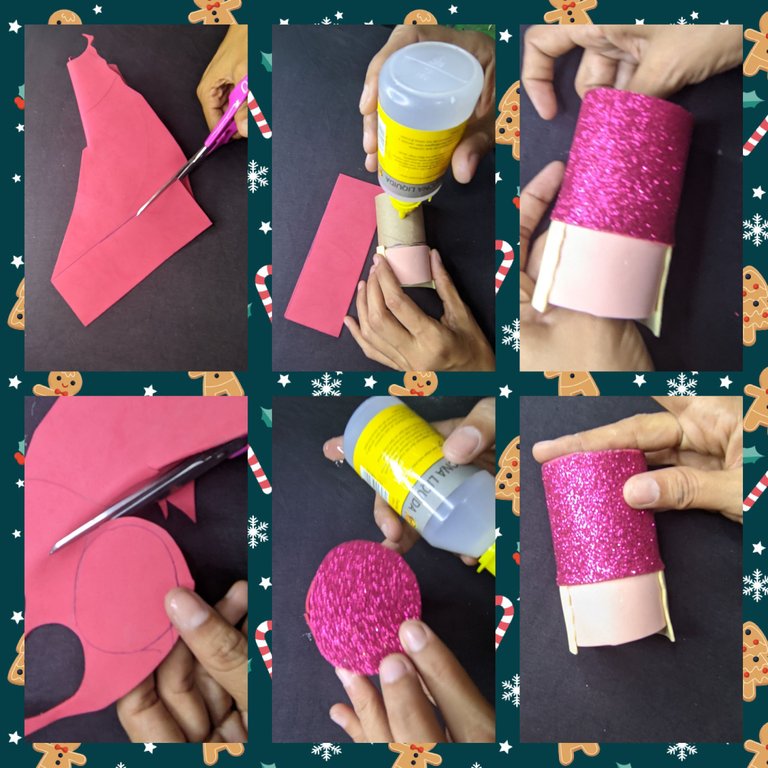
Del Foami fucsia recorté un rectángulo con el que forre la parte de arriba, para formar el sombrero del muñeco, también recorte un círculo que pegué en la parte de arriba y hemos terminado la parte de arriba.
❄️💂♀️❄️ Paso 5:
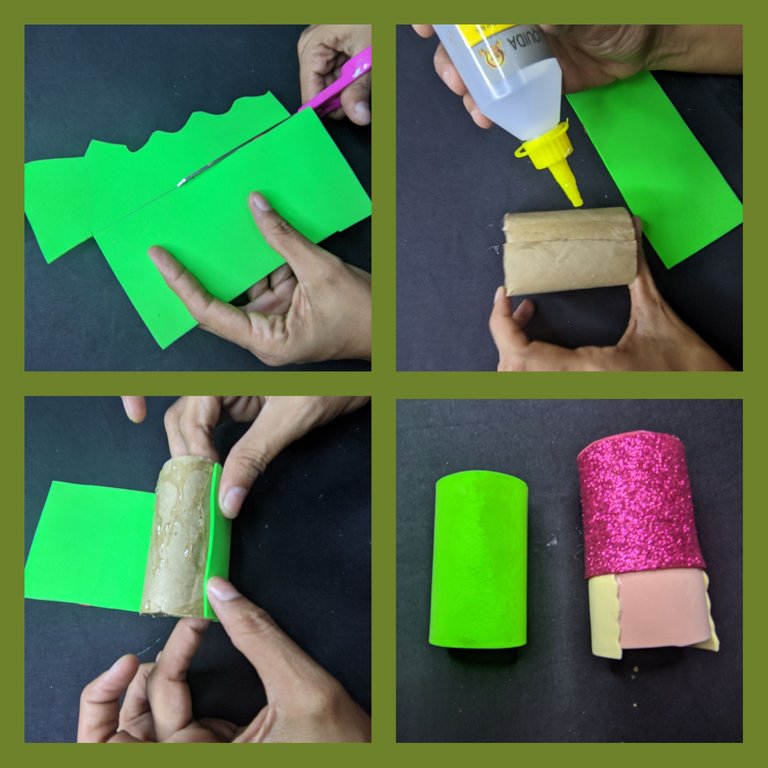
Ahora tomé el otro cilindro de papel higiénico y lo forramos con foami verde manzana y dejamos secar.
❄️💂♀️❄️ Paso 6:
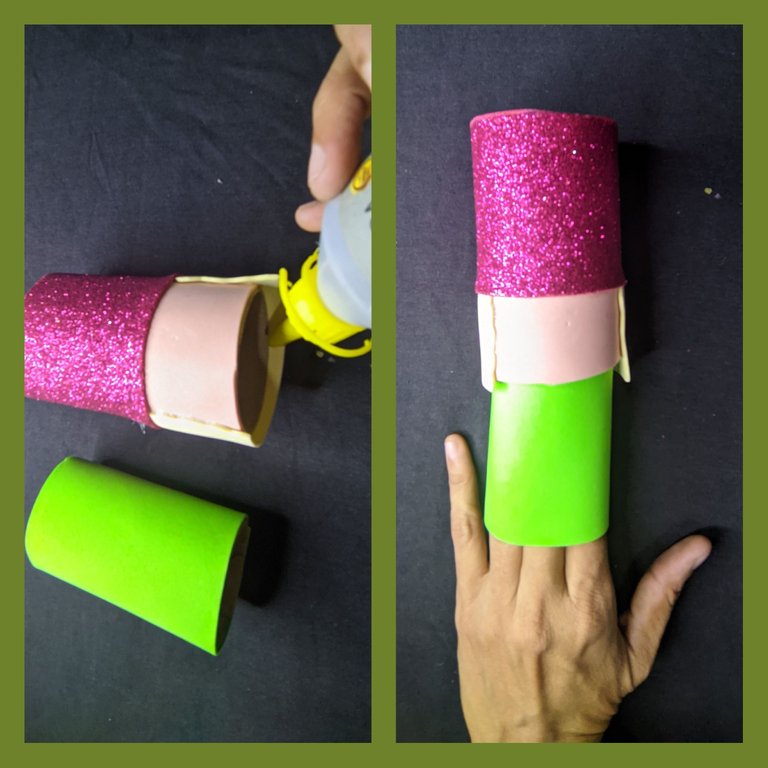
Cuando las dos partes que hemos armado están secas, aplicamos silicón líquido en la parte de adentro de la cabeza y metemos la pieza del pecho y dejamos secar.
❄️💂♀️❄️ Paso 7:
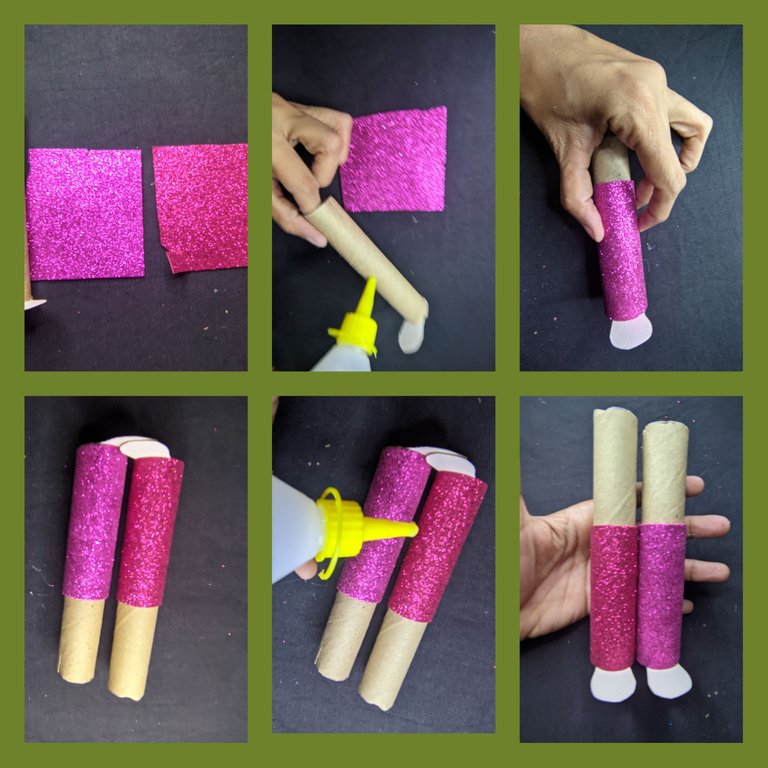
Ahora del foami fucsia recorté dos rectángulos y con el silicón líquido forramos las piernas, dejando sin cubrir la parte que vamos a usar para unir las piernas al cuerpo, eso sí antes de hacerlo le aplicó silicón líquido y pegamos ambas piernas.
❄️💂♀️❄️ Paso 8:
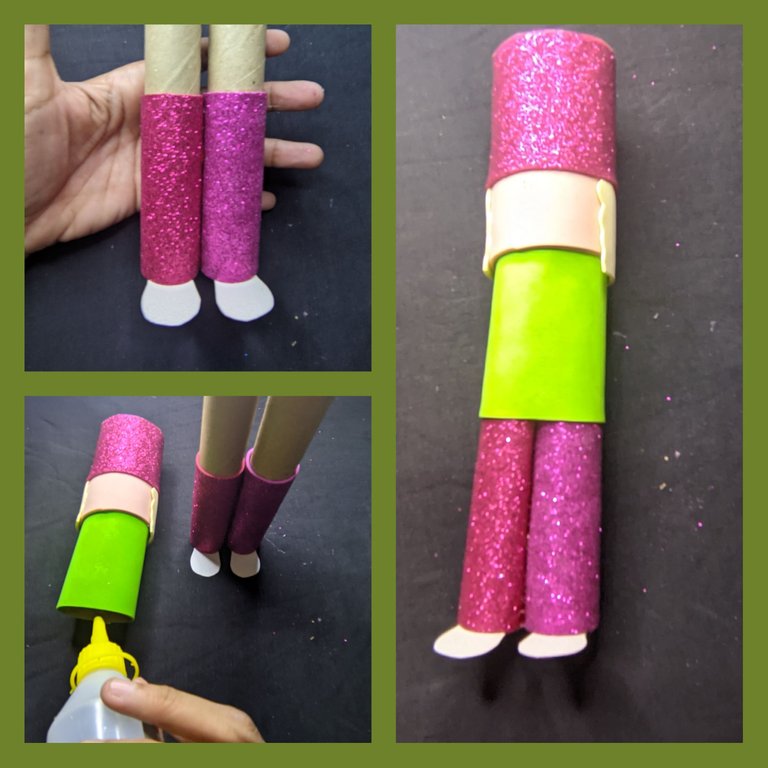
Aplicamos silicón líquido dentro del cuerpo y procedemos a pegar las piernas.
❄️💂♀️❄️ Paso 9:
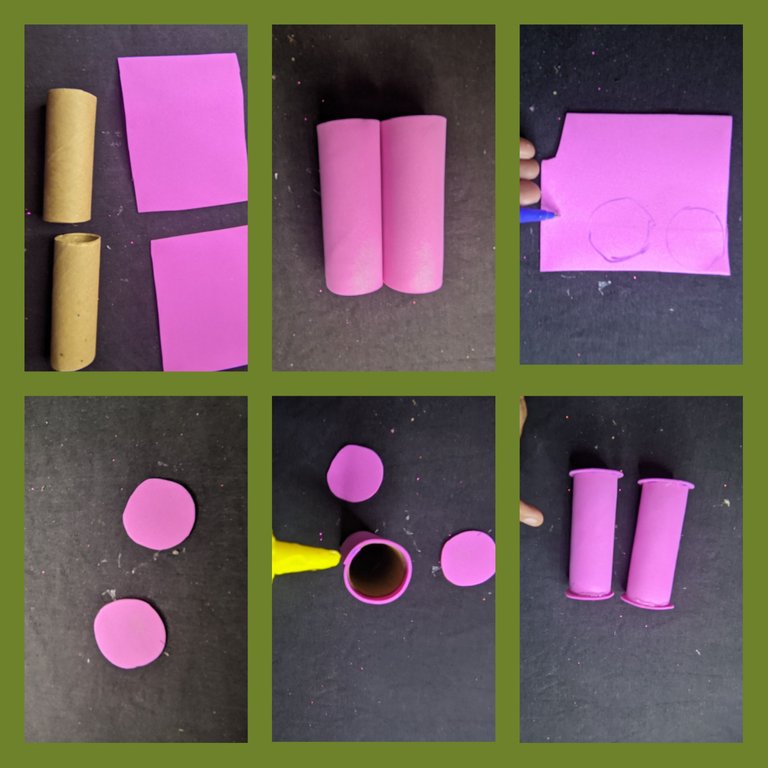
Tomé foami fucsia sin escarcha y recorté dos rectángulos con los que forramos los brazos, también recorté dos círculos y pegamos en ambos lados.
❄️💂♀️❄️ Paso 10:
Cuando ya están bien secos, aplicamos silicón líquido y pegamos al cuerpo y dejamos secar bien.
❄️💂♀️❄️ Paso 11:
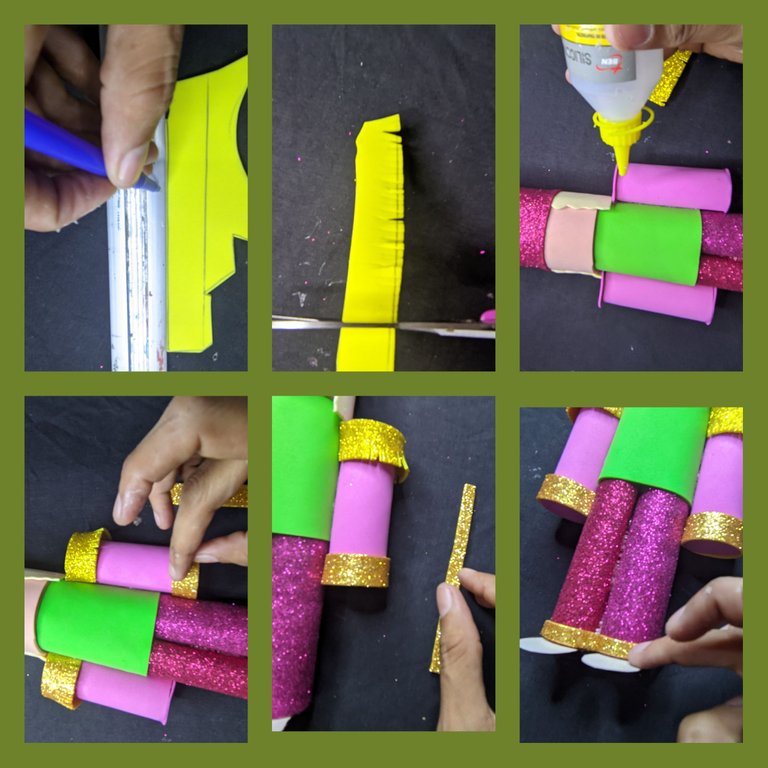
Cómo ya está armado nuestro muñeco, vamos a comenzar a darle los detalles, recorte una tira delgada de foami dorado, y le hice varios cortes, y pegamos en el hombro, también recorté dos tiras más y pegamos al borde de brazo y piernas.
❄️💂♀️❄️ Paso 12:
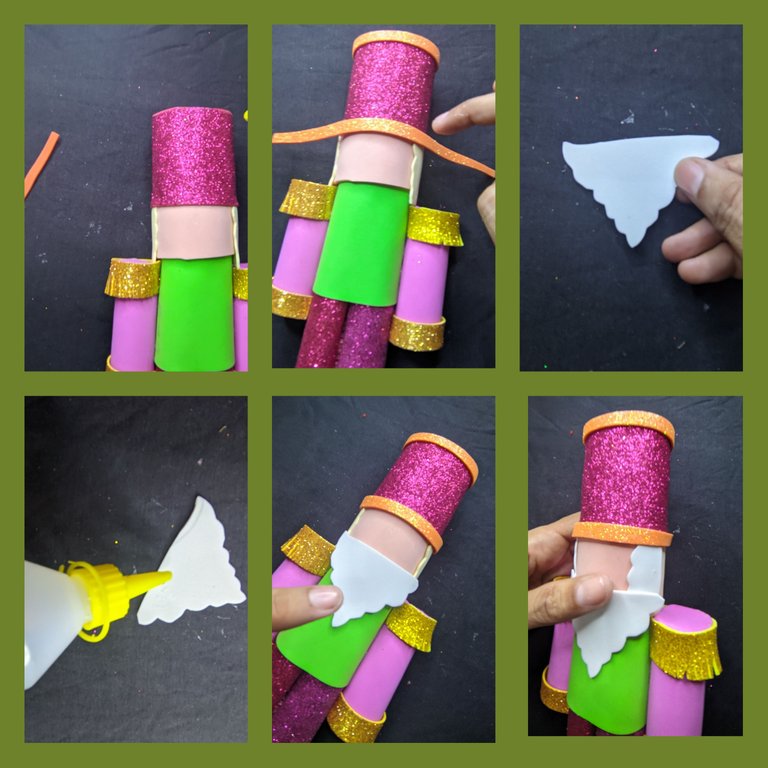
Recorté dos tiras de foami naranja y con el silicón líquido pegamos en ambos bordes del gorro del muñeco, en el foami blanco dibujé y recorté la barba y el cabello y luego pegamos.
❄️💂♀️❄️ Paso 13:
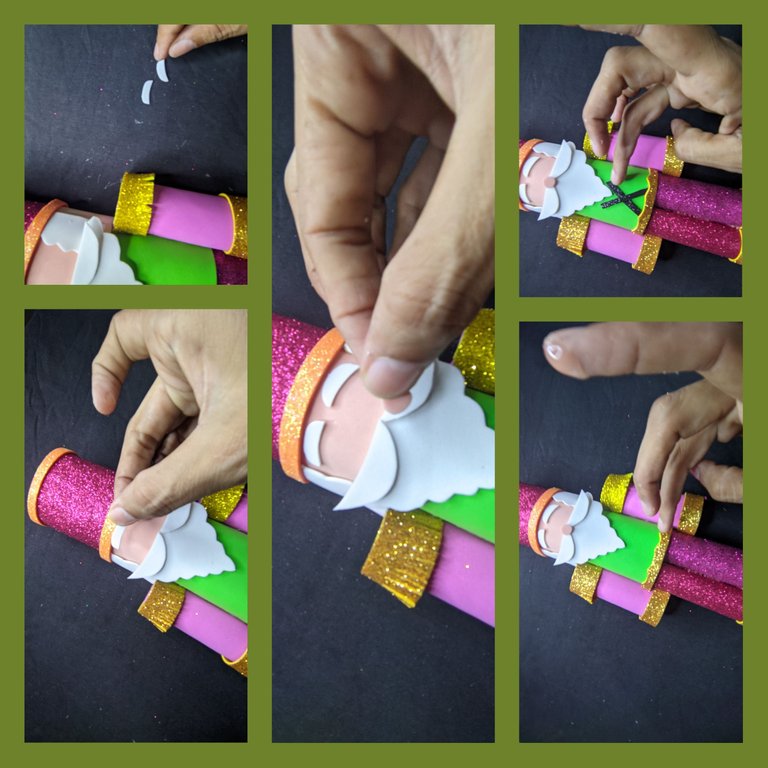
También recorté las cejas y el bigote y pegamos, y del foami color piel recorté un pequeño círculo que será nuestra naríz y pegamos.
Quise darle más detalles al traje y del foami negro recorte y forme una (x) y unos botones que luego pegamos.
❄️💂♀️❄️ Paso 14:
Pegamos una estrella de bisutería, así como unas flores, y pegamos una tira de foami negro.
❄️💂♀️❄️ Paso 15:
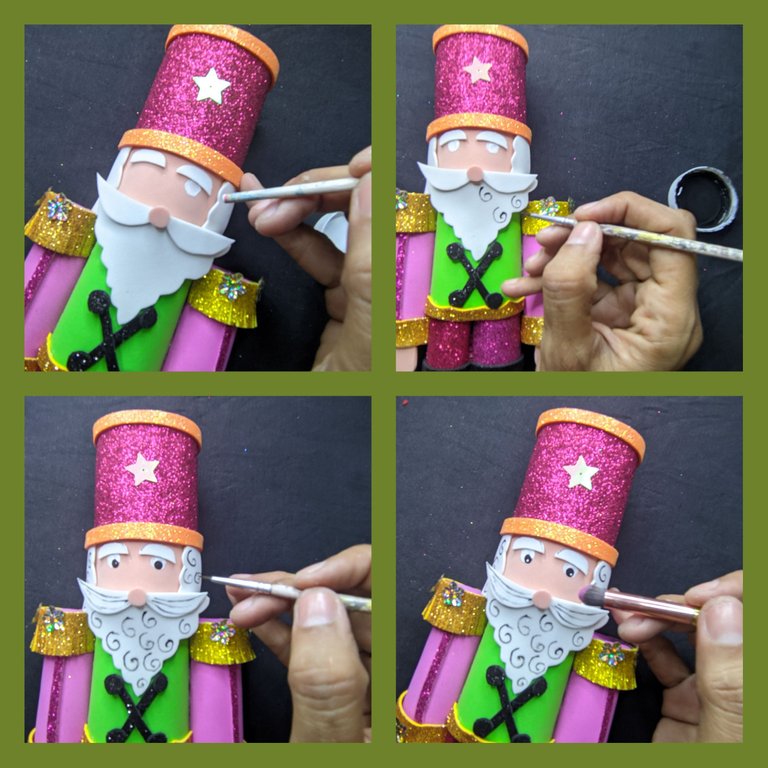
Tomé el pincel fino y la pintura blanca y negra y dibujé los ojos, y también le dibujé el cabello, finalmente aplicó un poco de rubor y listo.
❄️💂♀️❄️ Fotos finales❄️💂♀️❄️
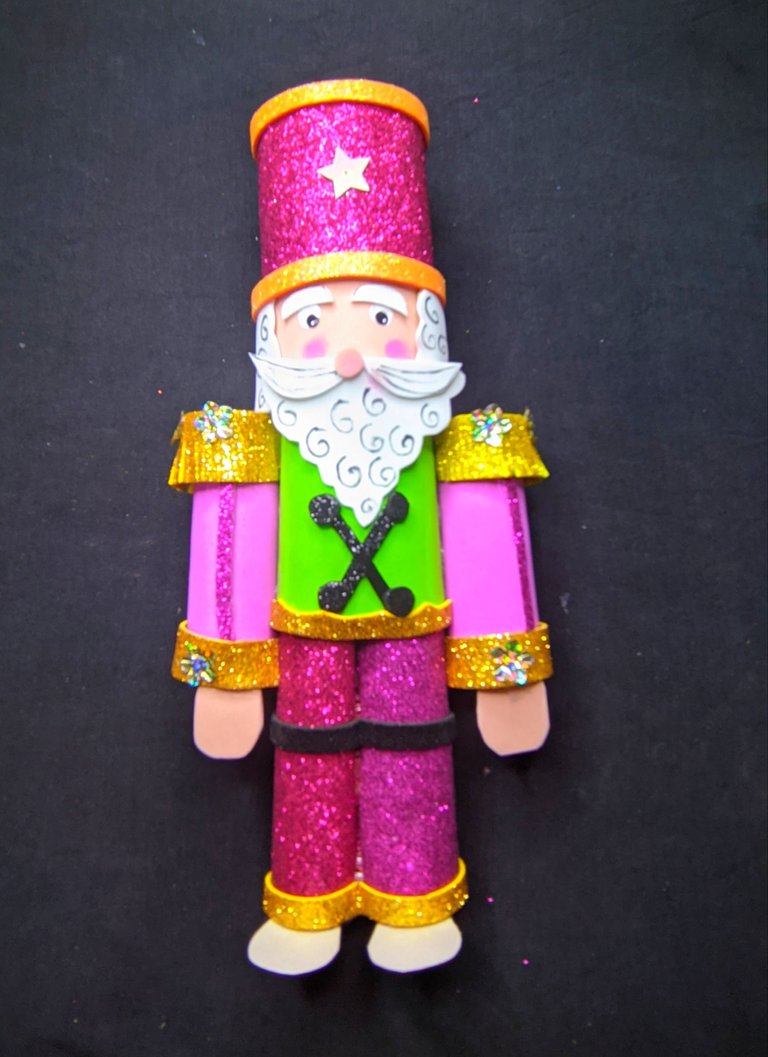
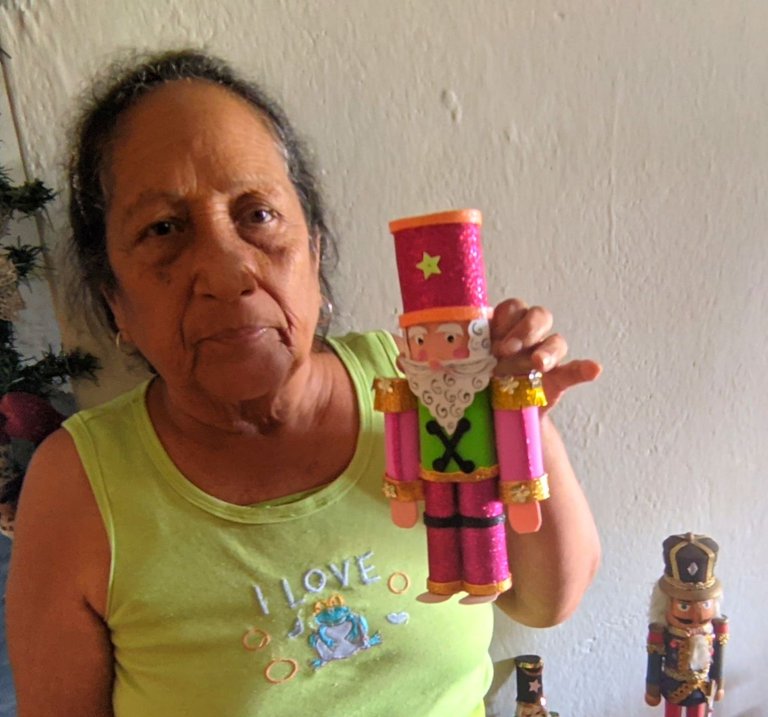
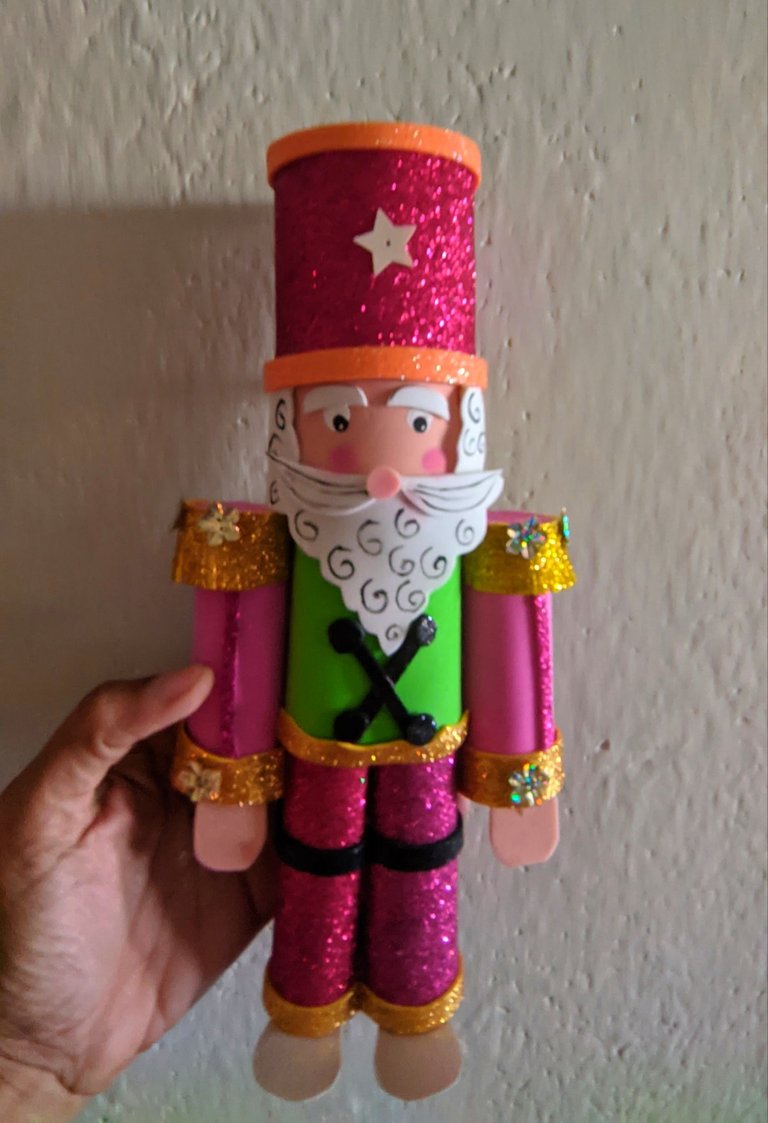
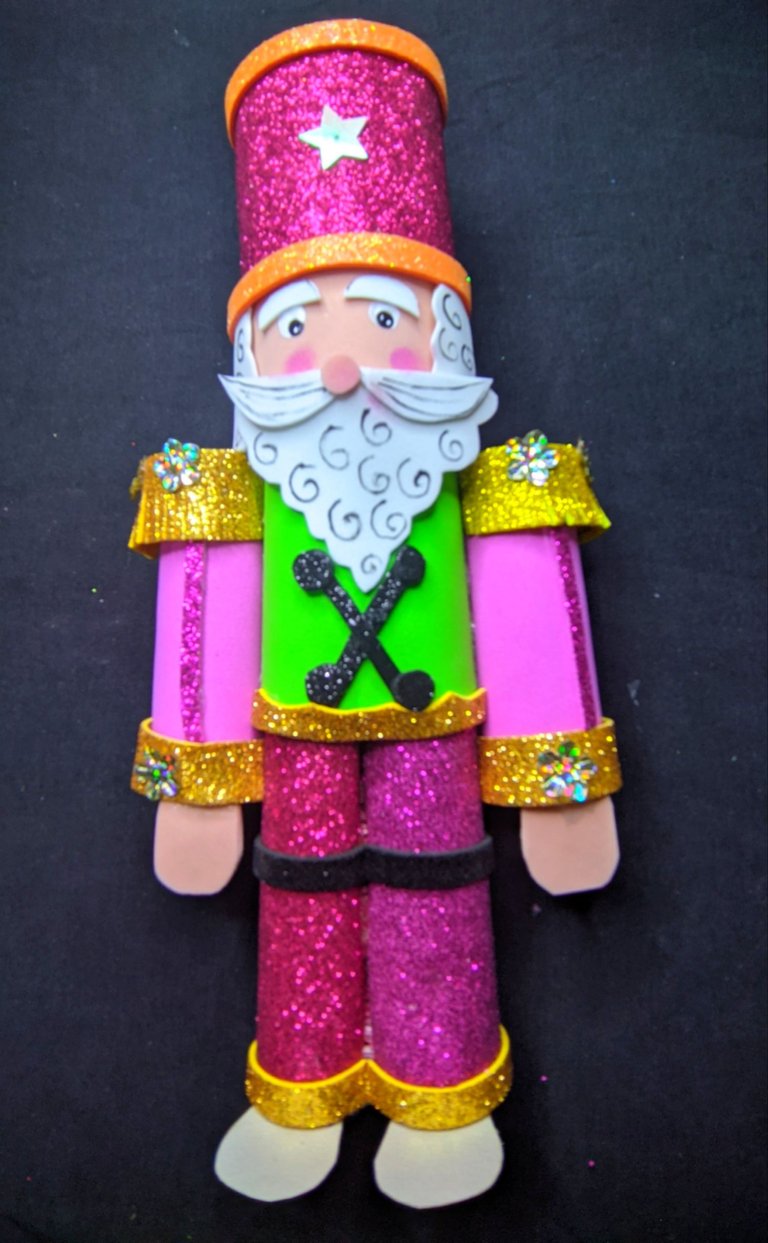
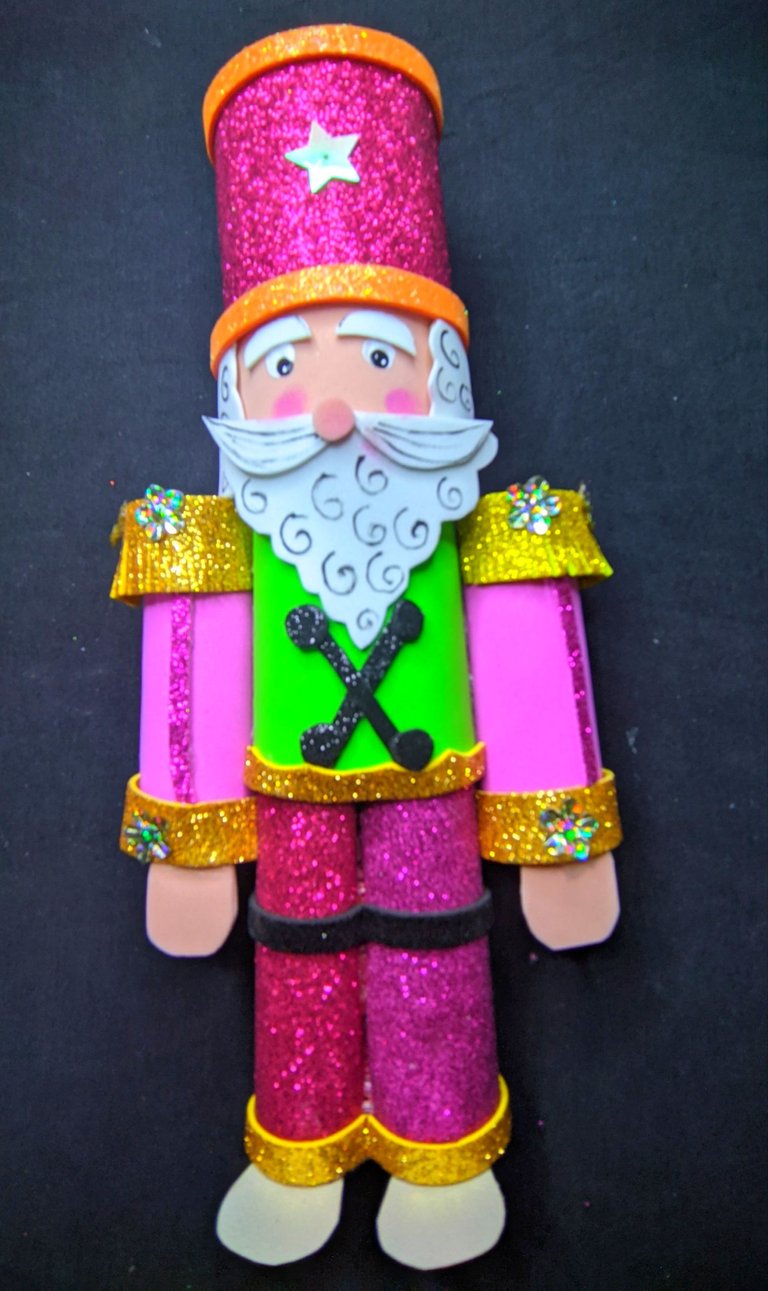
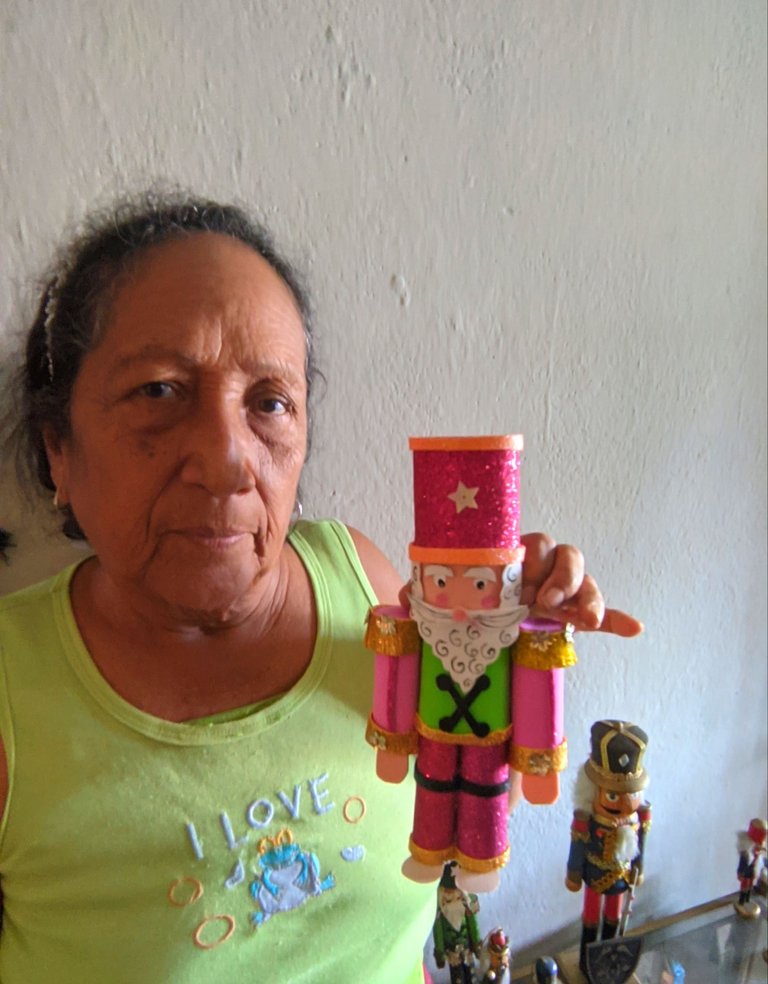
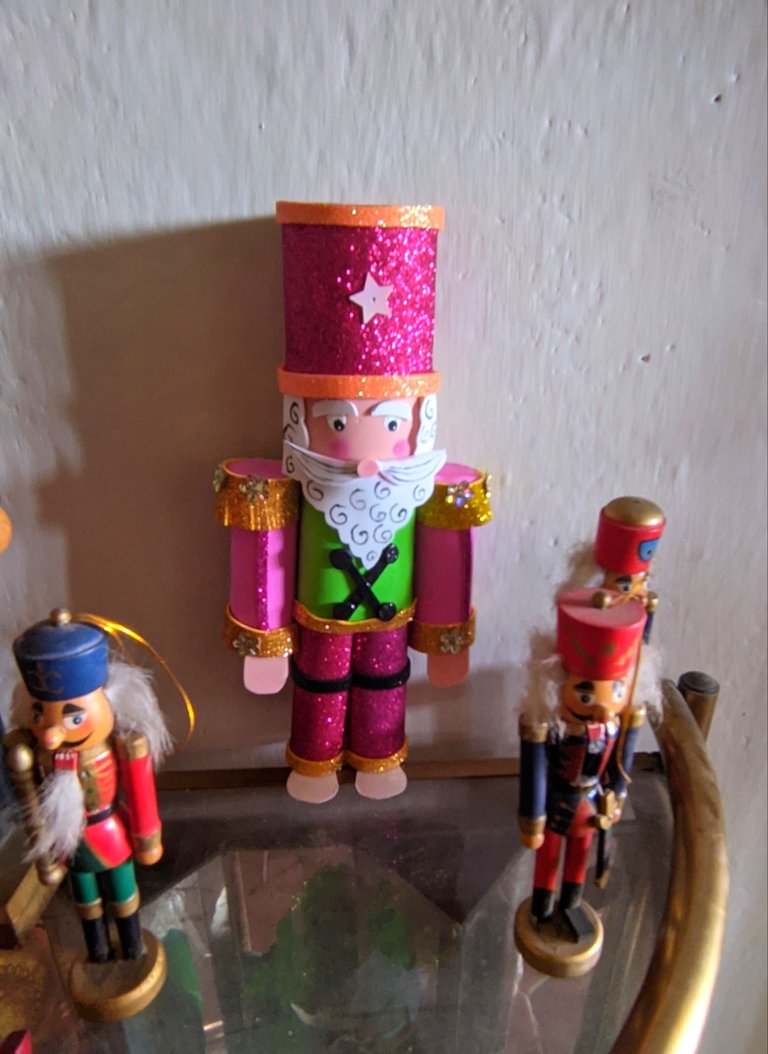
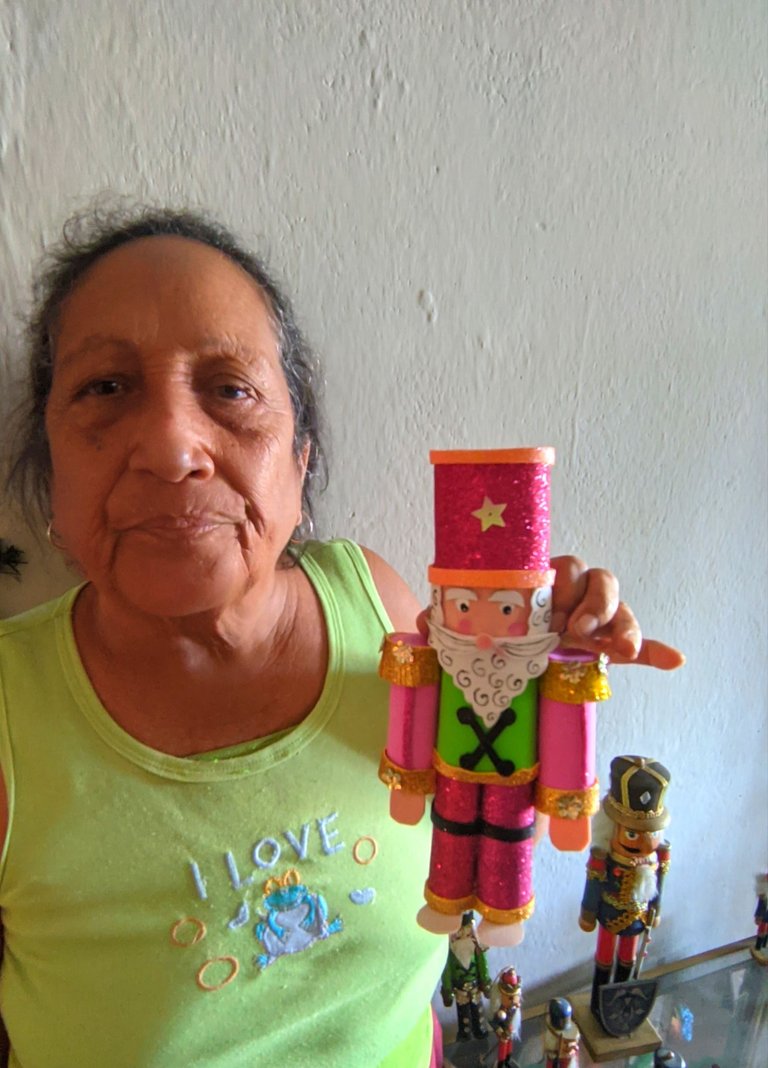
Bueno mis amores cómo pueden ver un lindo trabajo, realizado con amor y dedicación, como me gusta a mí, un hermoso cascanueces de colores poco tradicional, que se elaboró en parte con materiales de provecho, díganme ¿qué les pareció?.
❄️💂♀️❄️ Dios me los bendiga a todos. ❄️💂♀️❄️

❄️💂♀️❄️ ENGLISH ❄️💂♀️❄️
Greetings to all receive from this granny a shower of blessings to all who make life in this community, but may it extend to all those craft appreciators who make life in this unique blockchain.
Christmas is the most beautiful time of the year and perhaps the one I like the most, because there is an infinite amount of decorations that we can make, and that is my post today, one of the most beautiful characters of this time, the nutcrackers, and let me tell you that I really feel an incredible passion for these characters, so much that I have a small collection of them and every year I put a new one
Today we are going to make one with quite different colours, to the usual, to the classics, as they allow you to play with their colours and decorations, and as it is unusual to work this character in fuchsia colours, I decided to do it this way and I really liked the final result, here I will leave you the step by step and the final photos, I hope you like it as much as I liked it.
❄️💂♀️❄️ Materials ❄️💂♀️❄️
💂♀️ Foami of different colours.
❄ ️ 2 tubes of incense packaging.
💂♀️ two tubes of toilet paper roll.
❄ ️ Liquid silicone.
💂♀️ Scissors.
❄ ️ Ruler.
💂♀️ Pencil.
❄ ️ Black and white paint.
💂♀️ Blusher.
❄ ️ Cardboard.
💂♀️ Fine brush.
❄️💂♀️❄️ Step by step ❄️💂♀️❄️
❄️💂♀️❄️Paso 1:
First I took the thin tubes and with the ruler and the pencil we marked to draw the arms and legs from there.
❄️💂♀️❄️ Step 2:
Now on a small piece of cardboard I drew and then cut out the doll's feet, applied liquid silicone to the tube and glued the piece on the cardboard.
❄️💂♀️❄️ Step 3:
One of the toilet paper tubes, divide it into two parts one much smaller than the other and mark it, then grab the skin coloured foami and cut out a rectangle to cover the face of the doll, I also cut out another rectangle of beige foami and glue it, and let it dry.
❄️💂♀️❄️ Step 4:
From the fuchsia Foami I cut out a rectangle to line the top, to form the hat of the doll, I also cut out a circle that I glued on the top and we have finished the top.
❄️💂♀️❄️ Step 5:
Now I took the other toilet paper cylinder and lined it with apple-green foami and let it dry.
❄️💂♀️❄️ Step 6:
When the two parts are dry, apply liquid silicone to the inside of the head and put the chest piece in and let it dry.
❄️💂♀️❄️ Step 7:
Now from the fuchsia foami I cut out two rectangles and with the liquid silicone we cover the legs, leaving uncovered the part that we are going to use to attach the legs to the body, but before doing so I applied liquid silicone and we glued both legs together.
❄️💂♀️❄️ Step 8:
Apply liquid silicone inside the body and proceed to glue the legs on.
❄️💂♀️❄️ Step 9:
I took fuchsia foami without frosting and cut out two rectangles with which we lined the arms, also cut out two circles and glued them on both sides.
❄️💂♀️❄️ Step 10:
When they are completely dry, apply liquid silicone and glue to the body and let them dry well.
❄️💂♀️❄️ Step 11:
As our doll is already assembled, let's start giving him the details, I cut a thin strip of gold foami, and I made several cuts, and we glued it on the shoulder, I also cut two more strips and glued them to the edge of the arm and legs.
❄️💂♀️❄️ Step 12:
I cut out two strips of orange foami and with the liquid silicone we glued on both edges of the doll's hat, on the white foami I drew and cut out the beard and the hair and then we glued it on.
❄️💂♀️❄️ Step 13:
I also cut out the eyebrows and the moustache and glued them on, and from the skin-coloured foami I cut out a small circle that will be our nose and glued it on.
I wanted to give more details to the costume and from the black foami I cut out and made an (x) and some buttons that we glued on.
❄️💂♀️❄️ Step 14:
Paste a costume jewellery star, as well as some flowers, and glue on a strip of black foami.
❄️💂♀️❄️ Step 15:
I took the thin brush and the black and white paint and drew the eyes, and also drew the hair, finally applied some blush and that's it.
❄️💂♀️❄️ Photos finales❄️💂♀️❄️
Bueno mis amores how can you see a beautiful work, made with love and dedication, as I like it, a beautiful nutcracker of untraditional colours, which was made partly with useful materials, let me know what you think about it.
❄️💂♀️❄️ God bless you all. ❄️💂♀️❄️
That is a really cool nut cracker portrayed with lots of colours. Well done
Thank you very much for your words, I'm glad you liked it, thank you very much.
Congratulations @laabuelita! You have completed the following achievement on the Hive blockchain And have been rewarded with New badge(s)
Your next target is to reach 15000 upvotes.
You can view your badges on your board and compare yourself to others in the Ranking
If you no longer want to receive notifications, reply to this comment with the word
STOPGracias
¡Eso es genial @laabuelita! ¡Estamos aquí para animarte a alcanzar tus próximas metas en Hive!
Por cierto, también necesitamos tu ayuda. ¿Podemos pedirle que apoye nuestra propuesta para que nuestro equipo pueda continuar con su trabajo?
Todo lo que necesita hacer es hacer clic en el botón "soporte" en esta página: https://peakd.com/proposals/248.
Gracias!
Abuela esos colores estan demasiado espectaculares, me encantó!
Muchas gracias hijita, quise hacerlo en tonos fuera de lo común, Dios te bendiga
Me encantó los colores que usaste y el resultado es muy hermoso, me encanta la colección de Cascanueces que tienes @laabuelita 😉
Si los colores a mi también me gustaron, te cuento que mi colección sufrió un percance este año, cuando los saque había una caja con 7 de ellos que se rompieron, pero pronto los voy a restablecer, saludos y gracias
!discovery 20
Gracias
This post was shared and voted inside the discord by the curators team of discovery-it
Join our Community and follow our Curation Trail
Discovery-it is also a Witness, vote for us here
Delegate to us for passive income. Check our 80% fee-back Program
Muchas gracias por la ayuda Dios los bendiga
Congratulations, your post has been upvoted by @dsc-r2cornell, which is the curating account for @R2cornell's Discord Community.
Enhorabuena, su "post" ha sido "up-voted" por @dsc-r2cornell, que es la "cuenta curating" de la Comunidad de la Discordia de @R2cornell.
Gracias por el apoyo
Me enamoré. Indudablemente resalta entre todos los demás cascanueces que tienes en la mesita. Me encantó ver todos los detalles de la elaboración. Los colores que elegiste y la combinación. Te quedó muy bello este cascanueces. Felicidades. 🎉🙋🫂
Abuelita! Está precioso!!
Le quedó muy lindo! y la combinación de colores lo hace más llamativo y hermoso, gracias por compartir.