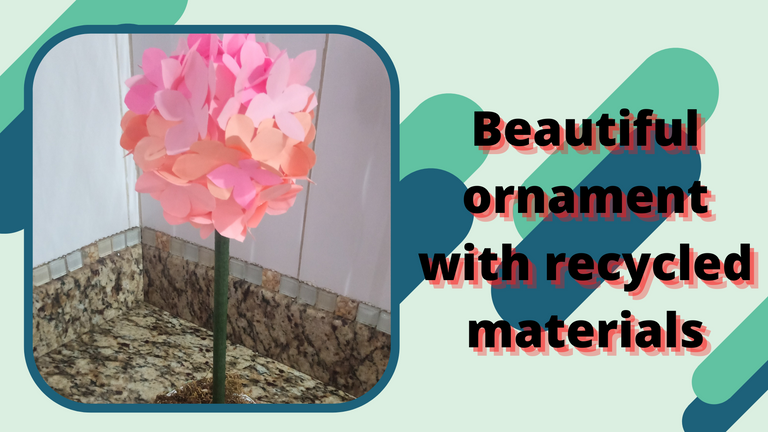

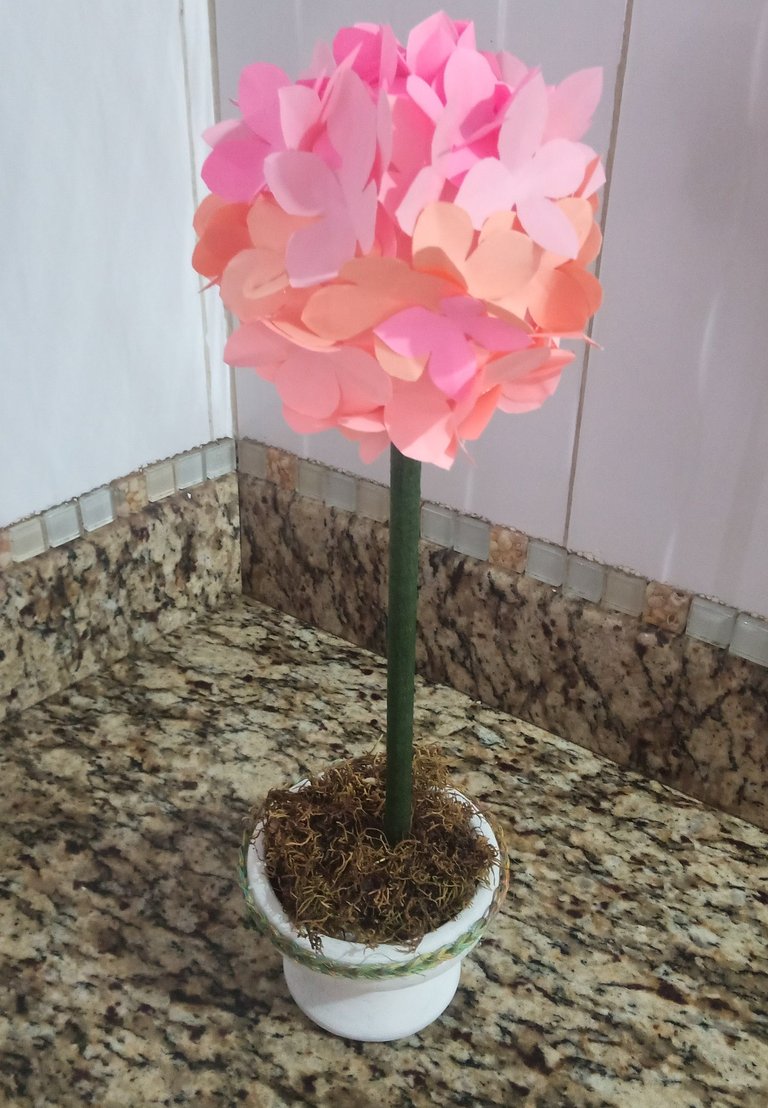
Hola amigos, es un placer para mí saludarlos en una más de mis publicaciones sobre manualidades.
Hoy vengo a compartirles un hermoso Topiario que elabore con materiales sencillos reciclados, es fácil de hacer y no requiere de muchos materiales, también es muy decorativo para adornar cualquier espacio libre que tengamos en nuestro hogar.
Las fotografías que verán a continuación, fueron tomadas con mi teléfono modelo Alcatel_5044R.

Hello friends, it is a pleasure for me to greet you in one more of my publications on crafts.
Today I come to share with you a beautiful Topiary that I made with simple recycled materials, it is easy to make and does not require many materials, it is also very decorative to decorate any free space we have in our home.
The pictures you will see below were taken with my phone model Alcatel_5044R.

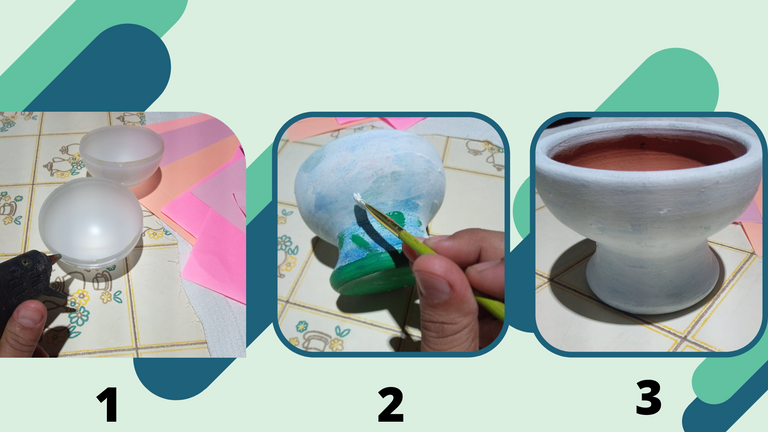
Paso 1: Utilice dos esferas de bombillos Led las que posteriormente pegaré con silicona caliente para utilizarla más adelante.
Paso2: Con una copa de arcilla que tenía guardada y ya no lo utilizaba, le aplique color blanco con pintura al frío, esta será la base para el Topiario.
Step 1: Use two spheres of LED bulbs which I will later glue with hot silicone for later use.
Step 2: With a clay cup that I had saved and no longer used, I applied white color with cold paint, this will be the base for the Topiary.
Paso3: Después de haber pegado con silicona caliente las dos esferas que anteriormente les había mencionado, realice un orificio con un tubo de hierro caliente para insertar en ese orificio el tallo de este adorno.
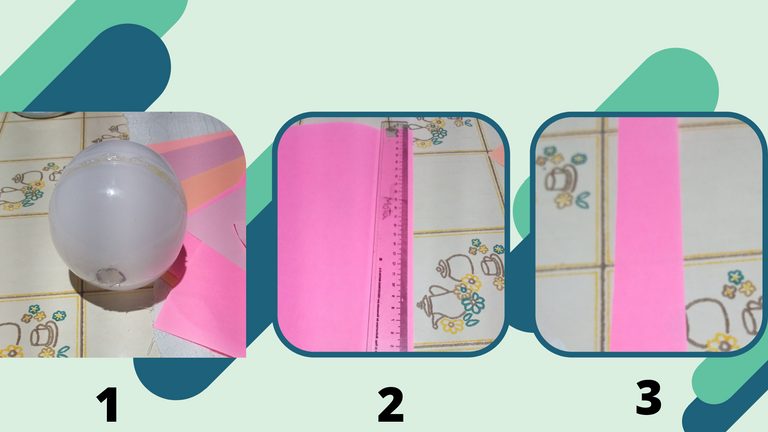
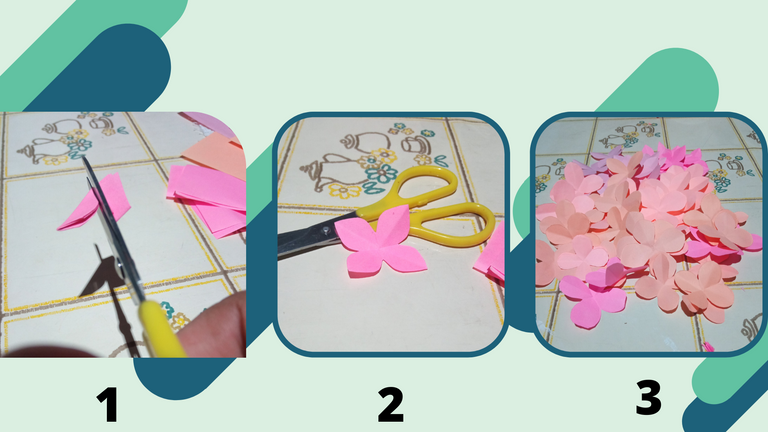
Paso4: Con la ayuda de una regla sobre un papel de color rosado, saque líneas del ancho de la regla para que todas las flores me quedaran del mismo tamaño.
Step 3: After gluing with hot silicone the two spheres that I mentioned before, make a hole with a hot iron pipe to insert the stem of this ornament.
Step 4: With the help of a ruler on pink paper, draw lines of the width of the ruler so that all the flowers are the same size.
Paso5: Luego recorte las líneas de papel en cuadros de 5 centímetros de largo y de ancho.
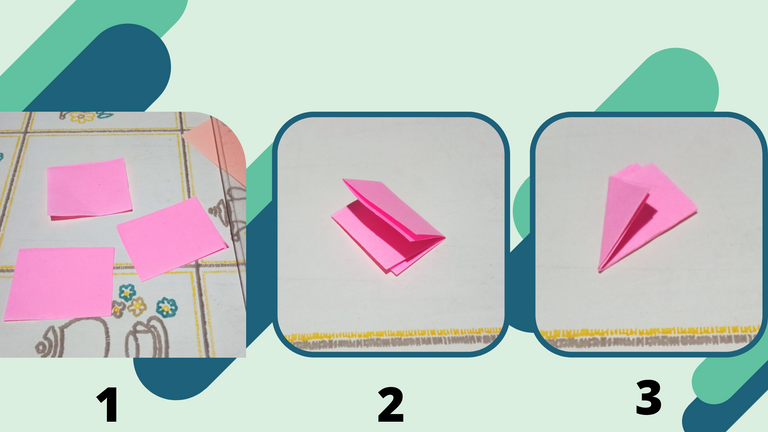
Paso6: Después uní dos cuadros, los doble por la mitad, luego esa misma mitad la volví a doblar dándole una forma triangular.
Paso7: Seguidamente recorte una forma de pétalo doblado con el doble que había realizado en forma de triángulo.
Paso8: Este corte da como resultado una flor sencilla de cuatro pétalos, utilice dos cuadros de papel, por lo que tuve como resultado dos flores, si colocamos tres o más cuadros de papel obtendremos el número de flores que queramos, para esto necesitamos una tijera más fuerte, pueden hacer el número de flores que deseen colocar al topiario.
Step5: Then I cut the paper lines into squares of 5 centimeters long and wide.
Step6: I then joined two squares together, folded them in half, then folded that same half back into a triangular shape.
Step7: Next I cut out a folded petal shape with the fold that I had made in a triangle shape.
Step8: This cut results in a single flower with four petals, I used two squares of paper, so I had as a result two flowers, if we place three or more squares of paper we will get the number of flowers we want, for this we need a stronger scissors, you can make the number of flowers you want to place to the topiary.
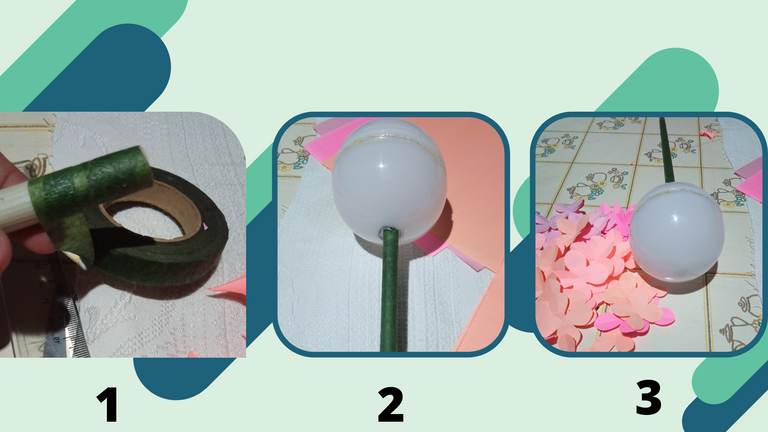
Paso9: Sobre un tubo de plástico, lo cubrí con cinta adhesiva Floratex de color verde para realizar el tallo de este adorno.
Paso10: Después de tener el tallo totalmente forrado, lo coloqué dentro del orificio de la esfera que anteriormente había hecho, lo asegure con un poco de silicona caliente para darle estabilidad y evitar movimientos al momento de adornarla con las flores.
Step 9: On a plastic tube, I covered it with green Floratex adhesive tape to make the stem of this ornament.
Step 10: After having the stem completely covered, I placed it inside the hole of the sphere that I had previously made, I secured it with a little hot silicone to give it stability and avoid movements at the moment of decorating it with the flowers.
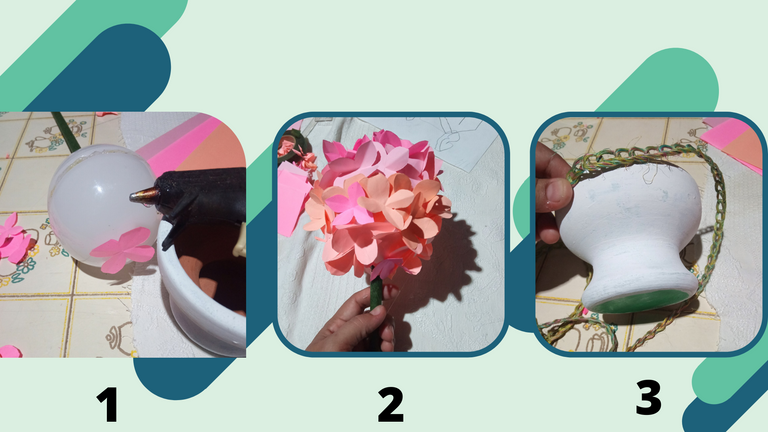
Paso11: Después de tener ya lista la esfera con el tallo, empecé a pegar cada una de las flores que anteriormente había recortado con un punto de silicona caliente para que no se cayeran de la esfera, ya que si utilizaría pega blanca u otro pegamento frío, se tardaría más en pegar sobre la esfera que es lisa y podría rodarse las flores del lugar de donde las estaría pegando.
Paso12: Luego de tener toda la esfera cubierta con las flores de papel de colores surtidos, empecé a colocarle los últimos detalles a la maceta del topiario, le coloque una cinta de mecatillo tejida en cadenas para adornar la parte superior.
Step 11: After having the sphere with the stem ready, I began to glue each of the flowers that I had previously cut out with a dot of hot silicone so that they would not fall off the sphere, because if I used white glue or other cold glue, it would take longer to glue on the sphere, which is smooth and the flowers could roll off the place where I would be gluing them.
Step 12: After having the whole sphere covered with the assorted colored paper flowers, I started to put the last details to the topiary pot, I put a ribbon woven in chains to decorate the top.
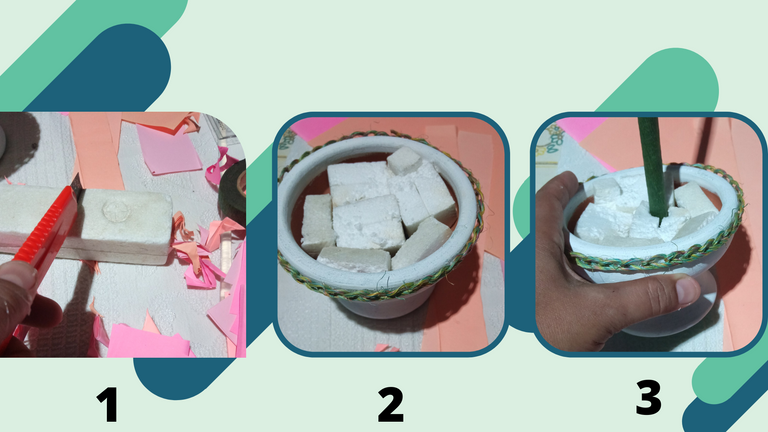
Paso13: Una vez decorada la maceta, recorte unos trozos de anime para rellenarla y colocar en ella el topiario.
Después de tener listo el topiario en la base, cubrí el anime con una grama artificial como detalle final para embellecer más esta hermosa decoración.
Step 13: Once the pot was decorated, I cut some pieces of anime to fill it and place the topiary in it.
After having the topiary ready at the base, I covered the anime with an artificial grass as a final detail to further embellish this beautiful decoration.
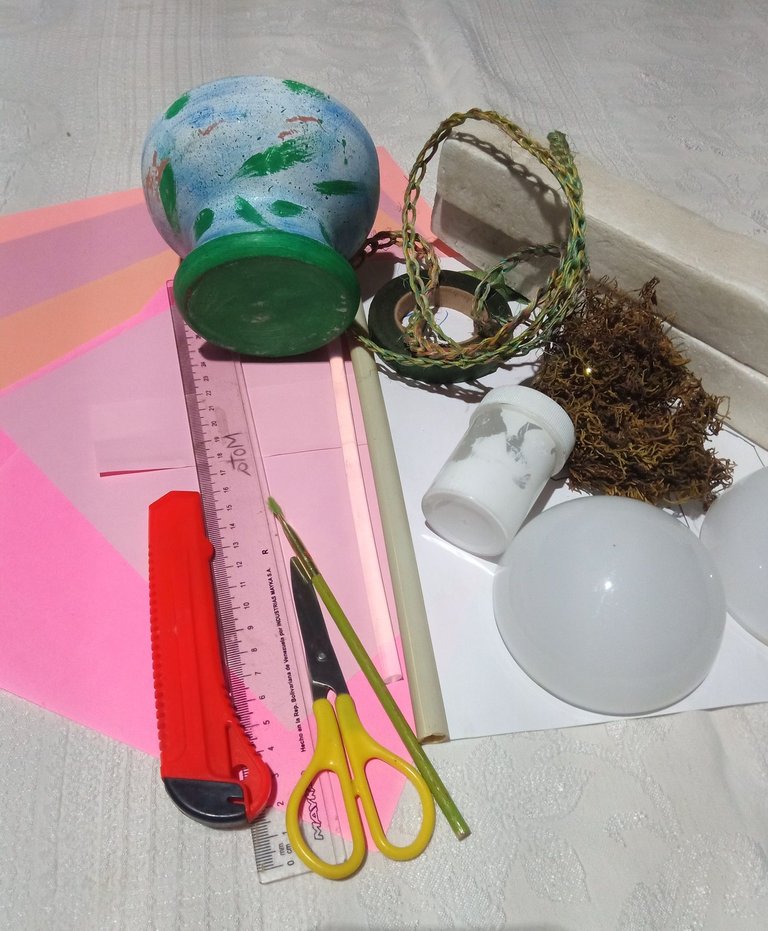
Materiales:
Regla.
Pintura al frío blanca.
Barra de silicona.
Cinta Floratex de color verde.
Exacto.
Tijera.
Pincel.
Grama artificial.
Jarrón de arcilla.
Mecatillo tejido.
Esferas de bombillos Led.
Anime.
Papel de color rosado.
Tubo de plástico.
Materials:
Ruler.
White cold paint.
Silicone bar.
Green Floratex tape.
Exact.
Scissors.
Brush.
Artificial grass.
Clay vase.
Woven basket.
Led bulb spheres.
Anime.
Pink paper.
Plastic tube.
social networks / redes sociales
![]()
![]()
Traductor Deepl
Translated Deepl
Ediciones Canva
Editions Canva


Me ha encantado la idea como decoración, le diste otra oportunidad a un viejo jarrón de arcilla.
Acerca de los materiales, los colocaste al final, lo ideal es ponerlos antes del paso a paso, supongo que se te pasó, un abrazo.
Lo tomare en cuenta en mi próximo post de manualidad amiga, gracias
Quedó muy bonito el resultado, me gustó cómo explicaste cada detalle y el cuidado que colocaste. Fue un gusto observar tu trabajo. Saludos, amiga.
Me alegro de que te haya gustado amiga @ramisey, hecho con mucho amor para mis lectores, saluditos
Muy bonito y creativo, en cualquier espacio de la casa quedará magnífico.💗
Asi es amiga, muchas gracias por tu comentario, saludos :D
Muy crativo tu post. felicidades
Gracias
Tiene usted una forma de presentar su publicación de forma muy atractiva, usa colores agradables. Por otra parte, su trabajo de reciclaje es bastante bueno. Mucha suerte para usted y buen ánimo.
Muchísimas gracias @soltecno, siempre pongo todo mi esfuerzo para dar lo mejor de mí en mis manualidades, saludos