Hola mis queridos amigos de #Hivediy, espero que todos se encuentren bien, disfrutando de sus seres amados, hoy quise hacer un post especial dedicado a las madres, se acerca una de las celebraciones más importantes en el año y aunque todos los días debemos estar agradecidos por nuestras madres y agasajarlas, tenemos una fecha especial para consentirlas, hoy les traigo un tutorial sencillo para elaborar una linda tarjeta en filigrana, cómo ya saben me encanta esta técnica que consiste en enrrollar tiras de papel y podemos hacer bellezas con ella.
Hello my dear friends of #Hivediy, I hope you are all well, enjoying your loved ones, today I wanted to make a special post dedicated to mothers, one of the most important celebrations of the year is approaching and although every day we should be grateful for our mothers and entertain them, we have a special date to spoil them, today I bring you a simple tutorial to make a nice filigree card, as you know I love this technique that consists of rolling strips of paper and we can make beauties with it.
Esta tarjeta es un obsequio lindo para nuestras madres y además es muy económico elaborarla, las mamis quedarán fascinadas con este bello detalle, la verdad yo quedé encantada, lastima que no tengo a mi madre cerca de mí ya que ella está en otro estado del país, pero de seguro se la haré llegar, bueno amigos acompañenme vamos al paso a paso.
This card is a nice gift for our mothers and it is also very economical to make it, moms will be fascinated with this beautiful detail, the truth is I was delighted, too bad I do not have my mother near me because she is in another state of the country, but surely I will send it to her, well friends come with me let's go to the step by step.
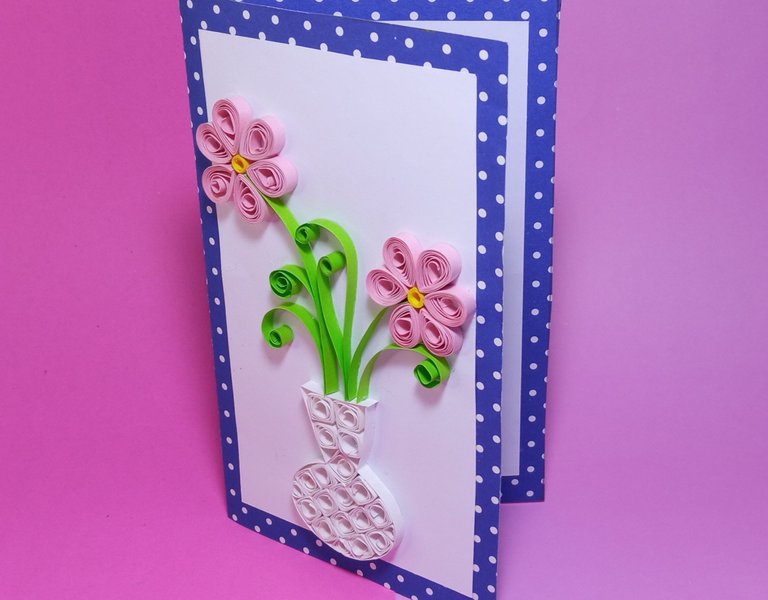
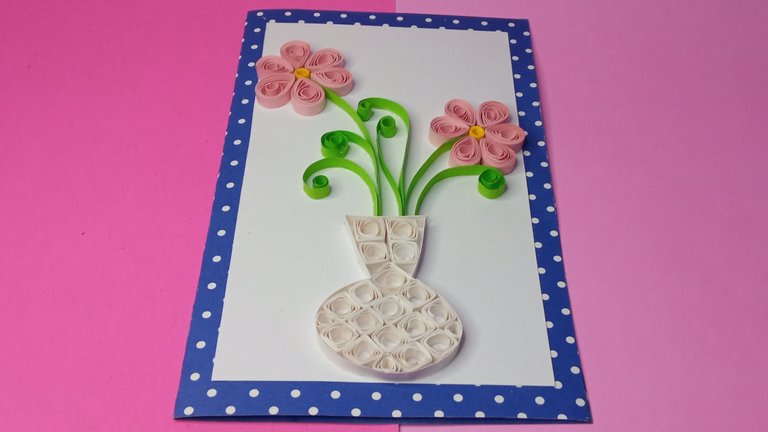
Tarjeta en filigrana para mamá
.
Filigree card for mom
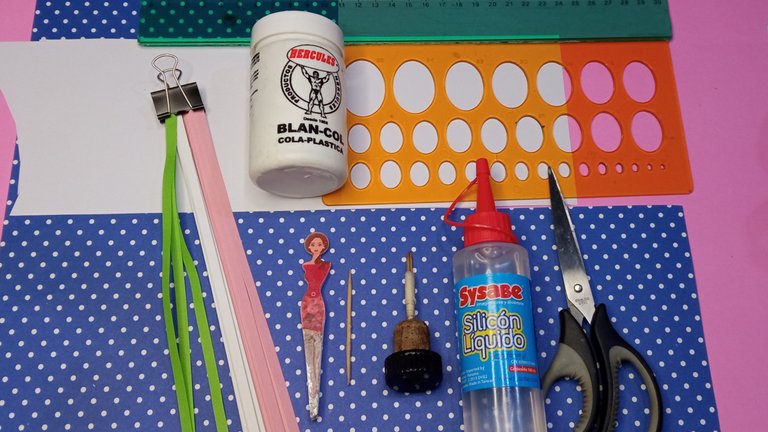
Materiales
Materials
Paso 1
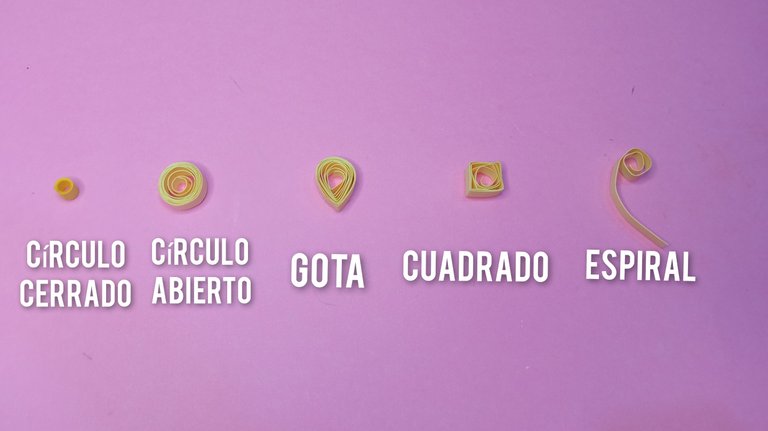
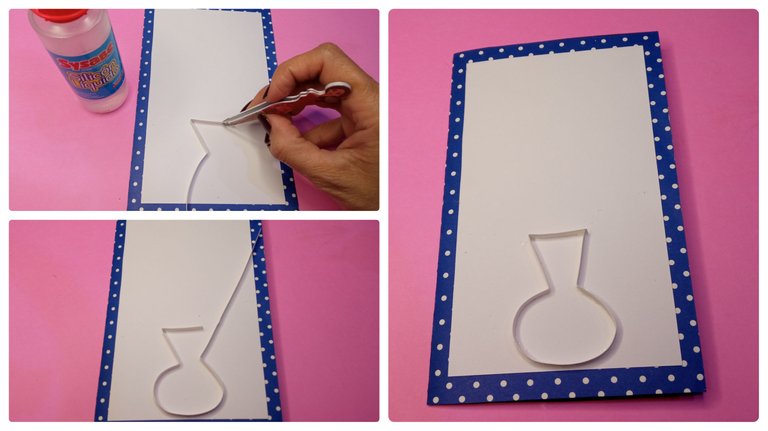
Para comenzar lo primero que haremos será elaborar un patrón con las formas básicas del filigrana, para la tarjeta usaremos el círculo cerrado, el círculo abierto, la gota, el cuadrado y la forma de espiral.Step 1
To begin with, the first thing we will do is to make a pattern with the basic filigree shapes, for the card we will use the closed circle, the open circle, the drop, the square and the spiral shape.
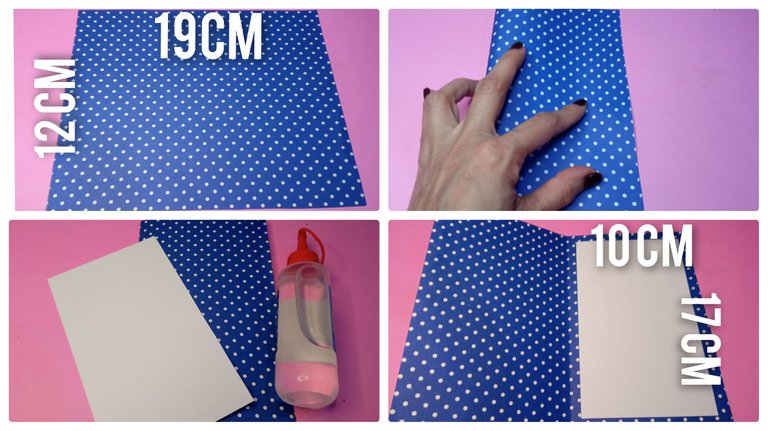
Paso 2
Luego comenzamos a armar la tarjeta, tomamos la cartulina azul de lunares y medimos 19 cm de largo por 12 cm de ancho, esta será la base para nuestra tarjeta, luego en la cartulina blanca medimos 17 cm de largo por 10 cm de ancho, procedemos a recortar y finalmente pegamos la blanca sobre la azul con silicón líquido.Step 2
Then we begin to assemble the card, we take the blue polka dots cardboard and measure 19 cm long by 12 cm wide, this will be the base for our card, then in the white cardboard we measure 17 cm long by 10 cm wide, we proceed to cut and finally glue the white on the blue with liquid silicone.
Paso 3
Después con un tira blanca de 20 cm de largo por 0,5 cm de ancho hacemos un jarrón, es muy simple solo vamos dando forma a la tira, vamos doblando y haciendo forma circular, luego pegamos con silicón líquido.Step 3
Then with a white strip of 20 cm long by 0.5 cm wide we make a vase, it is very simple, we just give shape to the strip, we bend it and make a circular shape, then we glue it with liquid silicone.
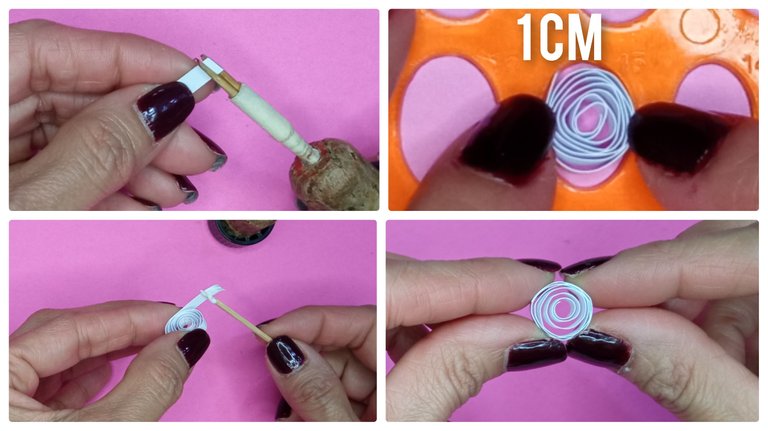
Paso 4
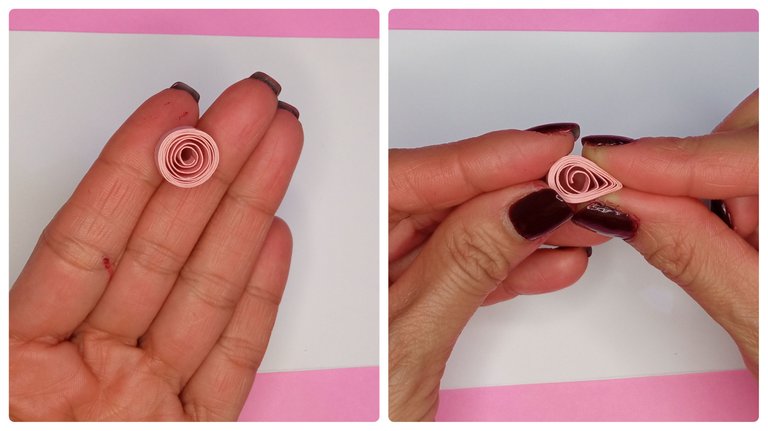
Ahora haremos la forma básica del círculo abierto, es muy sencilla de elaborar, introducimos en el enrrollador una tira blanca de 10 cm de larga por 0.5 cm de ancha, enrollamos sobre ella misma hasta el final, luego con cuidado soltamos en la plantilla y pegamos con un punto de pega blanca en la punta.Step 4
Now we will make the basic shape of the open circle, it is very simple to elaborate, we introduce in the winder a white strip of 10 cm long by 0.5 cm wide, we roll on it until the end, then we carefully release in the template and glue with a point of white glue at the tip.
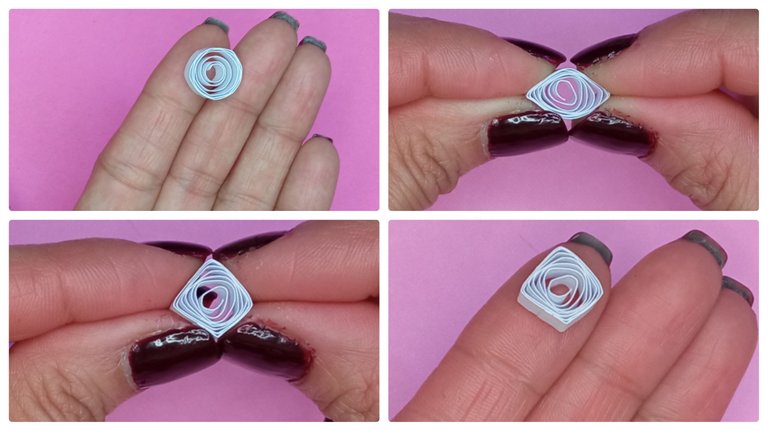
Paso 5
Después de hacer los círculos abiertos preocedemos a elaborar la forma básica del cuadrado, presionamos con los dedos índice y pulgar dando forma de óvalo, luego giramos y presionamos nuevamente los dedos para dar forma de cuadradoStep 5
After making the open circles, we will start to elaborate the basic shape of the square, we press with the index finger and thumb giving the shape of an oval, then we turn and press again the fingers to give the shape of a square.
Paso 6
Ya listos nuestros cuadros procedemos a pegar con pega blanca uno al lado del otro alineados y con mucha paciencia de artesano jejeje.Step 6
When our pictures are ready, we proceed to glue with white glue one next to the other aligned and with a lot of patience of a craftsman hehehe.

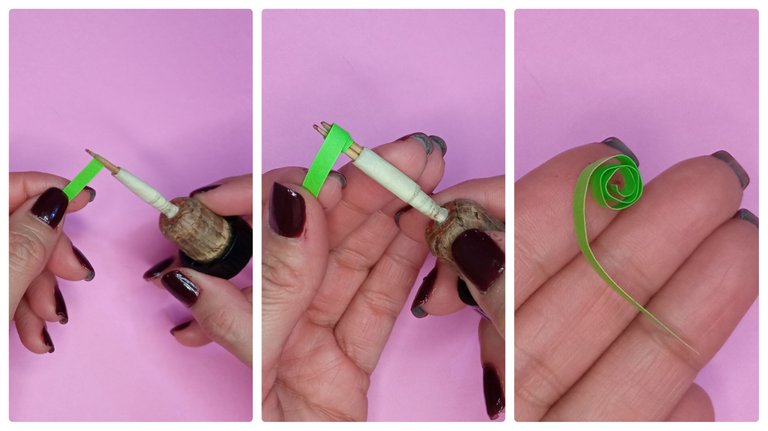
Paso 7
Es el momento de hacer espirales con tiras verdes de 5 cm de largo por 0.5 cm de ancho, introducimos la tira en el enrrollador giramos y damos 5 vueltas, luego soltamos con cuidado y ya tendremos una linda espiral.Step 7
It's time to make spirals with green strips of 5 cm long by 0.5 cm wide, we introduce the strip in the winder, turn and give 5 turns, then carefully release and we will have a nice spiral.
Paso 8
Ahora hacemos la forma básica de la gota, partimos de un círculo abierto ya explicado en el paso 4, luego tomamos el círculo abierto y con los dedos índice y pulgar de la mano derecha presionamos suavemente para formar la gota, debemos hacer doce para las dos flores.Step 8
Now we make the basic shape of the drop, we start from an open circle already explained in step 4, then we take the open circle and with the index finger and thumb of the right hand we press gently to form the drop, we must make twelve for the two flowers.
Paso 9
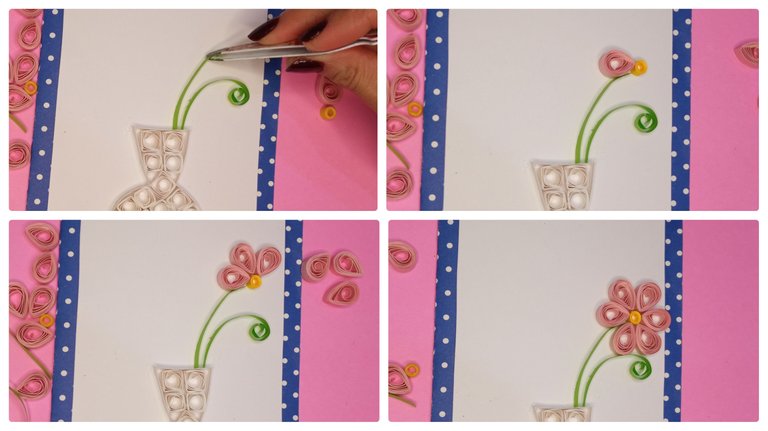
Ya nuestra tarjeta va tomando forma, pegamos un espirales del lado derecho de nuestro jarrón, una tirita verde que será de tallo, después vamos armando la flor, para el pistilo solo enrollamos una pequeña tira amarilla formando un círculo cerrado, después vamos pegando los pétalos a su alrededor, ya en este punto se ve muy linda.Step 9
And our card is taking shape, we glue a spiral on the right side of our vase, a green strip that will be the stem, then we assemble the flower, for the pistil we just roll a small yellow strip forming a closed circle, then we glue the petals around it, and at this point it looks very nice.
Paso 10
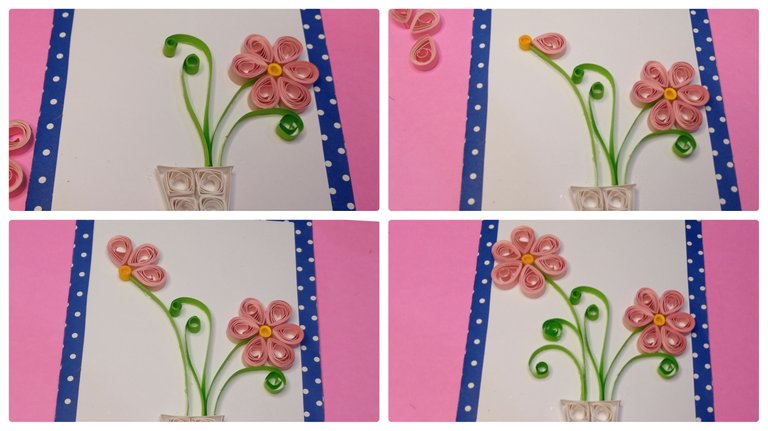
Terminamos de armar pegando más espirales del lado izquierdo que le darán vida a el bello jarrón y continuamos pegando los pétalos para armar la flor.Step 10
We finish gluing more spirals on the left side that will give life to the beautiful vase and continue gluing the petals to assemble the flower.
Por último quiero decirles que la herramienta que uso para enrrollar es muy fácil de elaborar, solo necesitamos un corcho, 2 palitos y teipe, se introducen los palitos en el corcho y luego se le coloca teipe alrededor para ayudar a dar firmeza y no se muevan.
Finally I want to tell you that the tool I use to roll up is very easy to make, we only need a cork, 2 sticks and teipe, the sticks are inserted into the cork and then teipe is placed around it to help give firmness and not move.
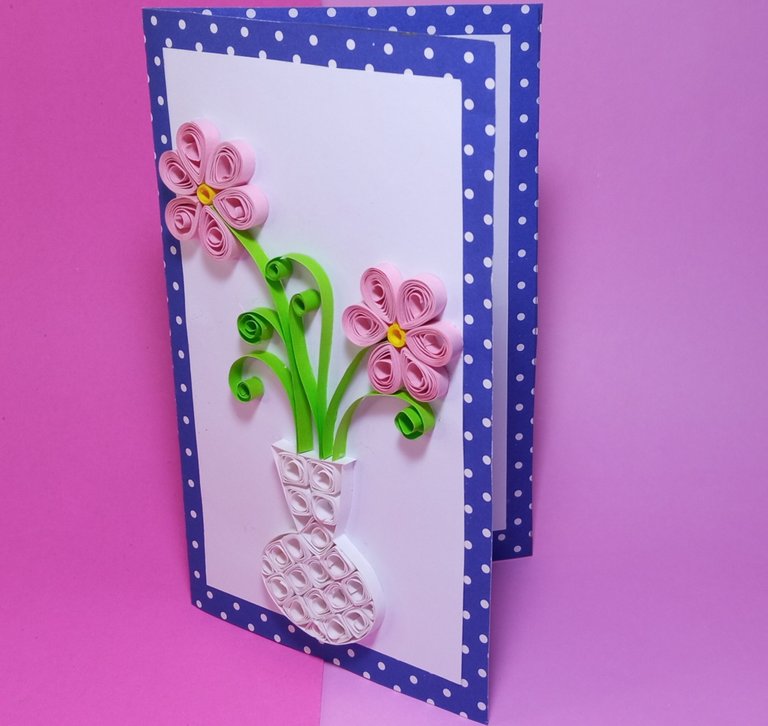
Listo amigos, así de linda quedó mi tarjeta para mamá, espero sea del agrado de todos ustedes y se animen a realizarla.
Ready friends, that's how pretty my card for mom turned out, I hope you all like it and are encouraged to make it.

Todas las fotos son tomadas de mi teléfono Redmi 9, para los collages usé la aplicación collage maker y para la traducción usé el traductor Deepl.
All photos are taken from my Redmi 9 phone, for the collages I used the collage maker application and for the translation I used Deepl translator.
Esto debe requerir mucha paciencia y espero. Felicidades, te quedó muy bello
Gracias por venir amiga, así es paciencia y dedicación, pero es fácil de realizar.
Está linda
Muchas gracias amiga.
Te quedo hermosa amiga @lilianap15. A tu mamita le va a encantar... Tenia pensado hacer también una tarjeta, pero preferí seguir con los accesorios jajaja. Pronto veré si hago otra cosa combinada. Abrazos ✨ 💕
Gracias amiga bella, si cuando pueda le enviaré la tarjeta.
Congratulations @lilianap15! You have completed the following achievement on the Hive blockchain and have been rewarded with new badge(s):
Your next payout target is 500 HP.
The unit is Hive Power equivalent because post and comment rewards can be split into HP and HBD
You can view your badges on your board and compare yourself to others in the Ranking
If you no longer want to receive notifications, reply to this comment with the word
STOPCheck out the last post from @hivebuzz:
Support the HiveBuzz project. Vote for our proposal!
Dear @lilianap15, we need your help!
The Hivebuzz proposal already got important support from the community. However, it lost its funding a few days ago and only needs a few more HP to get funded again.
May we ask you to support it so our team can continue its work this year?
You can do it on Peakd, ecency,
https://peakd.com/me/proposals/199
Your support would be really helpful and you could make a difference.
Thank you!