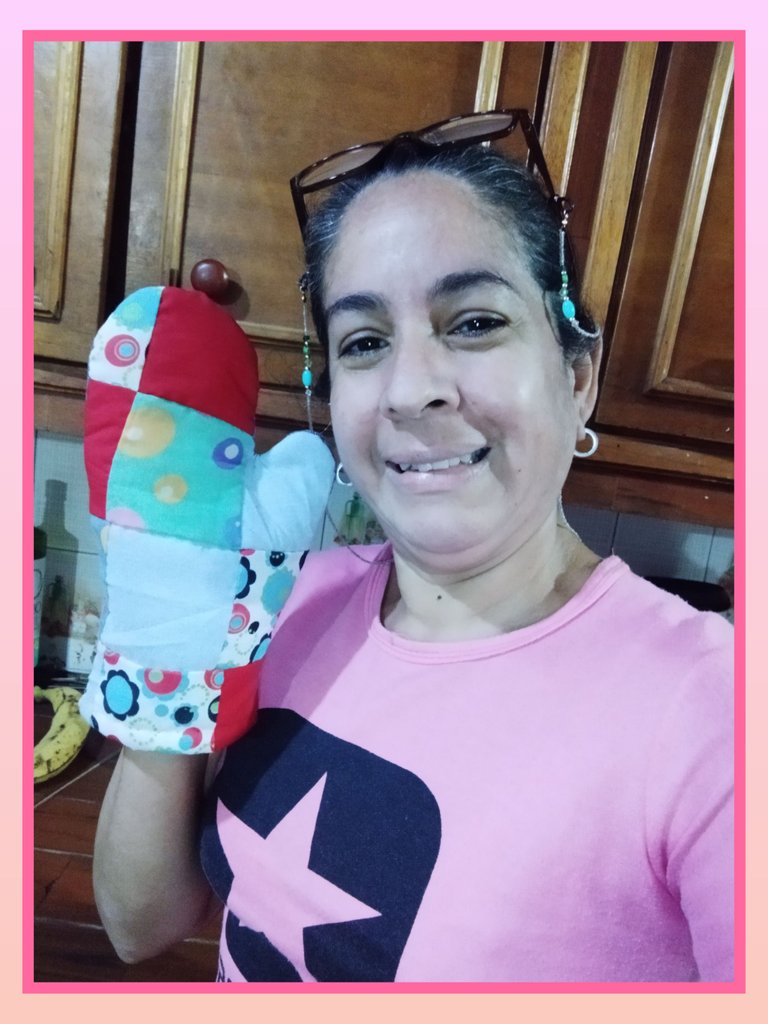
WELCOME TO MY BLOG!
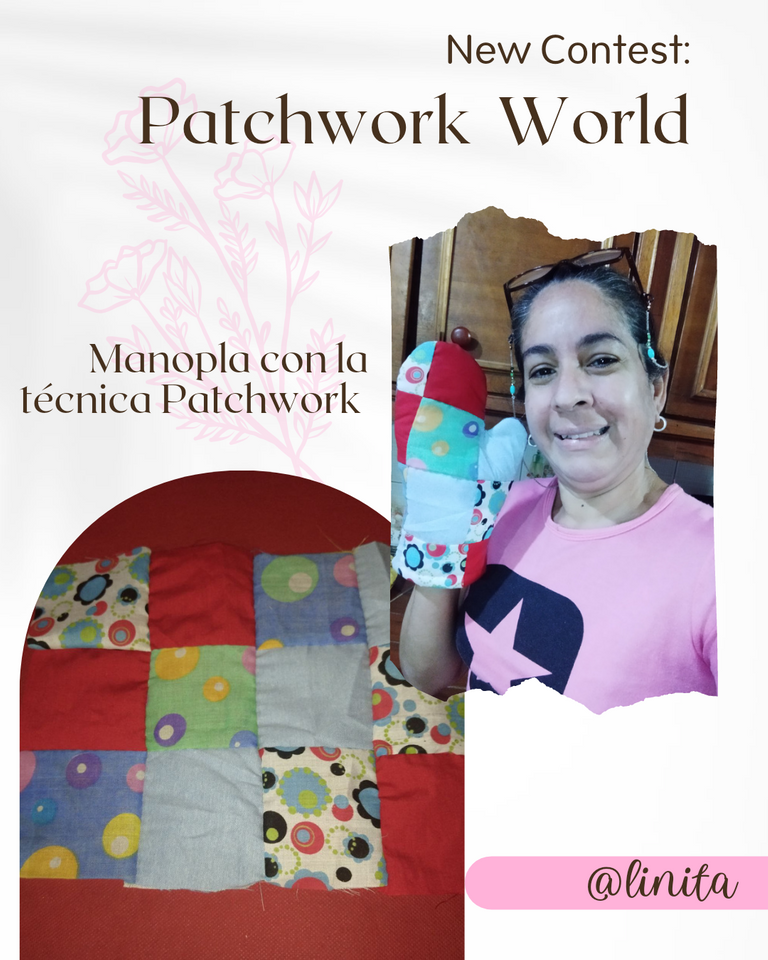
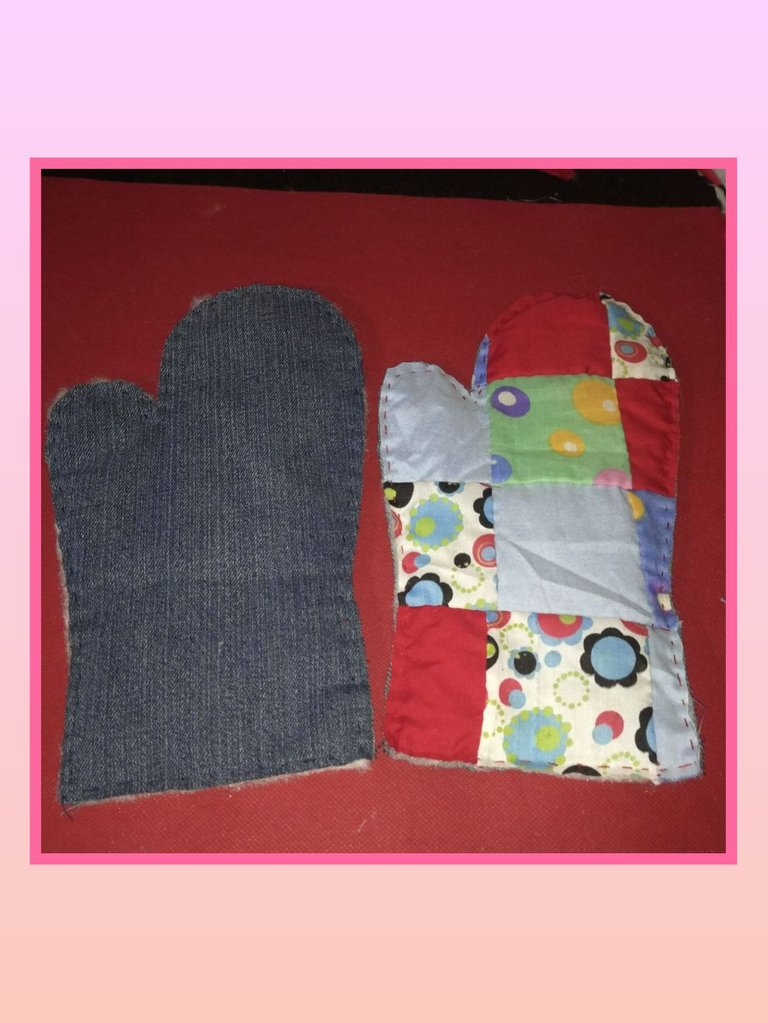
I hardly make it in time to post my work. Today I want to participate in this contest with a mitten that I made with this fantastic technique that consists of joining pieces of fabric in the shape and combination that we want, the question is to form a beautiful design of colors and textures and put those pieces of fabric to use. fabric that we have left when we do some sewing work. As I have told you before, most of my day is spent in the kitchen. Now the work is double because I have to make two or three menus, the first is for my mother's diet, who, as I have already told you, has health problems and requires special foods; the second is for the rest of the family but if it is very elaborate I must make a third one that lasts approximately 6 hours without decomposing at room temperature, this one is for my youngest daughter who has just started working. So due to this, I must have tools at hand that allow me to manipulate kitchen utensils without having an accident and hence the idea of making this fantastic mitt, which will help me not burn my hands.
For its elaboration I used different types of fabrics, among which jeans stand out and the truth, true, is the only one I know the name of, but they are still scraps that have remained from previous sewing jobs.
The making of this mitten, in addition to being necessary in my work, served me as a lot of distraction, since my days lately have been very monotonous and routine and cause great physical and mental fatigue. It was 4 hours dedicated to sewing and shaping my project even though my sewing skills are weak.
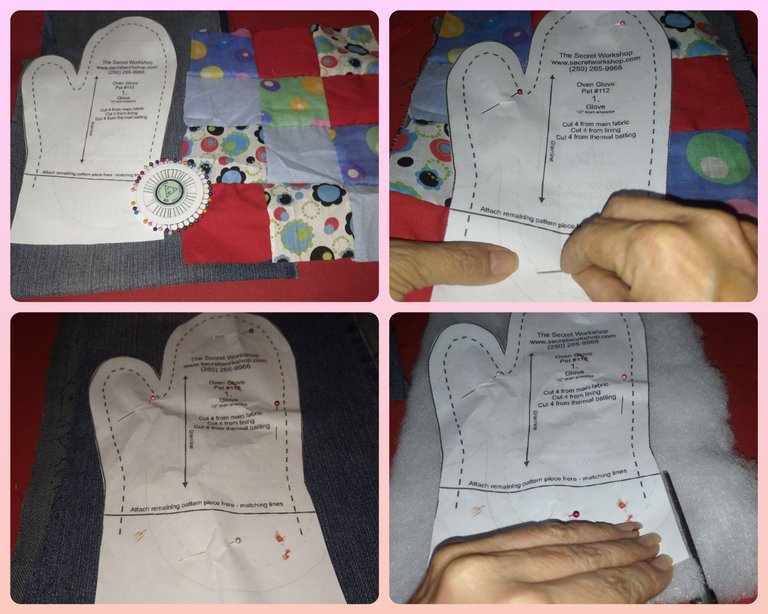
I downloaded the pattern online, and although it is very easy to do, since I have the means, I preferred to print it to facilitate the work. Here I leave the link in case you want to print it. I just adapted it to the desired size.
¡BIENVENIDOS A MI BLOG!
Casi casi no llego a tiempo para publicar mi trabajo. Hoy quiero participar en este concurso con una manopla que realicé con esta fantástica técnica que consiste en la unión de retazos de tela de la forma y combinación que deseemos, la cuestión es formar un bellos diseño de colores y texturas y darle uso a esos trozos de tela que nos quedan cuando realizamos algún trabajo de costura. Como ya le he contado con anterioridad la mayor parte de mi día la paso en la cocina. Ahora el trabajo es doble porque debo realizar dos o tres menús, el primero es para la dieta de mi mamá, que como también ya les he contado está con problemas de salud y requiere alimentos especiales; el segundo es para el resto de la familia pero si es muy elaborado debo realizar un tercero que dure aproximadamente 6 horas sin descomponerse a temperatura ambiente, este es para mi hija menor que recién comenzó a trabajar. Así que debido a esto, debo tener a mano herramientas que me permitan la manipulación de los utensilios de cocina sin tener un accidente y de allí la idea de realizar esta fantástica manopla, que me ayudará a no quemar mis manos.
Para su elaboración utilicé telas de diferentes tipos entre las que destaca el jeans y la verdad, verdadera, es la única que sé el nombre, pero igual son retazos que han quedado de trabajos de costuras anteriores.
La realización de esta manopla, además de necesaria en mis labores, me sirvió de mucha distracción, ya que mis días últimamente han sido bien monótonos y rutinarios y ocasionan un ran cansancio tanto físico como mental. Fueron 4 horas dedicados a la costura y a darle forma a mi proyecto a pesar que mis habilidades de costura son débiles.
El patrón lo descargué por internet, y aunque es muy fácil de hacer, como cuento con los medios preferí imprimirlo para facilitar el trabajo. Aquí les dejo el enlace por si quieren imprimirlo. Solo lo adapté al tamaño deseado.

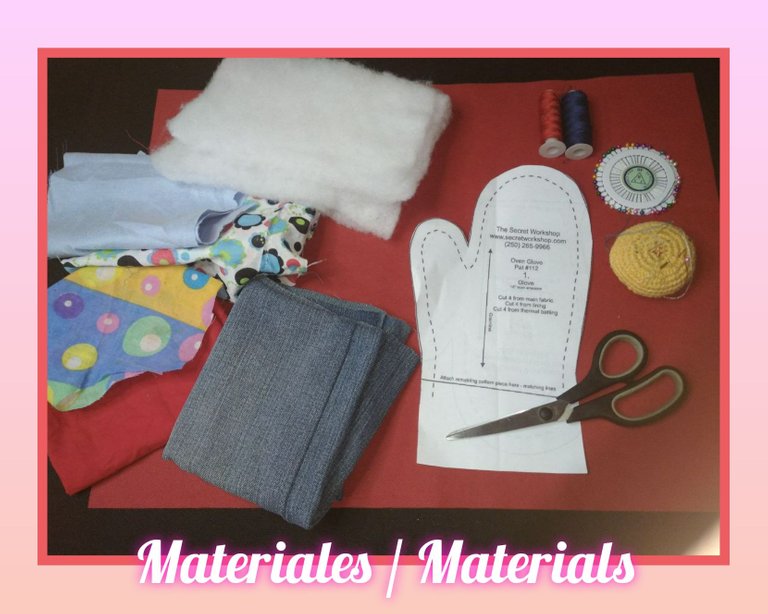
- Scraps of fabric of different types and textures
- Wadding or artificial padding
- Red and blue sewing threads
- Sewing needles
- Sewing pins
- Scissors
- Pattern
- Retazos de tela de diferentes tipo y texturas
- Guata o relleno artificial
- Hilos de coser rojo y azul
- Agujas de coser
- Alfileres de costura
- Tijera
- Patrón

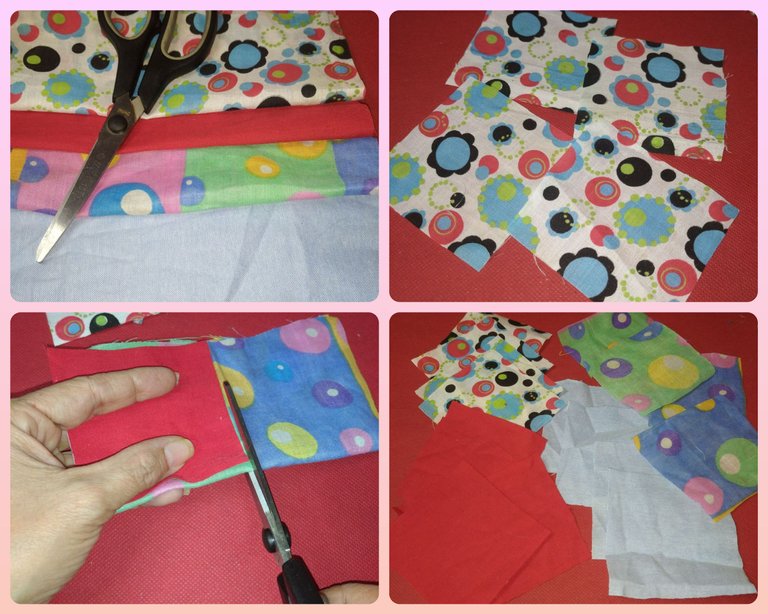
Step #1
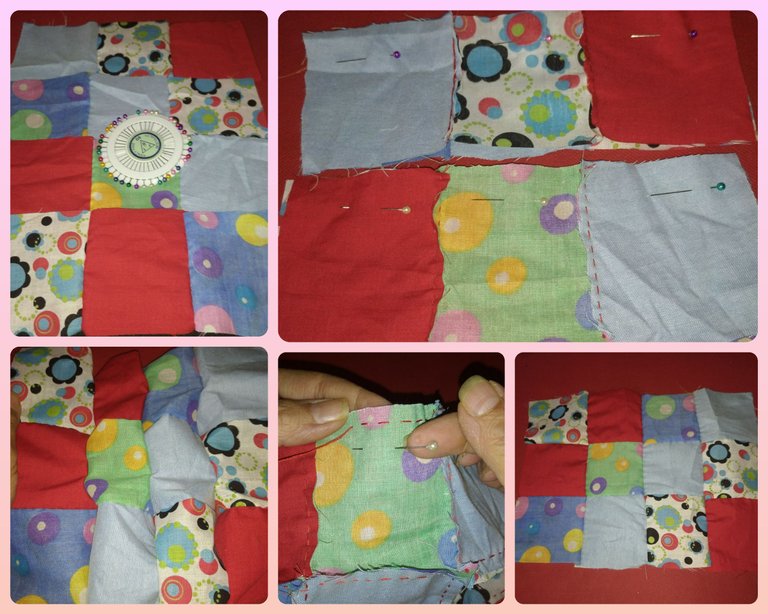
To make the patchwork technique I decided to make square cutouts with the different types of fabrics, I did not use a metric measure for this purpose. I made a first cut to the eye percent and with this I took the measure of the following pieces of different fabrics. I made 4 cuts of each type, without using the jeans fabric, just to make what would be the front part of the mitten, which is where I apply the technique.
Paso #1
Para realizar la técnica de patchwork decidí hacer recortes cuadrados con los diferentes tipos de telas, no utilicé una medida métrica para tal fin. Hice un primer corte al ojo por ciento y con éste tomé la medida de los siguientes retazos de diferentes telas. Realicé 4 cortes de cada tipo, sin usar la tela de jeans, solo para realizar lo que sería la parte frontal de la manopla que es donde aplico la técnica.
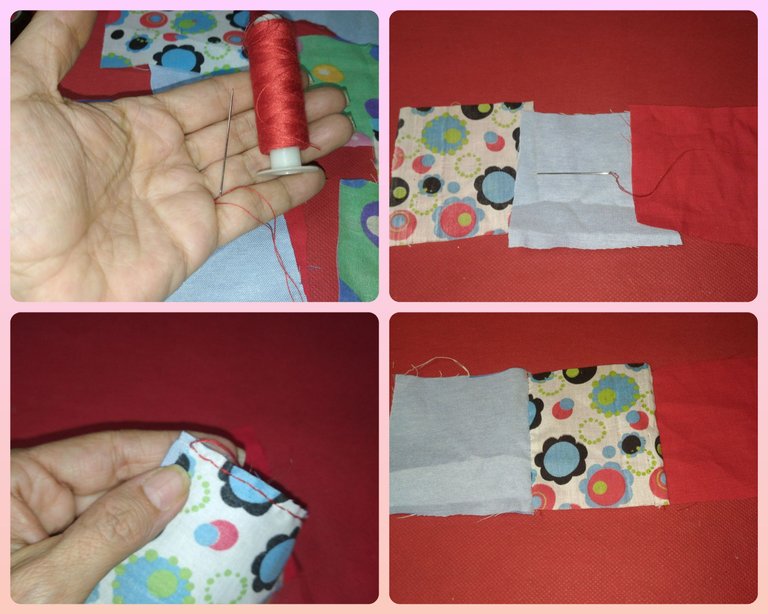
Step #2
Once the squares were cut out, I began to combine them and sew them three by three, taking into account the dimensions of the mitten pattern.
Paso #2
Una vez con los cuadros recortados, comencé a combinarlos y a coserlos de tres en tres, tomando en cuenta las dimensiones del patrón de la manopla.
Step #3
Once the sets of three pieces were ready, I made combinations and joined them with the help of pins to then sew them.
Paso #3
Listos ya los juegos de tres piezas, realicé combinaciones y las uní con la ayuda de los alfileres para luego coserlos.
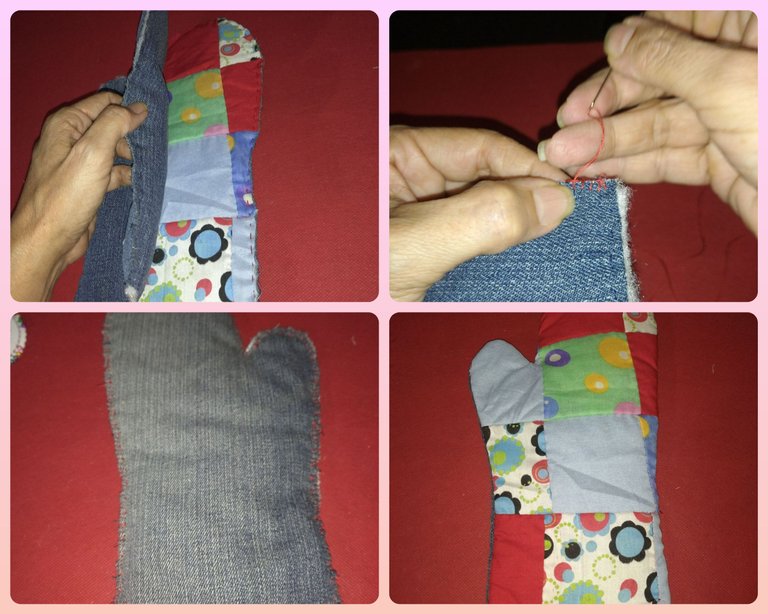
Step #4
Once the patchwork piece was made, I proceeded to remove the mold from the mitten with the help of the pattern. For this step I used the pins to hold the pattern with the layers of fabric to be used and the wadding.
Paso #4
Una vez realizada la pieza de patchwork, procedí a sacar el molde de la manopla con la ayuda del patrón. Para este paso utilicé los alfileres para sujetar el patron con las capas de tela a utilizar y la guata.
Step #5
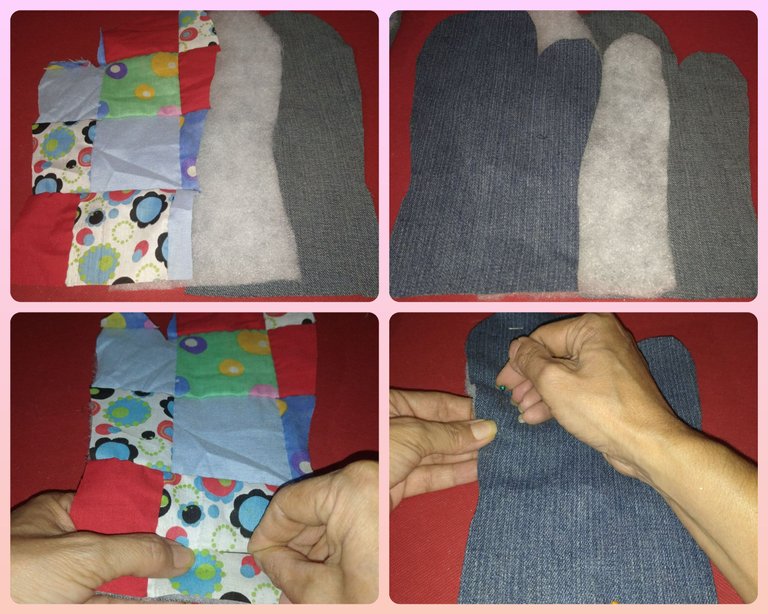
To further strengthen the mitten I used the denim fabric to create a beautiful heat resistant front face. In the same way, I cut the wadding for the filling. Also for the back of the mitten, I used denim fabric and made two identical pieces to fill with batting.
Paso #5
Para reforzar aún más la manopla utilicé la tela de jeans para crear una cara frontal hermosa y resistente al calor. De igual manera, realicé el corte de la guata para el relleno. También para la parte trasera de la manopla, utilicé tela de jeans e hice dos piezas idénticas para rellenarlas con guata.
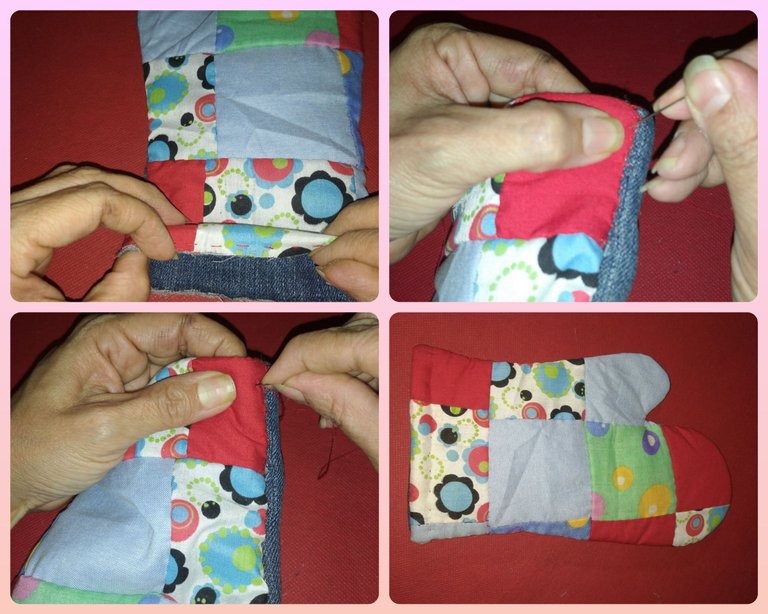
Step #6
When I had the two sets or pieces assembled, that is, a layer of fabric with wadding and jeans and a double piece of jeans and wadding, I sewed them to form two pieces of the same dimension and size.
Paso #6
Cuando tuve los dos juegos o piezas armadas, es decir, capa de tela con guata y jeans y doble pieza de jeans y guata, las cosí para formar dos piezas de igual dimensión y tamaño.
Step #7
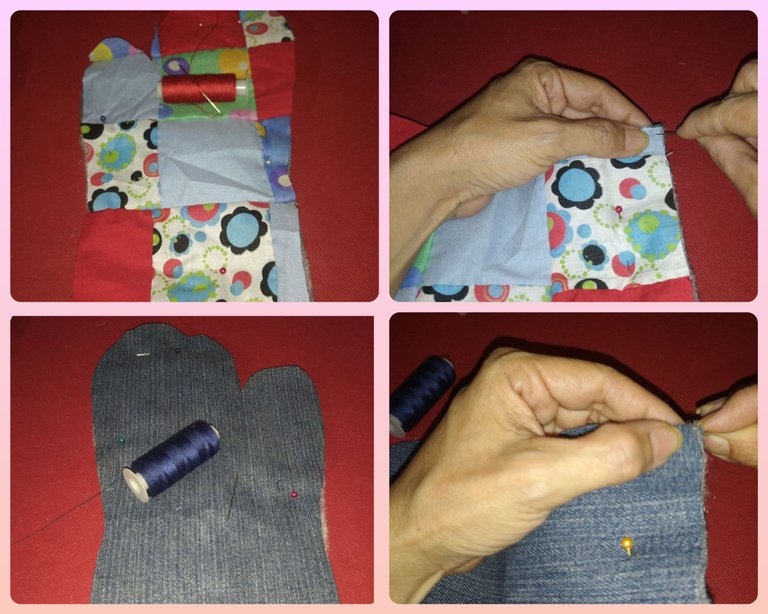
Both pieces are joined, ensuring that the part that has patchwork is inside the other jeans. We sew with a resistant seam, such as the buttonhole stitch, making short stitches so that it does not break when turning it. We finish off and very carefully turn it back to its original shape.
Paso #7
Se unen ambas piezas, procurando que la parte que tiene patchwork quede dentro de la otra de jeans. Cosemos con una costura resistente, como por ejemplo el punto ojal, realizando puntadas cortas para que no se rompa al voltearla. Rematamos y con mucho cuidado volteamos a su forma original.
Step #8
Finally we make a ring to close the glove and finish off the mitten.
Paso #8
Por último realizamos un ruedo para cerrar el guante y darle punto final a la manopla.
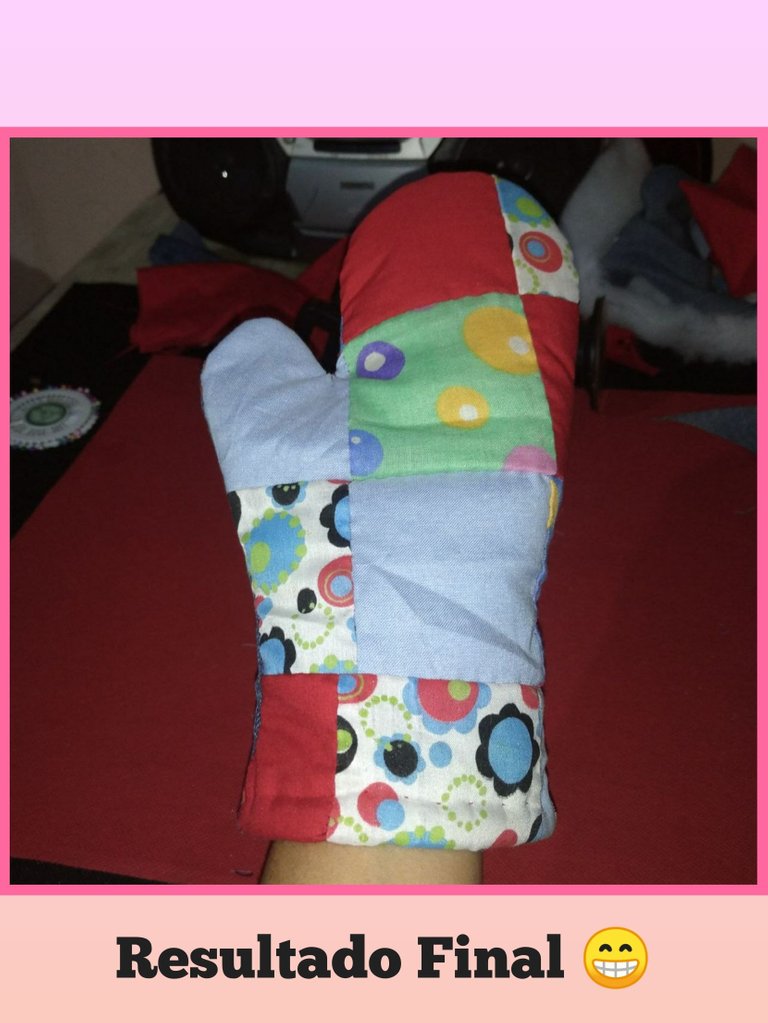
FINISHED PROJECT
Although it does not require much work to make a piece using the patchwork technique, the combination of fabrics, textures and colors plays an important role in the final result. I had a lot of fun creating this mitten and the best thing is that it will be very useful when cooking. I invite my friends @vicmito74 and @agathalara to show us how and what other garments we could make with this technique. See you next time.
PROYECTO FINALIZADO
Si bien para realizar una pieza utilizando la técnica de patchwork no requiere un ran trabajo, la combinación de telas, texturas y colores juega un papel importante para el resultado final. Me divertí mucho creando esta manopla y lo mejor es que e será de gran utilidad a la hora de cocinar. Invito a mis amigas @vicmito74 y @agathalara a mostrarnos cómo y qué otras prendas podríamos elaborar con esta técnica. Nos vemos en la próxima.
Hola 🙋
Me alegra que te hayas animado a participar.
Ese guante te quedó genial. Muy lindo, colorido y te será útil.
Gracias por compartir el paso a paso.
Saludos.
Hola @linita que bonita y útil manualidad, es verdad lo que dices, que estamos en la misma onda jajaja. Suerte en el concurso 🌸💮🌹
Hola amiga @linita, maravillosa idea, me encanto el resultado final al igual que los estampados de las telas y la combinación de los colores están espectacular 😊 ¡Éxitos en el concurso amiga y saludos! 💓 💕 💜
Hola,muchas gracias 😁
Tengo en casa un par de guantes así que se me quemaron porque la tela de la que estaban hecho no era la adecuada para el tipo de guante. Era un material que se ponía muy feo al contacto con el calor. Después le pregunté a mi mamá por qué pasaba esto y me dijo que esos guantes eran de adorno, no para usarlos en realidad jajaja...
A veces uno compra cosas que cree que podrá usar para ciertas labores y resulta que no... En fin, un guante bastante interesante el que nos comparte acá, creo que este sí podrá usarlo sin miedo a que se dañe, como el mío jeje..
Gracias por compartir su trabajo con nosotros, éxitos en el concurso.
Hola @gaboamc2393, sin duda podrías usarlo sin temor, como sabemos el jeans es una tela muy resistente y gruesa antiabrasión jejejeje. Saludos.
Que bien¡¡ excelente idea para reutilizar los recortes de tela. Felicitaciones amiga y Bendecido día👏👏🤩
Hola, me alegro que et haya gustado. Saludos.
Hola, que bonito trabajo realizaste y aun mas porque encontraste la manera de utilizar esta técnica en algo que te va a ser de mucha ayuda en la cocina.
The rewards earned on this comment will go directly to the people sharing the post on Twitter as long as they are registered with @poshtoken. Sign up at https://hiveposh.com.
¡Felicidades! Esta publicación obtuvo upvote y fue compartido por @la-colmena, un proyecto de Curación Manual para la comunidad hispana de Hive que cuenta con el respaldo de @curie.
Si te gusta el trabajo que hacemos, te invitamos a darle tu voto a este comentario y a votar como testigo por Curie.
Si quieres saber más sobre nuestro proyecto, acompáñanos en Discord: La Colmena.
Your content has been voted as a part of Encouragement program. Keep up the good work!
Use Ecency daily to boost your growth on platform!
Support Ecency
Vote for new Proposal
Delegate HP and earn more