BIENVENIDOS A MI BLOG
Cuando realizo proyectos, tanto para mi hogar como para cualquier actividad que realice, lo primero que pienso es qué voy a necesitar y cuántas cosas puedo hacer sin tener que ir a algún establecimiento y gastar por algo que puedo hacer con mis manos. Desde siempre he sido algo así como pichirre, dijeran mis hermanas, pero yo considero que si es algo que no es complicado y no requiere de tanto esfuerzo, porqué no hacerlo.
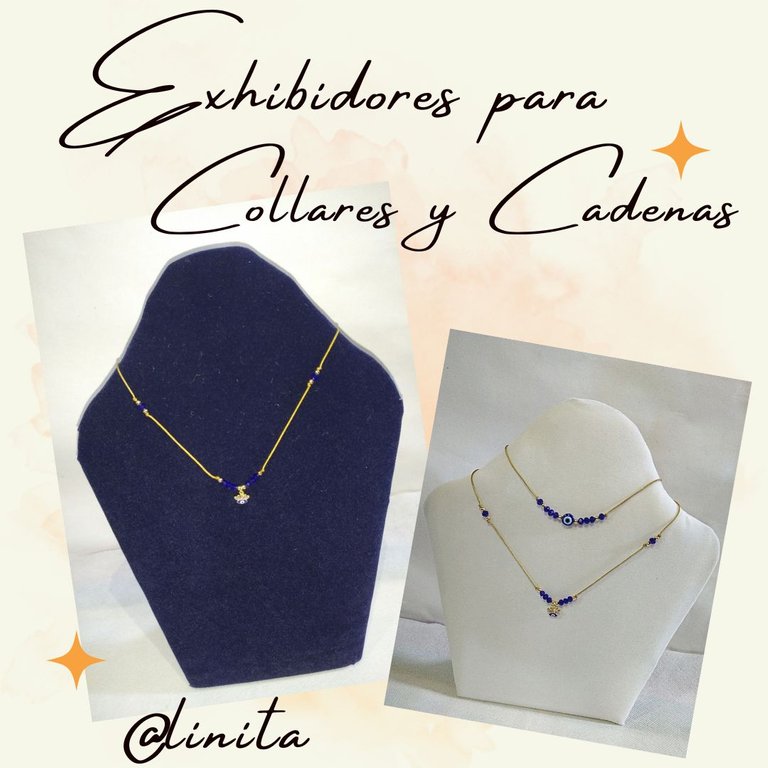
Este es el caso de estos exhibidores. En estos días he estado elaborando algunas piezas de bisutería y no tengo como hacer las fotos para que se vean bonitas y llamativas. Estuve visitando algunas tiendas donde venden estos exhibidores y tienen un costo de 6$ a 8$. Entonces le dije, eso es algo muy sencillo de realizar, así que veamos que necesito. Pedí uno para ver el material del que estaba hecho y listo. Todos los tenía en casa, incluyendo las telas de gamuza de unos vestidos que tenía en el closet llenos de peluza y polvo. Me tocó hacer limpieza pero no me importó con tal de ganar la experiencia haciéndolos y quien quita ganar algo de dinero extra si alguien quiere uno.
Así que aquí les explicaré como los hice paso a paso, con material reciclaje. Comencemos.
WELCOME TO MY BLOG
When I carry out projects, both for my home and for any activity I carry out, the first thing I think about is what I am going to need and how many things I can do without having to go to a store and spend money for something I can do with my hands. I have always been something like a pichirre, my sisters would say, but I consider that if it is something that is not complicated and does not require so much effort, why not do it.
This is the case with these displays. These days I have been making some pieces of jewelry and I don't have how to take the photos to make them look pretty and striking. I've been visiting some stores where they sell these displays and they cost $6 to $8. So I told him, that is something very simple to do, so let's see what I need. I ordered one to see the material it was made of and voila. I had all of them at home, including the suede fabrics of some dresses that I had in the closet full of lint and dust. I had to do the cleaning but I didn't care as long as I gained the experience doing them and who takes away earning some extra money if someone wants one.
So here I will explain how I made them step by step, with recycled material. Let's start.
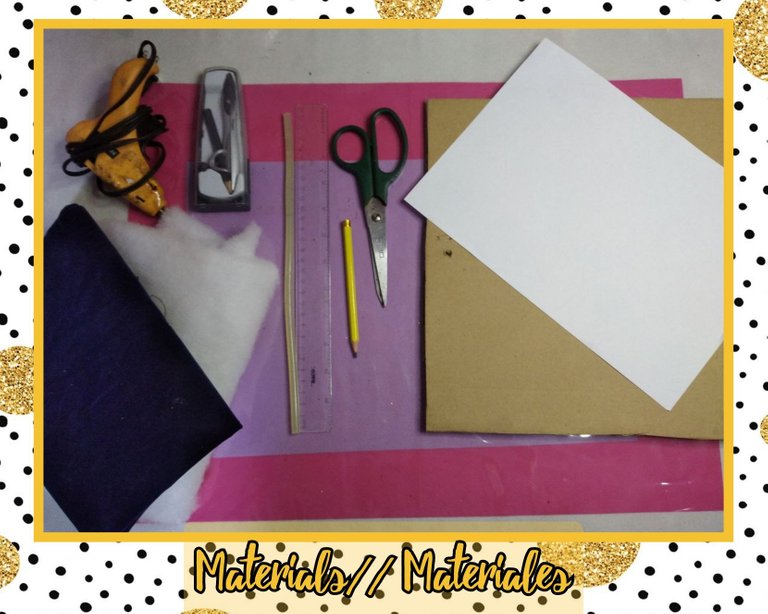
MATERIALES
- Caja de cartón (Utilicé una caja de pizza)
- Tela de gamuza (vestido deshecho)
- Guata o relleno.
- Pistola de silicón con barra
- Tijera
- 1 hoja de papel tamaño carta
- Lápiz y regla
- Compás
MATERIALS
- Cardboard box (I used a pizza box)
- Suede fabric (undone dress)
- Wadding or stuffing.
- Silicone gun with bar
- Scissors
- 1 sheet of letter size paper
- Pencil and ruler
- Compass
PASO A PASO
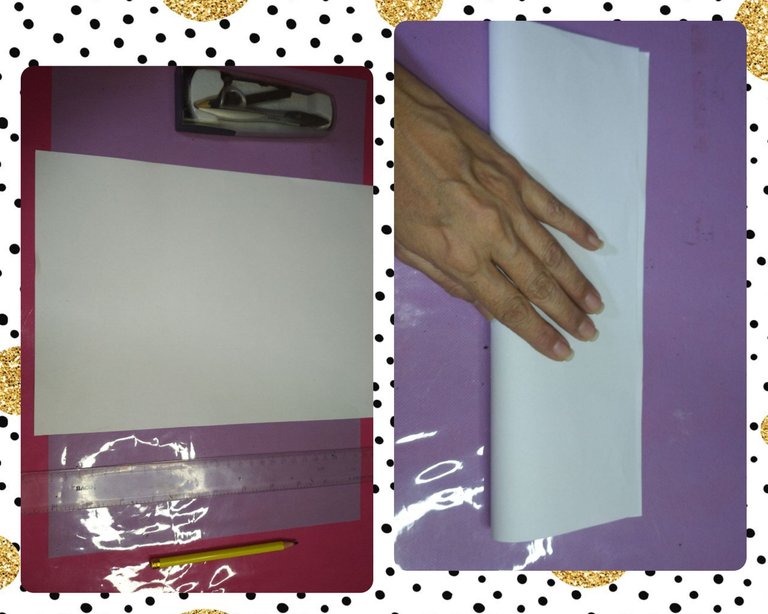
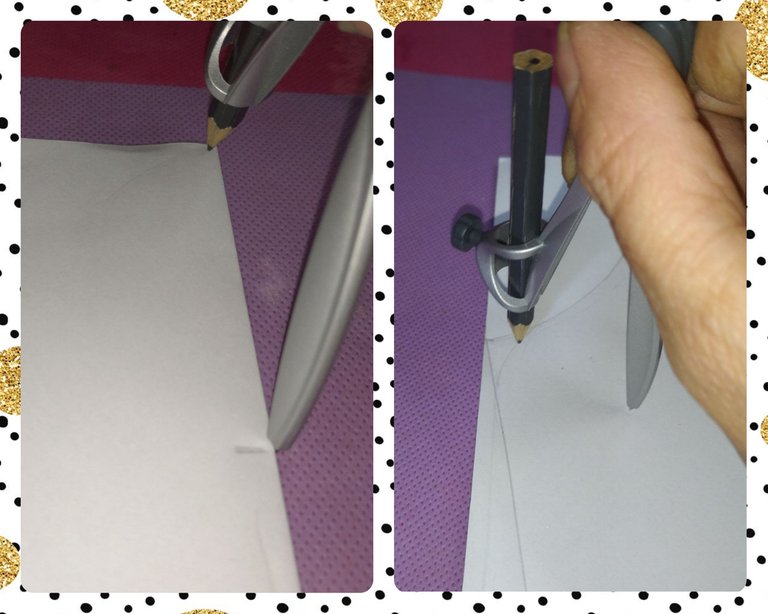
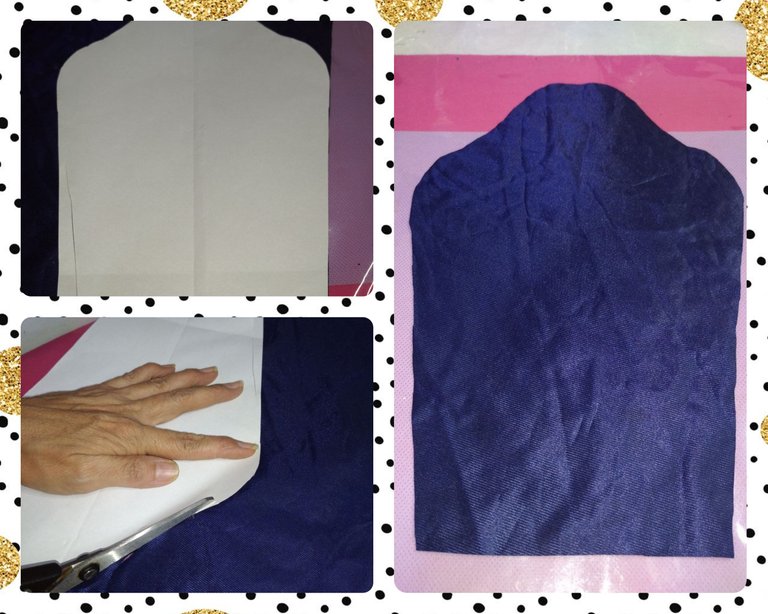
Comenzamos realizando el patrón del busto. Para ésto utilizamos la hoja tamaño, el lápiz, la regla, el compás y la tijera.
- Primeramente doblamos la hoja de forma vertical.
STEP BY STEP
We start by making the bust pattern. For this we use the size sheet, the pencil, the ruler, the compass and the scissors.
- First we fold the sheet vertically.
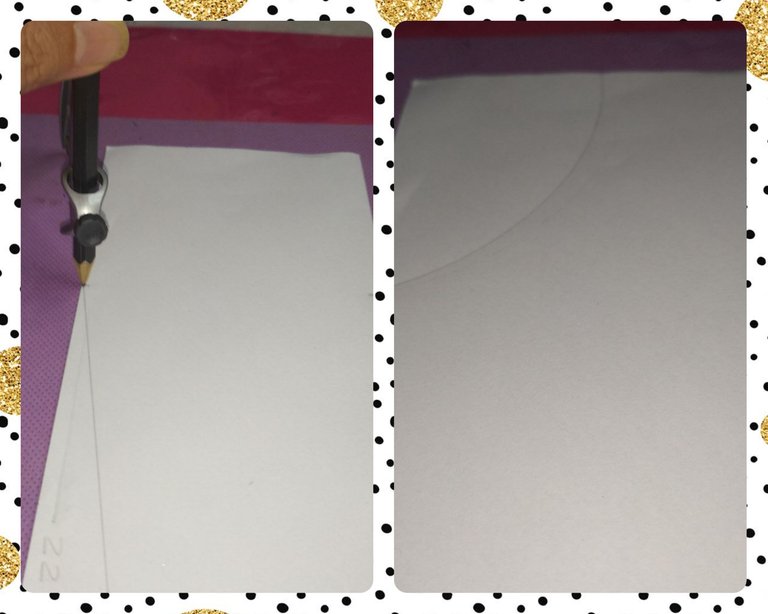
Trazamos 22 cm del lado donde tenemos la abertura de la página y en la parte mas angosta 6 cm a partir del doblez.
We draw a perpendicular line from the upper 6 cm mark to the lower 22 cm mark, taking as a guide the part where the page opens, as shown in the image.

Trazamos una línea perpendicular desde la marca superior de 6 cm hasta la inferior de 22 cm, tomando como guía la parte donde abre la página, como se muestra en la imagen.
We draw a perpendicular line from the upper 6 cm mark to the lower 22 cm mark, taking as a guide the part where the page opens, as shown in the image.

Ahora con el compás realizamos un semicírculo para darle forma a lo que sería el cuello del busto. Esto es a consideración de la profundidad que quieras. Lo haremos tomando como guía la esquina inferior del trazado donde realizamos la marca de los 22 cm.
Now with the compass we make a semicircle to shape what would be the neck of the bust. This is in consideration of the depth you want. We will do it taking as a guide the lower corner of the path where we make the 22 cm mark.
Del otro lado realizamos otro semicírculo partiendo del la marca de los 22 cm hacia la esquina superior. Esto es del lado contrario donde realizamos la parte del cuello.
Luego realizamos un semicírculo más pequeño en la esquina donde termina el cuello para darle la forma del hombro.
On the other side we make another semicircle starting from the 22 cm mark towards the upper corner. This is from the opposite side where we made the neck part.
Then we make a smaller semicircle in the corner where the neck ends to give it the shape of the shoulder.
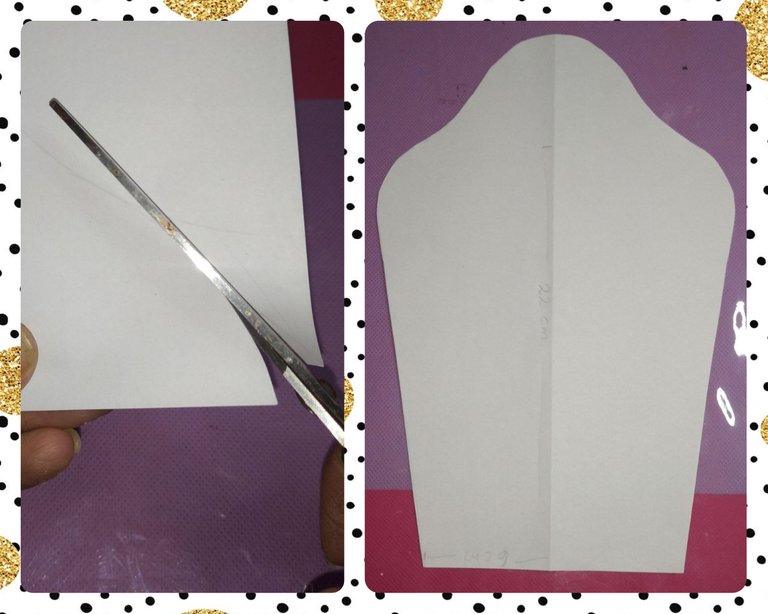
Recortamos para darle la silueta de busto y ya esta listo nuestro patrón.
We cut to give the bust silhouette and our pattern is ready.
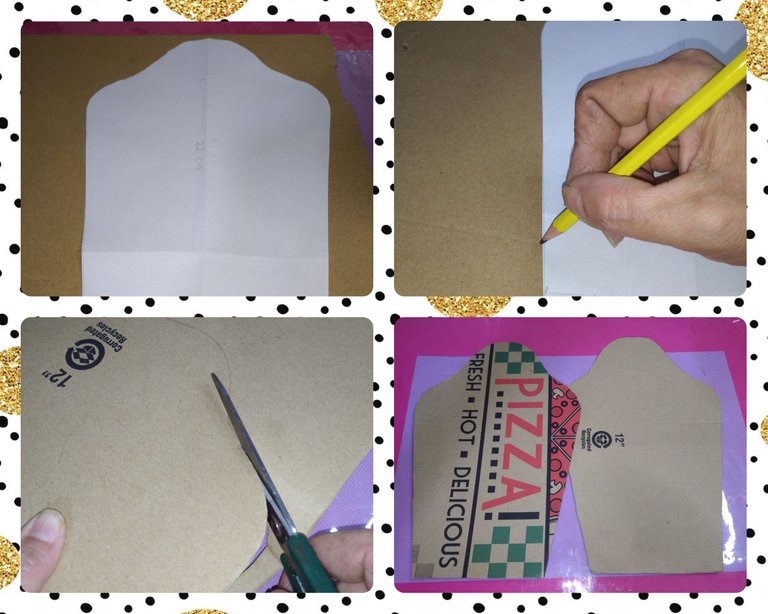
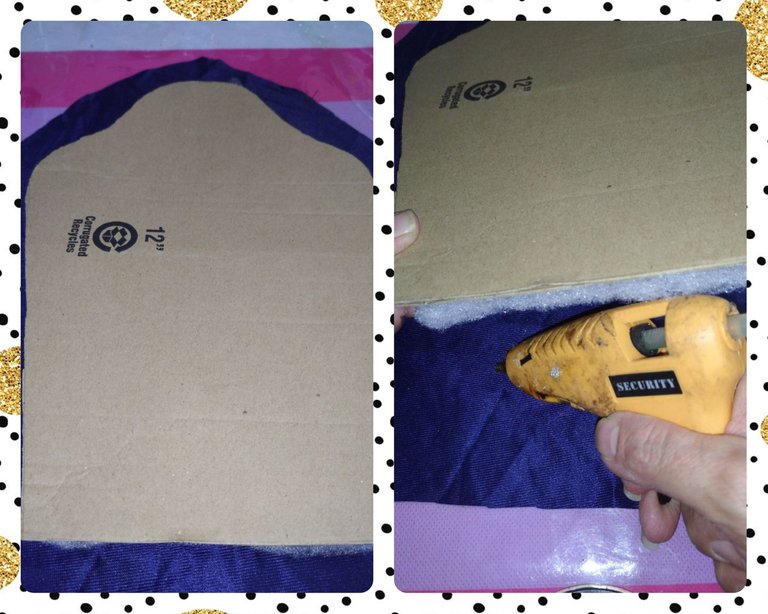
- Tomamos el patrón y marcamos en la caja de cartón para sacar dos piezas igual, también podemos realizar una sola pero si queremos un exhibidor firme y fuerte mejor hacerlo con el cartón doble.
- Recortamos ambas piezas.
- We take the pattern and mark on the cardboard box to get two equal pieces, we can also make a single one but if we want a firm and strong display, it is better to do it with double cardboard.
- We cut both pieces.
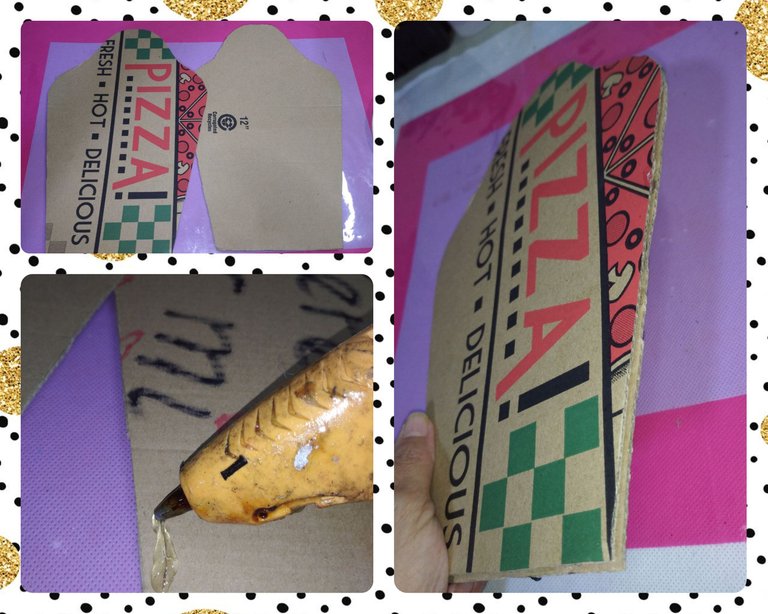
Unimos las dos piezas con silicón, utilizando la pistola previamente conectada a la corriente. lo hacemos de forma rápida antes que se enfríe.
We join the two pieces with silicone, using the gun previously connected to the current. we do it quickly before it gets cold.
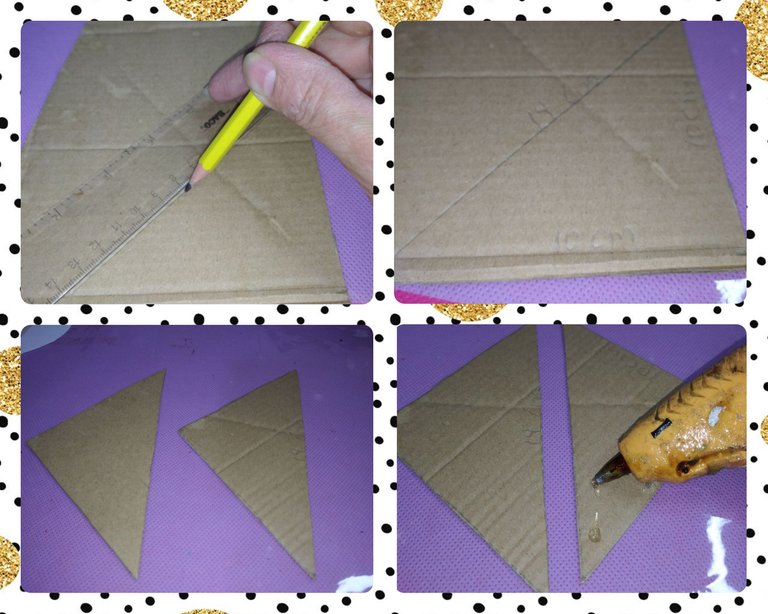
Realizamos dos triángulos de 14 cm x 10 cm x 10 cm y unimos con silicón. Esto nos servirá para realizar la base del busto. Dependiendo de la inclinación que queramos darle, vamos realizando cortes en uno de los extremos más corto hasta alcanzar la inclinación deseada.
We make two triangles of 14 cm x 10 cm x 10 cm and join them with silicone. This will help us to make the base of the bust. Depending on the inclination that we want to give it, we make cuts in one of the shorter ends until reaching the desired inclination.
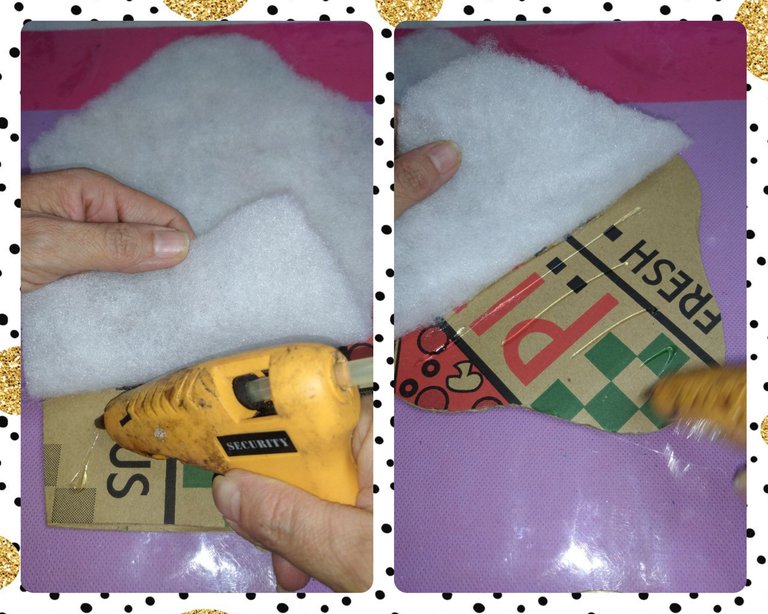
Tomamos el patrón y realizamos una pieza al ras con la guata o relleno, si la quieres muy esponjosa puedes doblar la cantidad de guata.
We take the pattern and make a piece flush with the wadding or filling, if you want it very fluffy you can double the amount of wadding.
Pegamos la guata a la silueta con silicón. No es necesario echar gran cantidad, sólo es para fijarla y evitar que se mueva.
We stick the wadding to the silhouette with silicone. It is not necessary to pour a large amount, it is only to fix it and prevent it from moving.
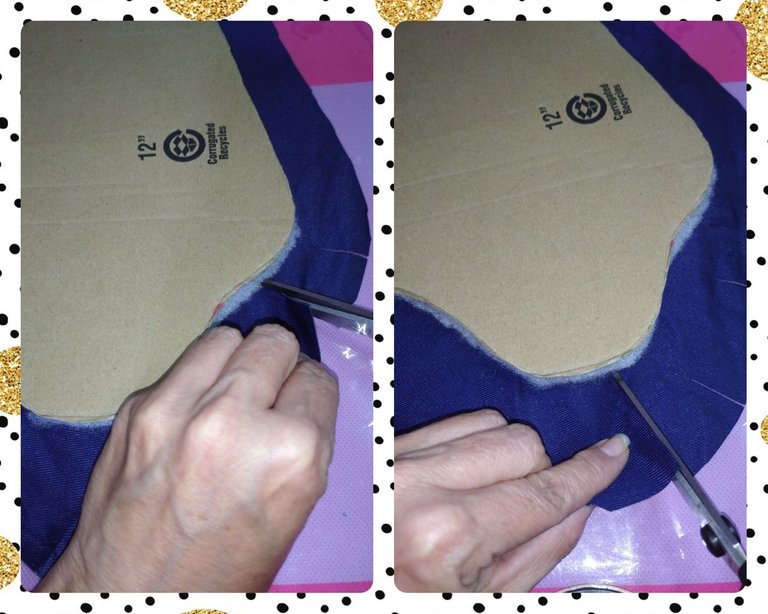
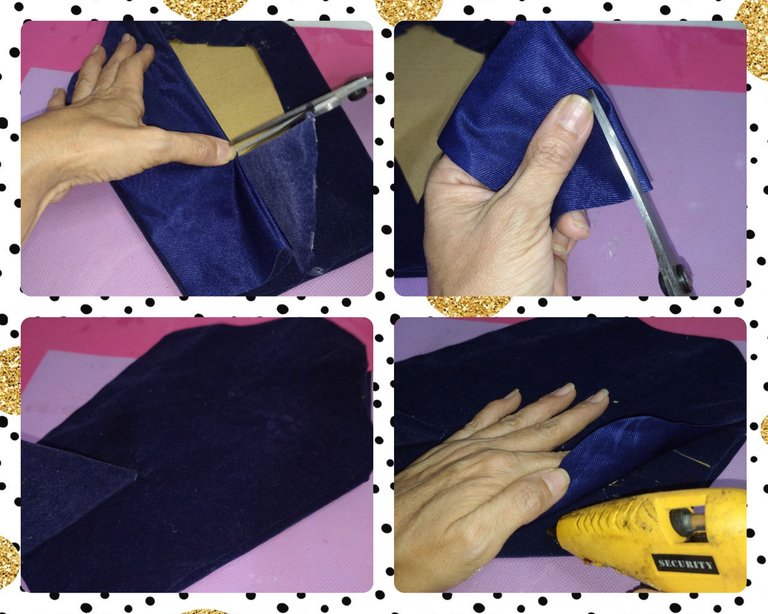
Cortaremos la tela de gamuza con la que forraremos el exhibidor. En esta parte tenemos que ser muy cuidadosos porque no la cortaremos al ras, debemos dejar 3 cm de distancia aproximadamente y daremos la forma del busto.
We will cut the suede fabric with which we will line the display. In this part we have to be very careful because we will not cut it flush, we must leave approximately 3 cm of distance and we will give the shape of the bust.

Colocamos la tela con la parte gamuzada hacia abajo y colocamos el cartón con guata de igual forma, con la parte del relleno hacia abajo.
Una vez ubicada en el centro, fijamos con puntos no muy gruesos de silicón.
Place the fabric with the suede side down and place the cardboard with wadding in the same way, with the stuffing side down.
Once located in the center, we fix with not very thick points of silicone.
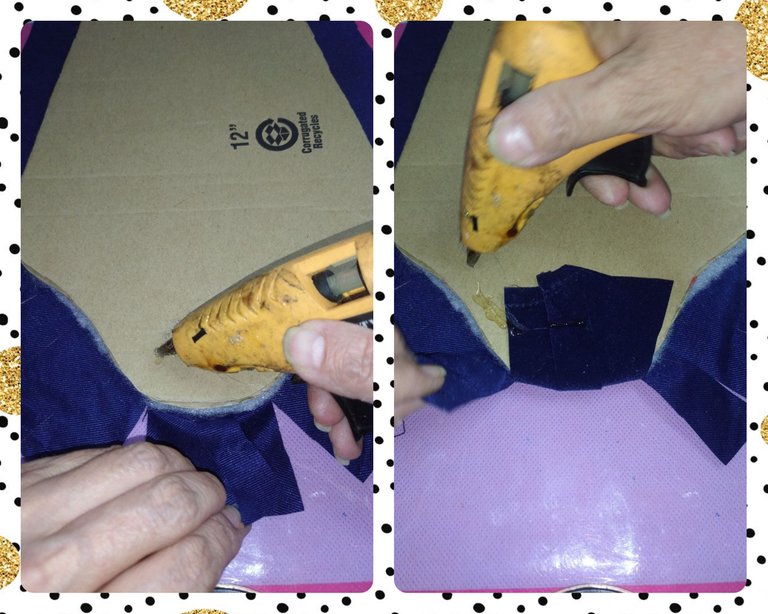
En esta parte comenzaremos a darle forma al busto con la tela. para evitar que se nos amontone la tela y se vea feo, debemos realizar corte de 2 cm aproximadamente en la curva del busto, es decir, en la zona que simula cuello y hombros.
In this part we will begin to shape the bust with the fabric. To prevent the fabric from piling up and looking ugly, we must make a cut of approximately 2 cm in the curve of the bust, that is, in the area that simulates the neck and shoulders.
Comenzamos a pegar cada pliegue cortado realizando estiramiento con poco de presión para evitar de se vea el corte e igualmente no se amontone.
We begin to glue each cut fold stretching with a little pressure to avoid seeing the cut and also not to pile it up.
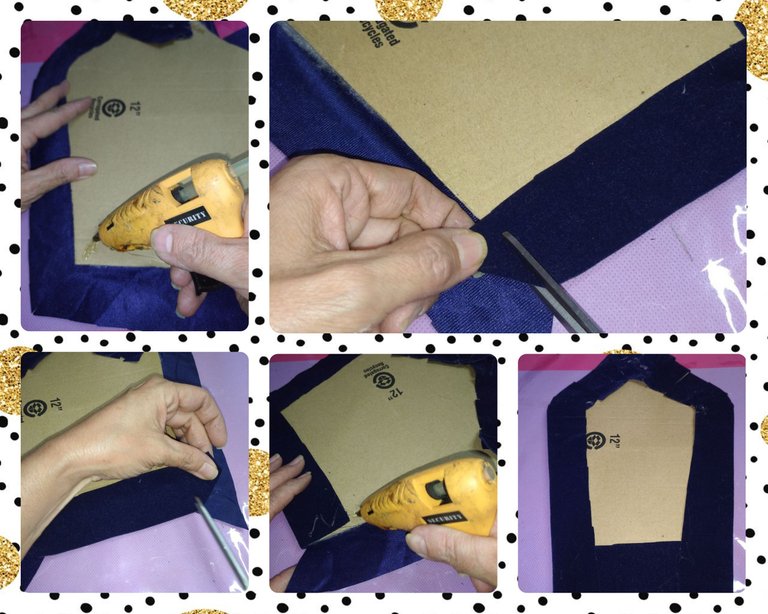
Cuando hayamos pegado la parte superior procedemos a pegar la inferior. Doblamos la tela y pegamos con silicón. Luego realizamos un corte a la altura del cartón para que n se vea excesivo al montar el otro pliegue.
Pegamos los bordes de los laterales y eliminamos el exceso de tela para terminar la parte delantera del busto.
When we have glued the upper part, we proceed to glue the lower part. We fold the fabric and glue with silicone. Then we make a cut at the height of the cardboard so that it does not look excessive when mounting the other fold.
We glue the edges of the sides and eliminate the excess fabric to finish the front part of the bust.
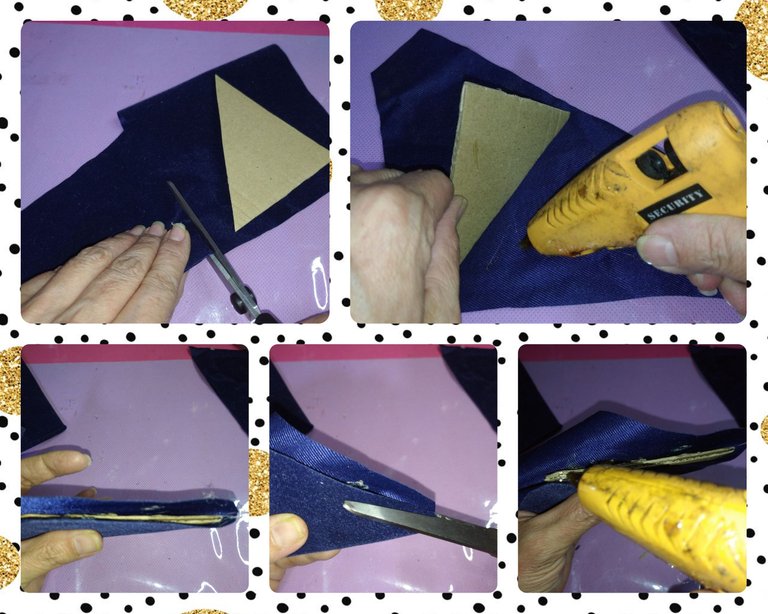
Ahora procedemos a forrar la base. Ya en este paso debemos haber cortado el triángulo para darle la inclinación que queremos que tenga el busto. Cortamos un trozo de tela que cubra el triángulo y sobre 4 cm aproximadamente de tela. Luego vamos a cortar el exceso de tela para forrar la parte que irá al piso la cual pegaremos con silicon.
Fijamos en el centro de la parte inferior del busto con silicón y una vez firme terminamos de pegar el resto de la tela que servirá de soporte.
Now we proceed to line the base. Already in this step we must have cut the triangle to give it the inclination that we want the bust to have. We cut a piece of fabric that covers the triangle and about 4 cm of fabric. Then we are going to cut the excess fabric to cover the part that will go to the floor which we will glue with silicone.
We fix in the center of the lower part of the bust with silicone and once firm we finish gluing the rest of the fabric that will serve as support.

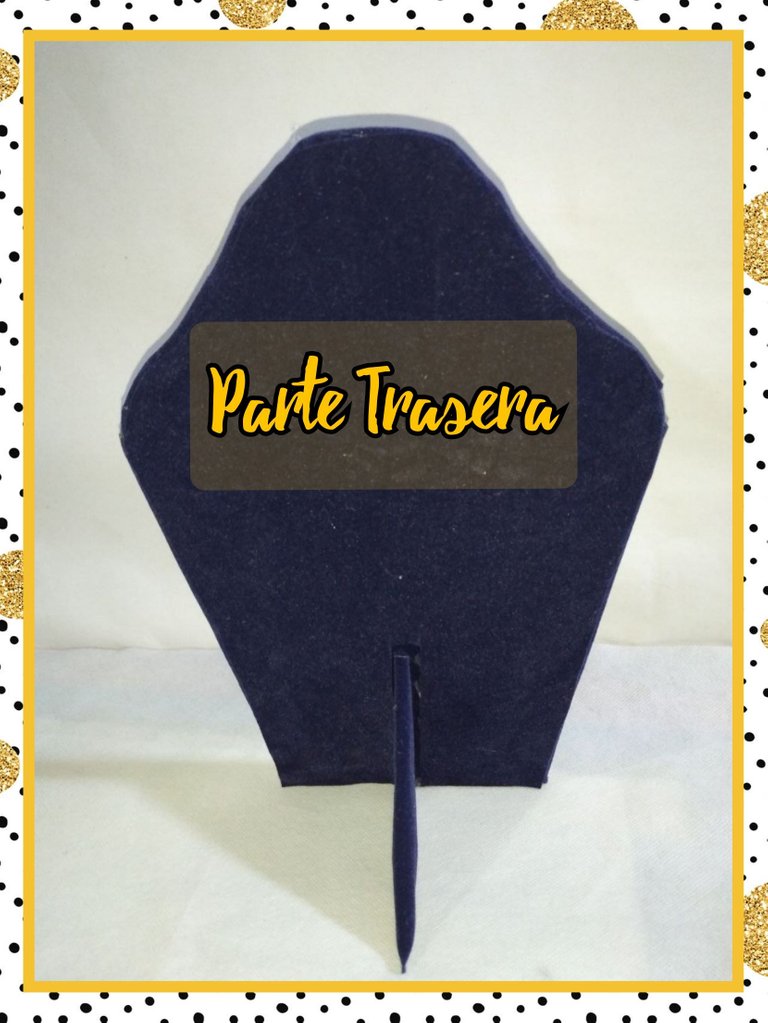
Hacemos otra pieza con la silueta del busto al ras con la tela gamuzada para realizar la parte trasera. Esta parte la podemos sustituir con otro tipo de tela en caso de no querer gastar la gamuza.
We make another piece with the bust silhouette flush with the suede fabric to make the back. This part can be replaced with another type of fabric in case you do not want to spend the chamois.
- La colocamos a la mitad para medir la altura de la base y realizamos una marca corte de 0,20 cm aproximadamente. Luego realizamos un corte a lo largo de la tela tomando como guía el corte de 0,20 cm anterior.
- La colocamos sobre la parte trasera y pegamos con el silicón para finalizar nuestro busto.
- We place it in the middle to measure the height of the base and make a cut mark of approximately 0.20 cm. Then we make a cut along the fabric using the previous 0.20 cm cut as a guide.
- We place it on the back and paste with the silicone to finish our bust.
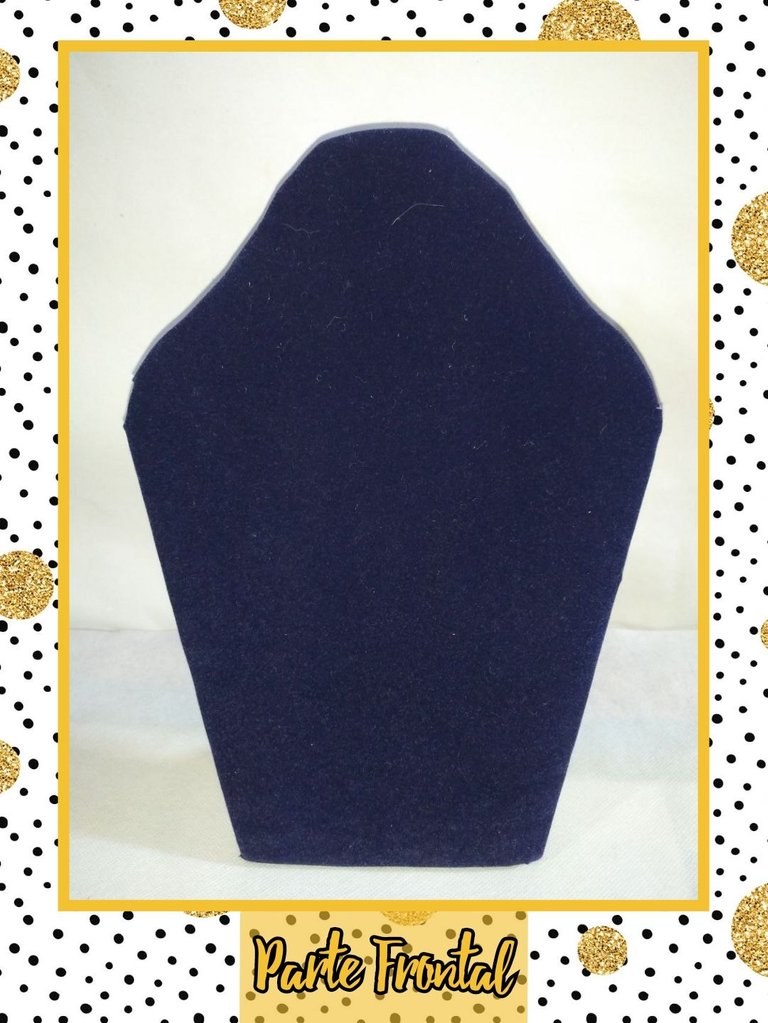
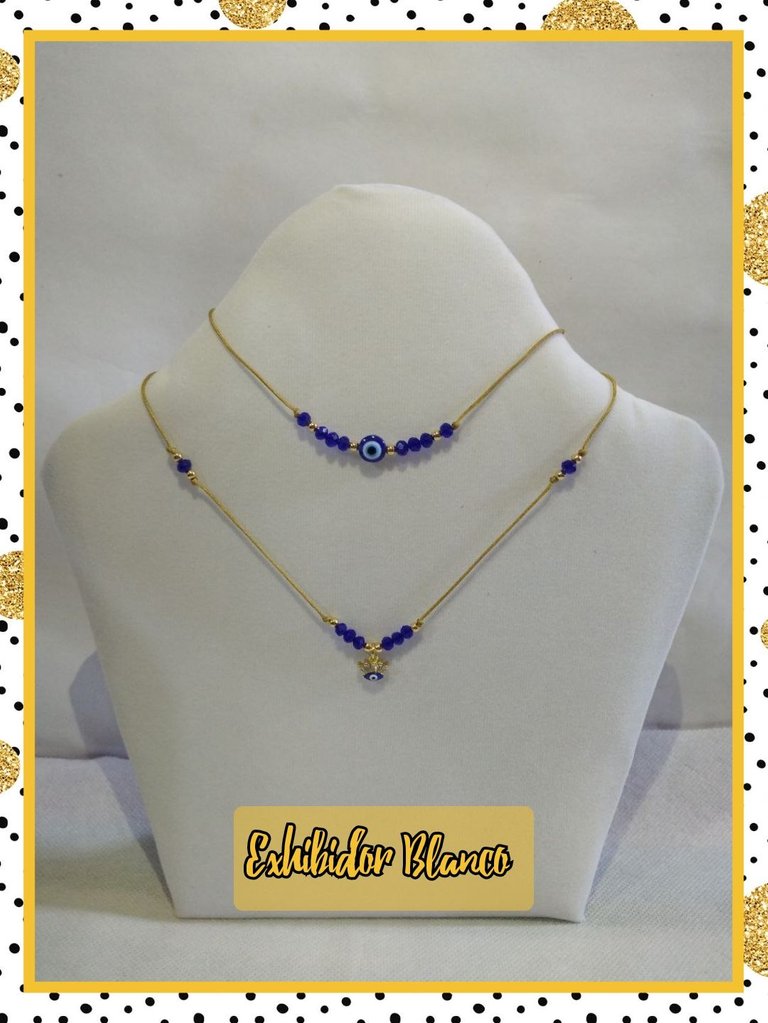
Así quedó mi exhibidor y para rematar con broche de oro realicé uno en blanco para resaltar aquellas piezas que sean oscuras. Es fácil y sencillo realizar estos exhibidores y lo mejor es que estamos ahorrando algo de dinero que podemos usar para comprar otras cosas que en realidad se nos sea imposible hacer. Espero que te haya gustado. Nos vemos en la próxima.
This is how my exhibitor turned out and to finish off with a flourish I made a blank one to highlight those pieces that are dark. It is easy and simple to make these displays and the best thing is that we are saving some money that we can use to buy other things that we are actually unable to do. I hope you liked it. See you next time.


Excelente idea!! Muy útil 😍
Excelente proyecto me encantó, sobre todo por la tela reciclada que utilizaste, le diste un gran uso.
Saludos 🤗🤗
Si jajajaja, esos vestidos eran de la época de María Castaña, así que ahora me han sido de gran utilidad. Gracias por comentar 😁
Bueno sí eran tan viejos, eso explica lo bien que se ve la tela, porque antes las telas como que eran más resistentes y duraderas. Tu proyecto se ve de calidad, no parece que fuese hecho con telas recicladas.
Es excelente Para apoyar los emprendimientos de bisutería, para exponer sus trabajos se ve muy bien...
Felicitaciones amiga 🤗🤗
Al fin pude ver todo el contenido 🙏
Hola @linita te felicito, los exhibidores se ven geniales, elegantes y muy bien realizados. Me da gusto saber que reciclando obtuviste estos maravillosos objetos que te serán de mucha utilidad.
Trataré de hacer unos para mí ya que el paso a paso está muy bien detallado. Gracias por compartir. 🤗🙋🌷👏🥳❤️🐝🙏
Hola amiga que buena idea, mucha creatividad vaya me encantó este post ya que se puede realizar para exhibir nuestros collares. Éxito amiga un gusto leerte.
Wuao nunca pense que seria relativamente facil, en el sentido de que se necesitan pocos material para realizar un exhibidor de collares. Realmente siento que es muy util ya que resalta la forma del collar y a su vez se ve la caida de ciertas piedras o dijes.
Wuao I never thought it would be relatively easy, in the sense that you only need a few materials to make a necklace display. I really feel that it is very useful because it highlights the shape of the necklace and at the same time it shows the fall of certain stones or charms.
The rewards earned on this comment will go directly to the people sharing the post on Twitter as long as they are registered with @poshtoken. Sign up at https://hiveposh.com.
Que práctico...