
BIENVENIDOS A MI BLOG
¡Holaaaa, holaaaaa! Amigos de creativos y creadores de Hive Diy. Desde hace tiempo he querido realizar este tipo de bolsitas pero además de tiempo y paciencia , se requiere de materiales que aún no poseo. Sin embargo, traté de ingeniármelas con los que tengo en casa.
Quise sorprender a mi hija menor para su cumpleaños #21. Ella es muy detallista con las personas que aprecia y prepara cajas personalizadas con pequeños detalles para dárselos en ocasiones especiales. Así que yo también quise retribuirle el gesto realizando todo desde la bolsa hasta el motivo para personalizarla.
WELCOME TO MY BLOG
Hellooooo, hellooooooo! Friends of creatives and Hive Diy creators. For a long time I have wanted to make this type of bags but in addition to time and patience, it requires materials that I do not yet possess. However, I tried to make do with the ones I have at home.
I wanted to surprise my youngest daughter for her 21st birthday. She is very detail-oriented with the people she appreciates and prepares personalized boxes with small details to give them on special occasions. So I also wanted to repay her gesture by making everything from the bag to the reason to personalize it.
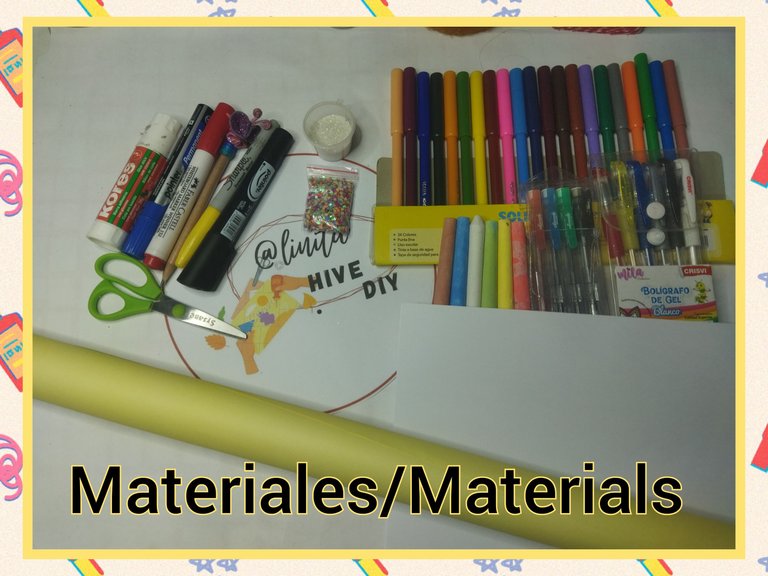
MATERIALES
- Pliego de papel bond amarillo
- Hoja de papel bond blanca
- Lápiz de grafito
- Borrador
- Marcadores de colores, punta fina
- Marcadores punta redonda
- Marcadores fluorescentes
- Lapiceros escarchados
- Lapicero de gel
- Gel escarchado
- Tizas de colores
- Tijera
- Pega en barra
MATERIALS
- Sheet of yellow bond paper
- Sheet of white bond paper
- Graphite pencil
- Draft
- Colored markers, fine tip
- Round tip markers
- Fluorescent markers
- Frosted pencils
- Gel pen
- Frosted gel
- Colored chalks
- Scissors
- Paste on a stick
PASO A PASO // STEP BY STEP
CÓMO HACER LA BOLSA
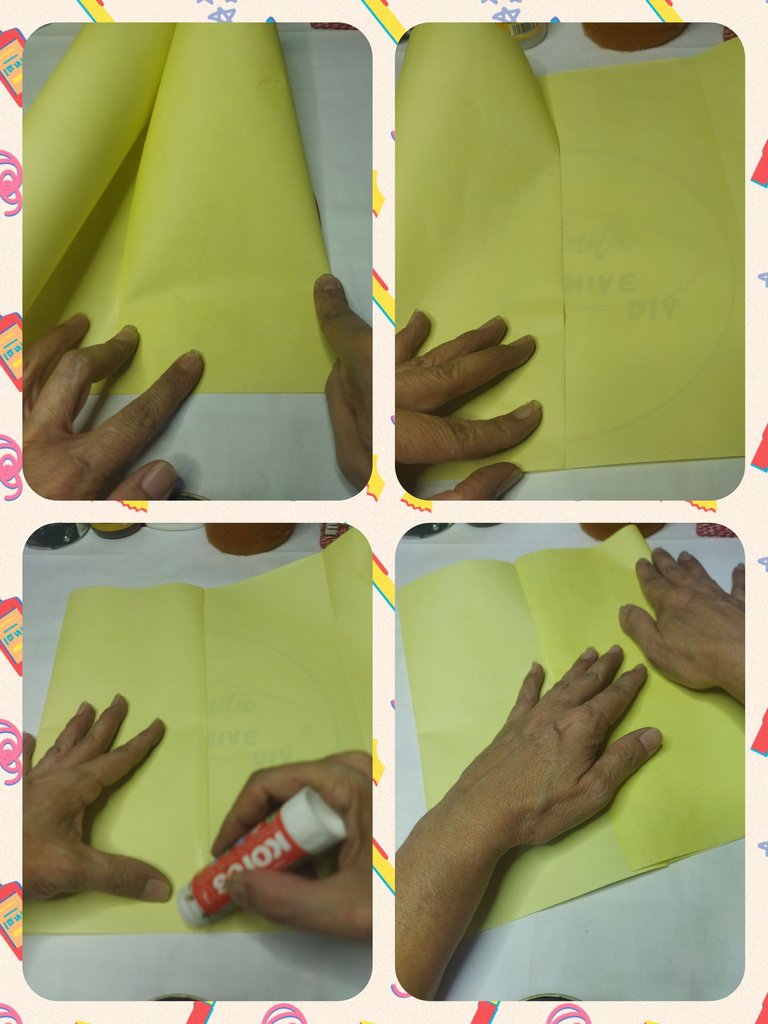
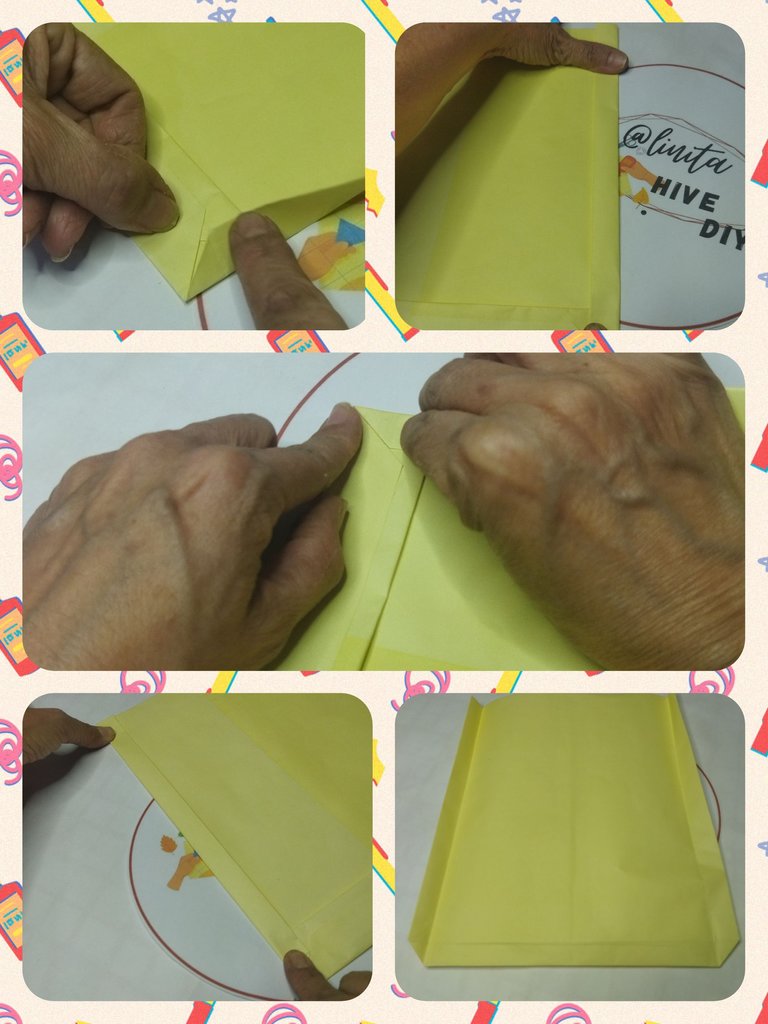
Para realizar la bolsa vamos a utilizar el pliego de papel bond amarillo. La medida va a depender del tamaño que la necesitemos. Esta bolsa será tamaño mediana.
Tomamos la regla y marcamos 30 cm x 50 cm y cortamos.
HOW TO MAKE THE BAG
To make the bag we are going to use the sheet of yellow bond paper. The measurement will depend on the size we need it. This bag will be size medium.
We take the ruler and mark 30 cm x 50 cm and cut.

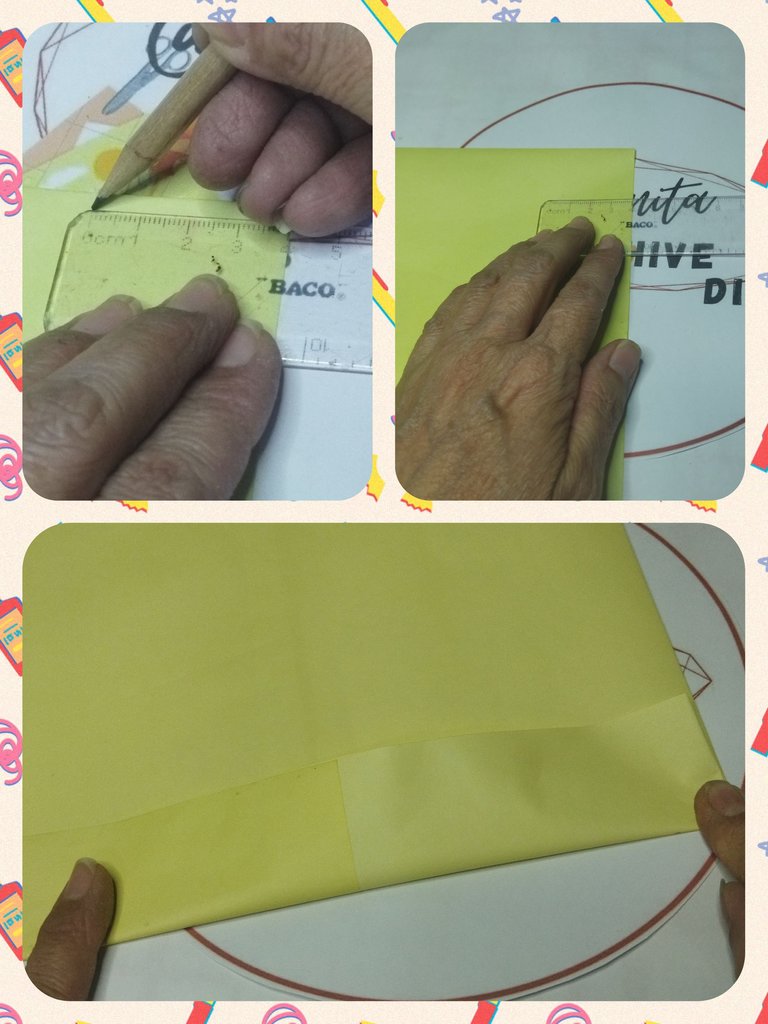
Doblamos a la mitad, tomando en cuenta el largo del papel.
We fold in half, taking into account the length of the paper.

Una vez marcado del centro tomamos el ala derecha y llevamos hasta la marca del doblez, sobrepasando la marcada por 1 cm.
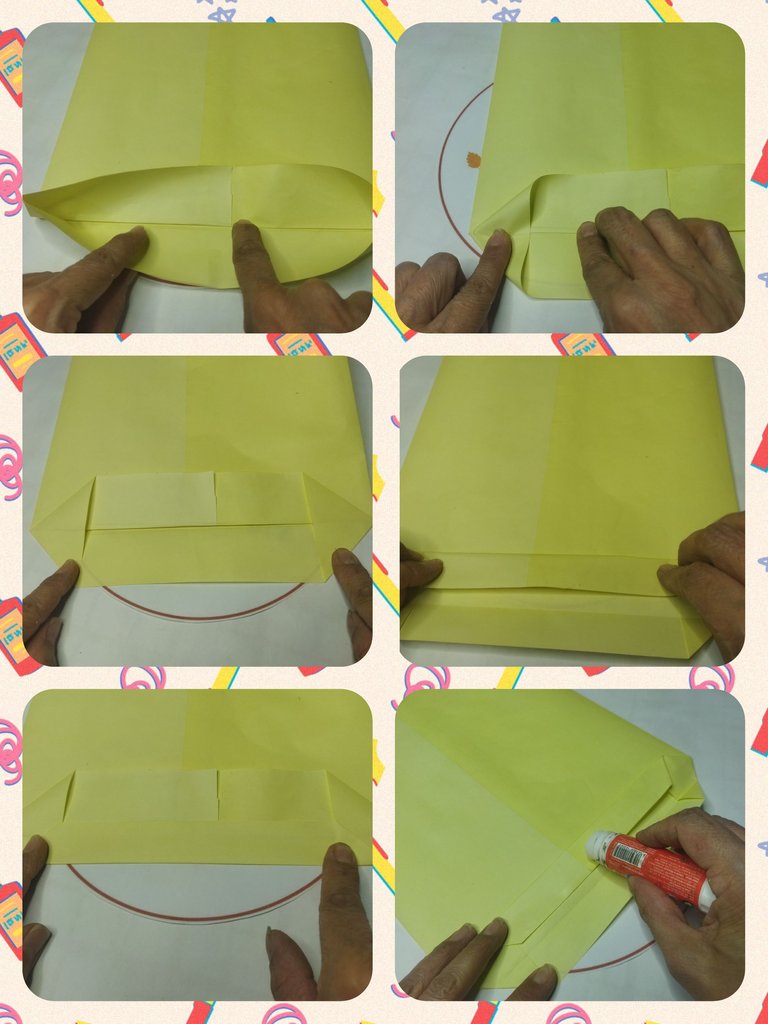
Realizamos en el mismo procedimiento en el lado izquierdo. Luego agregamos pegamento en cualquiera de las dos alas a la medida de 1 cm y pegamos la otra ala.
Once the center has been marked, we take the right wing and take it to the fold mark, exceeding the mark by 1 cm.
We carry out the same procedure on the left side. Then we add glue to either of the two wings to the 1 cm measurement and glue the other wing.
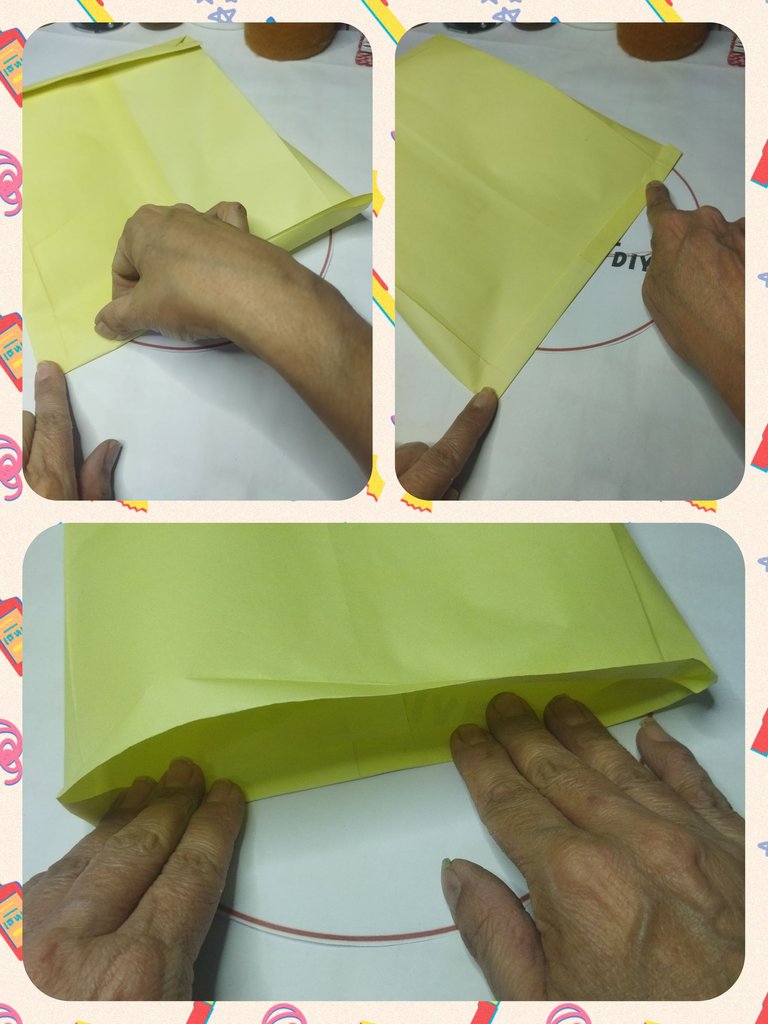
Para cerrar la parte inferior de la bolsa debemos tomar en cuenta el ancho que queremos la bolsa. En este caso será de 4 cm. Con la regla marcamos los 4 cm de ambos lados y doblamos para hacer la línea de marca.
To close the bottom part of the bag we must take into account the width we want the bag to be. In this case it will be 4 cm. With the ruler we mark the 4 cm on both sides and fold to make the marking line.
Abrimos el doblez y vamos a realizar un triángulo en cada una de las esquinas doblándolas hacia adentro.
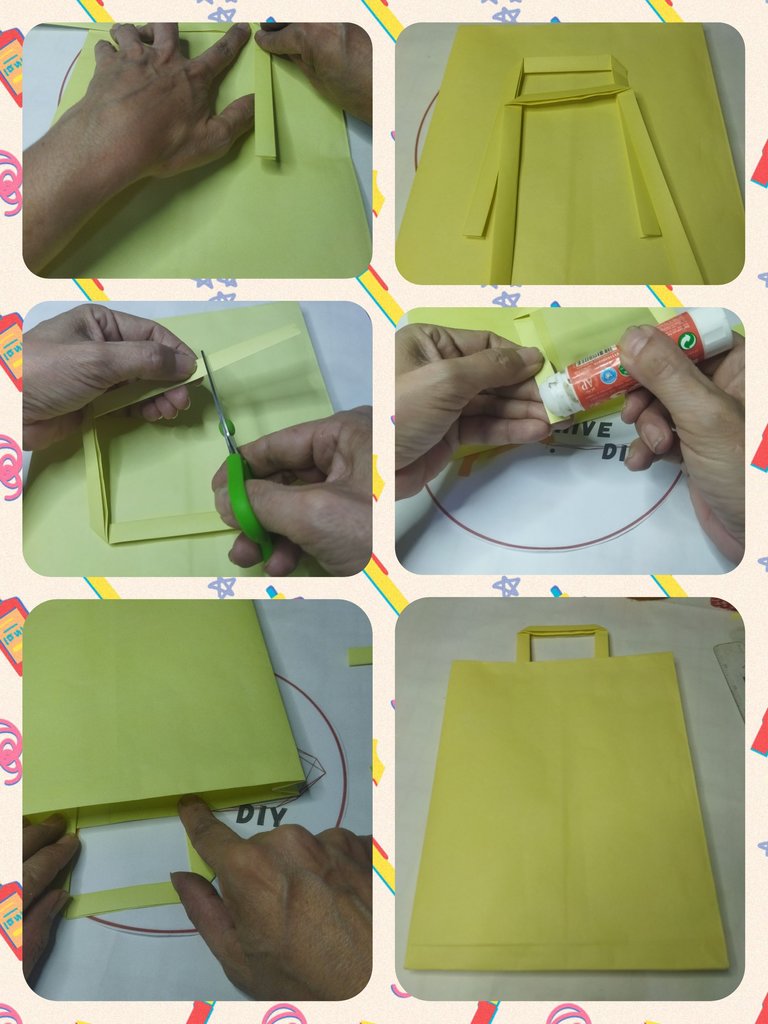
Luego doblamos la pestaña superior hasta el centro sobrepasando la línea divisora por 0,50 cm en ambos lados. Agregamos pegamento en cualquiera de las pestañas y unimos.
We open the fold and we are going to make a triangle in each of the corners by folding them inward.
Then we fold the top tab to the center, exceeding the dividing line by 0.50 cm on both sides. We add glue to any of the tabs and join.
Ahora realizamos el doble para darle la profundidad. Doblamos el lateral derecho justo en la marca triangular que forma la base de la bolsa y repetimos del lado izquierdo. Abrimos y doblamos nuevamente pero hacia dentro para que quede el doblez de la bolsa internamente.
Now we do double it to give it depth. We fold the right side right at the triangular mark that forms the base of the bag and repeat on the left side. We open and fold again but inwards so that the fold of the bag remains internally.
Y para la parte superior sólo haremos un doblez de 1 cm y luego pasaremos para la parte interna de la bolsa, no requiere pegamento pero si deseas puedes colocarle un poco.
And for the upper part we will only make a 1 cm fold and then we will go to the inside of the bag, it does not require glue but if you want you can add a little.
Para el asa. cortamos dos tiras de papel bond de 5 cm x 15 cm, doblamos por la mitad. Luego cada lado del doblez lo llevamos al centro y unimos para obtener una tira de 1,25 cm aprox.
For the handle. We cut two strips of bond paper measuring 5 cm x 15 cm, folding them in half. Then we take each side of the fold to the center and join together to obtain a strip of approximately 1.25 cm.
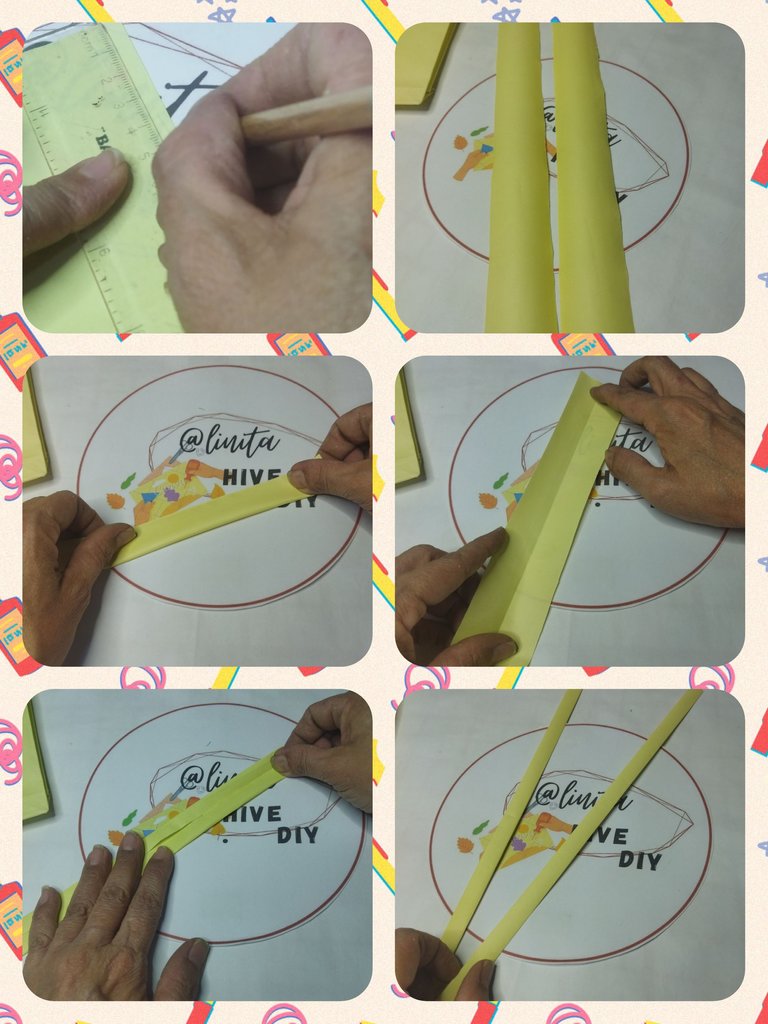
Hacemos un doblez de 90º en cada extremo de la bolsa y formamos el asa que luego pegaremos en la bolsa por dentro.
Y ya tenemos lista la bolsa. Ahora vamos con la presentación personalizada.
We make a 90º fold at each end of the bag and form the handle that we will then glue to the inside of the bag.
And now we have the bag ready. Now let's go to the personalized presentation.
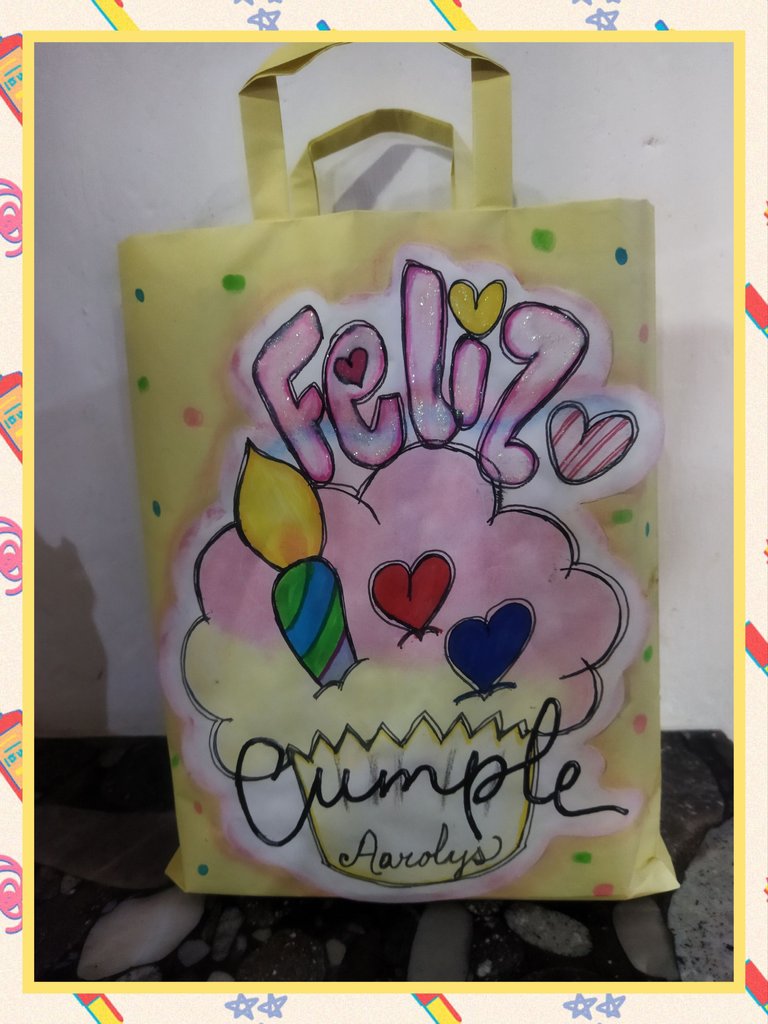
DETALLE PERSONALIZADO
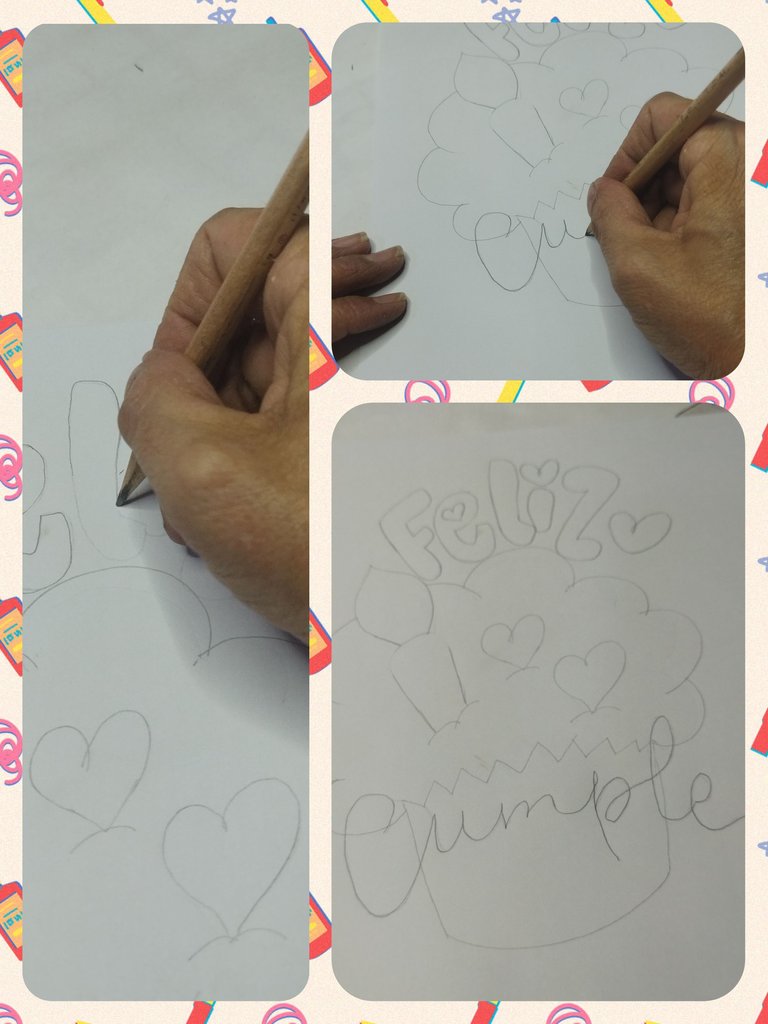
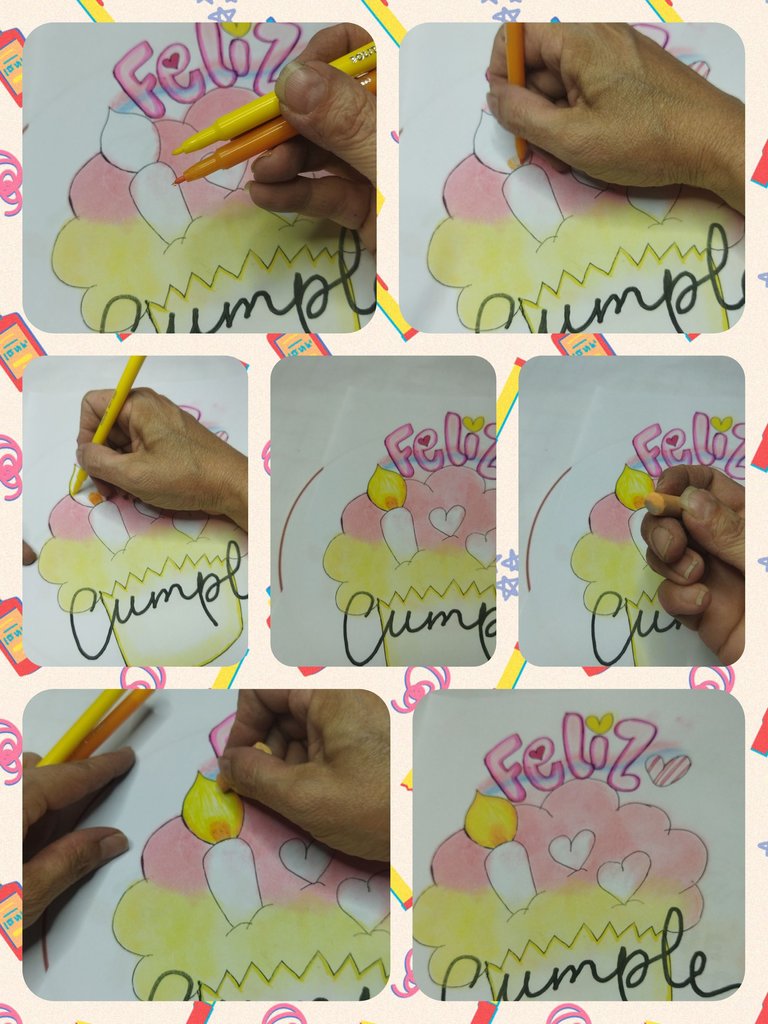
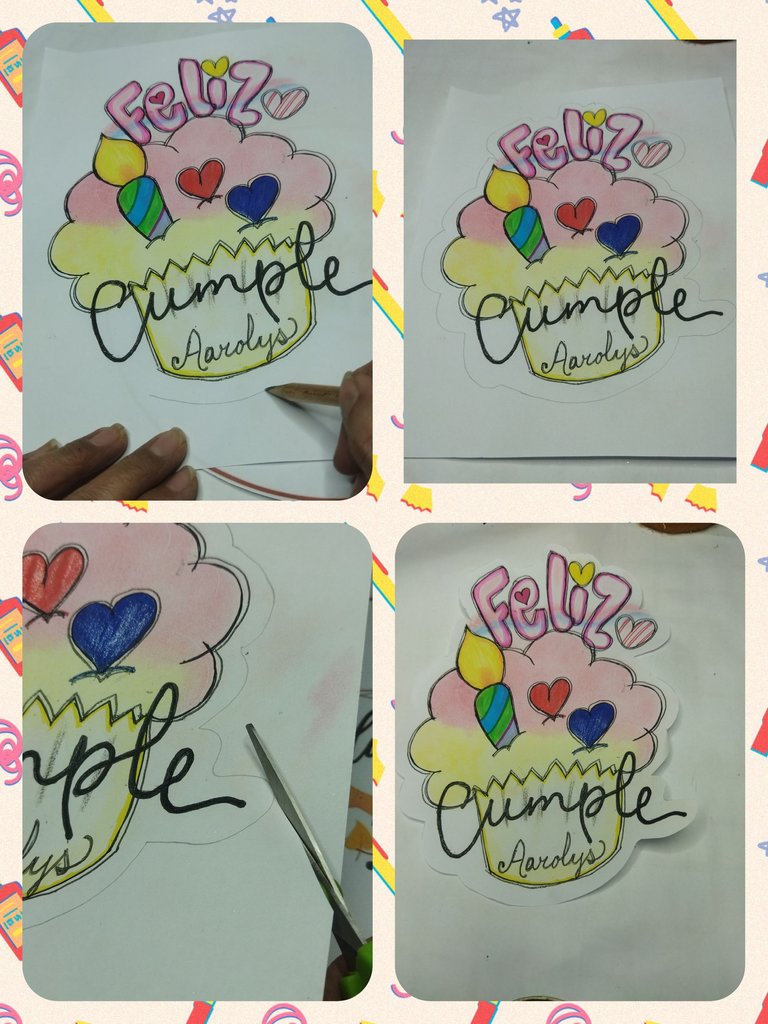
Para personalizar la bolsa realicé en una hoja de papel bond blanca, un cupcake con vela y corazones, bien sencillo porque me cuesta un poco dibujar a mano alzada.
CUSTOM DETAIL
To personalize the bag I made a cupcake with a candle and hearts on a sheet of white bond paper, very simple because it is a bit difficult for me to draw freehand.
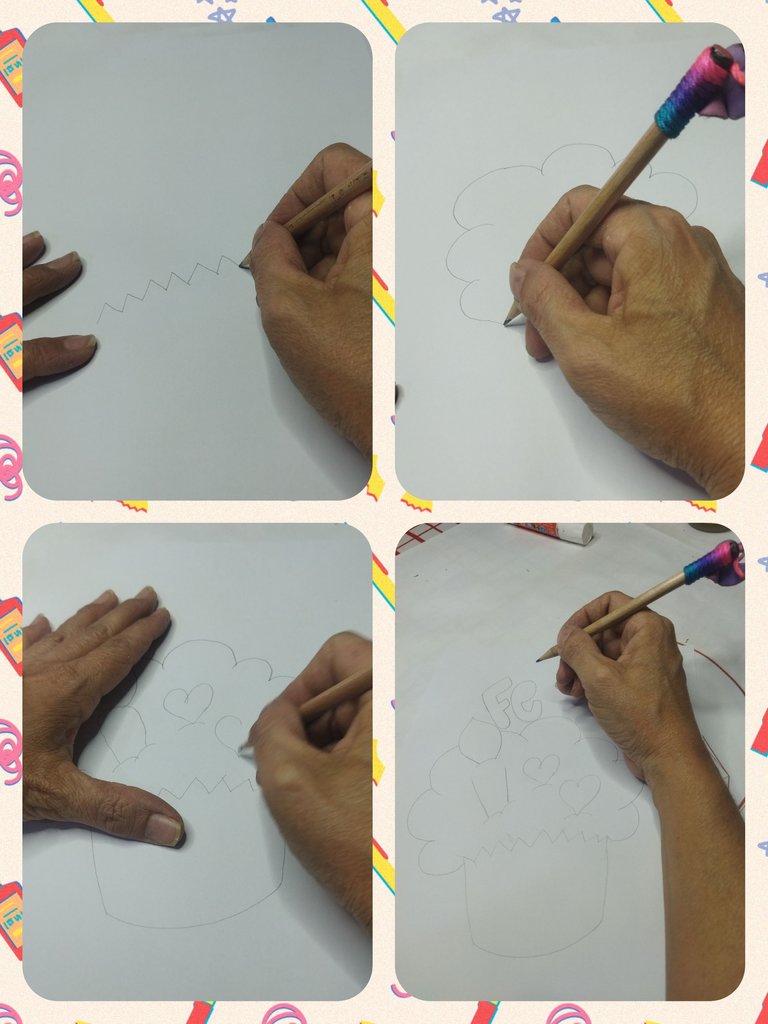
Luego un poco de lettering, también en aprendizaje de esta técnica de dibujar letras que me encanta, realicé Feliz Cumple.
Then a little lettering, also learning this technique of drawing letters that I love, I made Happy Birthday.
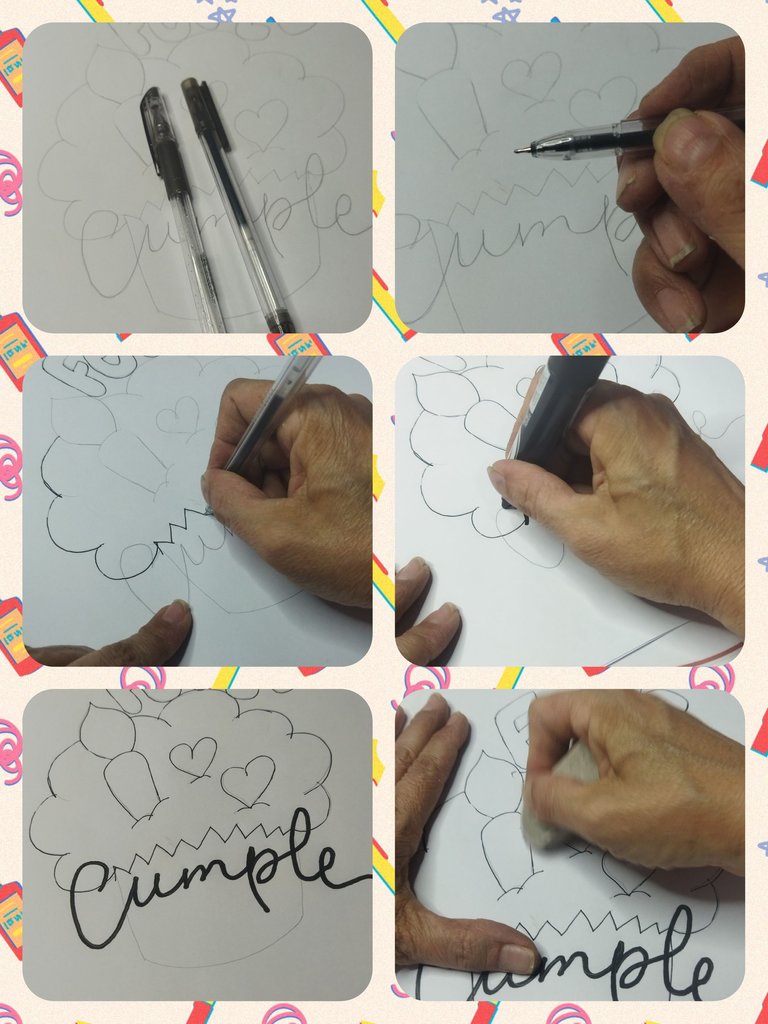
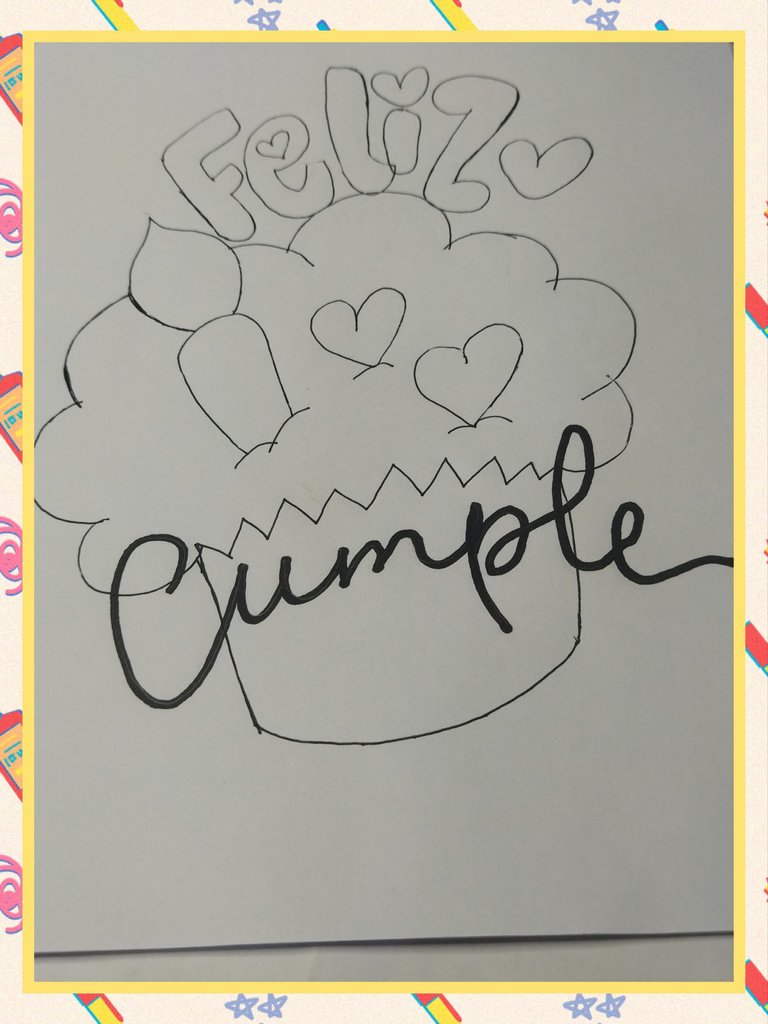
Ya con el diseño realizado, resalté con el lapicero de gel color negro, todo el dibujo. Y con el marcador negro punta redonda el Cumple.
Luego con el borrador eliminé las líneas sobrantes.
With the design done, I highlighted the entire drawing with the black gel pen. And with the round tip black marker, Cumple.
Then with the eraser I eliminated the excess lines.
Ahora a darle color al diseño. Con las tizas, rosada y azul,realicé un zigzag sobre las letras de Feliz, luego con el dedo las difuminé.
Now to give color to the design. With the pink and blue chalk, I made a zigzag over the letters of Feliz, then I blended them with my finger.
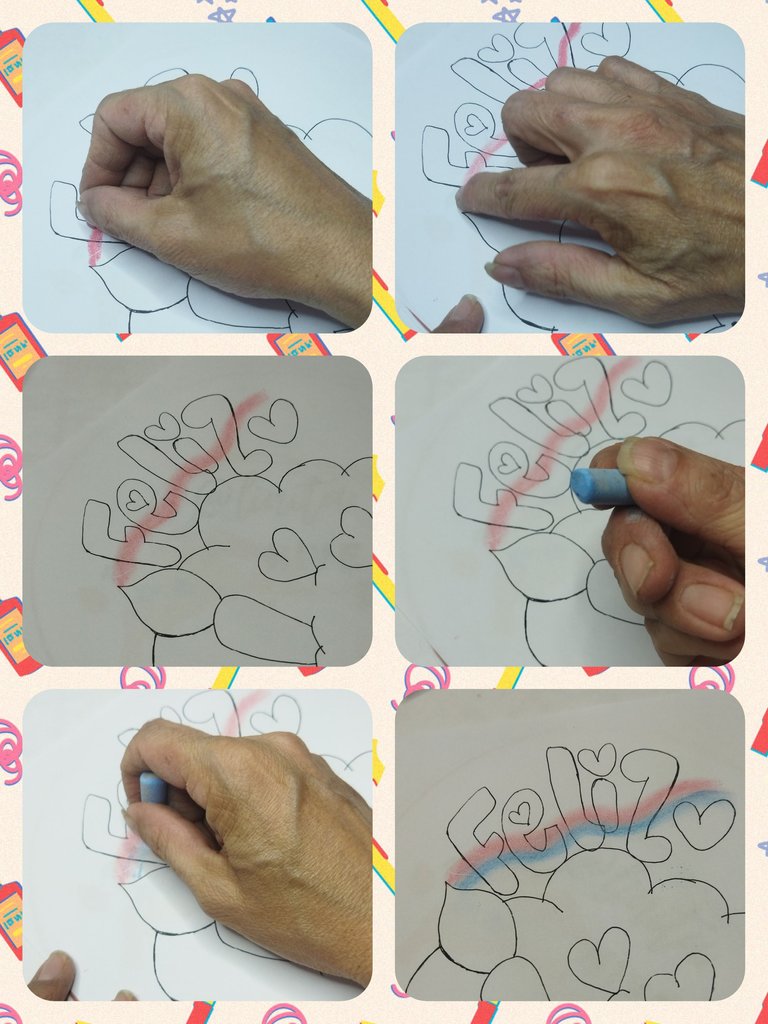
Con el marcador rosado punta fina delineé el FELIZ. Luego con el marcador fluorescente rosado realicé el sombreado.
With the pink fine tip marker I outlined the HAPPY. Then with the pink fluorescent marker I did the shading.
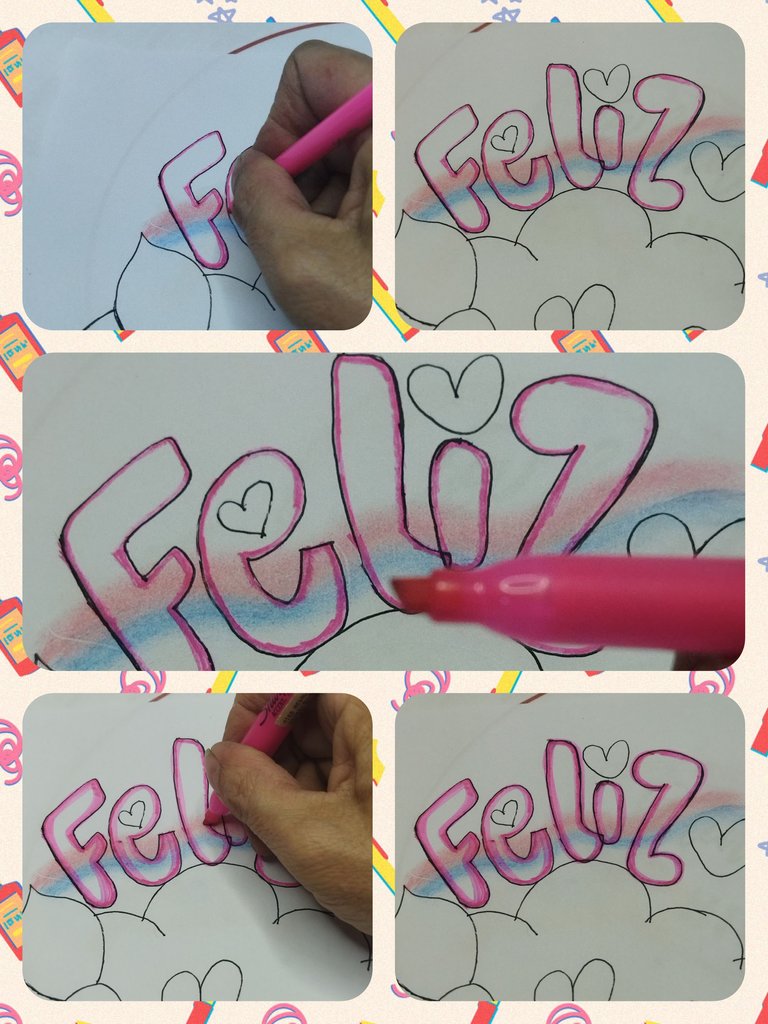
Para el relleno de las letras utilicé tiza rosada y difuminé con los dedos.
Los corazones de las letras los coloreé con marcadores rosado y amarillo.
To fill the letters I used pink chalk and blended with my fingers.
I colored the hearts of the letters with pink and yellow markers.

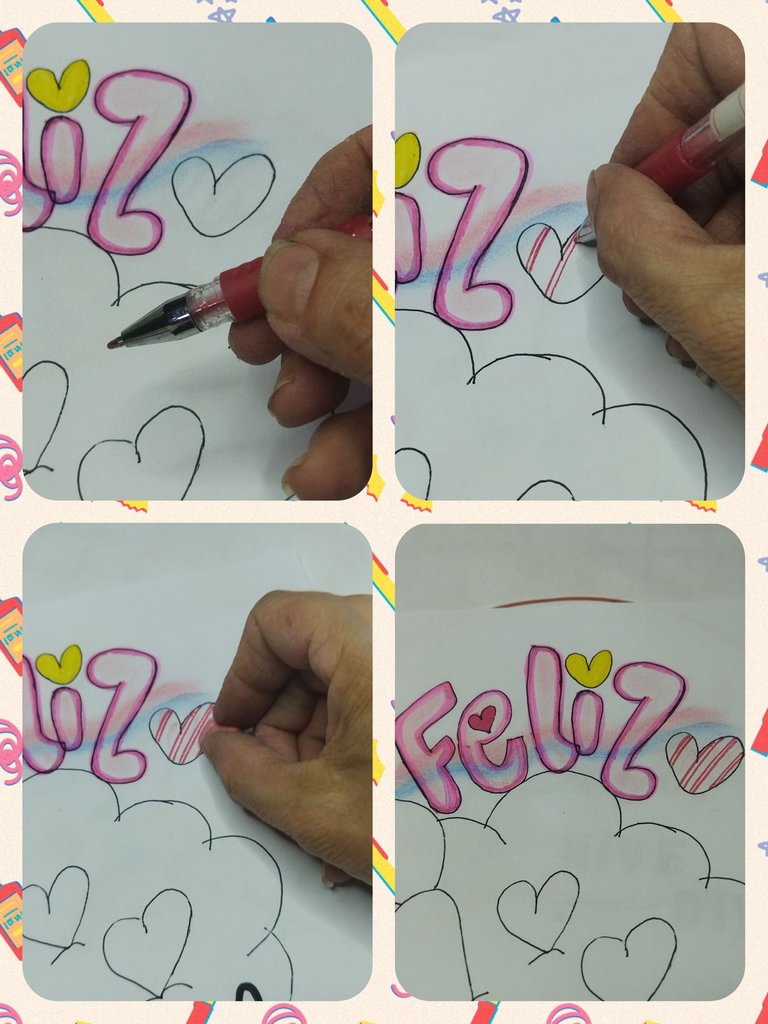
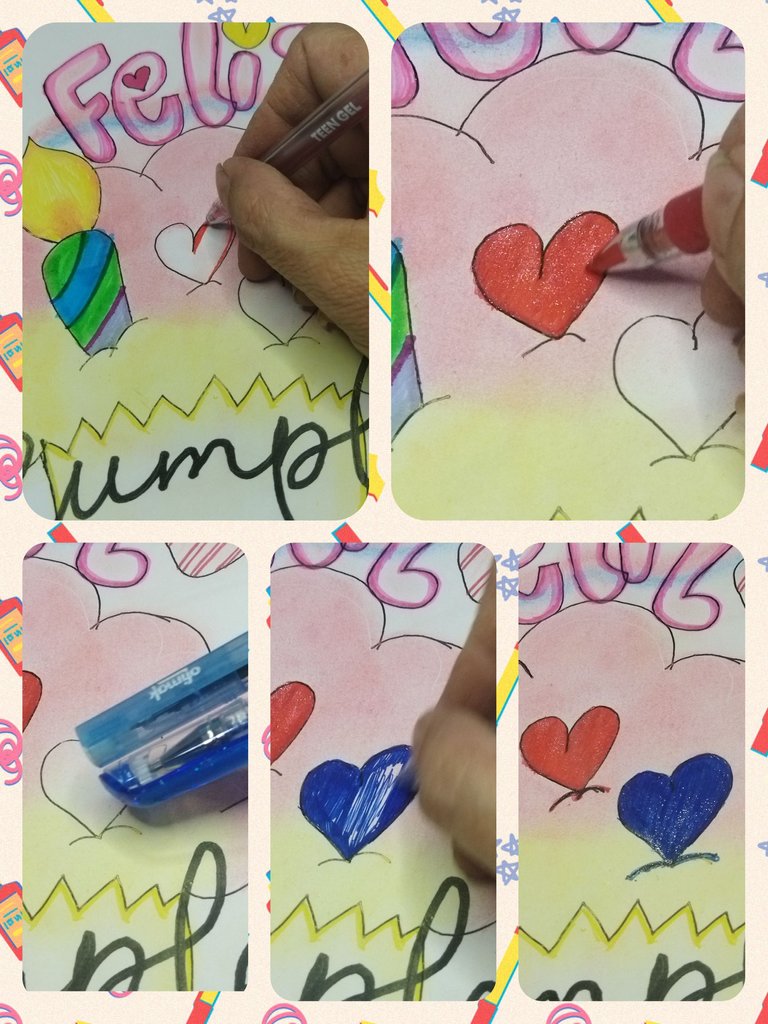
Para el corazón del lado derecho de FELIZ, realicé doble línea dentro del corazón con el lapicero escarchado rojo y rellené con tiza roja difuminada.
For the heart on the right side of MERRY, I made a double line inside the heart with the red frosty pen and filled in with smudged red chalk.
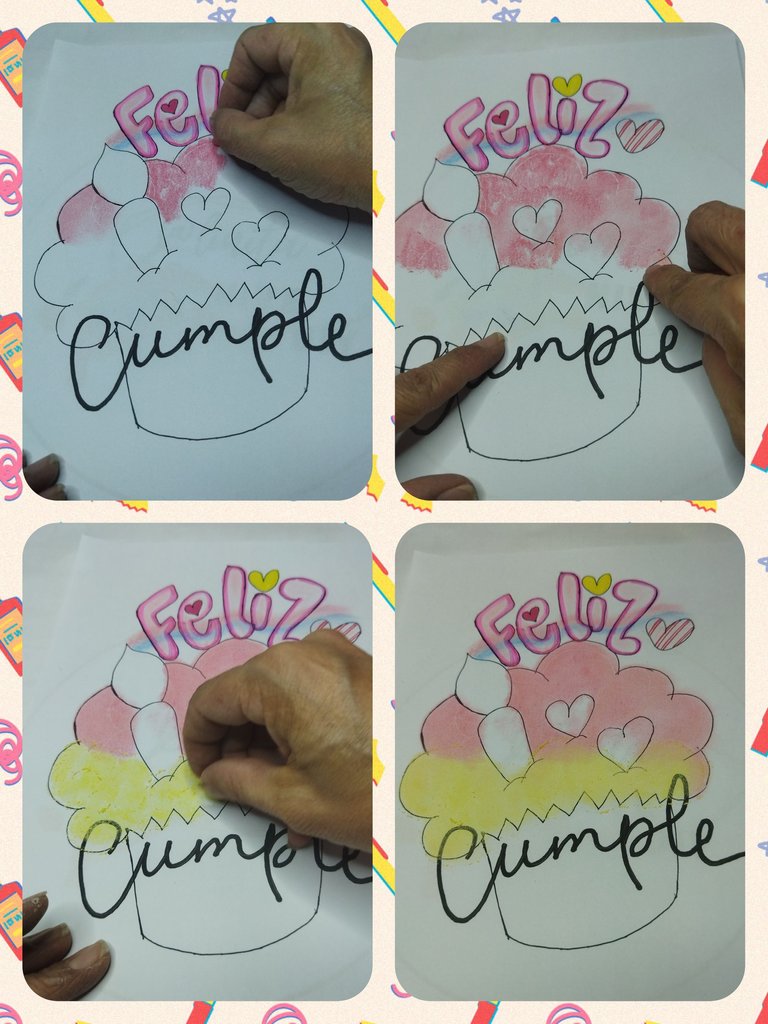
Para el relleno del cupcake utilicé tiza roja y amarilla difuminada con el dedo. Y para la base del cupcake utilicé marcador amarillo para delinear el contorno y tiza amarilla para el relleno.
For the cupcake filling I used red and yellow chalk smudged with my finger. And for the base of the cupcake I used yellow marker to outline the outline and yellow chalk for the filling.
Para la vela utilicé marcadores punta fina, amarillo y naranja para le llama y tiza amarilla para el relleno.
For the candle I used fine point markers, yellow and orange for the flame and yellow chalk for the fill.
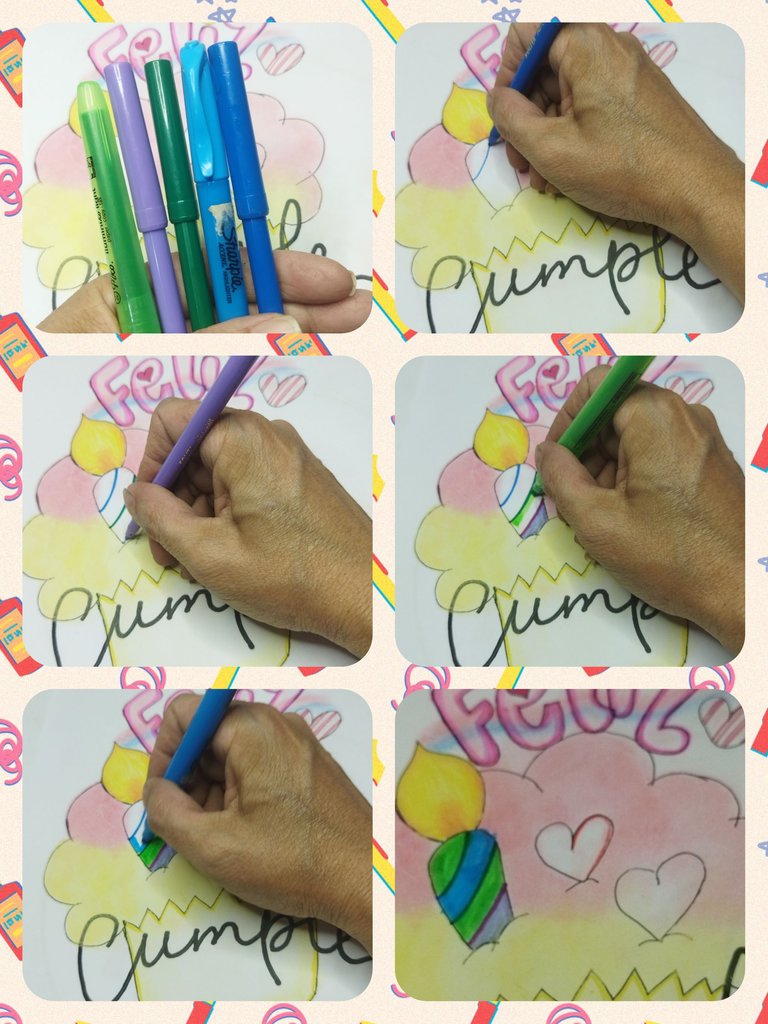
Y para la vela marcadores morado, azul, verde punta fina para lineas y para el relleno marcadores azul y verde fluorescentes.
And for the candle, purple, blue, green markers, fine tip for lines, and fluorescent blue and green markers for filling.
Para los corazones del cupcake utilicé lapicero escarchado rojo y azul para el relleno y lapicero en gel de los mismos colores para el contorno.
For the hearts of the cupcake I used a red and blue frosted pen for the filling and a gel pen of the same colors for the outline.
Con tiza negra realicé el sombreado de CUMPLE y los detalles de la base del cupcake.
Y para finalizar, con el lapicero en gel negro y el escarchado e, nombre de "Aarolys", debajo de CUMPLE.
With black chalk I made the shading of BIRTHDAY and the details of the cupcake base.
And finally, with the black gel pen and the frosty e, name "Aarolys", under BIRTHDAY.
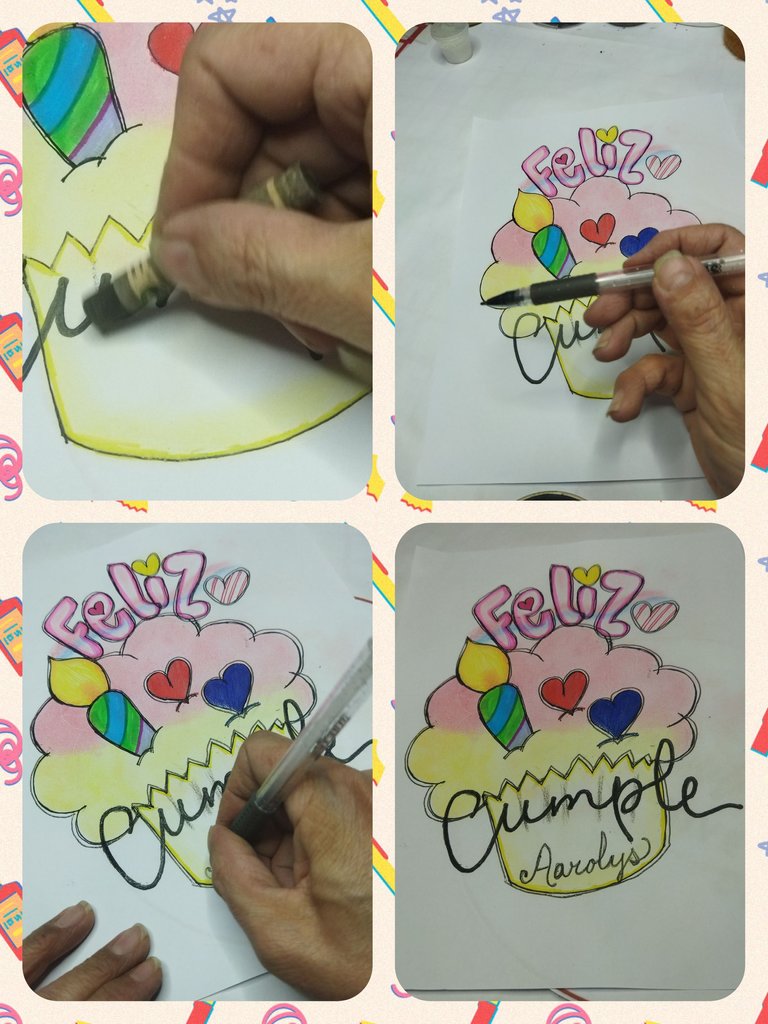
Con el lápiz de grafito delineé el contorno del dibujo ya listo, dejando aproximadamente 1 cm de distancia y recorte.
With the graphite pencil I outlined the outline of the ready drawing, leaving approximately 1 cm of distance and cut out.
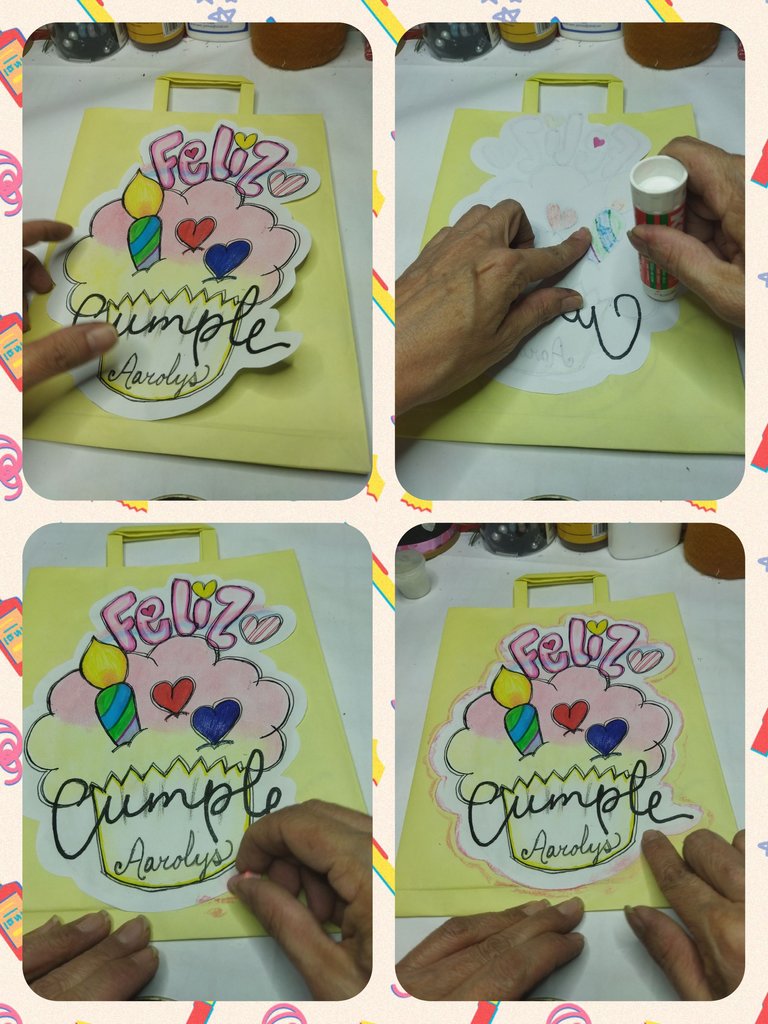
Y por último, agregué pegamento por la parte trasera del diseño y pegué en la bolsa.
Con tiza roja realicé el sombreado del contorno y difuminé con el dedo para resaltar aún más el diseño y con marcadores de diferentes colores realicé puntos disperso por el resto de la bolsa.
And lastly, I added glue to the back of the design and glued it to the bag.
With red chalk I made the contour shading and blurred with my finger to highlight the design even more and with markers of different colors I made dots scattered throughout the rest of the bag.
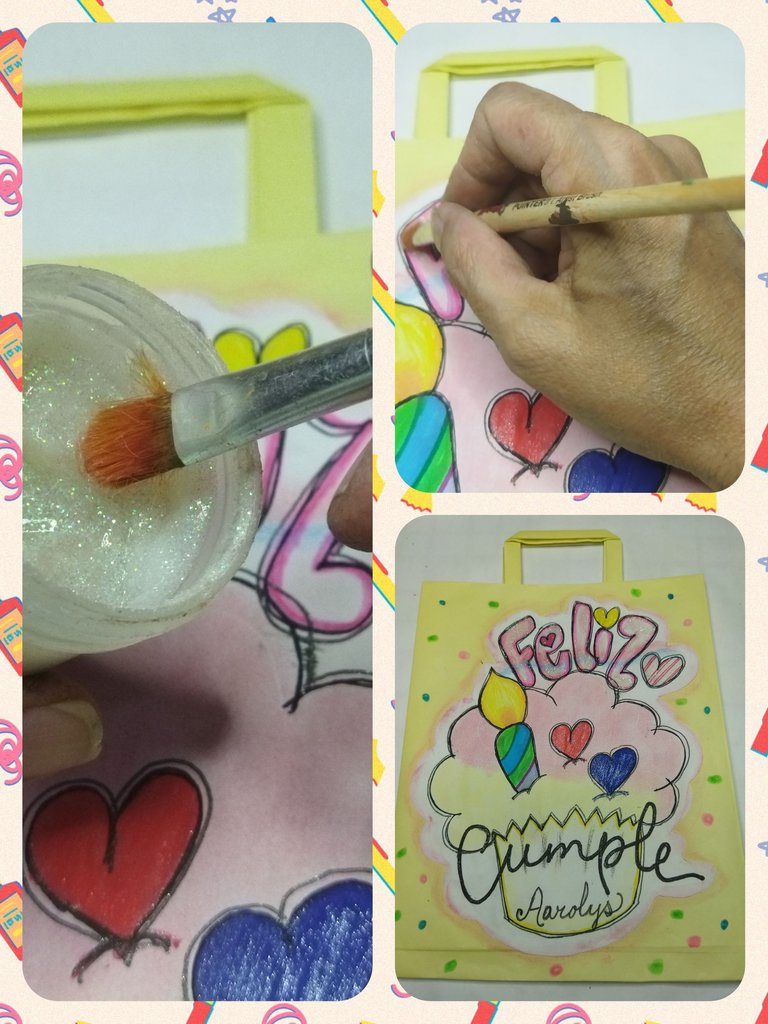
Con un pincel plano agregué gel escarchado en FELIZ y dejé secar por un día.
With a flat brush I added frosted gel in HAPPY and let it dry for a day.
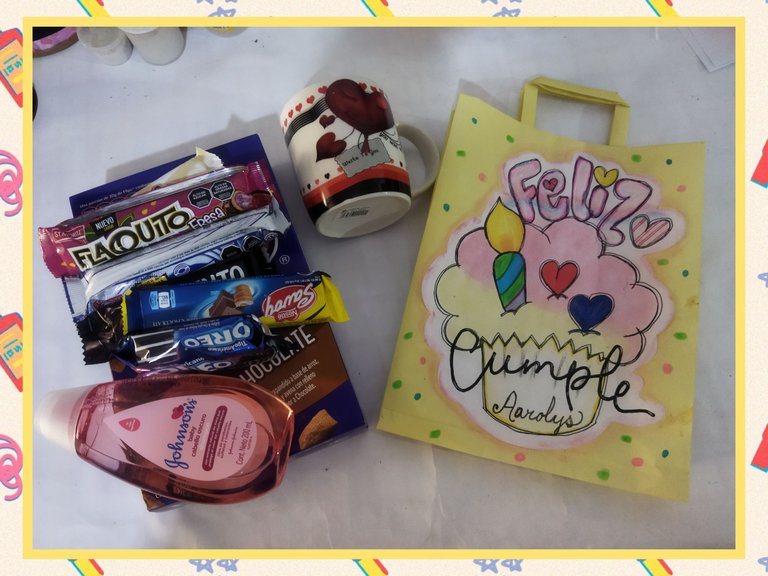
Y ya con la bolsa personalizada y lista, todo lo que iba anotando de sus deseos y que estuvo a mi alcance para rellenarla. Una forma especial de presentar un obsequio y sé que a ella le va a gustar y la va a conservar como un tesoro preciado.
Espero que también sea una idea creativa para ustedes. Nos vemos en la próxima.
And now with the personalized bag ready, everything that I was writing down about their wishes and that was within my reach to fill it. A special way to present a gift from her and I know she will like it and keep it as a precious treasure.
I hope it is a creative idea for you too. See you next time.
Hermosa, me fascino...gran idea gracias por compartir @linita
Hola @linita 👋
Siempre he querido aprender a realizar este tipo de bolsas. Las hago, pero luego se me olvida el proceso. Me encanta que también la hayas personalizado, se ve preciosa. Ideal para guardar muchos obsequios o toda esa chucheria 😋 te quedó muy linda.