¡Holaaaaaa, mis queridísimos amigos de Hive Diy!
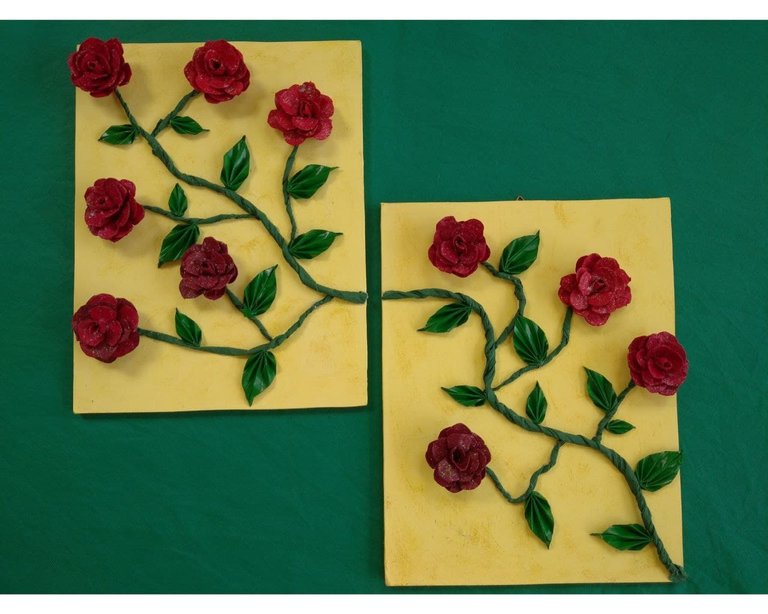
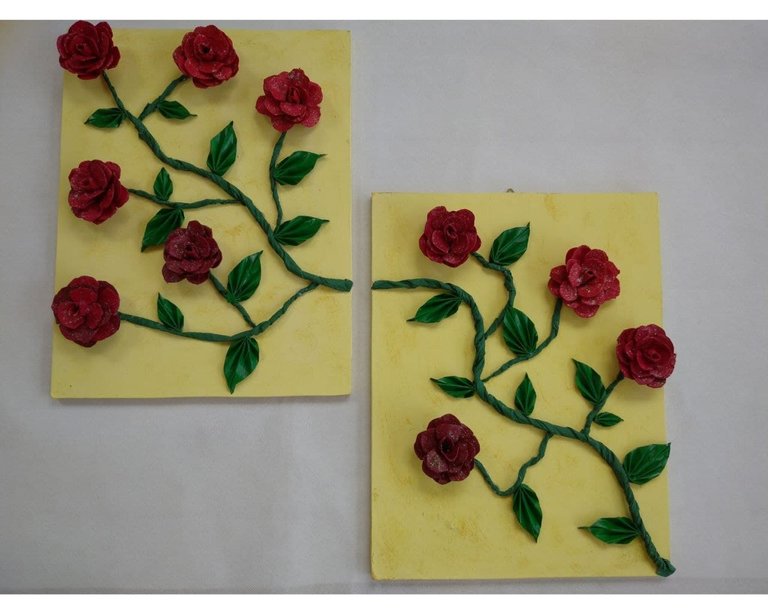
Son tantas las maravillas que podemos realizar a partir de un simple material desechable que aún me sorprendo de cómo podemos transformarlos hasta convertirlos en verdaderas obras de arte. Mi intención inicial al elaborar este cuadro, fue hacerlo sólo con pintura al frío sobre el MDF, luego se me ocurrió darle un poco más de vida y utilicé algo de materiales reciclable que siempre tengo en casa. Y de esta forma nació este hermoso cuadro de rosas elaborados con cartón de huevos y hojas de papel recicladas.
A continuación les explico cómo lo elaboré.
Sin más, comencemos.
Hellooooo, my dear Hive Diy friends!
There are so many wonders that we can make from a simple disposable material that I am still amazed at how we can transform them into true works of art. My initial intention when making this painting was to do it only with cold paint on the MDF, then it occurred to me to give it a little more life and I used some recyclable materials that I always have at home. And in this way was born this beautiful box of roses made with egg carton and recycled paper sheets.
Next I explain how I elaborated it.
Without further ado, let's get started.
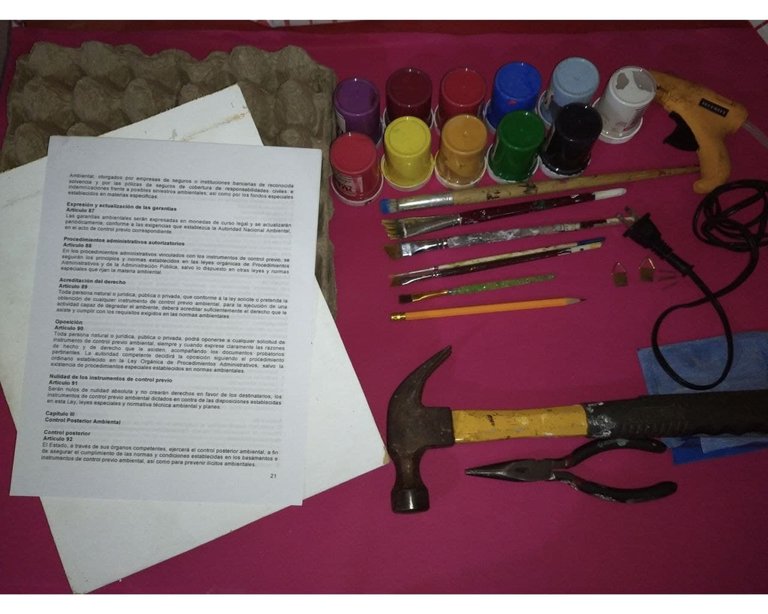
MATERIALES:
- 2 Retazos de MDF
- 1 cartón de huevos
- Hojas de papel recicladas
- Pintura al frío colores variados
- Pinceles
- Pega en barra
- Pega escolar
- Pistola de silicón con 3 barras
- Escarcha tornasol
- Lija
- 2 Ganchos de marquetería
- 4 clavos de madera
- Martillo
- Pinza
MATERIALS:
- 2 MDF Scraps
- 1 carton of eggs
- Recycled paper sheets
- Cold paint varied colors
- Brushes
- Stick on stick
- School glue
- Glue gun with 3 bars
- Litmus frost
- Sandpaper
- 2 marquetry hooks
- 4 wooden nails
- Hammer
- Gripper
PROCEDIMIENTO:
- Estos retazos de MDF fueron rescatados de una caja donde tengo varios materiales que podría darle nueva utilidad. LO que hice fue lijarlos y eliminar suciedad. Luego cubrí con doble capa de pintura al frío color amarillo claro y utilicé un pincel grueso angular.
PROCESS:
- These pieces of MDF were rescued from a box where I have several materials that could give it new use. What I did was sand them down and remove dirt. Then I covered with a double coat of cold light yellow paint and used a thick angular brush.
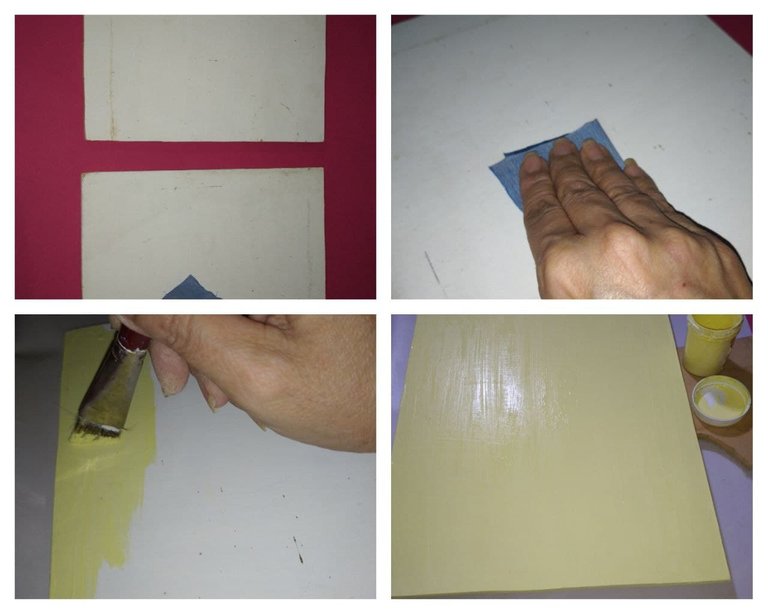
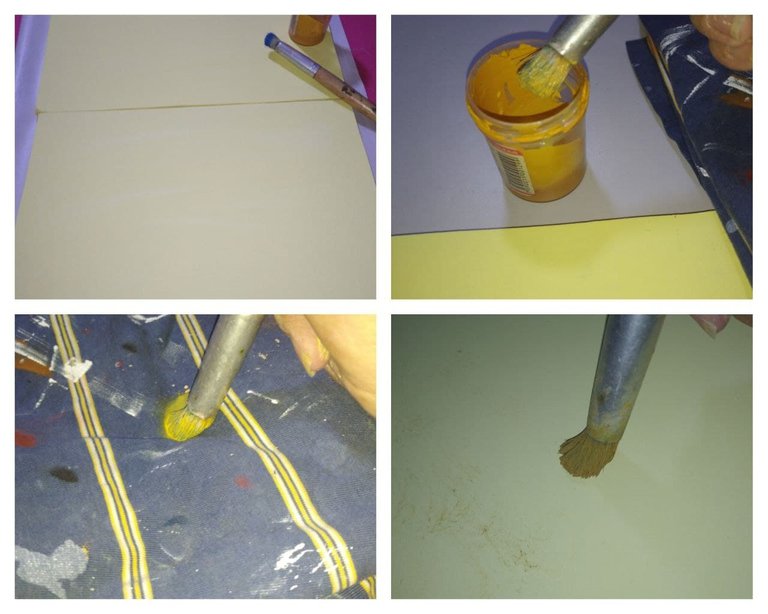
- Una vez seca la pintura, difuminé con un tono más oscuro para darle vistocidad al fondo de mi cuadro, para ello utilicé un pincel redondo y pintura mostaza.
- El proceso de difuminado consiste en empapar el pincel de pintura luego eliminar sobre una tela la mayor cantidad de pintura y hacer trazados circulares sobre l MDF.
- Once the paint is dry, I smudged with a darker tone to give visibility to the background of my painting, for this I used a round brush and mustard paint.
- The blurring process consists of soaking the paint brush then removing the largest amount of paint on a canvas and making circular paths on the MDF.
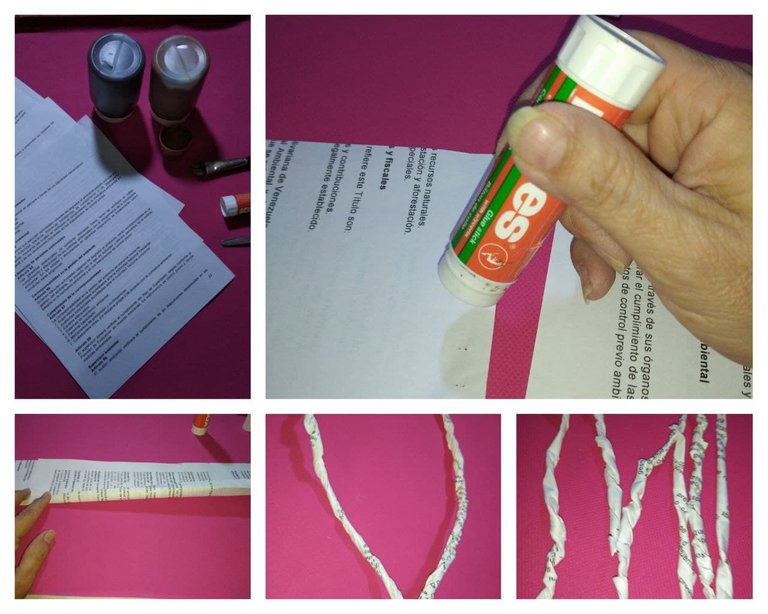
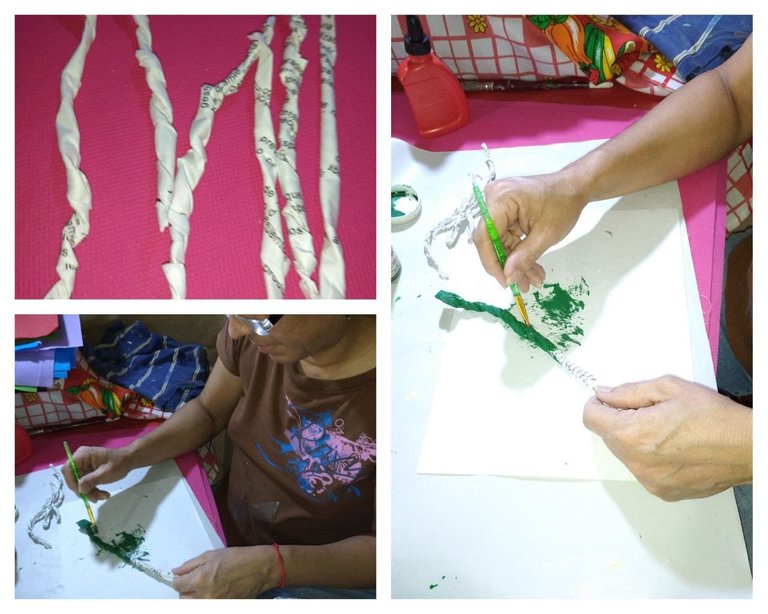
- Luego elaboré con las hojas de papel reciclado unas tiras que pegué con pega en barra y le di formas de ramas y las pinté con un pincel plano y pintura verde, con ellas simularé las ramas del rosal.
- Then I made some strips with the recycled paper sheets that I glued with stick glue and I gave them shapes of branches and I painted them with a flat brush and green paint, with them I will simulate the branches of the rose bush.
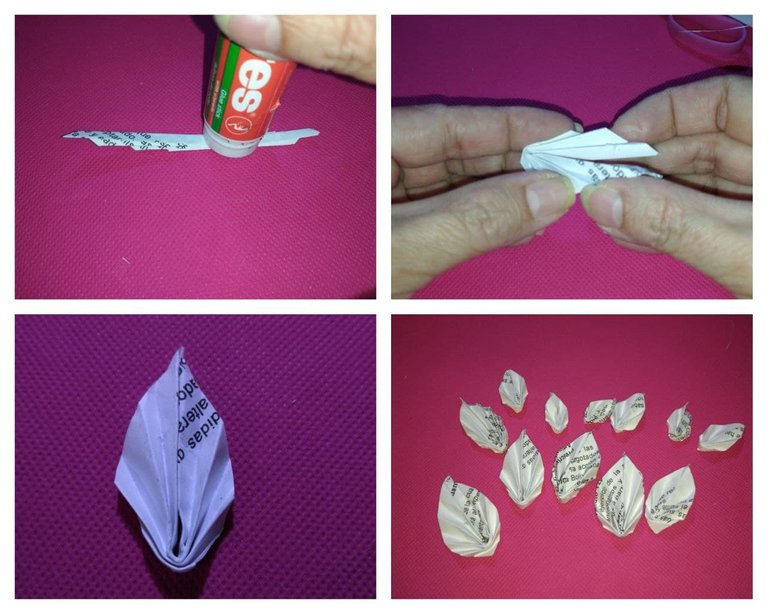
- También con hojas de papel reciclado realicé varias hojas con la técnica de abanico, que consiste en picar cuadros de papel, luego se forma un triángulo y se dobla en forma de abanico.
- Also with sheets of recycled paper I made several sheets with the fan technique, which consists of chopping paper squares, then a triangle is formed and folded into a fan shape.

- Luego hacemos un doblez por la parte más larga hacia adentro colocamos pega en barra y dejamos secar.
- Cuando ya está seca, abrimos y tenemos unas lindas hojas.
- Then we fold the longest part inwards, place glue on a stick and let it dry.
- When it is dry, we open and we have some beautiful leaves.
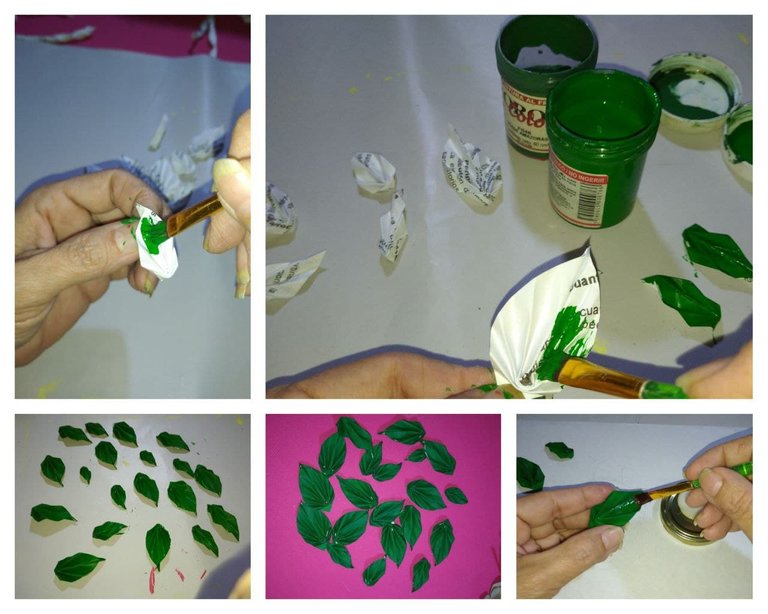
- Pintamos con dos capas de pintura para lo cual utilicé un pincel plano y pintura verde.
- Una vez seca la pintura, cubrí con una capa de pega escolar para darle brillo.
- We painted with two layers of paint for which I used a flat brush and green paint.
- Once the paint is dry, I covered with a layer of school glue to give it shine.
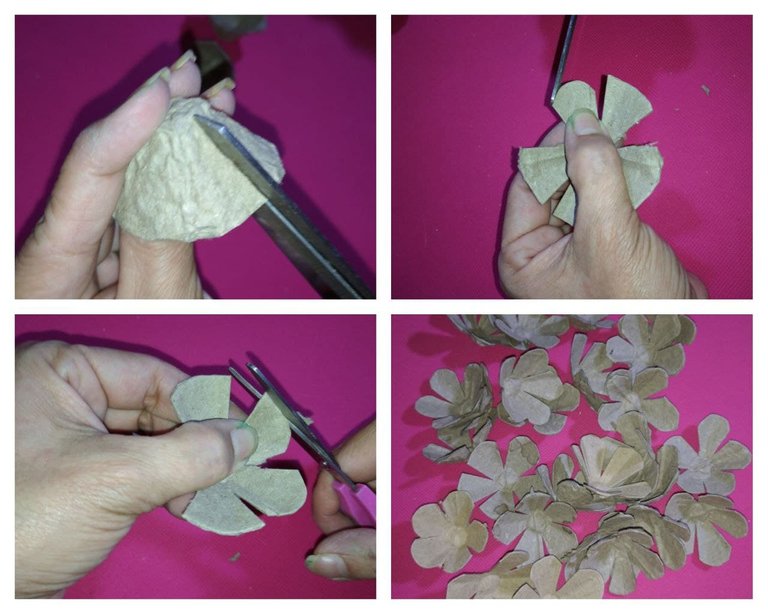
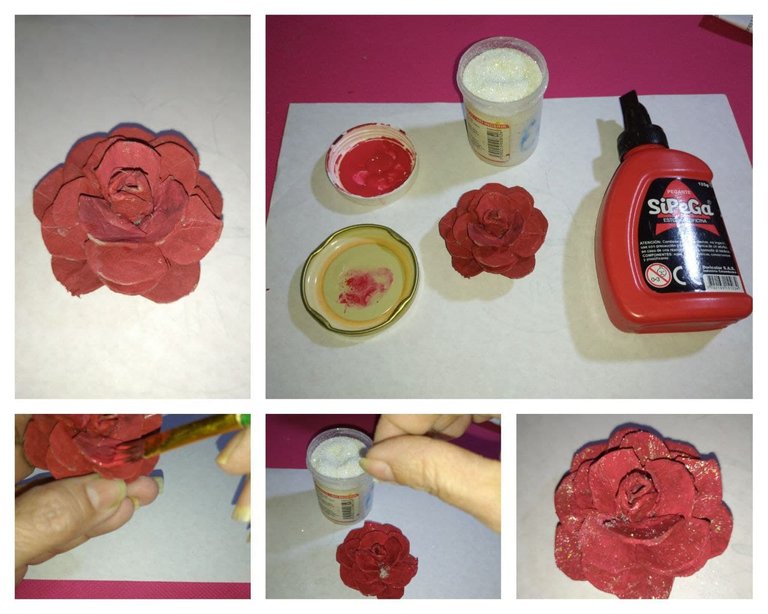
- Para realizar las rosas utilicé 40 piezas de cartón de huevos, para realizar 10 rosas.
- Para ello, corté las bases del catón donde se coloca el huevo, eliminé todo el contorno, dejándolo de forma de cono.
- Realicé cinco cortes para darle forma de pétalos en cada una de las piezas.
- To make the roses I used 40 pieces of egg carton, to make 10 roses.
- To do this, I cut the bases of the catón where the egg is placed, I eliminated the entire contour, leaving it in the shape of a cone.
- I made five cuts to shape petals in each of the pieces.

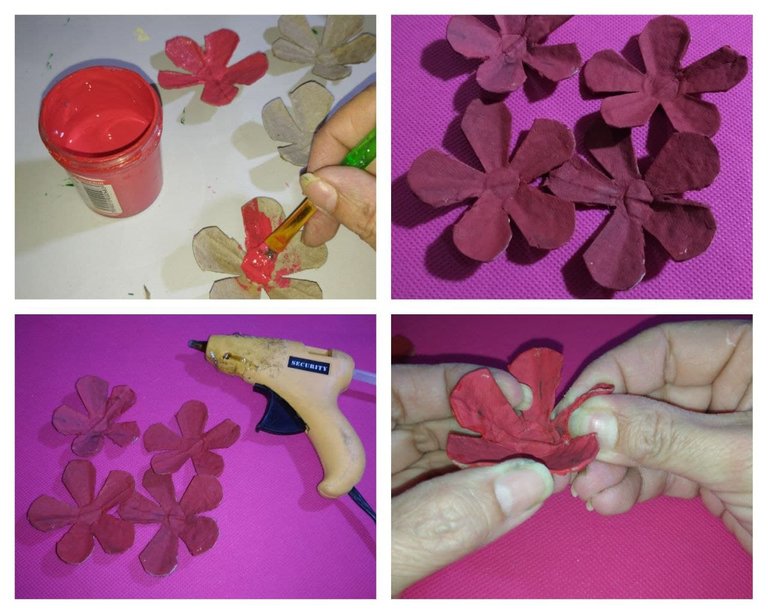
- Luego cubrí con una capa de pintura roja de varios tonos de forma aleatoria y dejé secar.
- Para cada rosa se utiliza 4 piezas de flores.
- Comenzamos realizando un doblez en dos pétalos de la flor, dejando uno intermedio.
- Agregamos silicón con la pistola en uno de los pétalos doblados y unimos hasta secar.
- Damos forma de capullo y con los pétalos restantes damos con los dedos hasta formar el capullo.
- Then I covered with a layer of red paint of various shades in a random way and let it dry.
- For each rose 4 pieces of flowers are used.
- We begin by making a fold in two petals of the flower, leaving one in between.
- We add silicone with the gun in one of the folded petals and join until dry.
- We shape a cocoon and with the remaining petals we give with our fingers until the cocoon is formed.
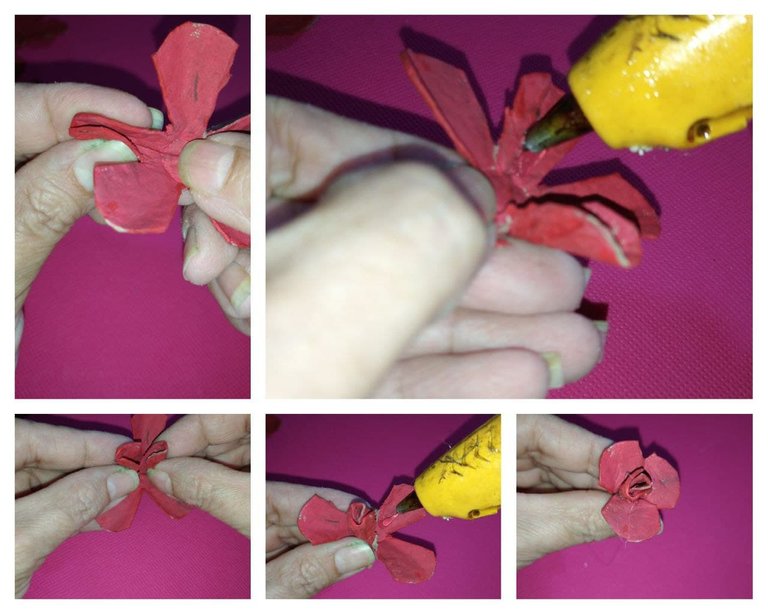
- Luego pegamos el capullo a otra pieza y colocamos pequeños hilos de silicón hasta medio pétalo y vamos pegando al capullo hasta ir formando la rosa.
Este procedimiento lo haremos con dos piezas más, tratando de pegar de forma asimétrica para crear nuestra rosa.
- Then we glue the bud to another piece and place small silicone threads up to half a petal and we stick to the bud until the rose is formed.
We will do this with two more pieces, trying to glue asymmetrically to create our rose.
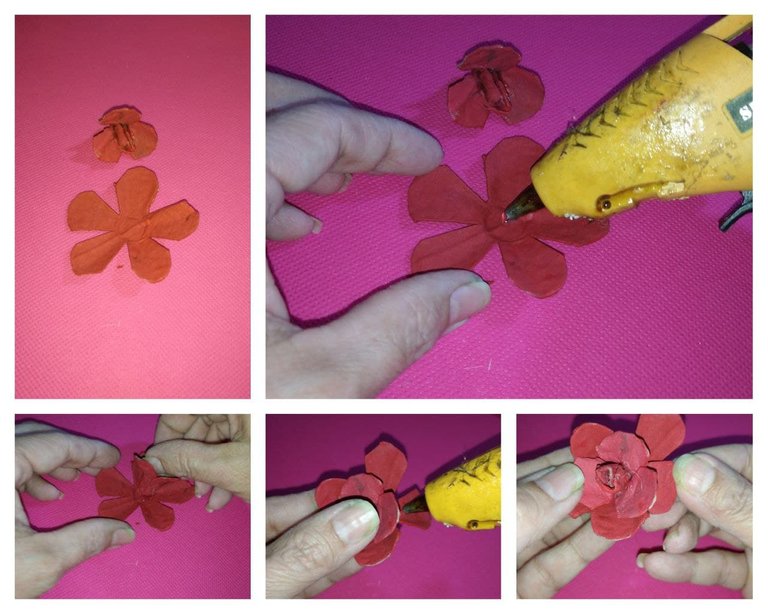
- Ya formada nuestra rosa, agregamos otra capa de pintura la cual mezclaremos con pega escolar para cubrir las partes que raspamos formando la flor y con la pega darle un tono brillante y más llamativo.
- Antes de secar rociamos escarcha tornasol en pequeñas cantidades y dejamos secar muy bien.
- Este procedimiento lo haremos con el resto de las piezas.
- Once our rose is formed, we add another layer of paint which we will mix with school glue to cover the parts that we scrape forming the flower and with the glue to give it a bright and more striking tone.
- Before drying we sprinkle litmus frost in small quantities and let it dry very well.
- We will do this procedure with the rest of the pieces.
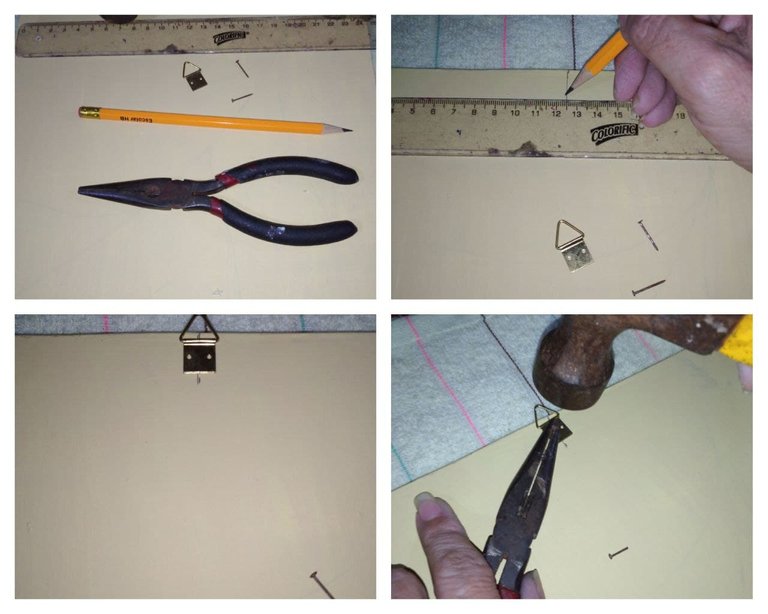
- Antes de comenzar a armar mi rosal, coloqué los ganchos de marquetería en cada pieza de MDF con mucho cuidado de no maltratar la pintura.
- Before starting to assemble my rose bush, I placed the marquetry hooks on each piece of MDF being very careful not to mistreat the paint.
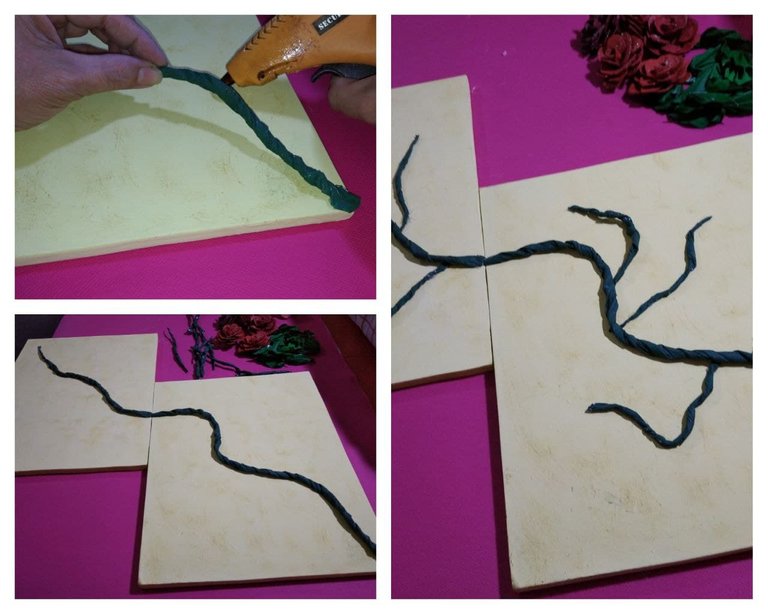
- Terminadas todas las piezas, comencé el montaje de mi rosal en el MDF.
- Coloqué las ramas dando la forma deseada de tal manera que tuviera continuidad en la otra pieza de MDF.
- Una vez colocadas las ramas, coloqué las rosas y las hojas.
- After all the pieces were finished, I began to assemble my rose bush on the MDF.
- I placed the branches giving the desired shape in such a way that it had continuity in the other piece of MDF.
- Once the branches were placed, I placed the roses and leaves.
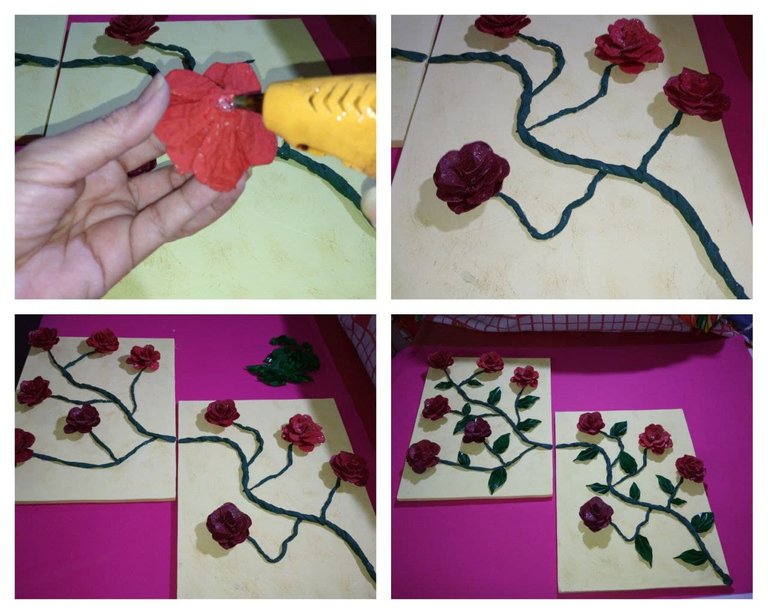
De esta forma práctica y sencilla, hacemos un hermoso cuadro para decorar ese espacio de nuestro hogar que no tenía vida a la vez que reutilizamos material reciclable.
Espero les haya gustado.
Nos vemos en la próxima entrega.
In this practical and simple way, we make a beautiful painting to decorate that space in our home that had no life while reusing recyclable material.
I hope you liked it.
See you in the next installment.
Utilicé https://translate.google.com para la traducción