There is a variety of eternal roses that vary according to the size and the number of petals, in my case I made several of different petals, one of five, another of 4 and the last one where I was short of material I made it of three petals, the most important thing when it comes to gluing them is to place them strategically so that they are beautiful, so you do not notice the difference between one and another, that will give you the practice and how you place each of the flowers, so it is very important to practice and have one or another trick up your sleeve.
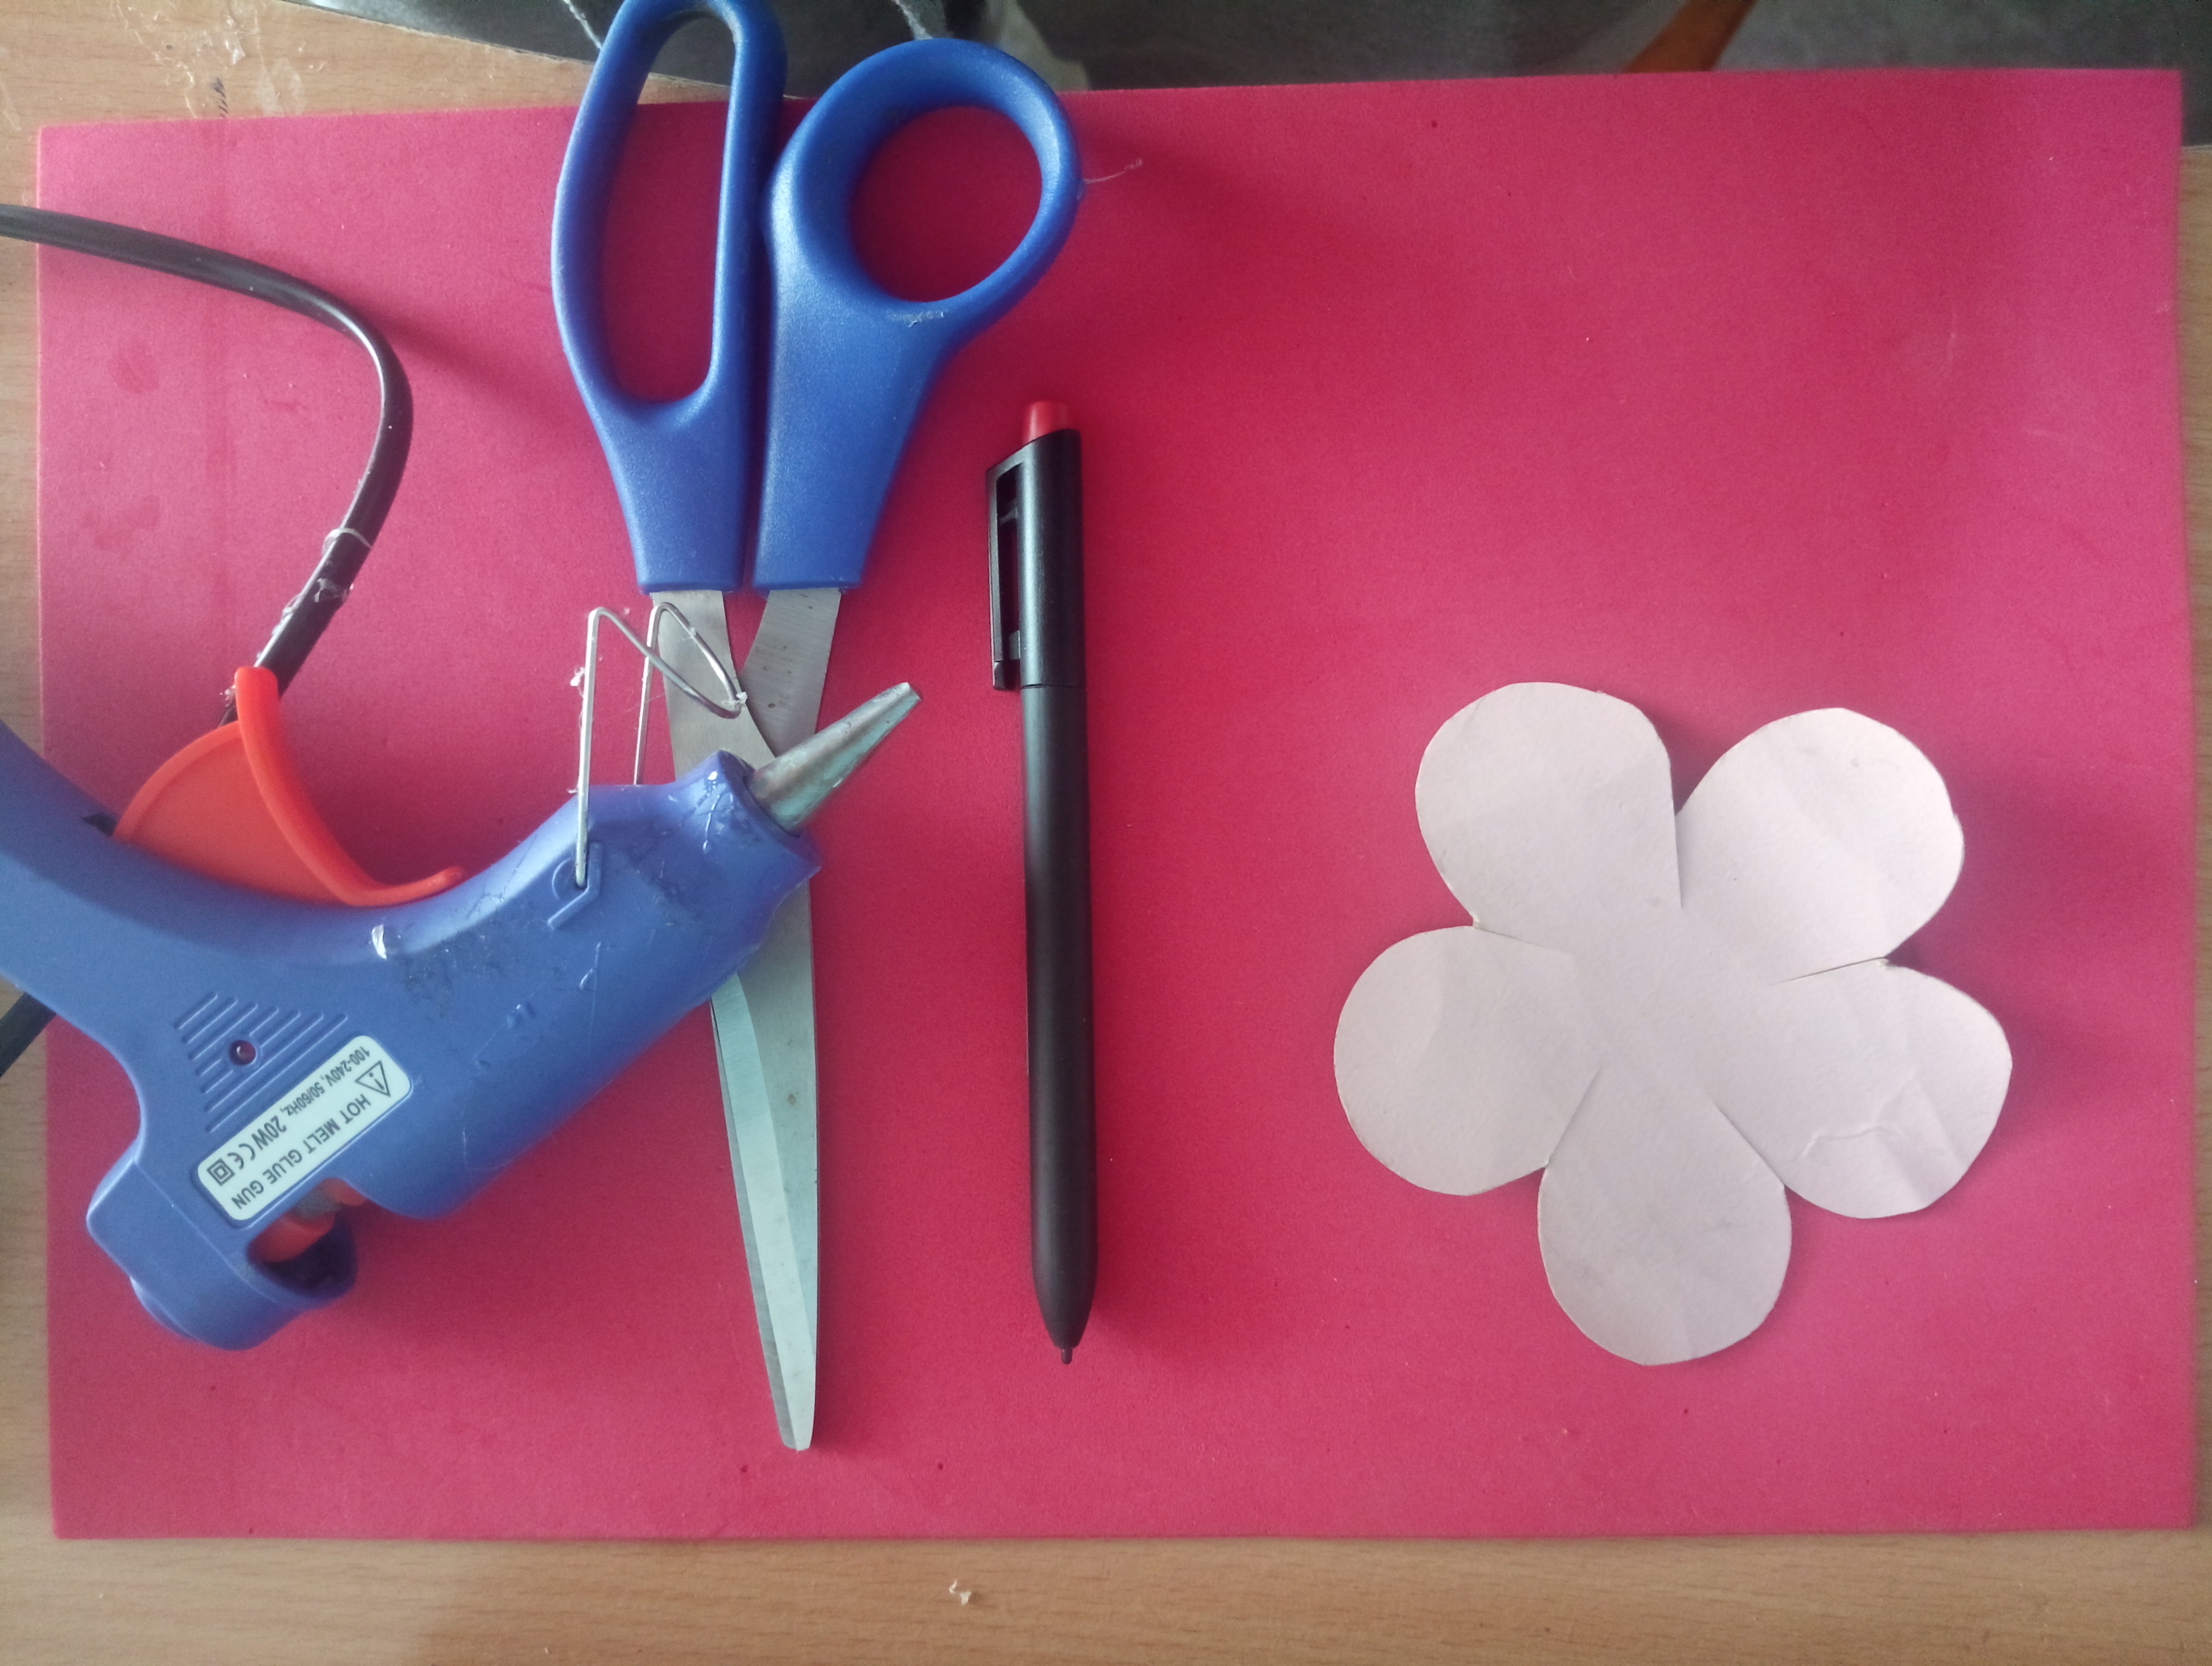
Next, I indicate you the materials that I used for this project, in my case I made several eternal roses.
Materials:
Foami of different colours
Silicone gun
Silicon
Hair iron
Sticks
Anime
Coloured cardboard.
Mould
Scissors
Pointer for marking
Procedure
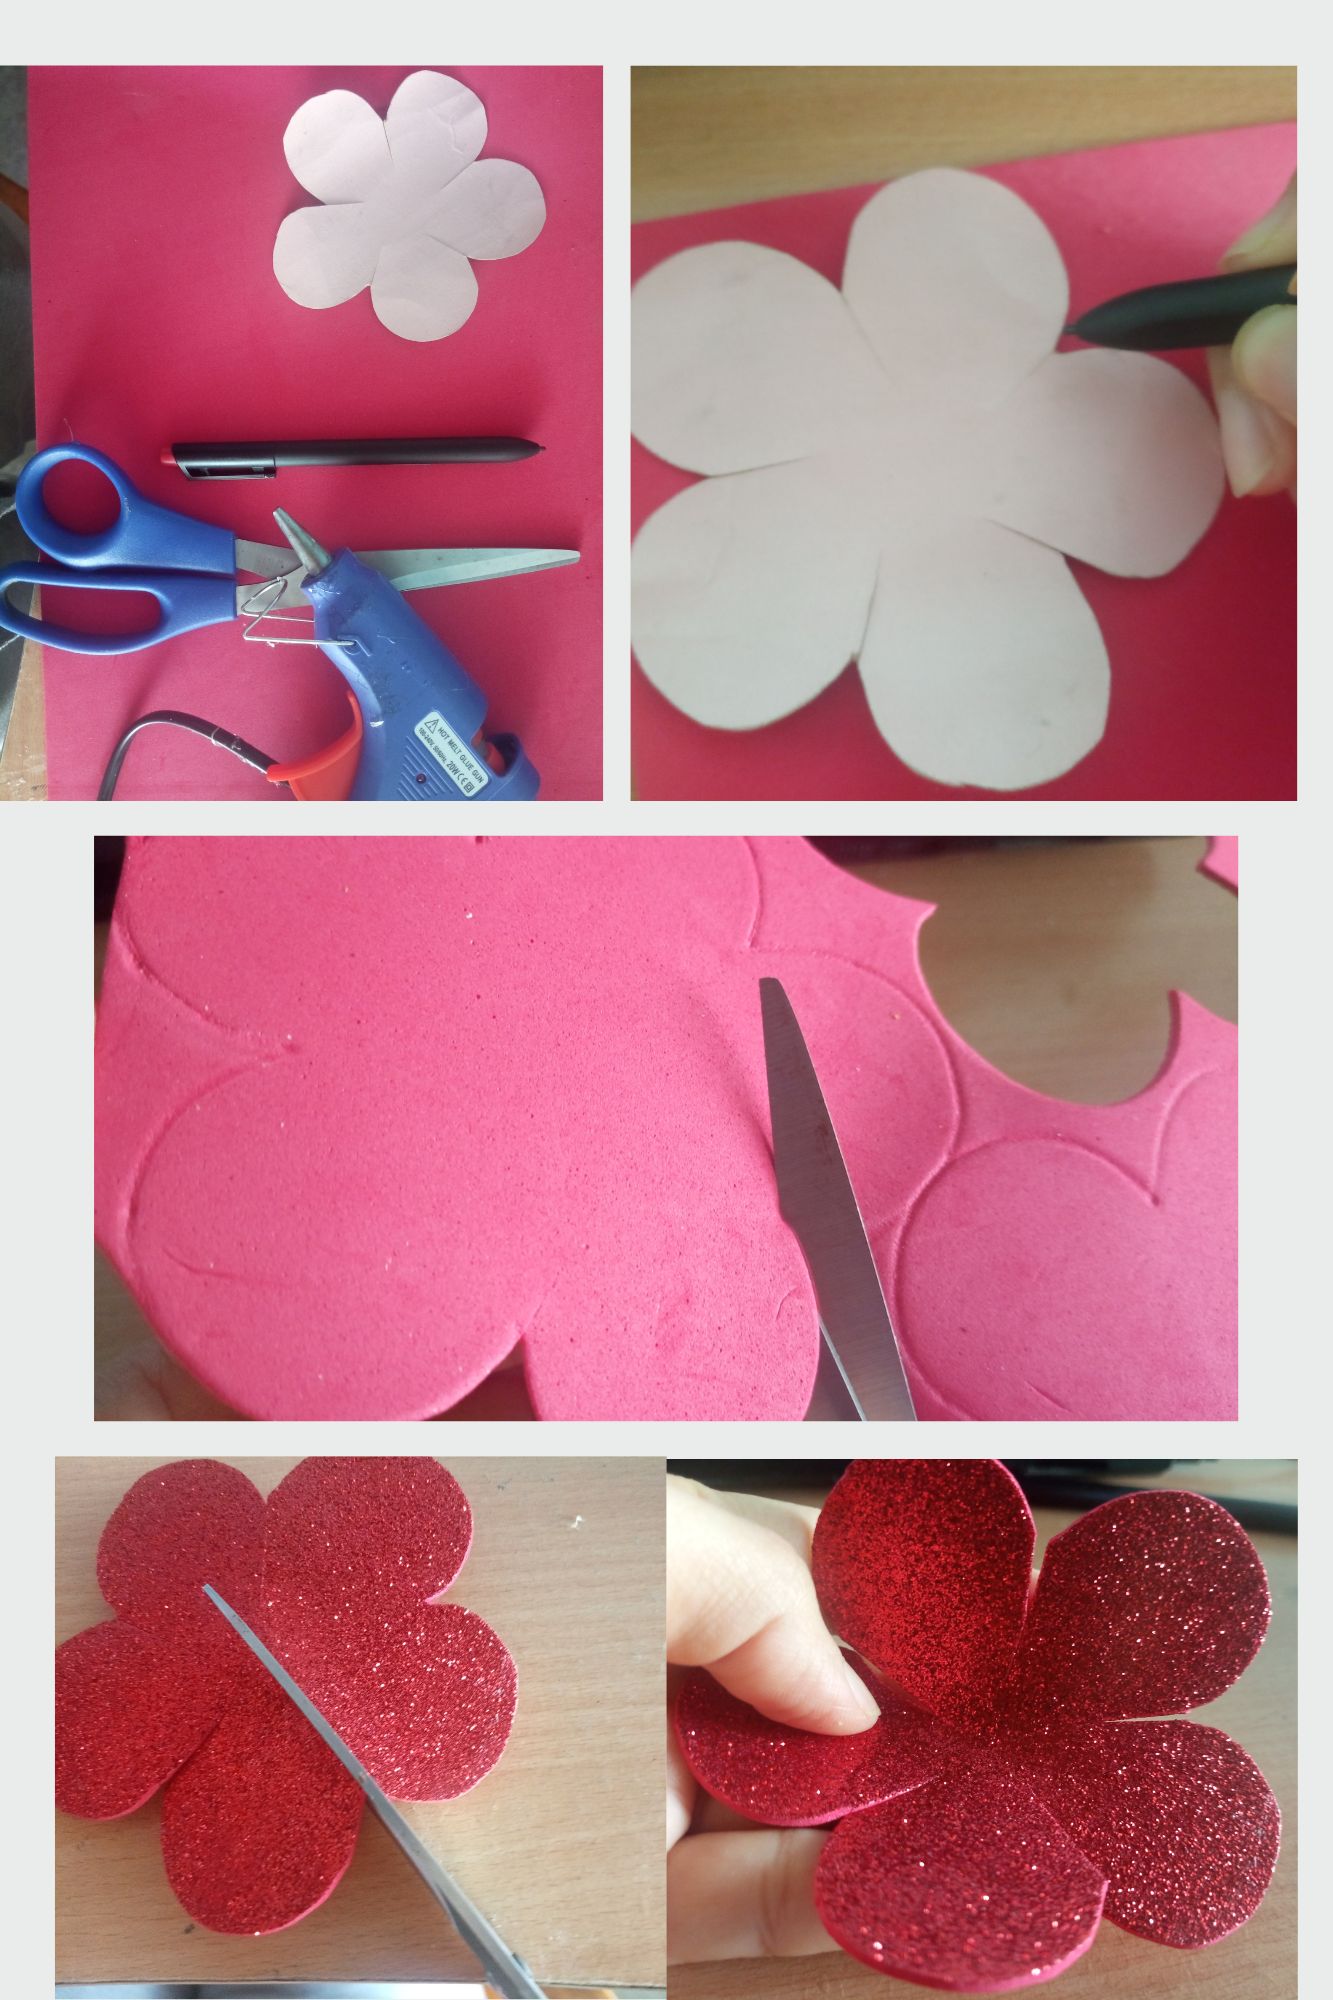
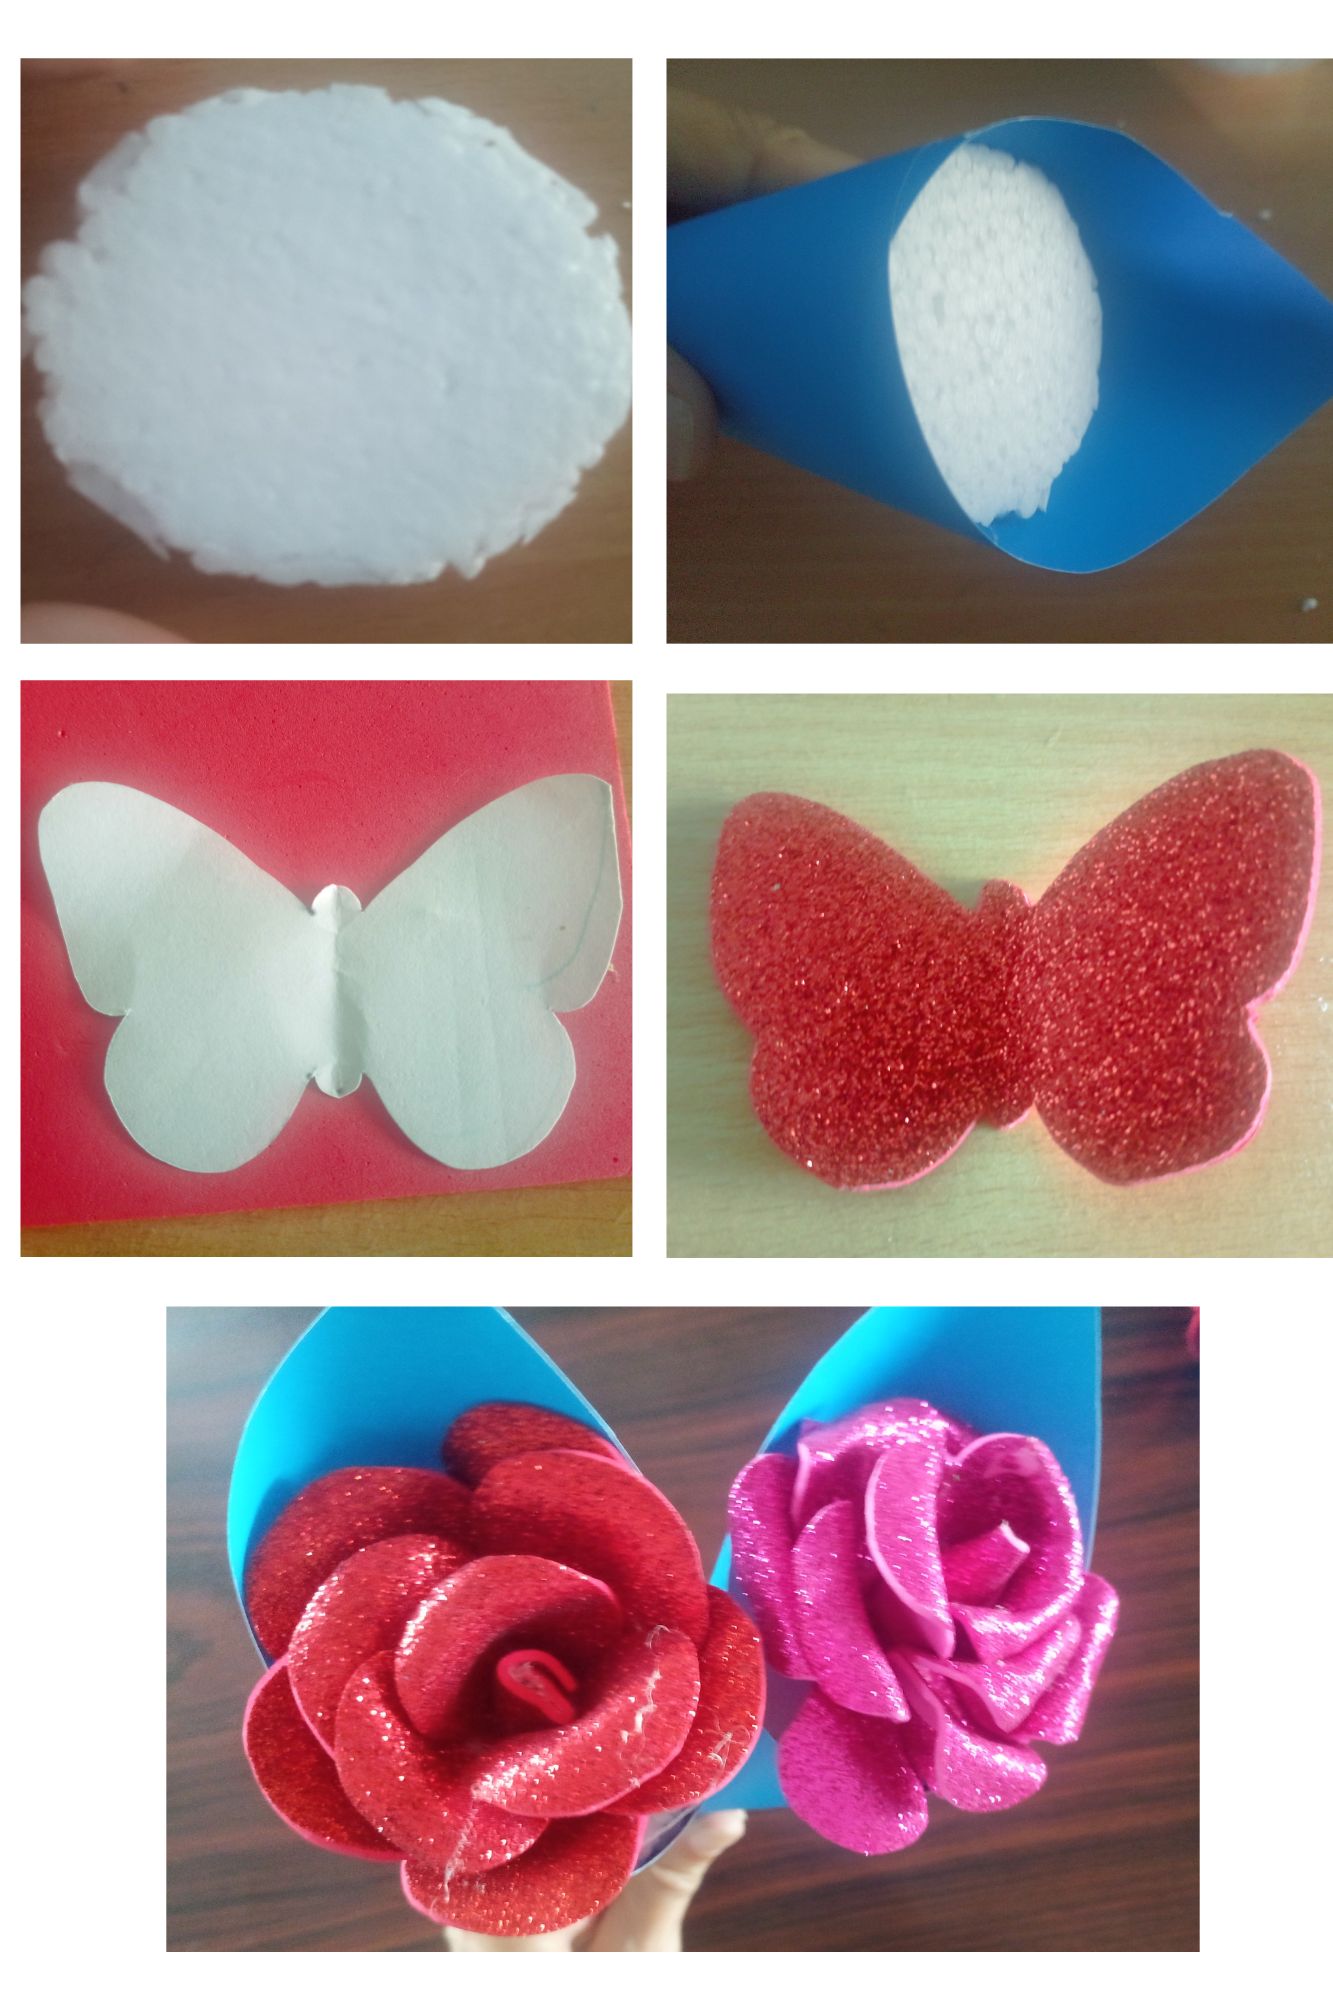
Take the foami on the side where it is not frosted, place the pattern to trace the petals and mark it with the pointer, I usually use the pointer a lot as it works without ink or graphite so the work is more professional.
I mark the petals in this case I used the whole sheet of foami so as not to waste material as it is a bit expensive.
When I cut each set of petals with a scissors I cut each line to give more shape to the petals.
With an iron I place each petal to heat it, with a toothpick I mould it into a rounded shape and then with two fingers I push the petal forward so that it has a two dimensional shape as close to a real petal as possible.
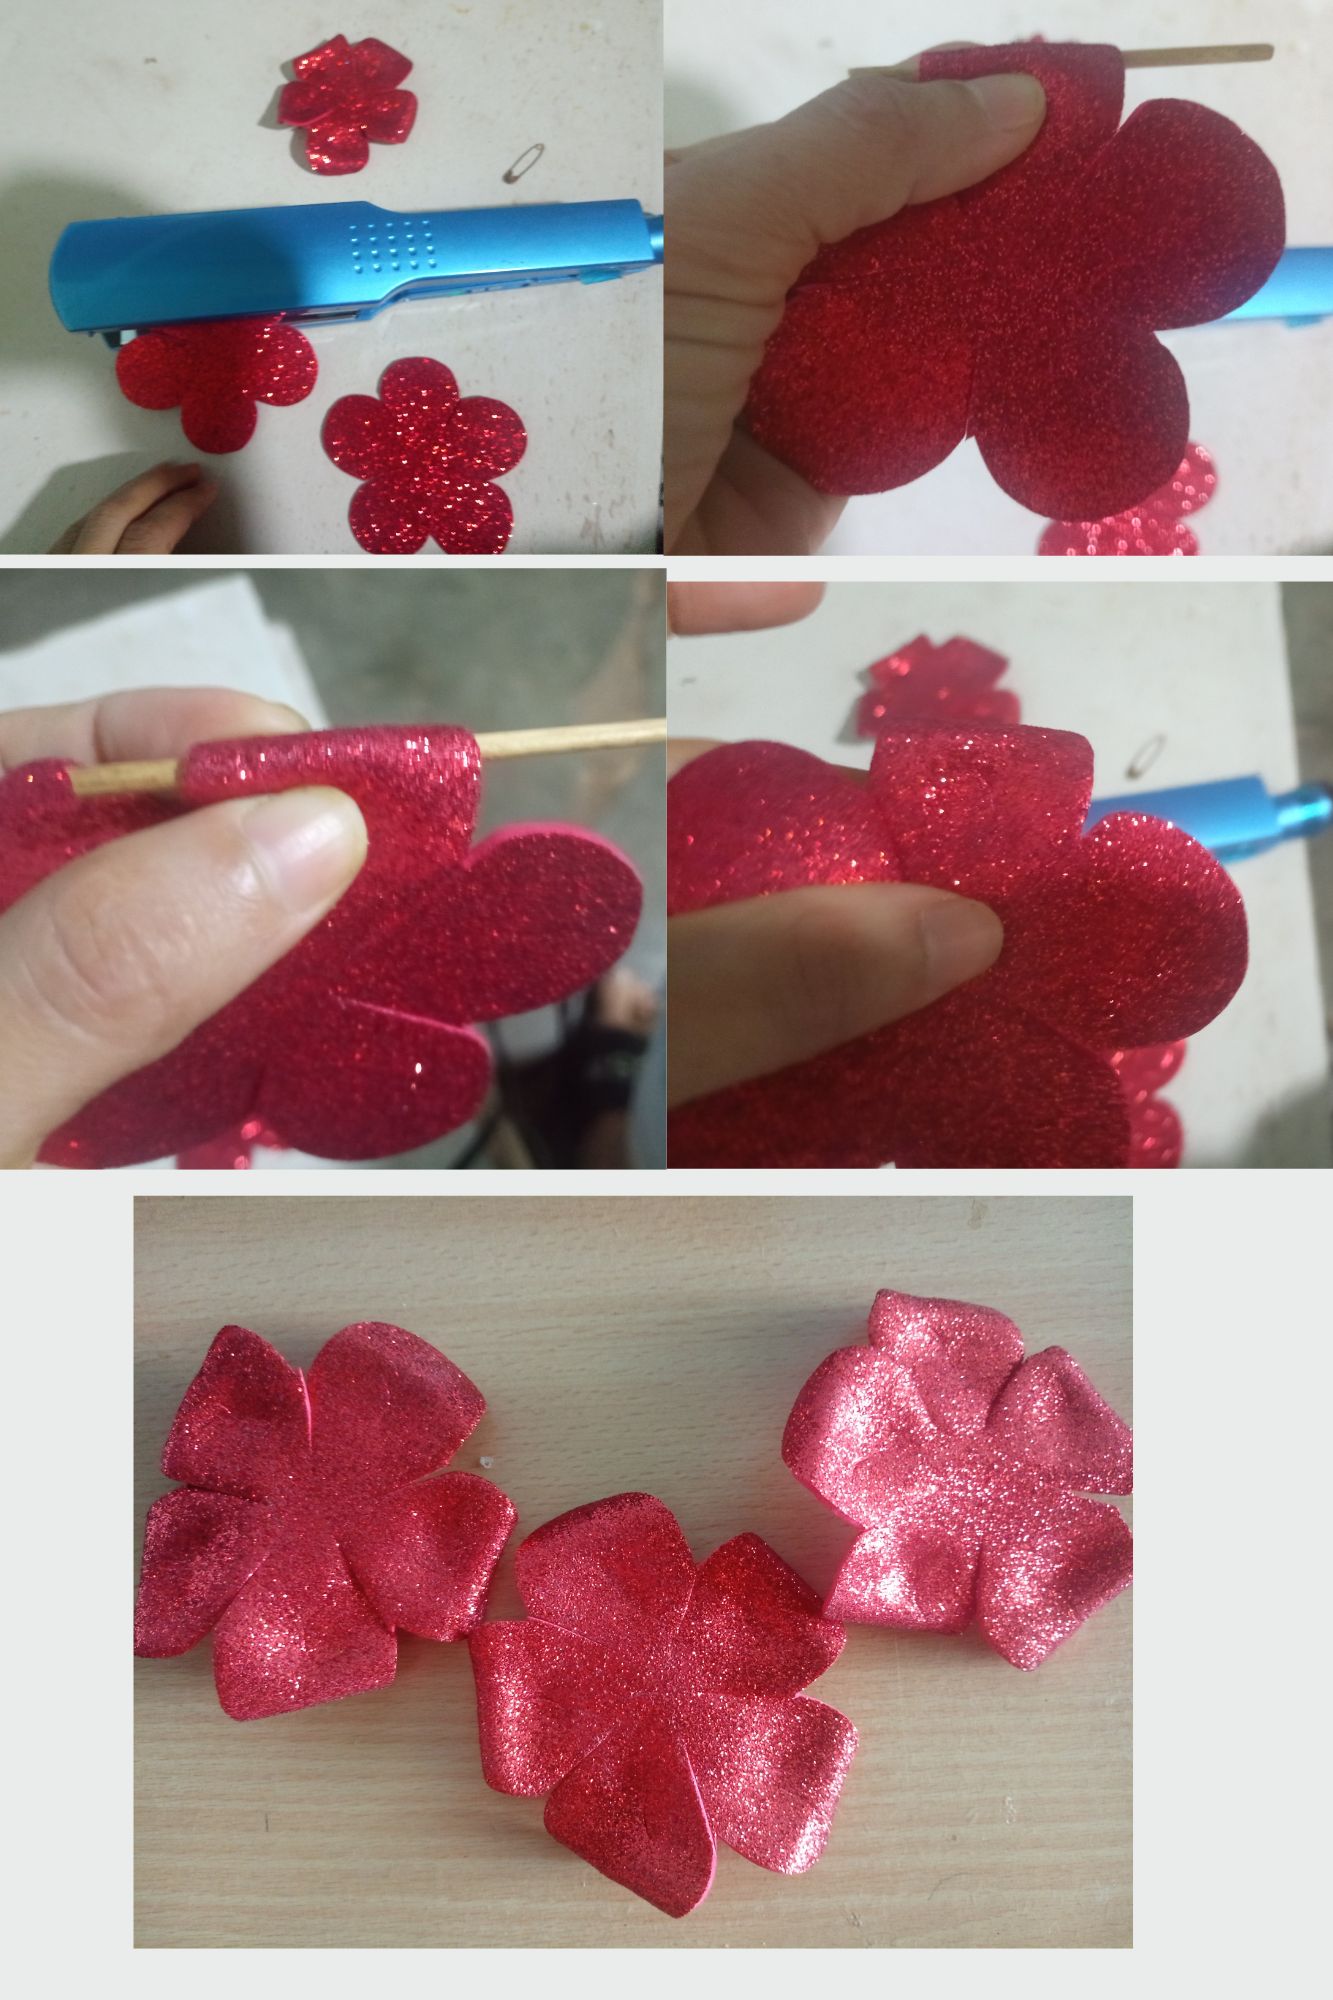
I take a stick, in this case I used small sticks that I created myself with a weed that comes out in winter, I take it and dry it and these strong sticks come out, when I take the stick I take a little piece of foami that is left over from the cuts of the petals I put silicone on it and I form a kind of little button that has the roses on it, I then place the series of petals in the middle and put it on the stick, proceed to put silicone on each of the petals and start to shape it without pressing too much so that the rose has volume.
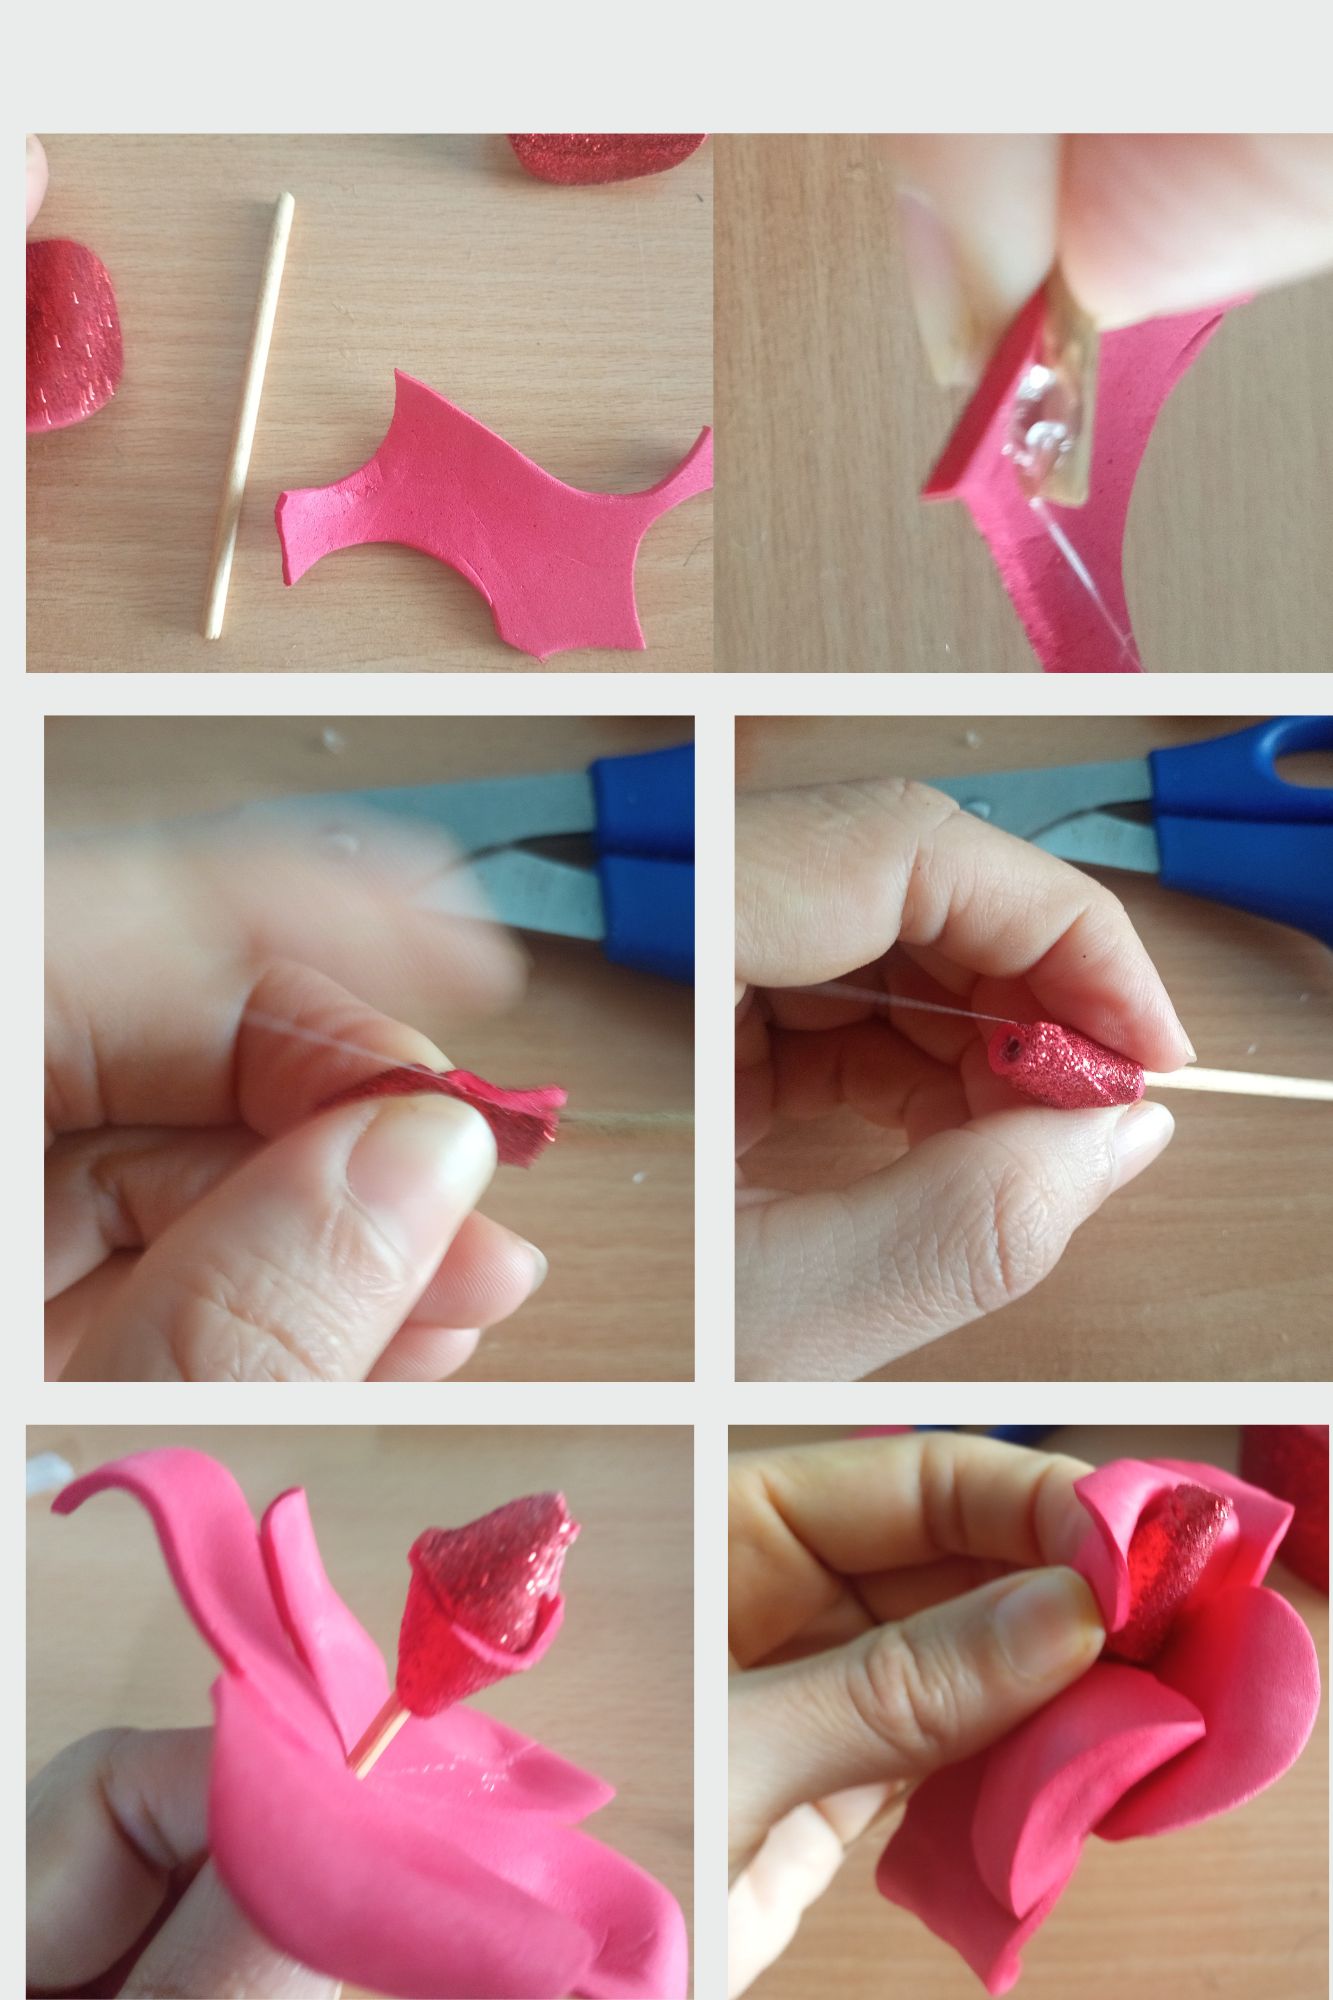
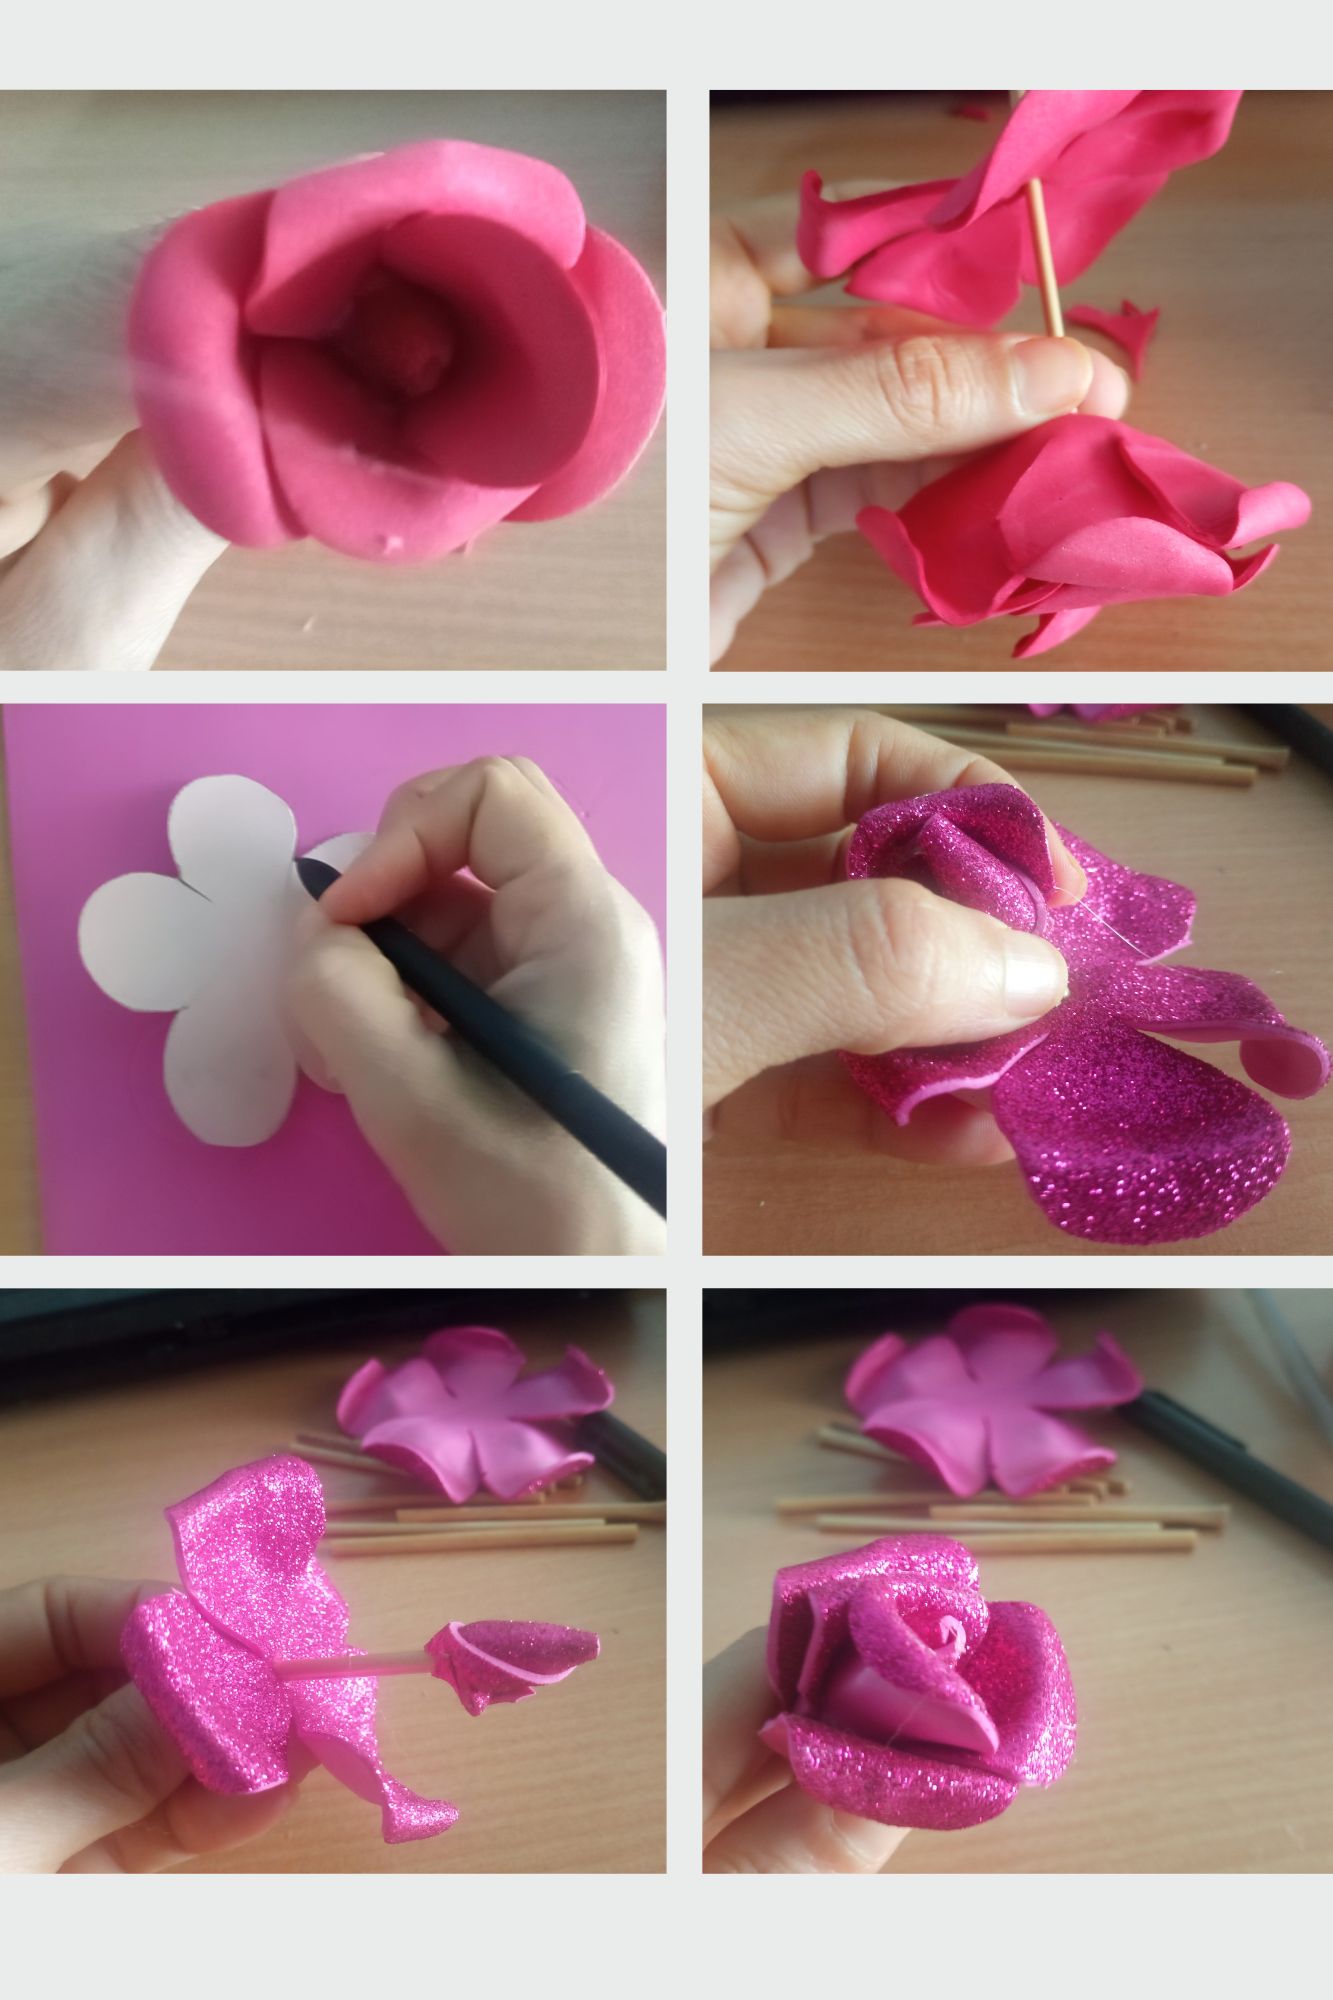
Once the first petal is strategically glued, we continue with the second petal and place it so that it is not in the same place as the other petals to gain volume and to be seen with the petals that are not uniform, so we continue with the third petal, for the fourth petal I usually put silicone only on the base so that the group of petals is in a leafy shape making the petal look more beautiful.
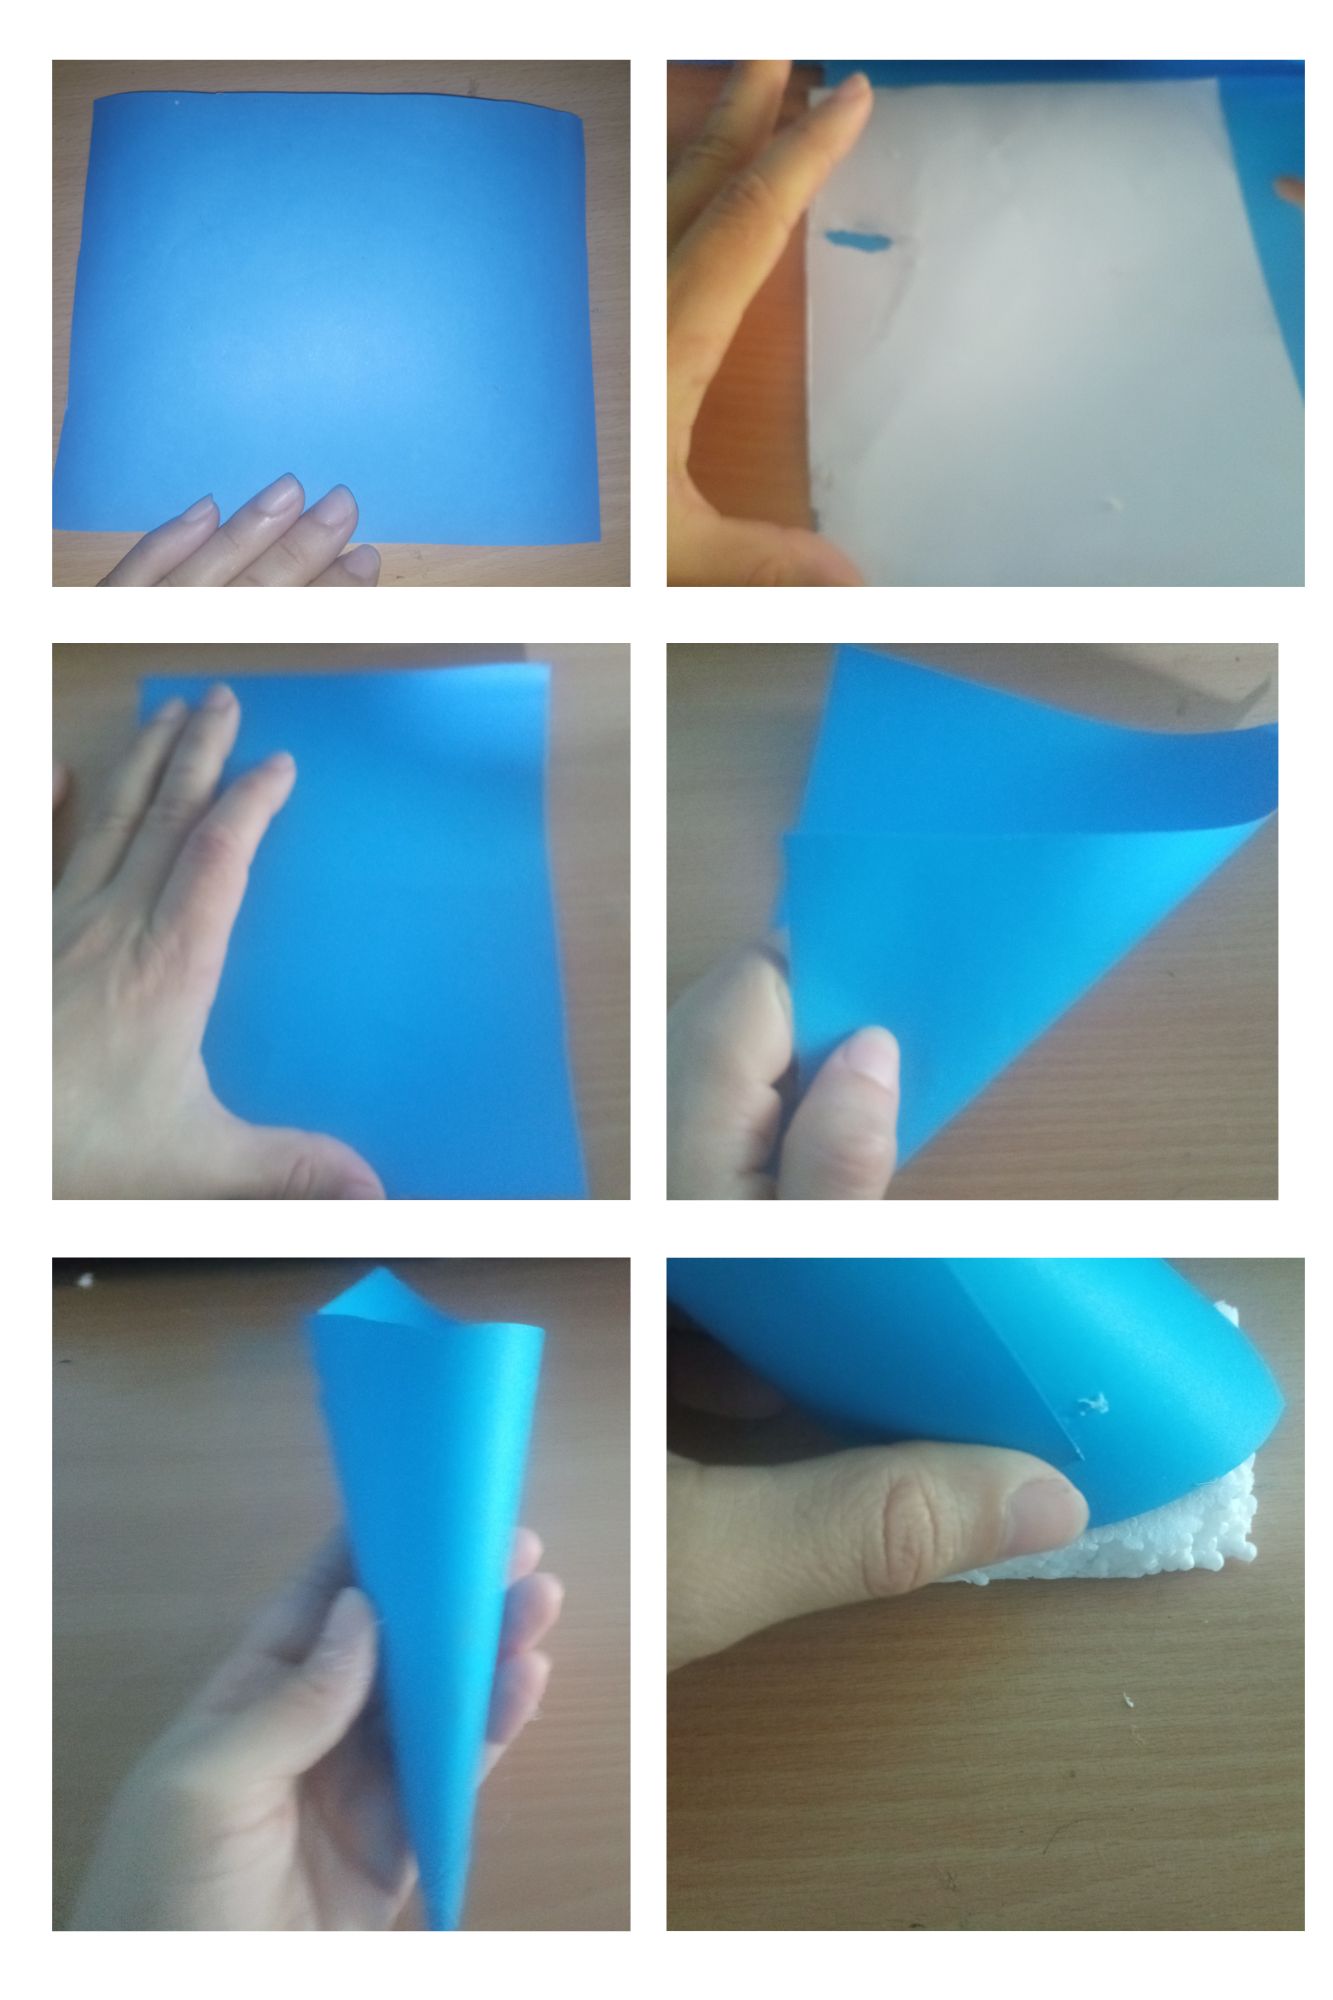
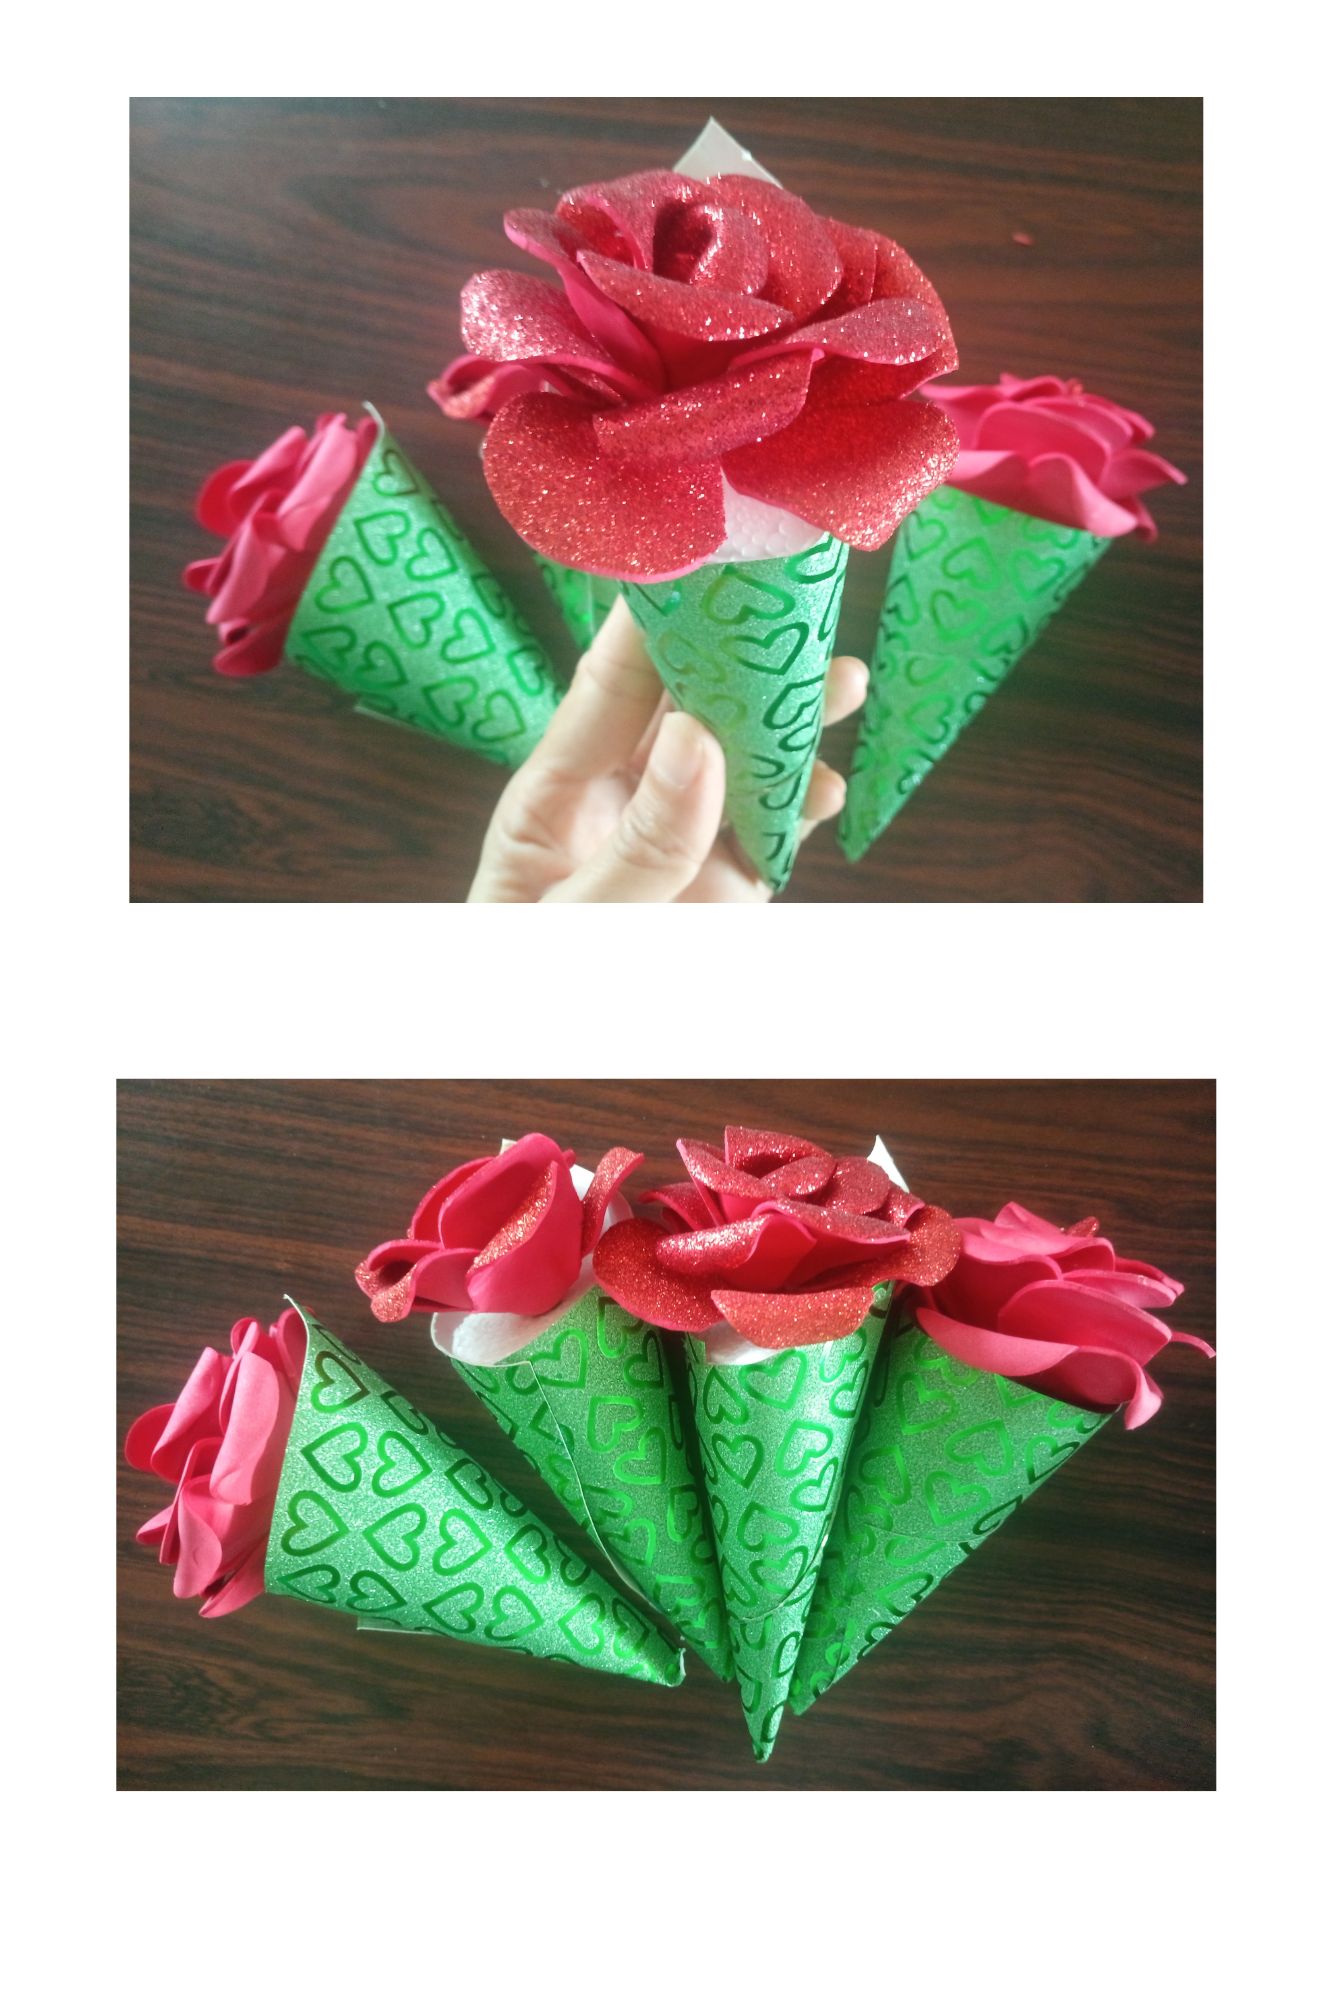
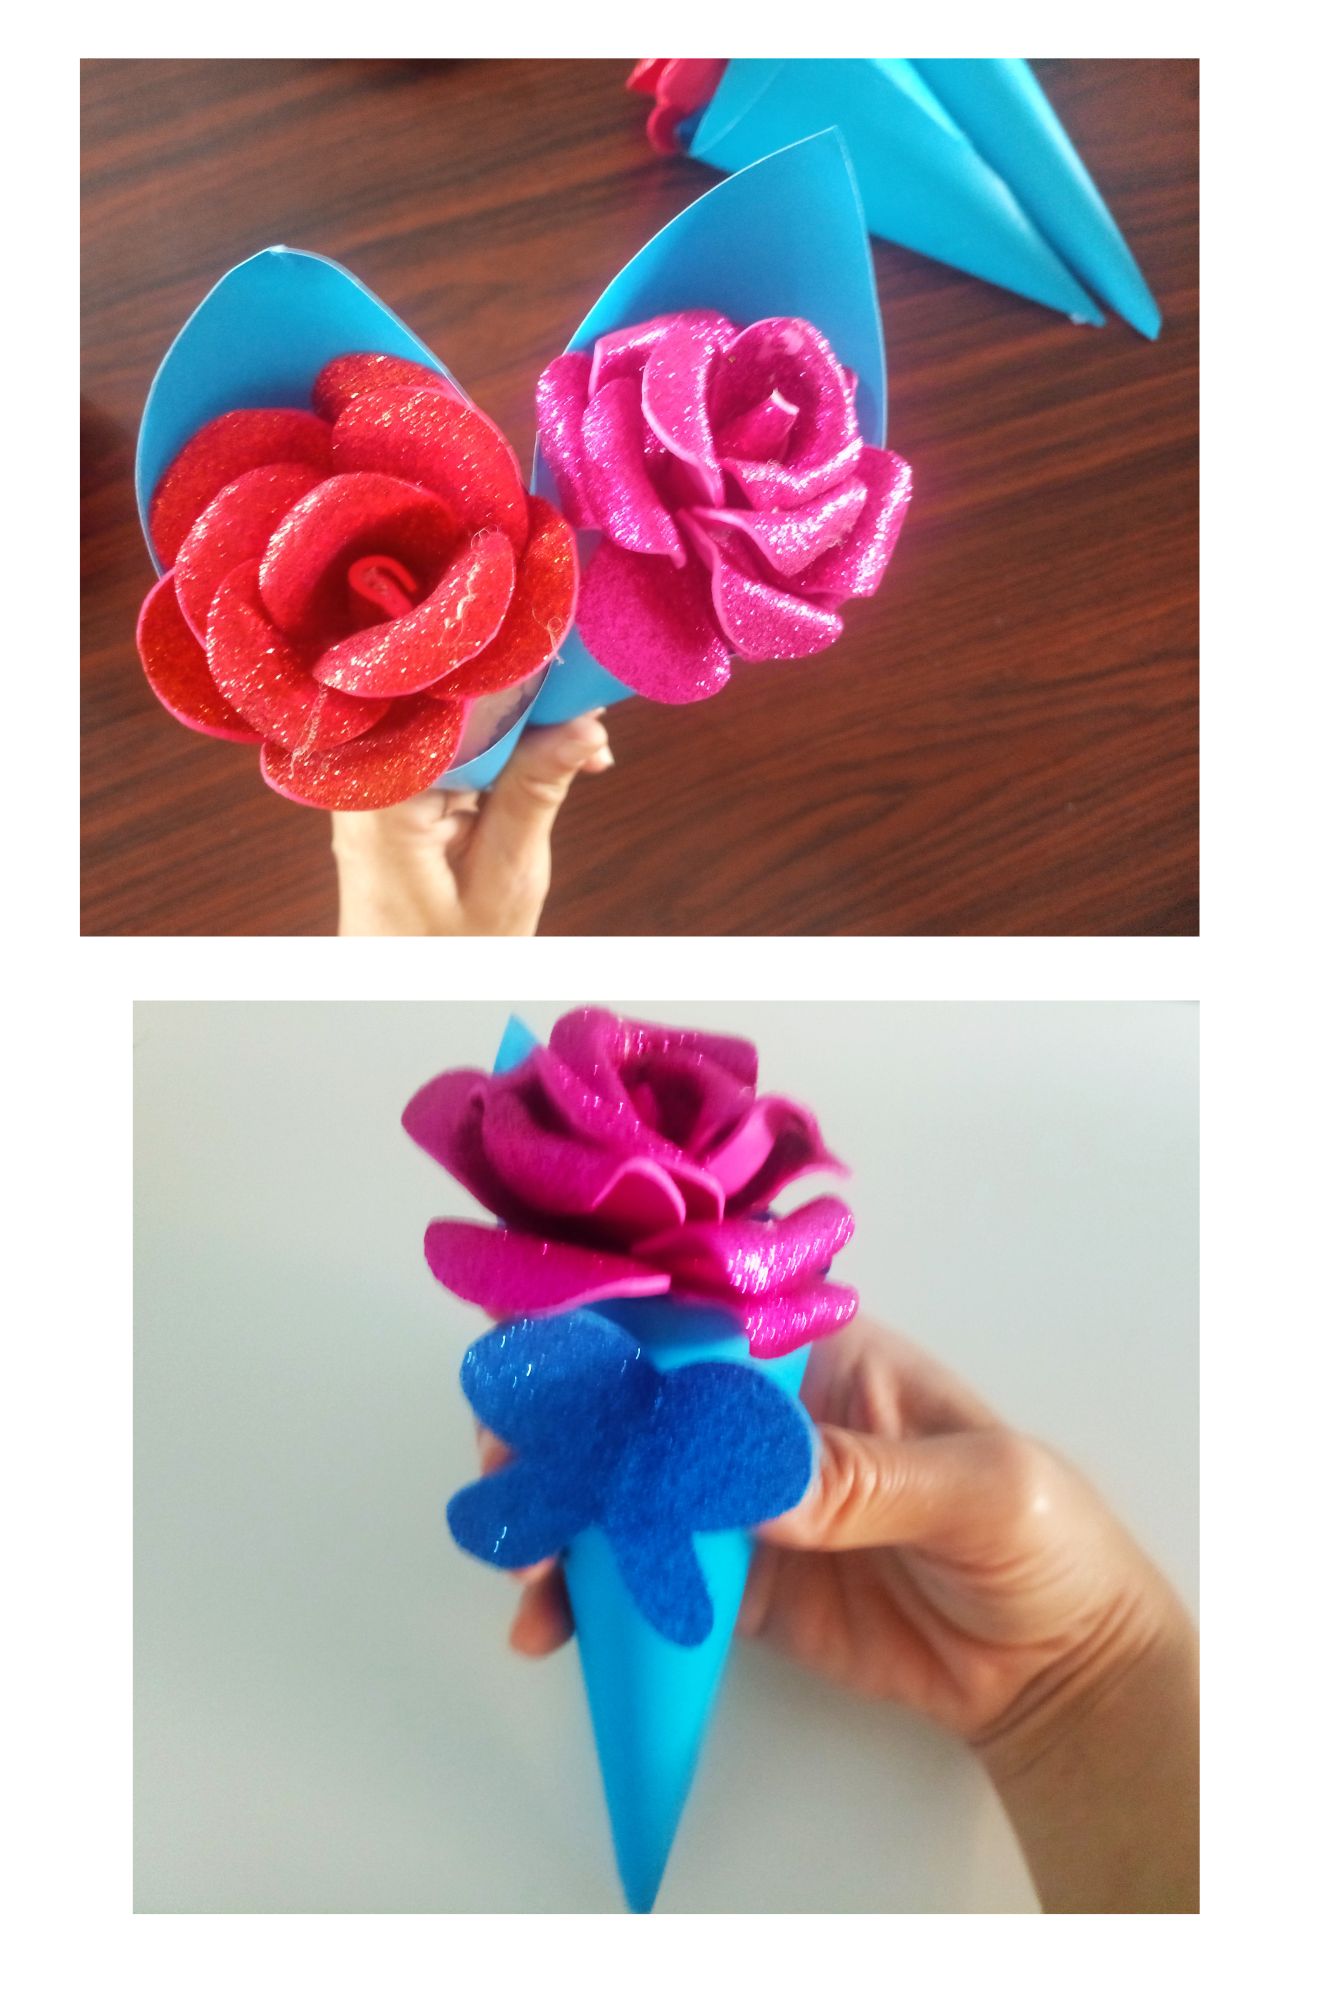
Then I take the cardboard and cut out a square and I make a kind of basket by taking the cardboard diagonally at the tip which makes the shape like a triangle, after I have the shape of the basket I put silicone on it to seal it.
Take the basket upside down to measure the anime to be cut out, then with the scissors cut out a circle to the size of the mouth of the basket we made.
The anime is pressed in, then look for the middle of the anime and insert the flower stick, some of them I cut a little vertical piece of green foami, I put silicone on it and wrapped the stick around it to make it look like a flower, but it was a bit thick and as the anime covers the stick well I decided to skip this step.
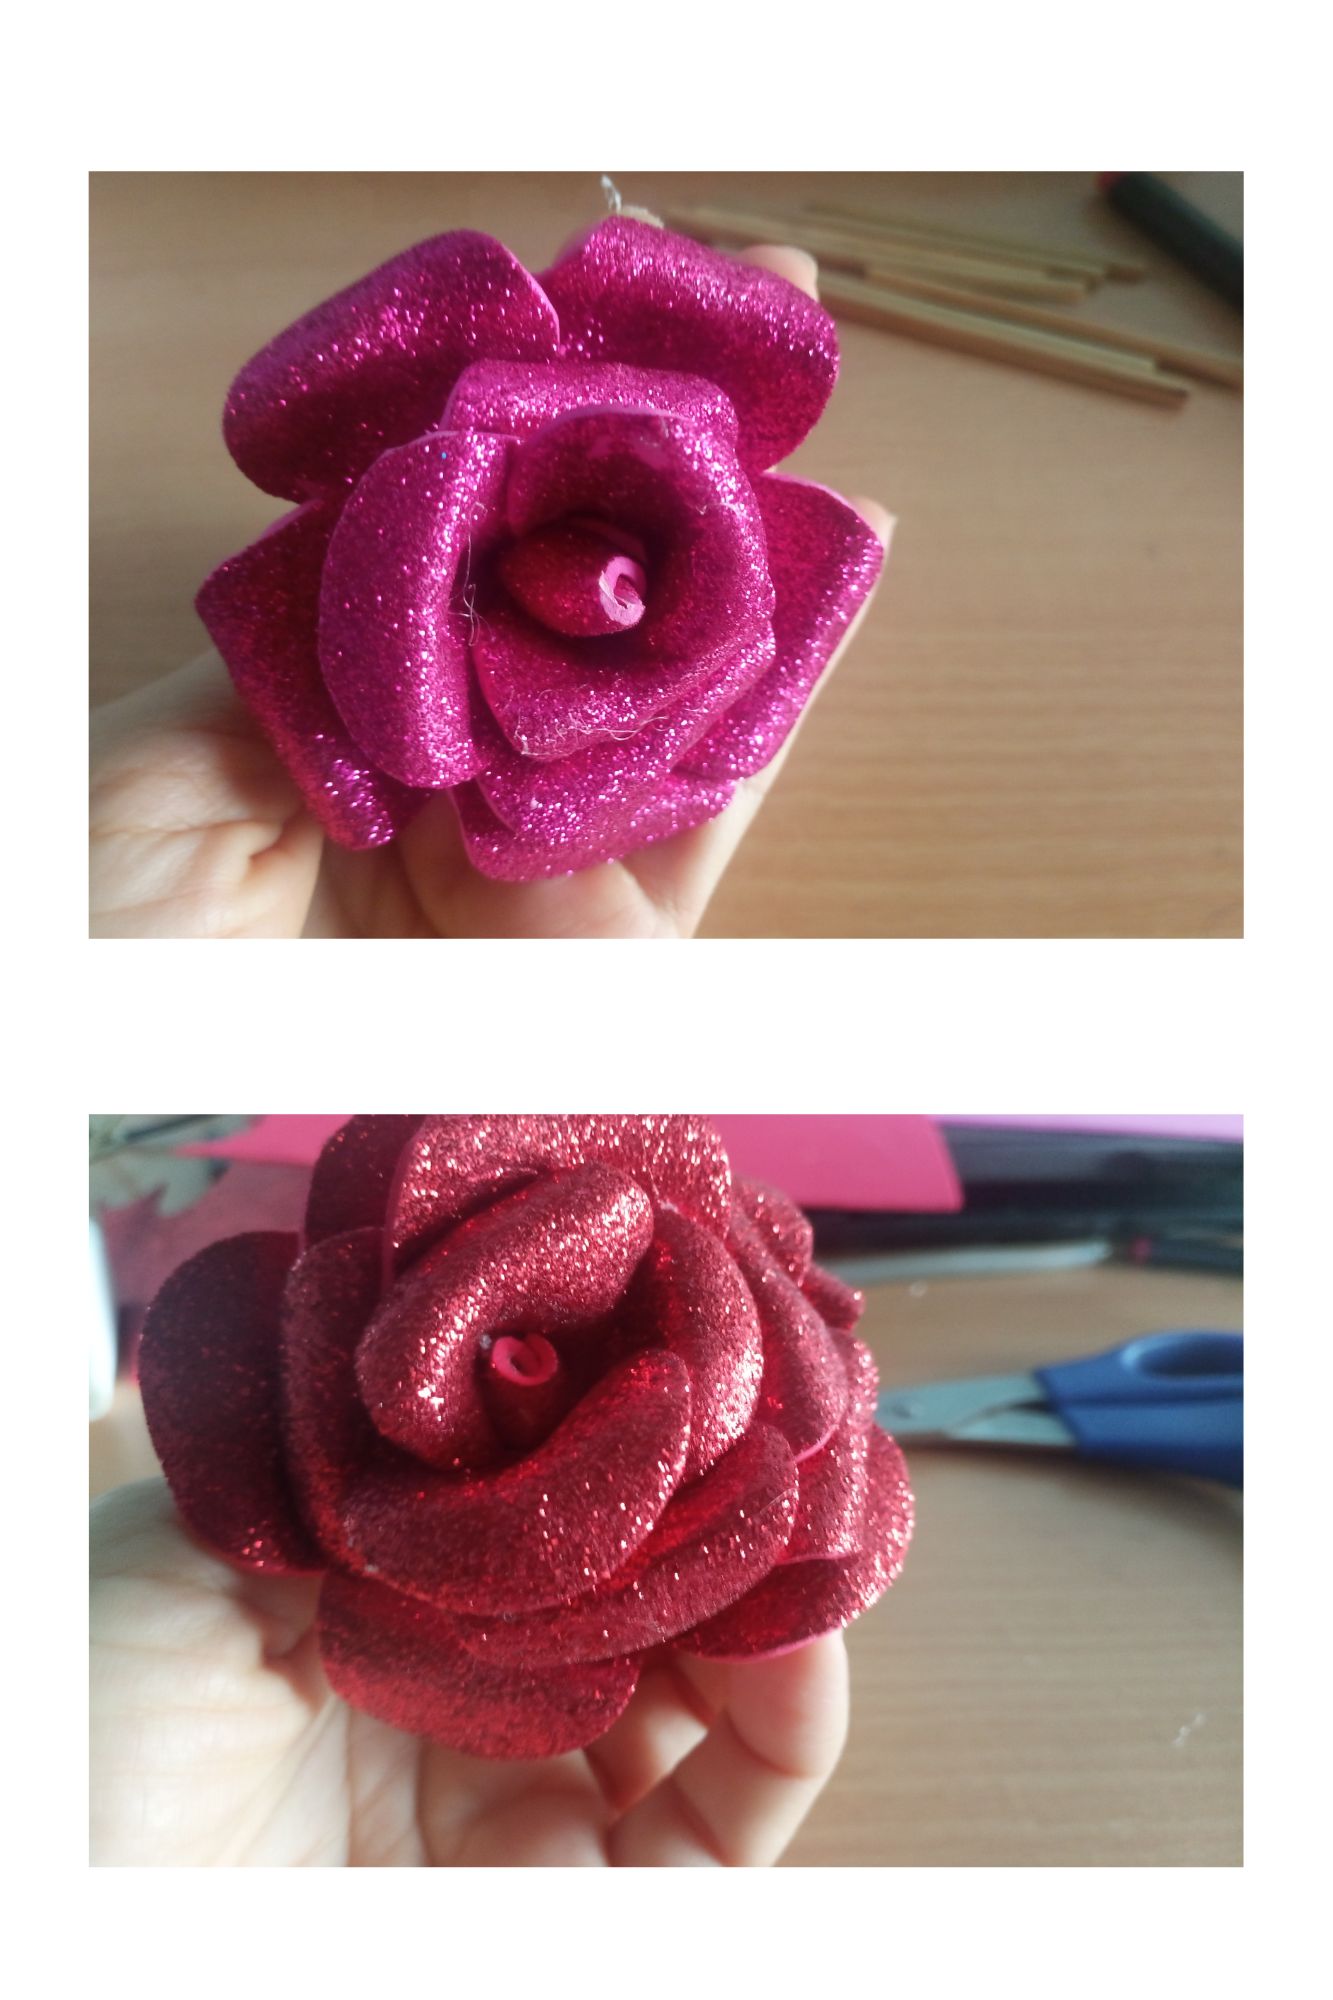
To make the project more flirty I looked for the mould of a butterfly and I marked it with the pointer on a little piece of foami, then I cut and glued, I did that with some of them because it took me a long time to make these little roses, it is a job that takes time, although it doesn't look like it, in my case I made 18 of these little eternal roses, that really took me forever to make them hahaha.
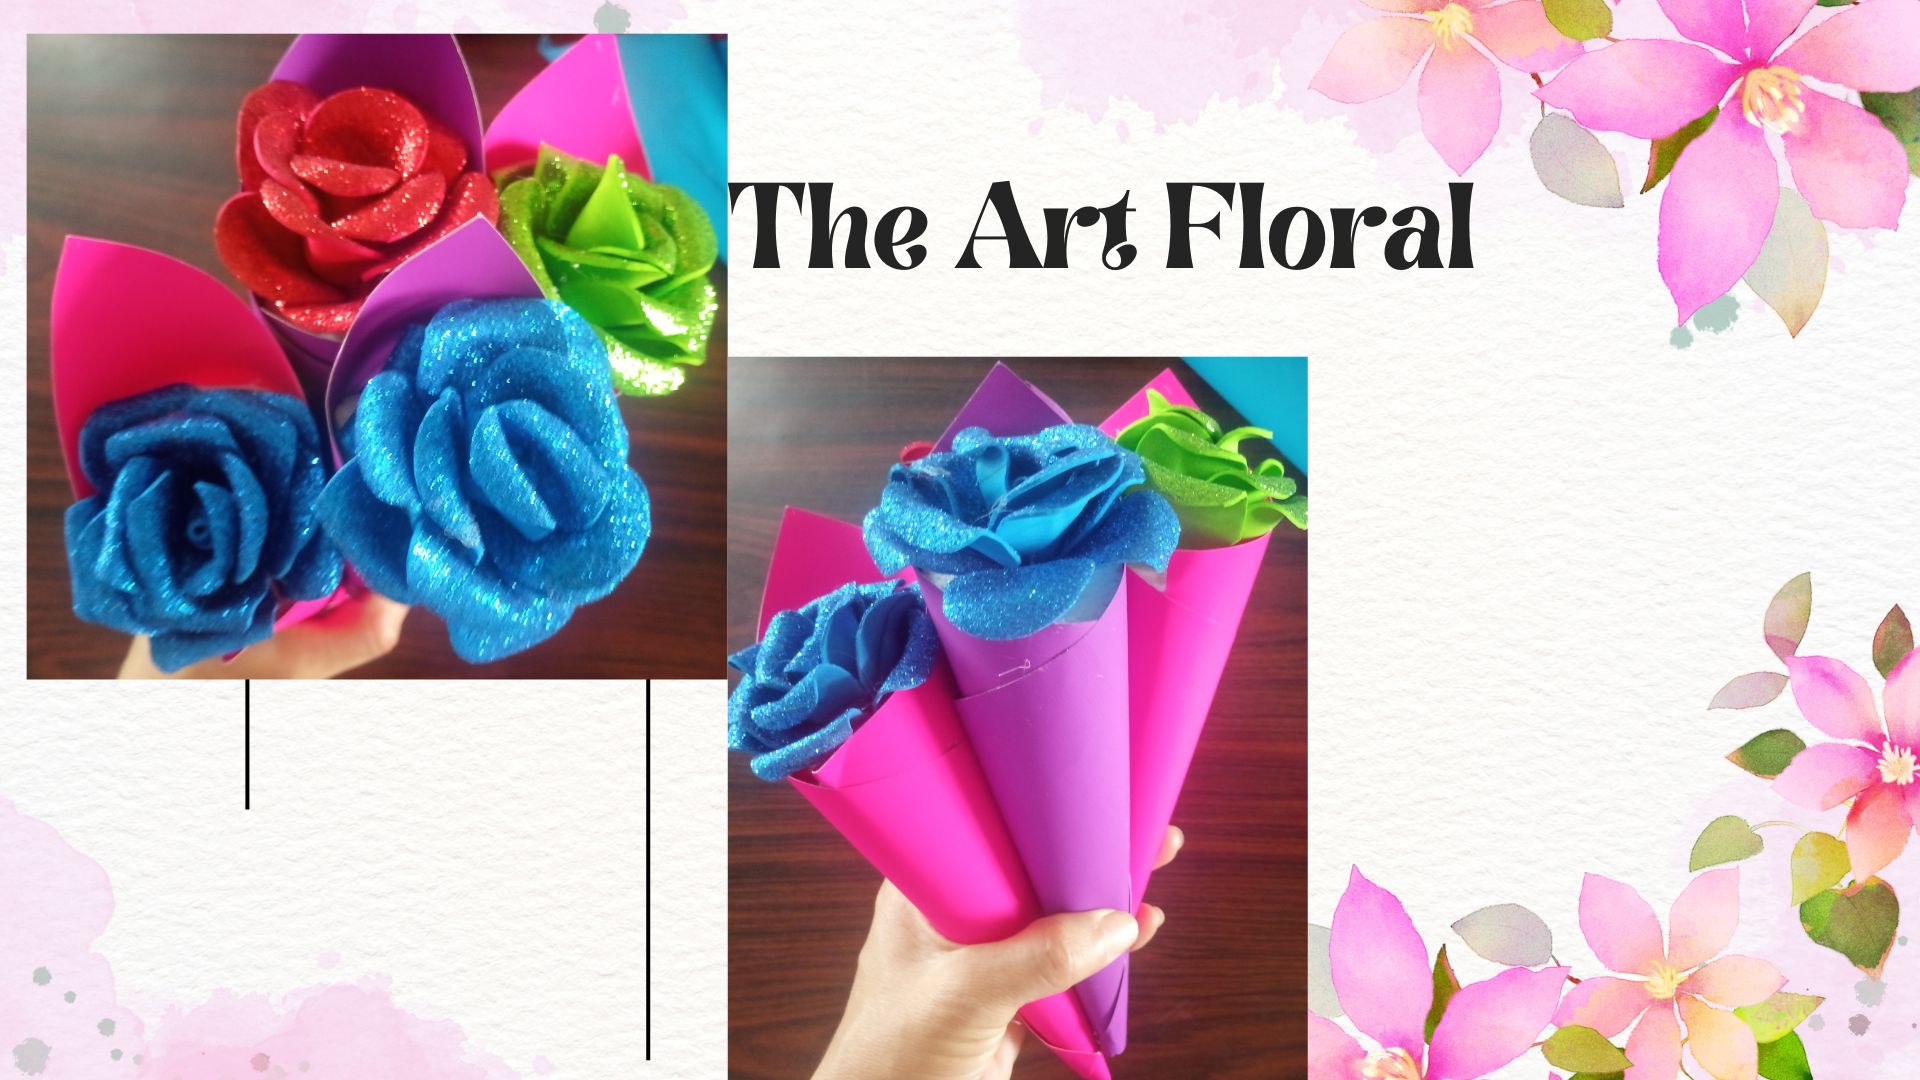
This is the result of a group of eternal flowers, a total of 18 everlasting roses in different colours I hope you liked the craft of the day.

Well friends this is all for my part, see you God willing in another post to continue showing you some of the crafts that I love to do. See you next time.
Español
Hay una variedad de rosas eternas que varían según el tamaño y el número de pétalos, en mi caso hice varias de diferentes pétalos, una de cinco, otra de 4 y la última en la que me quedé corta de material la hice de tres pétalos, lo más importante a la hora de pegarlas es colocarlas estratégicamente para que queden bonitas, para que no se note la diferencia entre una y otra, eso te lo dará la práctica y el cómo colocas cada una de las flores, por eso es muy importante practicar y tener algún que otro truco bajo la manga.
A continuación os indico los materiales que he utilizado para este proyecto, en mi caso he realizado varias rosas eternas.
Materiales:
Foami de diferentes colores
Pistola de silicona
Silicona
Plancha de pelo
Palillos
Anime
Cartón de colores
Molde
Tijeras
Puntero para marcar
Procedimiento
Toma el foami por el lado donde no está escarchado, coloca el patrón para trazar los pétalos y márcalo con el puntero, yo suelo usar mucho el puntero ya que funciona sin tinta ni grafito por lo que el trabajo es más profesional.
Marco los pétalos en este caso utilicé toda la hoja de foami para no desperdiciar material ya que es un poco caro.
Cuando corto cada juego de pétalos con una tijera corto cada línea para darle más forma a los pétalos.
()
Con una plancha coloco cada pétalo para calentarlo, con un palillo le doy forma redondeada y luego con dos dedos empujo el pétalo hacia adelante para que tenga una forma bidimensional lo más parecida a un pétalo real.
Tomo un palito, en este caso usé palitos pequeños que yo misma creé con una hierba que sale en invierno, lo tomo y lo seco y salen estos palitos fuertes, cuando tomo el palito tomo un pedacito de foami que sobra de los cortes de los pétalos le pongo silicón y voy formando una especie de botoncito que tiene las rosas, luego coloco la serie de pétalos en el centro y lo pongo en el palito, procedo a poner silicón en cada uno de los pétalos y empiezo a darle forma sin apretar mucho para que la rosa tenga volumen.
Una vez pegado estratégicamente el primer pétalo, continuamos con el segundo pétalo y lo colocamos de forma que no quede en el mismo sitio que los demás pétalos para ganar volumen y que se vea con los pétalos que no son uniformes, así continuamos con el tercer pétalo, para el cuarto pétalo suelo poner silicona solo en la base para que el grupo de pétalos quede en forma de hoja haciendo que el pétalo se vea más bonito.
Luego cojo el cartón y recorto un cuadrado y hago una especie de cesta cogiendo el cartón en diagonal por la punta lo que hace la forma como un triángulo, después de tener la forma de la cesta le pongo silicona para sellarla.
Tomo la canasta boca abajo para medir el anime a recortar, luego con la tijera recorto un círculo del tamaño de la boca de la canasta que hicimos.
Se presiona el anime, luego se busca el centro del anime y se inserta el palito de la flor, a algunos les corté un pedacito vertical de foami verde, le puse silicón y lo envolví con el palito para que pareciera una flor, pero quedó un poco grueso y como el anime tapa bien el palito decidí omitir este paso.
Para hacer el proyecto más coqueto busqué el molde de una mariposa y lo marqué con el puntero en un pedacito de foami, luego corté y pegué, eso lo hice con algunas porque me llevó mucho tiempo hacer estas rositas, es un trabajo que lleva tiempo, aunque no lo parezca, en mi caso hice 18 de estas rositas eternas, eso sí que me llevó una eternidad hacerlas jajaja.
Este es el resultado de un grupo de flores eternas, un total de 18 rosas eternas de diferentes colores espero que les haya gustado la manualidad del día.
Bueno amigos esto es todo por mi parte, si Dios quiere nos vemos en otro post para seguir mostrándoles algunas de las manualidades que me encanta hacer. Nos vemos la próxima vez.
Que buena idea la de usar la plancha para el cabello para calentar el foami y así poder moldearlo✨
Me gustó mucho el resultado, la idea de las rosas eternas es realmente bonita, saber que será un hermoso recuerdo que tendrás por largo tiempo sin cambios ☺️
Si, las rosas eternas son una gran regalo para compartir, gracias por tu agradable visita, saludos y bendiciones
Oh, muchas gracias, agradecida🥳
Esas rosas eternas son hermosas y es un detalle perfecto para quienes les gusta conservar esas cositas por mucho tiempo. Me gusta la forma de esas rosas, están preciosas 😍
Muchas gracias por visitar mi post, que bueno que te gustaron las rosas, saludos y bendiciones