Saludos, soy nuevo en la comunidad, me dedico a realizar joyería artesanal desde hace más de 10 años con el nombre M16uel joyas, en esta primera publicación que también será el primer tutorial de mi vida te voy a enseñar como realizar un anillo simple pero tambien bastante lindo de alambre usando algunas herramientas básicas.
Greetings, I'm new in the community, I've been making handmade jewelry for more than 10 years with the name M16uel joyas, in this first publication that will also be the first tutorial of my life I'm going to show you how to make a simple but also quite nice wire ring using some basic tools.

Usaremos:
- Pinzas de joyería, sobre todo la plana y de corte
- Alambre o hilo de cobre, también puede ser de plata, bronce, etc...; en este caso utilice de cobre de 1 mm de espesor.
- Mandril para joyería o cualquier objeto cilíndrico que pueda ayudarnos a redondear el anillo y que pueda contener la medida del aro que queremos hacer.
We will use:
- Jewelry tweezers, especially the flat and cutting ones.
- Copper wire or thread, it can also be silver, bronze, etc...; in this case use 1 mm thick copper.
- Jewelry mandrel or any cylindrical object that can help us to round the ring and that can contain the size of the ring we want to make.
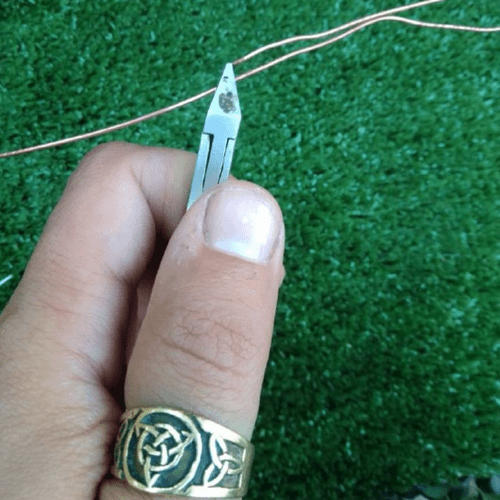
Paso 1
Con la pinza de corte, pica un trozo de alambre de aproximadamente 14 cm de largo, para poder maniobrar bien la elaboración de la pieza.
Doble a la mitad dejando una curva un poco abierta.
Step 1
With the cutting pliers, chop a piece of wire approximately 14 cm long, so that you can maneuver well the elaboration of the piece.
Fold it in half, leaving a slightly open curve.
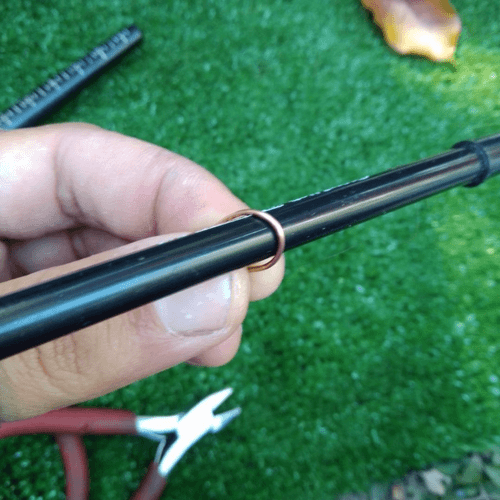
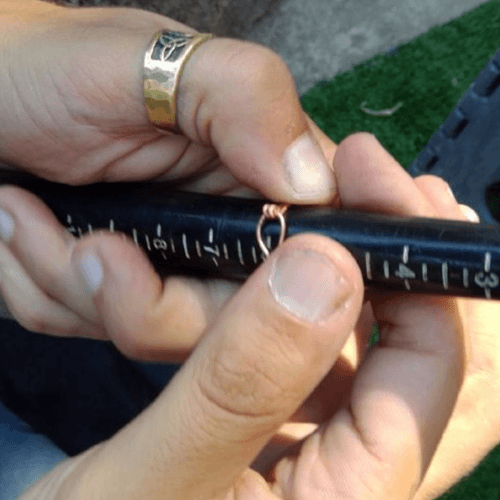
Paso 2
Modele mejor la curva del alambre con un bolígrafo por ejemplo.
Con el mandril fijé el anillo a una medida aproximada de la que necesites.
Inserte el extremo abierto por el aro, esto hazlo con cuidado ayudándote con la pinza, con estas ve juntando los dos hilos para tener un acabado mejor, con tus dedos ve moviendo el anillo a la medida deseada, ten calma en este paso.
Cuando hallas conseguido la medida dobla las puntas del alambre con calma.
Step 2
Model the curve of the wire better with a pen for example.
With the mandrel fix the ring to an approximate measure of the one you need.
Insert the open end through the ring, do this carefully helping you with the pliers, with these go joining the two wires to have a better finish, with your fingers go moving the ring to the desired size, be calm in this step.
When you have achieved the desired size, bend the ends of the wire calmly.
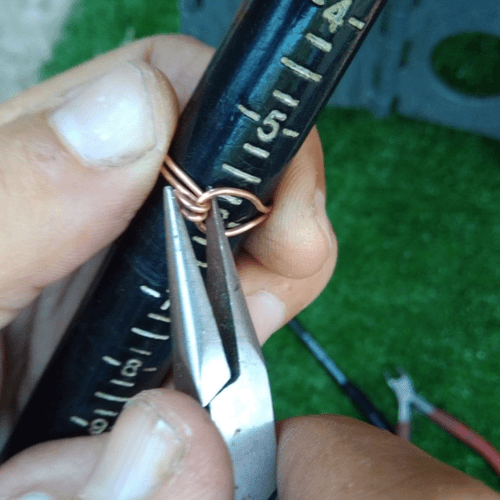
Paso 3
- Haz el corte del excedente de alambre.
- Con la pinza junta los hilos del anillo y crea una envoltura para cerrar el anillo.
- Si deseas ve cerrando un poco el ojal al gusto, hasta que estés conforme.
- Saca el anillo del mandril para manipularlo y verlo mejor, procura mejora el corte de la envoltura y ajústalo con la pinza de manera que no moleste ni lastime.
Step 3
- Cut the excess wire.
- With the pliers join the threads of the ring and create a wrap to close the ring.
- If you wish, close the eyelet a little to your liking, until you are satisfied.
- Remove the ring from the mandrel to manipulate it and see it better, try to improve the cut of the wrapping and adjust it with the pliers so that it does not bother or hurt.
Paso 4
-Inserte el anillo nuevamente al mandril para ajustar mejor en la talla y redondearlo
Step 4
-Insert the ring back onto the mandrel to better fit the size and round it.
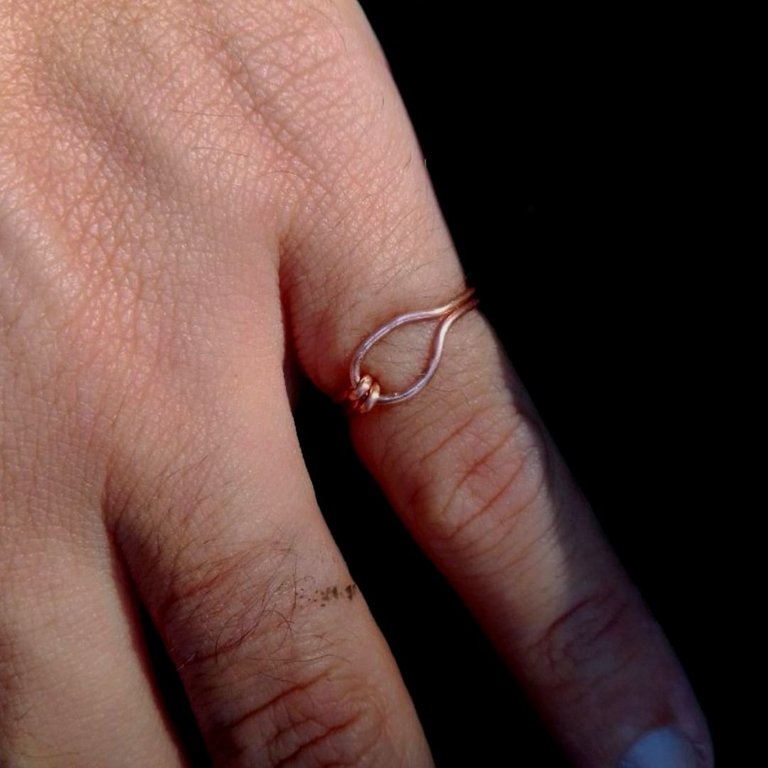
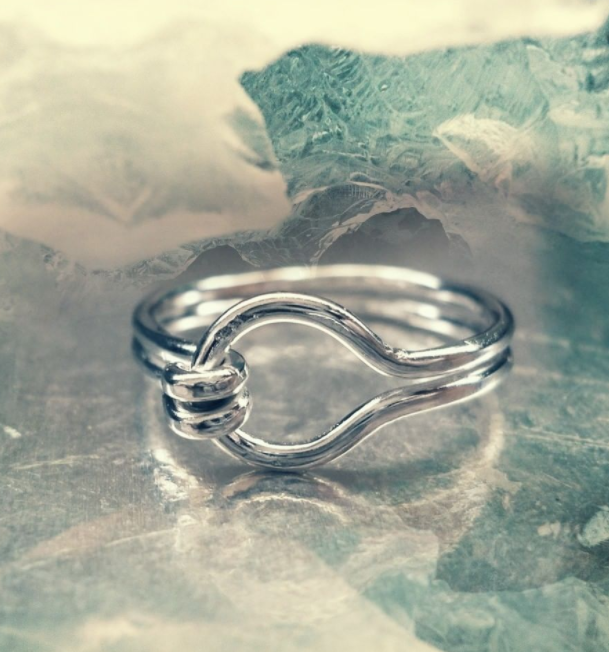
Paso 5
El resultado debería ser algo parecido a lo que aprecias en la imagen.
Para mejorar el resultado, podrías lijar con lija en este orden de número 220, 360 y 400, si tienes posibilidades de tener una cera de pulir metales ayudaría mucho con el brillo, para estos podrás usar unas herramientas como Dremel o Foredom, si no con la mano es más que suficiente.
Si elaboraste el anillo en cobre, si deseas puedes mandarlo a bañar en plata u oro.
Step 5
The result should be something similar to what you see in the image.
To improve the result, you could sand with sandpaper in this order of number 220, 360 and 400, if you have possibilities to have a metal polishing wax it would help a lot with the shine, for these you can use tools like Dremel or Foredom, if not with your hand is more than enough.
If you made the ring in copper, if you wish you can have it silver or gold plated.
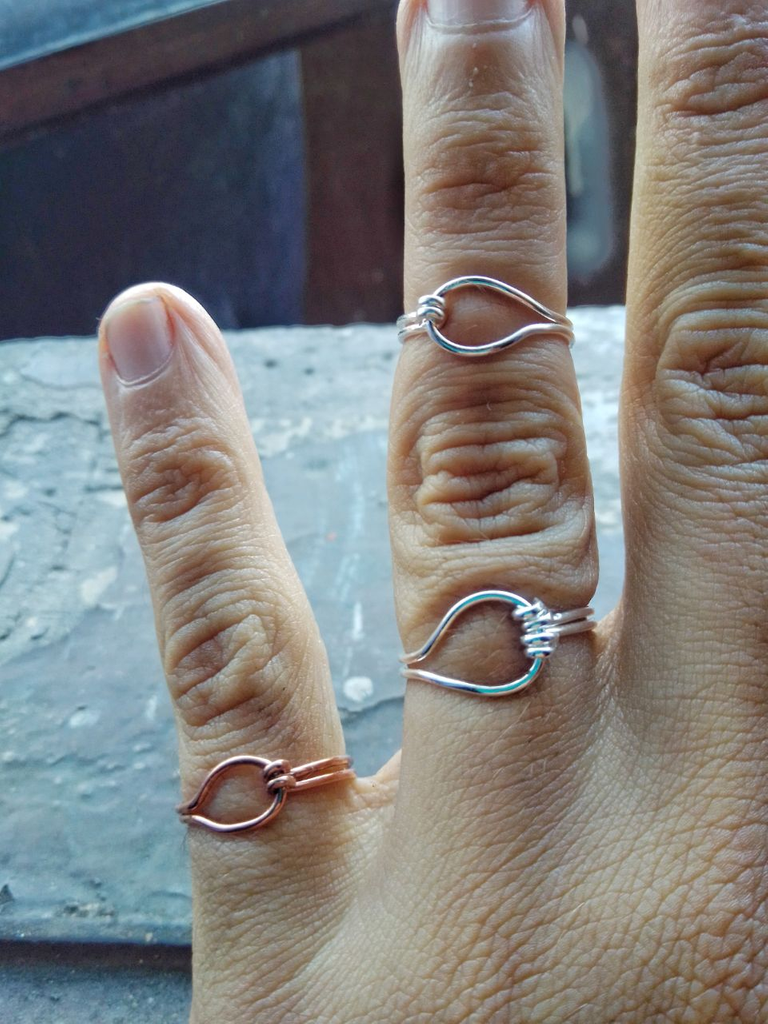
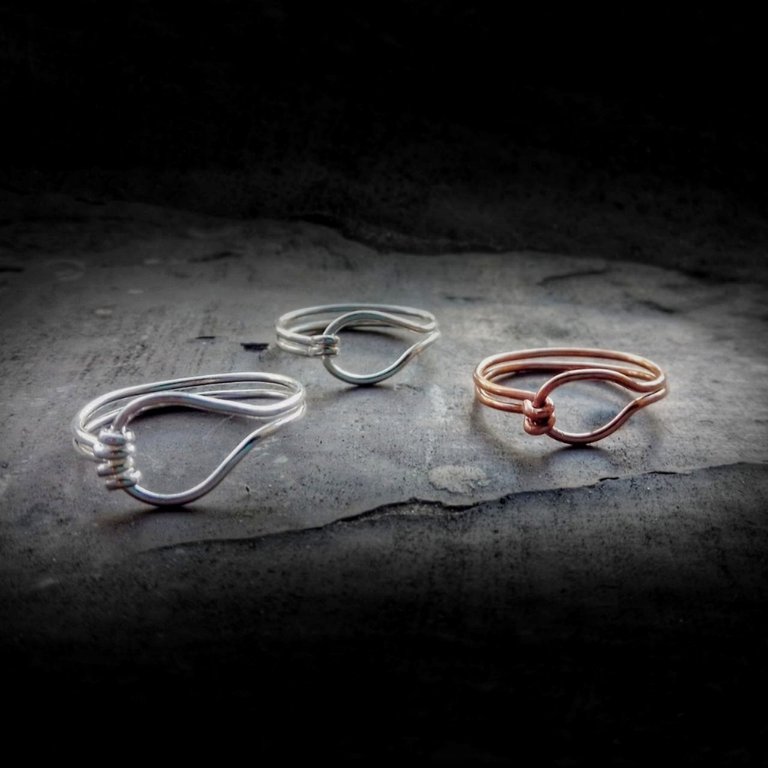
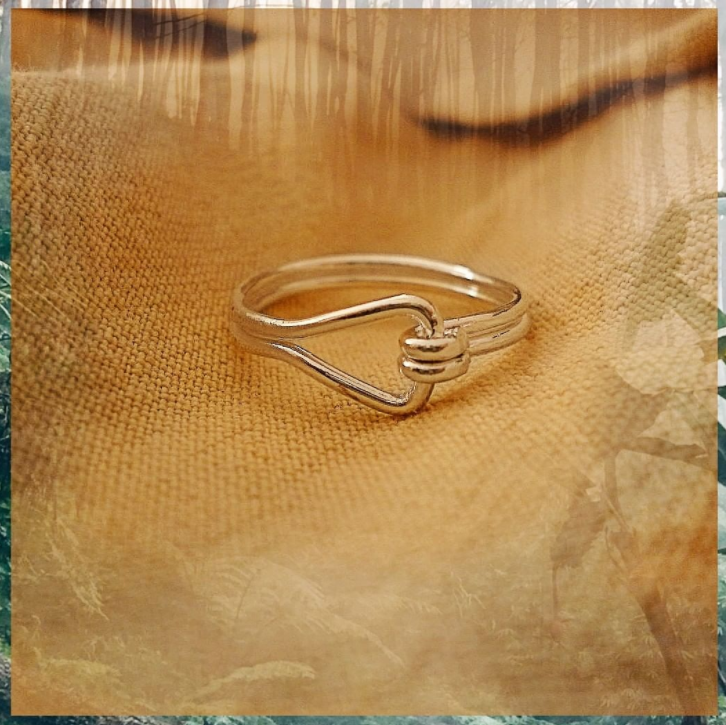
En la fotografía de arriba puedes ver como lucen puestos en cobre y en plateado, desde mi punto de vista llegan a ser bastante elegantes y diferentes a los que se consiguen habitualmente.
In the picture above you can see how they look put in copper and silver, from my point of view they become quite elegant and different from the ones you usually get.
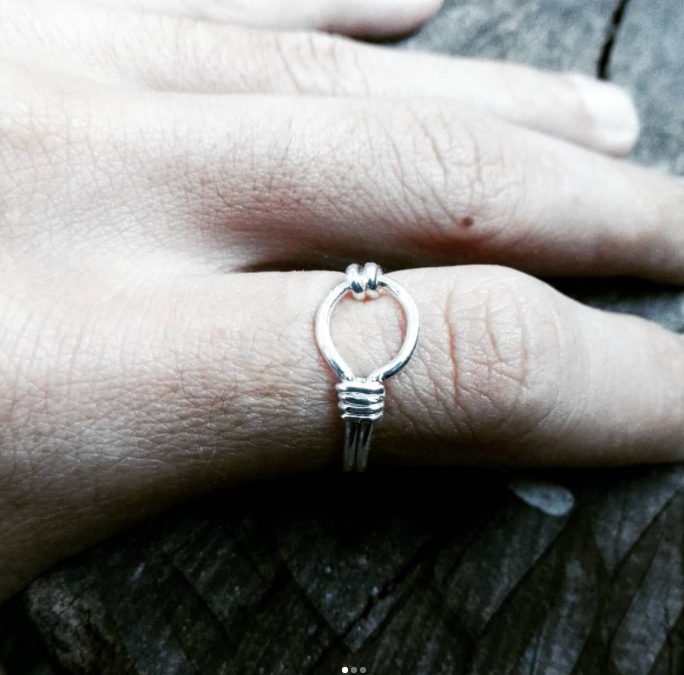
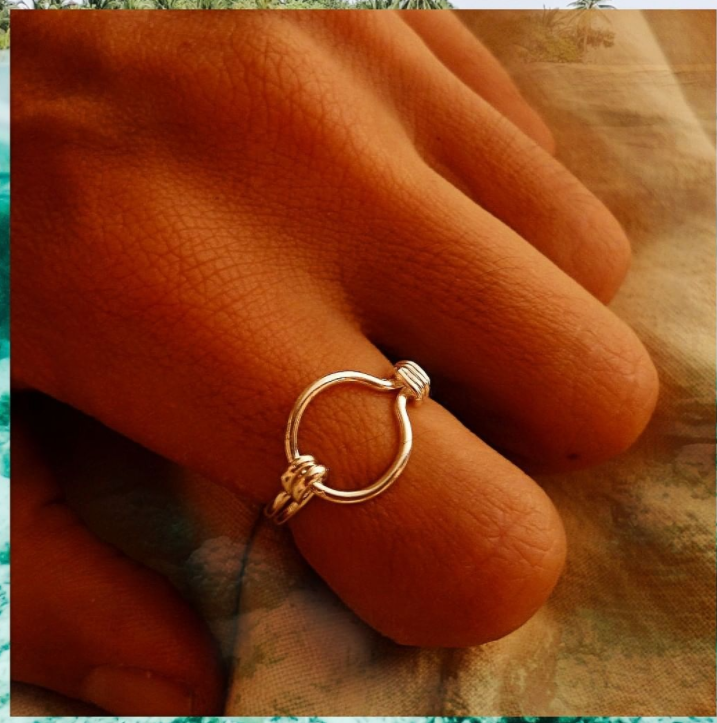
Las imágenes de arriba las saque de mi Instagram y son ejemplos de como puedes modificando un poco, tener una serie de anillos elegantes, que son una buena opción para regalar y para vender si te quieres iniciar en la creación de joyería artesanal.
Espero les haya gustado mi tutorial y espero recibir sus apreciaciones para motivarme a mejorar, porque pienso publicar más paso a paso y procesos de mis piezas, e incluso algunas reflexiones sobre la artesanía.
Si gustan me pueden seguir en esta platafoma de Hive o en mi cuenta de Instagram https://www.instagram.com/m16ueljoyas/
The images above were taken from my Instagram and are examples of how you can modify a little, to have a series of elegant rings, which are a good choice for gifts and to sell if you want to start creating handmade jewelry.
I hope you liked my tutorial and I hope to receive your feedback to motivate me to improve, because I plan to publish more step by step and processes of my pieces, and even some reflections on craftsmanship.
If you like you can follow me in this Hive platform or in my Instagram account https://www.instagram.com/m16ueljoyas/.
Bienvenido!!! es una linda pieza hecha a mano, veo que te dedicas a ello, estuve viendo tu Instagram, tienes hermosos trabajos artesanales.
Esperamos ver más seguido tus proyectos aquí. Gracias por mostrarnos cómo poder elaborarlas con este ordenado paso a paso.
Gracias.... me alaga mucho tu apreciación, si yo también espero publicar seguido, también agilizar mas la forma de explicación y el formato, para mejor...
¡Hola! ¡Ya estás aquí! Bienvenido 🥳
Me emocionó mucho ver tu tutorial. El anillo como me gusta, sencillo y hermoso.
Desde ya te sigo porque tengo mucho que aprender de tus conocimientos. Muy lindo el mandril. Estoy por salir a buscar uno.
Te auguro muchísimo éxito por aquí. Hive te esperaba. Saludos amigo. Yo soy Lelys 🙋
Hola amiga no había visto tu comentario, me había quedado sin internet, en lo posible consigue uno es muy útil, ese lleva conmigo muchos años
Hola. Espero que sigas con señal.
Claro, pronto saldré a buscarlo. Imagino que puedo encontrarlo en las joyerías o talleres. ¡Que estés bien!