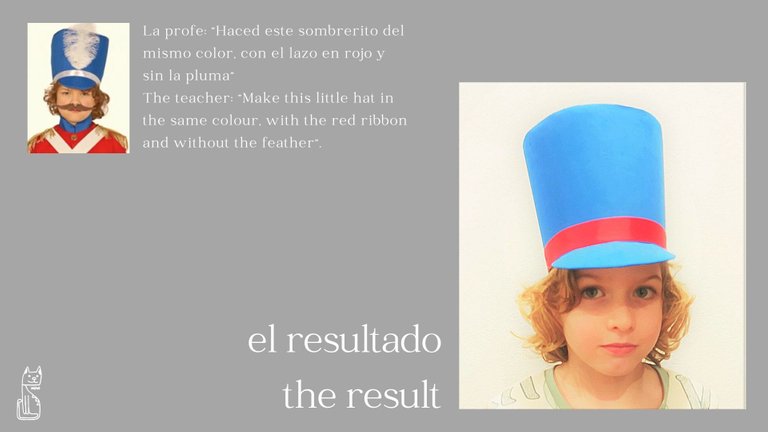
¡Hola, Mundo!
Retomamos hoy la tarea que nos encomendó la profesora de baile: un sombrero de soldado, como el de "El cascanueces", para la función de fin de curso de la clase de ballet de cinco años. Siguiendo las instrucciones que os mostré en la publicación del miércoles, ¡nos ponemos manos a la obra!
Hi, World!
Today we take up again the task given to us by the dance teacher: a soldier's hat, like the one in "The Nutcracker", for the end-of-year performance of the five-year-old ballet class. Following the instructions I showed you in Wednesday's post, let's get to work!

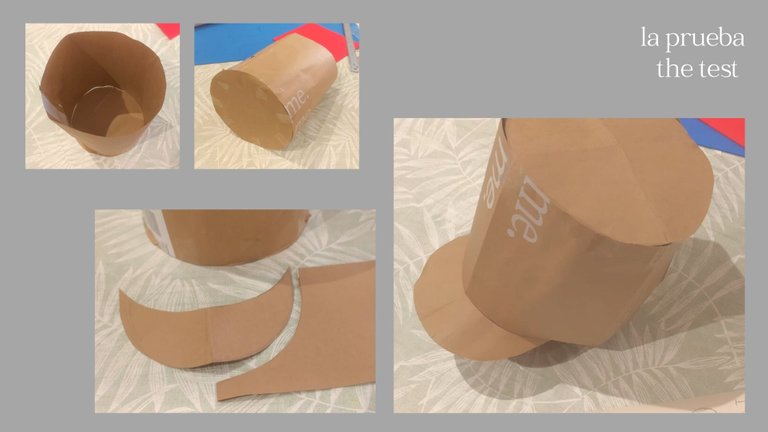
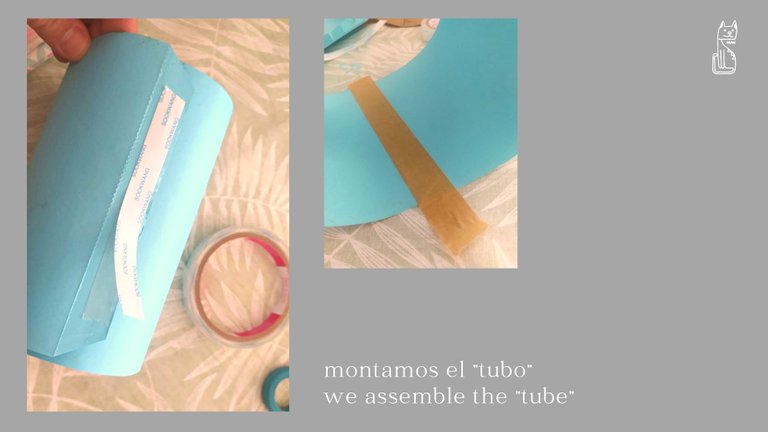
Aprovecho una bolsa de papel de un comercio para crear una plantilla y hacer las pruebas según los cálculos obtenidos previamente. Monto el tubo con cinta adhesiva y le coloco la tapa y la visera. Uso cinta adhesiva, pero en un mínimo de puntos, los justos para sujetarlo todo y hacer la prueba, y poder desmontarlo si fuese necesario.
I use a paper bag from a shop to create a template and make the tests according to the calculations previously obtained. I mount the tube with adhesive tape and place the cap and the visor. I use adhesive tape, but in a minimum number of points, just enough to hold everything in place and to be able to test it, and to be able to dismantle it if necessary.
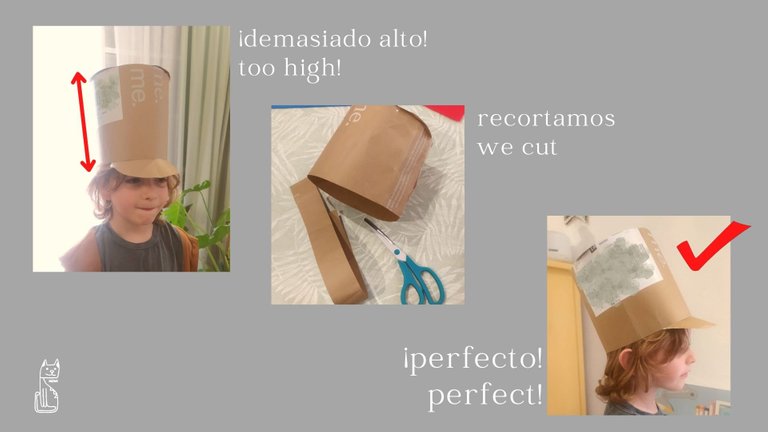
Efectivamente, al colocar el sombrero en la cabeza comprobamos que la proporción no es adecuada: hay que reducir la altura del sombrero. Desmontamos la visera (es más fácil que desmontar la tapa) y recortamos unos centímetros. Volvemos a montar todo el conjunto y vemos cómo con estas dimensiones el sombrero queda perfecto.
Indeed, when we put the hat on the head, we see that the proportion is not right: we have to reduce the height of the hat. We remove the visor (it is easier than removing the cap) and cut a few centimetres off. We reassemble the whole thing and we can see that with these dimensions the hat is perfect.
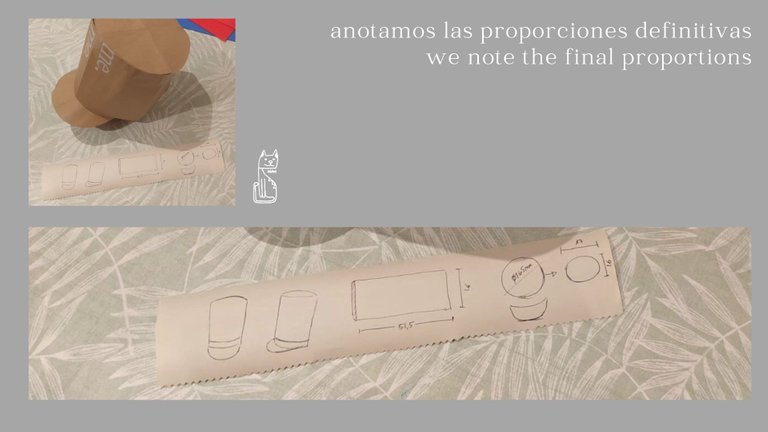
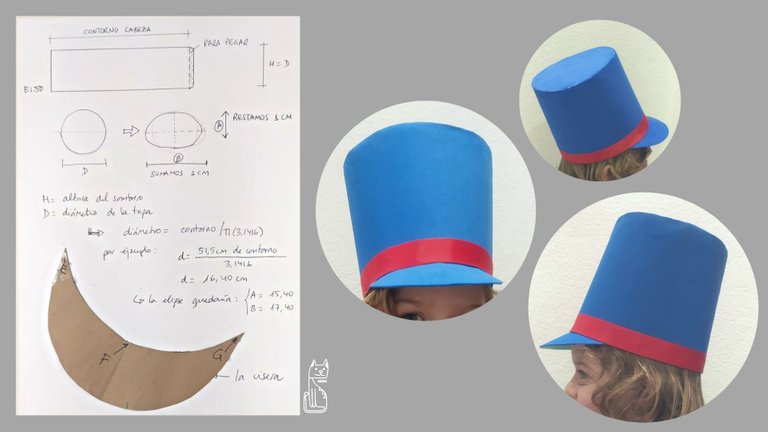
Anotamos estas modificaciones y nos percatamos que queda ideal si la altura del sombrero es la misma que el diámetro del mismo. Podemos pasar ya a recortar sobre el material definitivo que conformará la estructura: un papel de gramaje medio, como es la cartulina escolar.
We make a note of these modifications and realise that it is ideal if the height of the hat is the same as its diameter. We can now cut out the final material that will form the structure: a medium-weight paper, such as school cardboard.
Recortamos el rectángulo que conformará el tubo, sin olvidarnos de dejar unos centímetros laterales para crear una pestaña y poder cerrar el tubo. Lo pegamos con cinta de doble cara y reforzamos con cinta de papel en el interior y en el exterior.
Cut out the rectangle that will form the tube, remembering to leave a few centimetres on the sides to create a flange and to be able to close the tube. We stick it with double-sided tape and reinforce it with paper tape on the inside and outside.
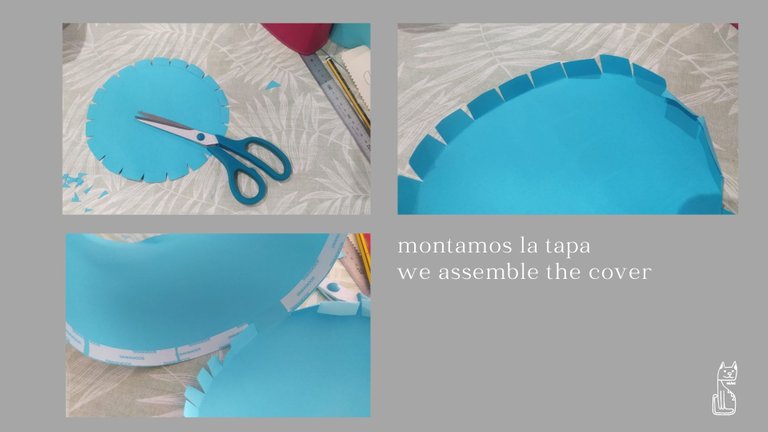
Nos ponemos con la tapa del sombrero. En la prueba comprobamos que sería conveniente "achatar" el círculo de la tapa, por lo que la convertiremos en una elipse: añadiremos un centímetro al diámetro del ancho, y restaremos otro centímetro al diámetro del fondo. Así, el sombrero será levemente más ancho de frente que de lado.
Recuerda dejarle a lo largo de todo el perímetro de la elipse una franja para crear unas pestañas que plegaremos y pegaremos en el interior del tubo. Haremos uso nuevamente de la cinta de doble cara, y cubriremos también con cinta de papel, para reforzar y proteger de los roces (esta zona estará en contacto con la cabeza).
We start with the lid of the hat. In the test we found that it would be convenient to "flatten" the circle of the lid, so we will turn it into an ellipse: we will add one centimetre to the diameter of the width, and we will subtract another centimetre to the diameter of the bottom. Thus, the hat will be slightly wider from the front than from the side.
Remember to leave a strip along the entire perimeter of the ellipse to create some tabs that we will fold and glue to the inside of the tube. We will use the double-sided tape again, and we will also cover it with paper tape, to reinforce and protect it from rubbing (this area will be in contact with the head).
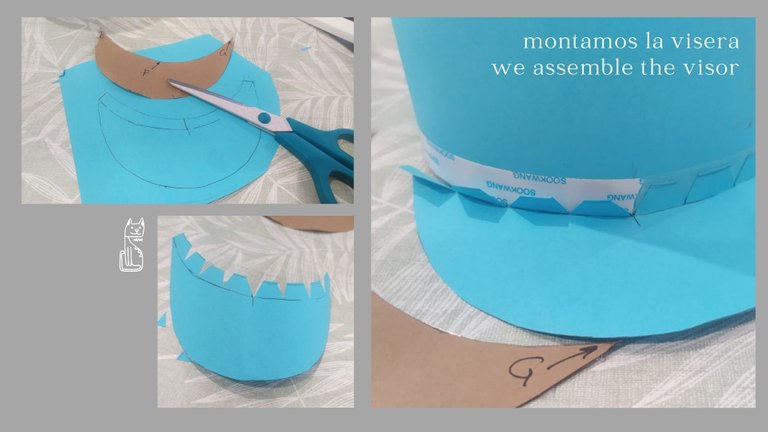
Por fin recortamos la visera, y procedemos de igual forma para crear y pegar las pestañas. En esta ocasión irán adheridas sobre el exterior del tubo. Es importante recordar que hay que centrarla en el lado más ancho del tubo (que se corresponde con el lado más largo de la elipse).
Finally we cut out the visor, and proceed in the same way to create and glue the tabs. This time they will be glued to the outside of the tube. It is important to remember to centre it on the widest side of the tube (which corresponds to the longest side of the ellipse).
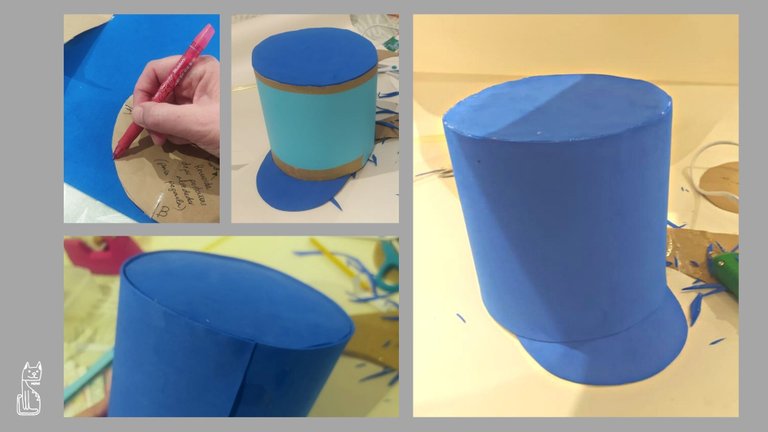
Por fin vamos recortando todas las piezas de goma EVA (sin pestañas) y las pegamos sobre la cartulina con silicona (fría o caliente), que es el adhesivo adecuado para este material.
Ten en cuenta que cuando vayas a recortar la goma para el tubo tienes que añadir unos milímetros más para cubrir la cartulina. Comprueba antes la medida definitiva.
Finally, cut out all the pieces of EVA rubber (without tabs) and glue them onto the cardboard with silicone (cold or hot), which is the right adhesive for this material.
Keep in mind that when you are going to cut the rubber for the tube you have to add a few millimetres more to cover the cardboard. Check the final size beforehand.
Sólo nos queda añadir el lazo rojo alrededor de la base del tubo. Yo he decidido cubrir todo el contorno para rematar el borde y simplificar el trabajo. Podría haber puesto el lazo sólo en la parte de delante, pero hubiese necesitado añadir remates y otros elementos decorativos.
All that remains is to add the red ribbon around the base of the tube. I have decided to cover the whole contour to finish off the edge and simplify the work. I could have put the ribbon only on the front part, but I would have needed to add trimmings and other decorative elements.
Preparé unas anotaciones a modo de resumen y esquema para compartir con el resto de la clase y que todas las familias elaborásemos el sombrero de la misma manera. También incluí la fórmula, para que el sombrero fuese a medida de todas las cabecitas. El sombrero se adapta muy bien a la fisionomía y hemos probado a bailar con él y se sujeta perfecta y cómodamente en la cabeza. Esperemos que "se porte bien" en la función :)
I prepared some notes as a summary and outline to share with the rest of the class so that all the families could make the hat in the same way. I also included the formula, so that the hat would fit all the little heads. The hat adapts very well to the physiognomy and we have tried to dance with it and it fits perfectly and comfortably on the head. Let's hope it "behaves well" at the show :)
Gracias por leerme. Encantada de tenerte por aquí 💛
Te doy la bienvenida a miAu!
Traducido gracias a la versión gratuita de DeepL
Imágenes editadas con la versión libre de Canva
Fotografías capturadas con mi teléfono móvil Xiaomi Redmi Note 8T
Thank you for reading me. Nice to have you around 💛
I welcome you to miAu!Translated with the free version of DeepL
Images edited with the free version of Canva
Pictures taken with my mobile phone Xiaomi Redmi Note 8T.
Congratulations @marguimiau! You have completed the following achievement on the Hive blockchain and have been rewarded with new badge(s):
Your next target is to reach 800 upvotes.
You can view your badges on your board and compare yourself to others in the Ranking
If you no longer want to receive notifications, reply to this comment with the word
STOPTo support your work, I also upvoted your post!
Support the HiveBuzz project. Vote for our proposal!
Excelente trabajo...fue una replica muy creativa.
💜🌸⭐🌹🌙🍁🌳🌟🌲🌈🏵️🌵🍀💫💫🍂🥀✨🌺🎊💙🐞💮🌷🌱🌼🎉☺️😉😃🥰🤗😘😊👍🏼
Muchas gracias, @chacald.dcymt, todo un halago viniendo de ti ☺
¡Qué bien contar con vuestro apoyo! Gracias, @sancho.panza
Thank you for sharing this amazing post on HIVE!
Your content got selected by our fellow curator @rezoanulvibes & you just received a little thank you via an upvote from our non-profit curation initiative!
You will be featured in one of our recurring curation compilations and on our pinterest boards! Both are aiming to offer you a stage to widen your audience within and outside of the DIY scene of hive.
Join the official DIYHub community on HIVE and show us more of your amazing work and feel free to connect with us and other DIYers via our discord server: https://discord.gg/mY5uCfQ !
If you want to support our goal to motivate other DIY/art/music/homesteading/... creators just delegate to us and earn 100% of your curation rewards!
Stay creative & hive on!
Muchas gracias, @rezoanulvibes y @diyhub, por valorar mi publicación. Me anima a seguir creando ☺