¡Hola, Mundo!
A estas alturas del año escolar andamos las mamis (y los papis, que también los hay) muy liadas con los preparativos de finales de curso. Lo mismo estamos preparando los regalos de agradecimiento de profesores, entrenadores y maestros, que organizando galas, fiestas o ceremonias. Esto incluye las decoraciones de los espacios en los eventos, la confección del vestuario de graduaciones, actuaciones y exhibiciones, o simplemente tener bien agendado que tal día tienen su examen de judo o la prueba de natación.
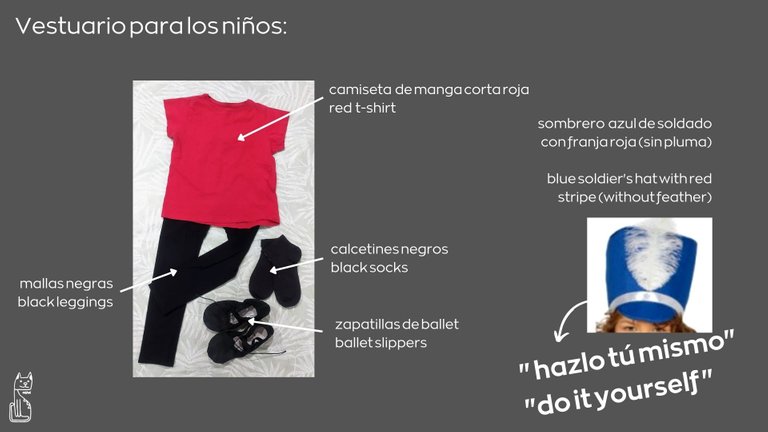
Esta mañana nos han dado las instrucciones para la actuación de fin de curso del grupo de ballet. Casi toda la ropa necesaria es la misma que han usado todo el año (zapatillas de ballet, mallas, calcetines) y habrá que buscar una camiseta roja, sin embargo, la "sorpresa" ha sido que tendremos que confeccionar un sombrero, a partir de una fotografía que nos ha facilitado la profesora de danza. Bueno, esta es la opción de los chicos, la de las chicas cambia ligeramente.
Hi, World!
At this point in the school year, we mums (and dads, of course) are busy with the preparations for the end of the school year. We are preparing the thank you gifts for teachers, coaches and professors, as well as organising galas, parties or ceremonies. This includes decorating the spaces at events, making the costumes for graduations, performances and exhibitions, or simply having their judo exam or swimming test scheduled for such and such a day. >
This morning we were given instructions for the ballet group's end of year performance. Most of the clothes needed are the same as they have been wearing all year (ballet shoes, tights, socks) and we will have to find a red t-shirt, however, the "surprise" was that we will have to make a hat from a photograph provided by the dance teacher. Well, this is the boys' option, the girls' option is slightly different.

El caso es que para no demorarlo más y que no se me junte con otras tareas, esta misma tarde he ido a comprar un pliego de goma EVA azul, que es lo único que creo que me falta en la lista de materiales y herramientas que necesitaré para hacer el sombrero.
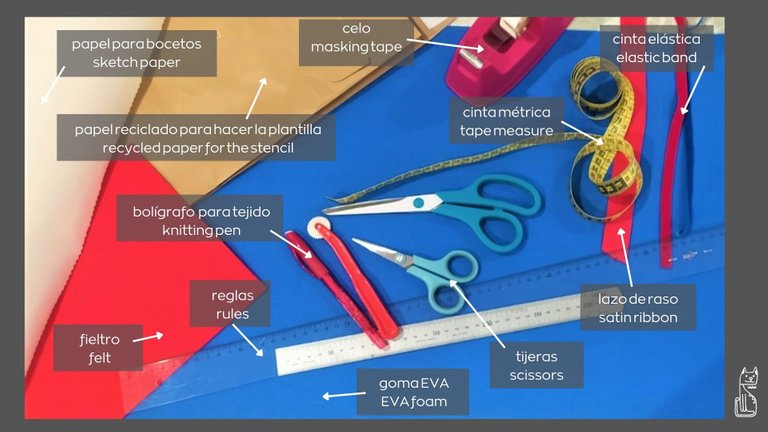
Herramientas:
- Regla: para medir y trazar el dibujo
- Tijeras: para cortar los papeles, la goma EVA, los lazos y los elásticos.
- Cinta métrica: para medir el contorno de la cabeza del niño.
- Bolígrafo o ruleta para marcar el tejido y dibujar la plantilla a recortar.
Materiales:
- Papel para bocetos: para diseñar la plantilla.
- Papel reciclado: para hacer la plantilla
- Celo: para sujetar la plantilla y probar el diseño en la cabeza (sin usar alfileres que rasguen el papel o dañen al niño).
- Fieltro rojo o lazo de raso rojo (aún no sé qué usaremos para la cinta perimetral del sombrero)
- Cinta elástica roja o azul: para sujetar en sombrero a la cabeza.
- Goma EVA azul: el material del sombrero.
- Cartón o cartulina gruesa: para hacer más fuerte la estructura del sombrero, sobre todo en la base, la visera y la parte superior.
In order not to delay it any longer and so that it doesn't get in the way of other tasks, this afternoon I went to buy a sheet of blue EVA rubber, which is the only thing I think I'm missing in the list of materials and tools I'll need to make the hat.
Tools:
- Ruler: to measure and trace the drawing.
- Scissors: to cut the papers, the EVA, the ribbons and the elastics.
- Tape measure: to measure the contour of the child's head.
- Pen or roulette to mark the fabric and draw the template to be cut out.Materials:
- Sketch paper: to design the template.
- Recycled paper: to make the template
- Tape: to hold the template and try the design on the head (do not use pins that will tear the paper or hurt the child).
- Red felt or red satin ribbon (I'm not sure what to use for the ribbon around the perimeter of the hat yet).
- Red or blue elastic ribbon: to attach the hat to the head.
- Blue EVA rubber: the material of the hat.
- Cardboard or thick cardboard: to make the structure of the hat stronger, especially at the base, the visor and the top.
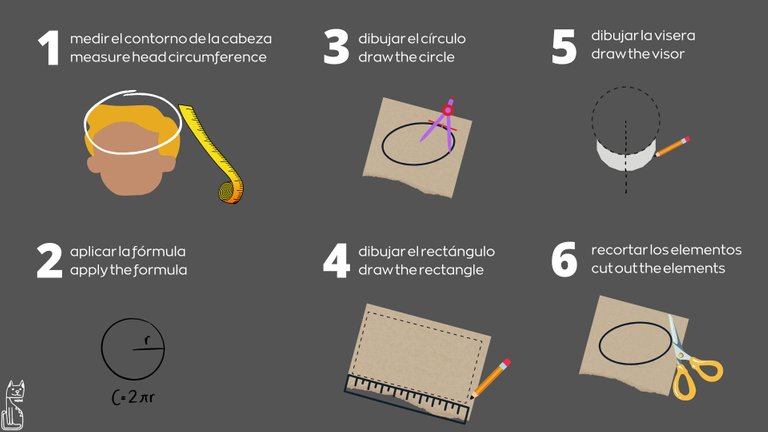
Con todos los materiales y herramientas preparados, lo primero que vamos a hacer es tomar la medida del contorno de la cabeza del niño, y sobre esta, comenzar a diseñar el sombrero. Necesitaremos construir una figura tipo tubular, una visera y una "tapadera". Seguiremos estos pasos:
- Medimos el contorno de la cabeza: en este caso son 51,5 centímetros.
- Aplicamos la fórmula de que el diámetro de una circunferencia es igual a la longitud de esta (es decir, el contorno que hemos medido en el niño) dividido entre "π" (el número Pi es aproximadamente 3,1416). Así, en nuestro caso dividiremos los 51,5cm de contorno entre 3,1416 (que es Pi) y nos sale la cantidad de 16,39, que son los centímetros de diámetro que va a tener el círculo que tenemos que dibujar, esto es, la base de nuestro sombrero.
- Dibujamos el círculo con ayuda de un compás: dividimos 16,39 entre dos, para obtener el radio de la circunferencia (que es la medida que fijamos en el compás.
- Dibujamos un rectángulo de base los 51,5cm de longitud de circunferencia (es decir, el contorno de la cabeza). La altura la vamos a dejar de momento sin definir, hasta que no hagamos la prueba. Recuerda que estamos calculando la plantilla sobre la marcha.
- Con la base del sombrero (el circulo) como referencia, dibuja una visera a mano alzada. Si dibujas sólo la mitad, úsala de plantilla para dibujar la otra parte y te saldrá perfectamente simétrica.
- Recorta todos los elementos. Podemos hacerlo sin dejar solapas para pegar unos a otros, porque de momento serán plantillas, y podemos fijarlo con celo. Cuando usemos el material definitivo, habrá que tener en cuenta el dejarle un margen para usarlo de zona de pegado.
With all the materials and tools ready, the first thing we are going to do is to take the measurement of the contour of the child's head, and on this, start designing the hat. We will need to build a tubular type figure, a visor and a "lid". We will follow these steps:
1. We measure the contour of the head: in this case it is 51.5 centimetres.
2. We apply the formula that the diameter of a circumference is equal to the length of the circumference (i.e. the circumference we have measured on the child) divided by "π" (the number Pi is approximately 3.1416). So, in our case, we will divide the 51.5cm of circumference by 3.1416 (which is Pi) and we will get 16.39, which is the diameter of the circle we have to draw, that is, the base of our hat.
3. We draw the circle with the help of a compass: we divide 16.39 by two, to obtain the radius of the circumference (which is the measure we set on the compass).
4. We draw a rectangle with a base of 51.5cm in circumference (i.e. the outline of the head). We are going to leave the height undefined for the moment, until we do the test. Remember that we are calculating the template as we go along.
5. With the base of the hat (the circle) as a reference, draw a freehand visor. If you draw only half of it, use it as a template to draw the other part and it will be perfectly symmetrical.
6. Cut out all the elements. We can do this without leaving flaps to glue one to the other, because for the moment they will be templates, and we can fix them with tape. When we use the definitive material, it will be necessary to leave a margin to use it as a gluing area.
Tenemos bastante trabajo avanzado para la siguiente jornada, en la que iremos montando todas estas piezas que hemos preparado. ¿Te pasas mañana?
We have a lot of work in progress for the next day, in which we will be assembling all these pieces that we have prepared. Will you come by tomorrow?
Gracias por leerme. Encantada de tenerte por aquí 💛
Te doy la bienvenida a miAu!
Traducido gracias a la versión gratuita de DeepL
Imágenes editadas con la versión libre de Canva
Fotografías capturadas con mi teléfono móvil Xiaomi Redmi Note 8T
Thank you for reading me. Nice to have you around 💛
I welcome you to miAu!Translated with the free version of DeepL
Images edited with the free version of Canva
Pictures taken with my mobile phone Xiaomi Redmi Note 8T.
Gracias por vuestro apoyo, ¡es un aliciente enorme para seguir creando!
@gasaeightyfive, gracias por compartir mi trabajo
@marcocasario, muchas gracias por difundir mi publicación
Gracias por compartir mi post, @cribbio