¡Hola, Mundo!
¡Qué me gusta un bebé! ¡Y una mamá embarazada! Es todo ilusión, alegría, proyectos,... Cuando comparten contigo las ecografías, emocionadas por el peso, el buen desarrollo y el bienestar de sus peques. Vivir esas experiencias junto a ellas es un honor, poder disfrutar de esos momentos tan íntimos y familiares y que formes parte de sus vidas, aunque sea a ratitos.
A una de esas imágenes de alta resolución que llegó a mi móvil aquel día no la pude dejar escapar. Fui a sacar una copia de esa carita tan bonita que ya se intuía y decidí hacerle un pequeño marco de papel, para que ocupara un lugar en casa y no acabara guardada en una de tantas carpetas en un cajón, como les suele ocurrir a casi todas las "ecos".
Hi, World!
How I love a baby! And a pregnant mum! It's all excitement, joy, projects.... When they share the ultrasound scans with you, excited about the weight, the good development and the wellbeing of their little ones. It is an honour to live these experiences with them, to be able to enjoy these intimate and familiar moments and to be part of their lives, even if it is just for a little while.
I couldn't let one of those high-resolution images that arrived on my mobile phone that day slip away. I went to take a copy of that beautiful face that I could already sense and I decided to make a small paper frame for it, so that it would occupy a place at home and not end up in one of the many folders in a drawer, as usually happens to almost all "echoes".

Un portafotos de sencilla estructura lo sujetaría. En esta ocasión el "clip" lo compré en una tienda de mi barrio, una bonita papelería, en la que siempre puedes encontrar el regalo ideal. Sin embargo, para otro trabajo lo haremos en casa, con un poco de habilidad, alambre y unos alicates (ya os lo mostraré en futuras publicaciones).
Los materiales son de lo más básico: restos de papeles nos bastarán para enmarcar la imagen, y luego podemos usar cualquier cinta decorativa. Para mi proyecto han sido necesarios:
- Pequeños restos de papel decorado libre de ácidos y ligninas.
- Cinta de papel decorada (washitape).
- Pegatinas.
- Cinta de madroño.
- Goma EVA.
- Cinta de papel adhesiva (de encuadernación).
- Cita de doble cara.
- Adhesivo líquido de secado rápido.
Como herramientas he usado simplemente unas tijeras (como una scrapera "de toda la vida" jejeje).
A photo holder with a simple structure would hold it. This time I bought the "clip" in a shop in my neighbourhood, a nice stationery shop, where you can always find the ideal gift. However, for another job we will do it at home, with a bit of skill, wire and pliers (I will show you in future posts).
The materials are very basic: paper scraps will be enough to frame the image, and then we can use any decorative ribbon. For my project they have been necessary:
- Small scraps of acid and lignin free decorated paper.
- Decorated paper tape (washitape).
- Stickers.
- Tape of arbutus.
- EVA glue.
- Adhesive paper tape (binding).
- Double-sided tape.
- Quick-drying liquid adhesive.As tools I simply used a pair of scissors (like a "lifelong" scrapbooker hehehe).
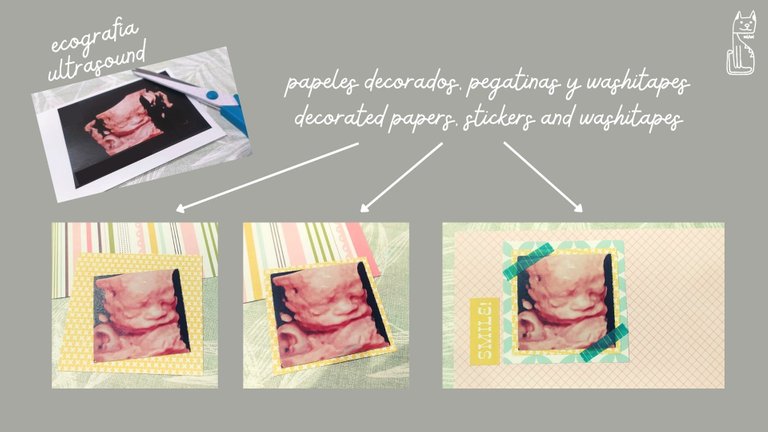
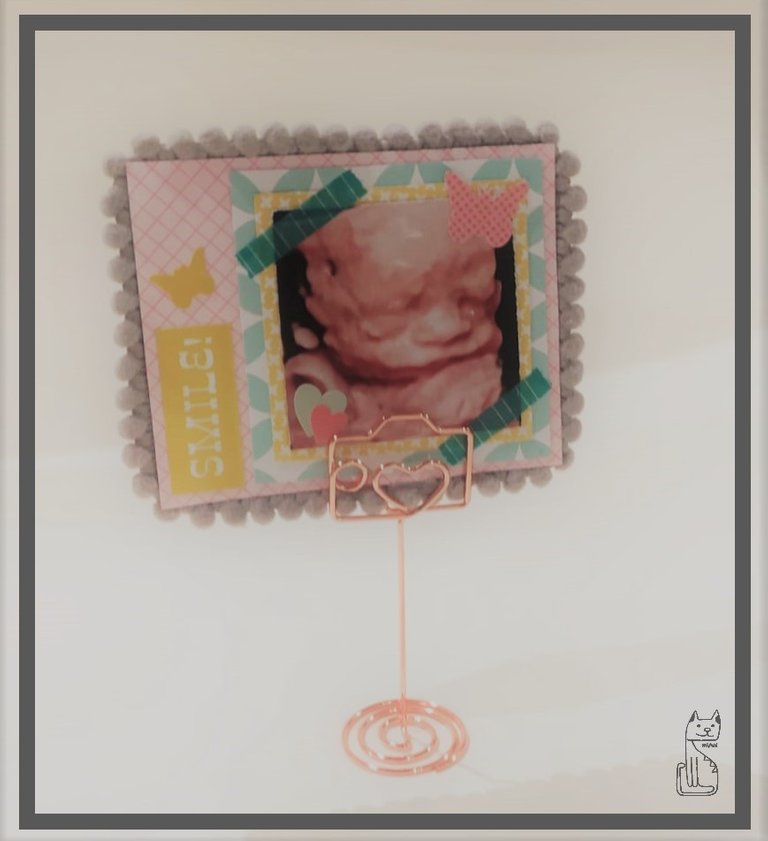
Después de recortar la ecografía en un pequeño tamaño (en este caso ha sido de 5x5 centímetros), le he ido pegando por detrás (con la cinta de doble cara) diferentes tipos de papeles, cada vez de un tamaño mayor: primero uno en tonos amarillos, luego otro con motivos aguamarina y finalmente uno en rosa. Le he puesto unos trocitos de washitape cortados a mano simulando que sujetaban la fotografía.
After cutting out the sonogram in a small size (in this case it was 5x5 centimetres), I have been sticking different types of paper on the back (with double-sided tape), each time in a bigger size: first one in yellow tones, then another with aquamarine motifs and finally one in pink. I put some small pieces of washitape cut by hand to simulate that they were holding the photograph.
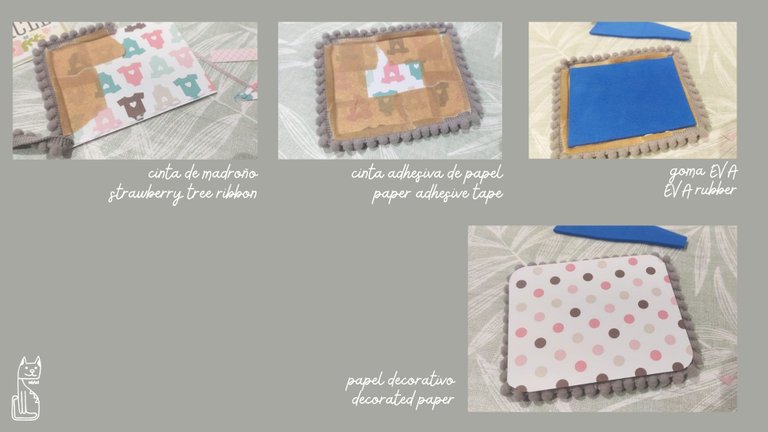
Detrás de la tarjeta le he pegado con el adhesivo de secado rápido (para trabajar con más seguridad) la cinta de madroño. Simultáneamente, iba reforzando la sujeción con cinta de papel de encuadernación, que me permitirá adherirla a la siguiente capa (si hubiese usado un simple celo, sobre él no hubiese podido pegar nada con el adhesivo líquido). Como el madroño tiene cierto grosor, regrueso la parte interior con goma EVA (aprovecho un resto, porque me da igual el color, ya que quedará oculta). Finalmente cubro la parte posterior con un rectángulo de papel al que le he redondeado las esquinas con una troqueladora.
Behind the card, I stuck the madroño tape with the quick-drying adhesive (to work with more security). At the same time, I was reinforcing the fastening with binding paper tape, which will allow me to stick it to the next layer (if I had used a simple tape, I would not have been able to stick anything on it with the liquid adhesive). As the wood has a certain thickness, I thicken the inner part with EVA rubber (I take advantage of a remainder, because I don't care about the colour, as it will be hidden). Finally, I cover the back with a rectangle of paper, rounded at the corners with a die cutter.
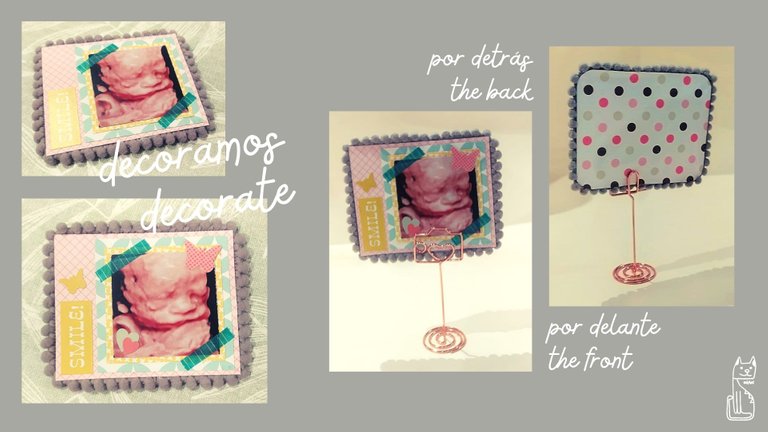
Termino la decoración frontal con más pegatinas que coordinan con los papeles, y en la parte posterior le dedico y firmo el regalo para mi amiga.
¡Ya puedo sujetar la tarjeta con el clip! Ha quedado un bonito conjunto con la tarjeta que le preparamos el otro día.
I finish the front decoration with more stickers that coordinate with the papers, and on the back I dedicate and sign the gift for my friend.
I can now attach the card with the clip! It's a nice combination with the card we made the other day.

Gracias por leerme. Encantada de tenerte por aquí 💛
Te doy la bienvenida a miAu!
Traducido gracias a la versión gratuita de DeepL
Imágenes editadas con la versión libre de Canva
Fotografías capturadas con mi teléfono móvil Xiaomi Redmi Note 8T
Thank you for reading me. Nice to have you around 💛
I welcome you to miAu!Translated with the free version of DeepL
Images edited with the free version of Canva
Pictures taken with my mobile phone Xiaomi Redmi Note 8T.
Muchas gracias por vuestro apoyo :)
🥰 lindo recuerdo.
💙✨🎊🌷🌺🐞💖🌻💜🎉💐🍄🌈⭐🌹🌱🌙🍁🌳🌟🌲🌼🏵️💮🌸🌵🍀💫🍂🥀🌺🌷🎊✨💙
Siiii ☺
Gracias por tu comentario, @chacald.dcymt
Congratulations @marguimiau! You have completed the following achievement on the Hive blockchain and have been rewarded with new badge(s):
Your next payout target is 1000 HP.
The unit is Hive Power equivalent because post and comment rewards can be split into HP and HBD
You can view your badges on your board and compare yourself to others in the Ranking
If you no longer want to receive notifications, reply to this comment with the word
STOPTo support your work, I also upvoted your post!
Support the HiveBuzz project. Vote for our proposal!