¡Hola, Mundo!
Mi preciosa amiga de nuevo a va ser mamá y le tengo preparado una bonita toquita de algodón para su bebé, en un verde agua divino. La dependienta de la tienda me la envolvió con mucho gusto, sin embargo, no puede faltar una dedicatoria bonita con mis mejores deseos para esa niña a la que estamos a punto de conocer. Esas palabras irán escritas en una tarjeta miAu! y os voy a mostrar lo fácil que es hacer una original y personalizada.
Hi, World!
My beautiful friend is going to be a mummy again and I have prepared a beautiful cotton baby blanket for her in a divine aqua green. The shop assistant was very happy to wrap it up for me, but a beautiful dedication with my best wishes for the little girl we are about to meet is a must. These words will be written on a miAu! card and I'm going to show you how easy it is to make an original and personalised one.


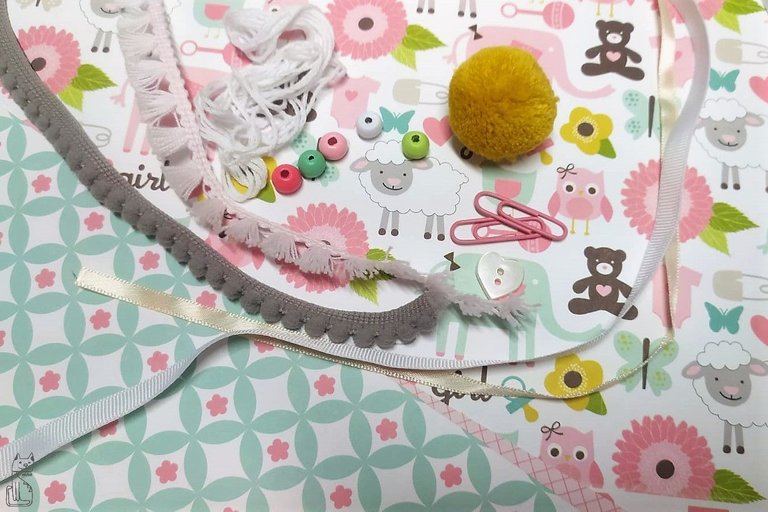
Ya sabes que lo primero que hacemos es elegir los materiales con los que vamos a crear nuestro proyecto. En esta ocasión me he ido a una colección infantil, en tonos rosas, grises, turquesas y verdes. De esa misma gama he escogido los complementos: bolitas de madera, cintas de madroño, pasamanería, hilo de algodón, botones,...
You know that the first thing we do is to choose the materials with which we are going to create our project. On this occasion I have gone for a children's collection, in shades of pink, grey, turquoise and green. I have chosen the accessories from the same range: wooden balls, ribbons, trimmings, cotton thread, buttons,...
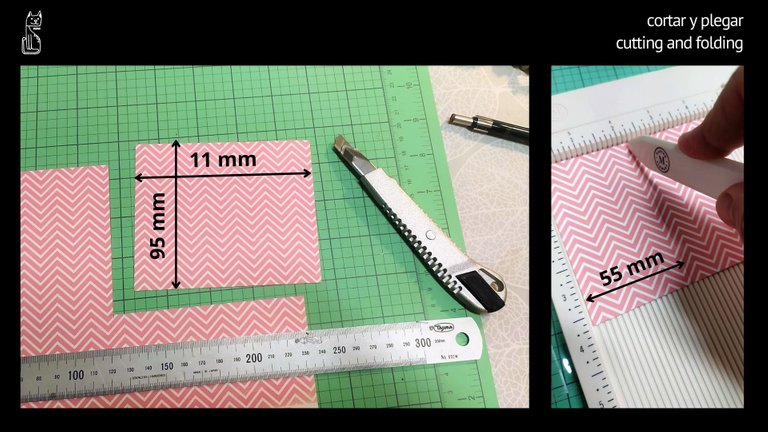
Recortamos el papel elegido para nuestra tarjeta y lo marcamos en el centro con la plegadora, para doblarlo por la mitad. ¡Ya tendríamos la estructura de la tarjeta!
We cut out the paper we have chosen for our card and mark it in the centre with the folding machine to fold it in half. We now have the structure of the card!
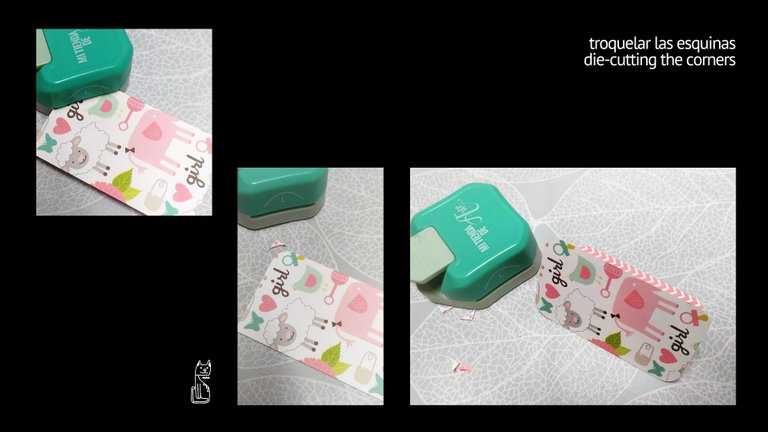
Con ayuda de una troqueladora de esquinas, redondeamos las cuatro de nuestra tarjeta (previamente plegada).
With the help of a corner punch, we round all four corners of our card (previously folded).
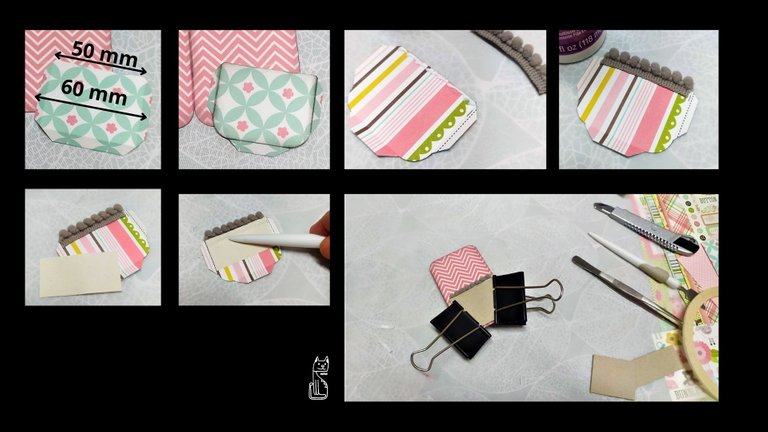
Originalmente se entintaban los cantos de los trabajos de scrapbooking para darle un aire antiguo, vintage, pero hoy día hay tintas de todos los colores que puedas imaginar y de multitud de acabados (mates, brillos, empolvados, perlados,...) así que el entintado es una opción que le puede ir genial a cualquier proyecto, sea del estilo que sea. He usado -quizás te resulte extraño- una tinta gris oscuro para nuestra tarjeta infantil: coordina a la perfección con el diseño del papel, y nos apartamos un poco del clásico rosa "para niña".
Originally the edges of scrapbooking works were inked to give them an antique, vintage look, but nowadays there are inks of all the colours you can imagine and a multitude of finishes (matte, glossy, powdered, pearlescent,...) so inking is an option that can be great for any project, whatever style it is. I have used -perhaps you may find it strange- a dark grey ink for our children's card: it coordinates perfectly with the design of the paper, and we move away a little from the classic "girly" pink.

Vamos a elaborar un bolsillo interior que nos serviría, por ejemplo, para meter dentro un billete, si el regalo que queremos hacer es dinero (como vimos en la publicación de los regalos de boda). Este no es el caso, así que lo usaremos simplemente como decoración.
We are going to make an inside pocket that would be useful, for example, to put a banknote inside, if the gift we want to give is money (as we saw in the publication of wedding gifts). This is not the case, so we will use it simply as a decoration.
Lo primero es preparar un trocito de papel (diferente al que estamos usando) que sea unos milímetros más estrecho que el ancho de la tarjeta cerrada, con unas pestañas laterales e inferior que doblaremos para pegar a la tarjeta.
Para decorar, le pegaremos por dentro una cinta de madroño, con pegamento de secado rápido, para facilitar la fijación. Un truco es encolarle otro papel sobre esta cinta para asegurarla mejor y, sobre todo, para que no se cree un "escalón" que moleste al meter cualquier elemento en el bolsillito.
Lo ideal es presionar todo el conjunto con unas pinzas. Recuerda usar un cartón para proteger tu trabajo, y que no se queden las marcas de las pinzas sobre este.
The first thing to do is to prepare a piece of paper (different from the one we are using) that is a few millimetres narrower than the width of the closed card, with some side and bottom tabs that we will fold to stick to the card.
To decorate, glue a ribbon of strawberry tree on the inside, using quick-drying glue, to make it easier to fix. A trick is to glue another piece of paper over this ribbon to secure it better and, above all, so that it does not create a "step" that bothers you when you put any element in the little pocket.
Ideally, press the whole thing together with a pair of tweezers. Remember to use cardboard to protect your work, so that the marks of the tweezers do not remain on it.
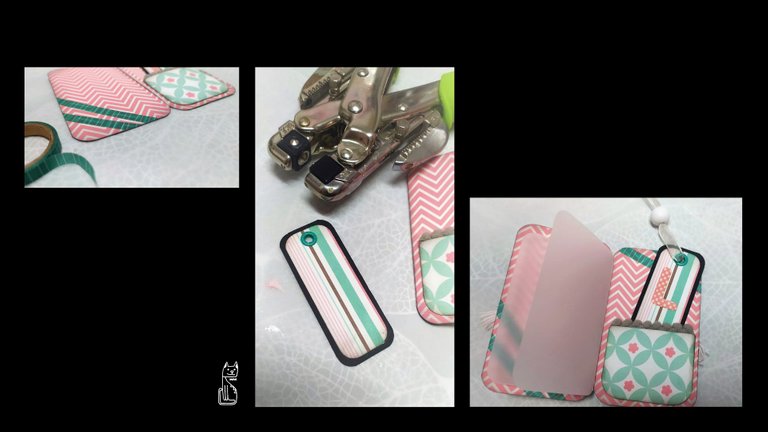
!Y nos ponemos ya con los detalles! Una fina cinta de washitape en verde le dará un toque de color al interior de la tarjeta. También hemos preparado una pequeña etiqueta con otro resto de papel y le hemos colocado un ojal en turquesa. Una bola de madera blanca con un lazo de tul en el mismo color remata el tag. Además, para escribir la dedicatoria usaremos papel vegetal blanco, que ilumina el interior del proyecto sin ocultar del todo ningún elemento. Este pliego estará sujeto por un hilo de bordar de algodón en blanco, que estará anudado en el exterior.
And let's get down to the details! A thin green washitape ribbon will add a touch of colour to the inside of the card. We have also prepared a small tag with another paper remnant and we have placed a turquoise eyelet on it. A white wooden ball with a tulle bow in the same colour finishes off the tag. In addition, we will use white tracing paper to write the dedication, which brightens up the inside of the project without completely hiding any of the elements. This sheet will be held in place by a white cotton embroidery thread, which will be knotted on the outside.
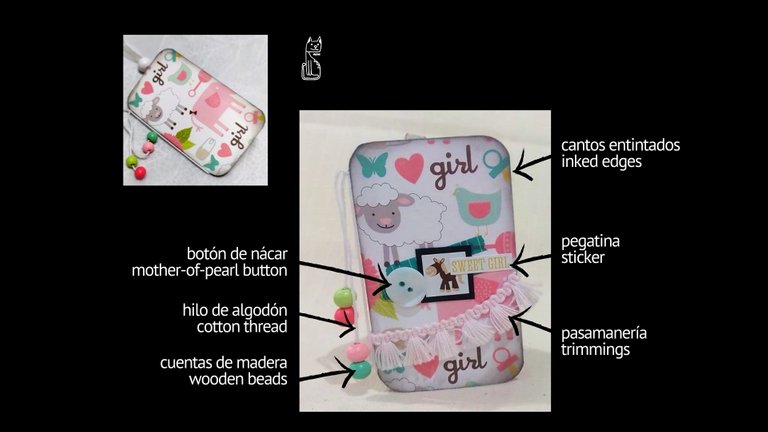
Para rematar el cordón blanco unas cuentas de madera más pequeñas que las del tag alegran el conjunto. Para fijarlas, anudo primero el extremo de los cabos, añado una gota de adhesivo líquido y tiro suavemente del cordón para ocultar la punta dentro. Si lo dejas secar, las bolas no se saldrán.
Encolamos la pasamanería, abrazando la tarjeta por delante y detrás y pegamos algunos elementos más, como un sencillo botón nacarado y unas pegatinas.
Espero que le guste a mi amiga y la quiera conservar siempre. Ahora voy a escribirle unas palabras antes de entregársela :)
To finish off the white cord, wooden beads, smaller than the ones on the tag, brighten up the whole. To attach them, I first knot the end of the strands, add a drop of liquid glue and gently pull the cord to hide the tip inside. If you let it dry, the balls won't come out.
We glue the trimmings on, hugging the card front and back and glue on a few more elements, such as a simple pearlescent button and some stickers.I hope my friend likes it and wants to keep it forever. Now I am going to write a few words to her before I give it to her :)
Gracias por leerme. Encantada de tenerte por aquí 💛
Te doy la bienvenida a miAu!
Traducido gracias a la versión gratuita de DeepL
Imágenes editadas con la versión libre de Canva
Fotografías capturadas con mi teléfono móvil Xiaomi Redmi Note 8T
Thank you for reading me. Nice to have you around 💛
I welcome you to miAu!Translated with the free version of DeepL
Images edited with the free version of Canva
Pictures taken with my mobile phone Xiaomi Redmi Note 8T.
b
Thank you for sharing this amazing post on HIVE!
Your content got selected by our fellow curator @rezoanulvibes & you just received a little thank you via an upvote from our non-profit curation initiative!
You will be featured in one of our recurring curation compilations and on our pinterest boards! Both are aiming to offer you a stage to widen your audience within and outside of the DIY scene of hive.
Join the official DIYHub community on HIVE and show us more of your amazing work and feel free to connect with us and other DIYers via our discord server: https://discord.gg/mY5uCfQ !
If you want to support our goal to motivate other DIY/art/music/homesteading/... creators just delegate to us and earn 100% of your curation rewards!
Stay creative & hive on!
¡Gracias por vuestro apoyo! Encantada de ser reconocida por una comunidad DIY
¡Qué alegría verme apoyada por vuestra Comunidad! Gracias