¡Saludos Comunidad Creativa! | ¡Greetings Creative Community!
Espero que tengan un lindo día y un grandioso fin de semana 🥰 Continuando con las ideas de manualidades elaboradas a partir de rosetones de papel hoy les quiero compartir un lindo osito panda con esta misma técnica, muy fácil de hacer y es ideal para decorar, queda perfecto en fiestas infantiles con esta temática ya que se puede decorar y ambientar con estos ositos, a continuación les comparto el tutorial y espero que les guste.
I hope you have a nice day and a great weekend 🥰 Continuing with the ideas of crafts made from paper rosettes, today I want to share a cute panda bear with this same technique, very easy to do and it is ideal for decorating, it is perfect in children's parties with this theme since it can be decorated and set with these bears, then I share the tutorial and I hope you like it.

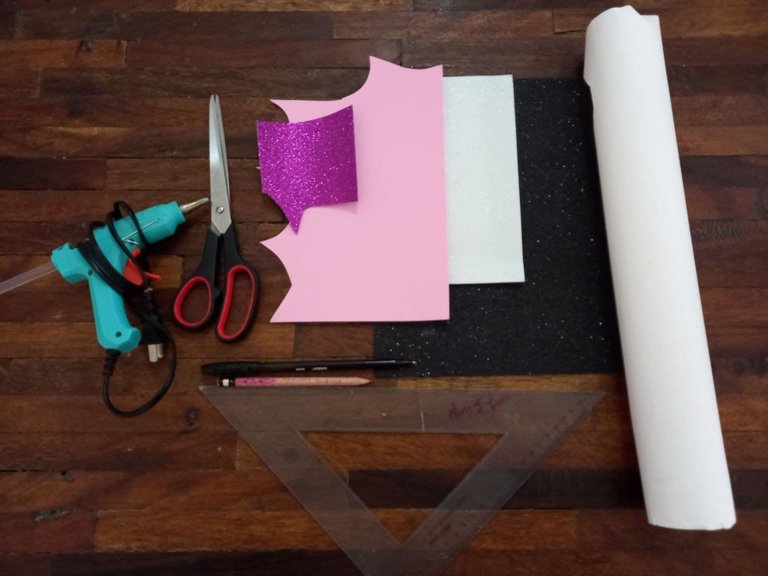
Materiales | Materials
🐼 Cartulina escolar blanca.
🐼 Foami escarchado blanco, negro y fucsia.
🐼 Foami rosado.
🐼 Lápiz.
🐼 Tijera.
🐼 Regla.
🐼 Silicón caliente.
🐼 White school cardboard.
🐼 White, black and fuchsia frosted foami.
🐼 Pink foami.
🐼 Pencil.
🐼 Scissor.
🐼 Rule.
🐼 Hot silicone.
Procedimiento ✂ | Process ✂
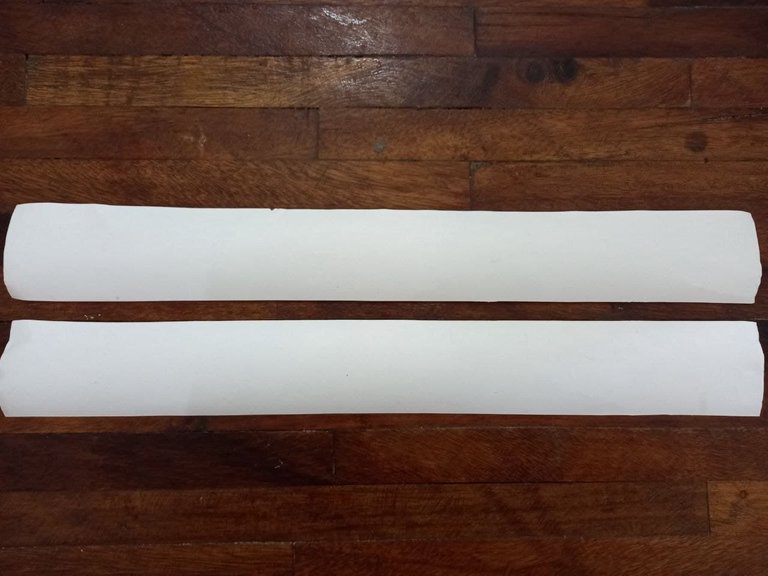
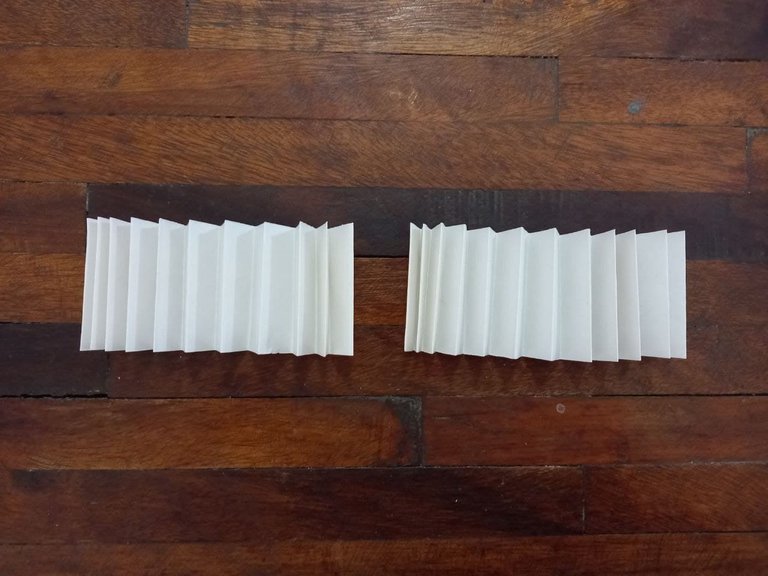
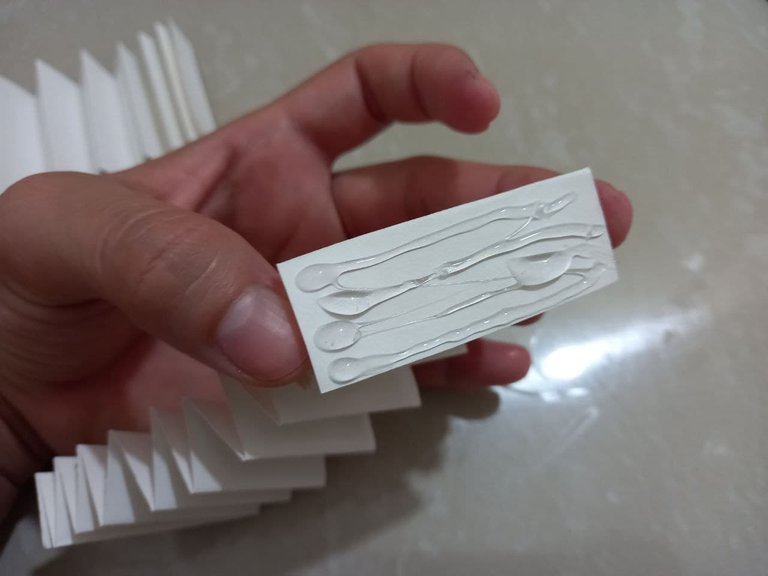
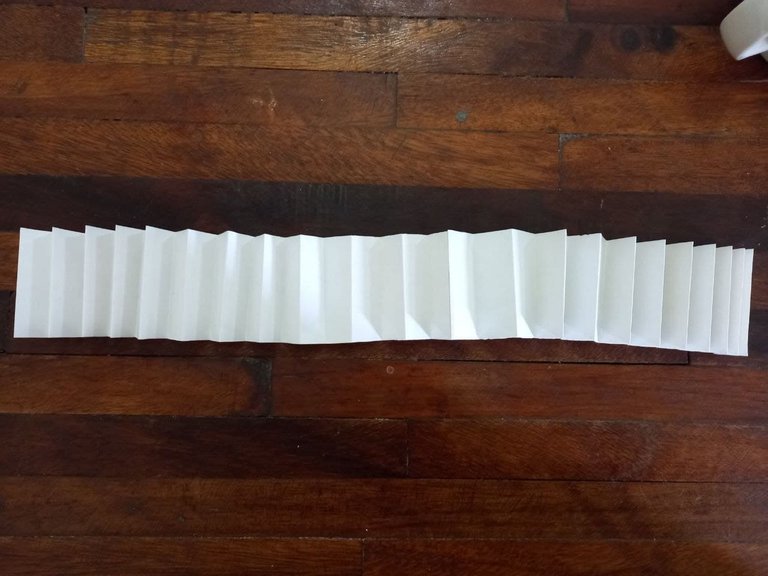
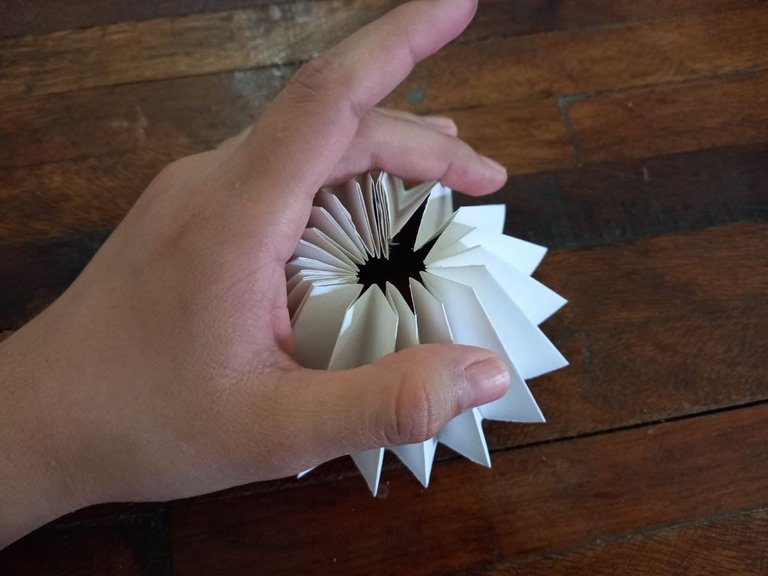
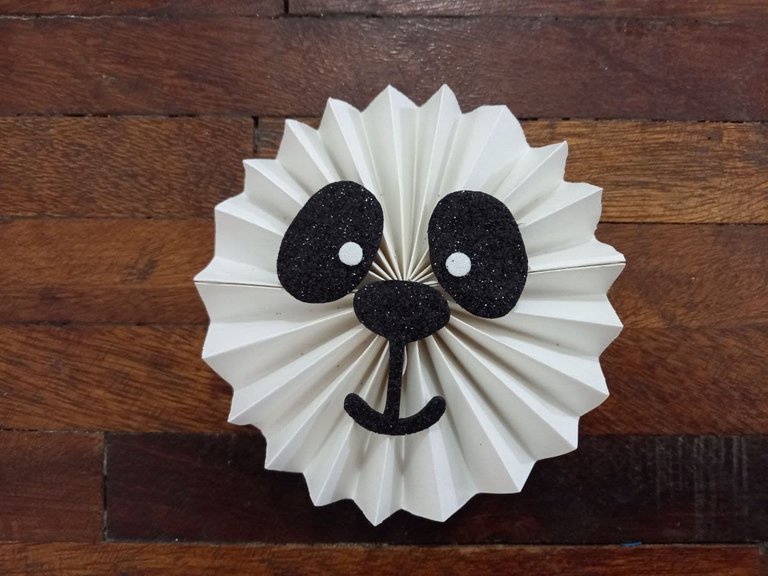
🐼 PASO 1. Lo primero que debemos hacer es el rosetón el cual será de cartulina escolar blanca, para ello con ayuda de la regla vamos a medir 2 tiras de cartulina escolar blanca ambas de unos 5 cm de ancho y del largo de la hoja de cartulina, recortamos y vamos a hacer dobleces de unos 2 cm aproximadamente, doblando hacia arriba y hacia abajo hasta llegar hasta el final dándole a la tira de cartulina la forma de acordeón o abanico, debemos hacerlo con ambas tiras de cartulina.
🐼 STEP 1. The first thing we must do is the rosette which will be made of white school cardboard, for this, with the help of the ruler we are going to measure 2 strips of white school cardboard, both about 5 cm wide and long of the cardboard sheet, we cut and we are going to make folds of approximately 2 cm, folding up and down until we reach the end, giving the cardboard strip the shape of an accordion or fan, we must do it with both cardboard strips.
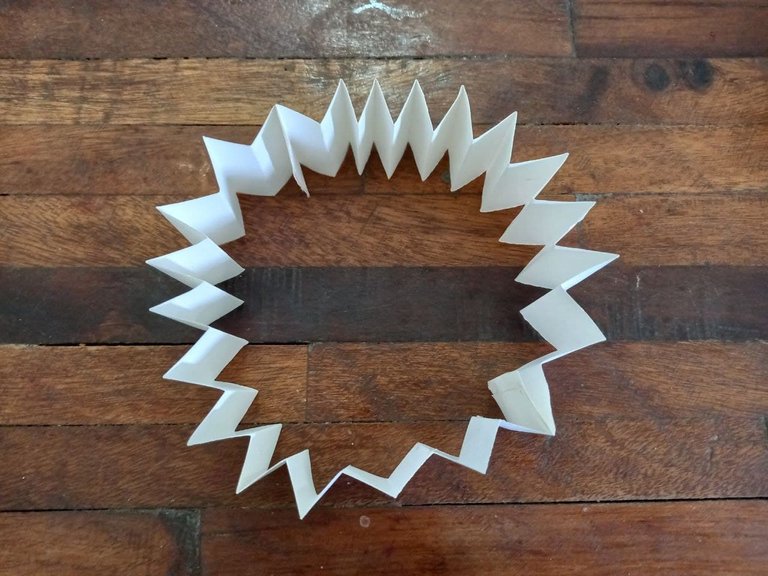
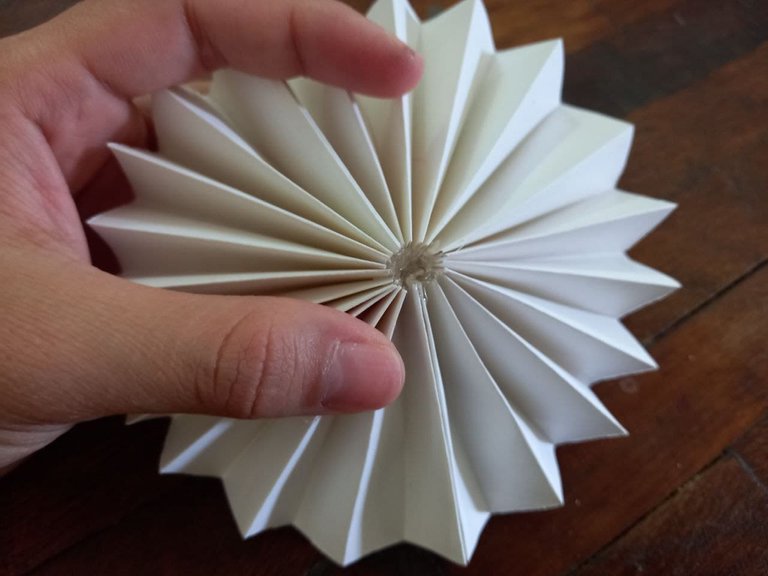
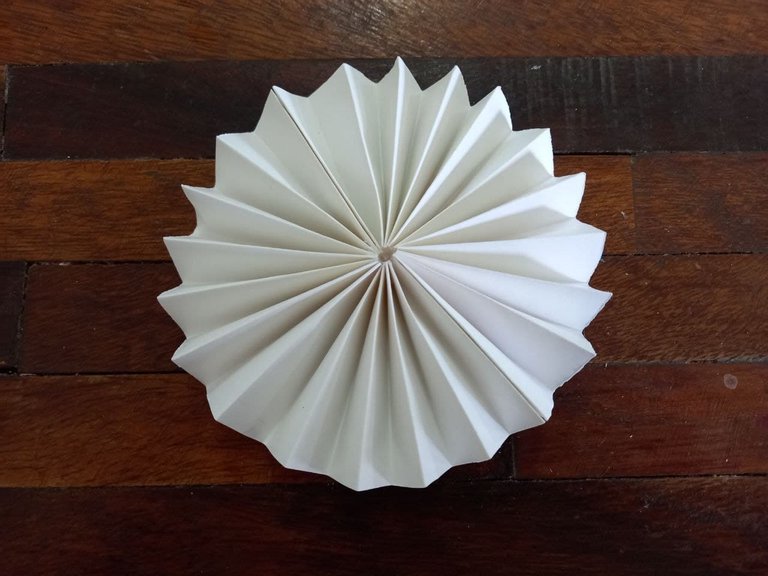
🐼 PASO 2. Luego de haber doblado ambas tiras de cartulina vamos a unirlas formando una sola pieza aplicando silicón en un extremo de una y pegándolo a un extremo de la otra, cuando ya sea una sola pieza repetimos y unimos sus 2 extremos hasta quedar en forma circular, recogemos con la mano y presionamos hacia abajo, aplicamos silicón en el centro y mantenemos presionado hasta que se pegue y quede la forma de rosetón.
🐼 STEP 2. After having folded both cardboard strips we are going to join them forming a single piece by applying silicone on one end of one and gluing it to one end of the other, when it is already a single piece we repeat and join its 2 ends until they are in a circular shape, we collect with the hand and press down, apply silicone in the center and keep pressed until it sticks and the rosette shape is left.
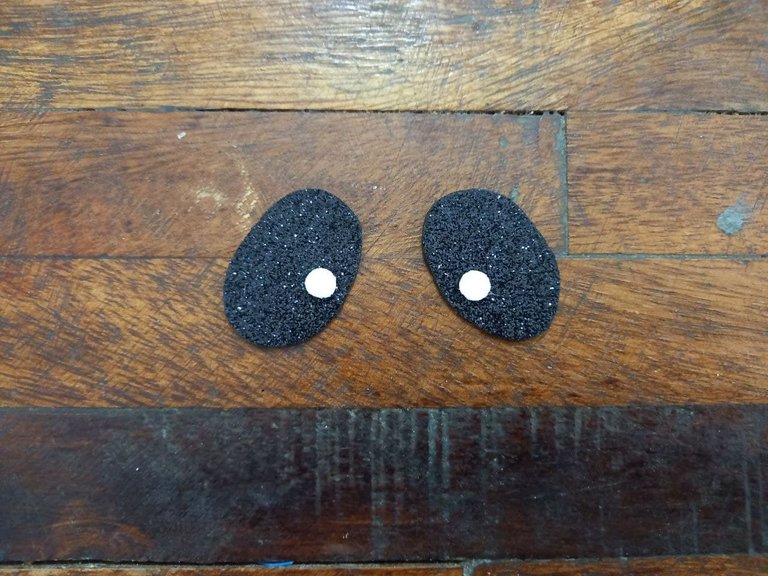
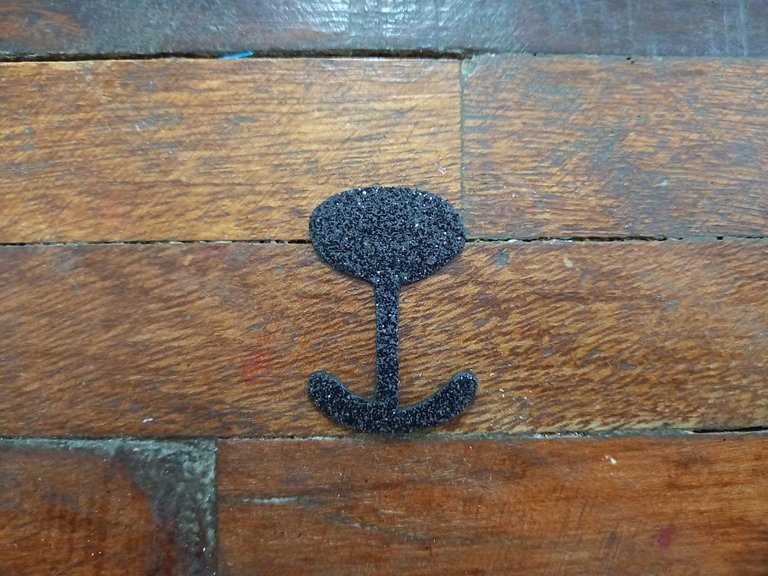
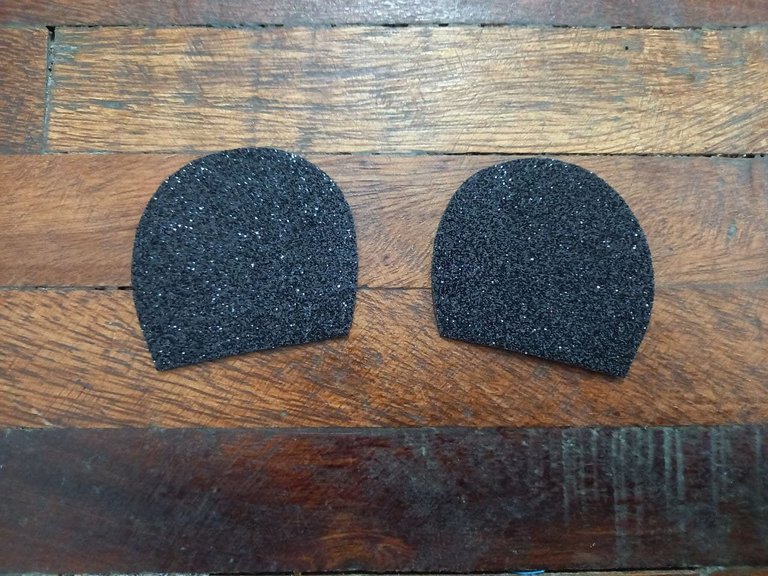
🐼 PASO 3. Comenzamos a hacer las piezas que forman al osito panda, primero haremos 2 óvalos medianos de foami escarchado negro recortamos y sobre ellos a un lado en el centro pegamos 2 círculos pequeñitos de foami escarchado blanco, una vez formados los ojos los pegamos sobre el rosetón para comenzar a formar el rostro del osito panda, debemos dejar una pequeña separación entre cada uno.
🐼 STEP 3. We begin to make the pieces that form the panda bear, first we will make 2 medium ovals of black frosted foami we cut and on them to one side in the center we glue 2 small circles of white frosted foami, once formed We glue the eyes on the rosette to begin forming the face of the panda bear, we must leave a small separation between each one.
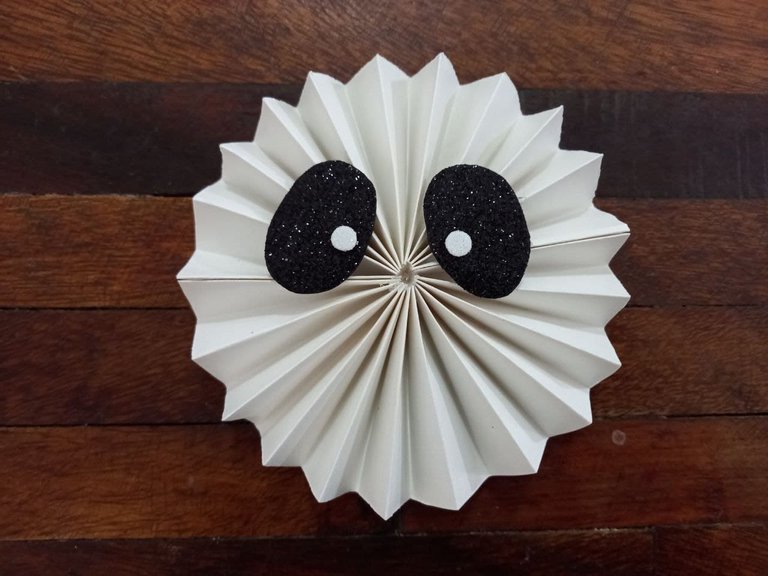
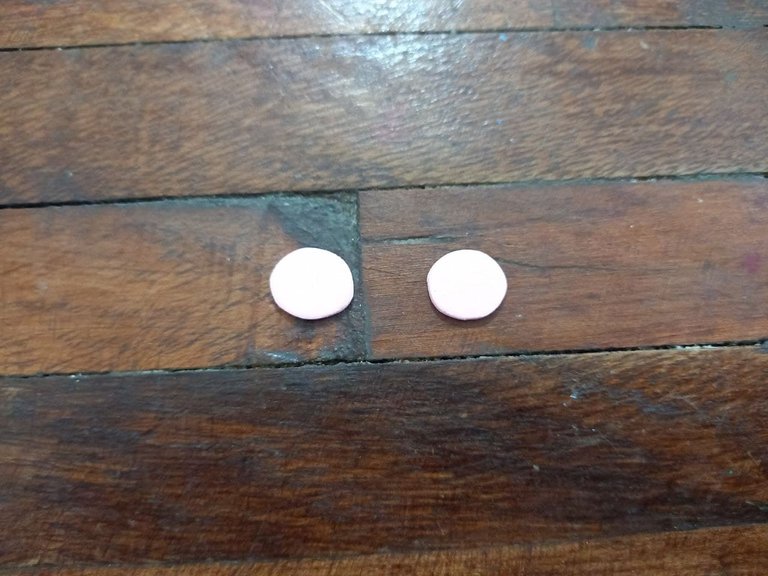
🐼 PASO 4. Hacemos la forma de la nariz y boca en foami escarchado negro y pegamos sobre el rosetón justo en el centro debajo de los ojos, luego hacemos 2 círculos pequeños de foami rosado, recortamos y pegamos a los lados de la boca, lo que vendrían siendo las mejillas del osito panda.
🐼 STEP 4. We make the shape of the nose and mouth in black frosted foami and glue on the rosette right in the center below the eyes, then we make 2 small circles of pink foami, cut and glue to the sides of the mouth, what would become the cheeks of the panda bear.
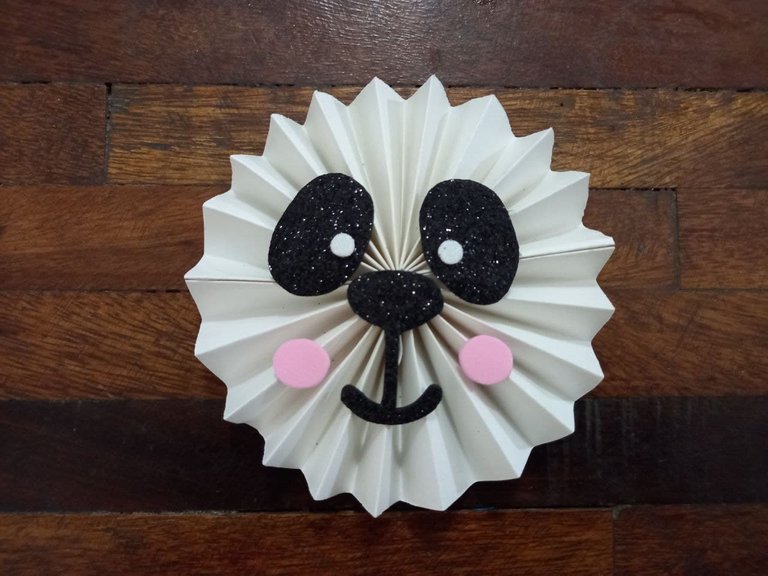
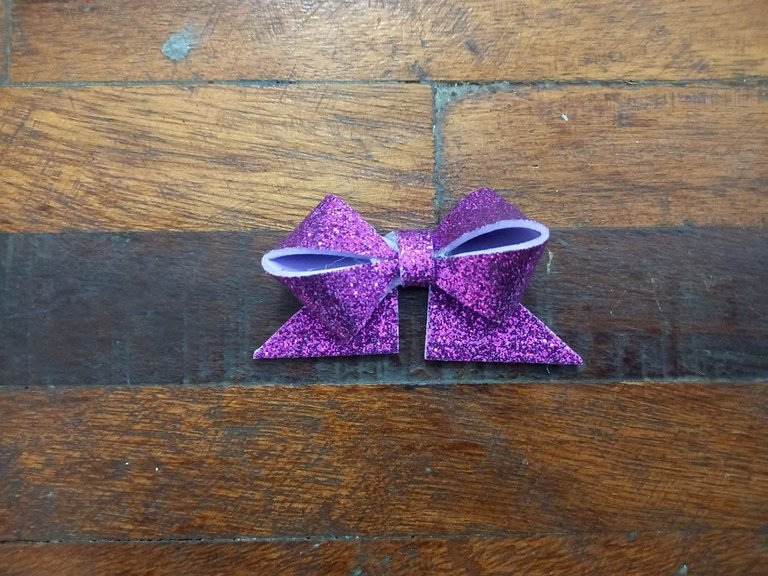
🐼 PASO 5. Hacemos 2 orejas en foami escarchado negro, recortamos y pegamos en la parte trasera superior del rosetón, luego hacemos un lazo pequeño de foami escarchado fucsia y lo pegamos en la parte frontal superior del rosetón quedando delante de la oreja, podemos pegar el lazo del lado de nuestra preferencia, aquí les dejo mi tutorial en caso de que les interese aprender a hacer este lindo lazo de foami.
🐼 STEP 5. We make 2 ears out of black frosted foami, cut them out and glue them to the upper back of the rosette, then make a small bow out of fuchsia frosted foami and glue it to the upper front part of the rosette, leaving it in front of the ear, we can paste the bow on the side of our preference, here I leave my tutorial in case you Interested in learning how to make this cute foami bow.

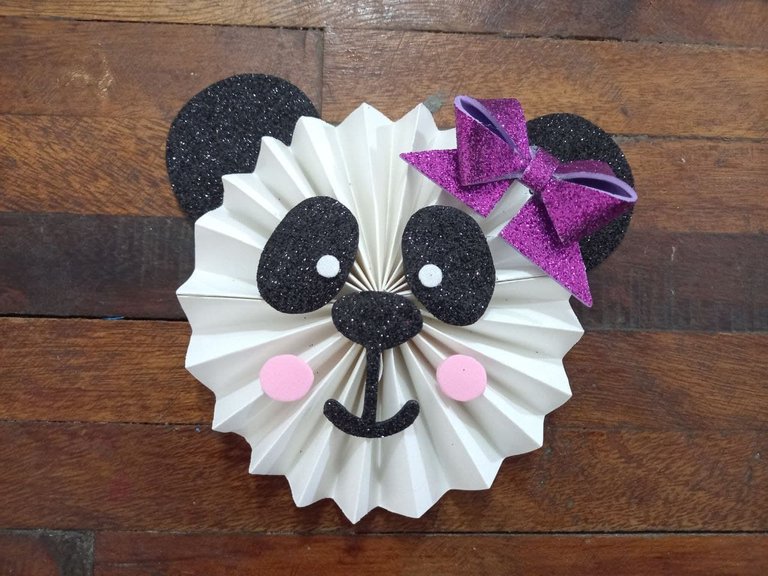
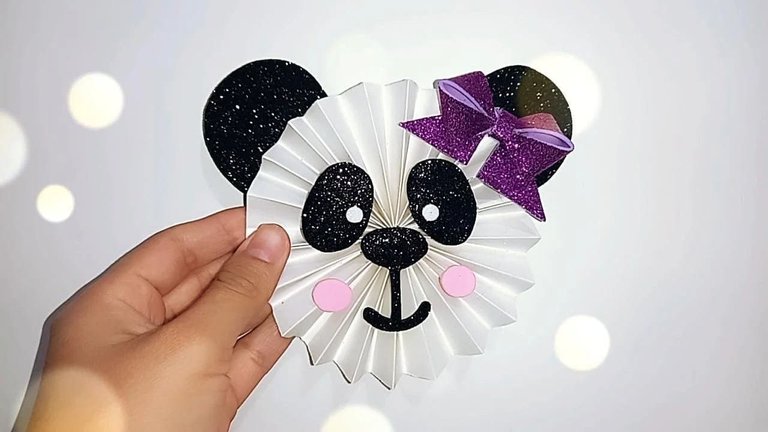
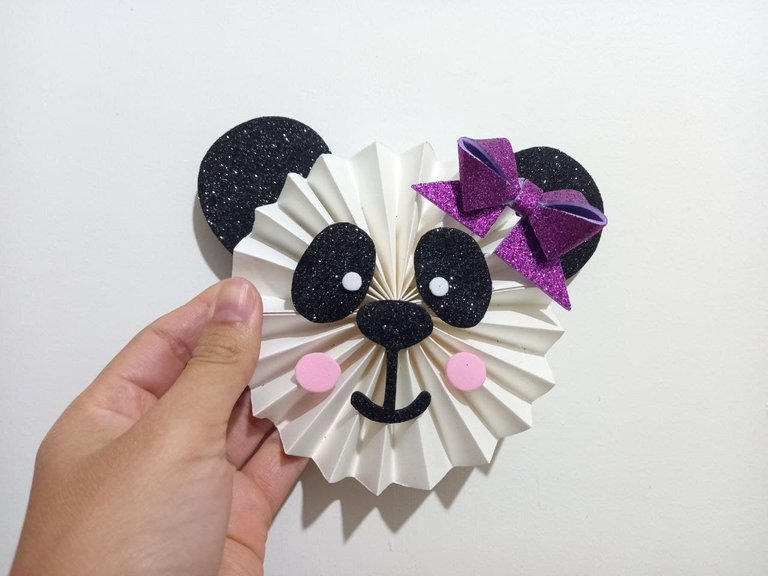
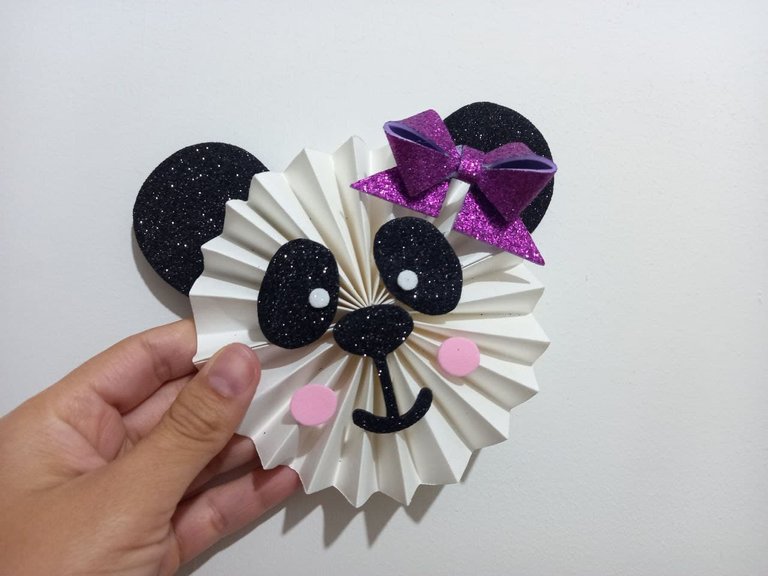
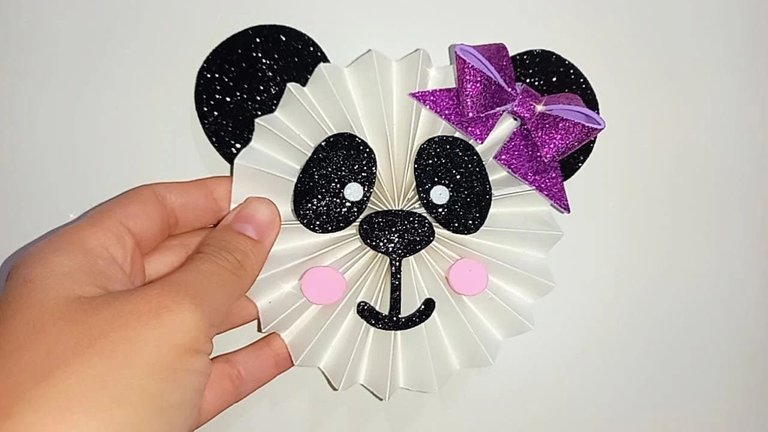
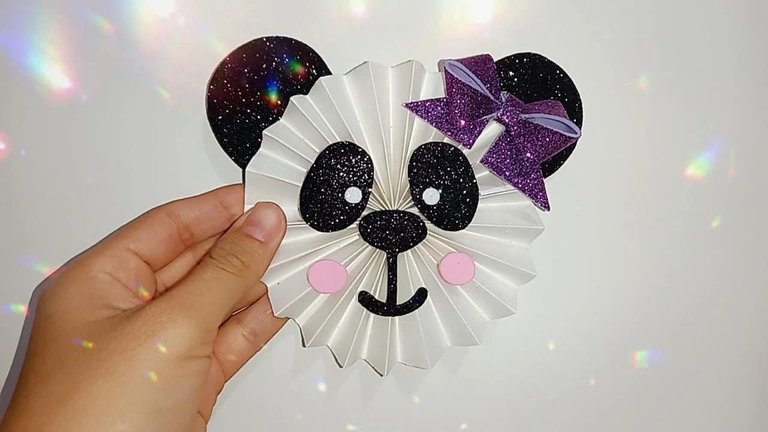
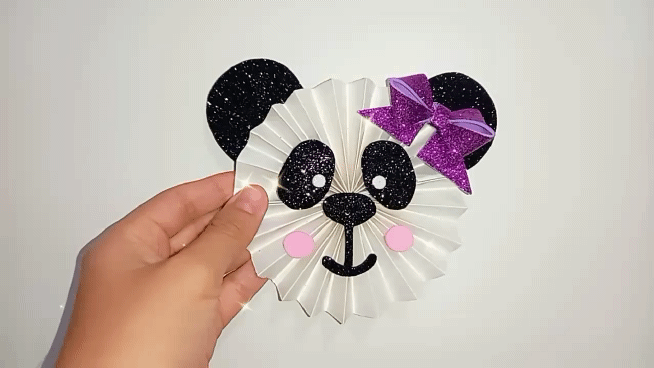
¡Y listo! De esta forma tan sencilla tenemos un hermoso osito panda elaborado a partir de un rosetón de cartulina, como habrán notado es muy fácil de hacer, una vez que hagamos el rosetón podemos convertirlo en lo que deseemos y decorar a nuestro gusto, yo amé el resultado de esta manualidad y espero que ustedes en casa también ❤
¡And ready! In this simple way we have a beautiful panda bear made from a cardboard rosette, as you may have noticed it is very easy to do, once we make the rosette we can turn it into whatever we want and decorate to our liking, I loved the result of this craft and I hope you at home too ❤
Resultado 🐼 | Result 🐼

Todas las fotografías son de mi propiedad.
Fotografías capturadas con mi Samsung Galaxy A12
Separador de texto elaborado en Canva.
Nos vemos en mi próxima publicación.
¡Tengan un feliz día!
All photographs are my property.
Photos captured with my Samsung Galaxy A12
Text separator made in Canva.
See you in my next post.
¡Have a happy day!
Thank you for sharing this amazing post on HIVE!
Your content got selected by our fellow curator @stevenson7 & you just received a little thank you via an upvote from our non-profit curation initiative!
You will be featured in one of our recurring curation compilations and on our pinterest boards! Both are aiming to offer you a stage to widen your audience within and outside of the DIY scene of hive.
Join the official DIYHub community on HIVE and show us more of your amazing work and feel free to connect with us and other DIYers via our discord server: https://discord.gg/mY5uCfQ !
If you want to support our goal to motivate other DIY/art/music/homesteading/... creators just delegate to us and earn 100% of your curation rewards!
Stay creative & hive on!
Thanks for the support ♥️
The rewards earned on this comment will go directly to the person sharing the post on Twitter as long as they are registered with @poshtoken. Sign up at https://hiveposh.com.
Que lindo quedó ese oso panda 😚😊Bendiciones
Hola muchas gracias, me alegra que te gustara ♥️ saludos!
hola amiga, este osito esta genial, ademas el procedimiento se ve facil, gracias por compartirlo con nosotros, saludos
Holaa gracias por tu comentario, de verdad que si es muy fácil y sobretodo lindo, me alegra que te gustara, saludos!