Hola, hola hermosa comunidad de #hivediy 👩🎨
Hola, hola hermosa comunidad de #hivediy 👩🎨
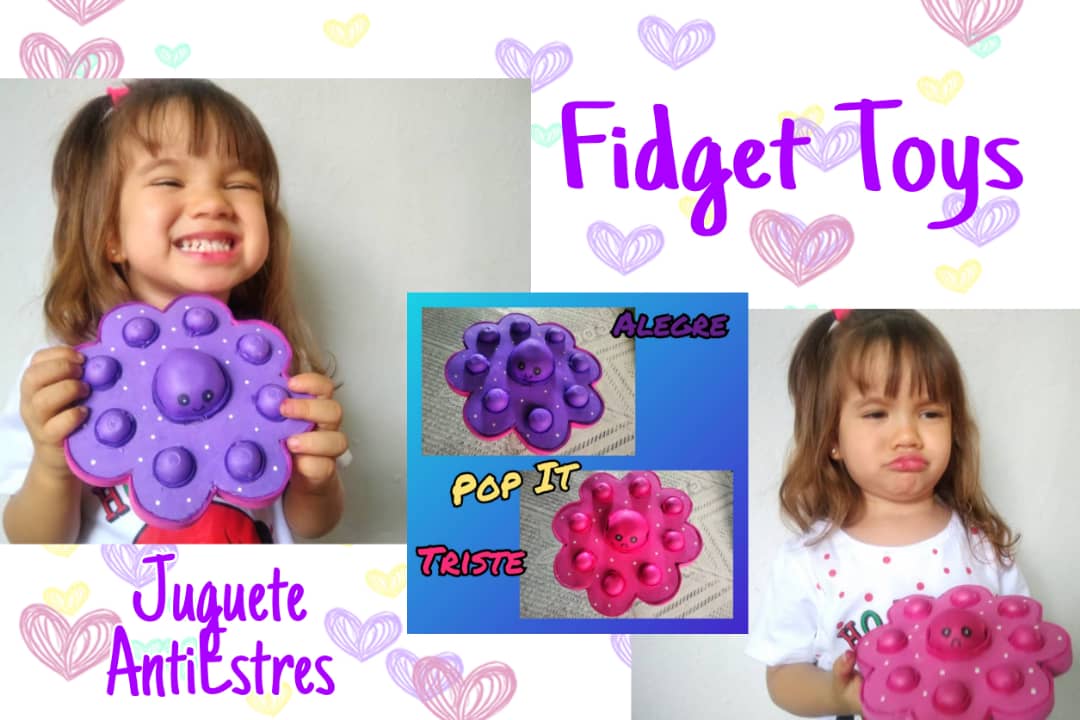
Bendecido día tengas todos mis queridos amig@s, una vez quiero compartir con ustedes un lindo trabajo que he realizado y me pareció estupendo, en días pasados nos reunimos con unos amigos quienes tienes una bebé de la edad de mi pequeña Nicole, exactamente 2 añitos, ella cargaba un juguete que está súper de moda hoy en día, y es conocido como un "POP IT" o "Fidget Toys".
Blessed day have all my dear friends, once I want to share with you a beautiful work that I have done and I thought it was great, in recent days we met with some friends who have a baby of My little Nicole's age, exactly 2 years old, she was carrying a toy that is super fashionable today, and is known as a "POP IT" or "Fidget Toys".
Este es un juguete relájate y antiestrés, muy colorido y llamativo, elaborado de muchas formas entre las más comunes, caballo, corazón, flor, unicornio, entre otros. Este juguete fué creado principalmente para niños que presentan alguna condición como autismo, déficit de atención, hiperactividad sin embargo se expandió y su popularidad creció rápidamente abarcando a la población en general.
This is a relax and anti-stress toy, very colorful and striking, made in many ways among the most common, horse, heart, flower, unicorn, among others. This toy was created mainly for children who have some condition such as autism, attention deficit, hyperactivity, however it expanded and its popularity grew rapidly encompassing the general population.
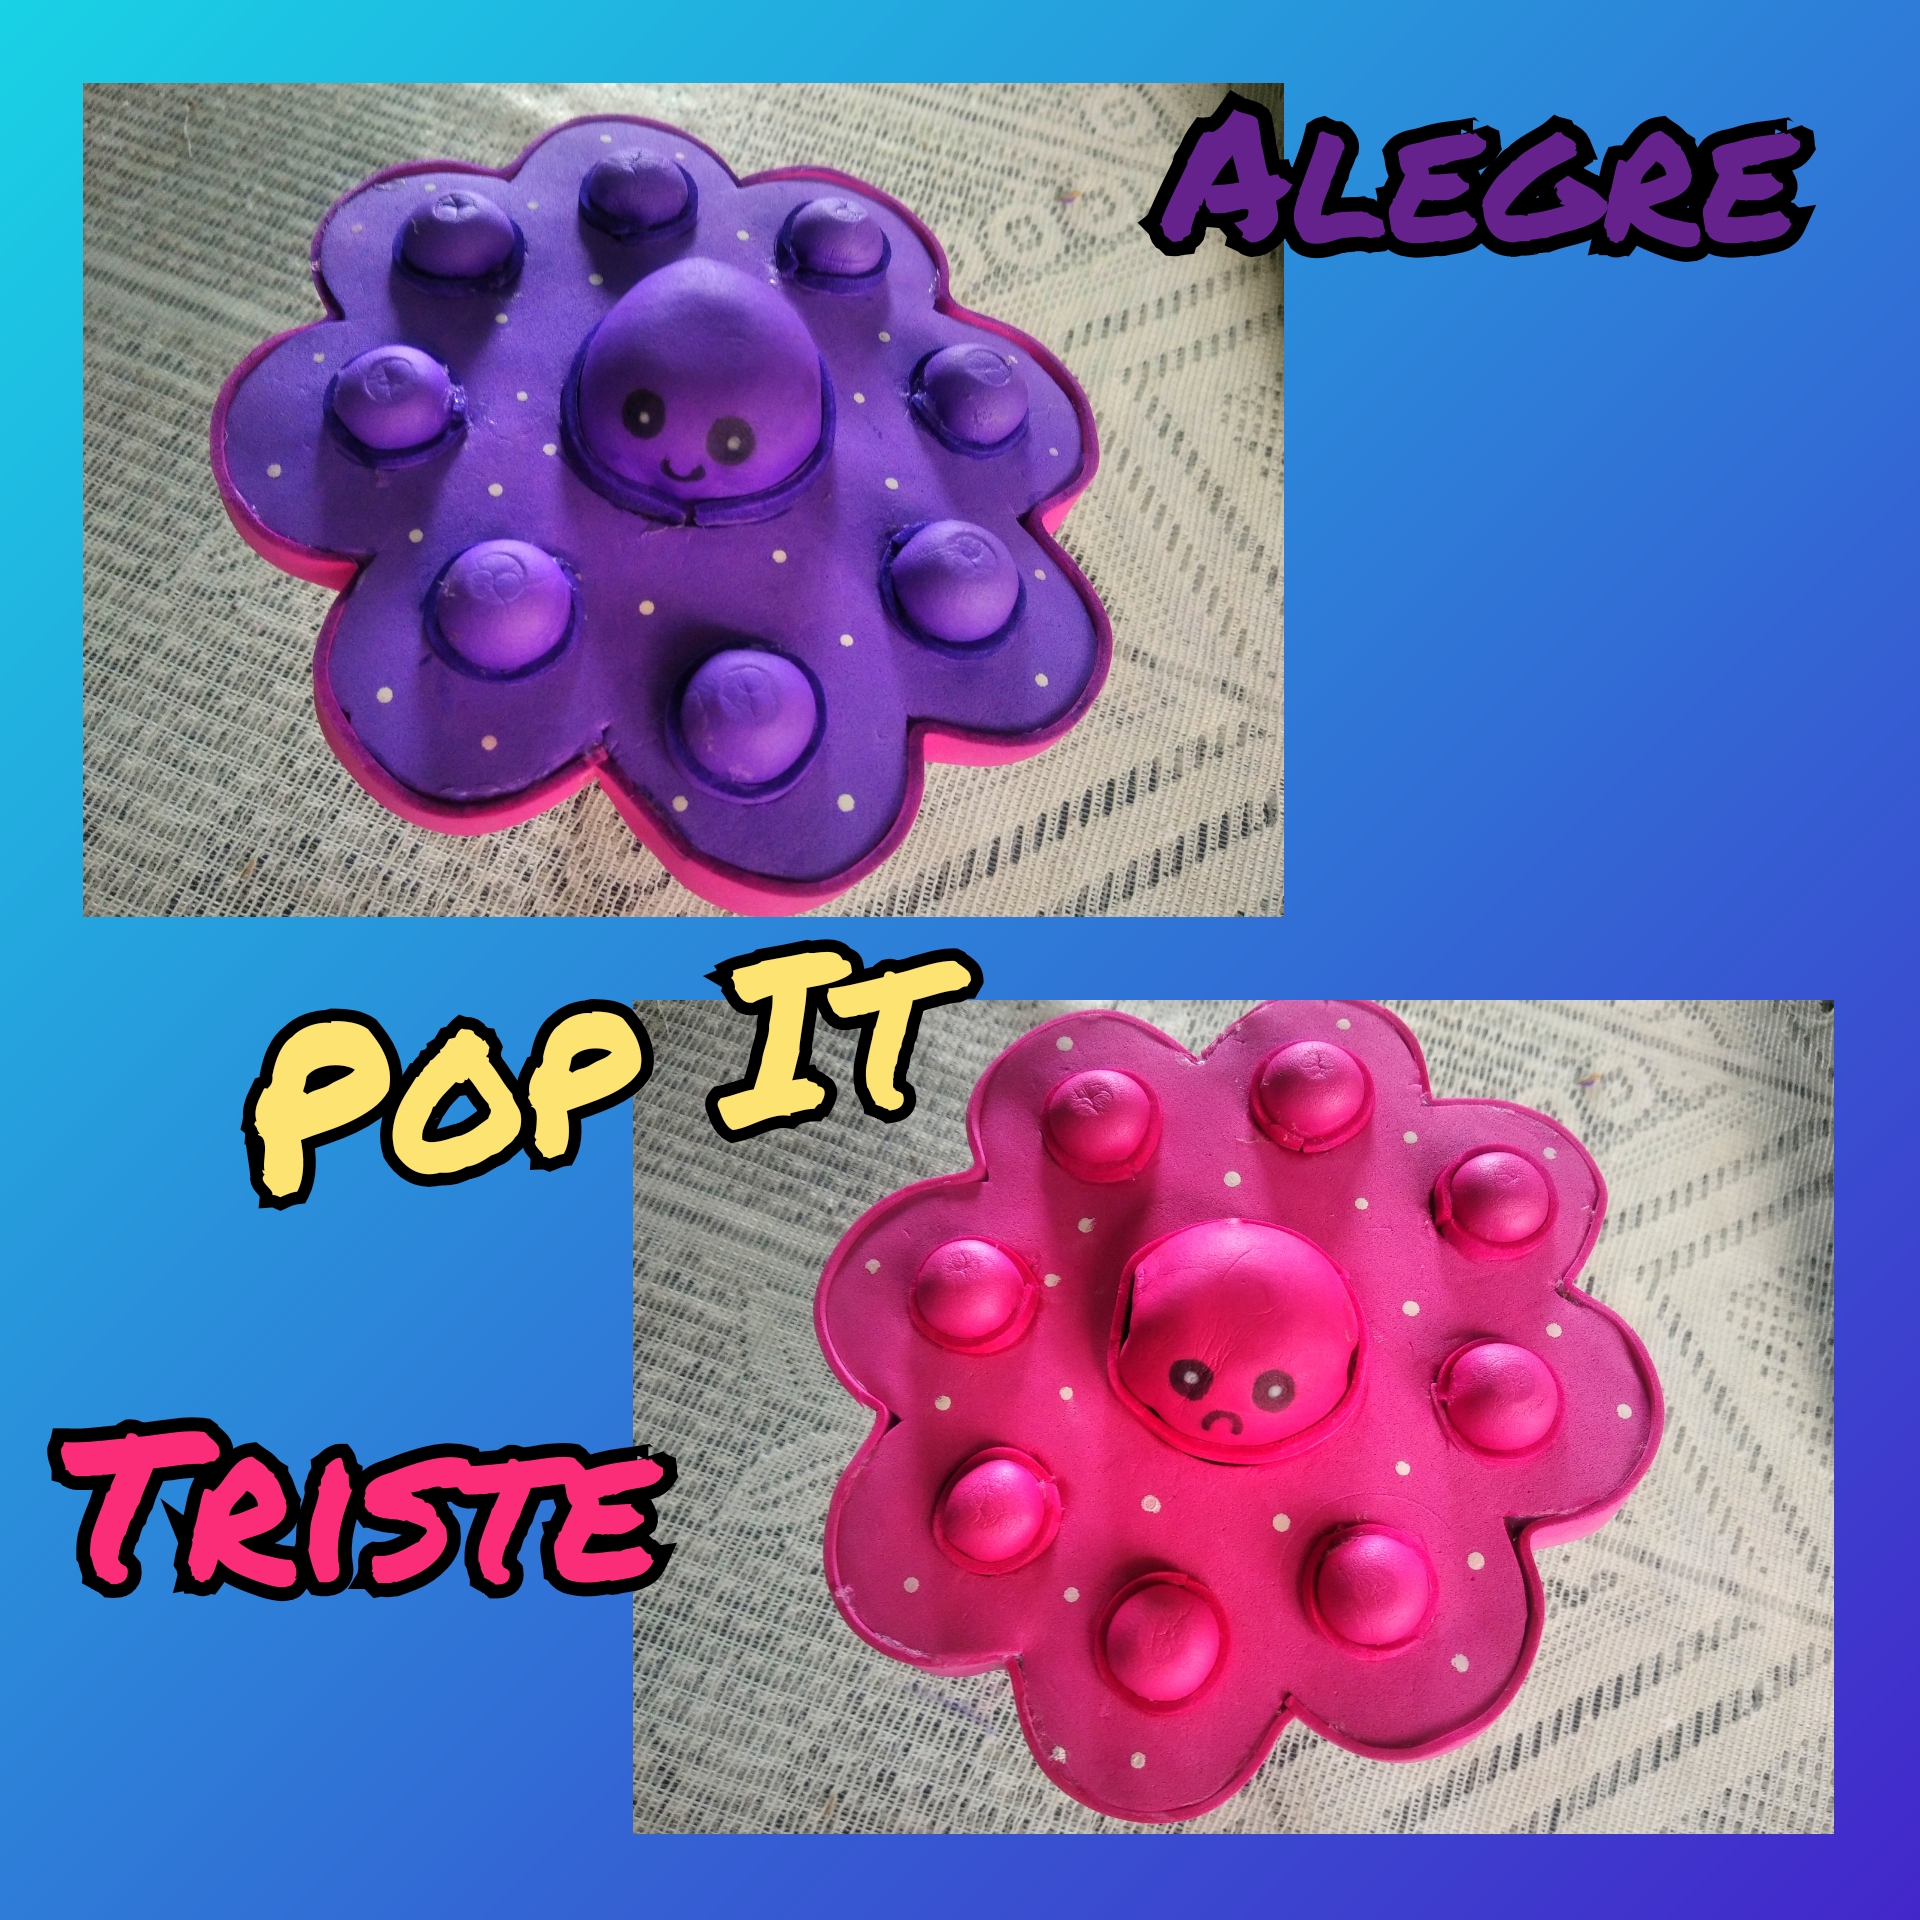
Hoy en día todos los niños quieren un pop It, les gusta la sensación de explotar las burbujas y el sonido que produce al hacerlo. Mi niña Nicole jugó toda la tarde con el pop It de Mari y no quería venirse a casa sin el, por eso amigos quise crear este pop It con mis propias manos, para que mi pequeña pueda entretenerse y disfrutar mucho. Este pop It además expresa emociones, por un lado está alegre y por el otro está triste. Ahora veamos los materiales que hemos usado para la elaboración de este pop It.
Nowadays all children want a Pop It, they like the feeling of popping bubbles and the sound it makes when doing so. My daughter Nicole played all afternoon with Mari's It pop and she didn't want to come home without it, that's why friends I wanted to create this It pop with my own hands, so that my little girl can entertain herself and enjoy a lot. This pop It also expresses emotions, on the one hand it is happy and on the other it is sad. Now let's see the materials we used to make this pop It.
Materiales
Materiales

🐙 Cartón.
🐙 Foami morado.
🐙 Foami fucsia.
🐙 Hija blanca.
🐙 Lápiz de grafito.
🐙 Marcadores morado, fucsia y negro.
🐙 Pistola de silicón.
🐙 Silicón en barra.
🐙 Tijera.
🐙 Metra o canica.
🐙 Pelota de plástico.
🐙 Vaso pequeño.
🐙 Plancha de cabellos.
🐙 Cardboard.
🐙 Purple foami.
🐙 Fuchsia foami.
🐙 White daughter.
🐙 Graphite pencil.
🐙 Purple, fuchsia and black markers.
🐙 Silicone gun.
🐙 Silicone in bar.
🐙 Scissor.
🐙 Meter or marble.
🐙 Plastic ball.
🐙 Small glass.
🐙 Hair straightener.
Ahora pasemos al paso a paso y elaboremos este Fidget Toys, el cual está inspirado en un lindo pulpo ya que a mi niña le gustan muchos los animales y por eso quise hacerlo de pulpo.
Now let's go step by step and make this Fidget Toys, which is inspired by a cute octopus since my daughter likes many animals and that's why I wanted to make it an octopus.
Elaboración
Elaboración
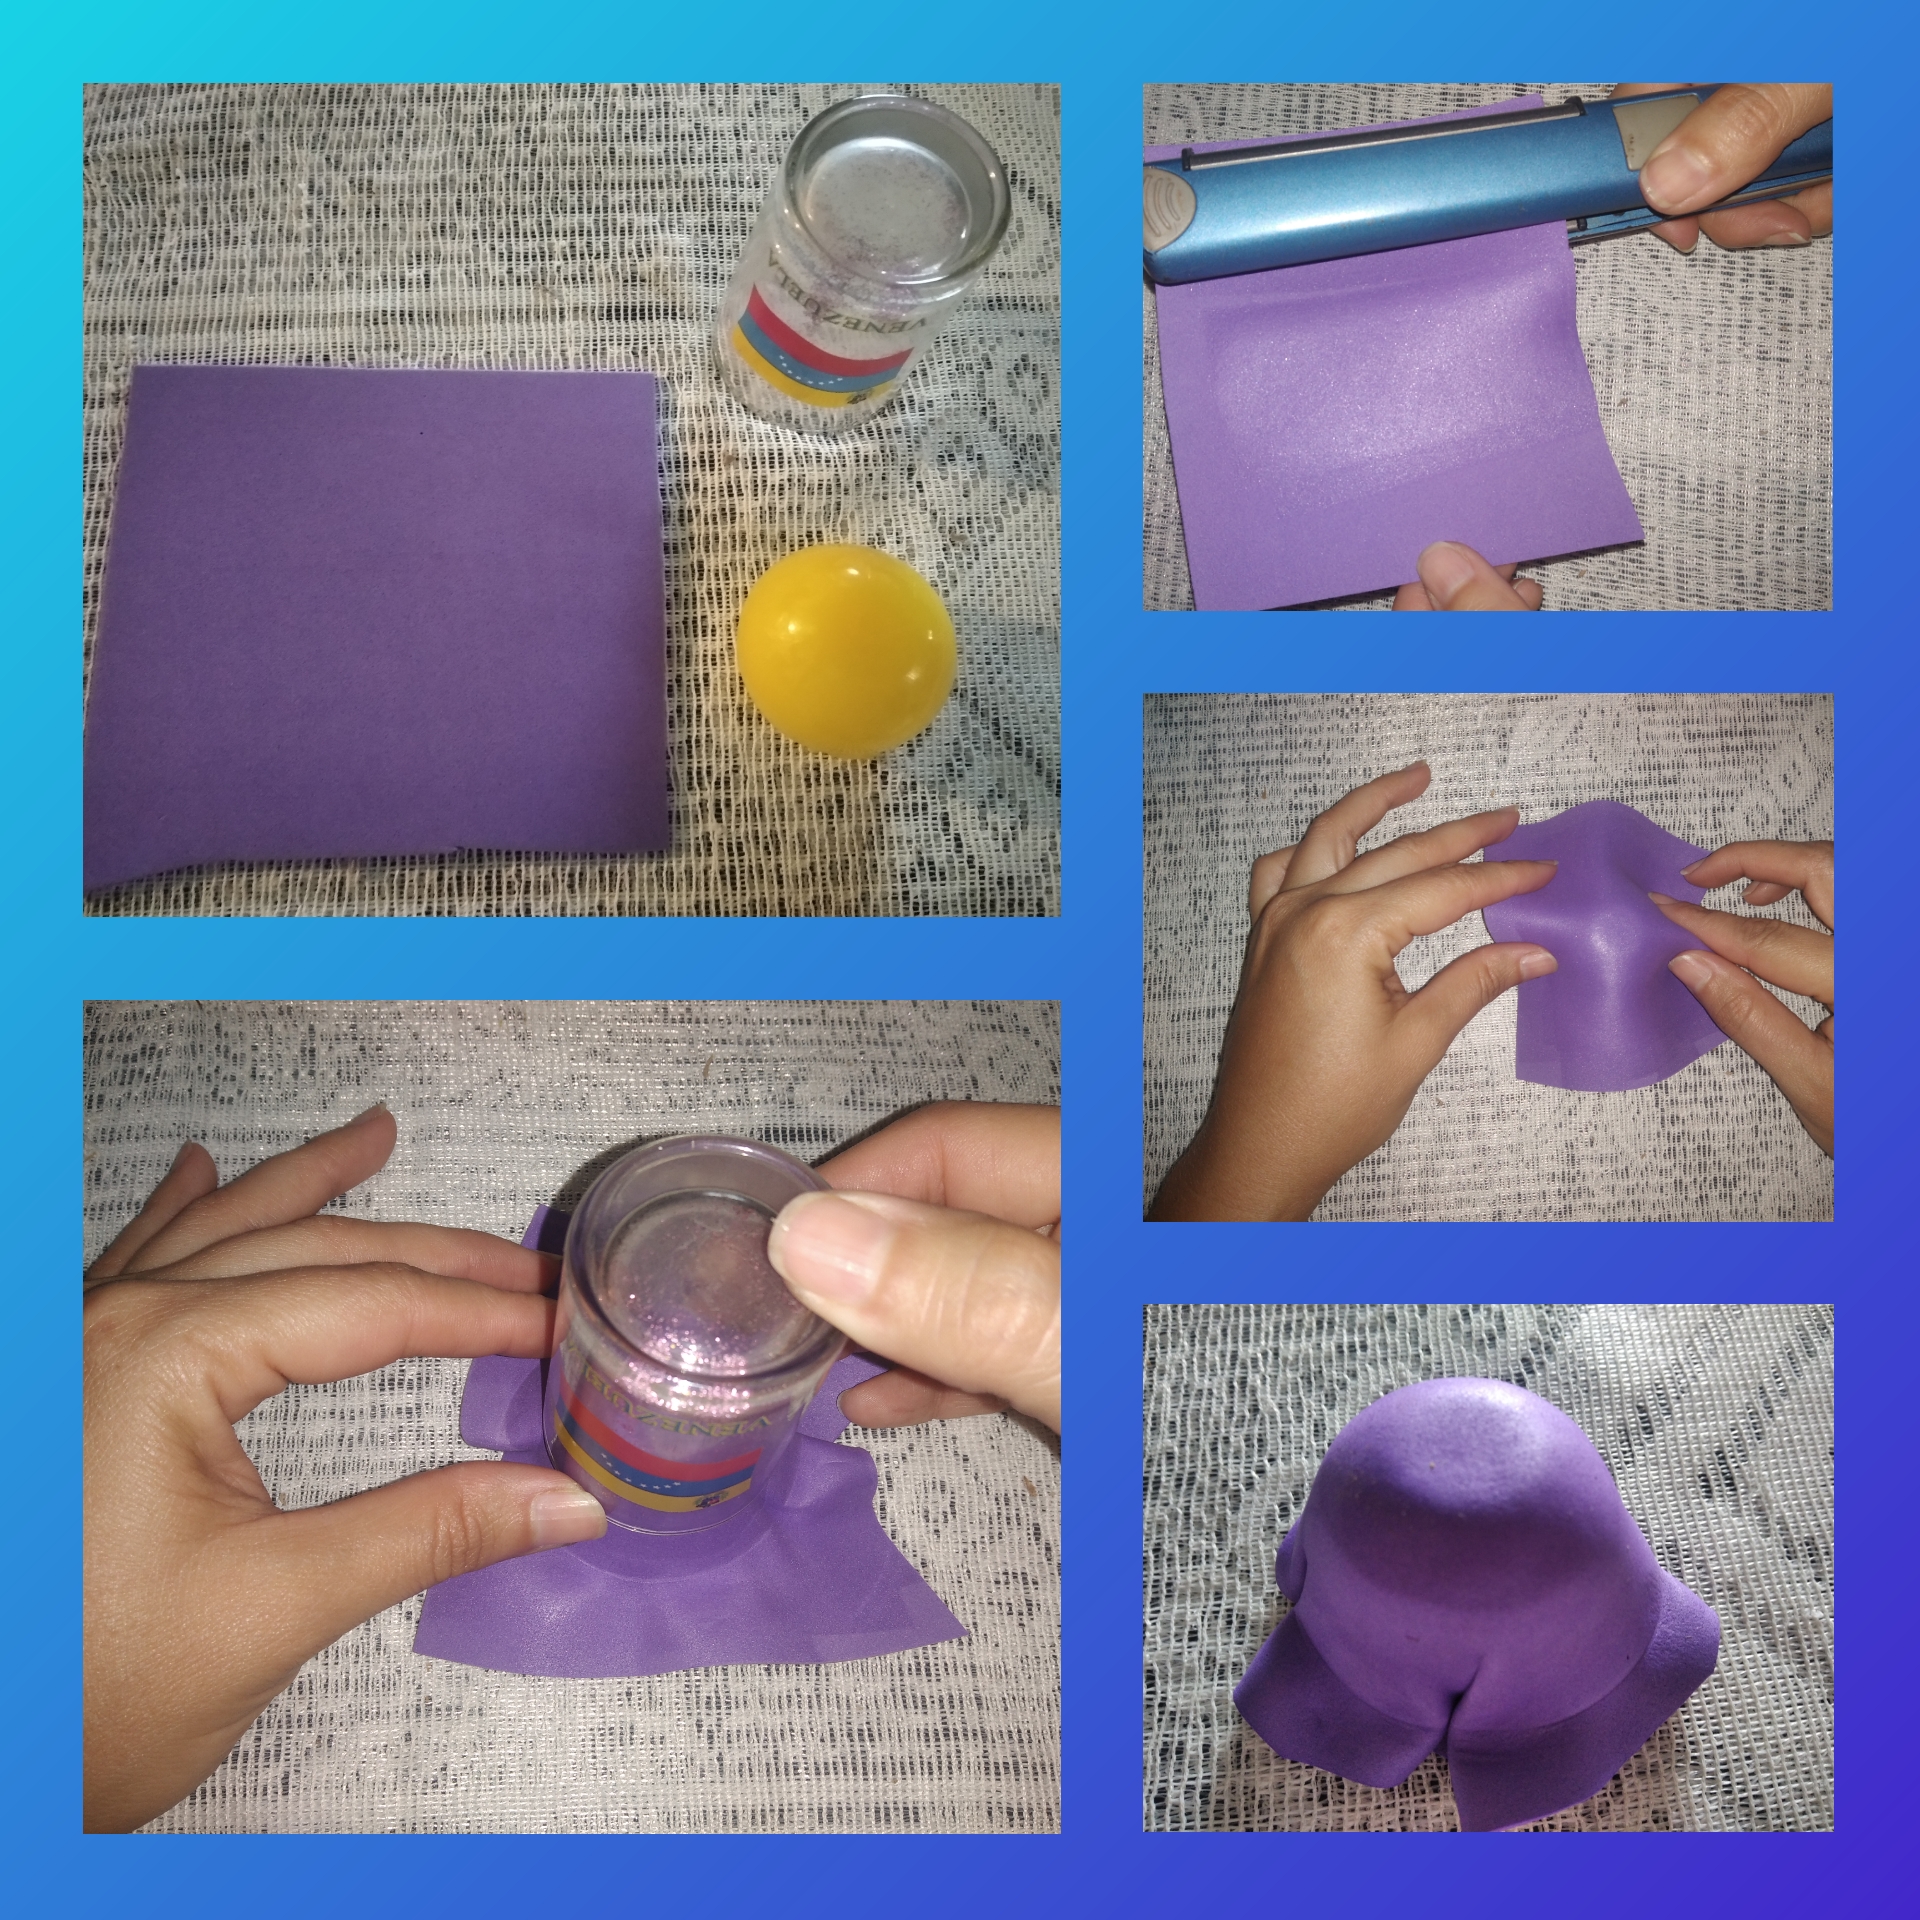
Paso 1.
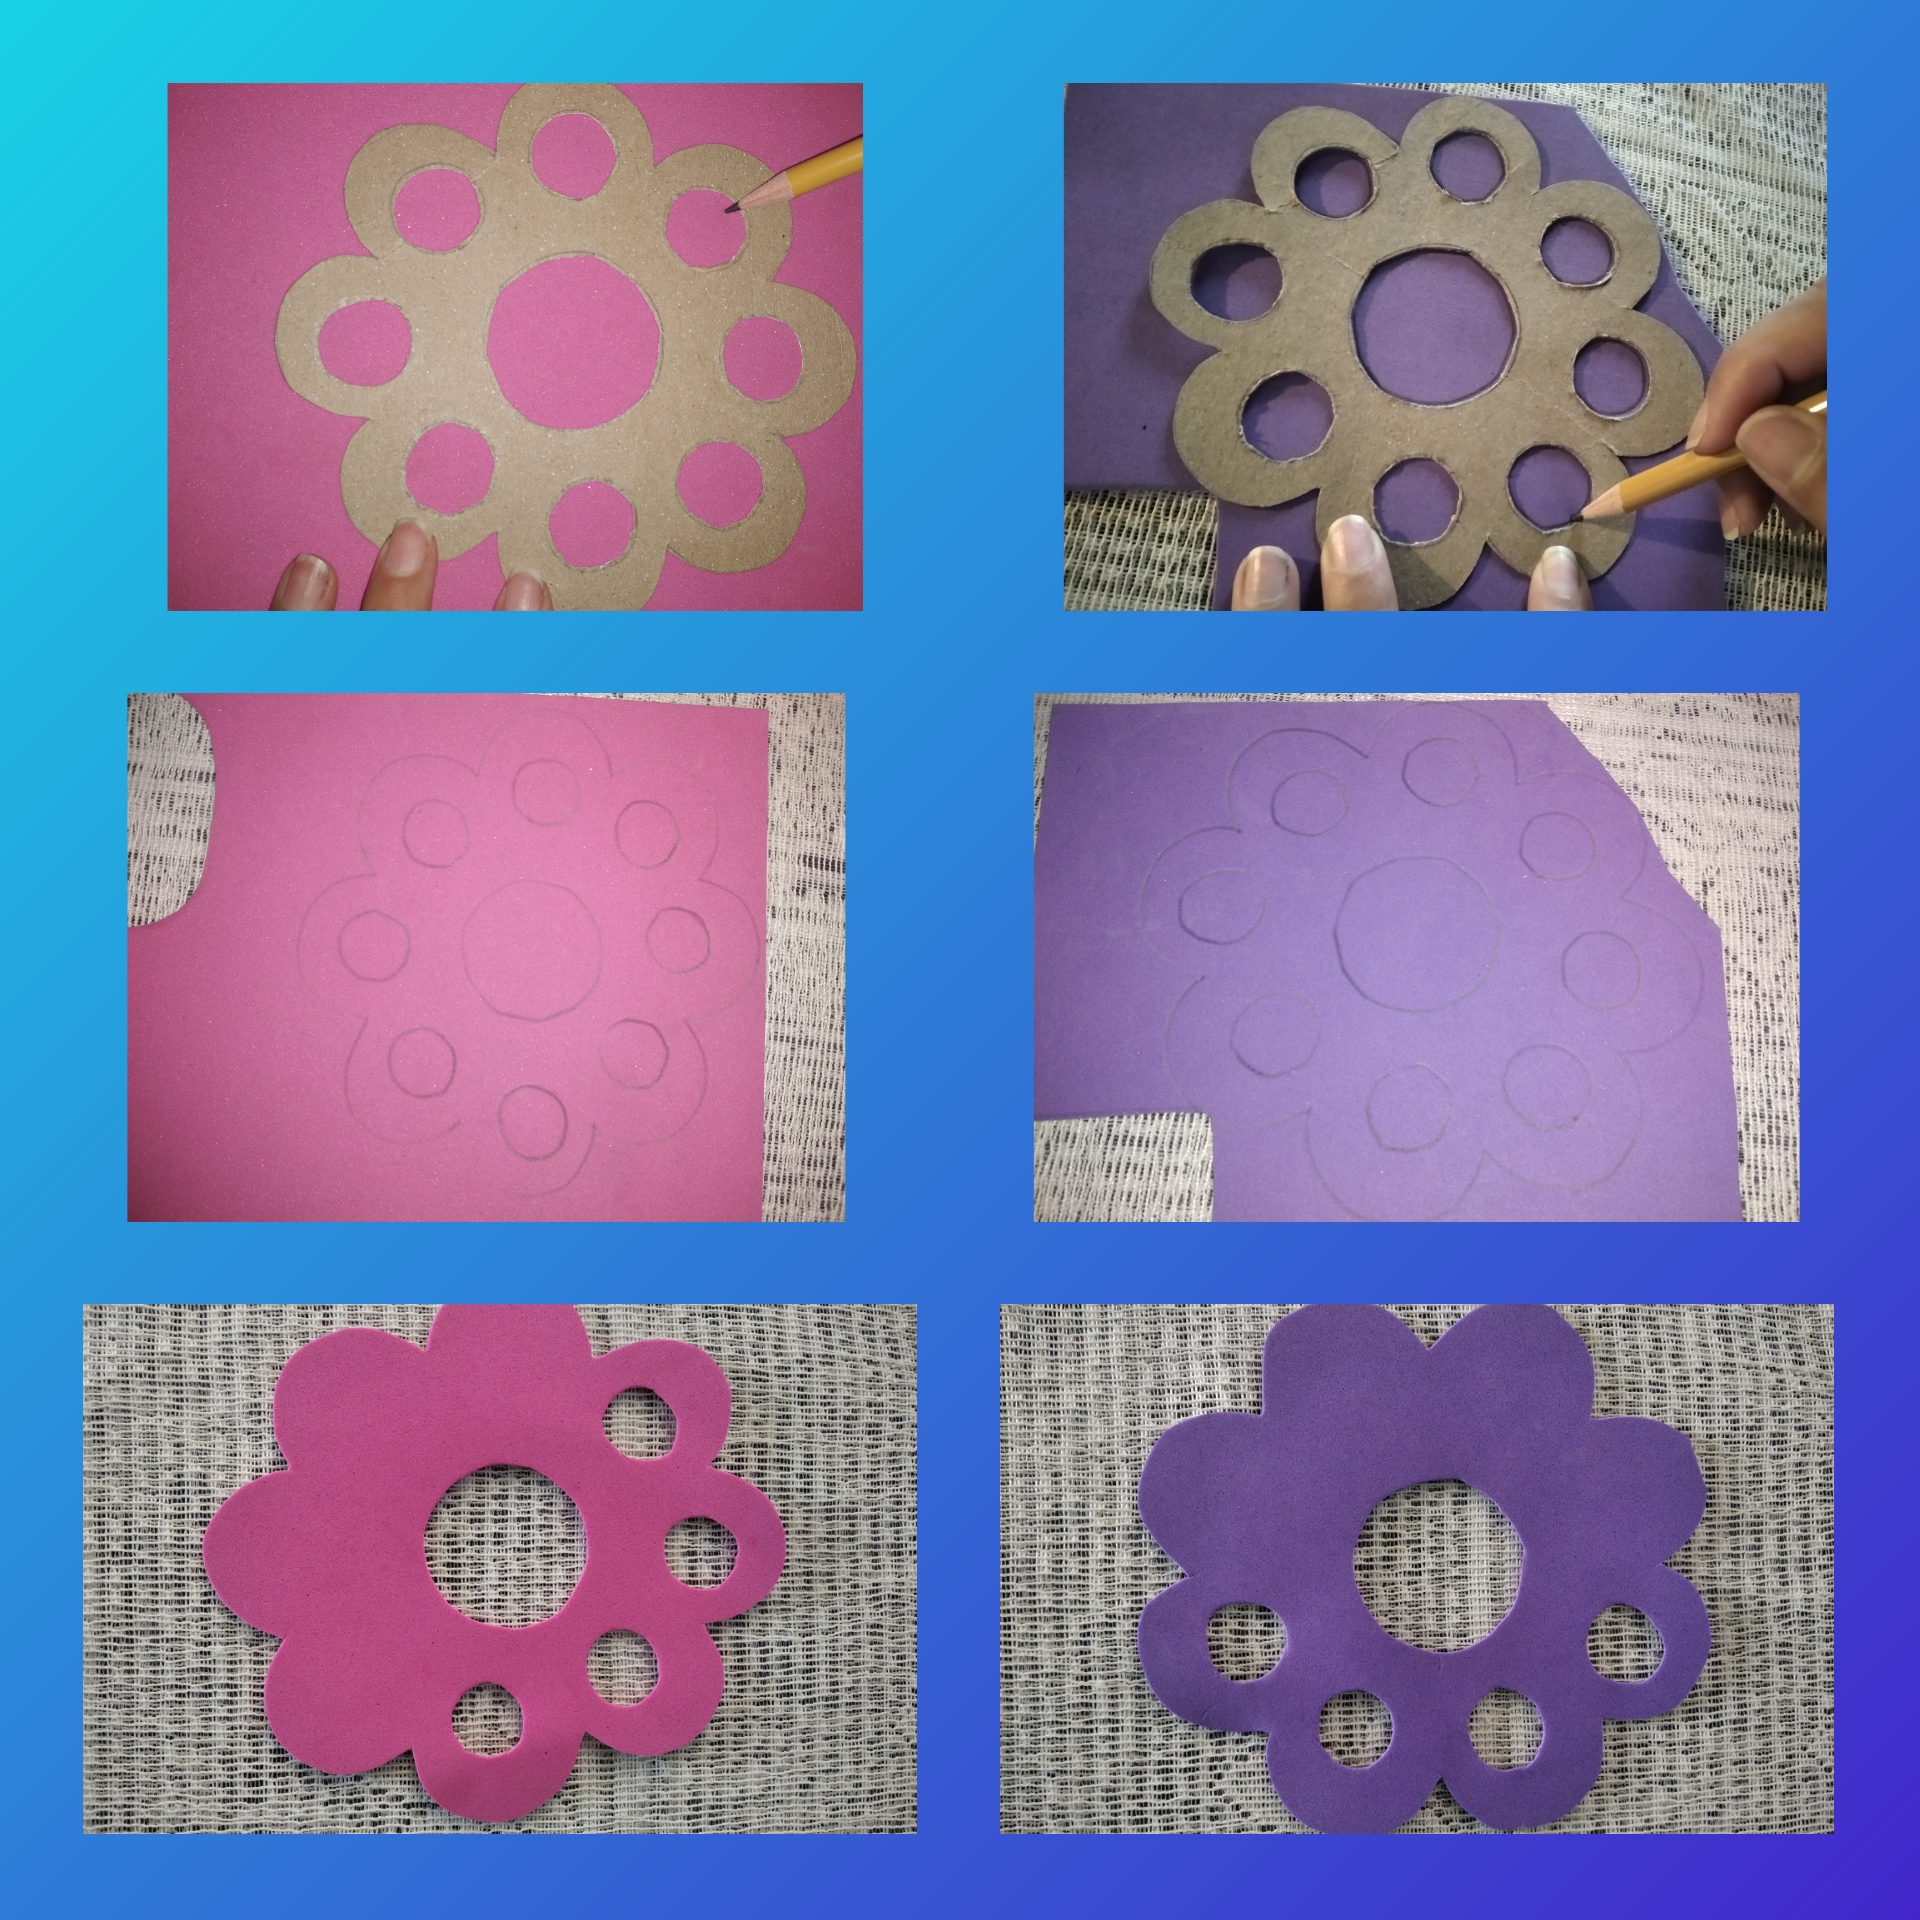
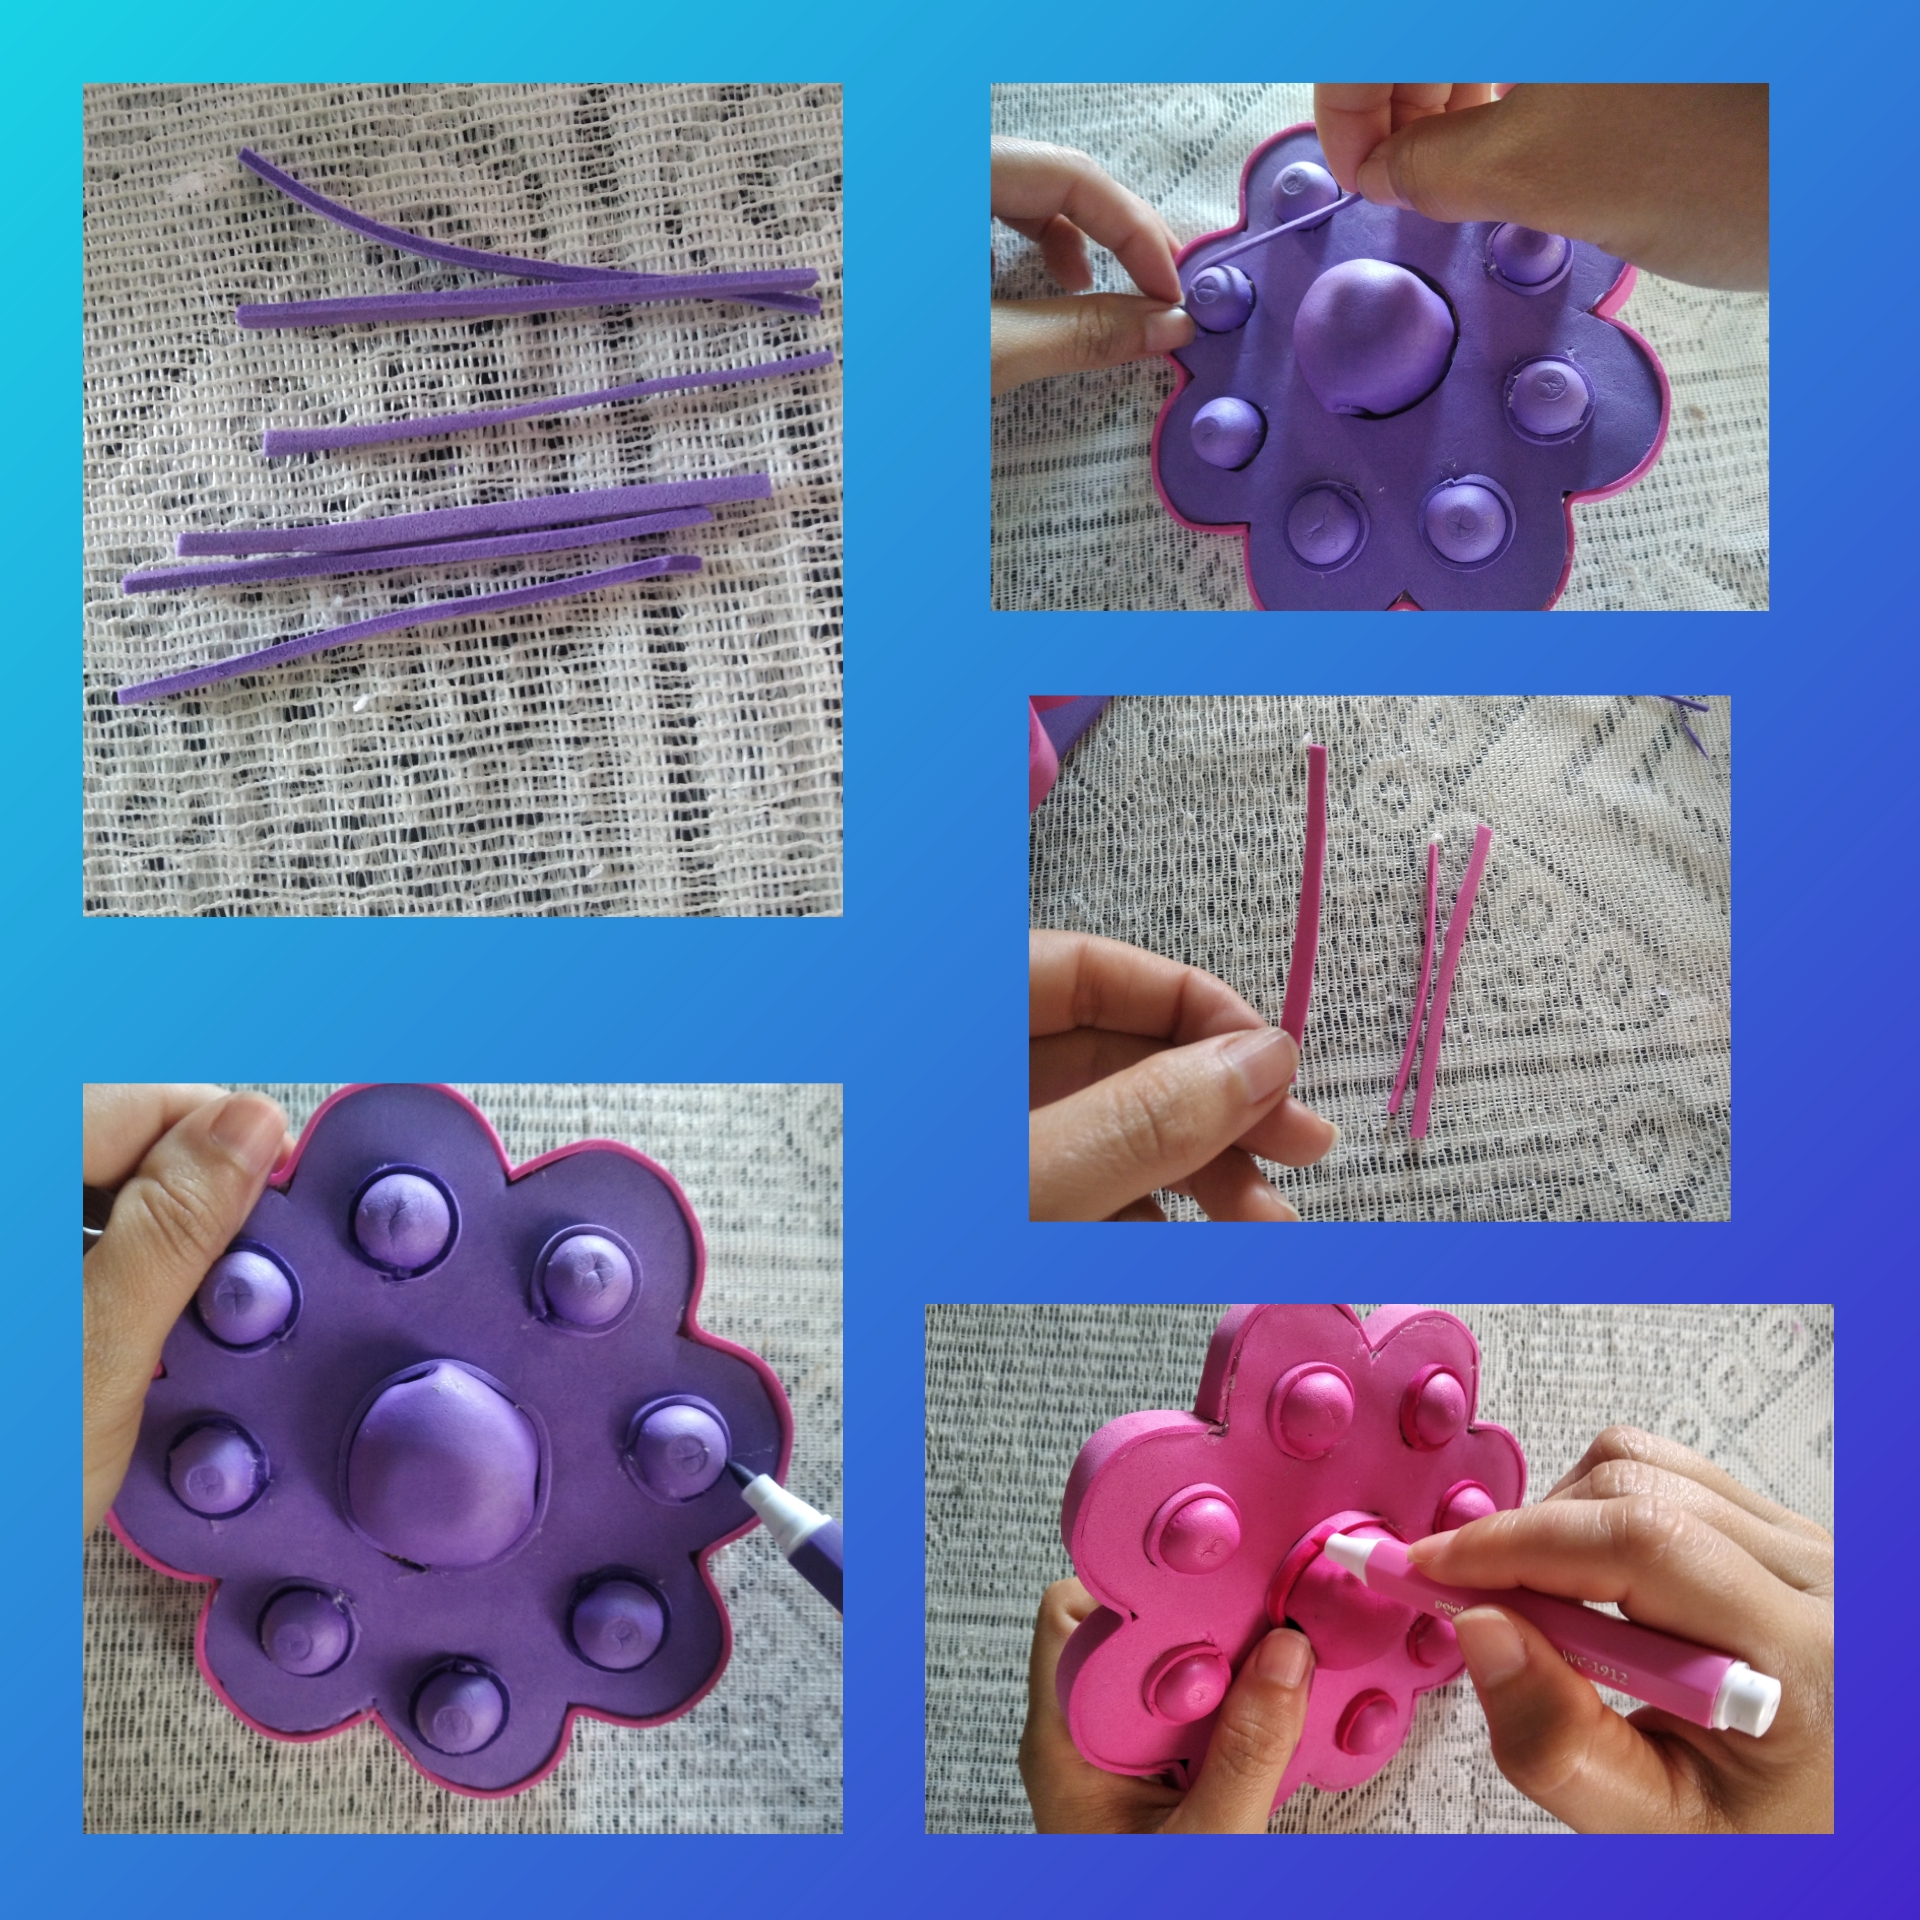
Comenzamos esta elaboración por dibujar en una hoja blanca un pulpo como lo muestra la imágen y del tamaño que queremos sea nuestro pop It, luego de dibujarla vamos a tomar un molde en este caso voy a usar una tapa de acetona y al rededor de ella voy dibujando un circulo en el medio de cada tentáculo, luego con un molde más grande en este paso un vaso voy a dibujar el círculo central el cual es más grande que los 8 círculos que hicimos al rededor. Recortamos por el borde y por en centro de cada círculo formado y ya tendremos el molde listo.
Step 1.We begin this elaboration by drawing an octopus on a white sheet as shown in the image and the size we want our pop It to be, after drawing it we are going to take a mold in this case I am going to use an acetone cap and around it I draw a circle in the middle of each tentacle, then with a larger mold in this step a glass I will draw the central circle which is larger than the 8 circles we made around it . We cut along the edge and in the center of each circle formed and we will have the mold ready.
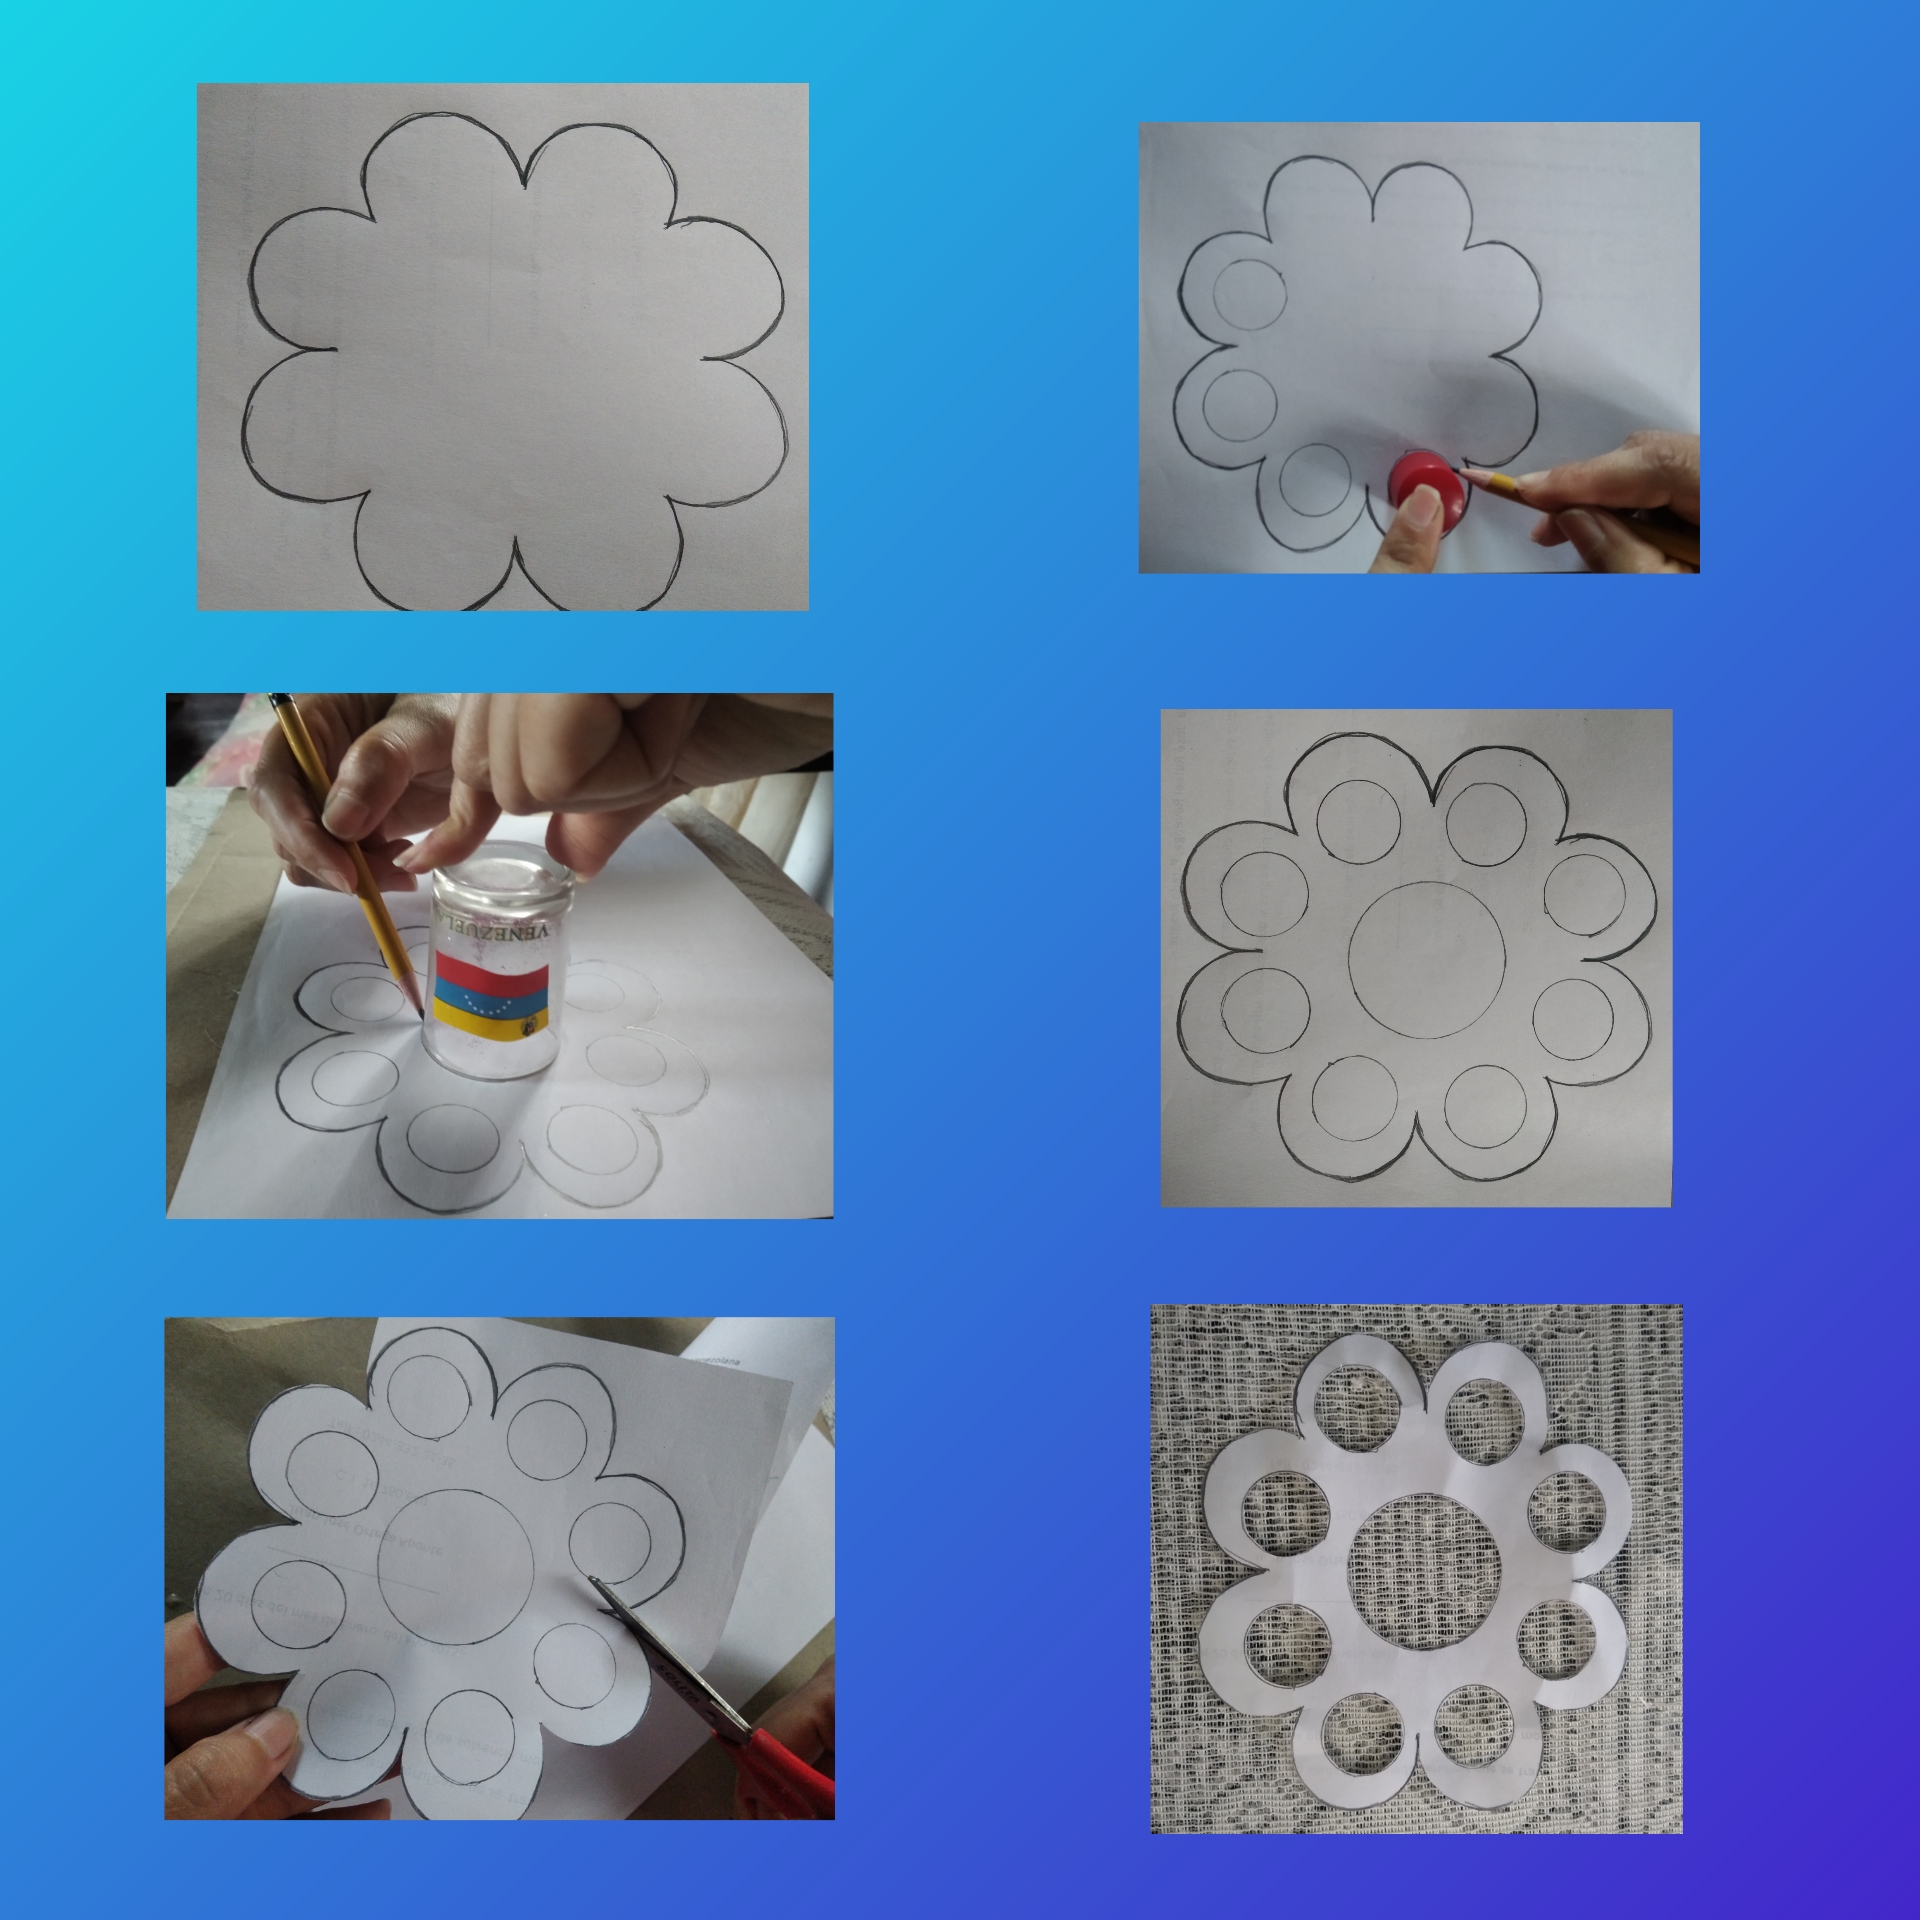
Paso 2.
Colocamos sobre el cartón el molde que obtuvimos y lo vamos a dibujar, lo hacemos dos veces y luego los recortamos.
Step 2.We place the template we obtained on the cardboard and we are going to draw it, we do it twice and then we cut it out.
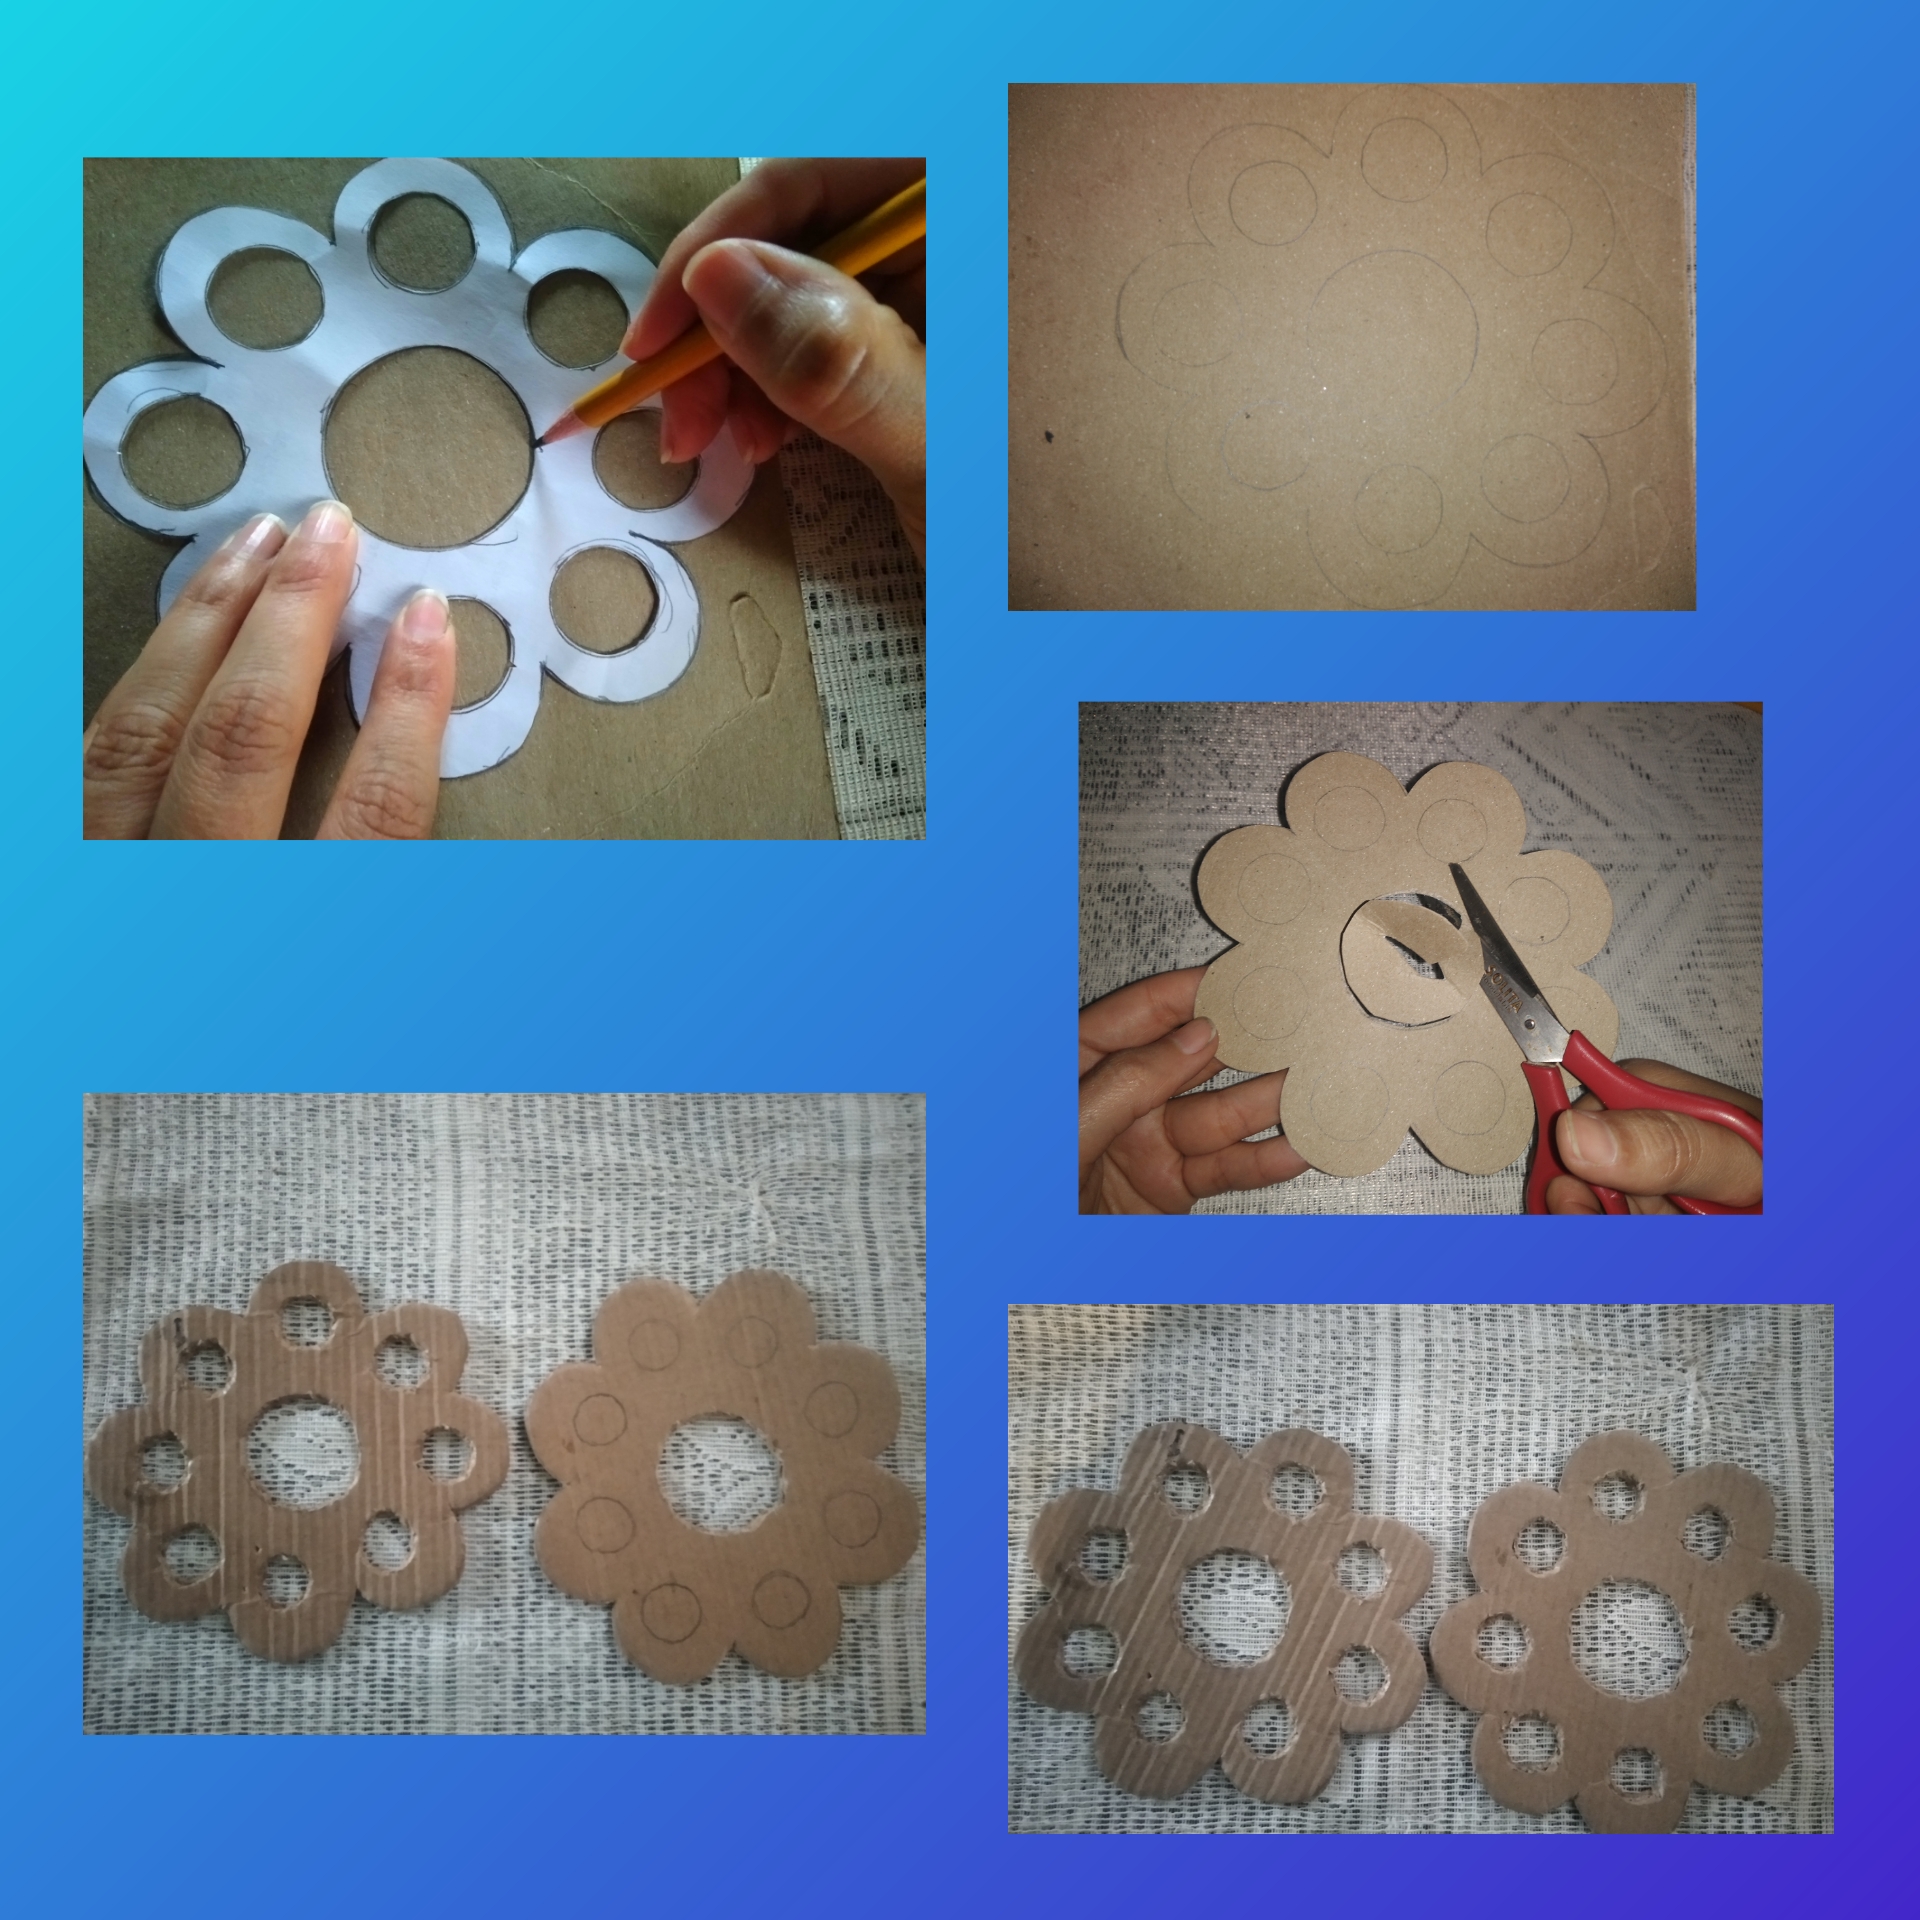
Paso 3.
Al tener nuestros dos cartones listos, vamos a remarcar en el foami fucsia y luego en el foami morado, los recortamos.
Step 3.When we have our two cardboards ready, we are going to highlight the fuchsia foami and then cut them out on the purple foami.
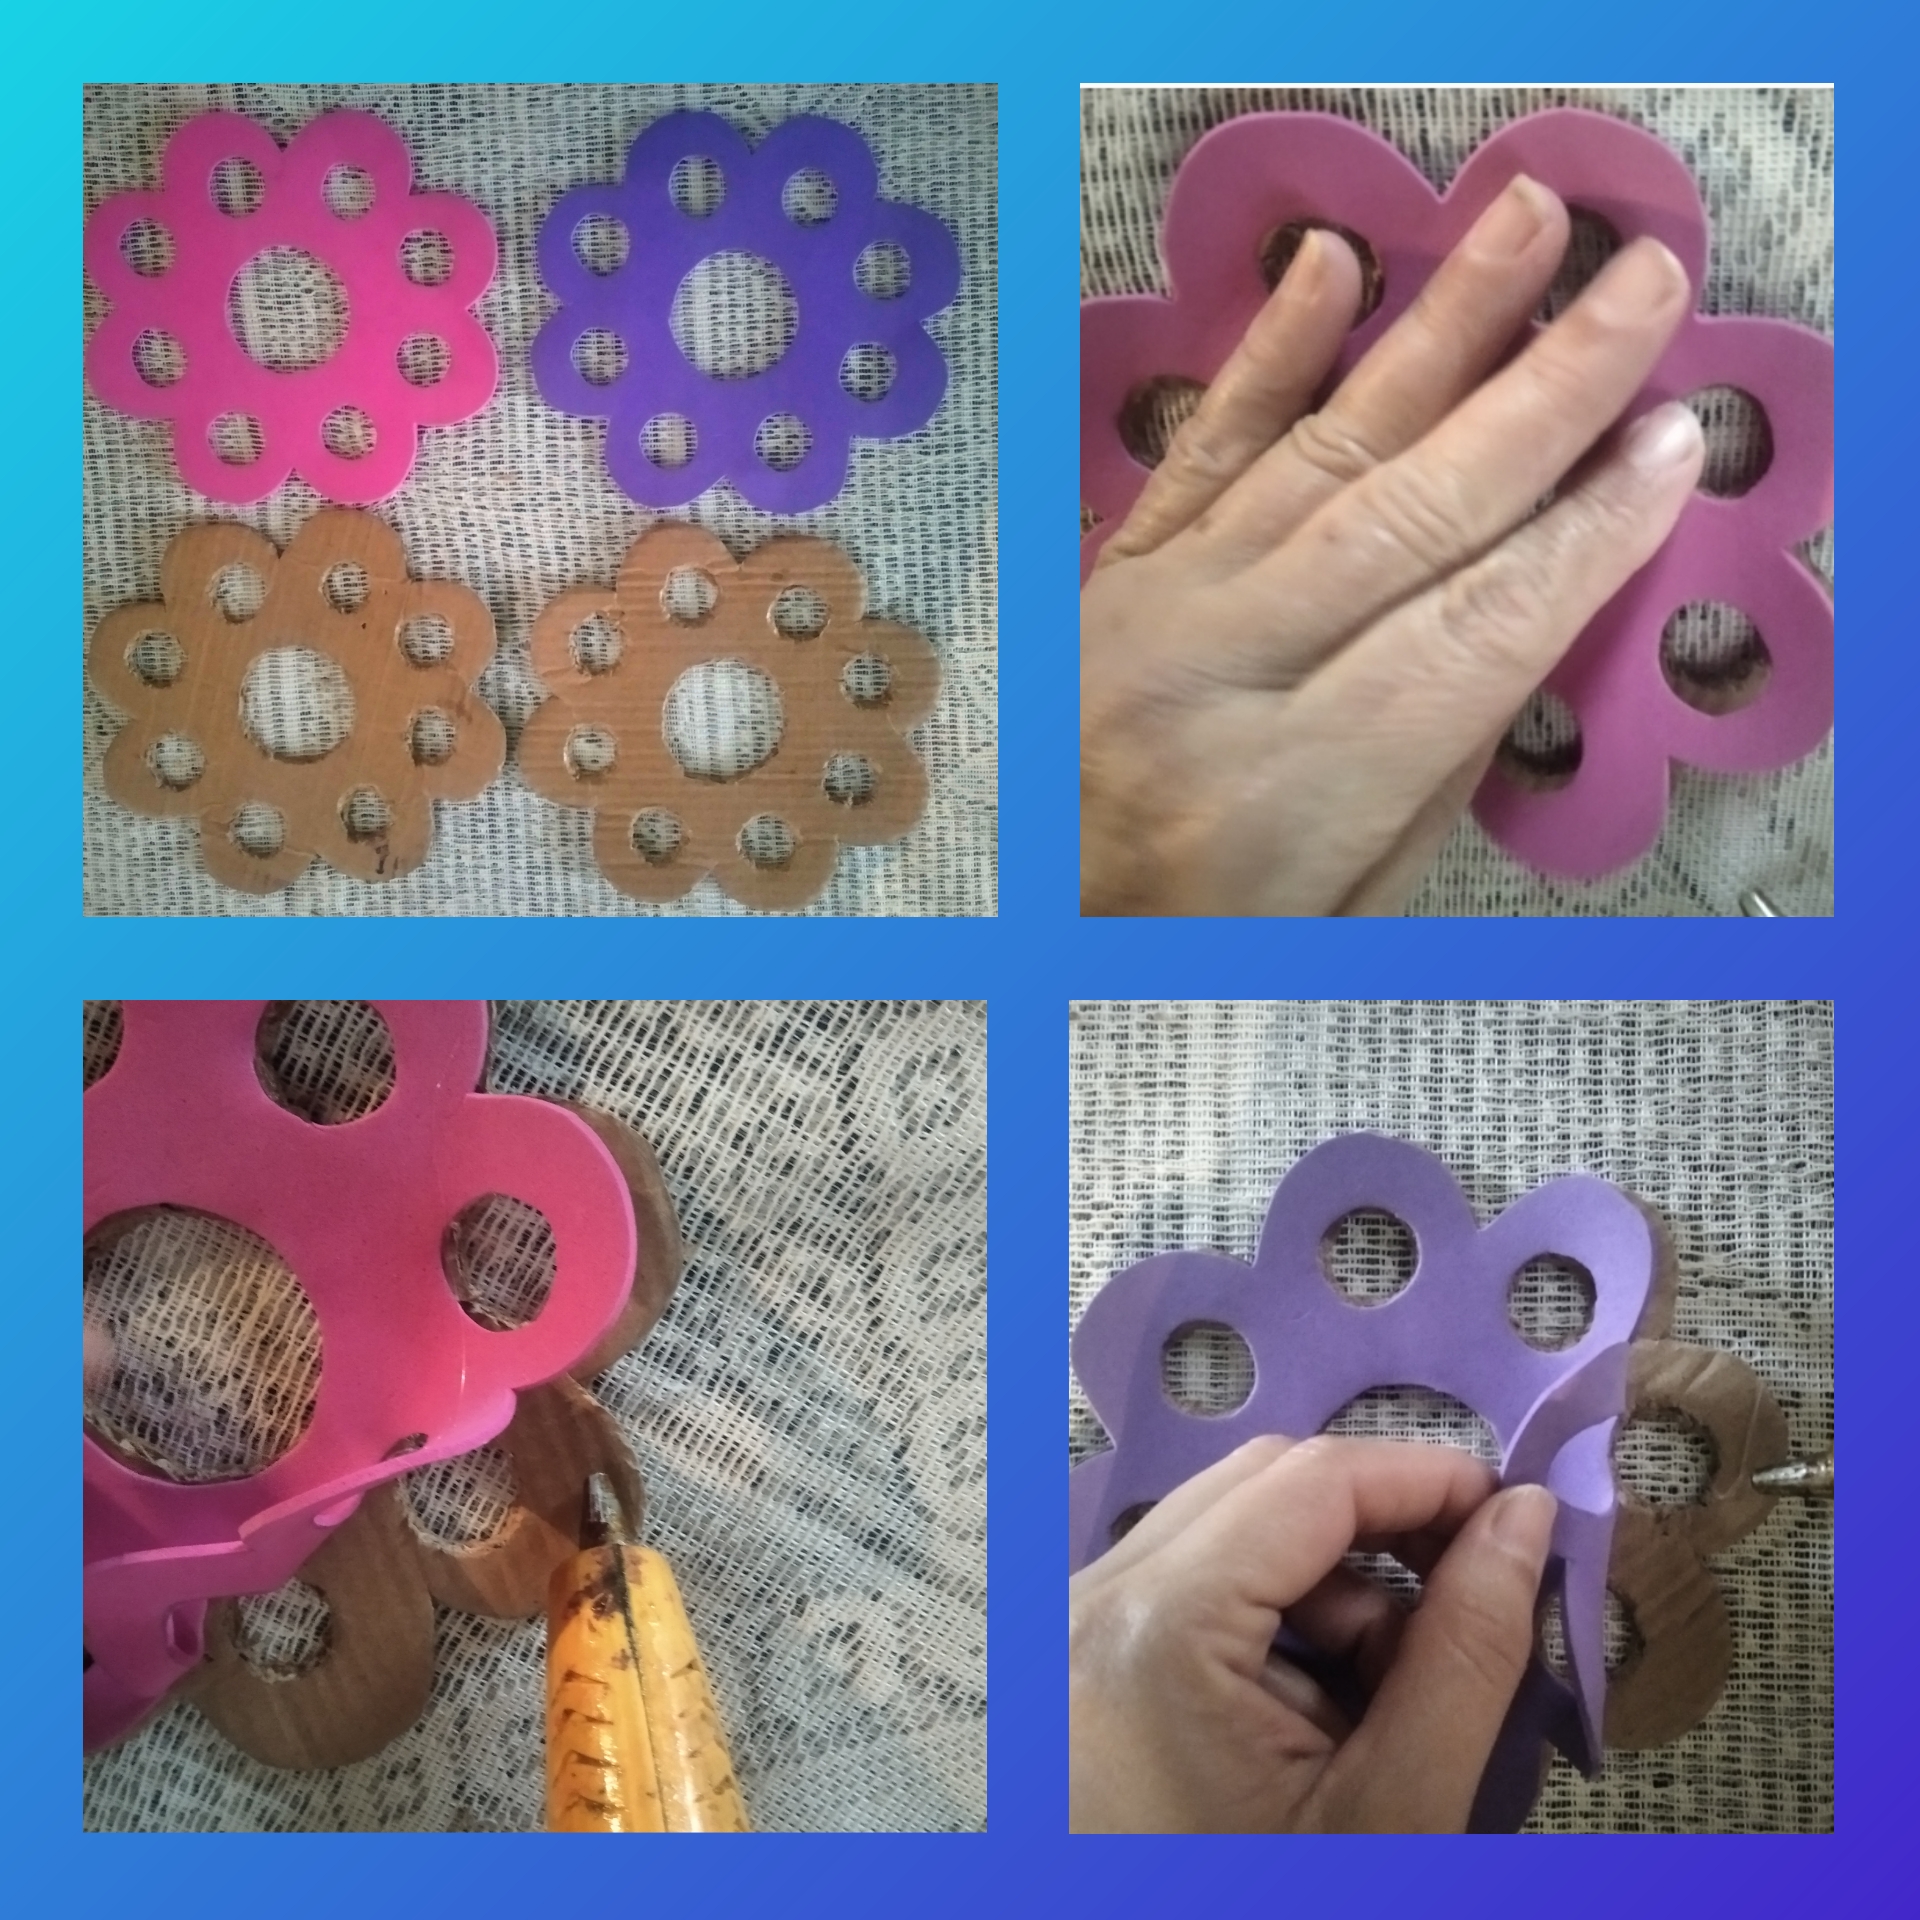
Paso 4.
Al tener las cuatro piezas listas, vamos a unir con silicón la pieza morada con un cartón y la pieza fuscia con el otro cartón.
Step 4.When we have the four pieces ready, we are going to glue together the purple piece with a piece of cardboard and the fuchsia piece with the other piece of cardboard.
Paso 5.
Ahora vamos a hacer las burbujas que le darán emoción a este lindo pop It. Comenzamos por tomar un pedazo de foami morado y lo vamos a calentar con la plancha de planchar cabellos, luego que esté caliente lo colocamos sobre una Metra o canica y con la tapa de la acetona lo envolvemos esto para darle esa forma avalada al foami, por último recortamos el foami sobrante.
Step 5.Now we are going to make the bubbles that will give emotion to this cute pop It. We start by taking a piece of purple foami and we are going to heat it with the hair iron, after it is hot We place it on a Metra or marble and with the acetone lid we wrap this to give the foami that endorsed shape, finally we cut the excess foami.
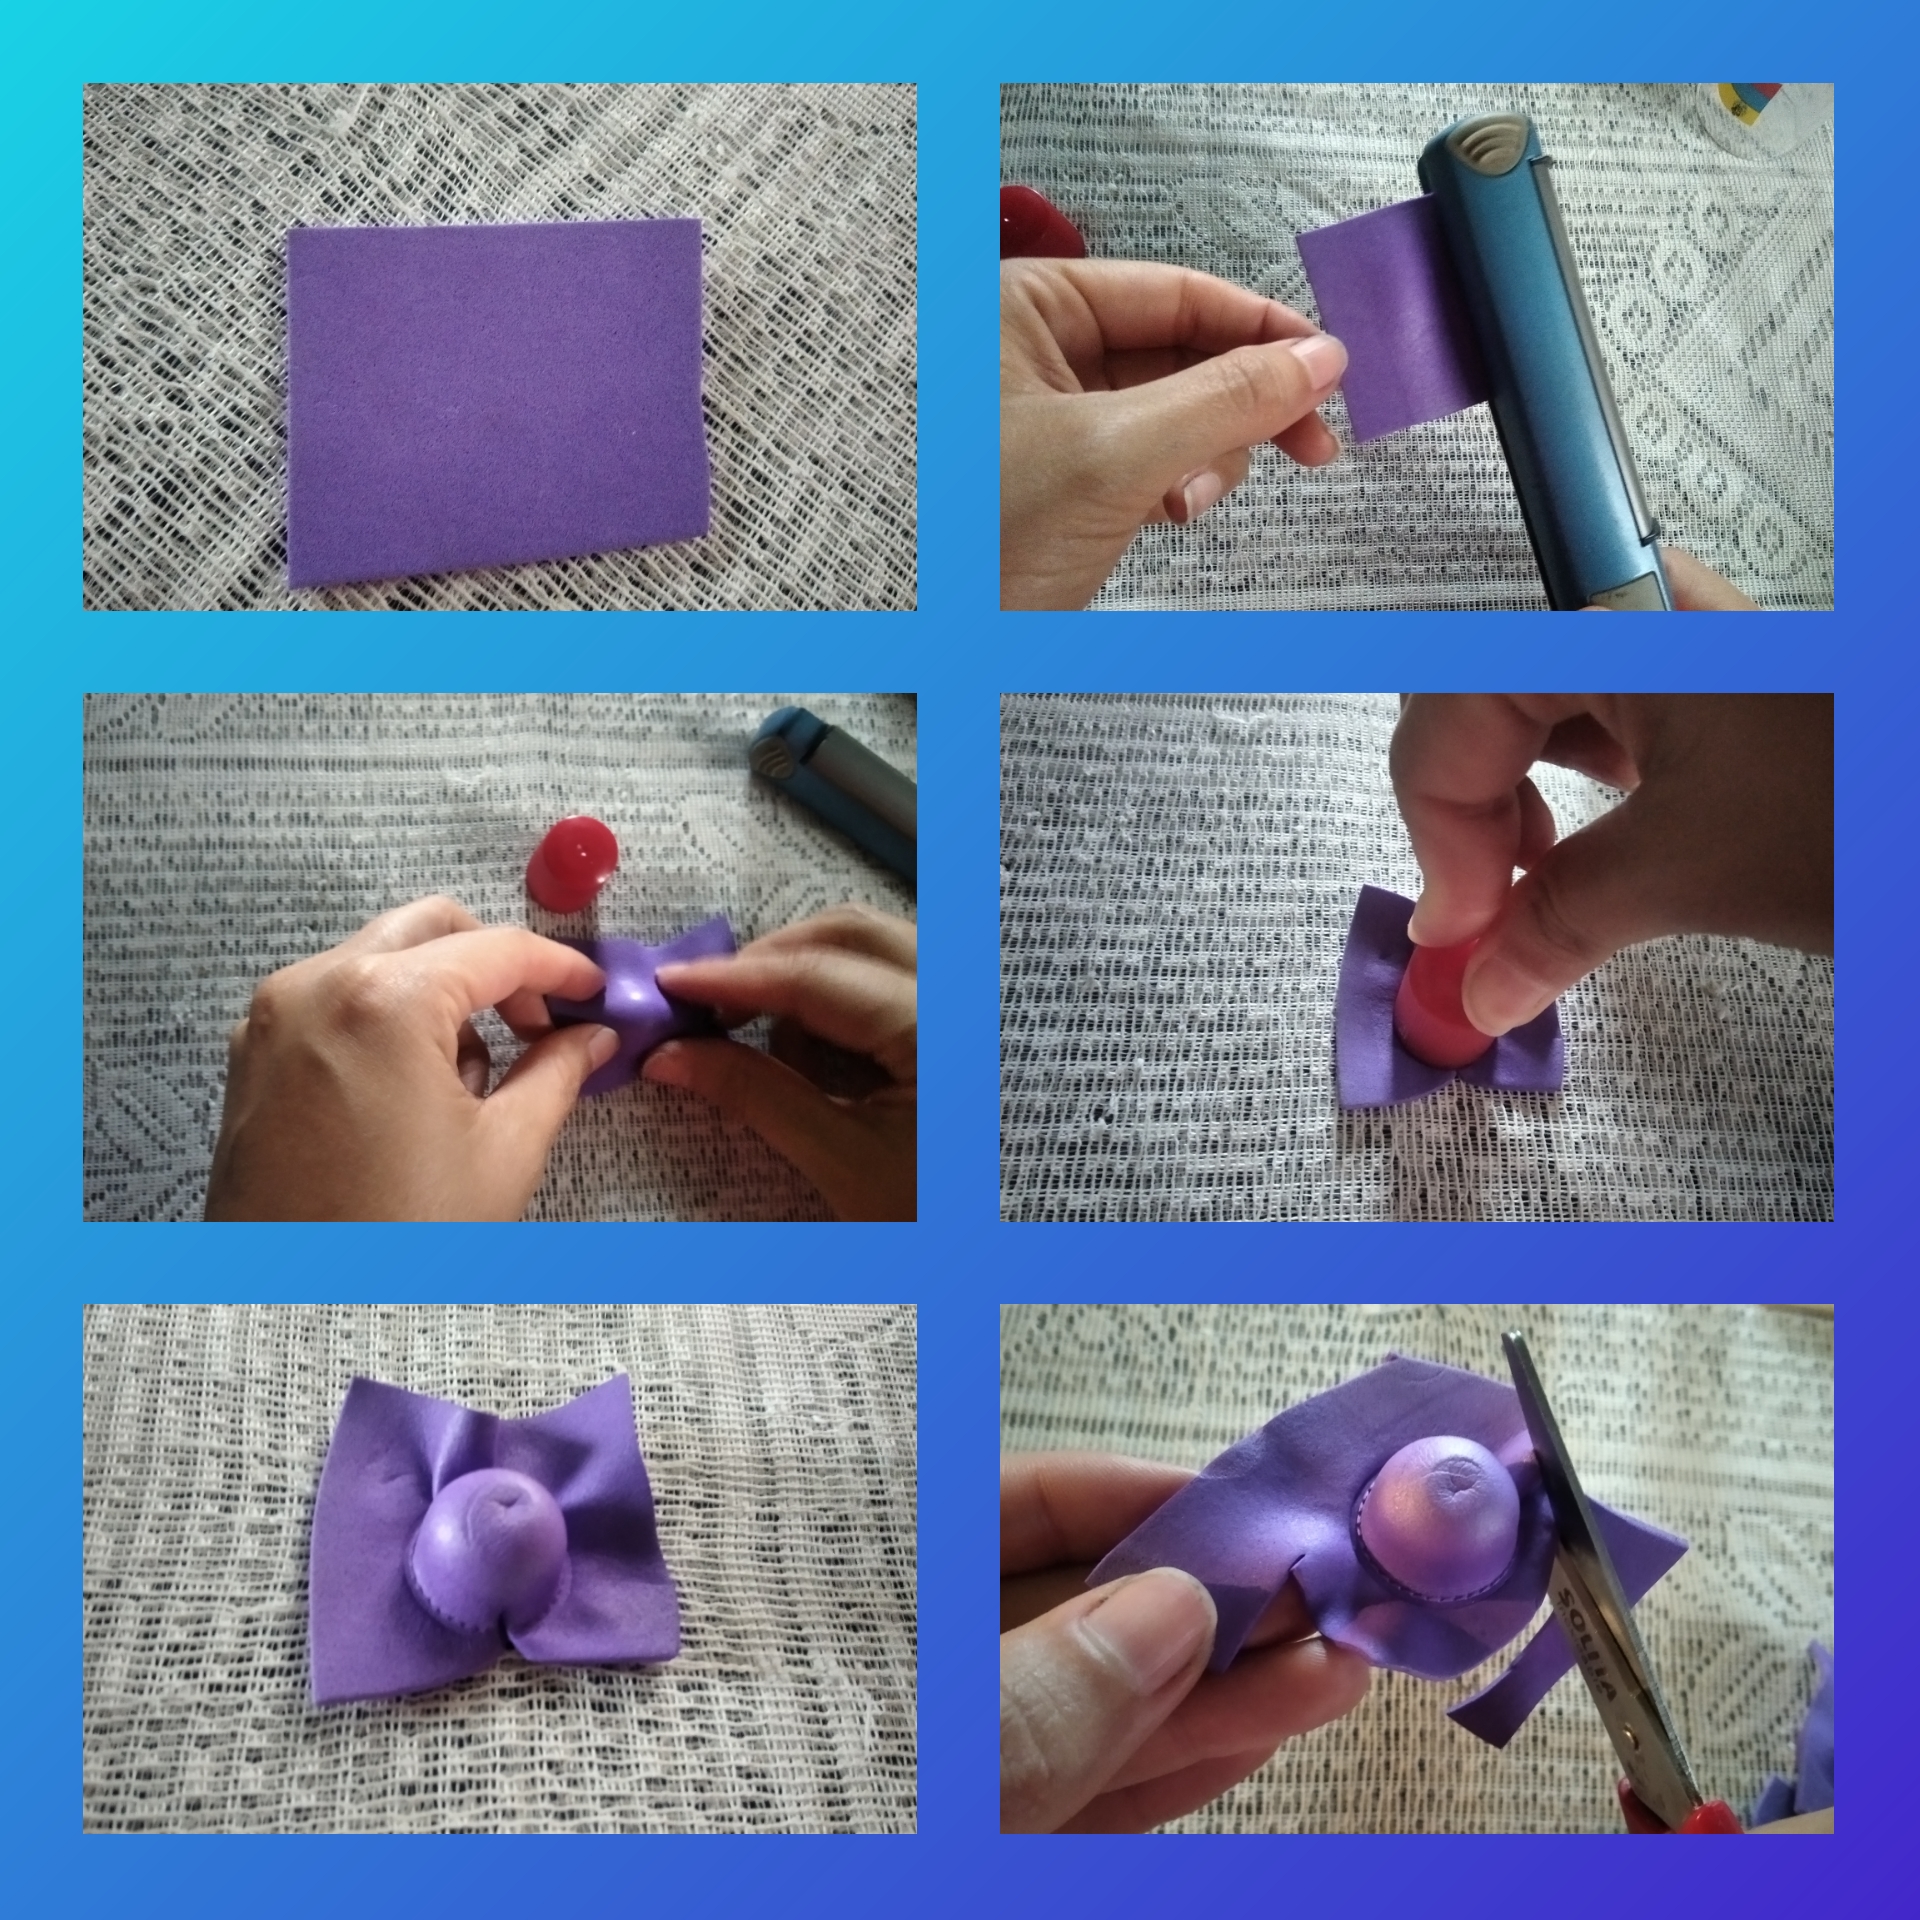
Paso 6.
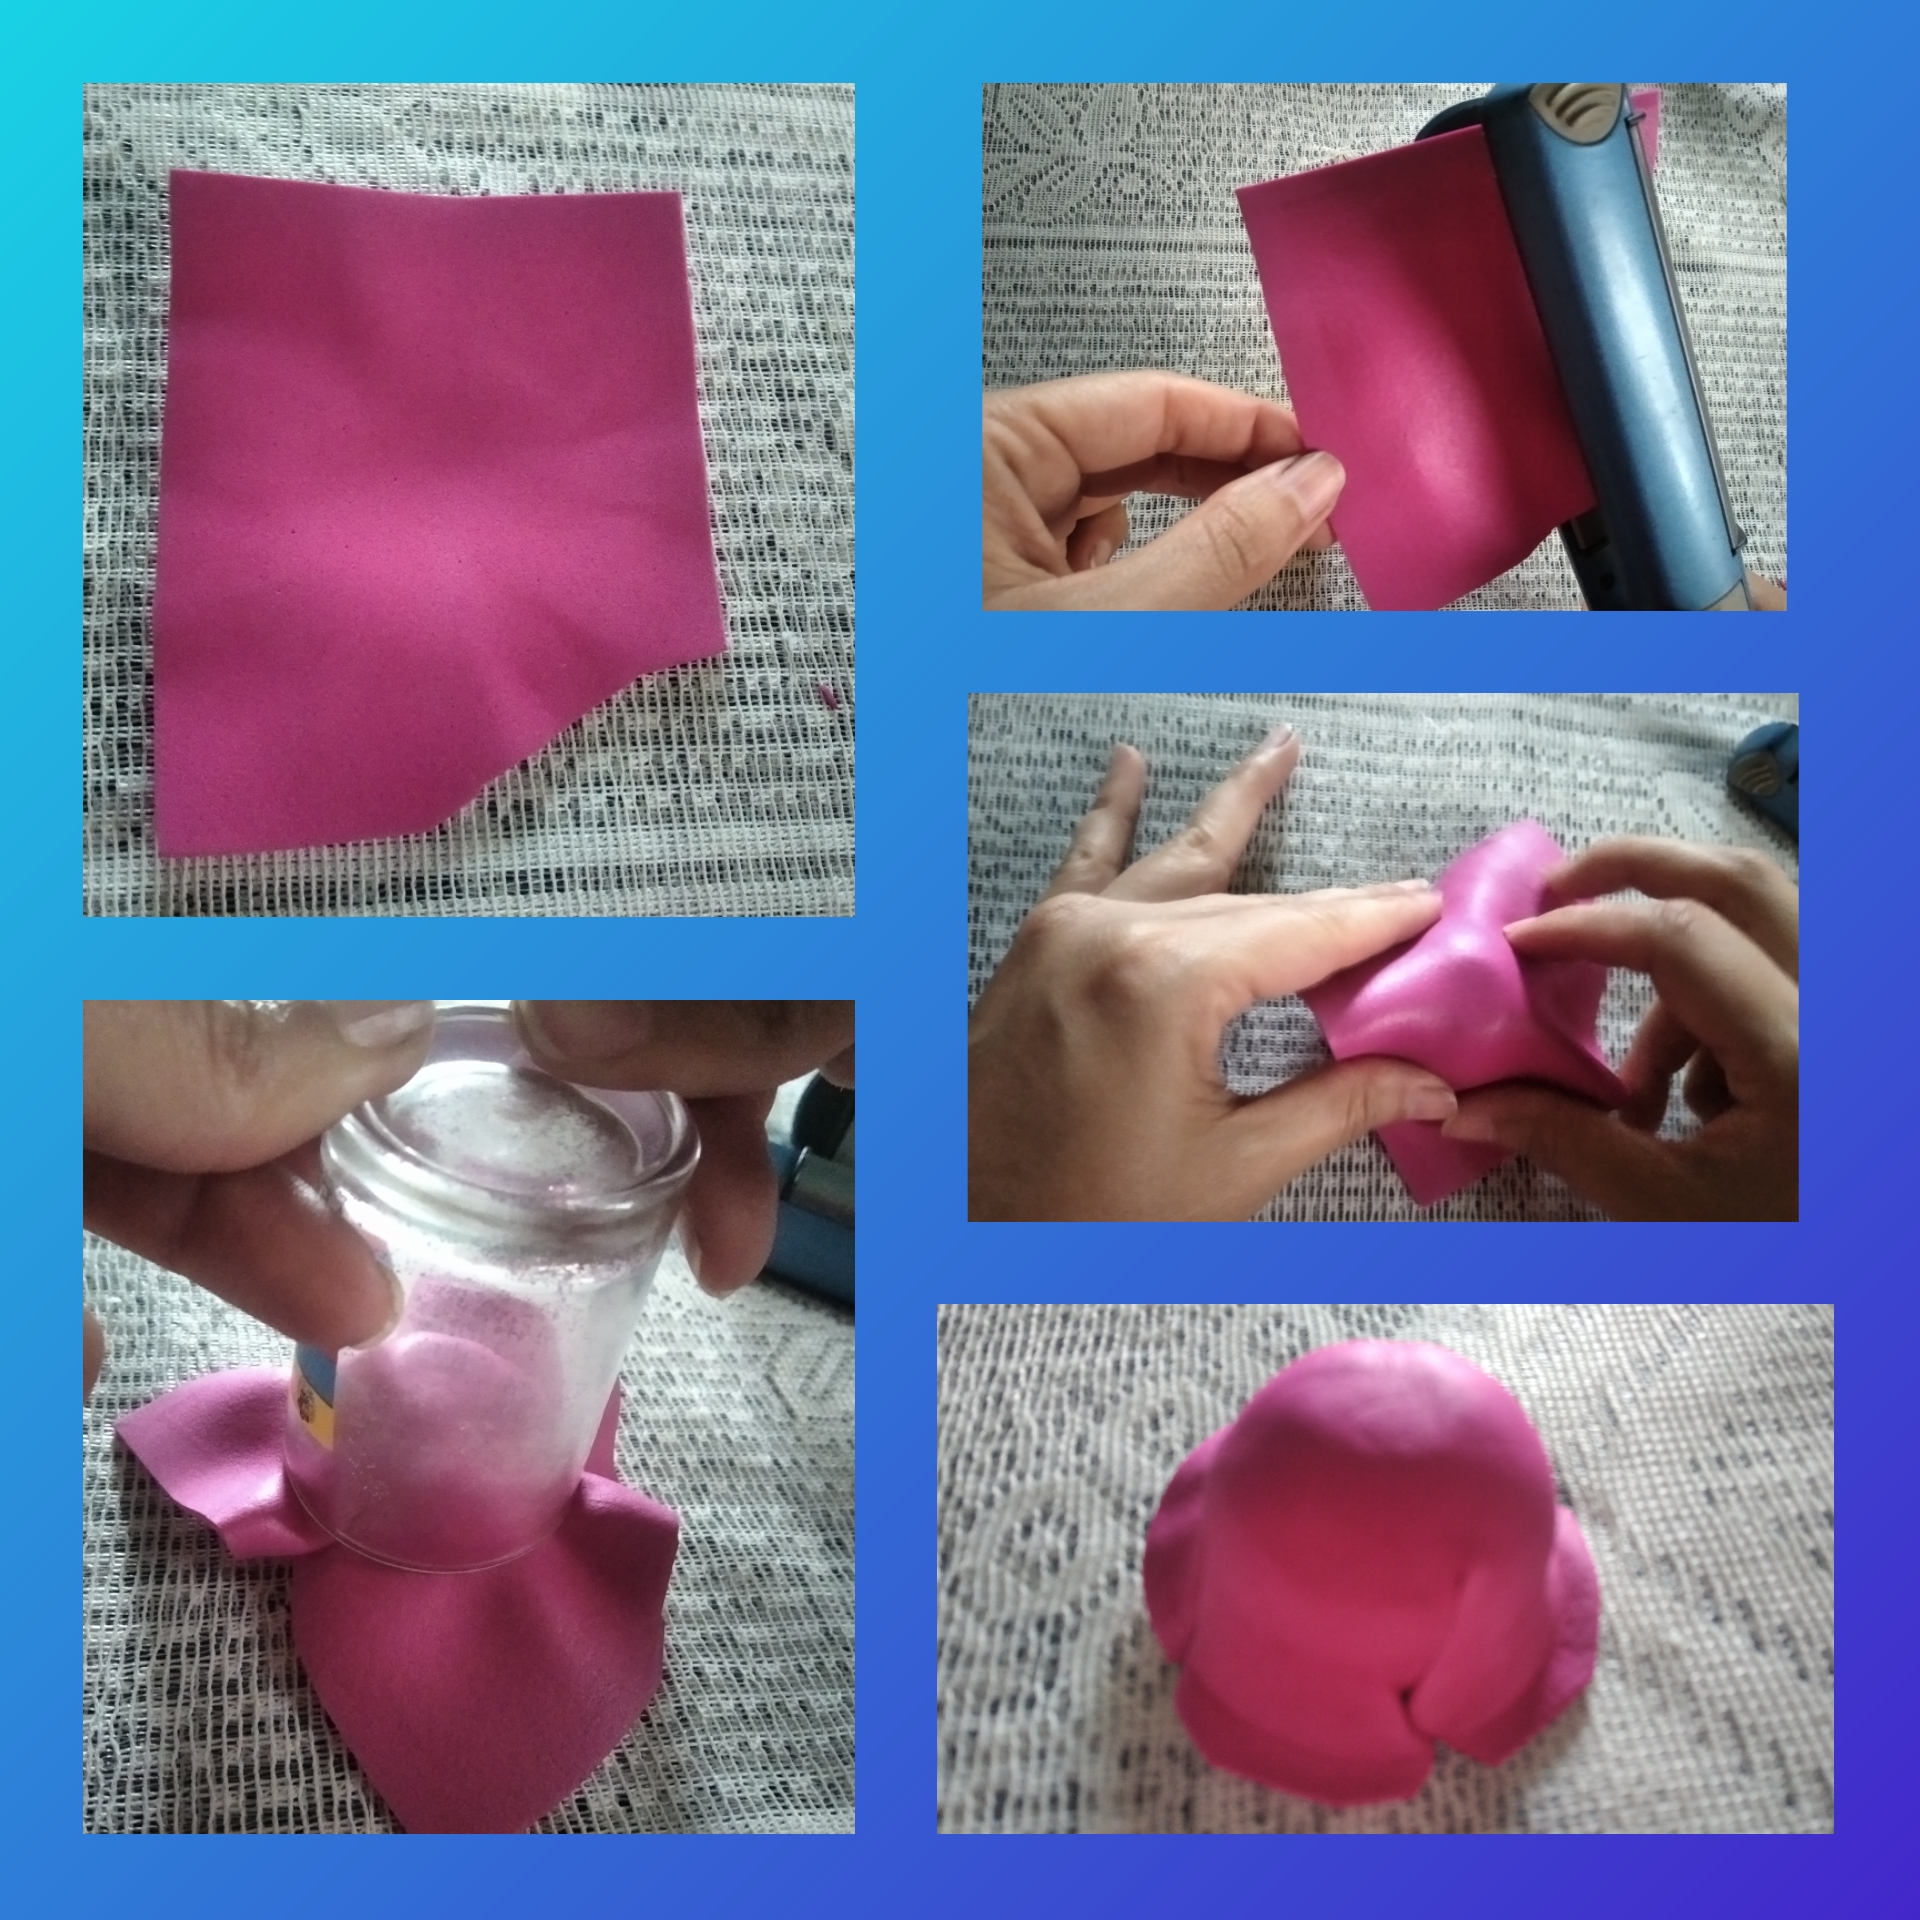
De igual manera hacemos con el foami fucsia, tomamos un pedazo y lo calentamos con la plancha, luego lo colocamos sobre la canica y por último colocamos la tapa de la acetona, recortamos el foami sobrante y nos quedará de esta manera.
Step 6.In the same way we do with the fuchsia foami, we take a piece and heat it with the iron, then we place it on the marble and finally we put the acetone lid, we cut the excess foami and we will stay this way.

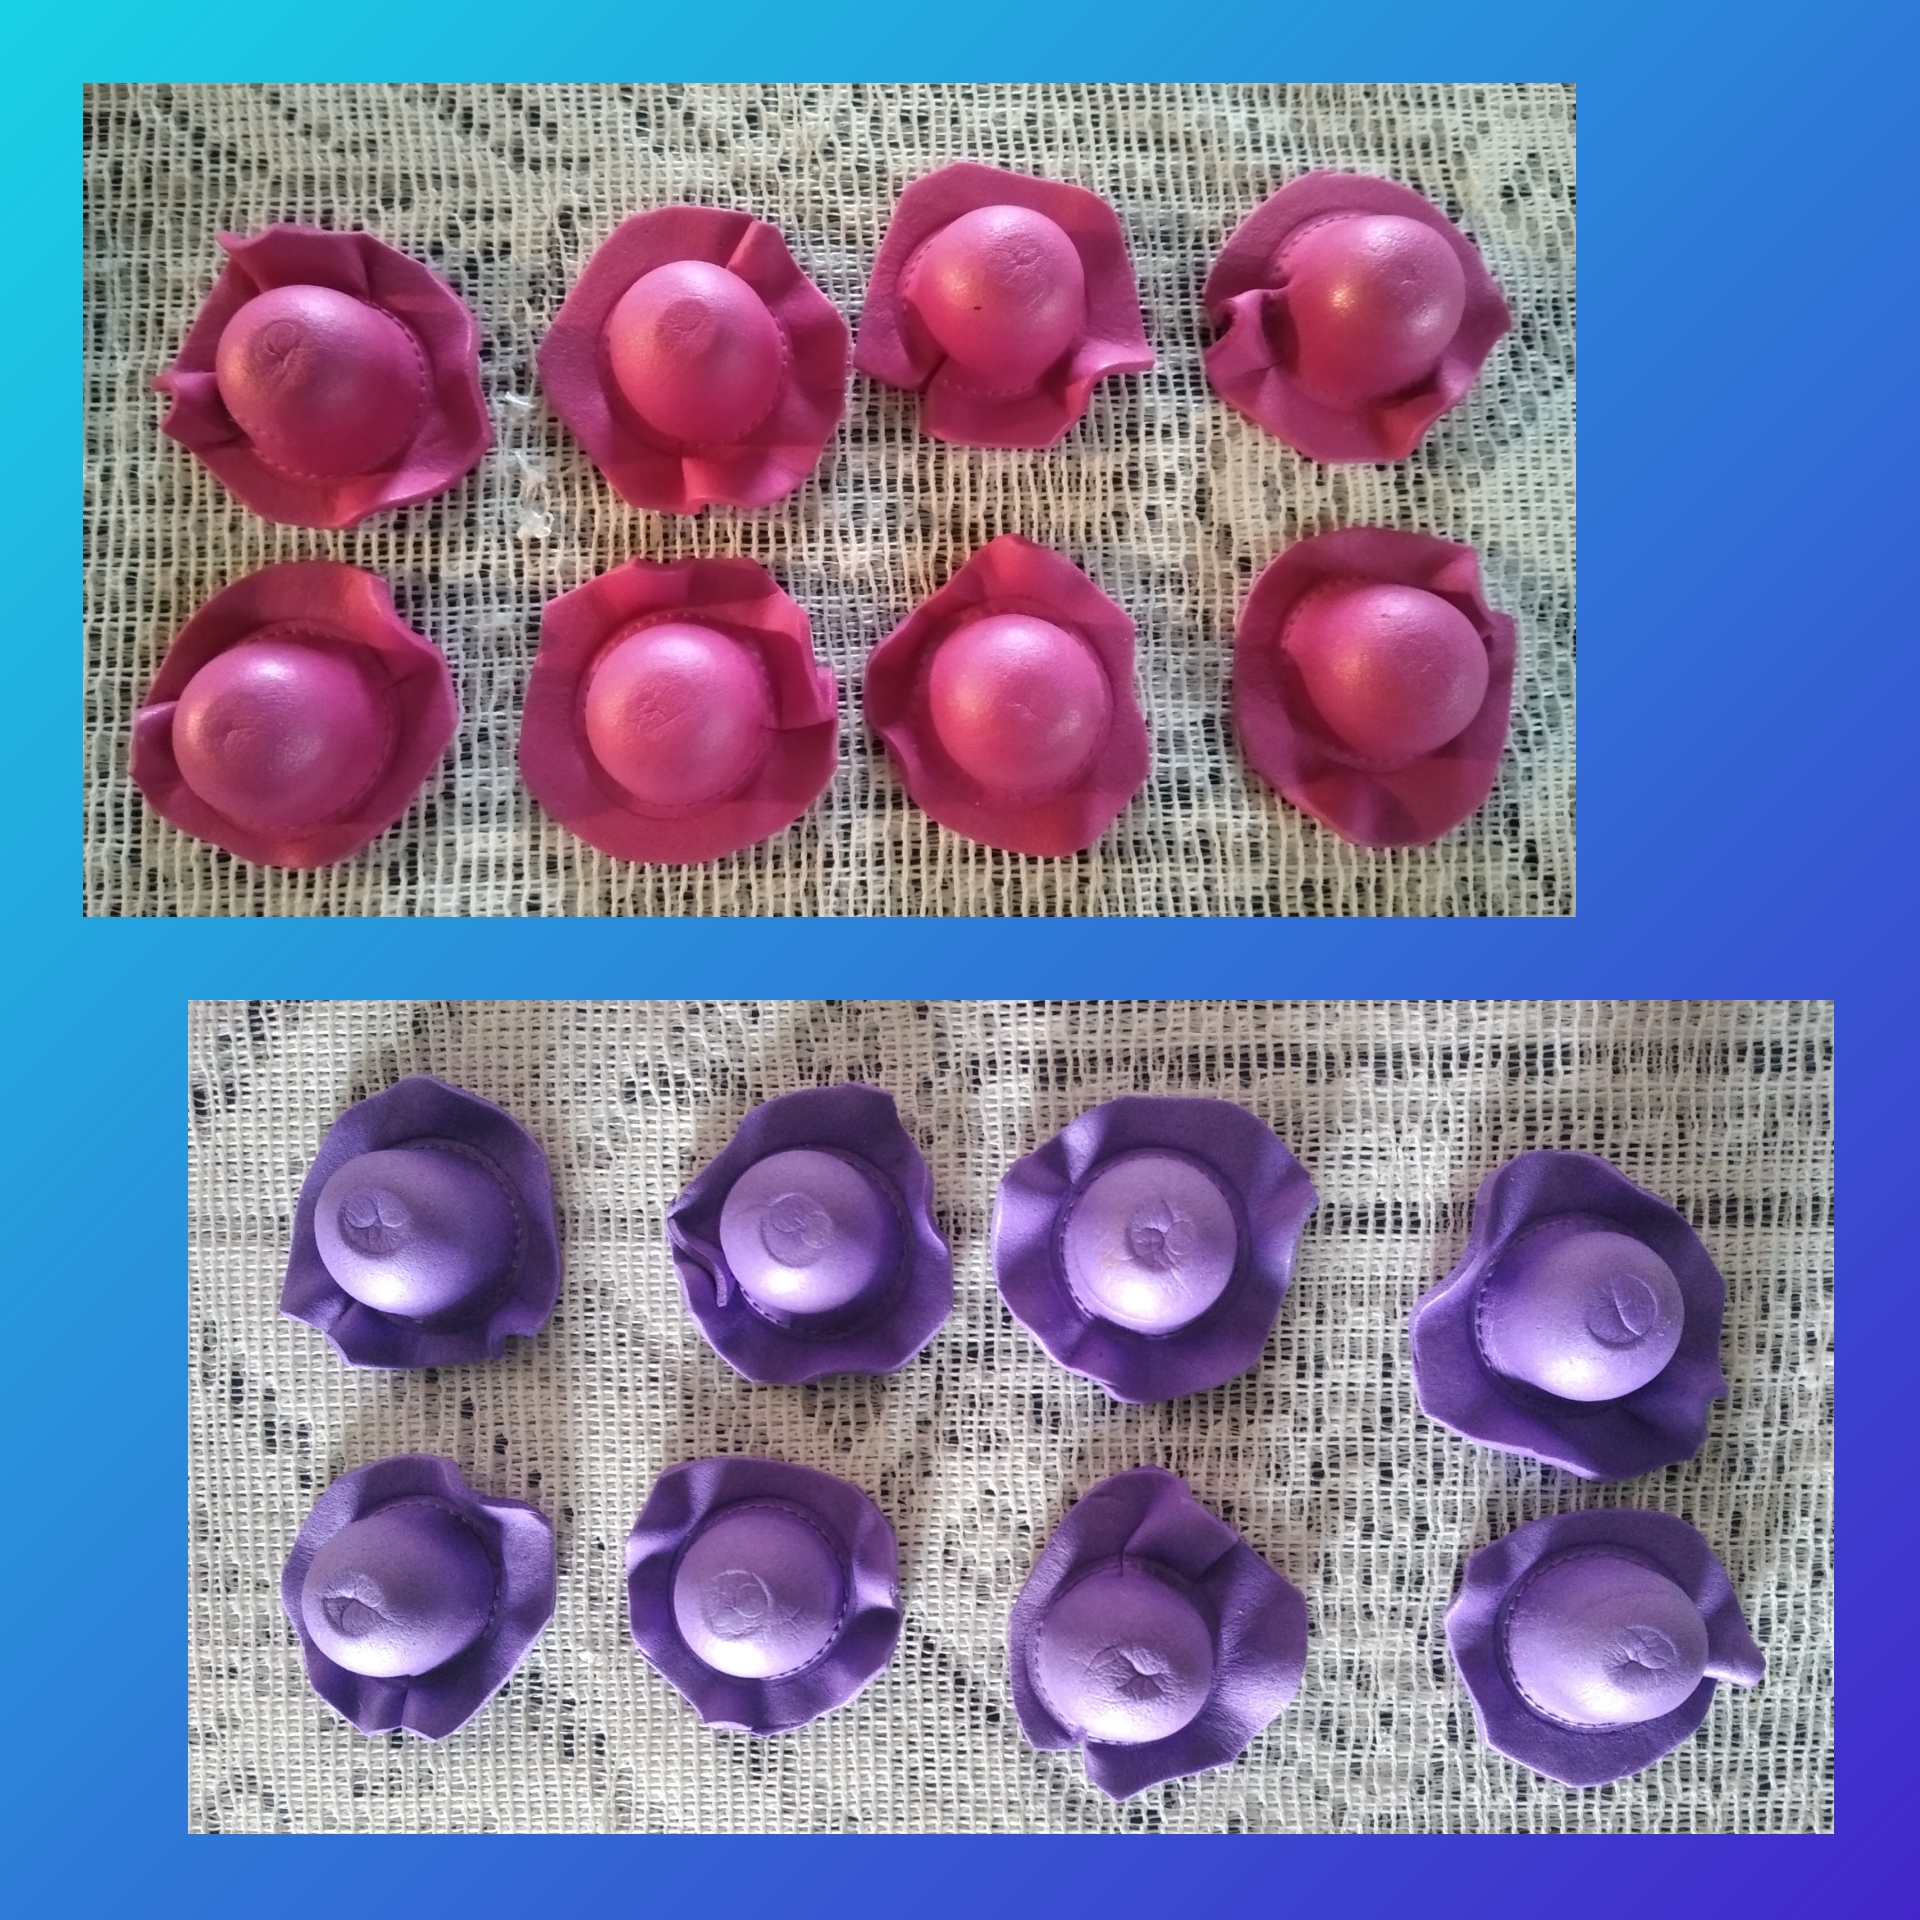
En total haremos ocho burbujas fucsia y 8 burbujas moradas.
In total we will make eight fuchsia bubbles and 8 purple bubbles.
Paso 7.
Para la burbuja que va en el centro y viene siendo la cabeza del pulpo usaremos una pelota de plástico pequeña como molde. De igual manera tomamos un pedazo de foami que cubra la pelota, luego calentamos el foami con la plancha y colocamos sobre la pelota y sobre este el vaso para darle la forma ovalada.
Step 7.For the bubble that goes in the center and is the head of the octopus, we will use a small plastic ball as a mold. In the same way we take a piece of foami that covers the ball, then we heat the foami with the iron and place it on the ball and on it the glass to give it the oval shape.
Paso 8.
Haremos lo mismo para la cabeza fuscia, tomamos el foami fuscia lo calentamos, luego lo colocamos sobre la pelota plástica y por último lo introducimos en el vaso.
Step 8.We will do the same for the fuscia head, we take the fuscia foami and heat it, then we place it on the plastic ball and finally we put it in the glass.
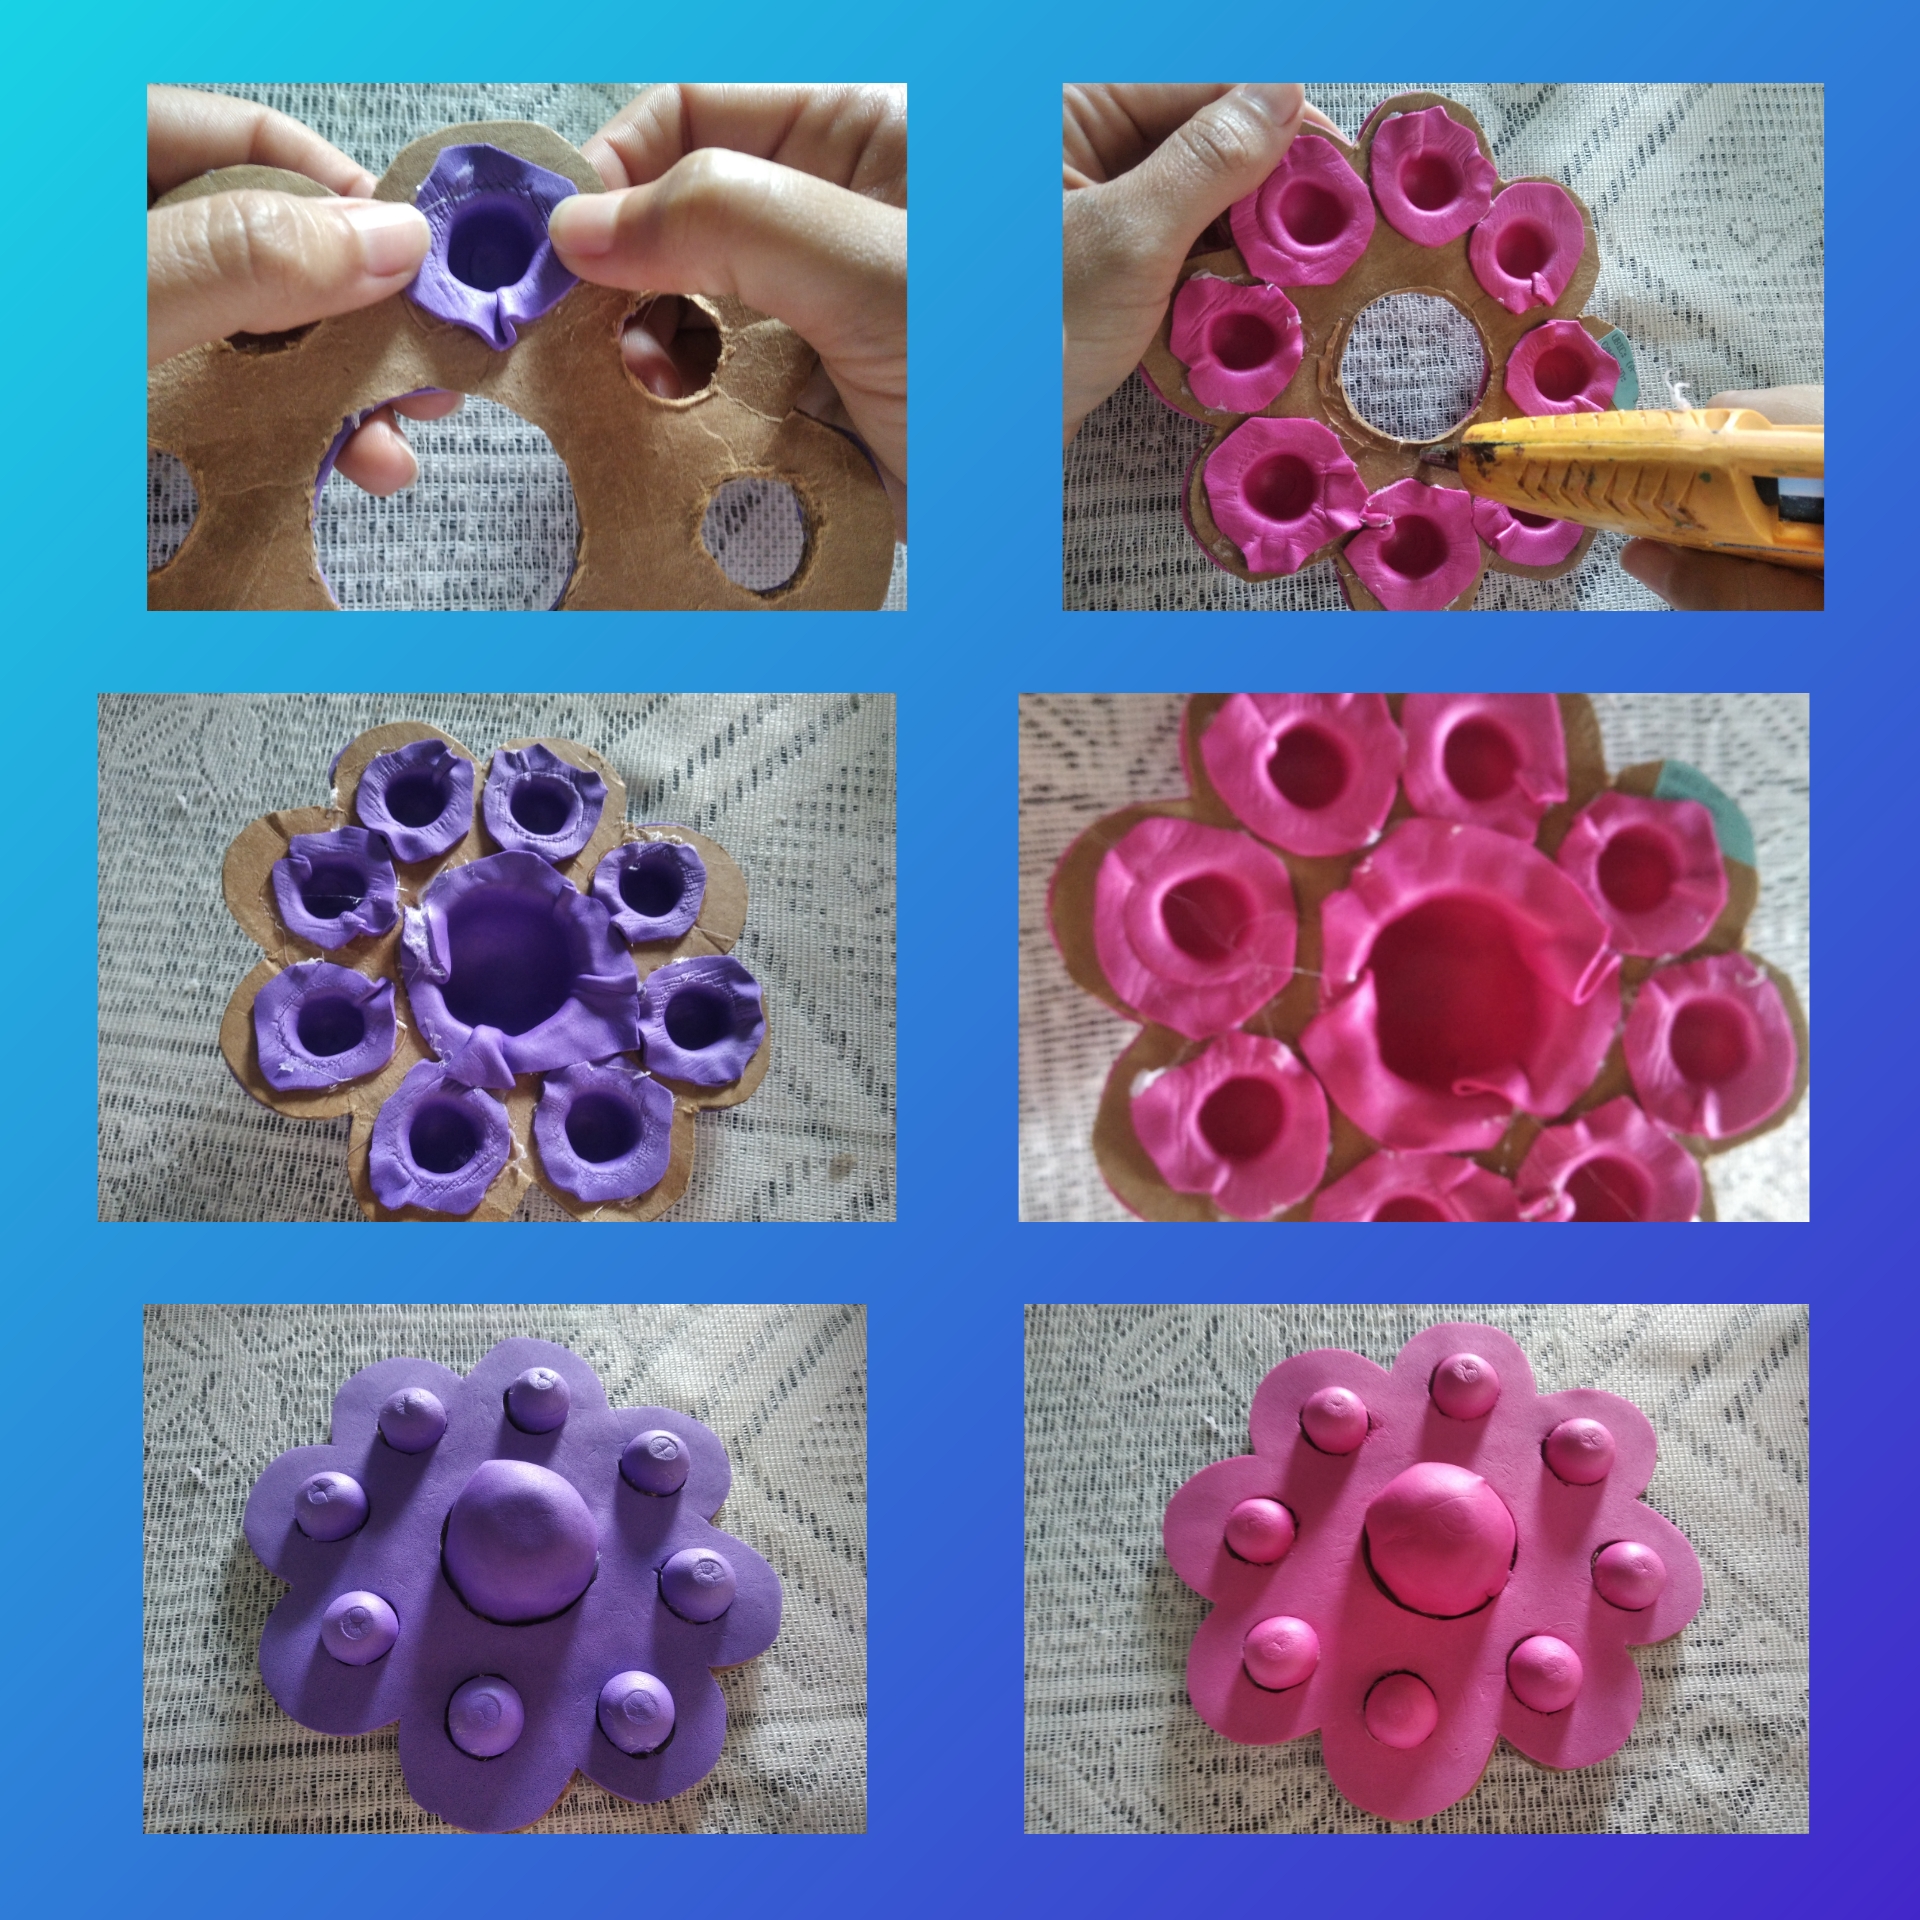
Paso 9.
<div class="text-justify"We already have the two bases ready and all the bubbles, we are going to assemble in the part of the cardboard we are going to paste with silicone, we introduce each bubble in each hole as shown in the image.
Step 9.
Paso 10.
Con silicón unimos las dos piezas y nos quedará un pop It por los dos lados, un lado fuscia y el otro morado.
Step 10.With silicone we join the two pieces and we will be left with a pop It on both sides, one side fuscia and the other purple.
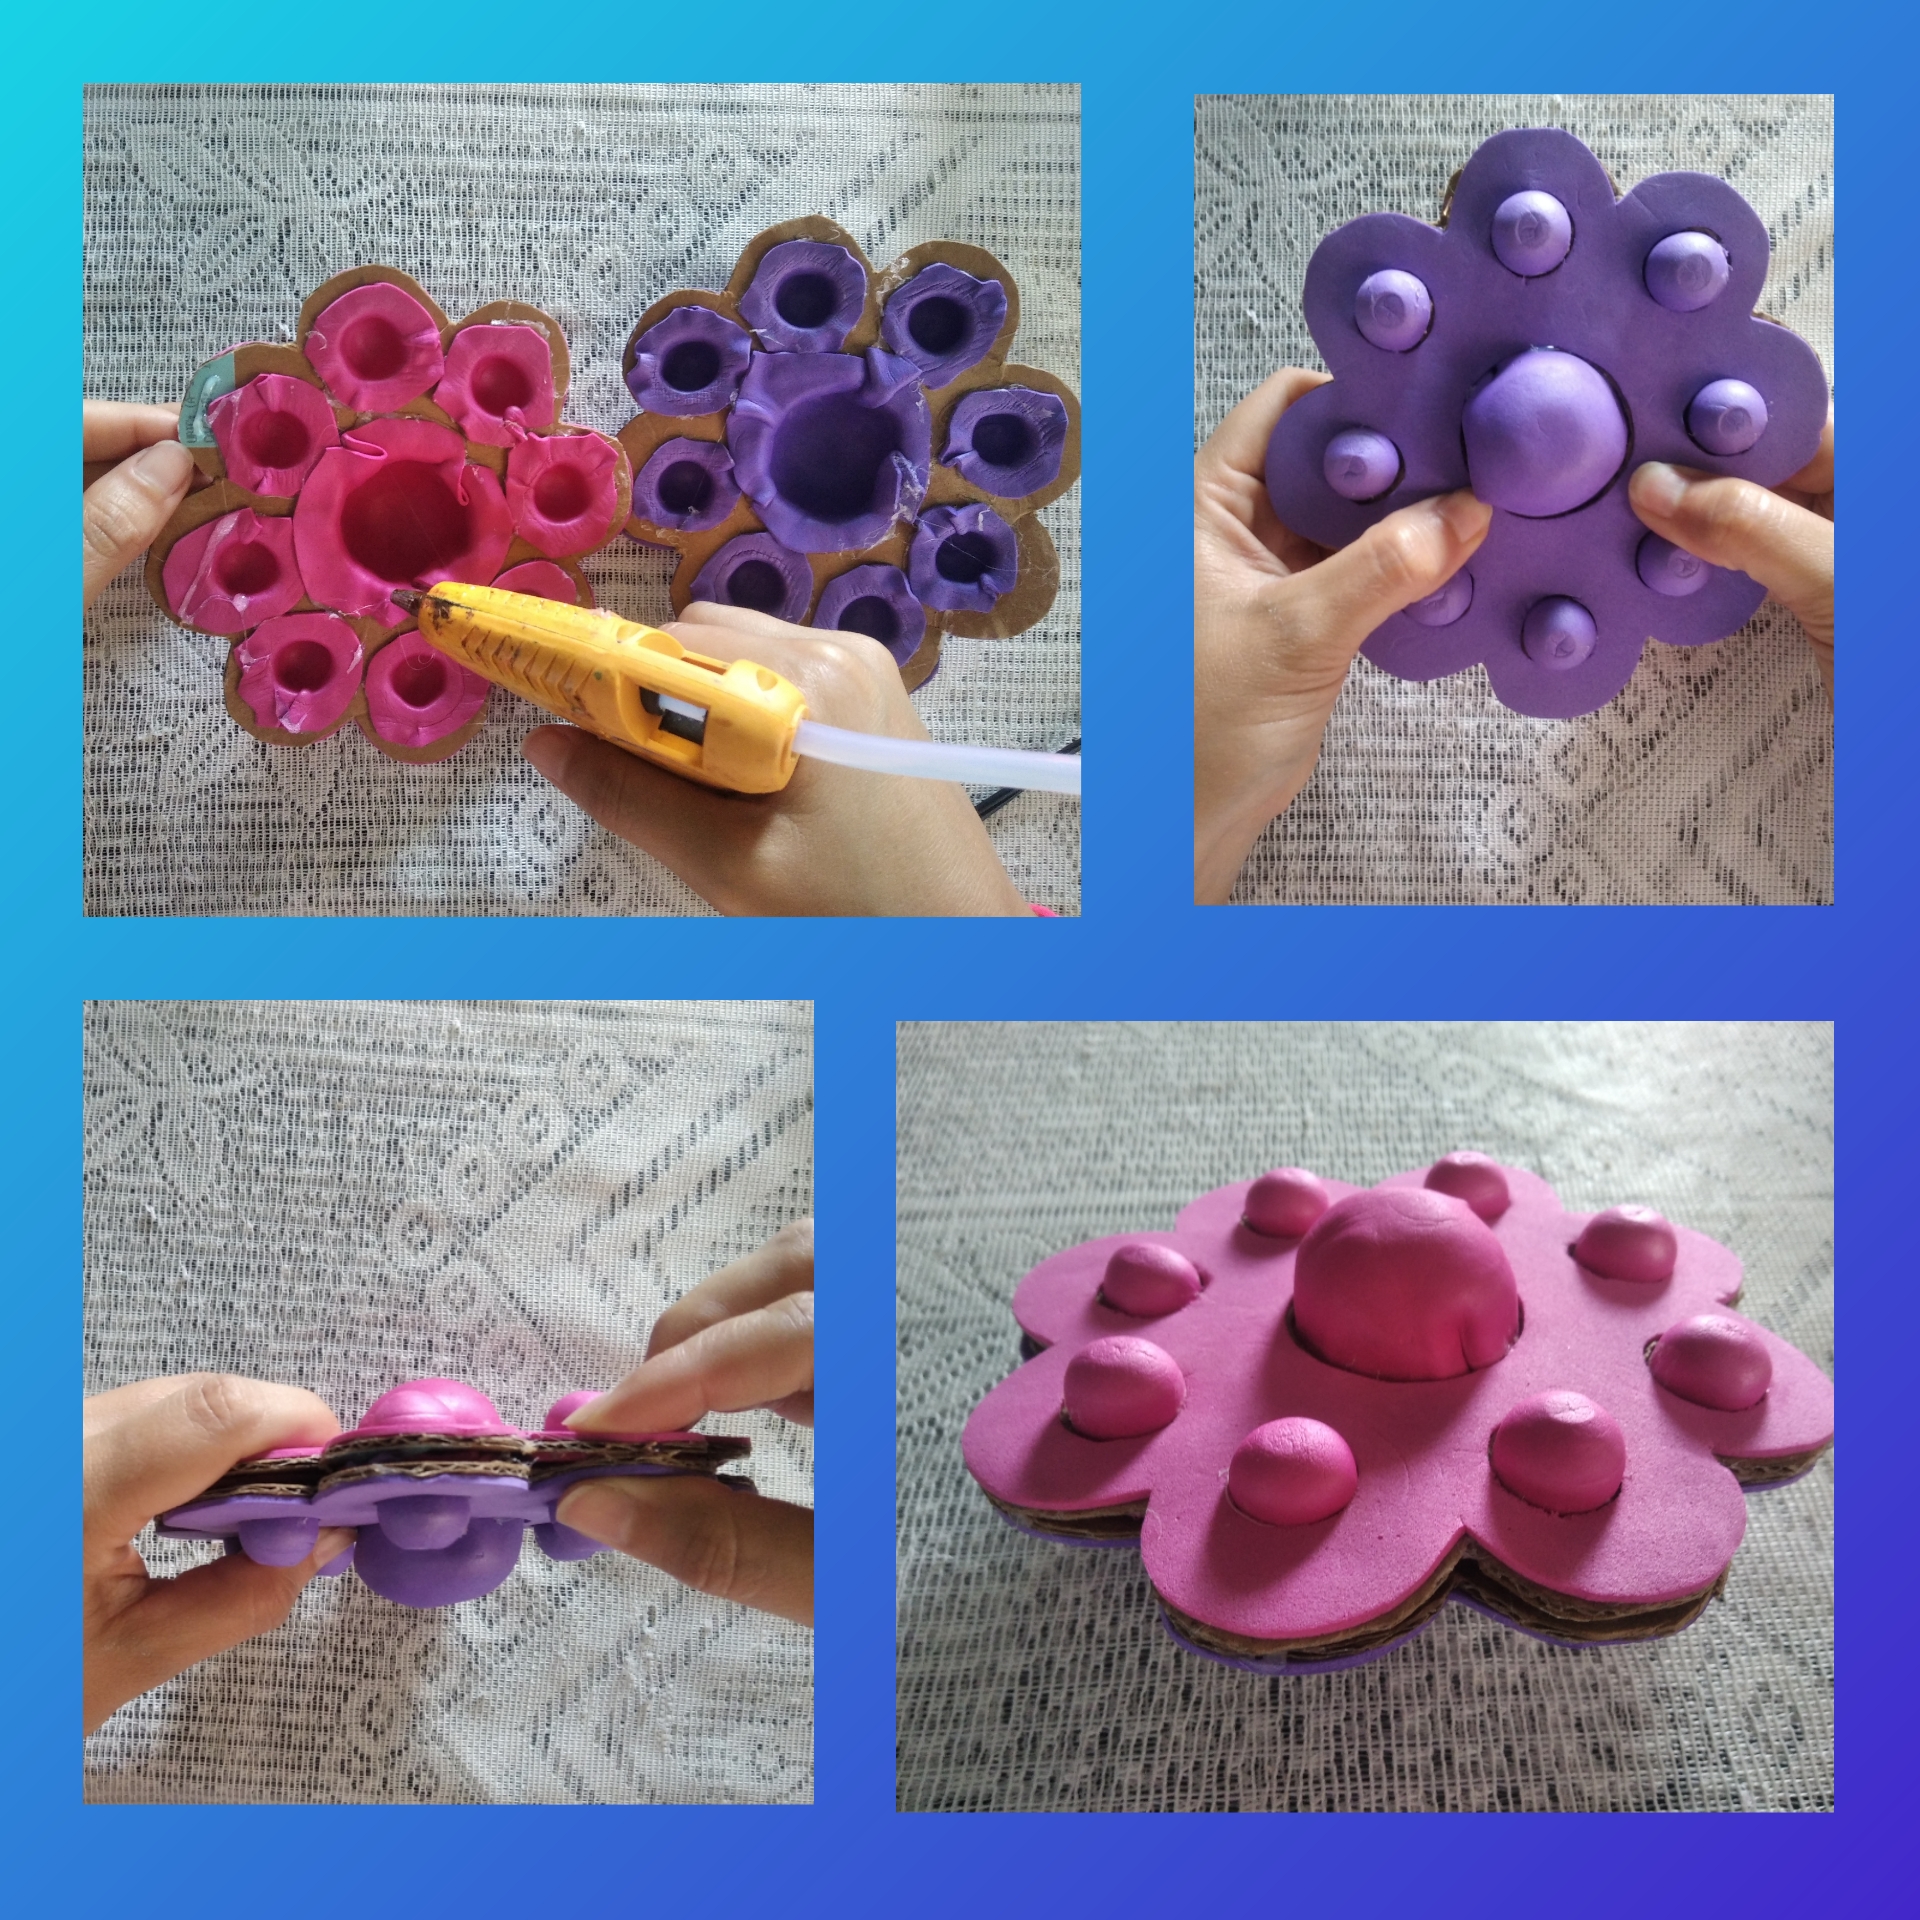
Paso 11.
Vamos a cubrir las orillas, con el foami fuscia medimos el ancho del pop It y recortamos una tira y la unimos con silicón por todo el borde.
Step 11.We are going to cover the edges, with the fuscia foami we measure the width of the pop It and cut a strip and join it with silicone around the edge.

Paso 12.
Para hacer este pop It más parecido a los que venden en las tiendas, recortamos unas cintas delgadas de foami morado y fuscia y las pegamos al rededor de las burbujas, luego con un marcador repasamos el borde de cada burbuja.
Step 12.To make this Pop It more similar to those sold in stores, we cut some thin purple and fuchsia foami ribbons and glued them around the bubbles, then with a marker we traced the edge of each bubble.
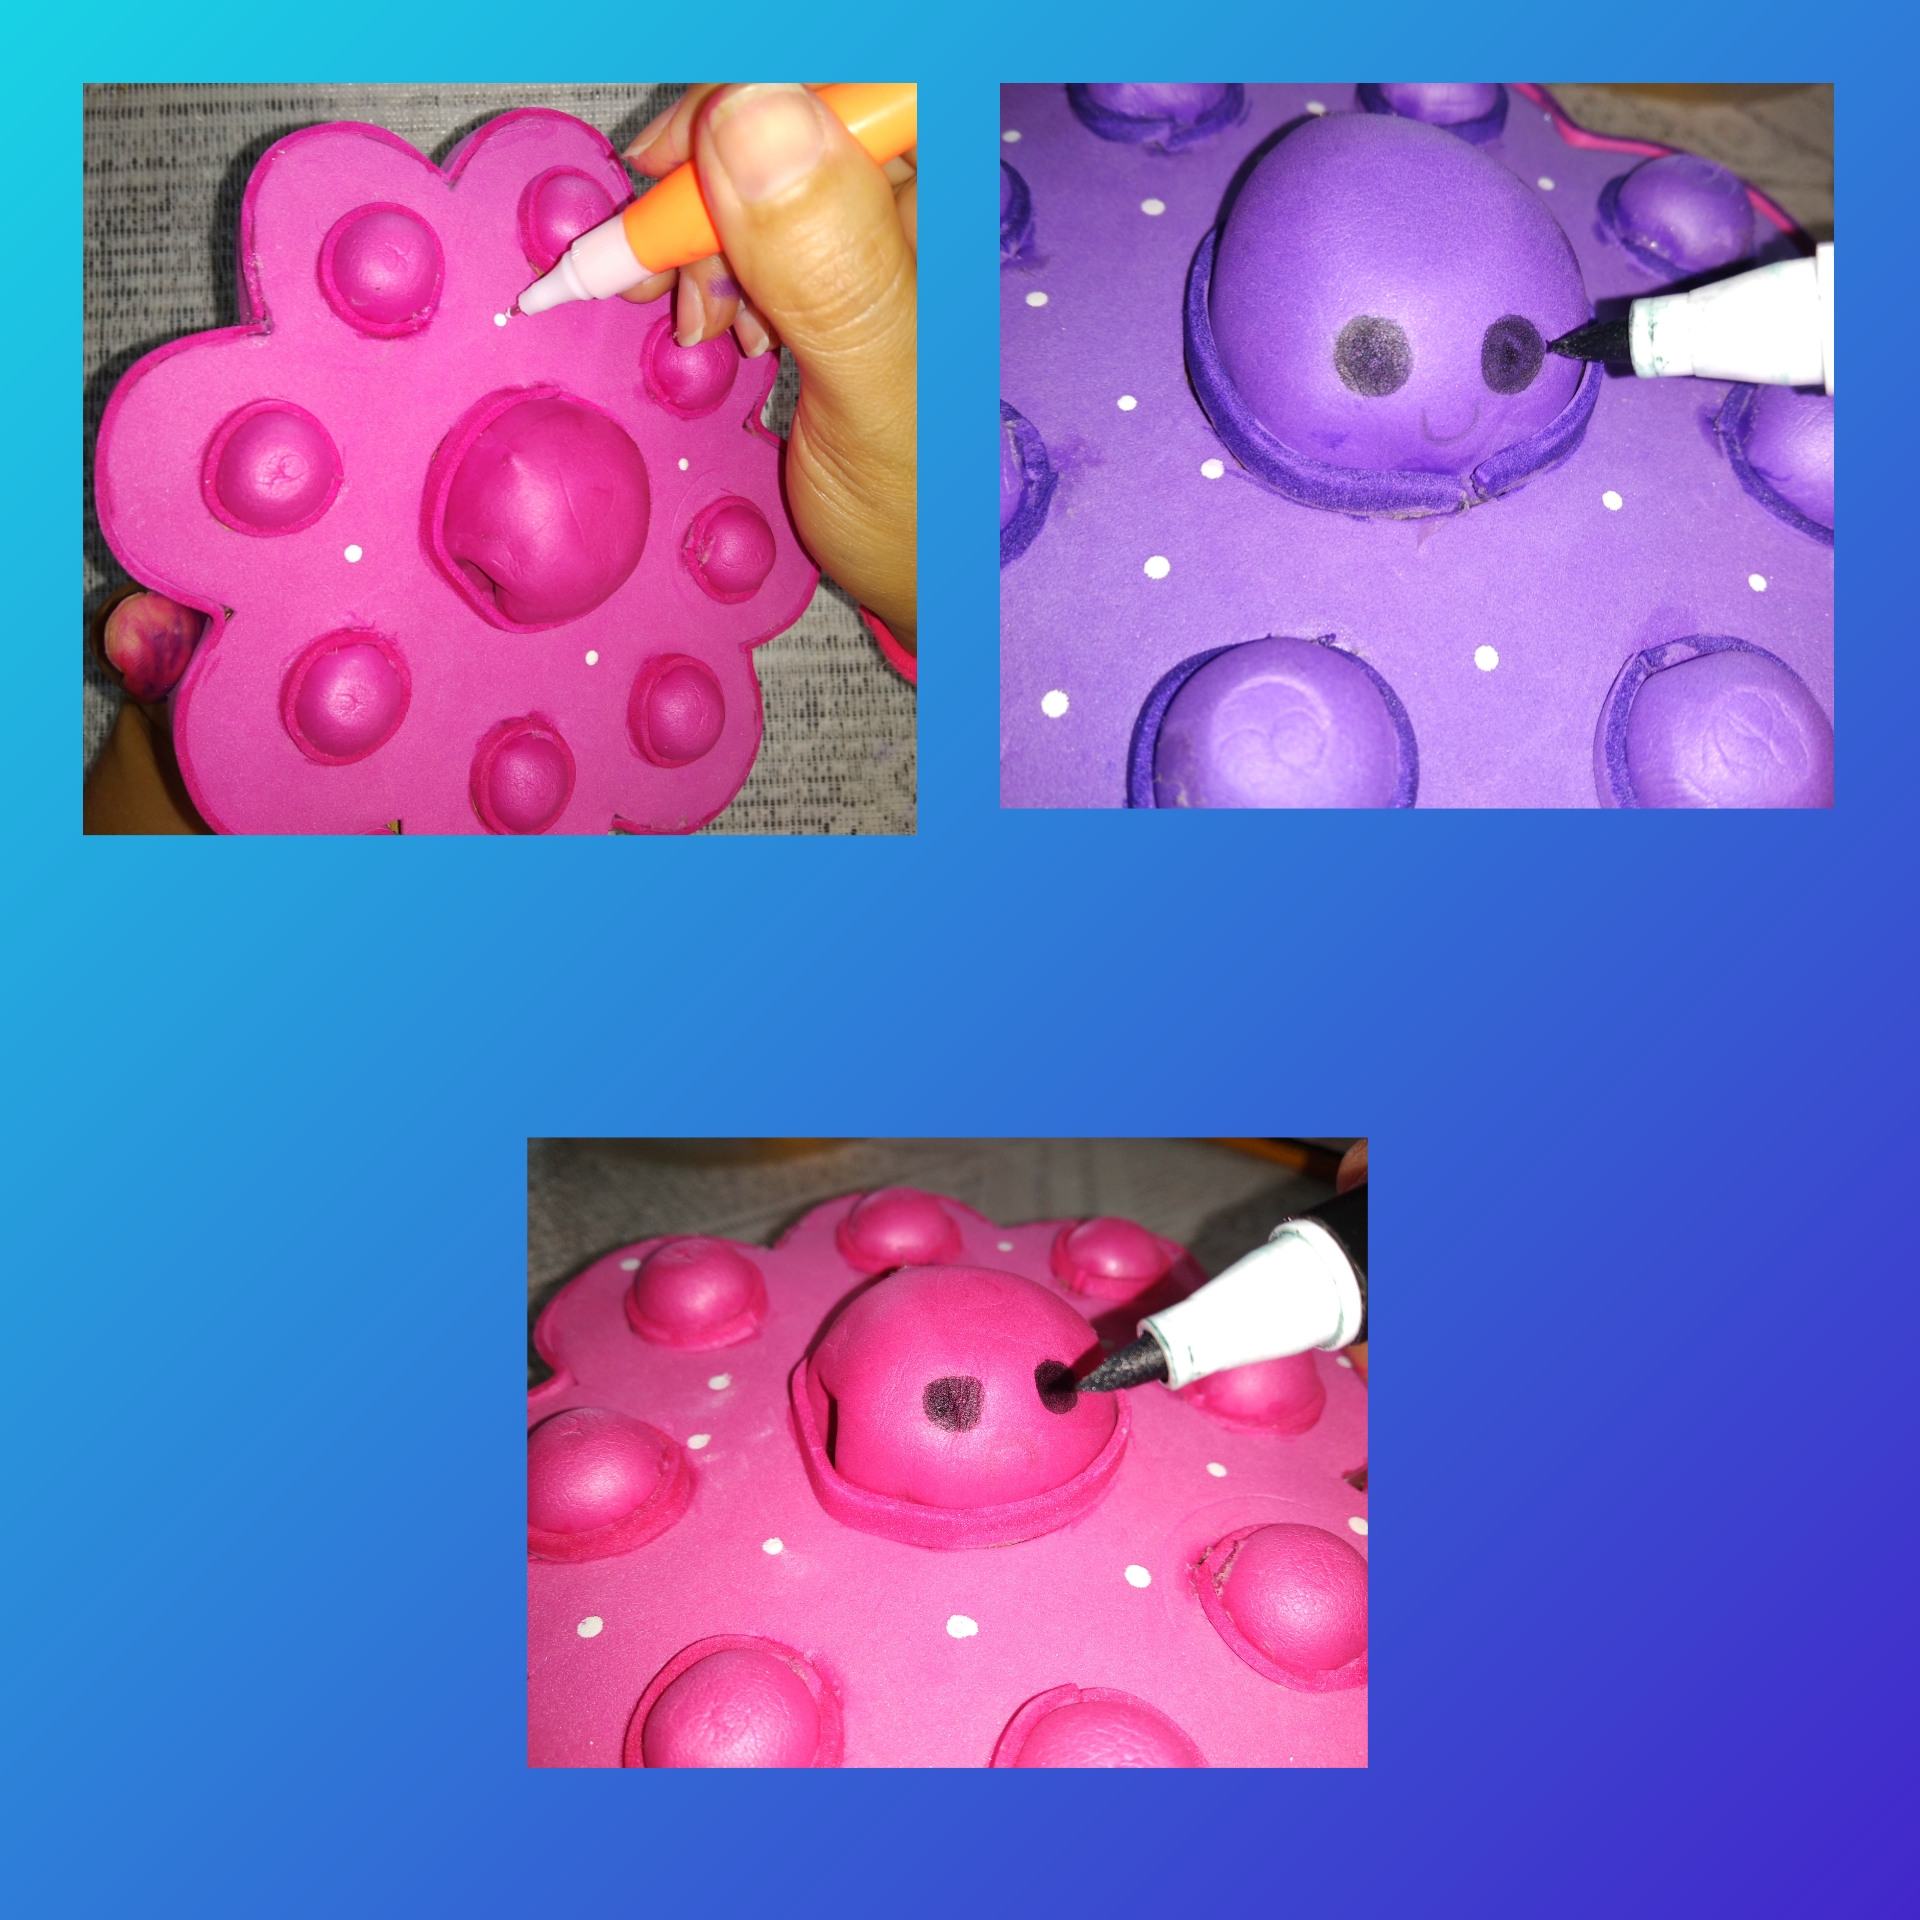
Paso 13.
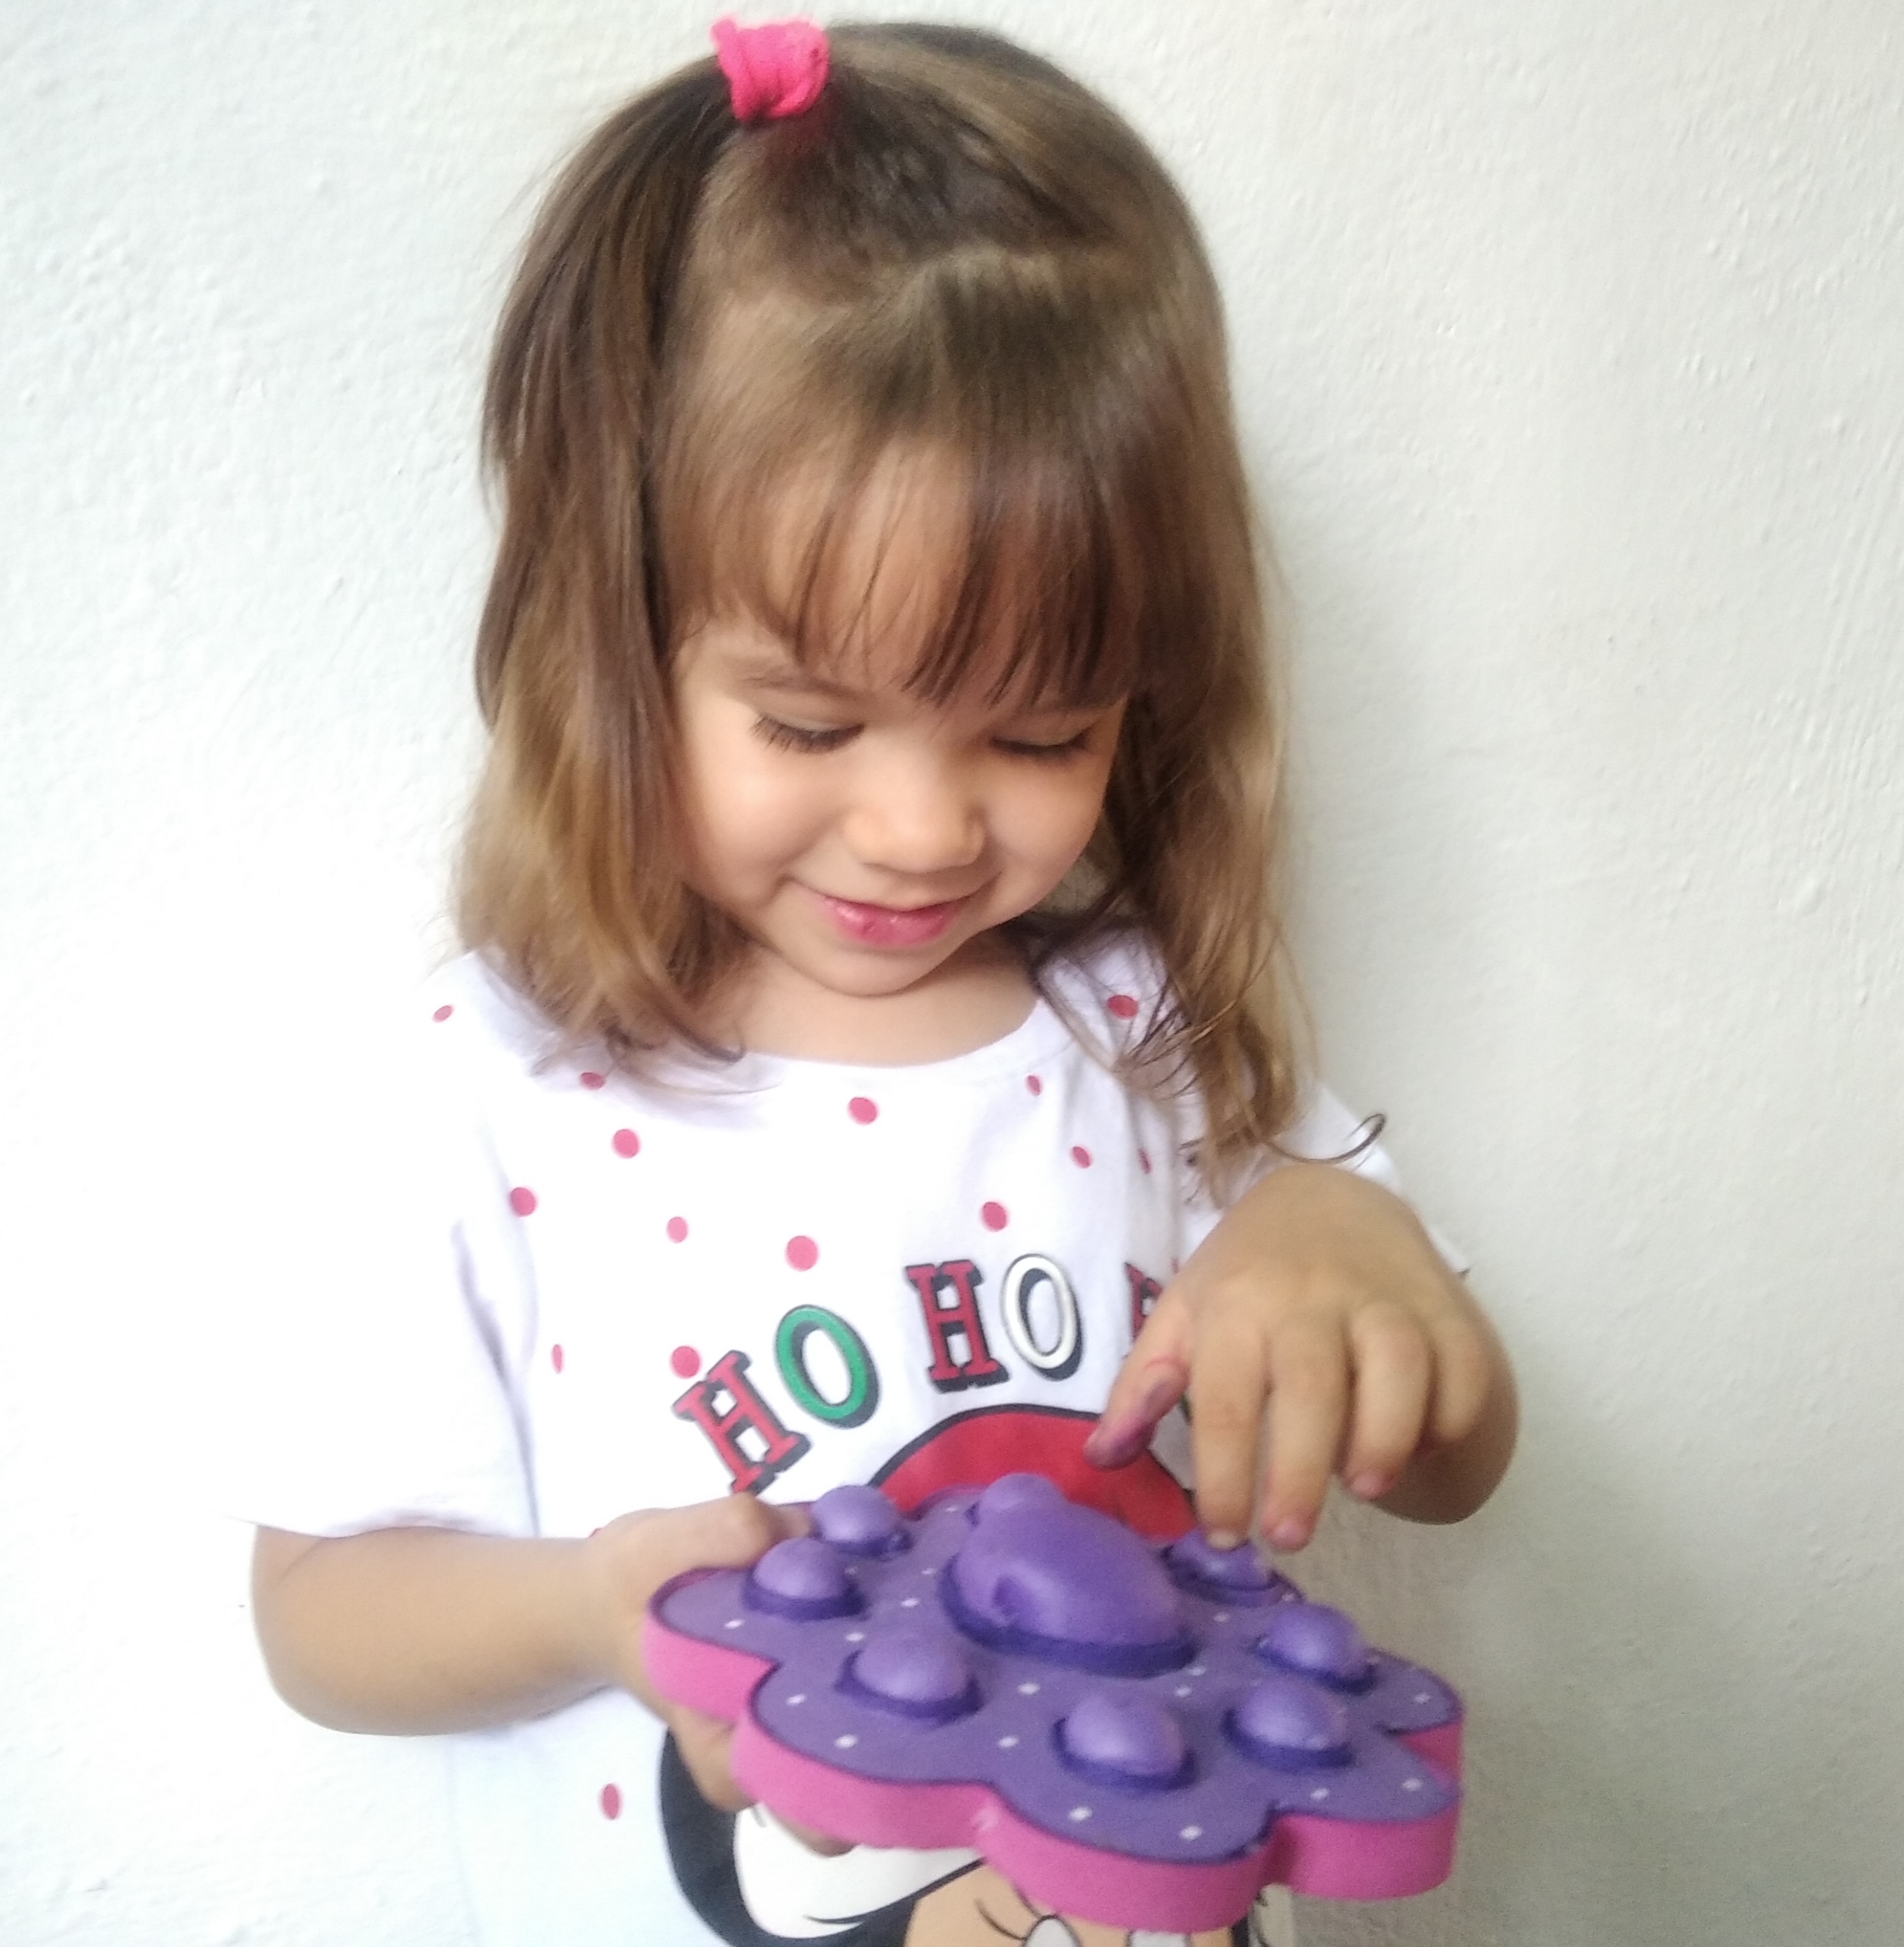
Como último paso tomamos el corrector y hacemos unos puntos blancos a la base del pop It, con el marcador negro hacemos los ojos y la boca y terminado nuestros pop It, veamos amigos este juguete antiestrés ideal para nuestros pequeños.
Step 13.As a last step we take the corrector and make some white dots at the base of the pop It, with the black marker we make the eyes and the mouth and finished our pop It, let's see friends this ideal anti-stress toy for our little ones.
Presentación Final.
Presentación Final.
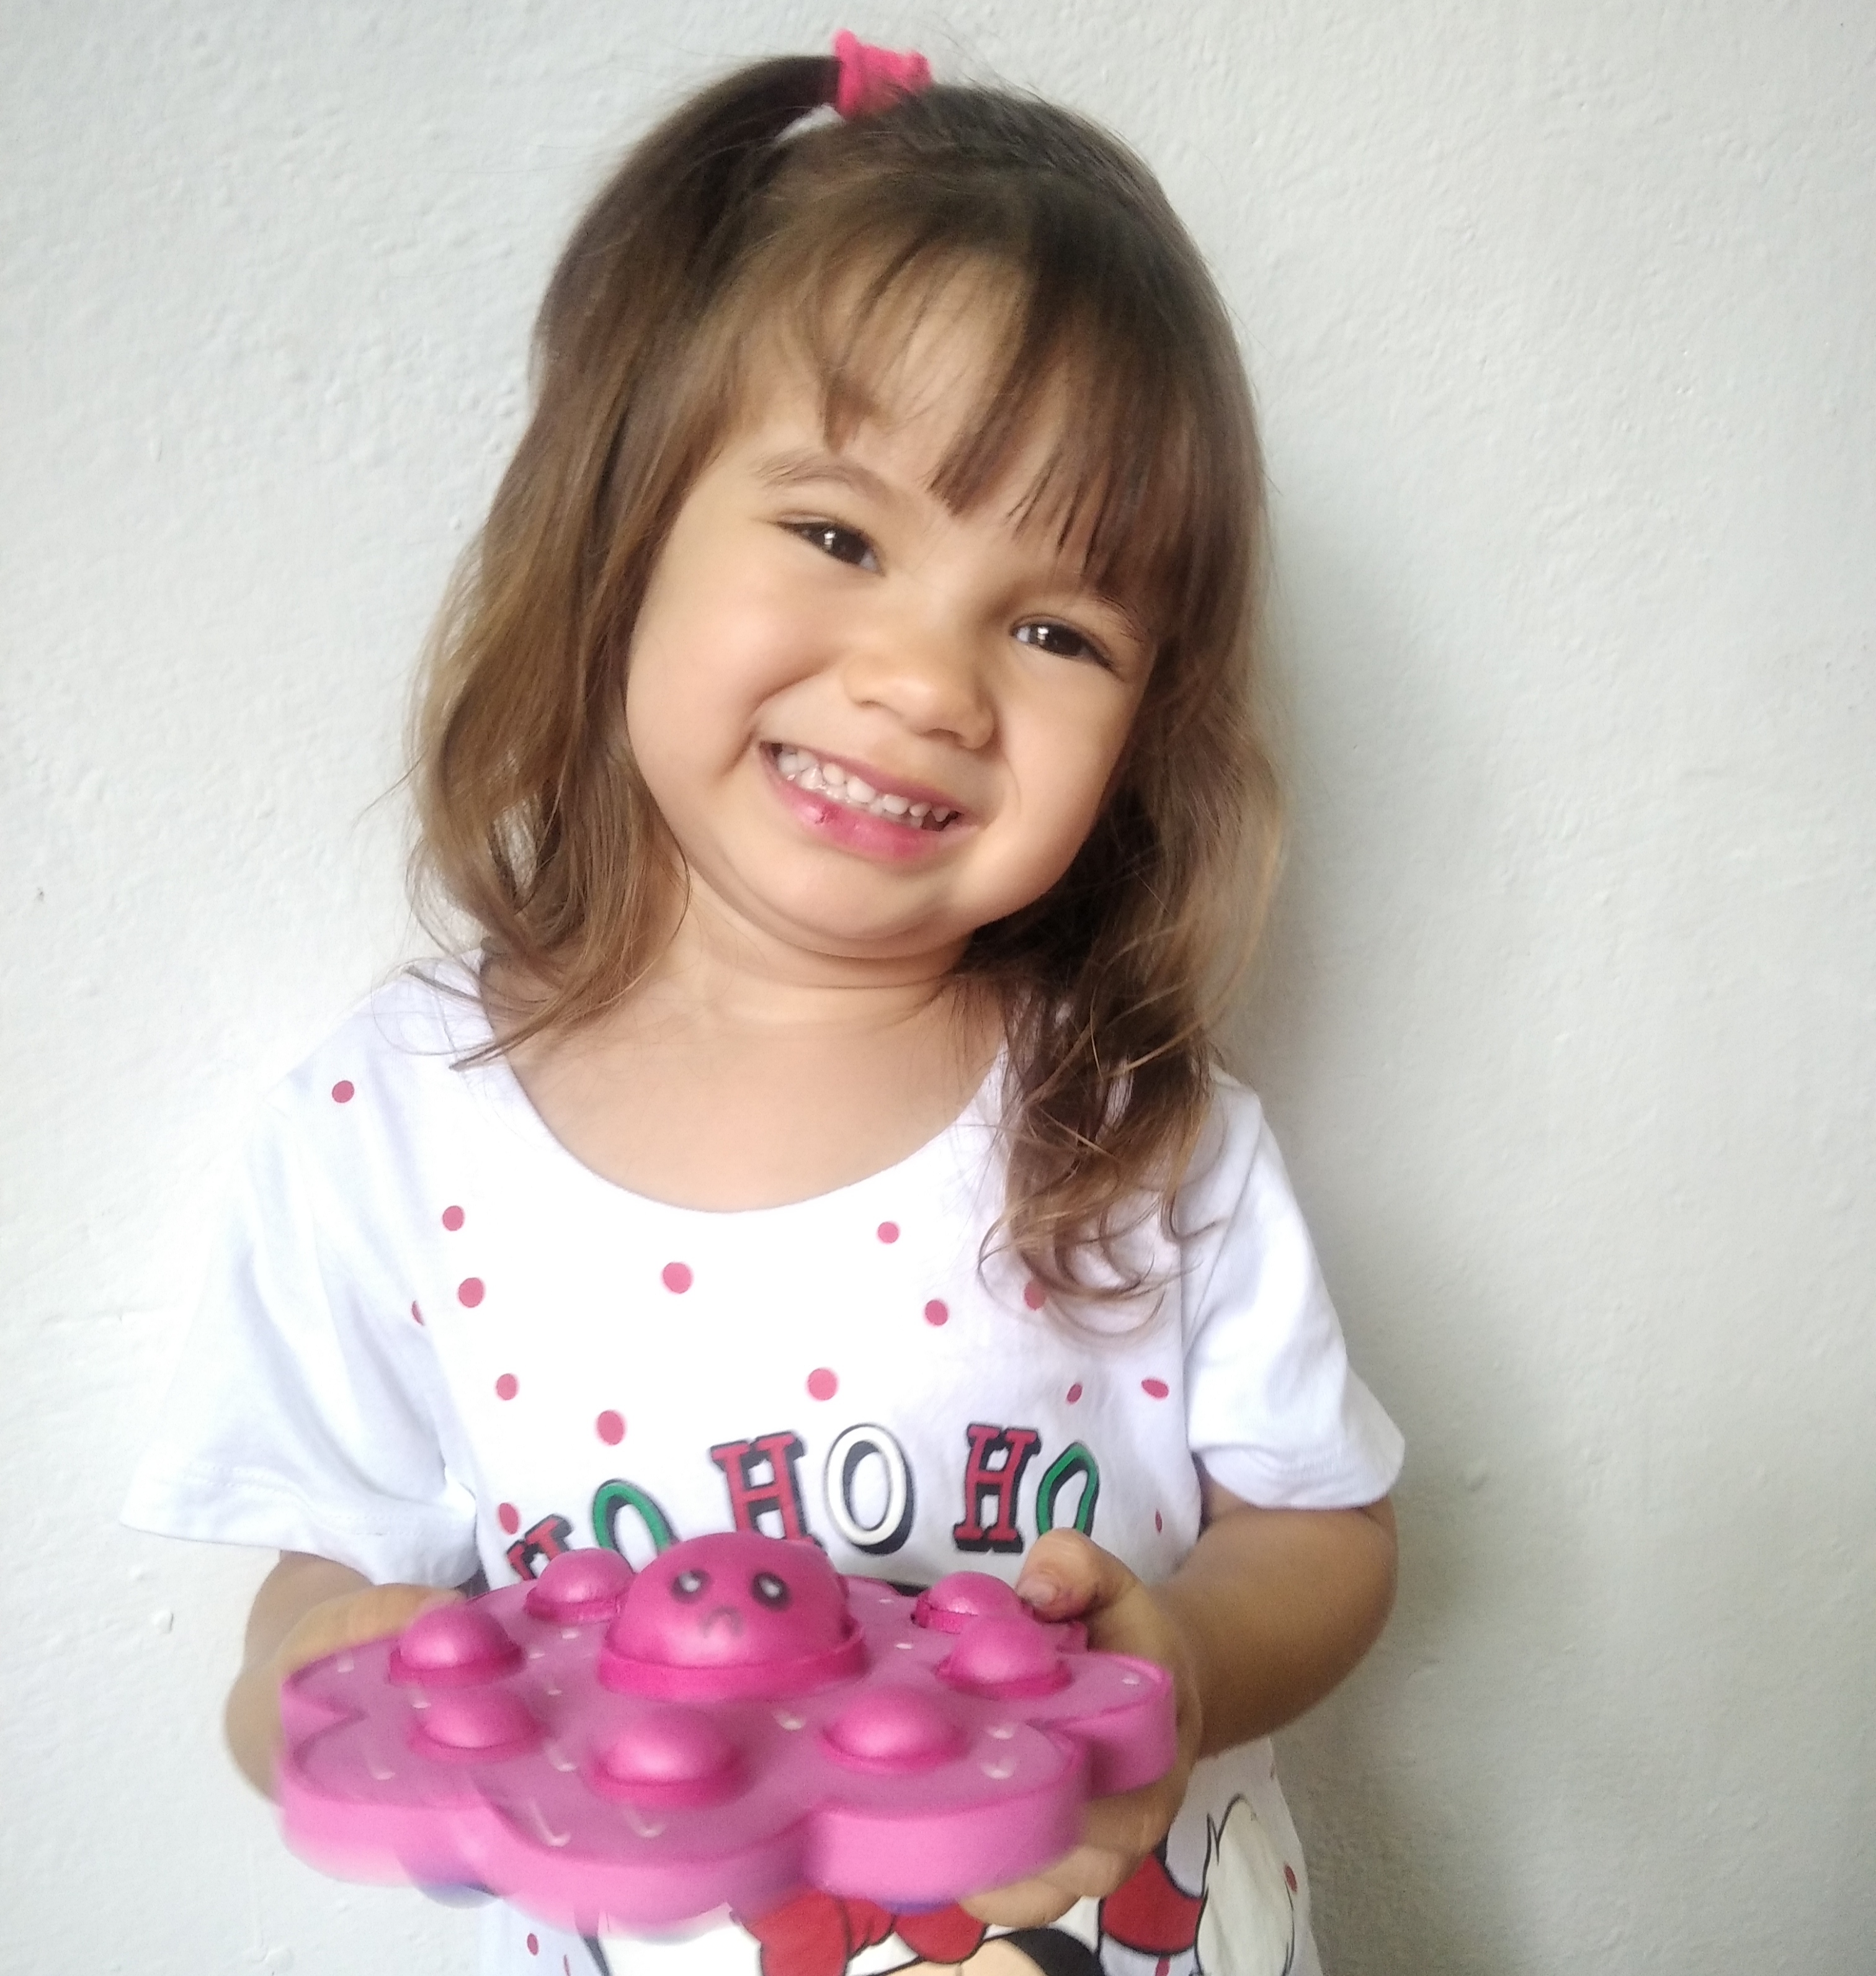
Bueno amigos me despido por ahora, espero les haya gustado tanto como a mi bebé esta genial manualidad, gracias a los que me siguieron hasta aquí, miles de bendiciones para todos.
Well friends, I say goodbye for now, I hope you liked this great craft as much as my baby did, thanks to those who followed me here, thousands of blessings to all.
Todas las fotografías son mi propiedad, tomada con mi teléfono Redmi 8A y editadas con la aplicación Polish.Traductor Googl.co.ve. Los separadores de texto usados. All photos are my property, taken with my Redmi 8A phone. Translator Googl.co.ve. The text separators used.
Gracias por su Visita. ❤️
Thank you for your visit. ❤️
Me gustó, bonito y diferente, y con pocos materiales, me encantó.
Hola amiga 🥰🥰 que bueno que te guste 😊 me alegro mucho y siii con pocos materiales y súper divertido de crear los niños disfrutan mucho, Nicole a cada rato agarraba las burbujas 😃😃 Gracias por tu comentario, lo valoro muchísimo. 😊🥰💖
Ay que belleza 😍😍😍
Guao es un juegue Genial que esta de moda actualmente y mira lo práctico que es hacerlo en casa.
Está fantástica La idea.
Muy creativo.
Te felicito por tu creatividad.
Gracias por compartirnos tu paso a paso que esta genial.
Bendiciones ❣️
Hola amiga gracias por tu agradable visita😊🤗
Siii quedó genial, Nicole no lo quiere soltar ahora 😃😃 Es muy divertido crear para nuestros chamos ellos disfrutan mucho durante el proceso.
Bendiciones para ti! 💖💖😘
Congratulations @mayi04! You have completed the following achievement on the Hive blockchain and have been rewarded with new badge(s):
Your next target is to reach 50 posts.
You can view your badges on your board and compare yourself to others in the Ranking
If you no longer want to receive notifications, reply to this comment with the word
STOPTo support your work, I also upvoted your post!
Check out the last post from @hivebuzz:
Support the HiveBuzz project. Vote for our proposal!
Excelente. Me encanto @mayi04 💖
Saludos amiga gracias por tu visita, me alegro que te haya gustado.😊😊🥰🥰
Congratulations @mayi04! You received a personal badge!
You can view your badges on your board and compare yourself to others in the Ranking
Check out the last post from @hivebuzz:
Support the HiveBuzz project. Vote for our proposal!
Gracias hivebuzz por siempre estar atento y apoyarnos en nuestros avances en la colmena. Feliz de pertenecer a esta gran familia Hive. 😊🥰❤️
De nada @mayi04 😊🌹 ¡Es un placer tener un miembro como tú entre nosotros! Esperamos aquí de nuevo por muchos años.
😍😍😍❤️ Gracias!!!