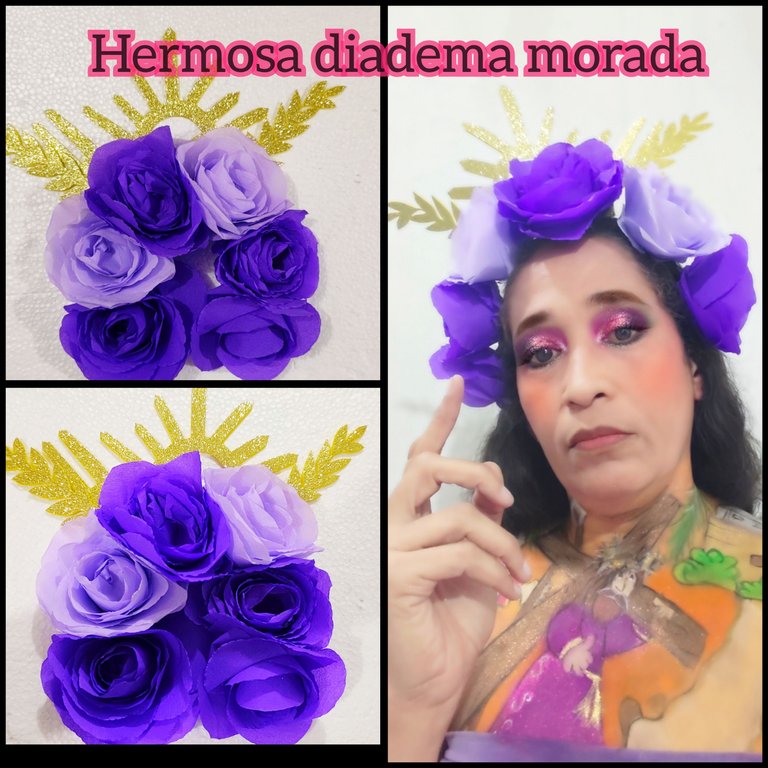
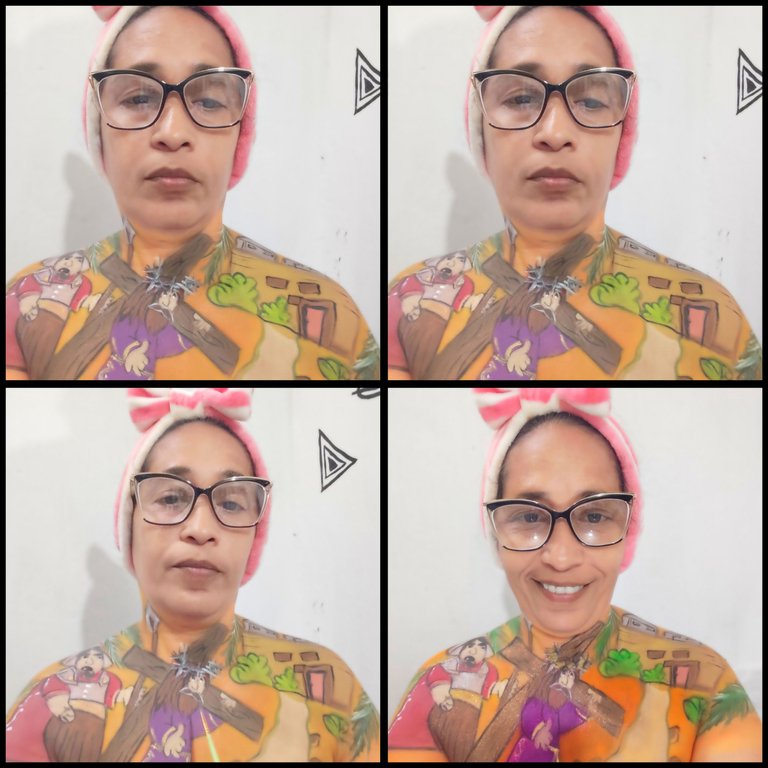
Saludos gente bonita de #hive, espero que este pasando una semana santa maravillosa, yo en casita, y un poco afligida porque primera vez en mucho tiempo no pude asistir a la procesión del nazareno, Pero de igual manera quise hacerle un homenaje, así que conjugue 2 de mis pasiones, primero creando una hermosa diadema en color morado y luego un maquillaje artístico con el que luciremos la diadema.
Acá les dejo el paso a paso de todo este trabajo realizado hoy, en la diadema solo nos tardamos 2 horas realizarla, Mientras que el maquillaje artístico tuvo una duración de 4 horas, fue bastante rápido ya que dibujó fue tipo caricatura y se facilita realizarlo.
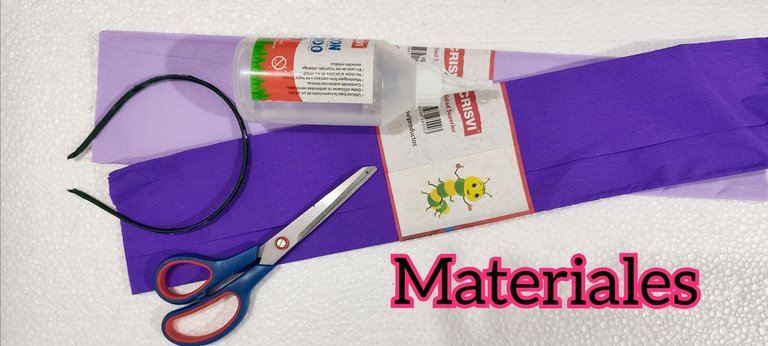
💜 MATERIALES 💜
💜 Papel crepé morado.
💜 Papel crepé lila.
💜 Cintillo base.
💜 Silicón líquido.
💜 Foami escarchado dorado.
💜 Tijera.
💜 Lápiz.
💜 Anime o Icopor
💜 PASO A PASO DE LA DIADEMA💜
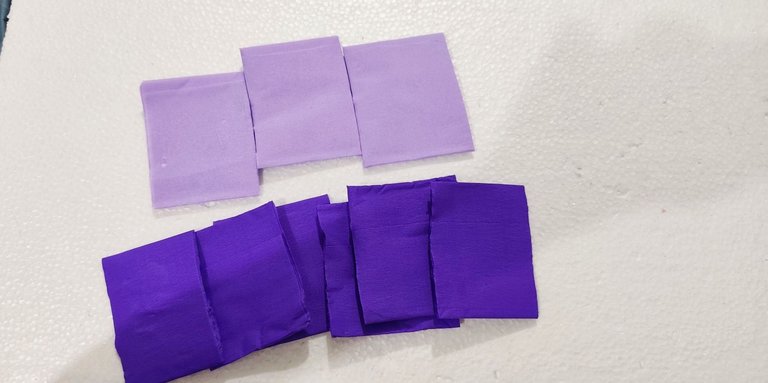
💜 PASO 1:
Tome el papel crepé morado y lo piqué en varias partes, luego repetí el procedimiento con el papel crepé lila.
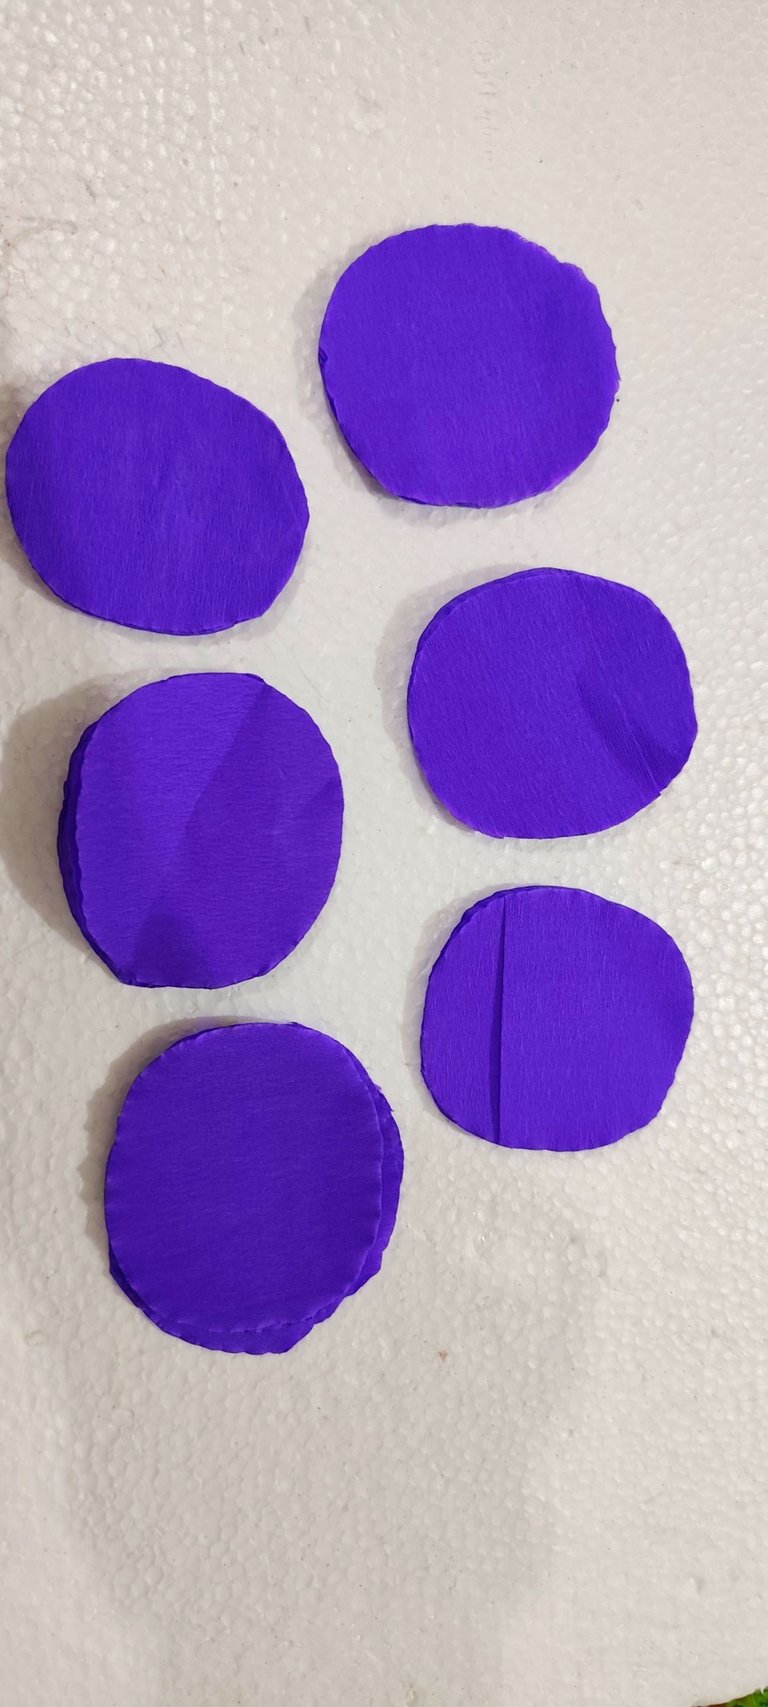
💜 PASO 2:
Luego con la tijera recortamos en círculos.
💜 PASO 3:
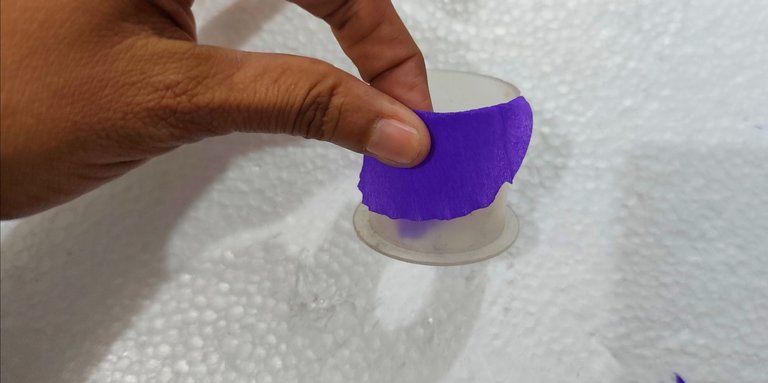
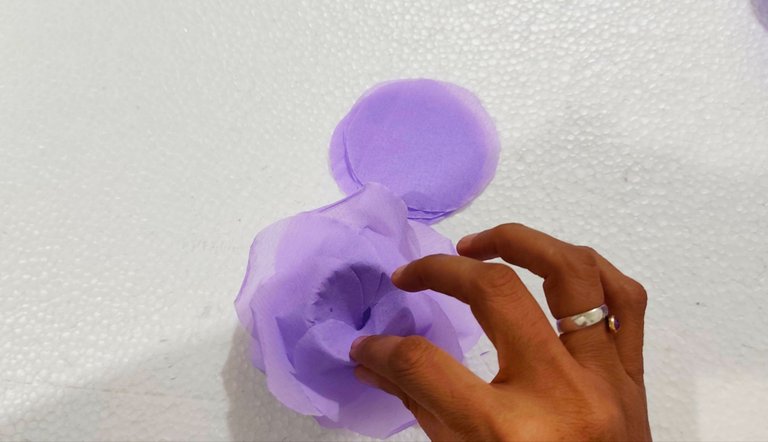
Para este paso nos ayudamos con algún objeto que sea redondo y que nos sirva para formar la flor, eso sí debemos recordar que el tamaño de la flor será del ancho que tenga este objeto con el que vamos a trabajar, puede ser un vaso, un rollo de papel higiénico, etc.
Tómame uno de los círculos del papel crepé y lo colocamos en el objeto, así como se aprecia en la fotografía.
💜 PASO 4:
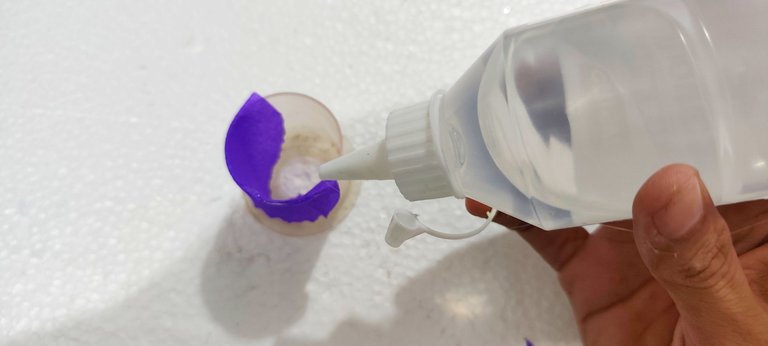
Luego aplicó silicón líquido encima del pétalo que ya colocamos y montamos encima de otro.
Este paso lo vamos a repetir tantas veces como queramos, ya que depende del tamaño que se deseen las rosas, mientras más pétalos más grande será nuestra rosa.
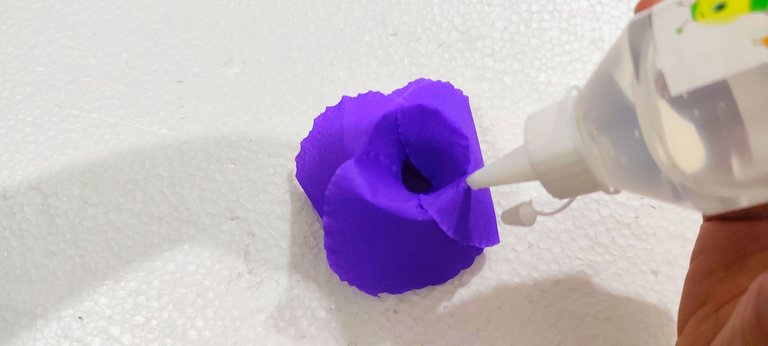
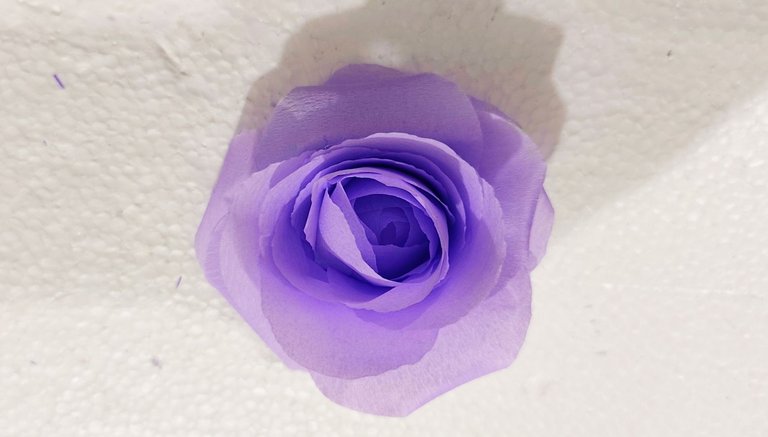
💜 PASO 5:
Cuando ya la flor está formada tomamos uno de los pétalos y los pegamos en el fondo, y despegamos de la base donde hicimos la rosa.
💜 PASO 6:
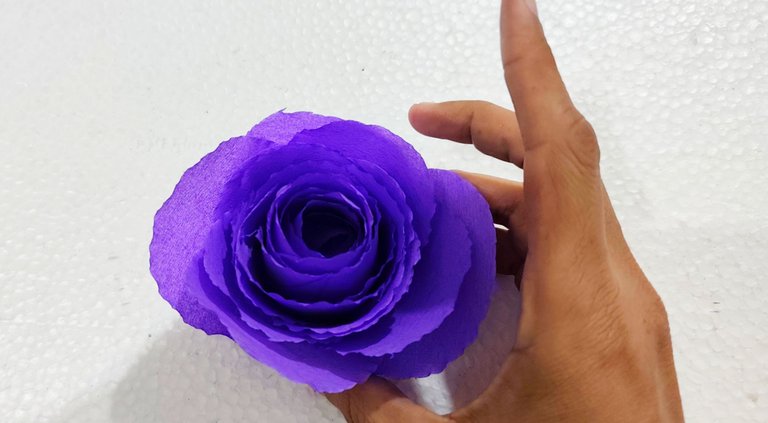
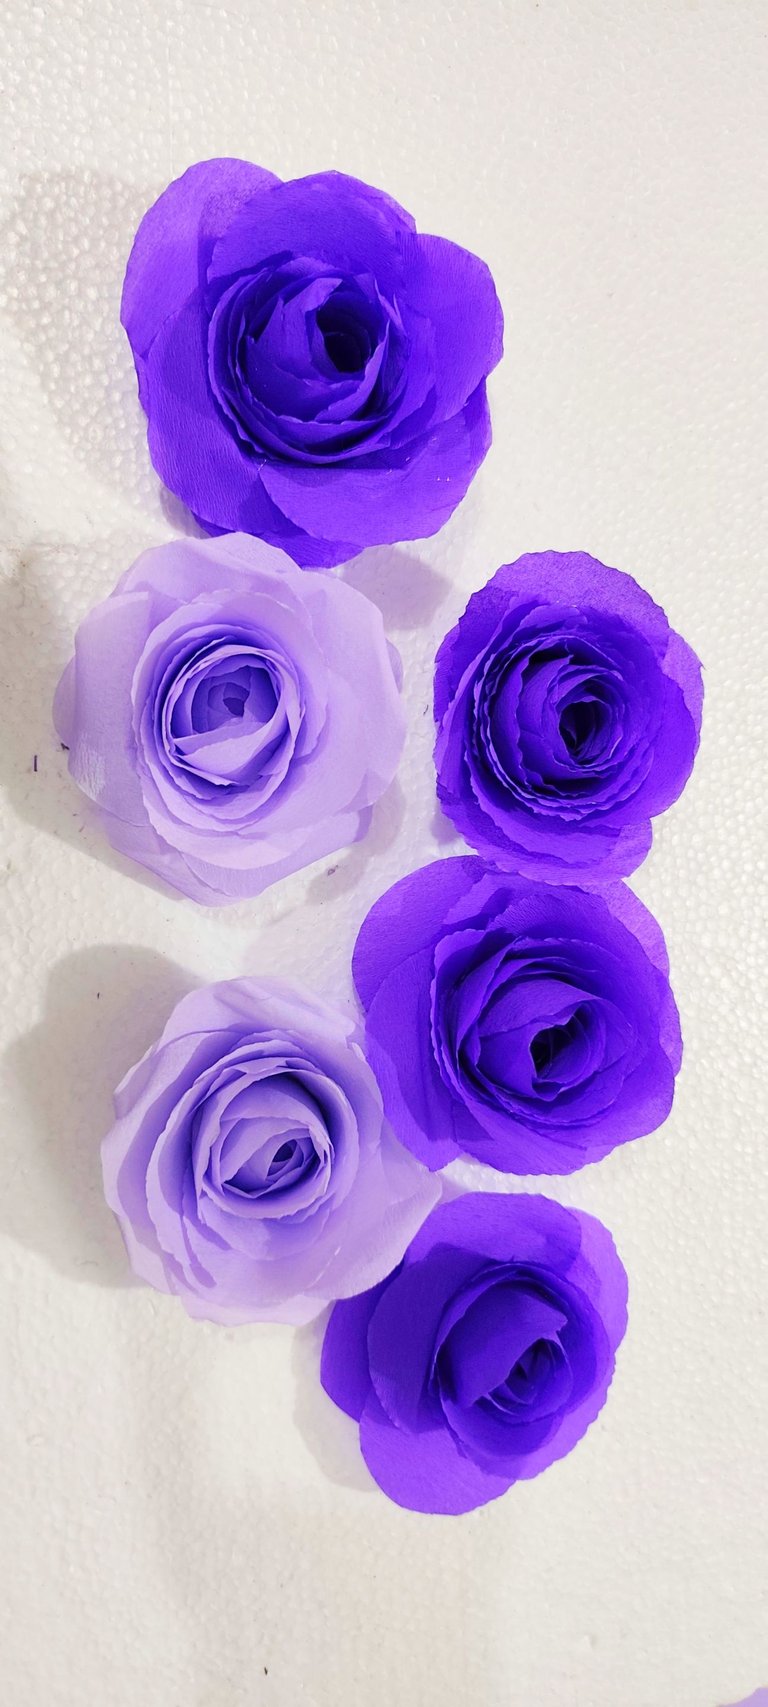
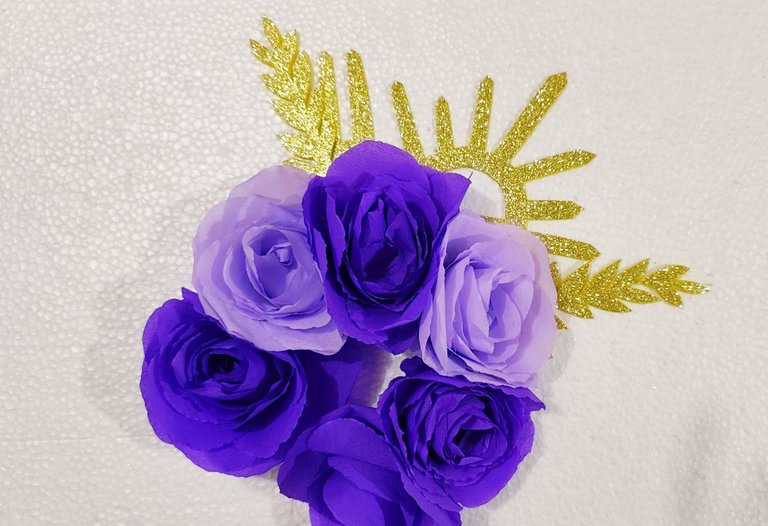
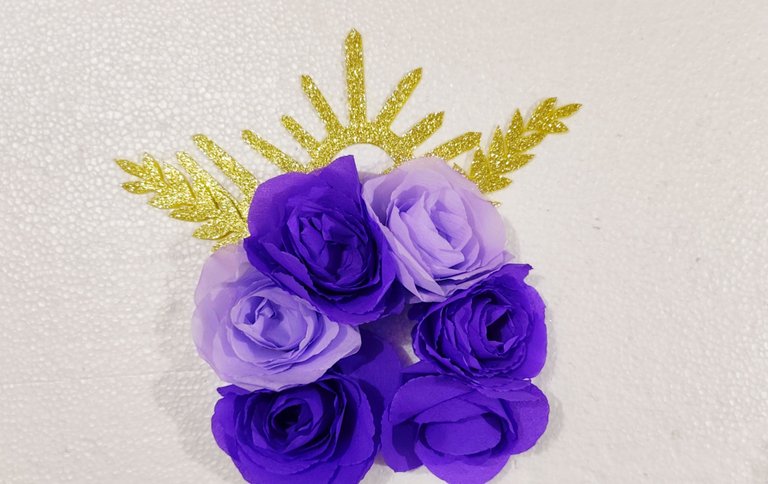
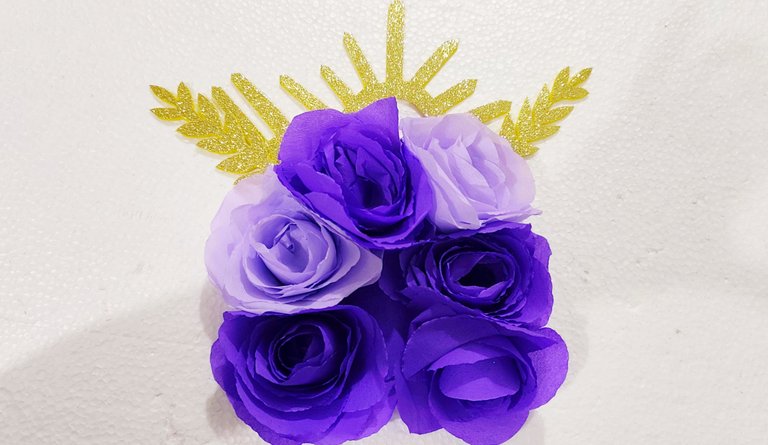
Repetimos el mismo procedimiento con el papel crepé de color lila, yo forme para esta diadema 4 rosas moradas y 2 lilas.
💜 PASO 7:
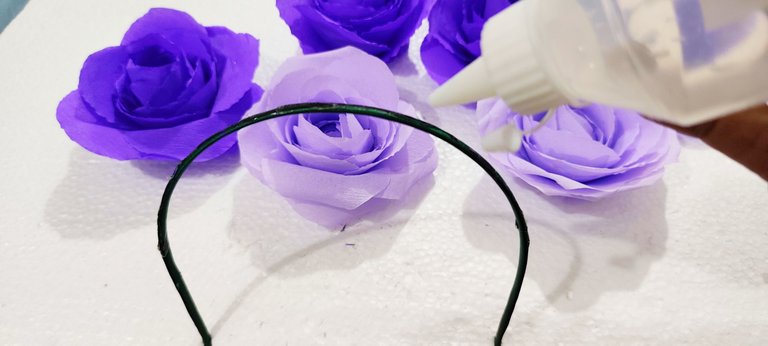
Tomó el cintillo base y lo anclamos en un trozo de anime o icopor, para ayudarnos a trabajar, entonces aplicó silicón líquido en la base del cintillo e inicio a pegar las flores y dejamos secar.
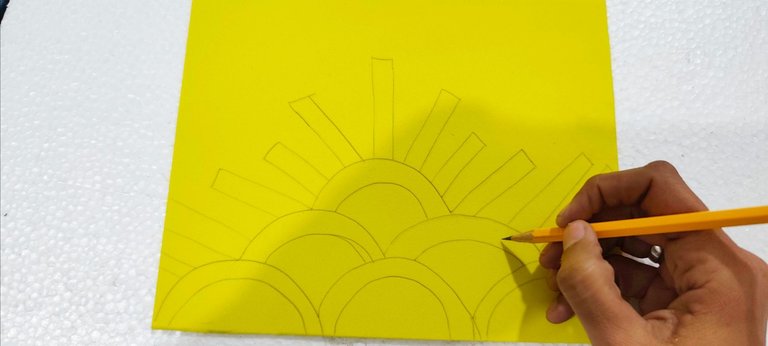
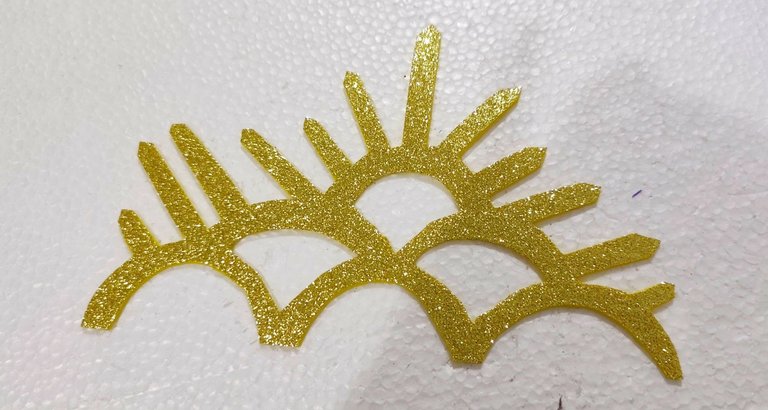
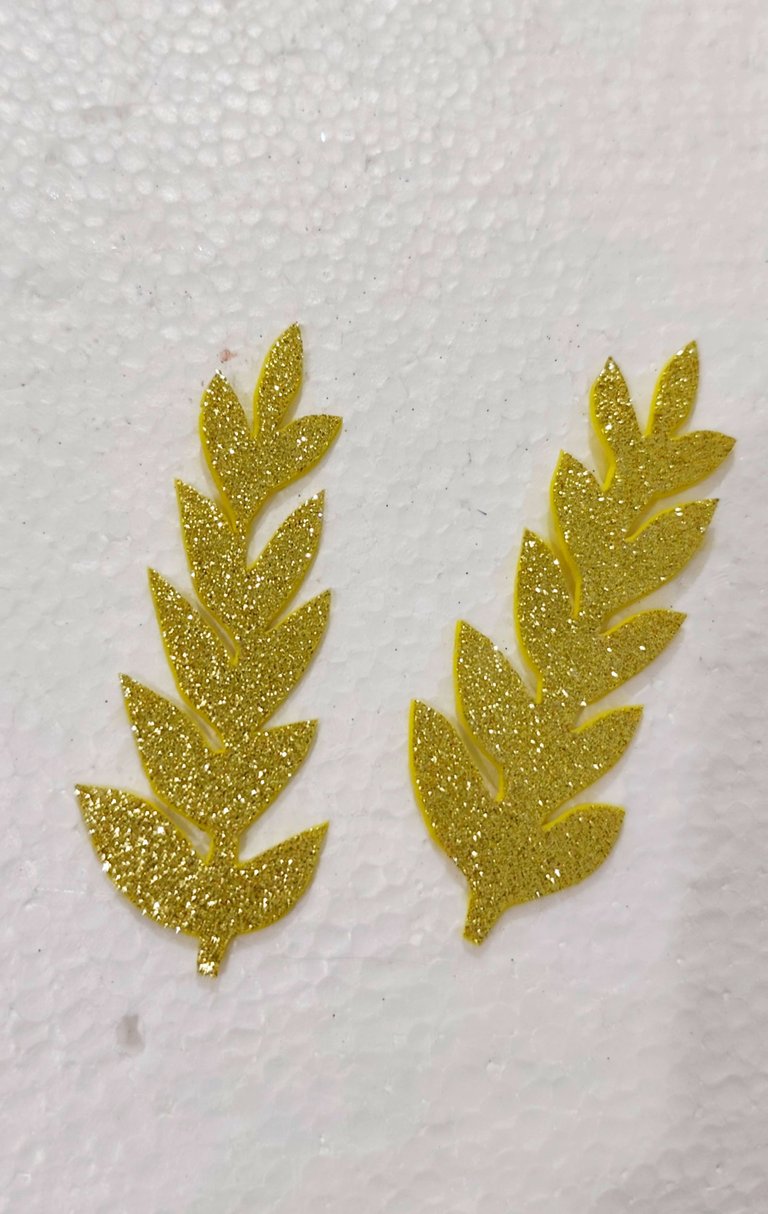
💜 PASO 8:
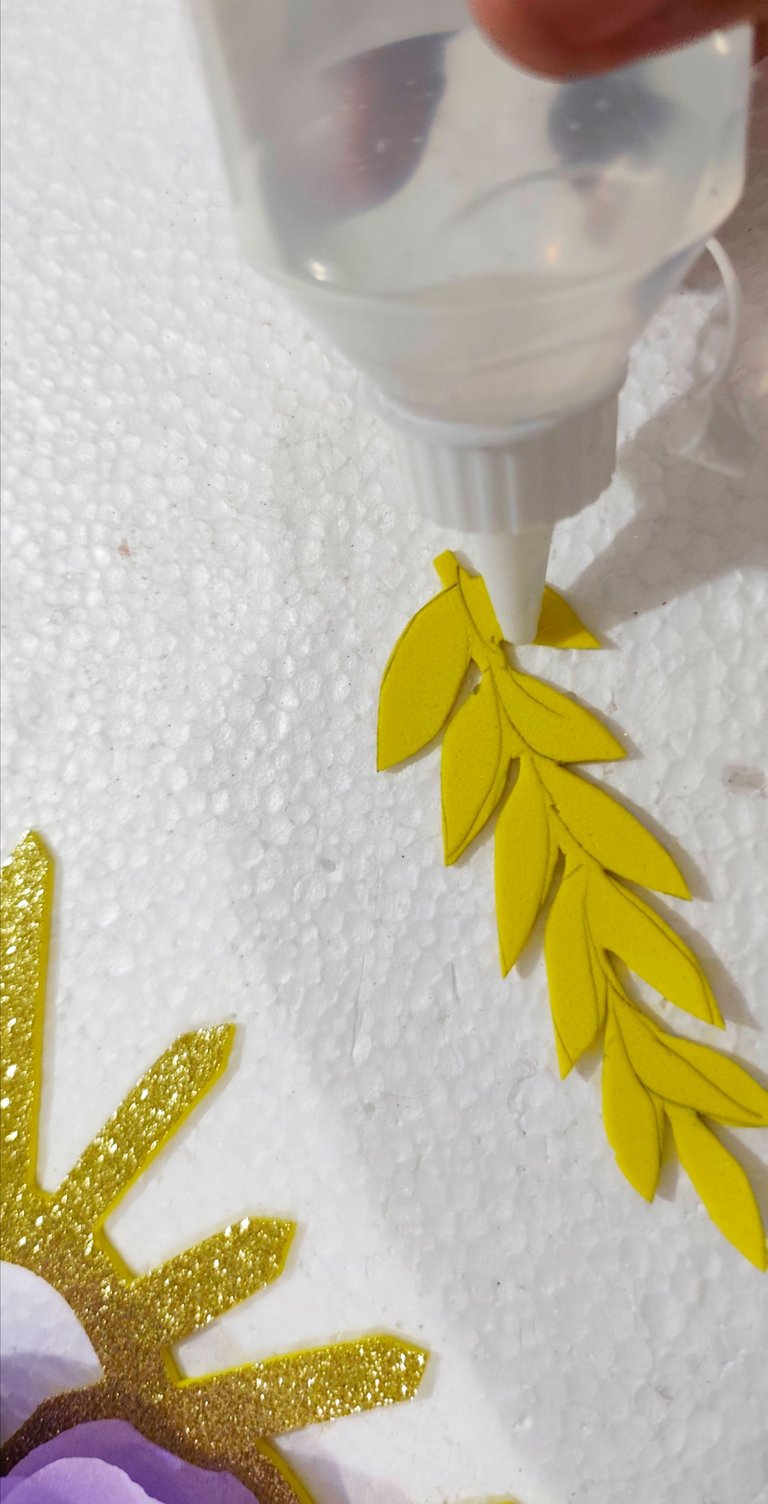
En el foami escarchado dorado hice el dibujo a mi gusto adicional a ese dibujo y recortó dos ramos de olivos que dibuje previamente.
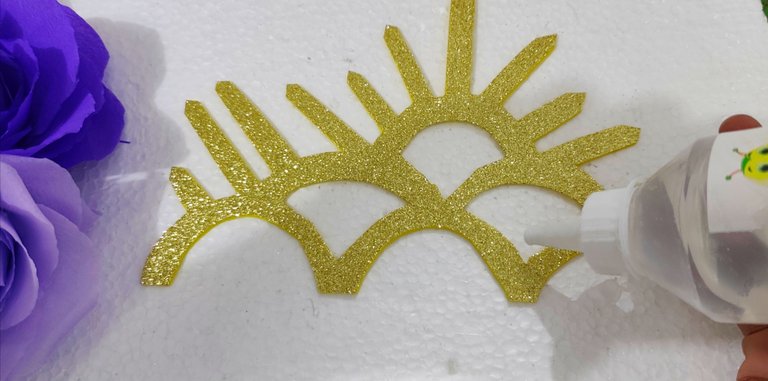
💜 PASO 9:
Le aplicó silicón líquido a la figura que yo saqué del foami escarchado dorado y pegamos por la parte trasera de las rosas y dejó secar bien.
💜 PASO 10:
Luego a los dos ramos de olivos que recortamos, le aplicó silicón líquido y pegamos cada uno en un extremo de la diadema y listo, dejamos reposar bien hasta que todo esté pegado y seco.
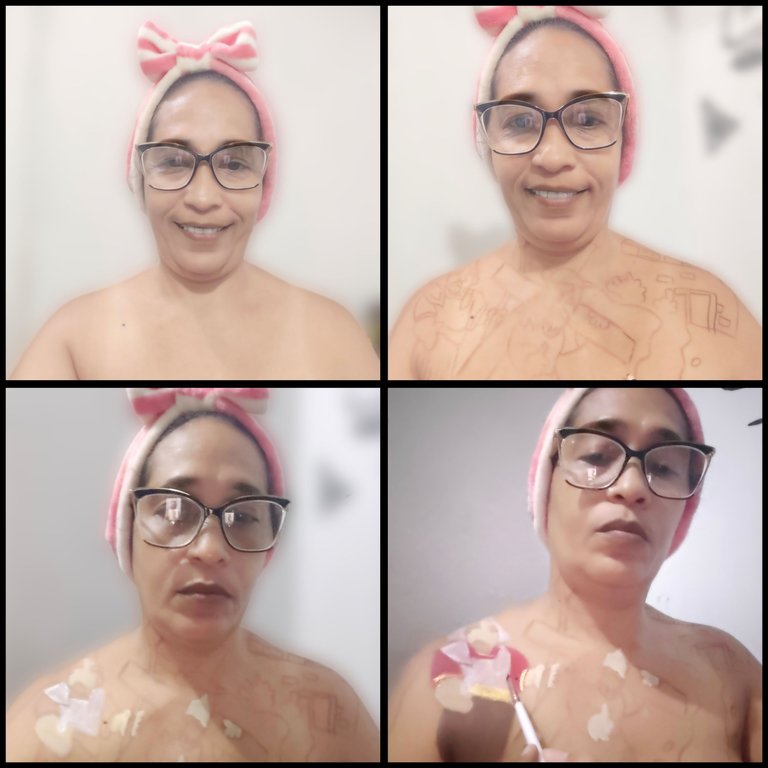
Primero debemos hacer el Skin care, para preparar la piel.
💜 PASO 2:
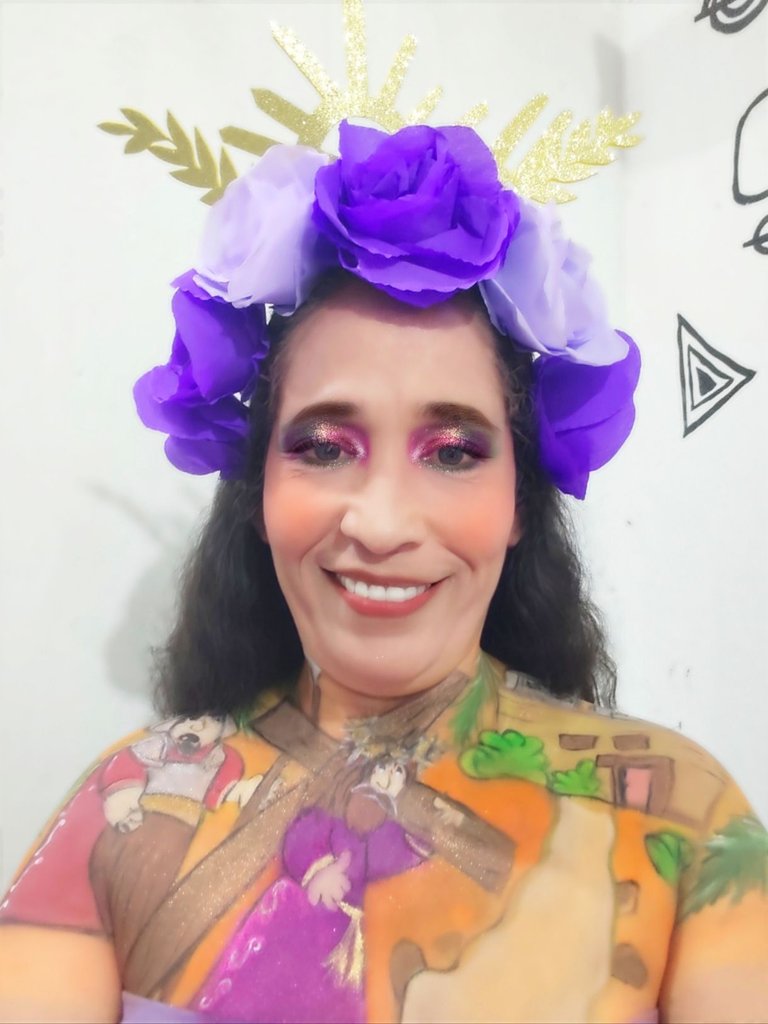
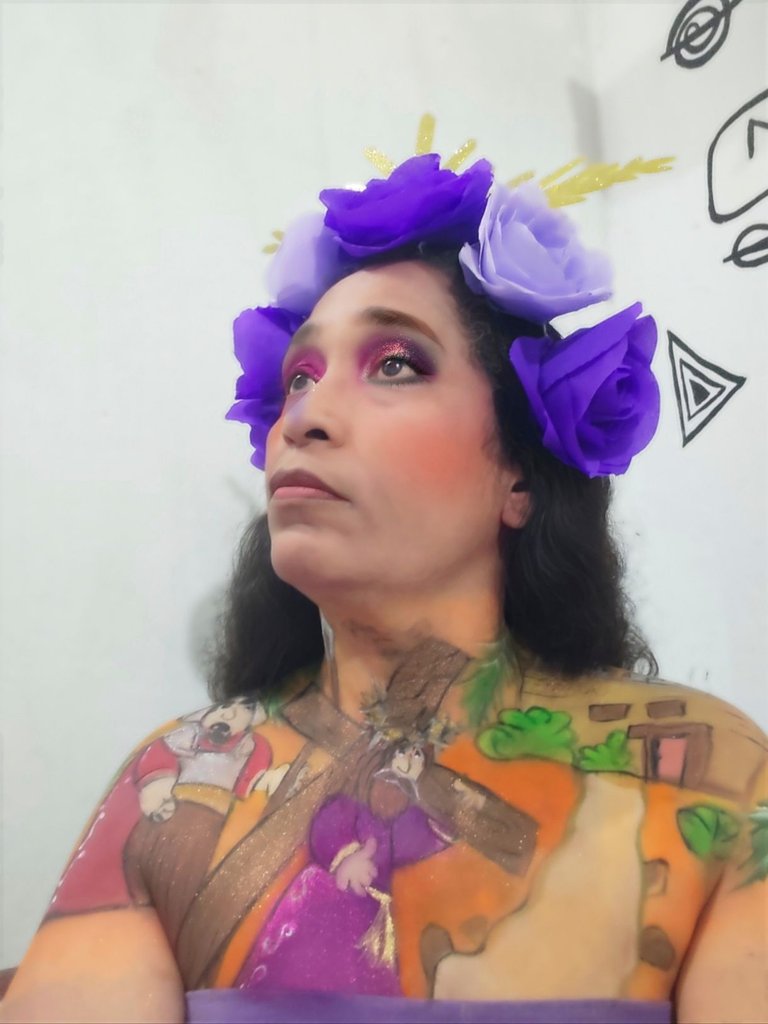
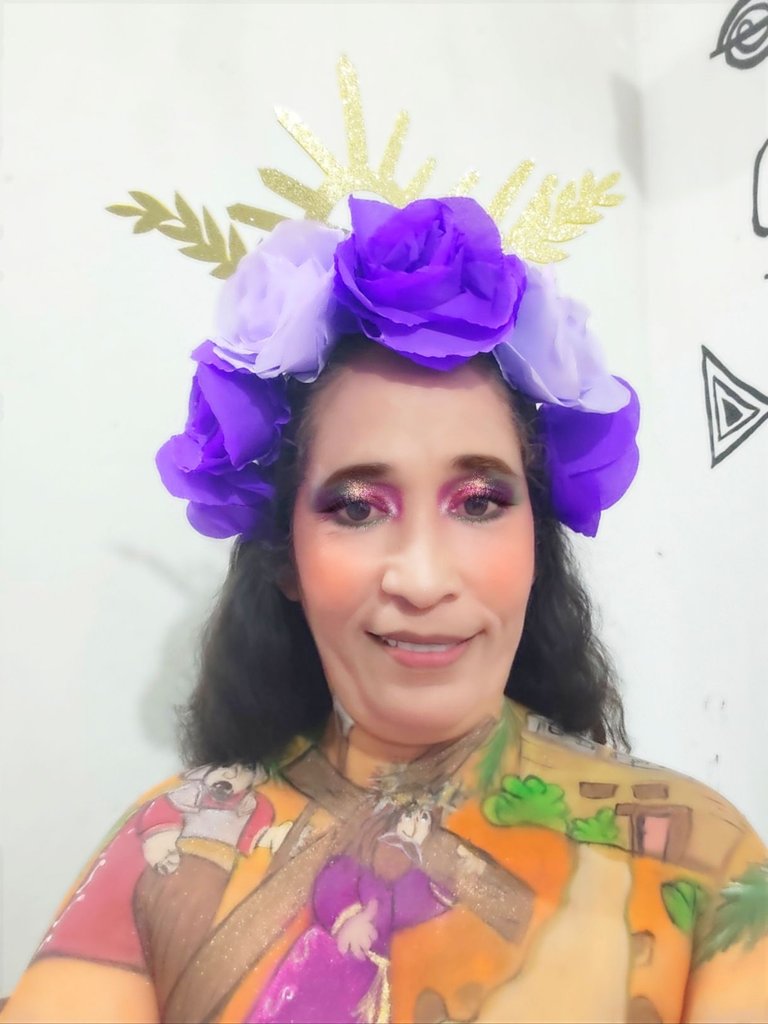
Con el lápiz de ojos marrón procedí a realizar el dibujo, en este caso es una escena del nazareno mientras era azotado por un guardia, Pero en lugar de hacerlo real, trabaje con imágenes infantiles tipo caricatura, ya que como no tenía luz, era más fácil trabajar con este tipo de imágenes.
Luego procedí a aplicar el maquillaje corporal el cuál fui sellando color a color con el polvo suelto translúcido.
💜 PASO 3:
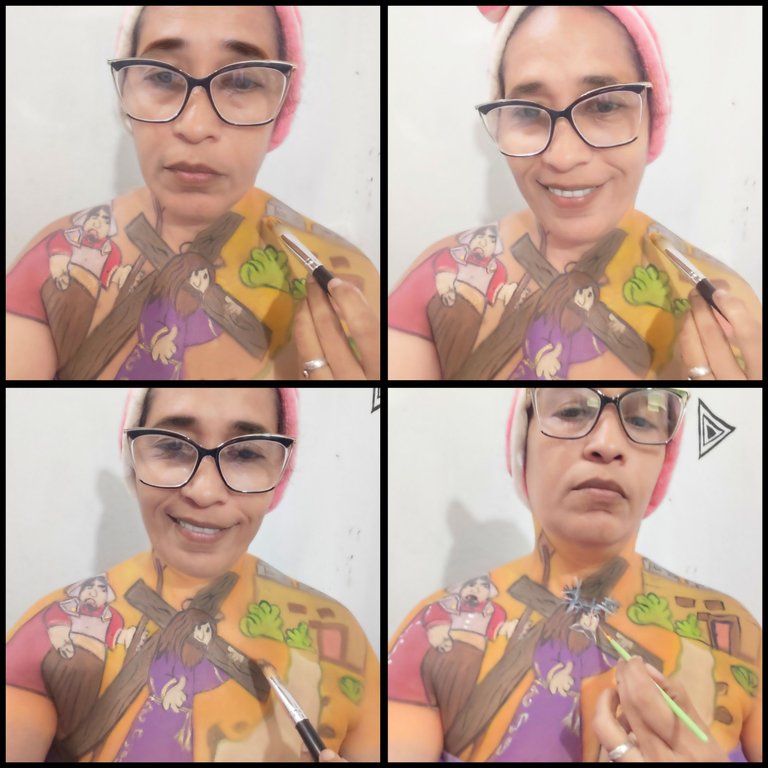
Cuando ya tiene todo el dibujo los colores, procedí a darle fondo a mi escena, en esta ocasión lo hice primero con el maquillaje corporal y sellando con polvo suelto translúcido, trabaje con tonos naranjas y rojizos para dar esa sensación de atardecer.
💜 PASO 4:
Con el pincel fino proceso a delinear y dar los diferentes detalles que lleva el dibujo, y finalmente aplicó los pigmentos para avivar los colores.
💜 PASO 5:
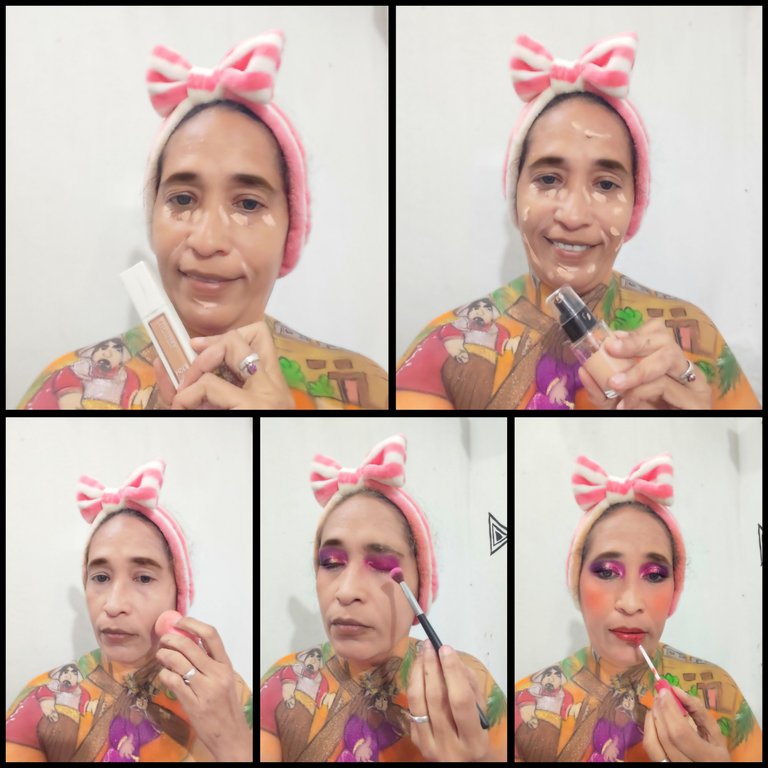
Pasamos ahora al maquillaje en el rostro, que fue algo bien sencillo. Primero aplicó corrector de ojeras, contorno, base líquida y difuminó con una esponja húmeda.
Luego me aplicó las sombras, la máscara de pestañas, el rubor, el iluminador y el labial y listo terminamos el maquillaje.
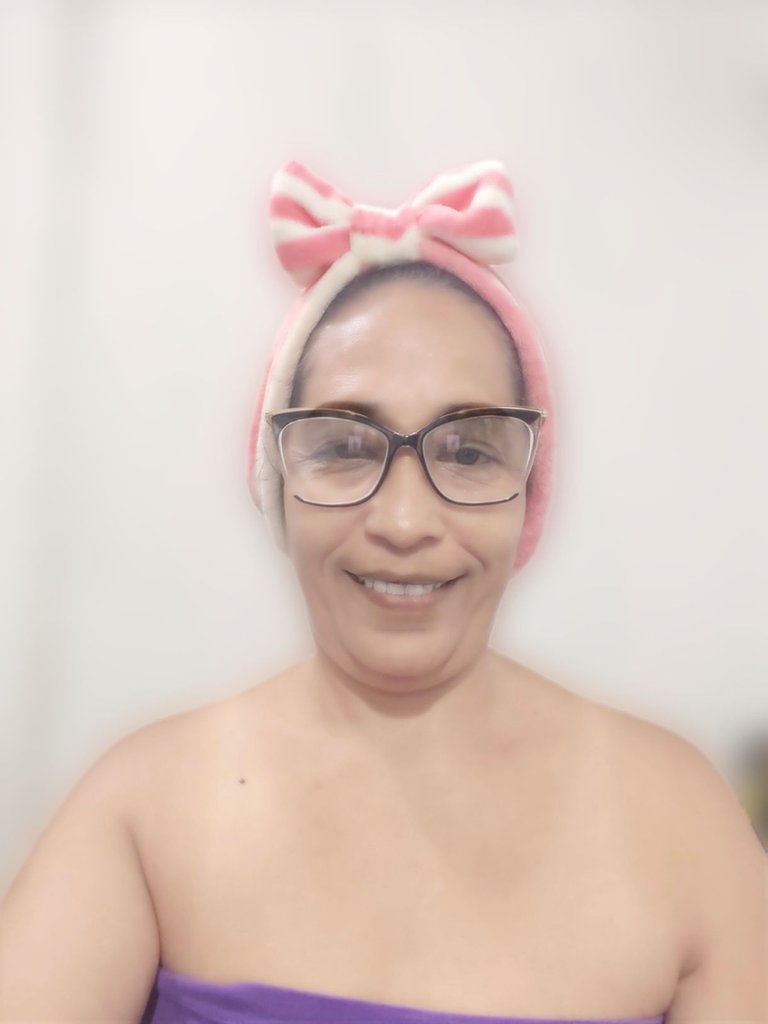
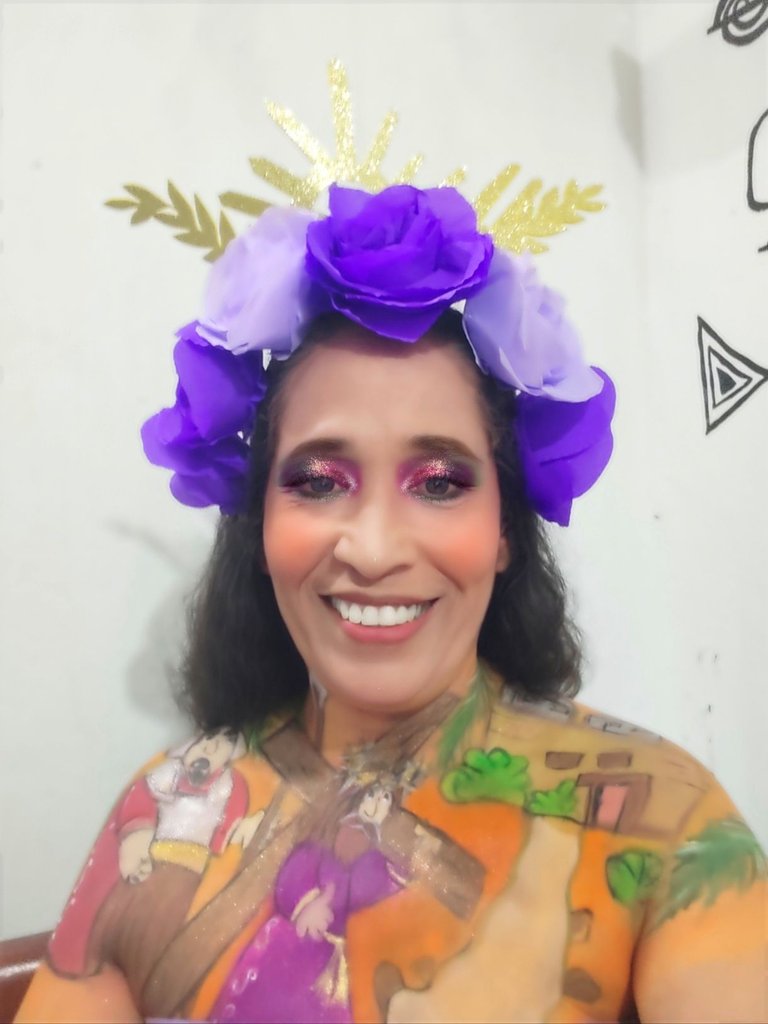
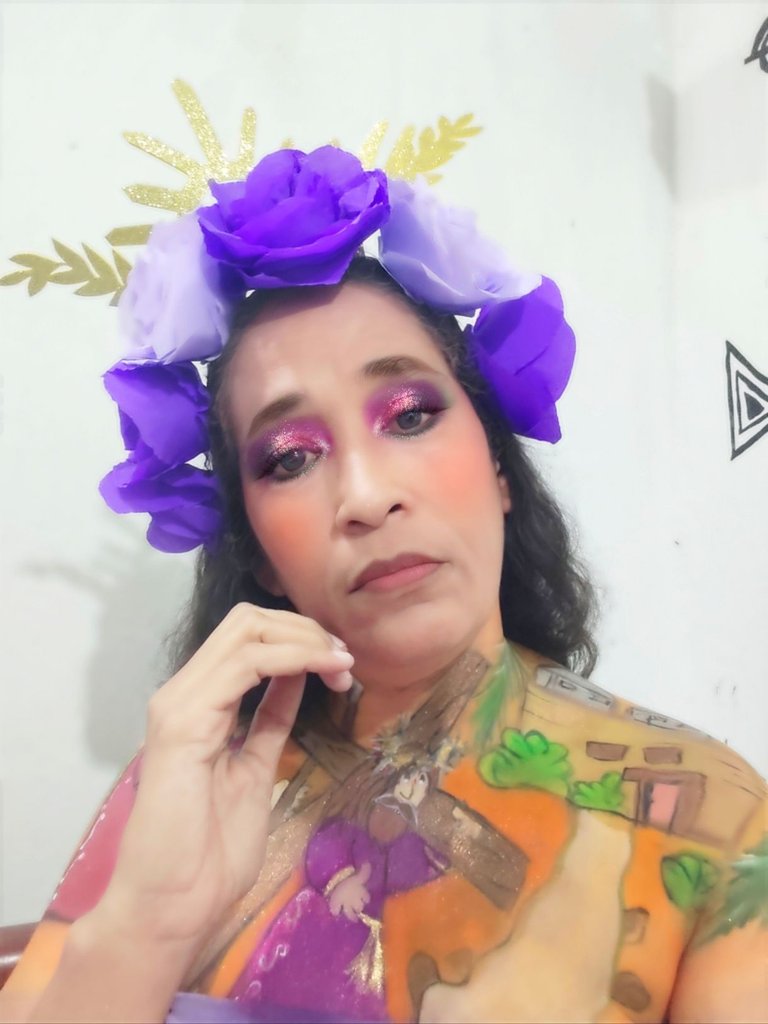
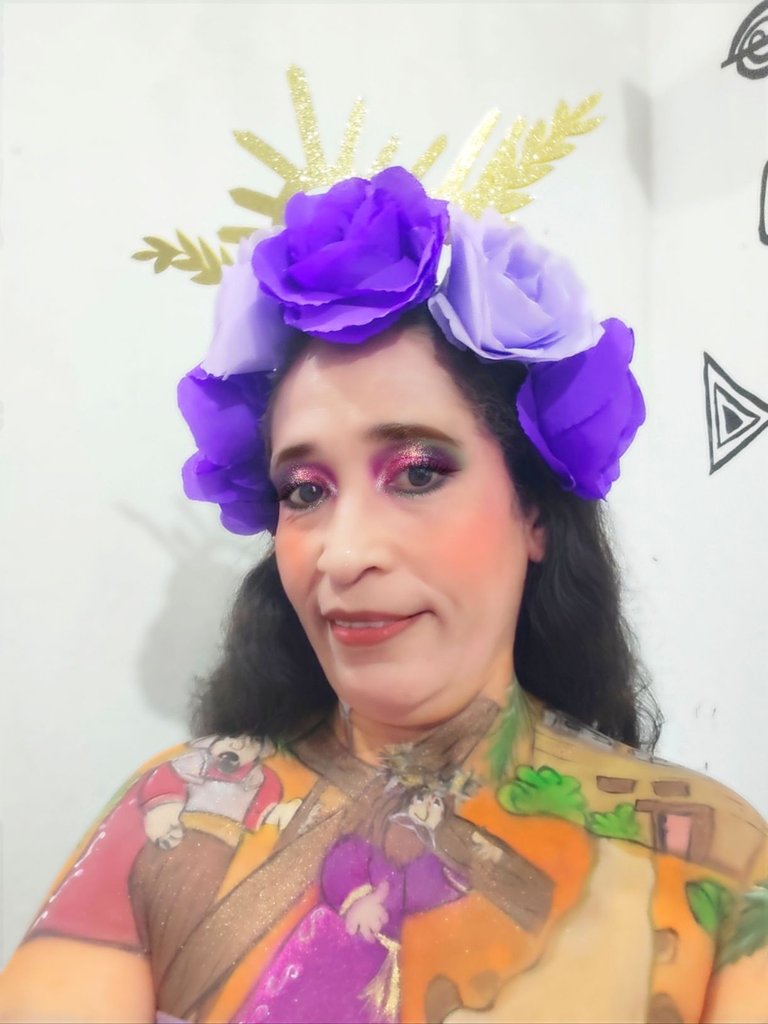
Solo nos quedaba arreglar el cabello y colocarnos la hermosa diadema que luce realmente hermosa con este maquillaje.
💜 RESULTADO FINAL 💜
Realmente espero que el trabajo sea de su agrado, lo hice contra todo pronóstico, ya que no teníamos luz en la casa, aún así me ayude con las de emergencia y pude solventar, si deseas que elabore algún maquillaje especial házmelo saber en los comentarios, y de antemano muchísimas gracias.
💜 CRÉDITOS 💜
Todas las fotografías fueron tomadas con mi teléfono Xiaomi redmi y son de mi propiedad utilizando el programa polish y el traductor Deepl.
Greetings beautiful people of #hive, I hope you are having a wonderful holy week, I at home, and a little sad because for the first time in a long time I could not attend the procession of the Nazarene, but I wanted to pay tribute to him, so I combined 2 of my passions, first creating a beautiful headband in purple and then an artistic makeup with which we will wear the headband.
Here I leave you the step by step of all this work done today, the headband only took us 2 hours to make it, while the artistic makeup lasted 4 hours, it was quite fast because it was drawn as a cartoon and it was easy to do it.
I took the purple crepe paper and cut it into several pieces, then repeated the procedure with the lilac crepe paper.
💜 STEP 2:
Then with the scissors we cut in circles.
💜 STEP 3:
For this step we help ourselves with an object that is round and that we use to form the flower, we must remember that the size of the flower will be the width of this object with which we will work, it can be a glass, a roll of toilet paper, etc..
Take one of the crepe paper circles and place it on the object, as shown in the picture.
💜 STEP 4:
Then he applied liquid silicone on top of the petal we already placed and mounted on top of another one.
We are going to repeat this step as many times as we want, since it depends on the size of the roses, the more petals the bigger our rose will be.
💜 STEP 5:
When the flower is already formed we take one of the petals and glue them to the bottom, and we take off from the base where we made the rose.
💜 STEP 6:
Repeat the same procedure with the lilac crepe paper, I made 4 purple and 2 lilac roses for this headband.
💜 STEP 7:
He took the base headband and anchored it on a piece of anime or Styrofoam to help us work, then he applied liquid silicone to the base of the headband and started to glue the flowers and let it dry.
💜 STEP 8:
On the gold frosted foami I did the drawing to my taste in addition to that drawing and cut out two bunches of olive trees that I drew previously.
💜 STEP 9:
He applied liquid silicone to the figure that I took out of the gold frosted foami and glued it to the back of the roses and let it dry well.
💜 STEP 10:
Then to the two bunches of olive trees that we cut out, we applied liquid silicone and glued each one to one end of the headband and that's it, we let it rest until everything is glued and dry.
First we must do the Skin care, to prepare the skin.
💜 STEP 2:
With the brown eye pencil I proceeded to make the drawing, in this case it is a scene of the Nazarene while being whipped by a guard, but instead of making it real, I worked with cartoon-like children's images, because as I had no light, it was easier to work with this type of images.
Then I proceeded to apply the body make-up which I sealed color by color with the translucent loose powder.
💜 STEP 3:
When I had all the colors drawn, I proceeded to give background to my scene, this time I did it first with the body makeup and sealing with translucent loose powder, I worked with orange and reddish tones to give that sunset feeling.
💜 STEP 4:
With the fine brush he outlined and gave the different details of the drawing, and finally he applied the pigments to enliven the colors.
💜 STEP 5:
Now we moved on to the makeup on the face, which was quite simple. First she applied concealer, contour, liquid foundation and blended with a damp sponge.
Then she applied the shadows, mascara, blush, highlighter and lipstick and that was it, we finished the makeup.
All that was left to do was to fix the hair and put on the beautiful headband that looks really beautiful with this makeup.
💜FINAL RESULT💜
I really hope that the work is to your liking, I did it against all odds, since we had no light in the house, even so I helped me with the emergency and I could solve, if you want me to elaborate some special makeup let me know in the comments, and thank you very much in advance.
💜 CRÉDITS 💜
All pictures were taken with my Xiaomi redmi phone and are my own using polish and Deepl translator.
I used these colors because it is the makeup of the Nazarene who wears purple, I had never worked with this range for a headband, But I tell you that I loved it, I was fascinated, greetings and thank you for visiting me, happy holy week, rain of blessings. 💜🌹💜
Hola amiga @mayifiestas Me quito el sombrero, espectacular diadema y maquillaje eres una gran artista, Dios te bendiga, yo no tengo paciencia para las manualidades jajaja. Besos y Abrazos.
Me halagan mucho tus palabras, con este arte del maquillaje ciertamente hay que tener mucha paciencia, pero para mí es parte de mi vida, de mi escencia y lo utilizo para drenar tantas emociones reprimidas que tengo, por la situación de salud que vive mi esposo,te agradezco mucho tu visita, saludos.💜🌹💜
Pero qué bonito te quedó! tanto el cintillo como la pintura, ambos hacen una mezcla fabulosa, especial para estas fechas de cuaresma. Gracias por compartir este tutorial! 🤗💚


~~~ embed:1912716675998167533?t=y4ejOnxWsHp6eJPIkadIQA&s=19 twitter metadata:TWF5ZWxpbjIwMjF8fGh0dHBzOi8vdHdpdHRlci5jb20vTWF5ZWxpbjIwMjEvc3RhdHVzLzE5MTI3MTY2NzU5OTgxNjc1MzN8 ~~~
The headband is so beautiful purple and lilac combined with gold is really beautiful, the aura is elegant💥
I used these colors because it is the makeup of the Nazarene who wears purple, I had never worked with this range for a headband, But I tell you that I loved it, I was fascinated, greetings and thank you for visiting me, happy holy week, rain of blessings. 💜🌹💜
Hola amiga @mayifiestas Me quito el sombrero, espectacular diadema y maquillaje eres una gran artista, Dios te bendiga, yo no tengo paciencia para las manualidades jajaja. Besos y Abrazos.
Me halagan mucho tus palabras, con este arte del maquillaje ciertamente hay que tener mucha paciencia, pero para mí es parte de mi vida, de mi escencia y lo utilizo para drenar tantas emociones reprimidas que tengo, por la situación de salud que vive mi esposo,te agradezco mucho tu visita, saludos.💜🌹💜
Que lindos colores y queda bien complementada con el maquillaje que hiciste, te quedo muy linda amiga, feliz semana santa 😘
Gracias mi buhita hermosa, un abrazo grande y fuerte desde la distancia, feliz semana santa.💜🌹💜
Excelente trabajo, muy creativo, como sugerencia utiliza esta aplicación para mejorar un poco algunos datos en la escritura, saludos amiga. https://languagetool.org/webextension/welcome/finish?lang=es
Muchísimas gracias amigo, y gracias por la sugerencia, saludos feliz semana santa 💜🌹💜
Excelente trabajo, me encantó la diadema y el maquillaje es una locura. Espectacular.
Muchísimas gracias mi reina linda, es un placer conocerte y tenerte por ac por mi contenido, gracias por el apoyo.💜🌹💜
Pero qué bonito te quedó! tanto el cintillo como la pintura, ambos hacen una mezcla fabulosa, especial para estas fechas de cuaresma. Gracias por compartir este tutorial! 🤗💚
Gracias a ti por pasar y visitar, feliz día y bendiciones 💜🌹💜
Muy lindo mayii <3
Gracias mi reina, que bueno verte por acá, saludos 💜🌹💜
sii apoyando de a poquito jeje