¡Hola, amigos de Hive! Mis mejores vibras y deseos para todos
Hello Hive friends! My best vibes and wishes to all
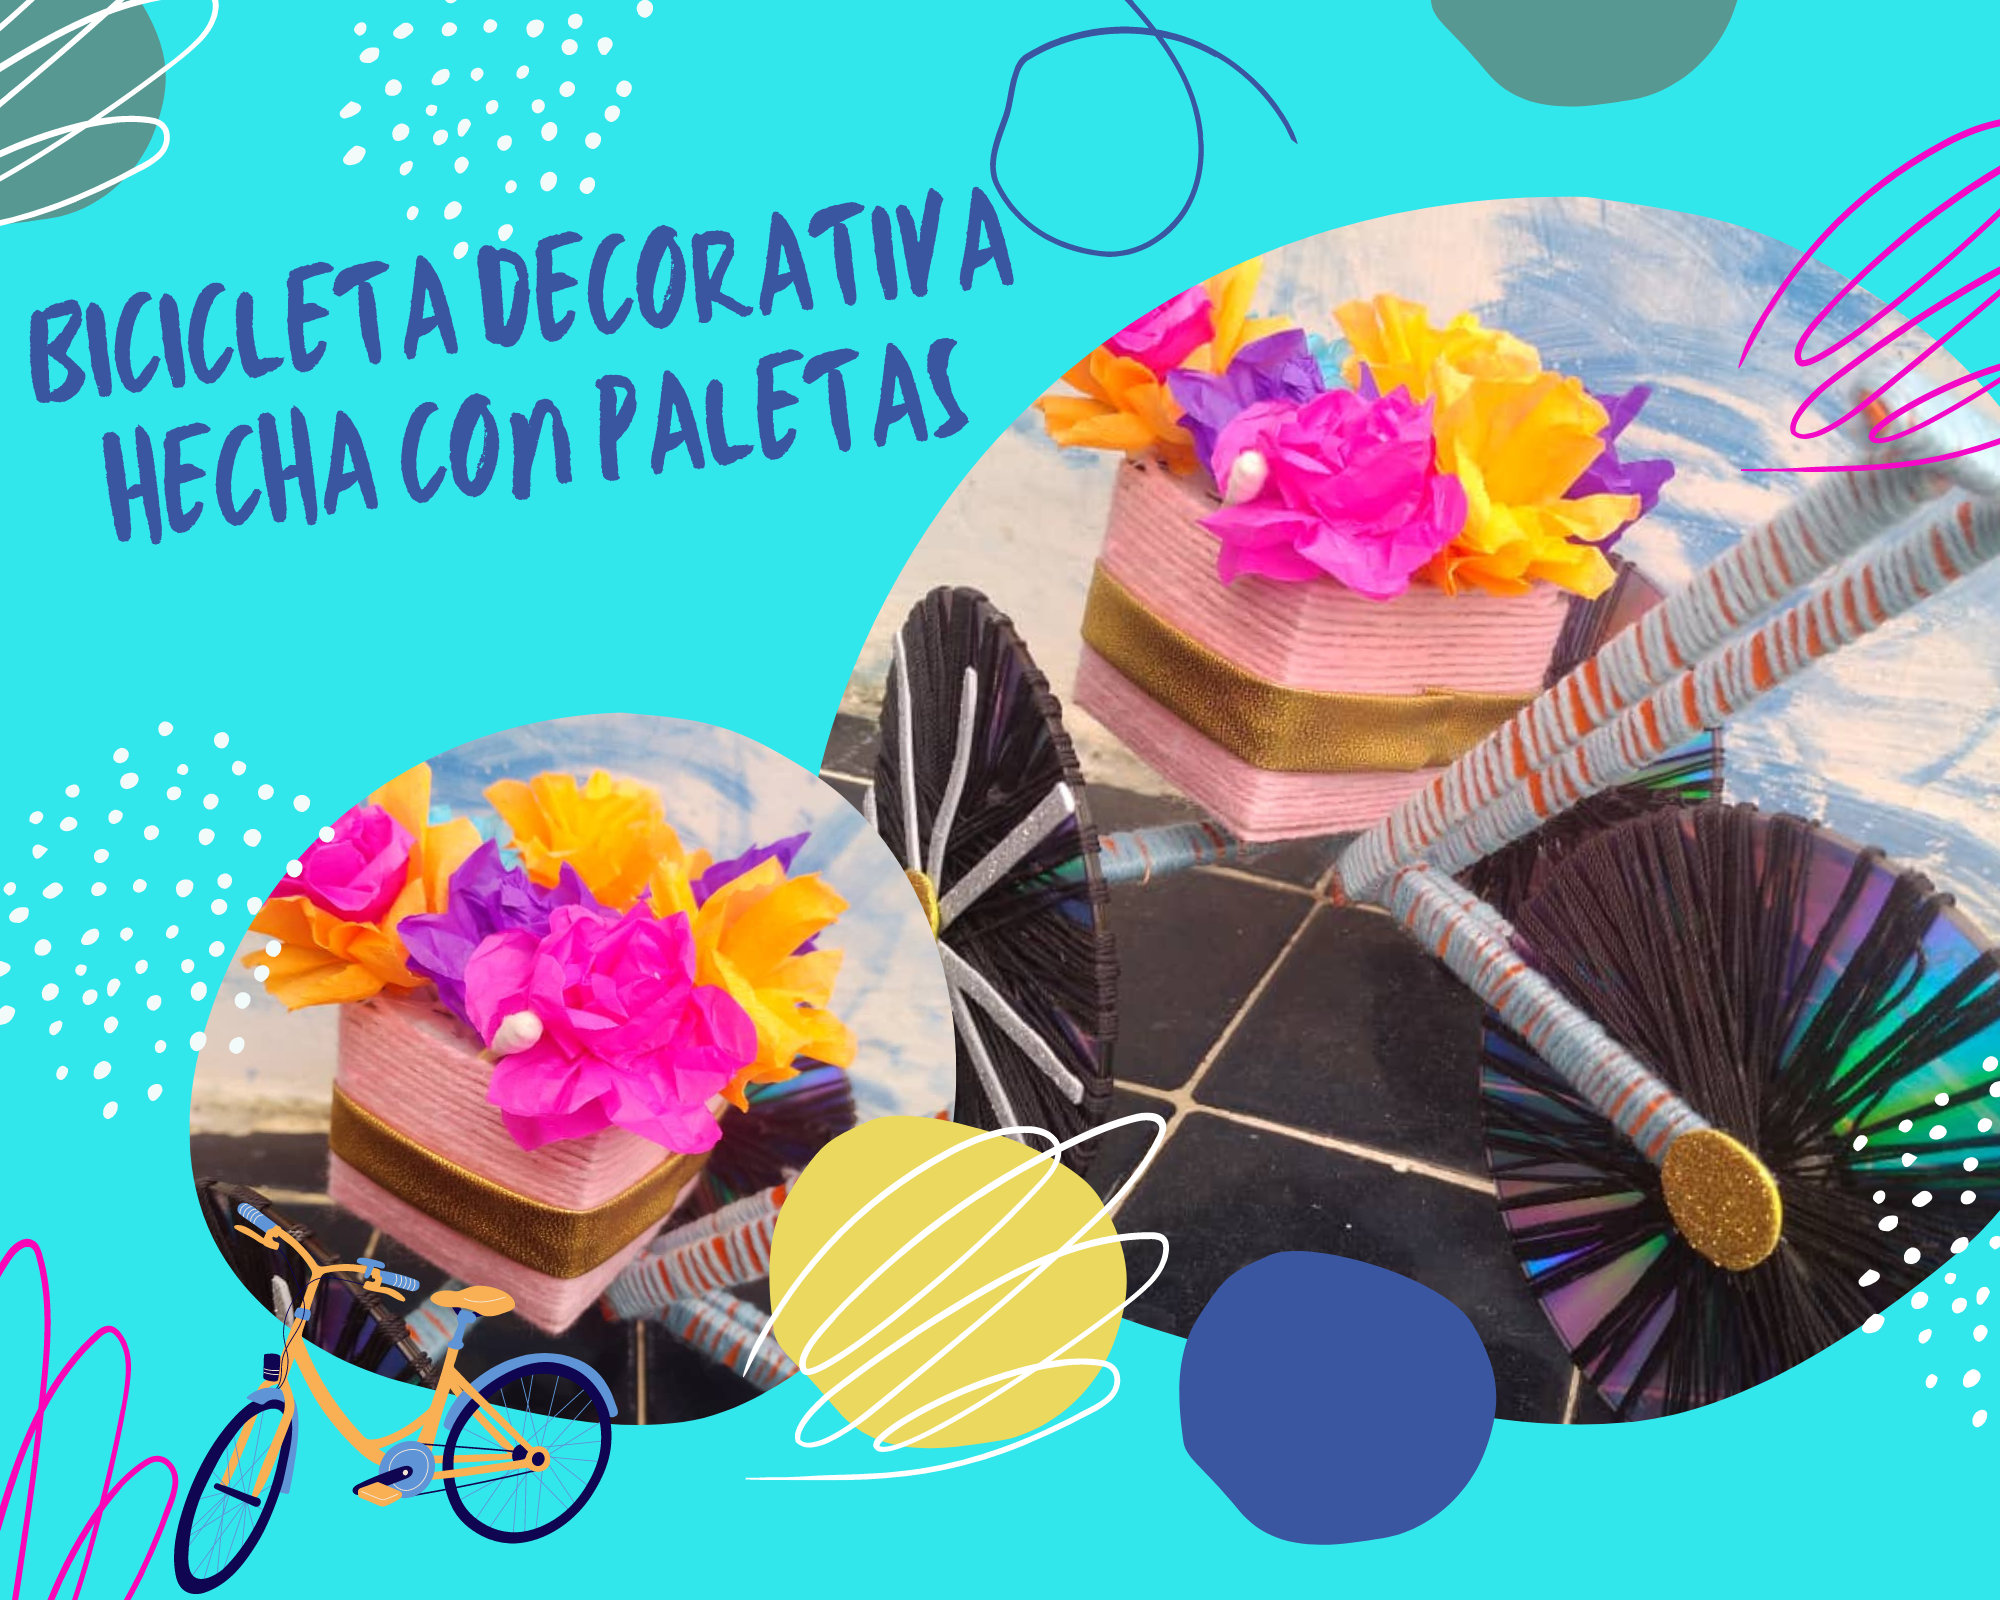
Desde hace un tiempo he querido hacer pequeñas cosas decorativas, de las que se puedan colocar como centro de mesa, o una simple decoración en un estante. Por eso, se me ocurrió hacer una linda bicicleta hecha con paletas y CD’s viejos. Me encanta llevar mi creatividad hasta otros lados, y no hay mejor forma de hacerlo, más que cuando usamos pequeñas cosas que ya tenemos en nuestro hogar y las reutilizamos. Así que les mostrare paso a paso como lo realice.
For some time I have wanted to make small decorative things, which can be placed as a centerpiece, or a simple decoration on a shelf. So it occurred to me to make a nice bicycle made out of old pallets and CDs. I love taking my creativity to other places, and there is no better way to do it, more than when we use small things that we already have in our home and reuse them. So I will show you step by step how to do it.

- 6 CD’s viejos
- Paletas de cualquier color
- Estambre de color azul y rosado
- Cartulina
- Silicón
- 6 old CDs
- Palettes of any color
- Blue and pink stamen
- Cardboard
- Silicon
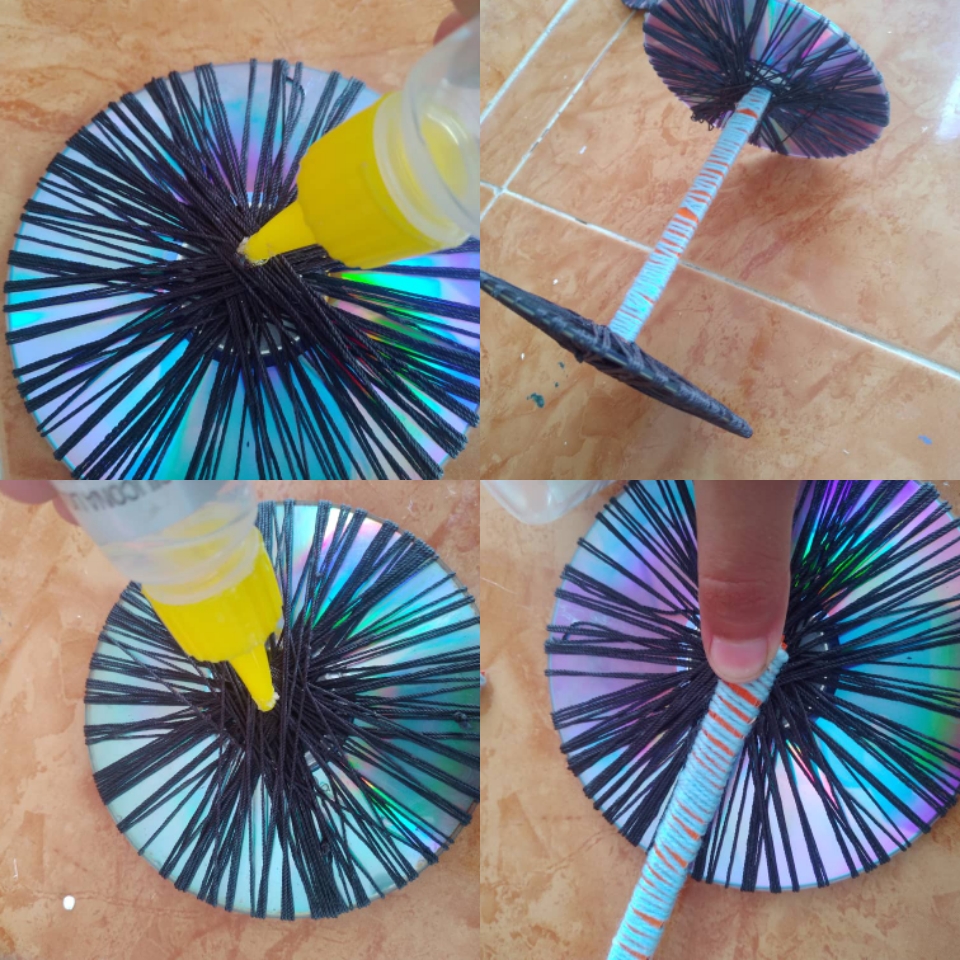
1✨
Tomamos dos cd, y con silicón los pegamos, dejando solo a la vista la parte que es cómo tornasol. Hacemos el mismo procedimiento con el resto hasta que nos queden 3 cd, los cuales sean las ruedas.
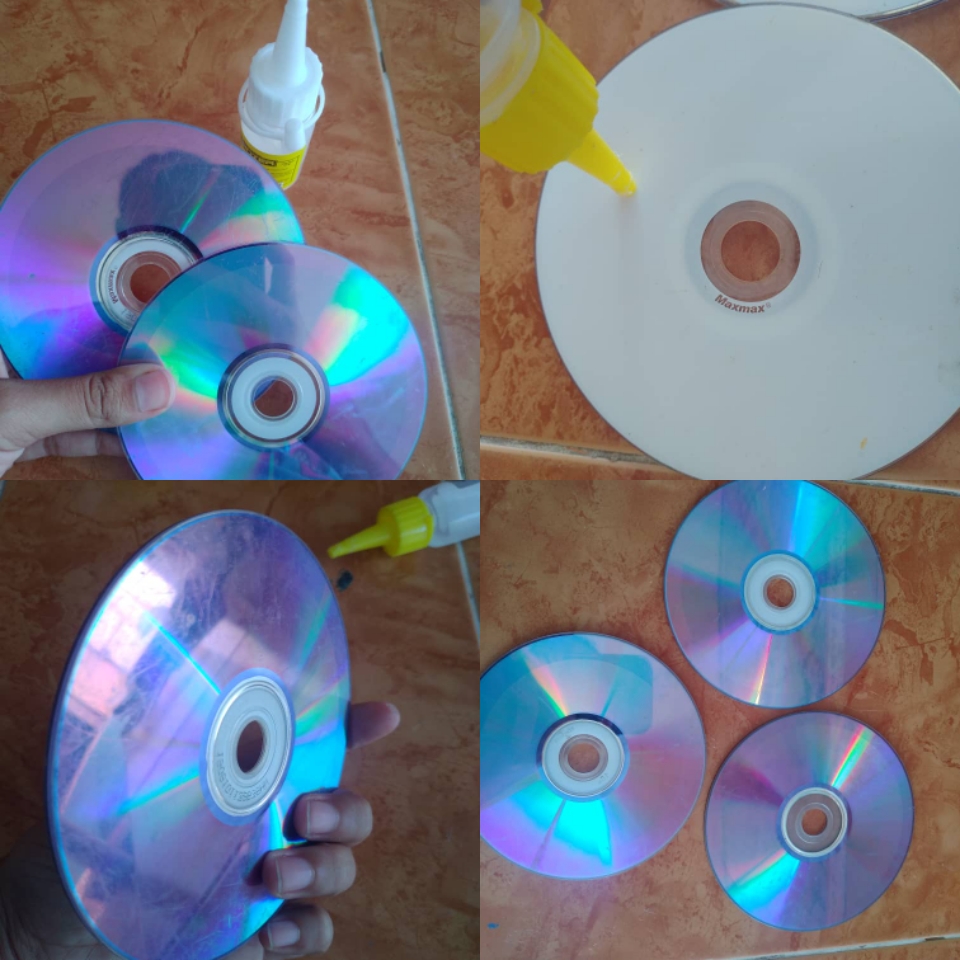
We take two CDs, and with silicone we glue them, leaving only the part that is like litmus visible. We do the same procedure with the rest until we have 3 cd left, which are the wheels.
2✨
Echamos un poco de silicón en uno de los lados del CD, y pegamos un extremo del hilo negro; con cuidado empezamos a enrollar éste alrededor hasta que nos quede un franja. Del mismo modo seguimos rodeando el cd con franjas de hilo que estén distanciadas entre sí. Y ya que estén cubiertas, cortamos y pegamos el otro extremos del hilo con silicón, luego procedemos a separar el hilo entre cada franja para que se cubra por completo, hasta que nos quede de este modo.
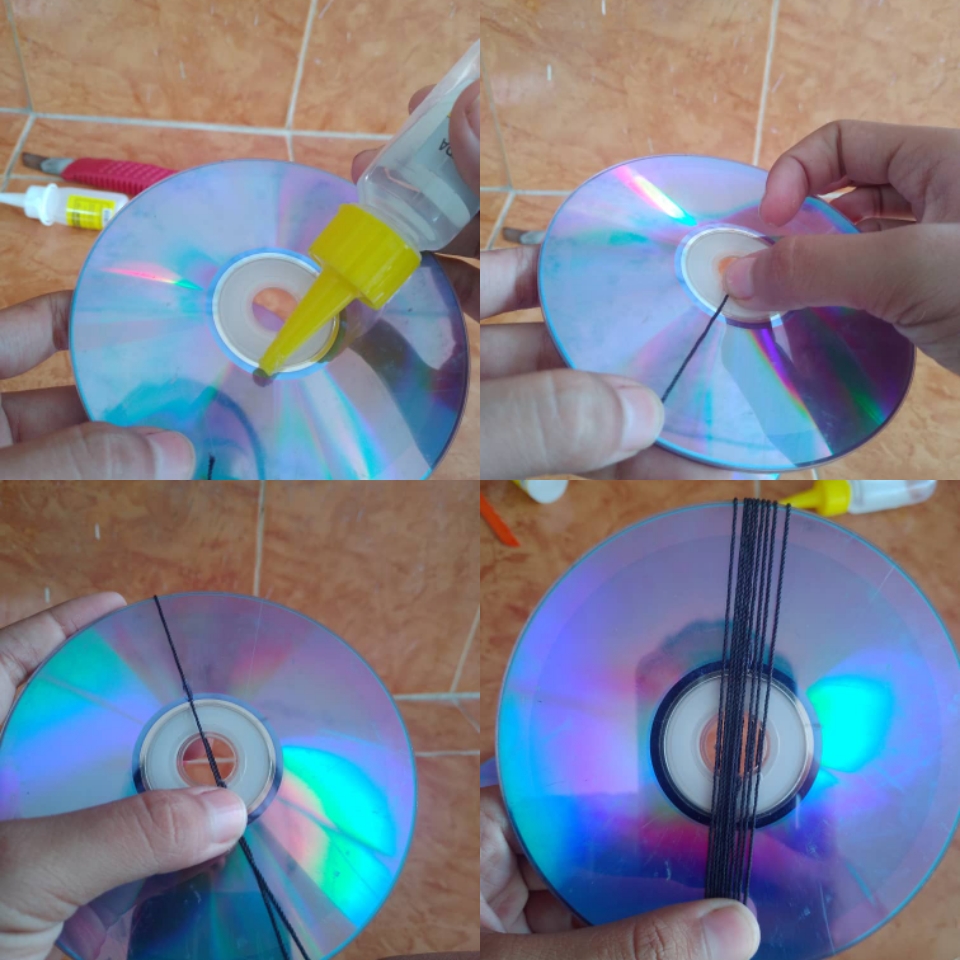
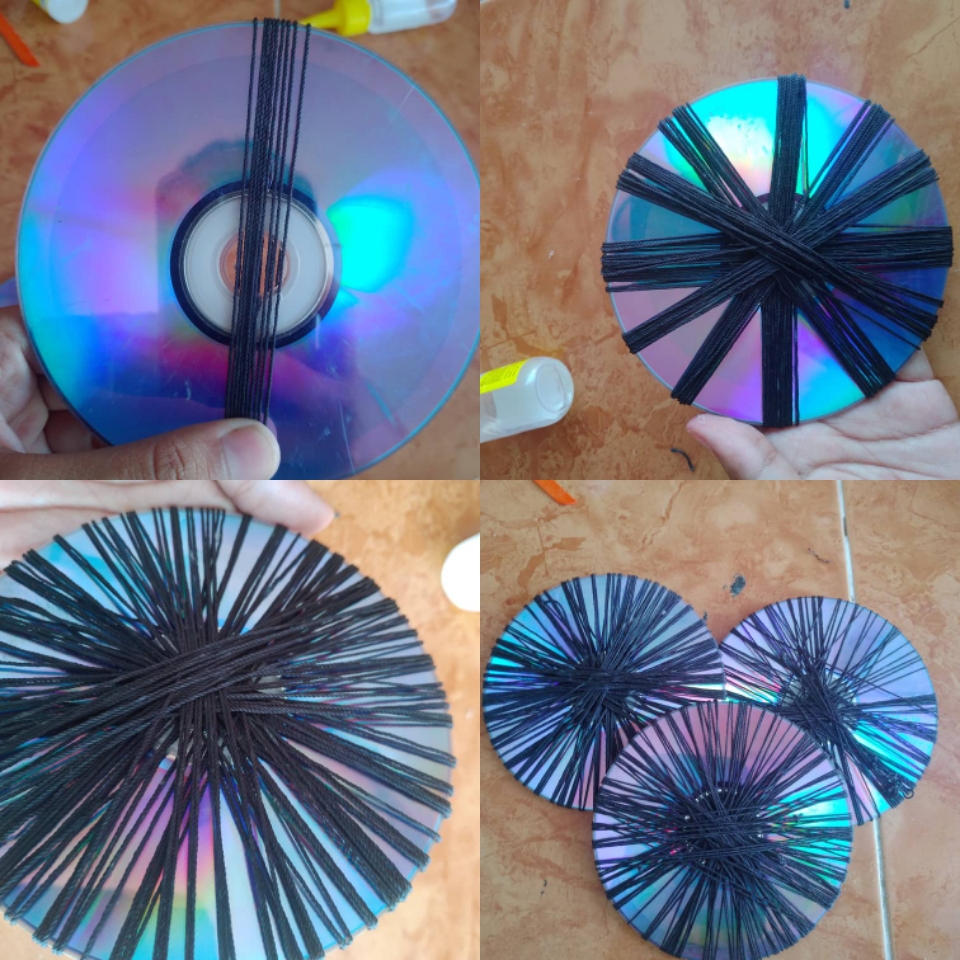
We put a little silicone on one of the sides of the cd, and we glued one end of the black thread; carefully we begin to roll this one around until we have a strip. In the same way, we continue to surround the cd with strips of thread that are spaced from each other. And since they are covered, we cut and glue the other ends of the thread with silicone, then we proceed to separate the thread between each strip so that it is completely covered, until we are left in this way
3✨
Procedemos a cubrir dos paletas unidas con estambre, las cuales serán nada menos que la estructura de nuestra bicicleta. En mi caso, las paletas que tenía eran muy gruesas, así que con un exacto las dividí a la mitad, pero si ustedes tienes unas más delgadas, no hace falta.
En total deberán ser 6 tiras cubiertas, las cuales una de ella será más pequeña.
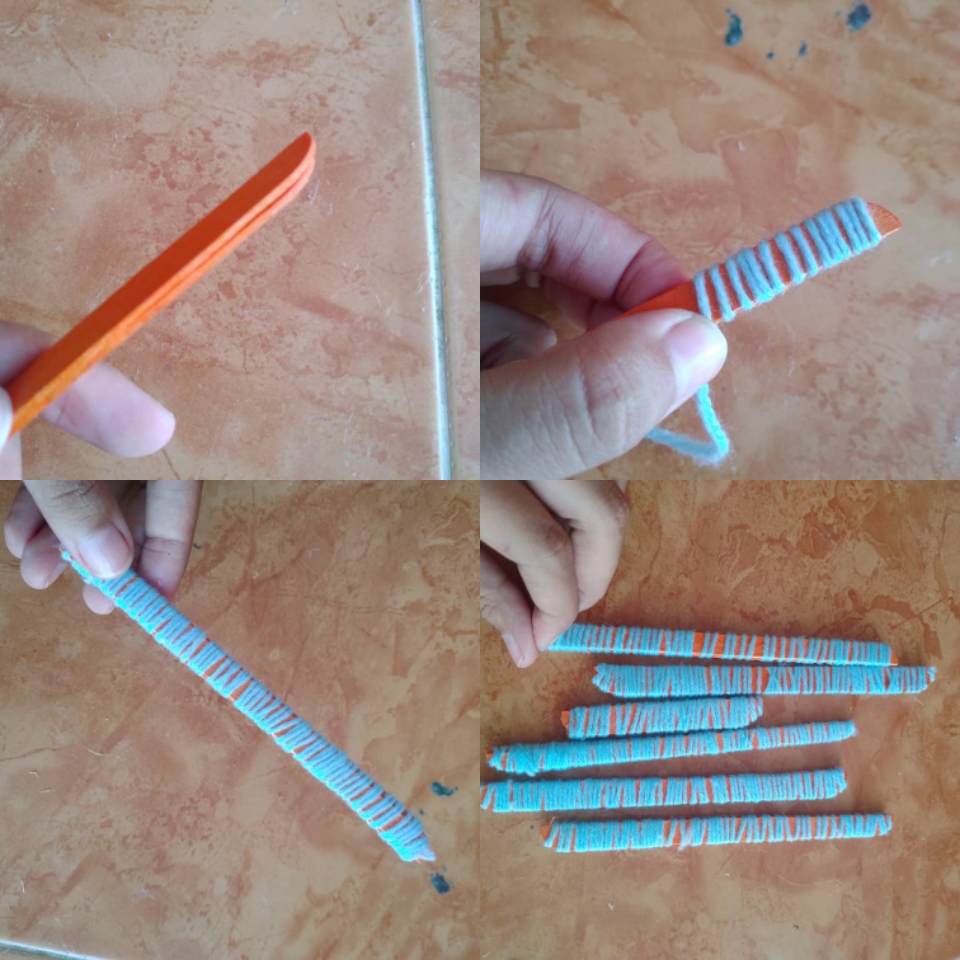
We proceed to cover two pallets joined with yarn, which will be nothing less than the structure of our bicycle. In my case, the palettes I had were very thick, so with an exact one I divided them in half, but if you have thinner ones, it is not necessary.
_In total there should be 6 covered strips, one of which will be smaller.:
4✨
Ahora llego la hora de armar todas las piezas. Incrustamos una de las paletas en el orificio de un cd, colocando uno a cada extremo de esta y lo reforzamos con silicón. Luego, procedemos a pegar dos paletas a cada lado del cd restante hasta que nos quede de esta forma.
Now it's time to put all the pieces together. We embed one of the paddles in the hole of a cd, placing one at each end of it and reinforcing it with silicone. Then, we proceed to paste two paddles on each side of the remaining CD until it is this way.
5✨
Con cuidado unimos las dos estructuras hasta que están tenga un soporte, y por ultimo pegamos lo que será el volante de la bicicleta, uniendo dos paletas en cada lado de la base, y así colocamos la paleta más pequeña en la parte superior con silicón.
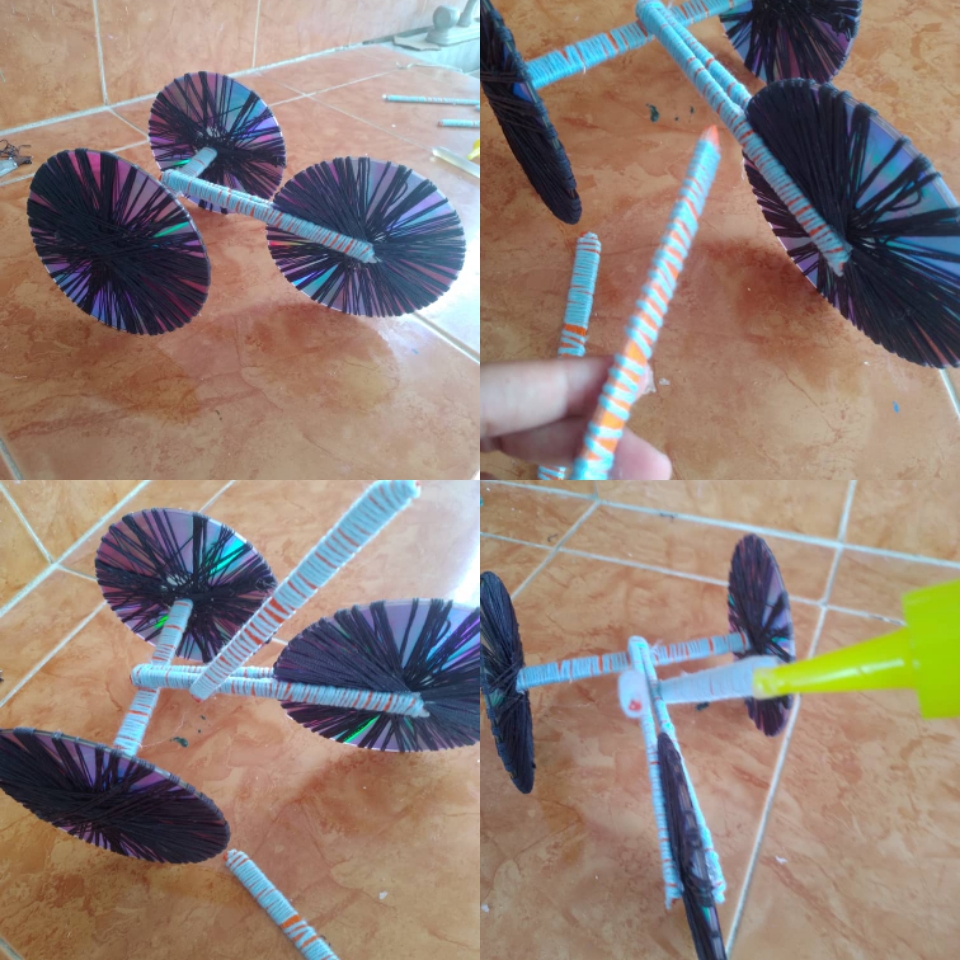
Carefully join the two structures until they are on a support, and finally we glue what will be the wheel of the bicycle, joining two pallets on each side of the base, and thus we place the smallest pallet on top with silicone
6✨
En el caso de la canasta, hacemos una cajita con cartulina y la forramos con estambre rosado, decoramos con una tira dorada y la pegamos en la base. Solo nos queda dar los toque finales, los cuales serán dependiendo de lo que más les guste. En mi caso decidí poner en la cesta unas pequeñas flores de papel crepe, y decorar las ruedas con Foami.
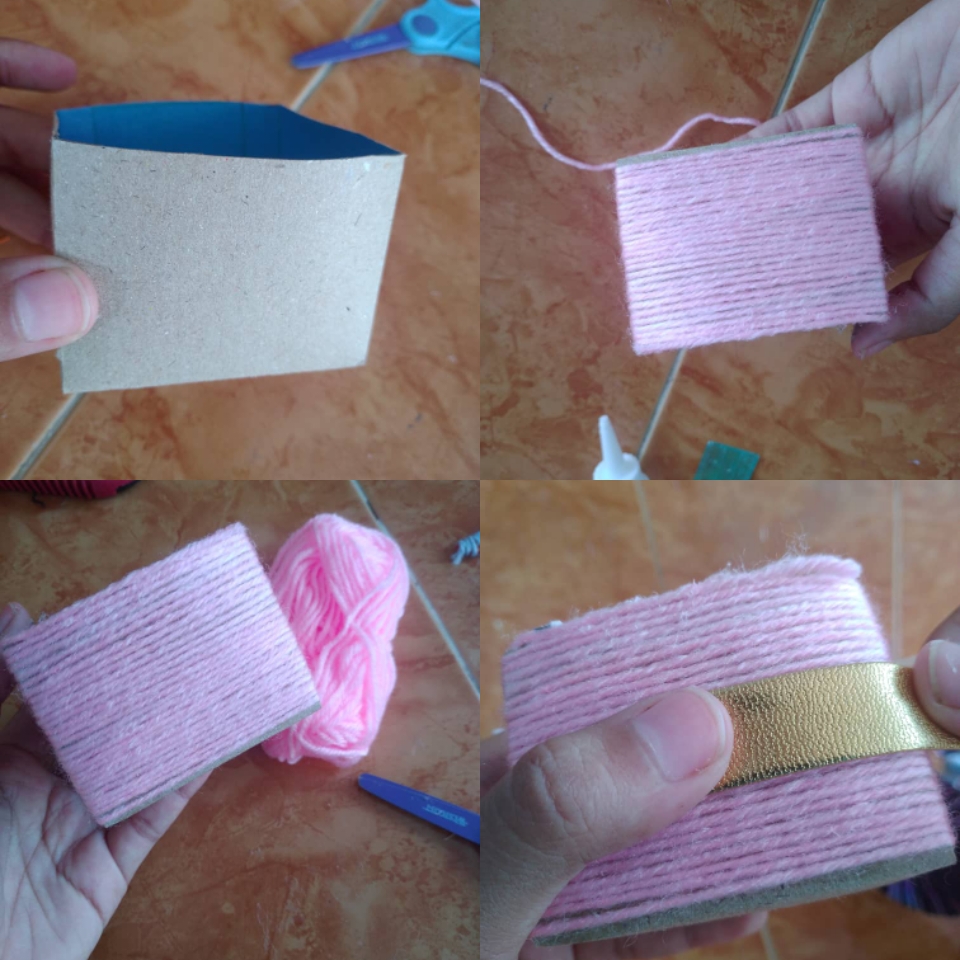
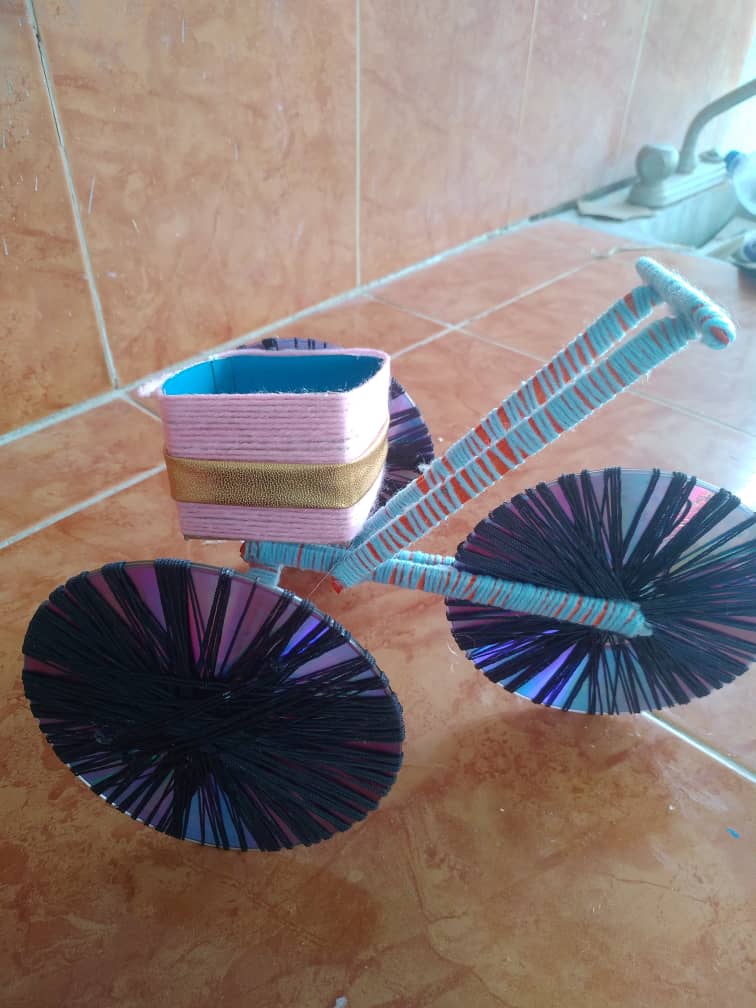
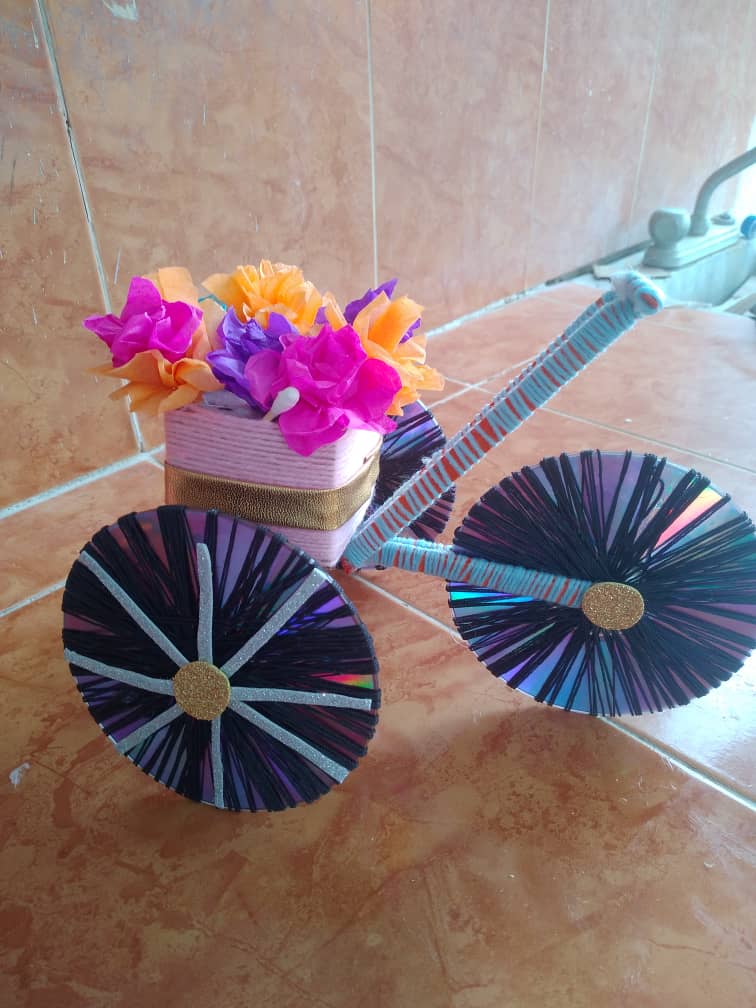
In the case of the basket, we make a box with cardboard and line it with pink yarn, decorate with a golden strip and glue it to the base. We only have to give the final touches, which will be depending on the ones you like the most. In my case, I decided to put some small crepe paper flowers in the basket, and decorate the wheels with Foami.
Y listo, así nos quedó nuestra pequeña bicicleta decorativa.
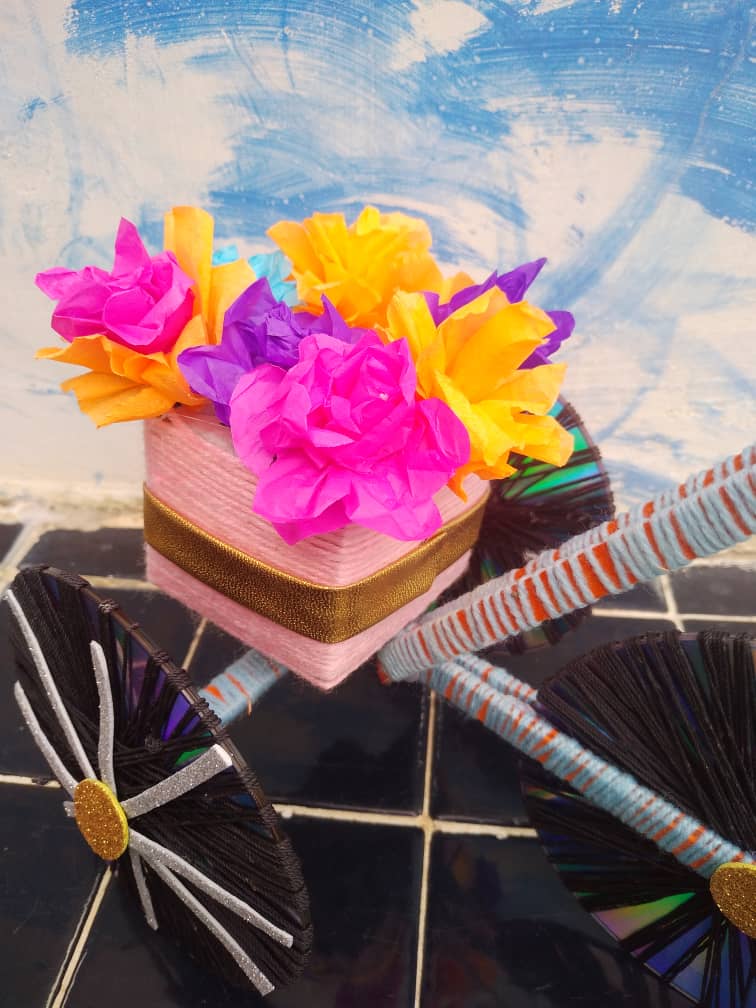
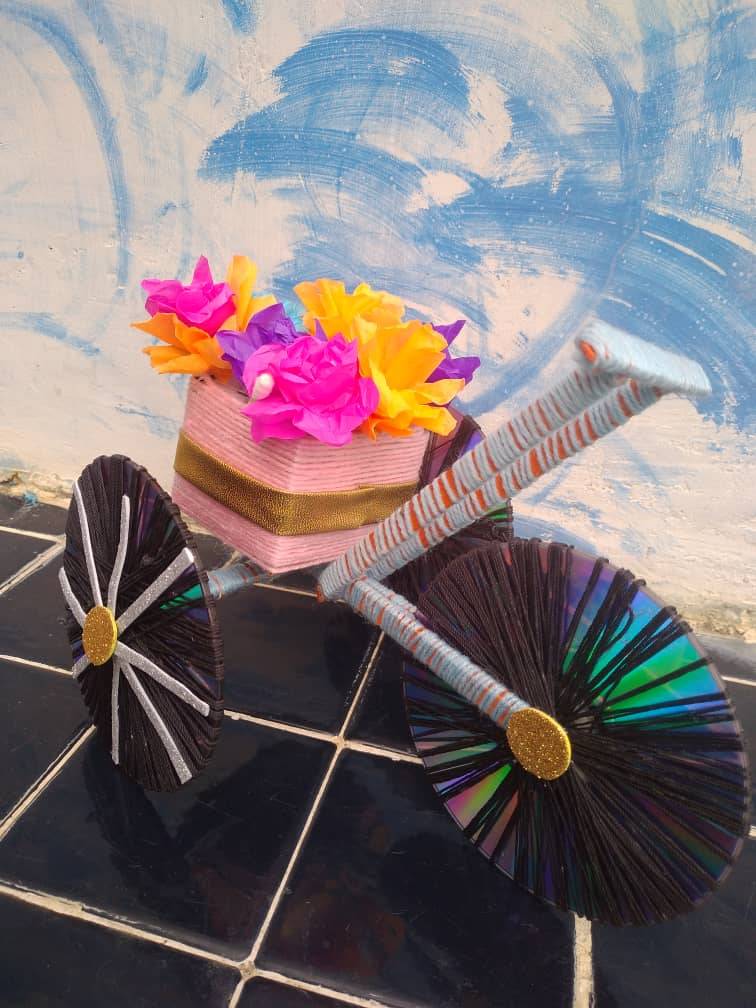
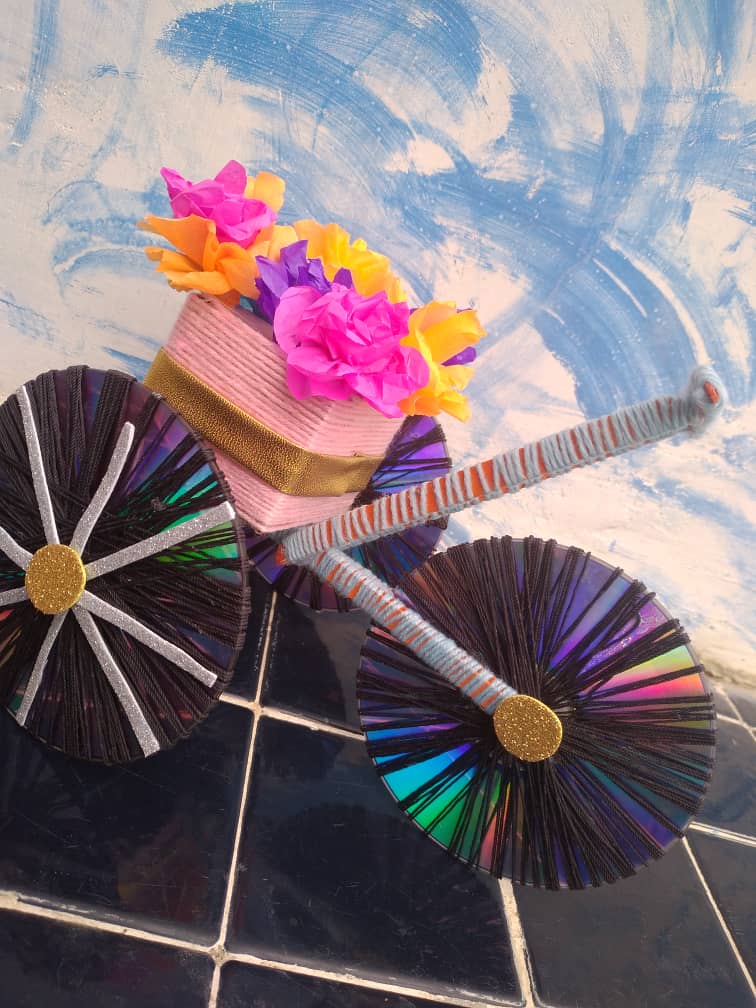
And voila, that's how we got our little decorative bike.
Esta es una forma muy creativa de usar cosas que quizás nos estorban, pero que podemos darle una vuelta diferente, y crear algo tan sencillo como esta decoración.
This is a very creative way of using things that may get in the way, but that we can give it a different spin, and create something as simple as this decoration.
✨Espero que este post sea de su agrado y que ustedes puedan hacer una igual en sus casas.✨
I hope this post is to your liking and that you can make one like it at home.
Congratulations @michell02! You have completed the following achievement on the Hive blockchain and have been rewarded with new badge(s) :
Your next target is to reach 1500 upvotes.
You can view your badges on your board and compare yourself to others in the Ranking
If you no longer want to receive notifications, reply to this comment with the word
STOPCheck out the last post from @hivebuzz:
Support the HiveBuzz project. Vote for our proposal!
Me encantó te quedó espectacular @michell02, felicidades. Gracias por compartir tu lindo trabajo! Saludos.
Me alegra mucho que te haya gustado! Saludos 😍😍