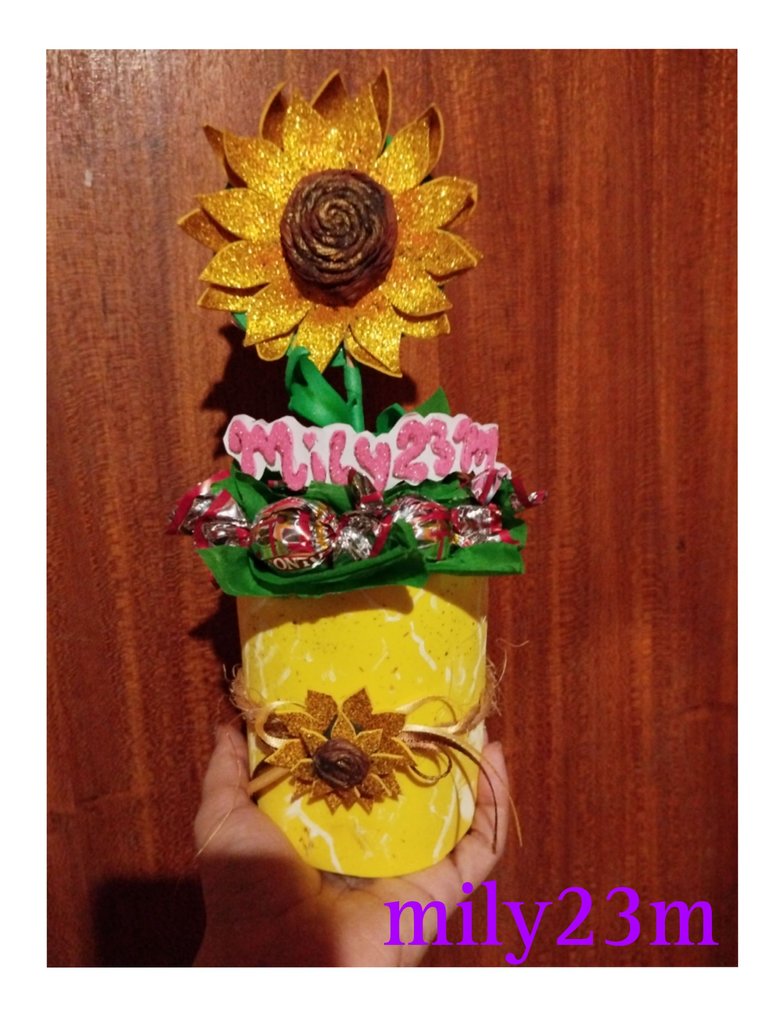
Hola amigos de la comunidad DIY y Crafter's, el día de hoy les traigo mi entrada para #activate creando + para el día de las madres , en una de las actividades programadas por la comunidad con el fin de incentivar a la comunidad y a la creatividad para esta fecha súper importante como lo es el día de las madres, así que poniéndome manos a la obra y con el tiempo ⏱️ contando , saque este pequeño dulcero / arreglito de forma de girasol 🌻, con una especie de macetita en foami, así que manos a la obra 🖤. Ya había hecho una versión así antes y me gustó como me quedo ,así que me inspire para recrearlo en una nueva versión más sencilla ,y con el macetero desde cero,y una versión diferente del girasol en 3D.
Materiales.
- Foami dorado escarchado.
- foami amarillo.
- Foami verde.
-palillo de altura.
-Cartulina.
-Tijera,regla y compás.
-Papel crepe verde y marrón.
-pistola de silicón, y barritas de silicón.
-pintura negra y dorada.
-cintas para decorar.
🌻Manos a la obra !🌻
Hello friends of the DIY and Crafter's community, today I bring you my entry to get active creating + for Mother's Day ,in one of the activities planned by the community in order to encourage the community and creativity for this date super important as Mother's Day is, so I got to work and with time ⏱️ counting, I took out this little candy box / Sunflower-shaped arrangement 🌻, with a kind of foam pot, so let's get to work 🖤.I had already made a version like this before and I liked how it turned out, so it inspired me to recreate it in a new, simpler version,,and with the flowerpot from scratch,and a different version of the 3D sunflower.
Materials.
- Frosted gold foam.
- yellow foam.
- Green foami.
-Scissors, ruler and compass.
-Green and brown crepe paper.
-silicone gun, and silicone bars.
-black and gold paint.
-ribbons to decorate.
🌻Let's get to work!🌻
( )
)
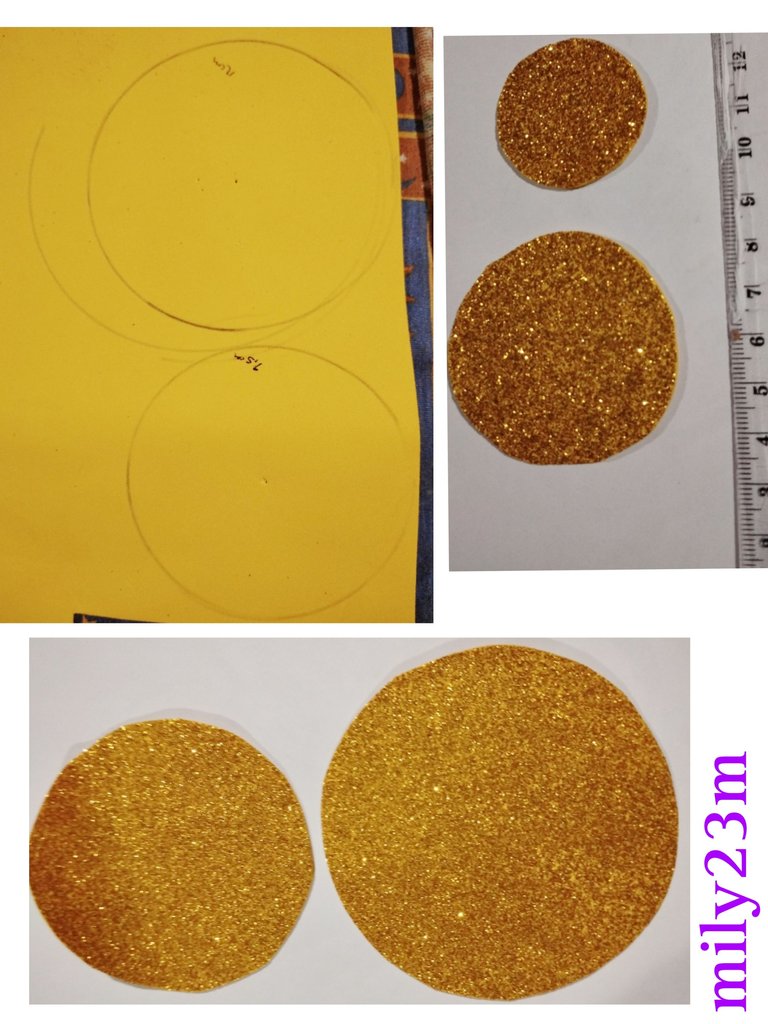
#1.Como primer paso , usé un foami dorado escarchado , también les sirve uno amarillo escarchado ,por la parte de atrás del Foami, con ayuda de un compás, hice un círculo de 9.5 cm de diámetro ( este será la flor interna) , y otro de 12 cm, este será el de afuera, estos formarán el girasol ,de un tamaño mediano,También hice otros dos más pequeños ,uno de 5 cm y otro de 3,5 cm, está serán para formar el girasol pequeño, y los recorté.
#1.As a first step, use a frosted gold foam, a frosted yellow one also works on the back of the Foami, With the help of a compass, I made a circle 9.5 cm in diameter (this will be the internal flower), and another 12 cm, this will be the outer one, these will form the sunflower,, of a medium size, I also made two other smaller ones, one of 5 cm and another of 3.5 cm, these will be to form the small sunflower, and I cut them out.
( )
)
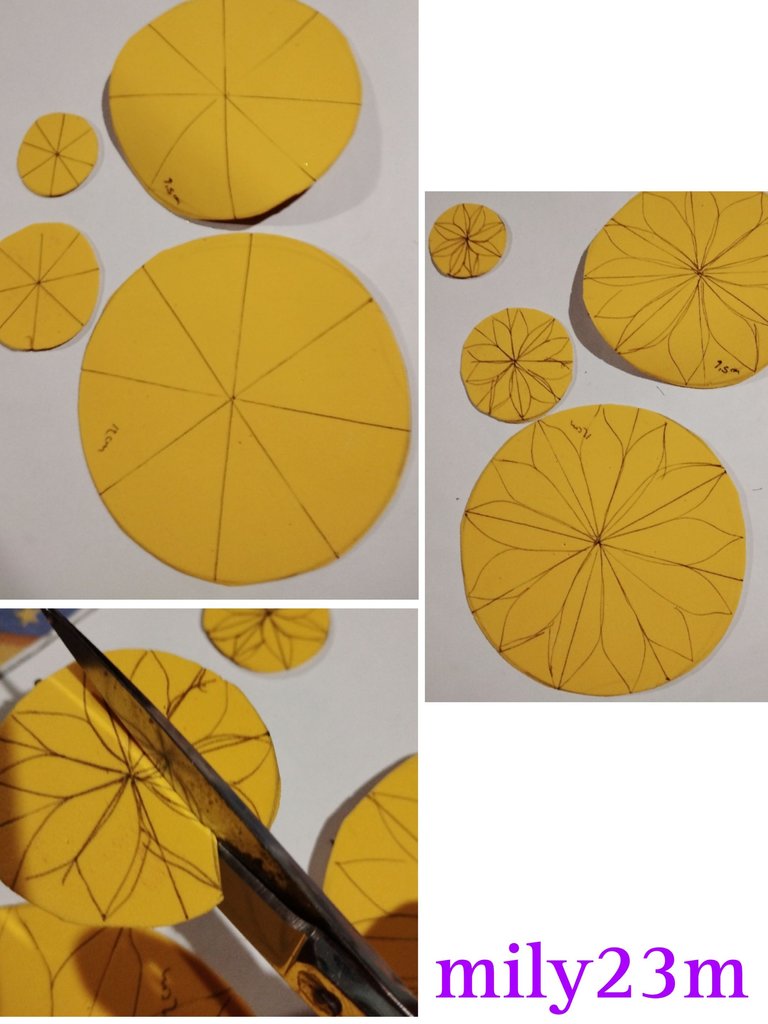
#2.Para ayudarme a hacer la forma de la flor , hice una línea a través de todo el diámetro del círculo, con una línea vertical ,una horizontal, y luego otros dos líneas diagonales, así quedará como en las imágenes, de esta forma se hacen más fácil poder repartir los pétalos de forma iguales ,luego marqué los pétalos ,como pueden ver en las fotos no los hice todo perfectos, ya que mientras voy cortando los pétalos no todos me quedan 100% iguales ,y de igual forma al momento de usar calor estos no quedarán tan simétricos.
#2.To help me make the flower shape, I made a line across the entire diameter of the circle, with one vertical line, one horizontal, and then another two diagonal lines, This is how it will look like in the images, in this way it becomes easier to distribute the petals equally, then mark the petals,As you can see in the photos I did not make them all perfect, since while I am cutting the petals not all of them are 100% the same,and likewise when using heat these will not be as symmetrical.
( )

 )
)
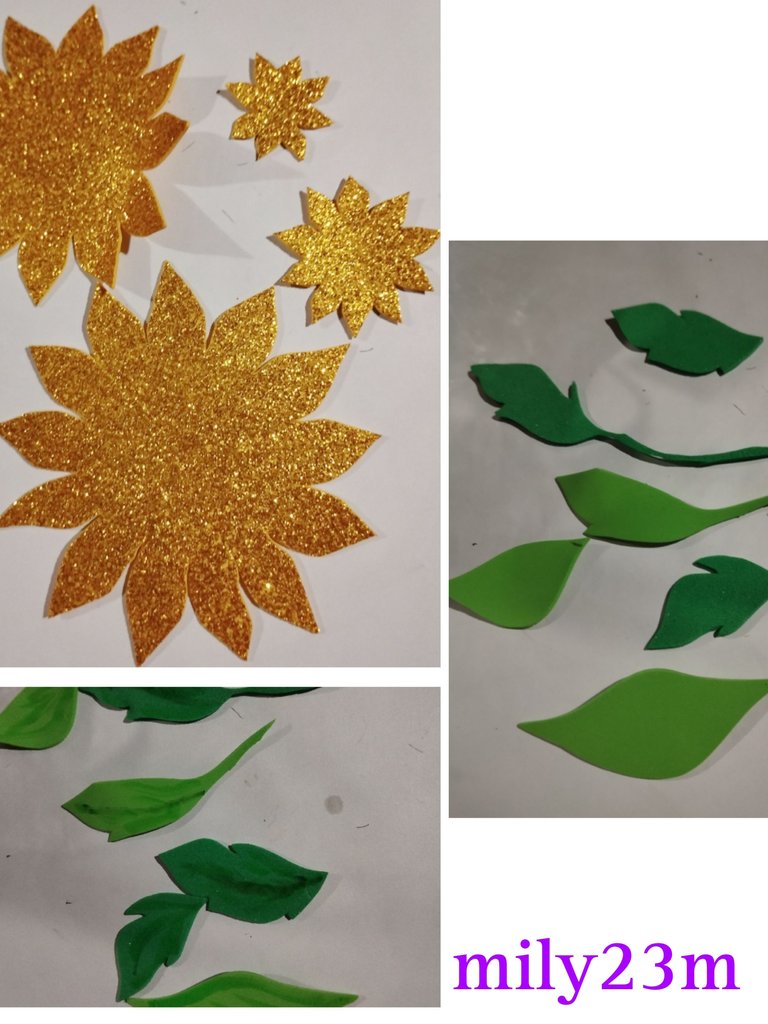
#3.Como pueden ver en la imagen ,así quedan las flores una vez recortadas, también hice con retazos de foami verdes una hojitas , y las pinte con un poco de color de acuarelas ,para hacerle algunas líneas imitando como las venitas de la hoja.Con una plancha de ropa, le aplique calor a las flores y las hojas , esto hacé que se encojan un poco las piezas ,pero le darán movimiento y mejor aspecto a las flores. Utilizando un lápiz de color naranja de acuarela ,le hice a las flores una raya en cada pétalo , y con un pincel 🖌️ humedecido lo difumine, también con un marcador negro hice pequeños puntitos , alrededor del centro de la flor ,esto es para dar un aspecto más realista a la flor y que no se vea tan plana y sencilla.
#3.As you can see in the image, the little flowers look like this once cut out, I also made little leaves with pieces of green foam,and I painted them with a little watercolor color, to make some lines imitating the veins of the leaf.With a clothes iron, apply heat to the flowers and leaves, this causes the pieces to shrink a little, but will give movement and a better appearance to the flowers. Using an orange watercolor pencil, I made a stripe on each petal on the flowers, and with a moistened brush 🖌️ I blended it,Also with a black marker I made small dots around the center of the flower, this is to give a more realistic appearance to the flower and not make it look so flat and simple.
( )
)
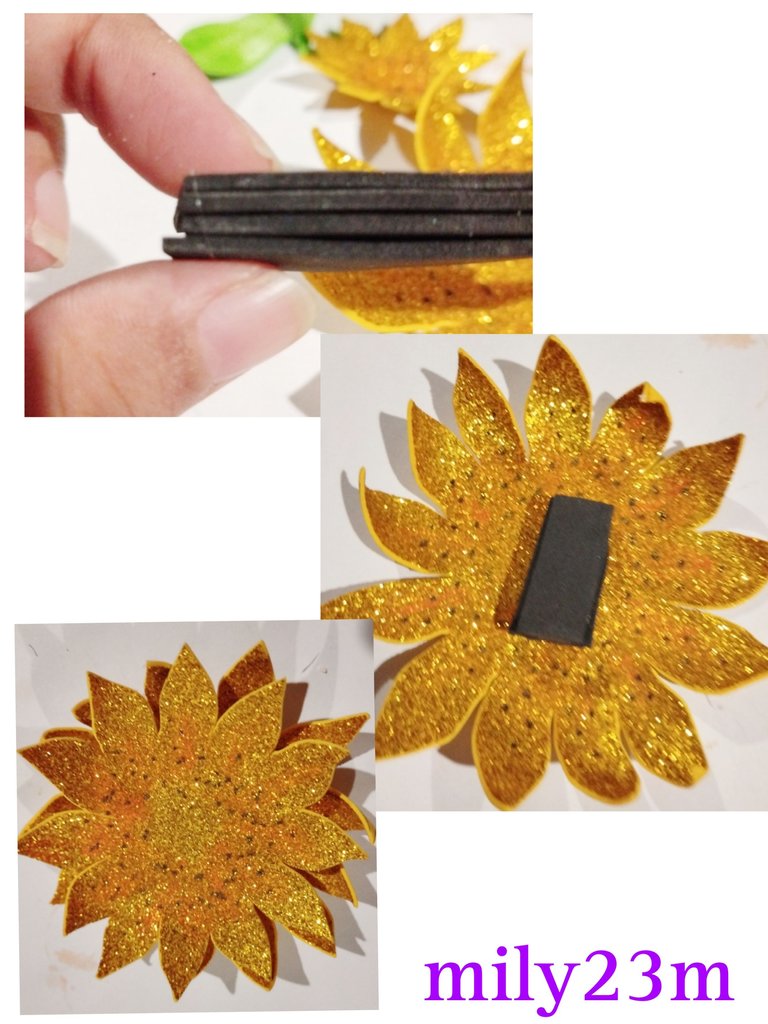
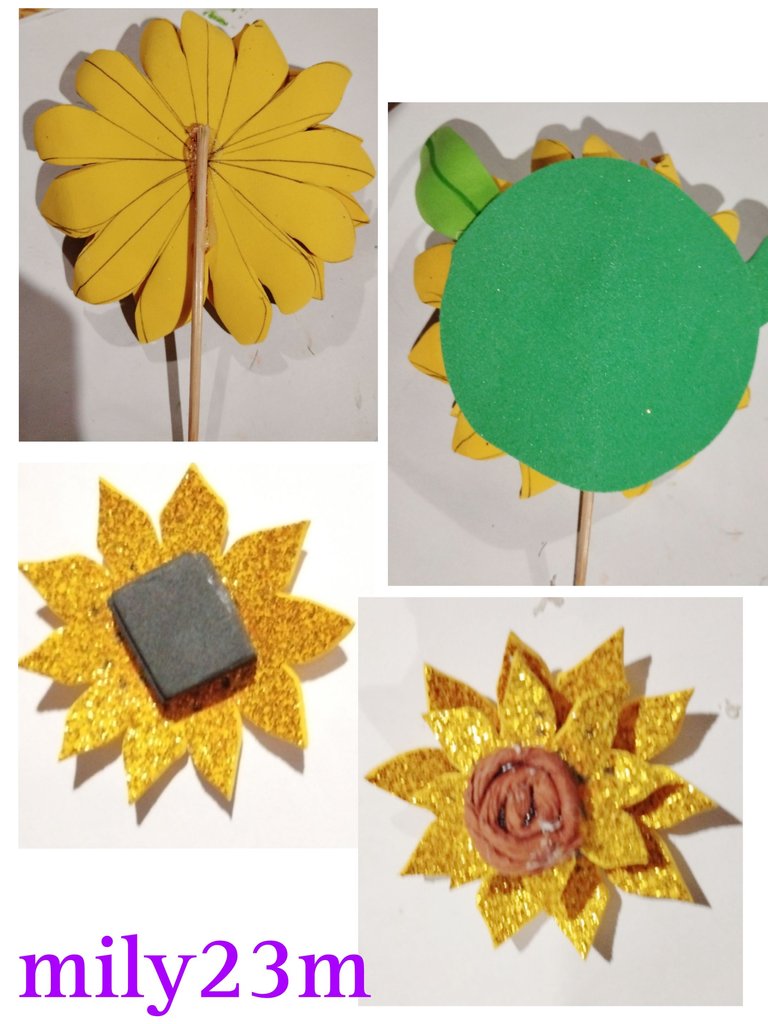
#4. Con un retazo de foami negro,corté unos rectángulos ,y pegue cuatro de estos uno encima de otro, esto servirá como una especie de separador para darle un efecto 3D a la flor, este separador lo pegué en todo el centro de la flor , y luego pegué con silicón caliente la flor más pequeña.
#4. With a piece of black foam, I cut some rectangles, and glued four of these one on top of the other,This will serve as a kind of separator to give a 3D effect to the flower, I glued this separator throughout the center of the flower,and then I glued the smaller flower with hot silicone.
( )
)
( )
)
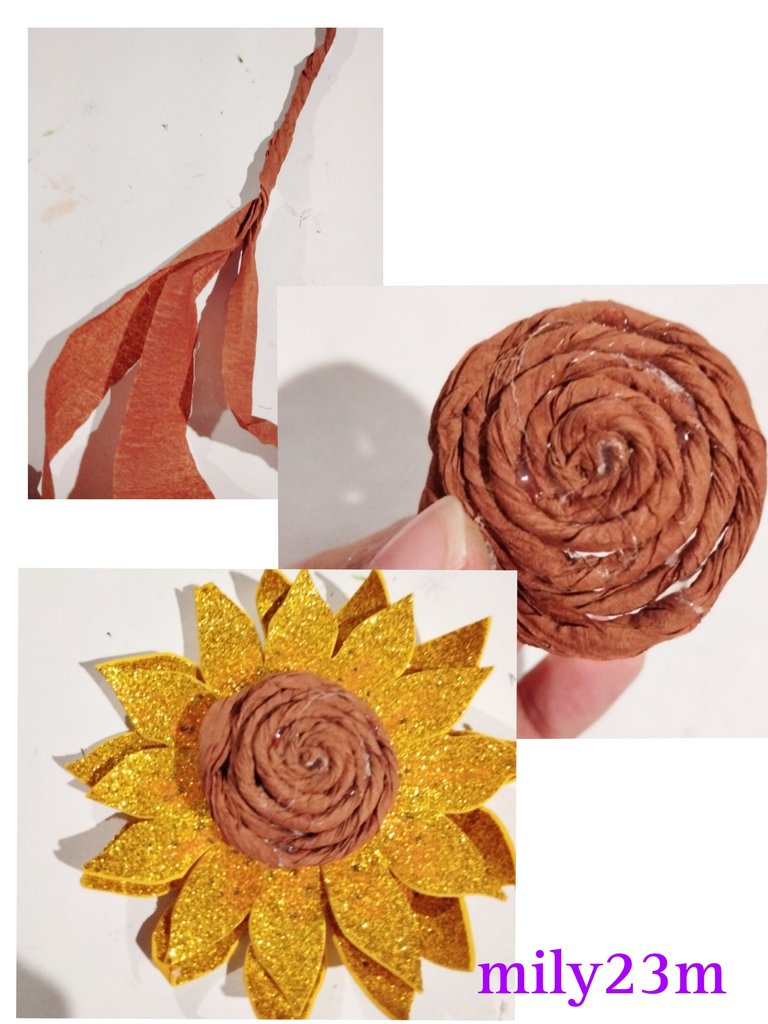
#5.Con papel crepé de color marrón, corte una tira larga y empecé a enrollarlo y apretarlo, esto para crear una especie de "cordón " ,luego empecé a enrollarlo para formar un círculo 🛞,si ven en la fotos , usé silicón caliente y quedaron algunos restos, pero esto se disimulará más adelante con pintura, una vez hecho este circulito lo pegue al centro de la flor .
Para el cuerpo de la flor,use un palito de altura, pegando la flor por la parte de atrás, para disimular la parte de atrás y qué quede mejor , con foami verde corte un círculo y lo usé para tapar la unión del palillo y la flor. Para la flor pequeña también use un separador para elevar la flor del medio, e hice otro centro marrón para la flor pequeña.
#5.With brown crepe paper, I cut a long strip and began to roll it and tighten it, this to create a kind of "cord",then I started to roll it to form a circle 🛞, if you see in the photos, I used hot silicone and there were some remains, but this will be hidden later with paint,but this will be hidden later with paint, once this little circle is made I glue it to the center of the flower.
For the body of the flower, use a tall stick, gluing the flower on the back, to hide the back and make it look better, With green foam I cut a circle and used it to cover the union of the toothpick and the flower. For the small flower I also used a spacer to elevate the middle flower, and made another brown center for the small flower.
( )
)
( )
)
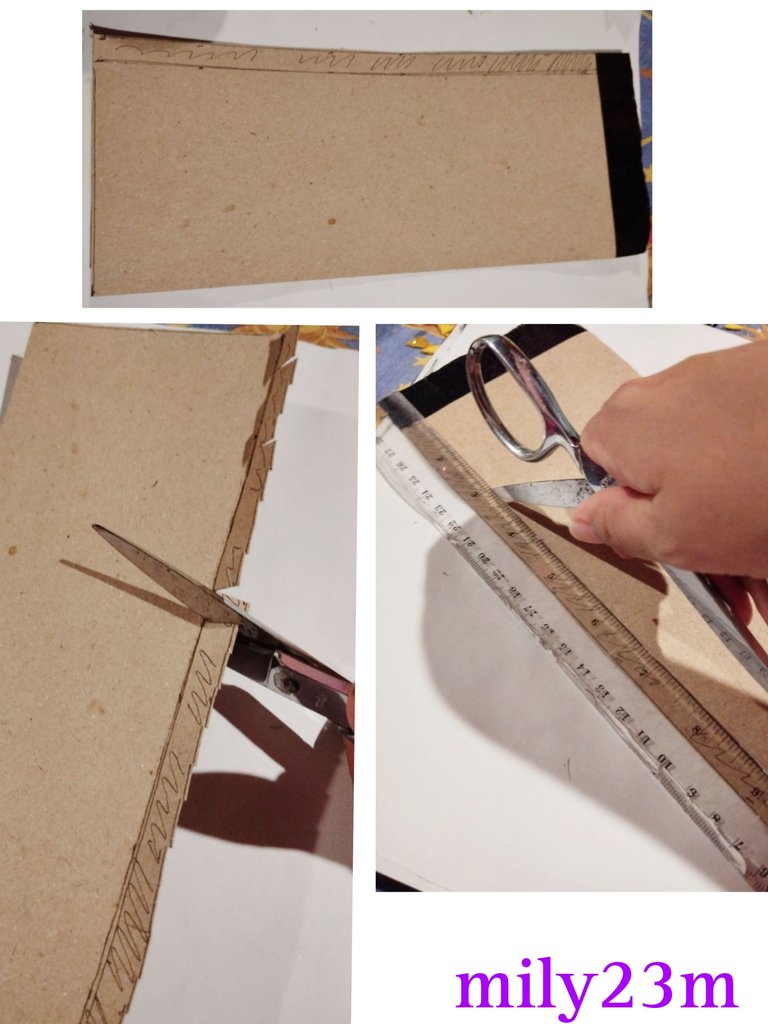
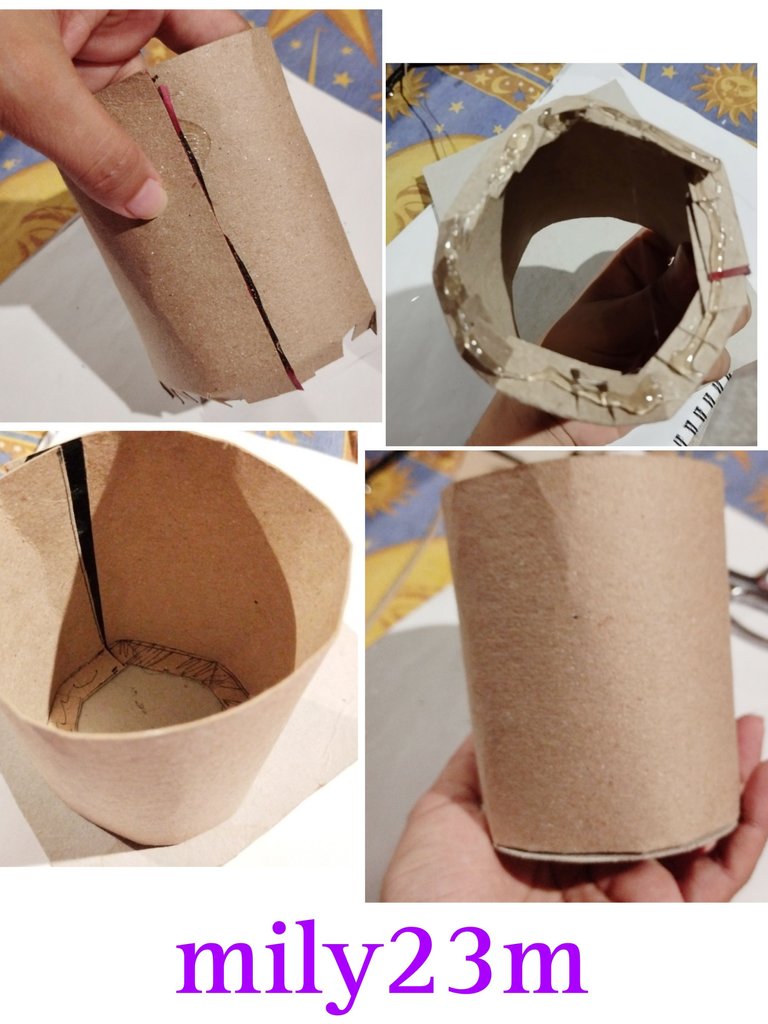
#6.Con cartulina (use material reciclado,la parte de atrás de un block ) marqué la altura que quería para el jarrón o maceta, marqué 11 cm de altura ,y use el largo completo del cartón ,pero tú lo puedes hacer del tamaño que quieras.Marqué una división de un centímetro, al final de la cartulina, con una tijera, hice presión a la división de un centímetro, como se ve en las fotos ,esto es para que sea más fácil crear un doblez en la cartulina, y con la tijera corté esta pestaña,haciendo ranuras,esto hará que al doblar la cartulina para hacer el cilindro , sea mucho más fácil de que tome la forma y pegarlo ,lo pegué a una pieza de cartón para hacer el fondo ,y luego recorté todo alrededor para que quede un círculo prolijo.
#6.With cardboard (use recycled material, the back of a block) I marked the height I wanted for the vase or pot, I marked 11 cm high,and use the full length of the cardboard, but you can make it any size you want. Mark a division of one centimeter, at the end of the cardboard, with scissors,I made pressure at the division of one centimeter, as seen in the photos, this is to make it easier to create a fold in the cardboard, and with the scissors I cut this tab,making slots, this will make it much easier to take the shape and glue it when folding the cardboard to make the cylinder,I glued it to a piece of cardboard to make the background, and then cut out everything around it so that it was a neat circle.
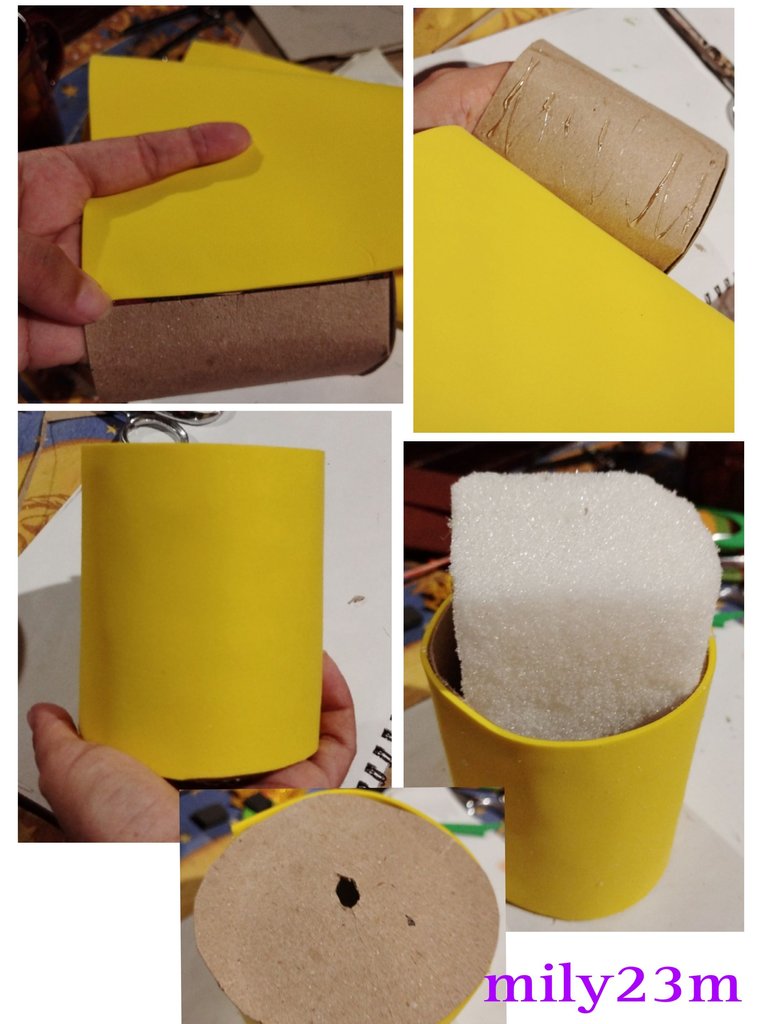
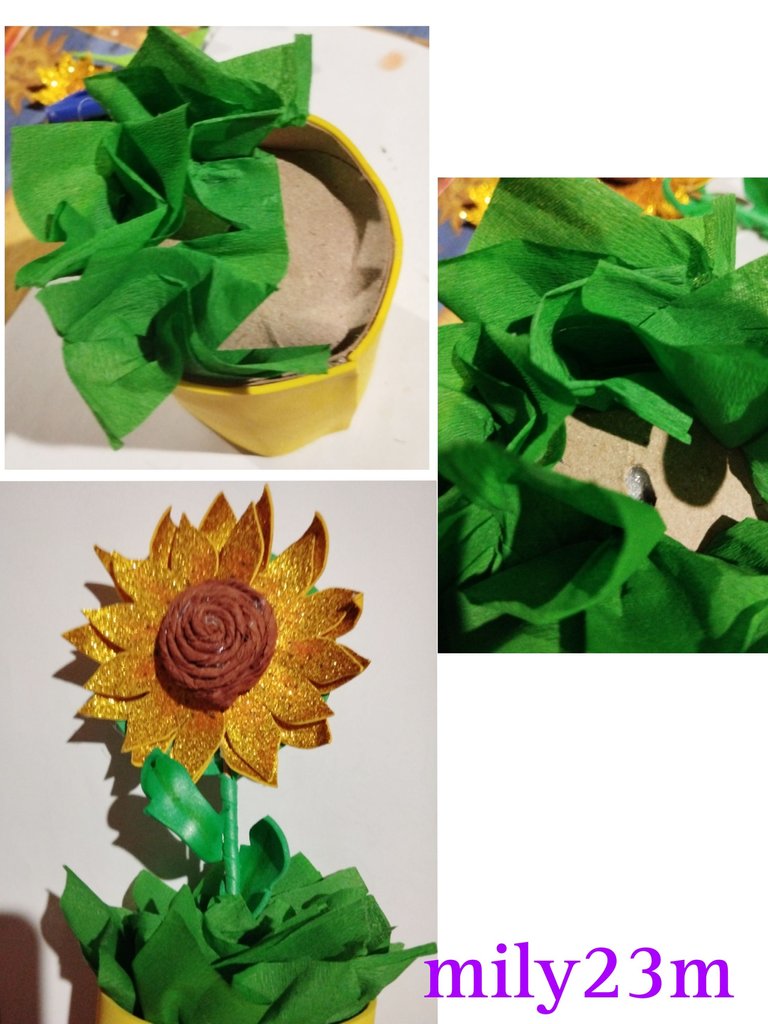
#7.Con foami amarillo forré el cilindro de cartón ,una vez forrado , le puse un aním adentro, y corté un círculo de la cartulina con la que hice la estructura , al centro le abrí un huequito un poco grande justo en el medio ,por aquí pasará el palito de la flor,en este círculo de cartulina con papel crepé color verde , pegué pequeñas decoraciones a modo de pañuelos para tapar el fondo del círculo y dar la ilusion de un pasto.Hice 5 de estos pañuelitos y los pegue alrededor del círculo de cartulina,y al agregué uno al centro cercano al agujero 🕳️ del medio para taparlo.Con una tira larga de foami verde forré el palito de altura, y le puse dos hojitas para decorar.
#7.With yellow foam I lined the cardboard cylinder, once lined, I put an anime inside, and cut a circle from the cardboard with which I made the structure,In the center I opened a little big hole right in the middle, the flower stick will pass through here, in this circle of cardboard with green crepe paper,I glued small decorations like handkerchiefs to cover the bottom of the circle and give the illusion of a grass.I made 5 of these handkerchiefs and glued them around the cardboard circle, and added one to the center near the hole 🕳️ in the middle to cover it.With a long strip of green foam I lined the tall stick, and put two little leaves on it to decorate.
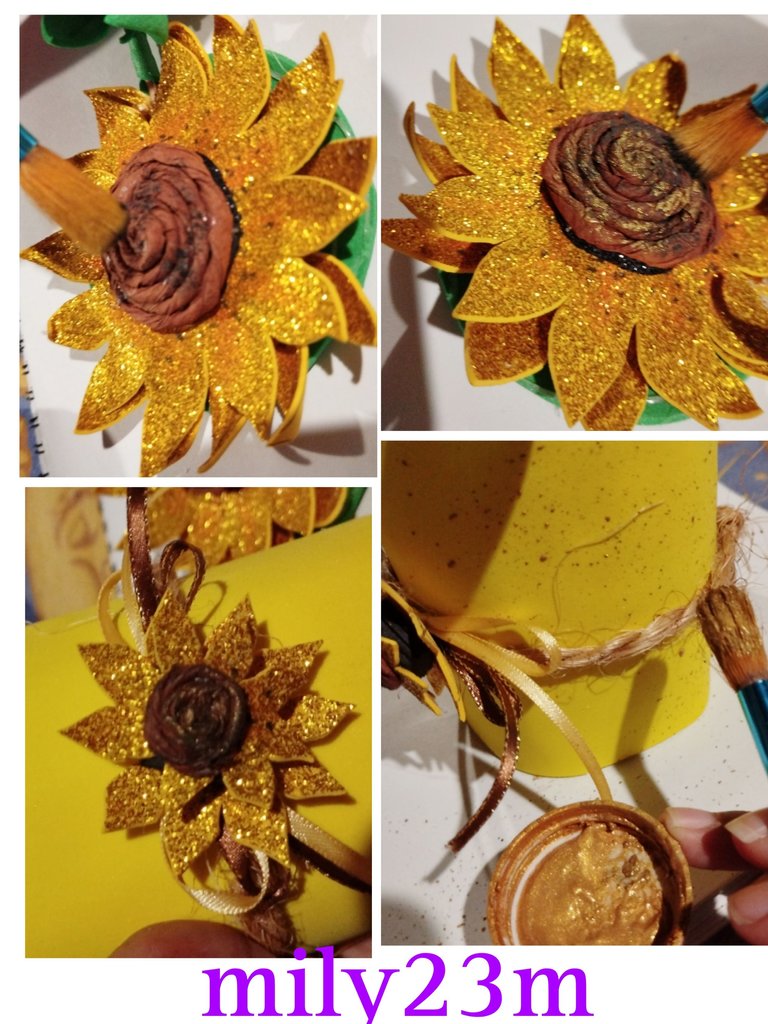
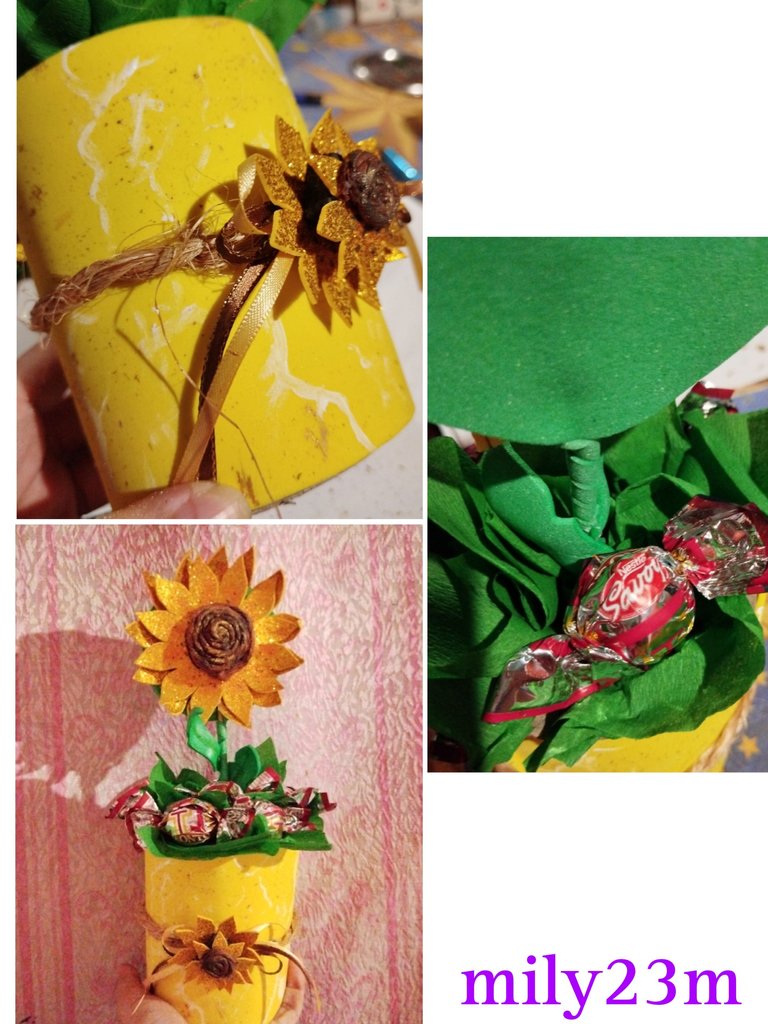
#8.Con un pincel tomé pintura negra y la descargué en una servilleta, de forma qué con el pincel seco le dí pequeños toques en el centro de la flor ,una vez seco , con un pincel dorado hice el mismo proceso , dando pequeños toques, esto es para darle un toqué metálico y que se vea más bonito los centros de las flores.Decoré el contornos de la maceta , con una cinta de mecatillo, y le agregué un lacito, luego pegué el girasol pequeño en medio de este. Con la pintura dorada y un pincel salpiqué todo el contorno del envase, también con un pincel muy fino y con pintura blanca agregué unos pequeños " rayones " esto para darle un aspecto de cerámica, jeje no quedo tan bien ,pero me gustó el diseño,una especie de mármol.Le agregué unos bombones ( torontos unos chocolates venezolanos que me encantan) y los pegué a la decoración de pasto.
Y listo ya quedaría el resultado final 🌻.
#8.With a brush I took black paint and poured it on a napkin, so that with the dry brush I gave small touches in the center of the flower, once dry,With a gold brush I did the same process, giving small touches, this is to give it a metallic touch and make the centers of the flowers look more beautiful. I decorated the contours of the pot with a string ribbon, and added a little bow, then I glued the small sunflower in the middle of it. With the gold paint and a brush I splashed all around the container, also with a very fine brush and with white paint I added some small "scratches"this to give it a ceramic look, hehe it didn't look so good, but I liked the design, a kind of marble. I added some chocolates (Torontos, some Venezuelan chocolates that I love) and I glued them to the grass decoration.
And the final result would be ready 🌻.
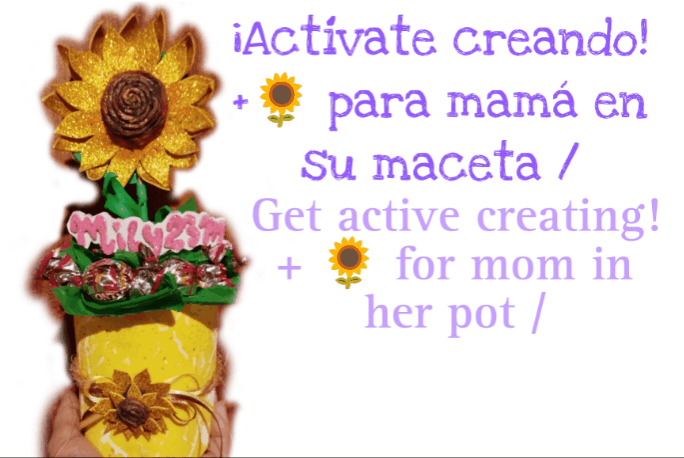
🌻Espero que les haya gustado está bastante largo ,pero les dejo las imágenes detalladas para que se guíen si quieren intentarlo , a mí me gustó mucho como quedó , fue divertido participar, aúnque lo hice con el tiempo corriendo,así que una disculpa.🌻
Un feliz día de las madres a todas esas mujeres hermosas y fuertes que nos han dado la vida y que cada día nos cuidan y nos aman💙 a mi mamita hermosa y todas las mamás 💙 feliz día de las madres 🌻 espero que pasen su día muy bien.
🌻Fotos tomadas por mi equipo Redmi note 12, editadas en Pics art y traducido en traductor Google translate, GIF creado en app editor de gif.🌻
🌻I hope you liked it, it's quite long, but I leave you the detailed images to guide you if you want to try it, I really liked how it turned out, it was fun to participate, even though I did it with time running out, so an apology.🌻
A happy Mother's Day to all those beautiful and strong women who have given us life and who take care of us and love us every day💙 to my beautiful mom and all the moms 💙 happy mothers day 🌻 I hope you have a great day.
🌻Photos taken by my Redmi note 12 team, edited in Pics art and translated in Google translate, GIF created in gif editor app.🌻

Muy bonito regalo 🎁 para mamá. 🙋🏻♀️❤️😌
Muchas gracias @creacioneslelys ☺️💙 y. Mi me encantó ese monedero con rosas que compartiste!
Has sido votado por
PROYECTO ENLACE
'Conectando Ideas y Comunidades'
PROYECTO ENLACE es un proyecto de curación de habla hispana enfocado en recompensar contenido de calidad y apoyar autores en su proceso de crecimiento en HIVE.
Creemos y apostamos por el futuro de esta gran plataforma, y estamos muy emocionados de poder hacerla crecer junto a esta comunidad. Así que te invitamos a publicar en nuestra COMUNIDAD y estar atento a todas las actividades que tenemos preparadas y que estaremos publicando en breve.
¿QUIERES AUTOMATIZAR TUS GANANCIAS DE CURACIÓN? SE PARTE DEL PROYECTO ENLACE APOYANDO A NUESTRO TRAIL EN HIVE.VOTE INGRESA AQUÍ PARA CONOCER LOS DETALLES.
¿QUIERES INVERTIR ENLACE? DESCUBRE COMO HACERLO Y GENERAR INGRESOS DE FORMA SEMANAL MEDIANTE TU DELEGACIÓN DE HP AQUÍ TE EXPLICAMOS COMO.
Te invitamos a participar en nuestro servidor de Discord: https://discord.gg/3S9y7BbWfS
Atentamente
EQUIPO ENLACE 2024
Muchas gracias por la consideración ☺️💙
Muchas gracias por considerar mi trabajo 💜😊 @yennysferm71 y @hivediy
Congratulations @mily23m! You have completed the following achievement on the Hive blockchain And have been rewarded with New badge(s)
Your next target is to reach 30 posts.
You can view your badges on your board and compare yourself to others in the Ranking
If you no longer want to receive notifications, reply to this comment with the word
STOPCheck out our last posts: