
💜✨💜✨💜✨💜✨💜✨💜✨💜✨💜✨
Hola comunidad de manualistas y artesanos💜, hoy les traigo un proyecto de maqueta escolar que me encargaron, y quería compartirles un poco del proceso , está era mi primera vez haciendo una maqueta de este tipo , de satélite y, no tenía mucha idea de como hacerlo quería que tratara que se viera muy fiel a la imagen y no como algo tan escolar , así que busque algunas imágenes que había por Google pero no me convencían mucho el resultado, a la final encontré una ilustración de ejemplo que si me gustó (fuente :https://www.gettyimages.es/ilustraciones/sat%C3%A9lite ) y trate un poco de imitar las partes, aquí les dejo un todas las fotos del paso a paso ,y no les miento fue un poco más difícil de lo que pensé que sería.

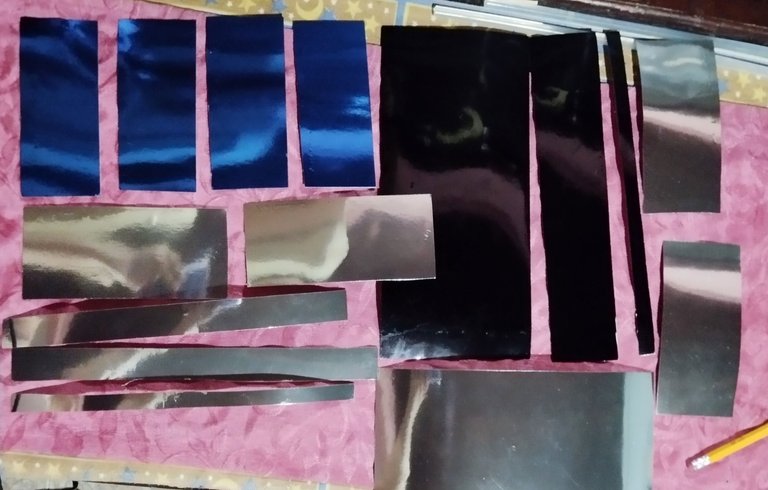
🛰️ Cartulina negra grande tipo espejo
🛰️ Cartulina azul tipo espejo
🛰️ Cartulina plateada tipo espejo
🛰️ Regla,tijera
🛰️ Silicón en barras y pistola de silicon
🛰️ Retazos de Foami negro
🛰️ Palitos de altura
🛰️ Pitillos de plástico para base de globos
🛰️ Tapa de envase reciclado
Manos a la obra
English Version
💜✨💜✨💜✨💜✨💜✨💜✨💜✨💜✨
Hello community of craftsmen and artisans💜, today I bring you a school model project that I was commissioned, and I wanted to share a little of the process with you, this was my first time making a model of this type, of a satellite, and I didn't have much idea of how to do it. I wanted it to try to make it look very faithful to the image and not like something so school-like, so I looked for some images that were on Google but I wasn't very convinced by the result, in the end I found an example illustration that I did like (source: https://www.gettyimages.es/ilustraciones/sat%C3%A9lite) and I tried a little to imitate the parts, here are all the step-by-step photos, and I'm not lying to you, it was a little more difficult than I I thought it would be.
🛰️ Large black mirrored cardstock
🛰️ Blue mirrored cardstock
🛰️ Silver mirrored cardstock
🛰️ Ruler, scissors
🛰️ Glue sticks and hot glue gun
🛰️ Black foam scraps
🛰️ Tall sticks
🛰️ Plastic straws for balloon bases
🛰️ Recycled container lid
Let's get to work

 |  |  |
 | 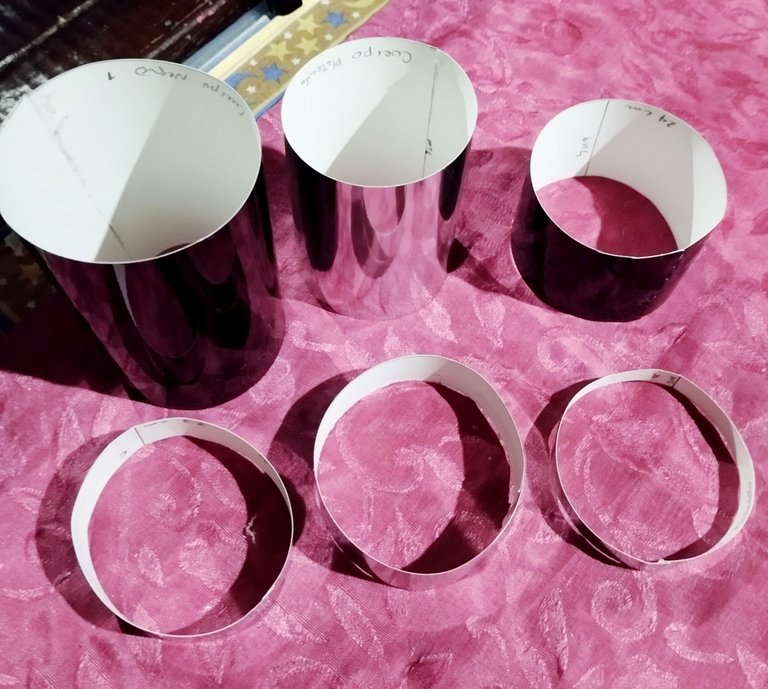 | 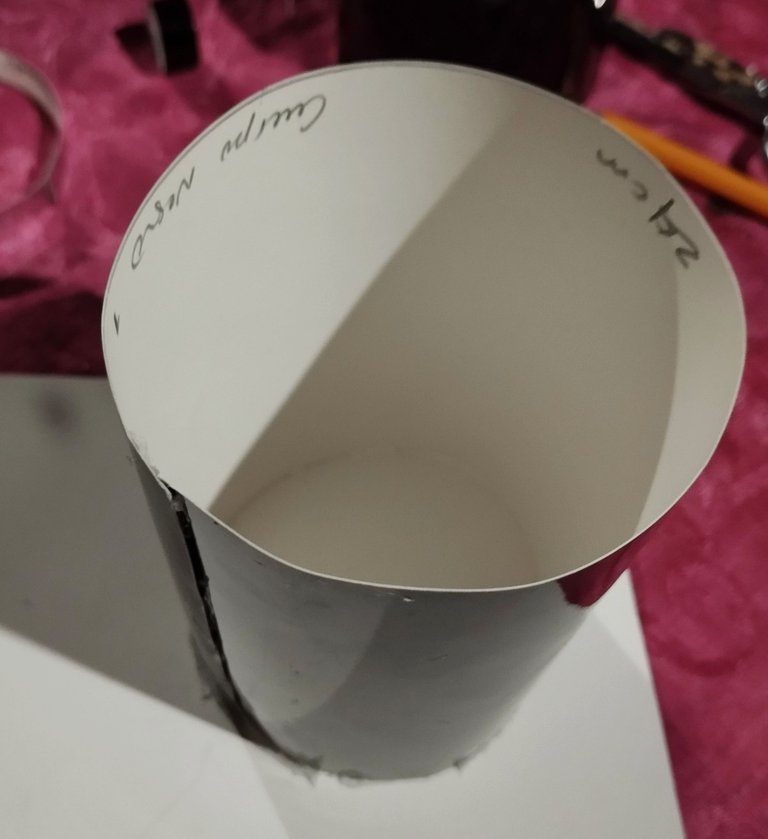 |
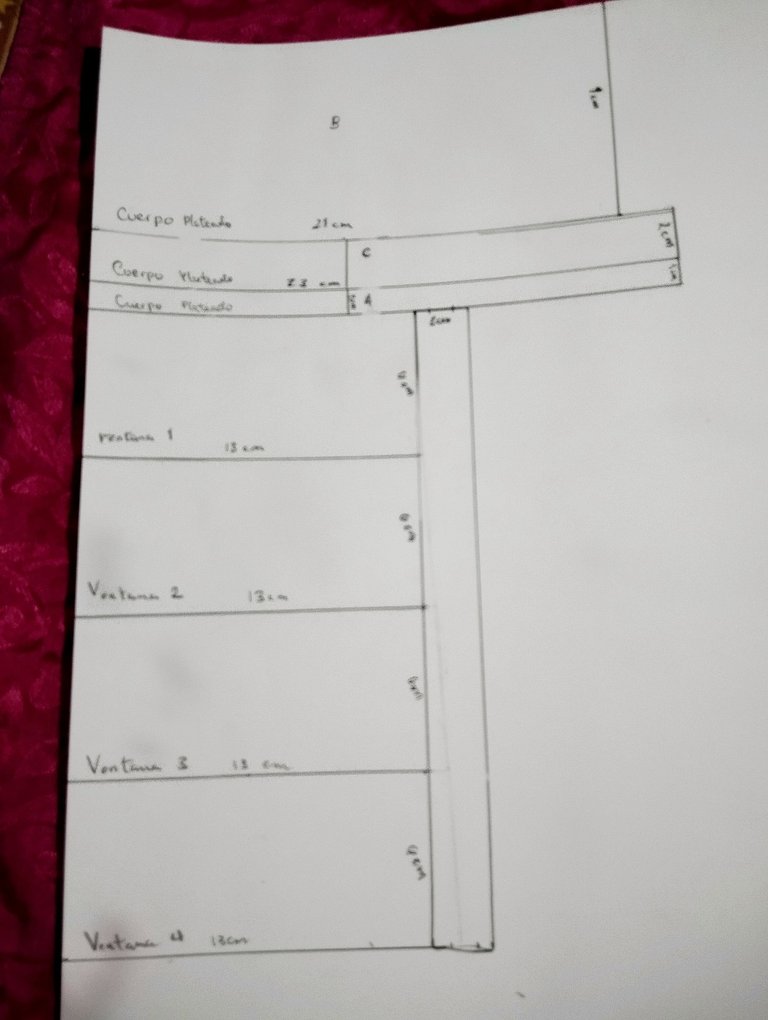
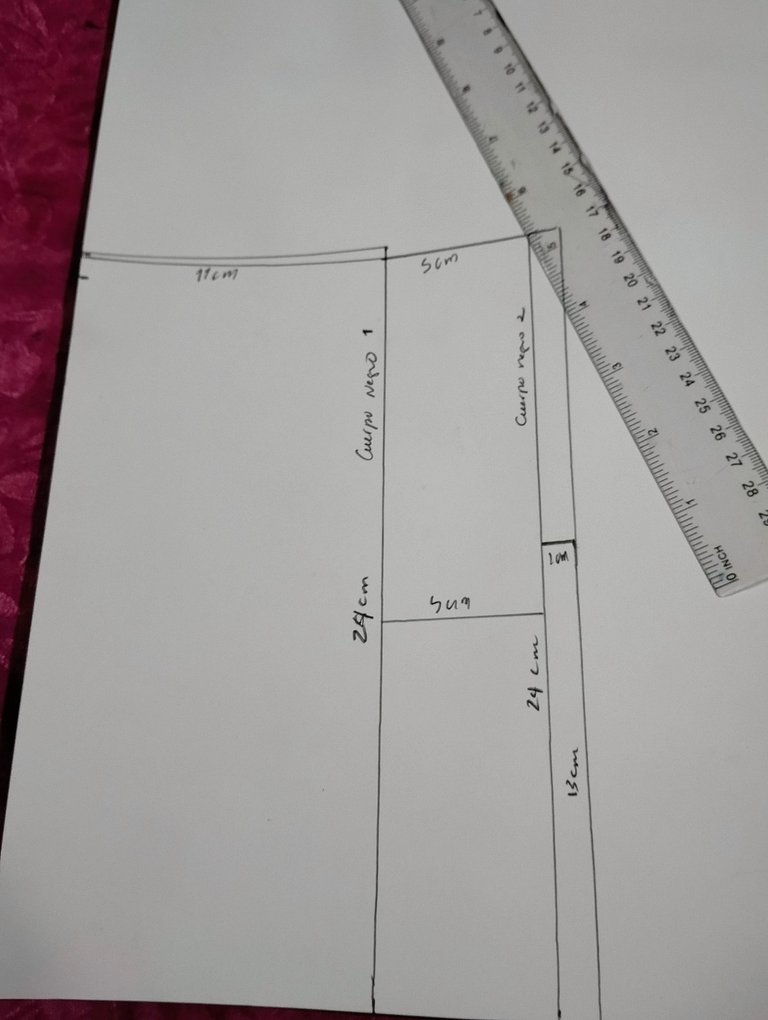
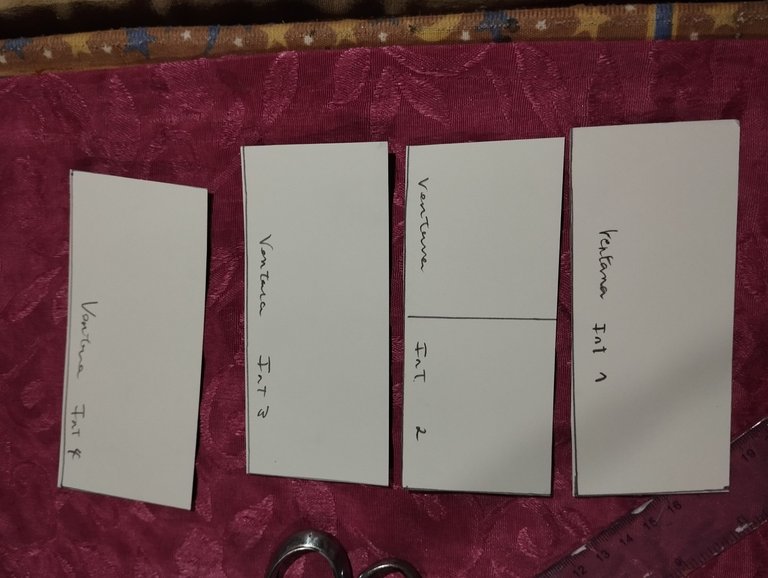
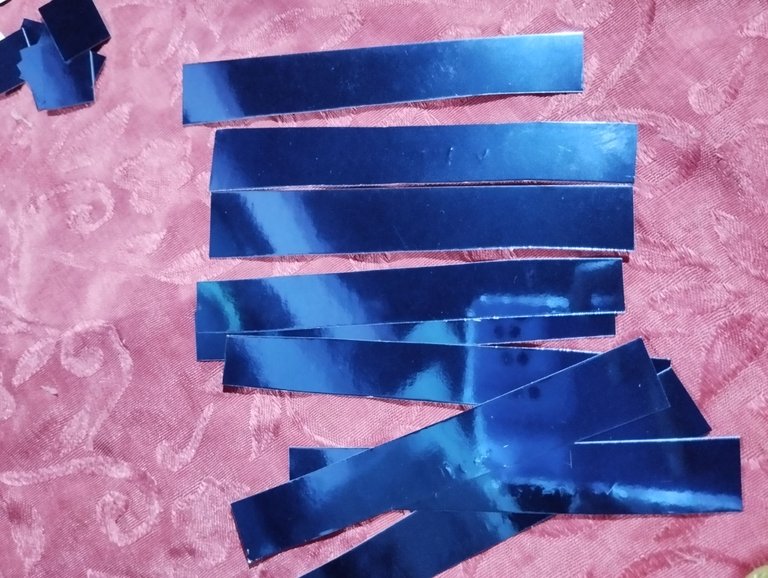
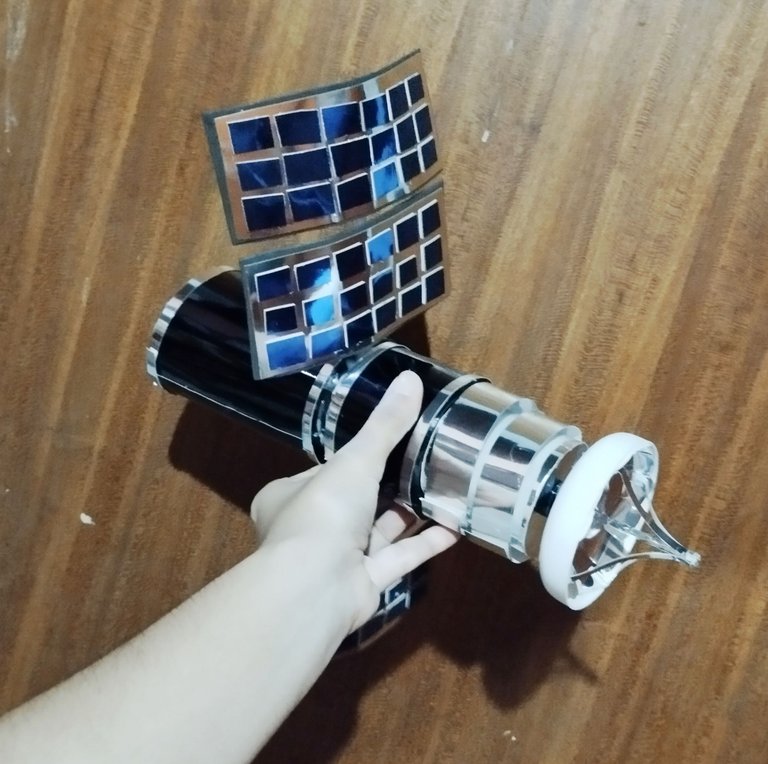
#1 Sin tener un patrón saque más o menos a ojo por ciento como dicen el patrón de cada parte del satélite, para la cartulina plateada para la mitad del cuerpo superior ,hice un rectángulo de 21cm x 9cm de ancho, dos tiras de 23cm x 2cm de ancho, otra tira de 23 CM (pero luego la corte a unos 14 CM x 1cm) . Y luego hice 4 rectángulos de 13cm x 6cm para las ventanas. Para la parte inferior con la cartulina negra haciendo dos rectángulos uno de 24 cm x 11 CM y otro de 24 CM x 5 CM . También para las ventanas paneles, serán en Cartulina azul 11cm x 4,5cm para los cristales,pero más adelante modifique. Un poco esto luego corté y arme cada cilindro con silicón caliente, tendría dos cilindros negros ,y uno plateado, y tres aros planteados más finos.
English Version
#1 Without having a pattern I made more or less by eye percent as they say the pattern of each part of the satellite, for the silver cardboard for the upper half of the body, I made a rectangle of 21cm x 9cm wide, two strips of 23cm x 2cm wide, another strip of 23 CM (but then I cut it to about 14 CM x 1cm). And then I made 4 rectangles of 13cm x 6cm for the windows. For the bottom with the black cardboard making two rectangles one of 24 cm x 11 CM and another of 24 CM x 5 CM. Also for the window panels, they will be in blue cardboard 11cm x 4.5cm for the crystals, but later I modified. A little of this then I cut and assembled each cylinder with hot silicone, I would have two black cylinders, and one silver, and three thinner posed rings.
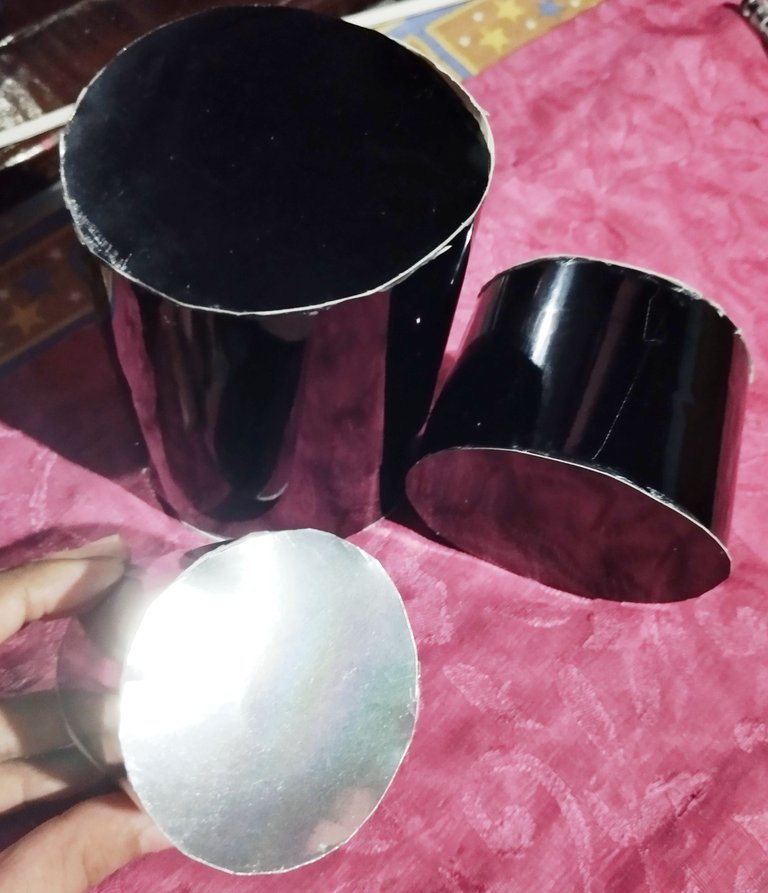 |  | 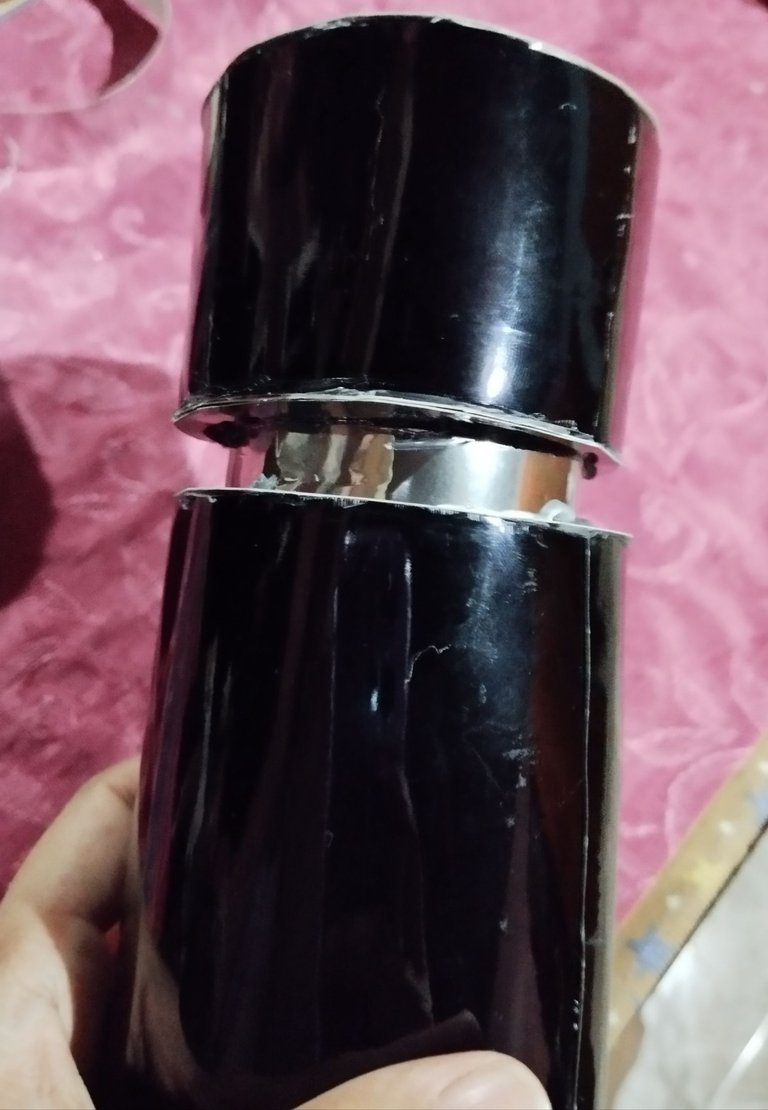 |
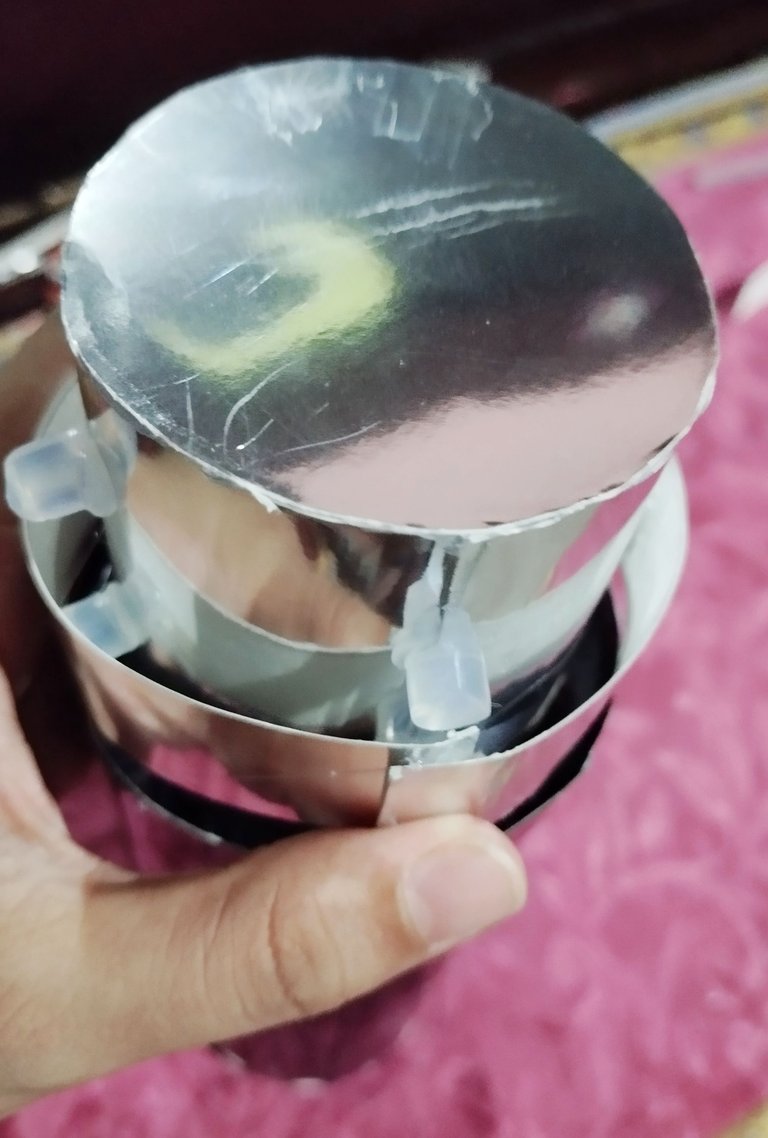
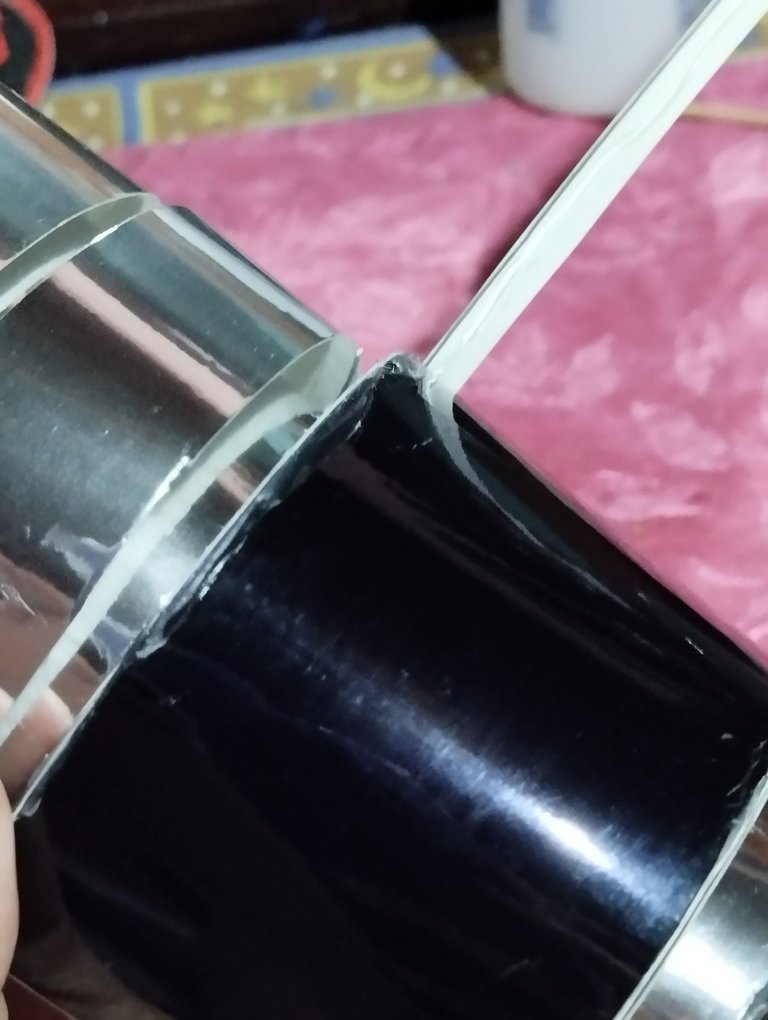
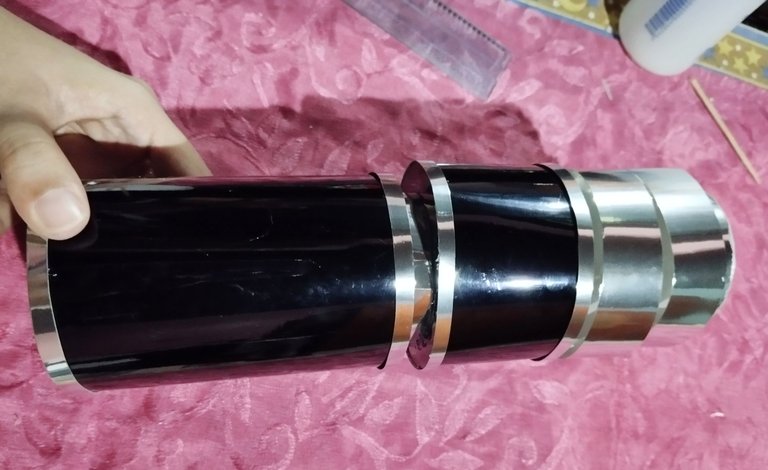
#2 Para poner las tapas superior e inferior a cada cilindro, pegué con silicón caliente el cilindro en los bordes, pegué la cartulina, luego recorté cuidadosamente el borde cortando toda la orilla del círculo.Con el cilindro negro más grande le pegué el aro plateado de 1cm y lo achiqué dejándolo de 14cm de largo, corté pequeños trocitos de silicon del mismo grosor del ⭕ plateado. Y luego de tener este bien pegado ,pegué el segundo cilindro negro que haría el segundo tramo del cuerpo negro del satélite, el resultado parece un termo.
English Version
#2 To put the top and bottom covers on each cylinder, I glued the cylinder to the edges with hot silicone, glued the cardboard, then carefully cut the edge by cutting the entire edge of the circle. With the largest black cylinder I glued the 1cm silver ring and made it smaller, leaving it 14cm long, I cut small pieces of silicone the same thickness as the silver ⭕. And after having this well glued, I glued the second black cylinder that would make the second section of the black body of the satellite, the result looks like a thermos.
 |  |  |
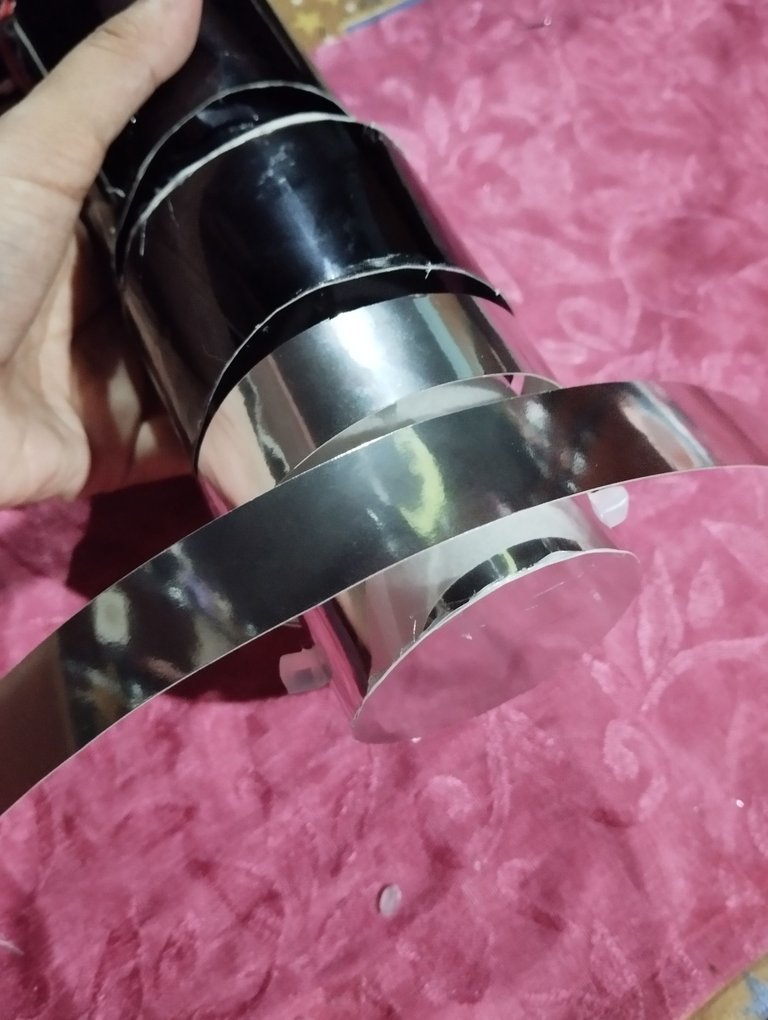 |  |  |
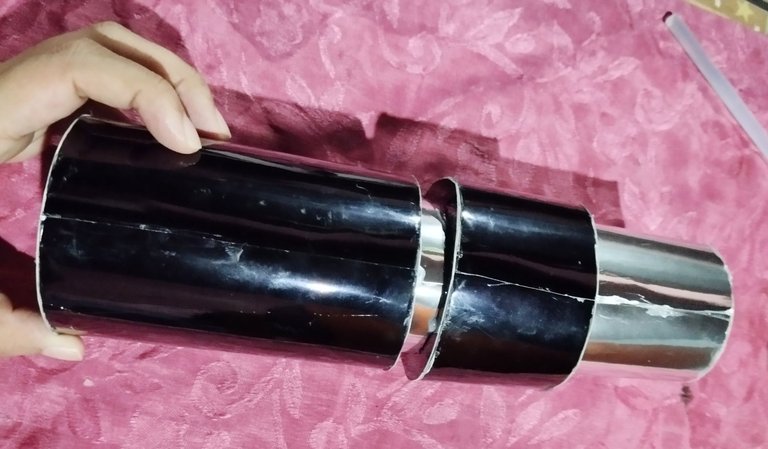
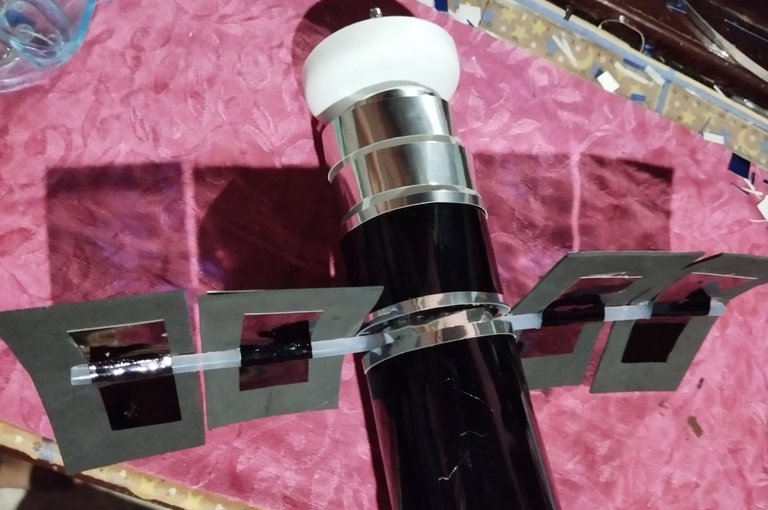
#3 Teniendo el cilindro plateado con sus tapas, y lo pegué al extremo del cilindro negro, este cilindro plateado le haremos un efecto como de dos aros orbitando por todo el cuerpo plateado ,para hacer un efecto en 3D, cortaremos unos taquitos de las barras de silicón y la pegaremos dos en fila en la parte superior, inferior y a los laterales de este cilindro. Ya con estos taquitos ,colocaremos la cinta plateada y enrrollaremos pegando este a los silicones, y ajustándolo el aro al contorno que haría con el grosor de éstos silicones. Luego de este cilindros hice el Segundo haciendo lo mismo, el resultado es estás dos franjas plateadas que quedan flotando haciendo el efecto de partes metálicas orbitando el satélite. Un consejo a tener en cuenta es que siempre me asegure que la parte de los cilindros en donde se encuentran los extremos siempre las alinee para que quedarán boca abajo y no se viera mucho.Para hacer otra conexión usé parte de una tapa de colirio y le pegué una tirita de cartulina negra para hacer la conexión d ella pieza que se pegará a la antena del satélite.📡
English Version
#3 Having the silver cylinder with its caps, and glued it to the end of the black cylinder, this silver cylinder we will make an effect like two rings orbiting around the silver body, to make a 3D effect, we will cut some small blocks from the silicone bars and glue them two in a row on the top, bottom and sides of this cylinder. With these blocks, we will place the silver tape and roll it up, gluing it to the silicones, and adjusting the ring to the contour that it would make with the thickness of these silicones. After this cylinder I made the second one doing the same, the result is these two silver stripes that float making the effect of metallic parts orbiting the satellite. A tip to keep in mind is to always make sure that the part of the cylinders where the ends are always align them so that they would be face down and not very visible. To make another connection, I used part of an eye drop cap and glued a strip of black cardboard to it to make the connection of the piece that will be glued to the satellite antenna. 📡
 |  | 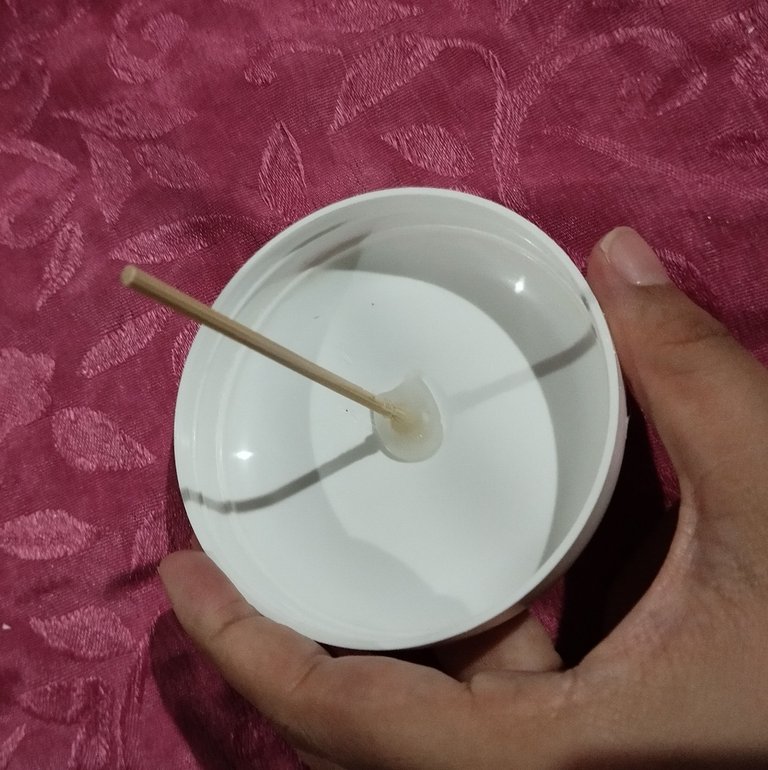 |
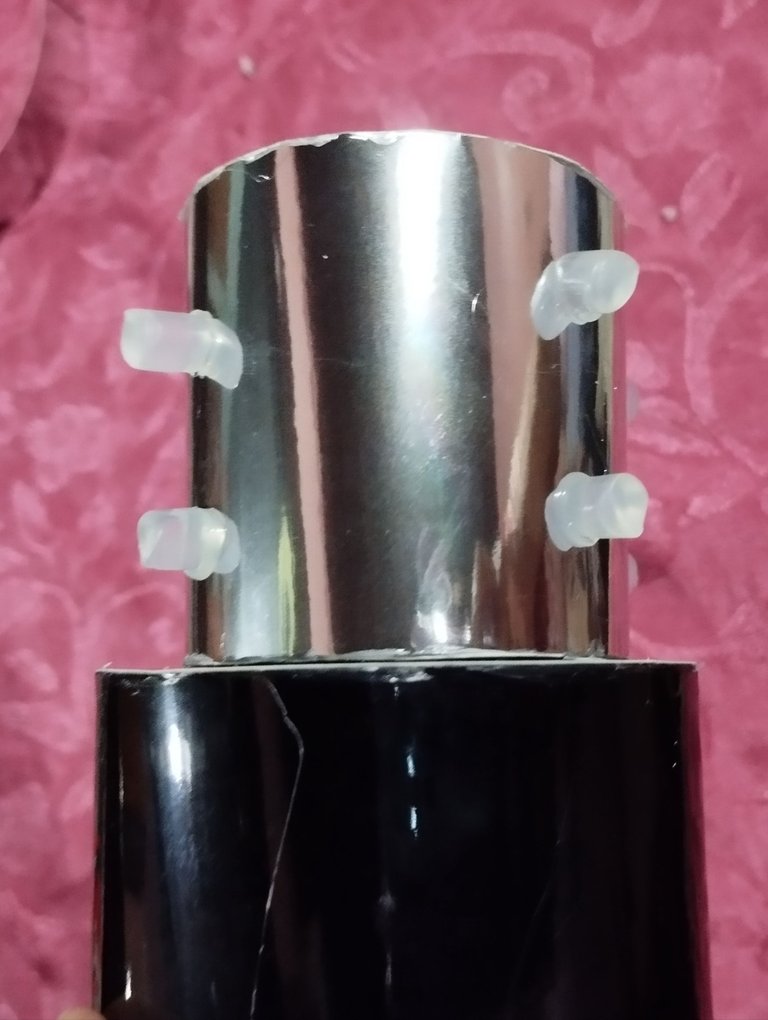
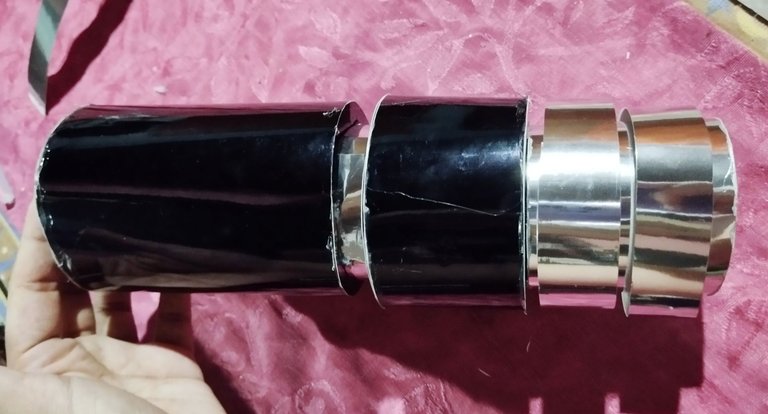
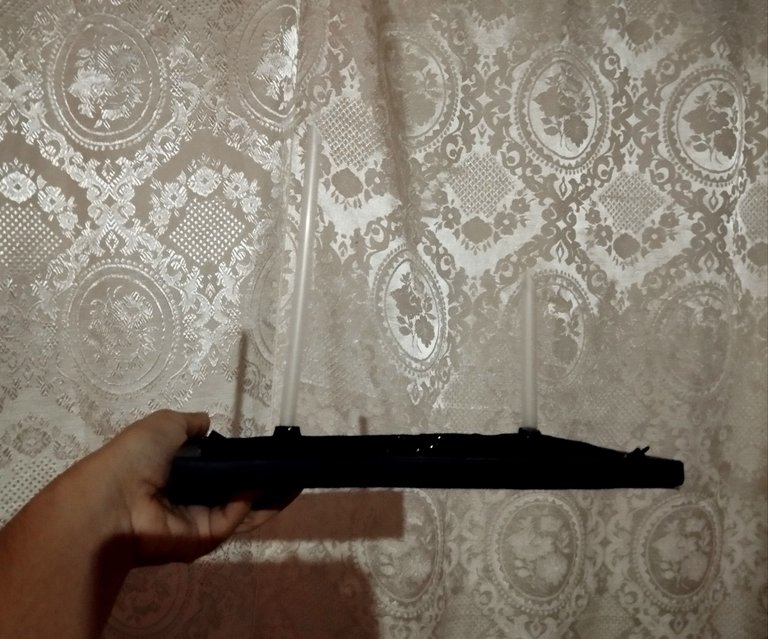
#4 corté varias tiras largas plateadas con un grosor de 0,5cm, para ponerle los bordes a los cilindros negros y darle más detalles y mejor acabado, para hacer la campana recicle la tapa de una envase de baño de crema ,con su aspecto tendría el aspecto ideal, y corté un pedazo de palito de altura y con silicón caliente lo pegué en el medio para hacer la antena.
English Version
#4 I cut several long silver strips with a thickness of 0.5cm, to put the edges on the black cylinders and give it more details and a better finish, to make the bell I recycled the lid of a bath cream container, with its appearance it would have the ideal look, and I cut a piece of stick of height and with hot silicone I glued it in the middle to make the antenna.
 |  |  |
 | 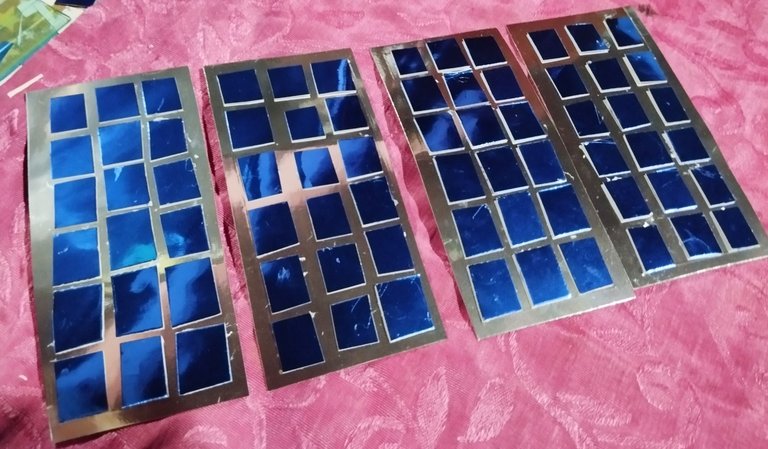 |  |
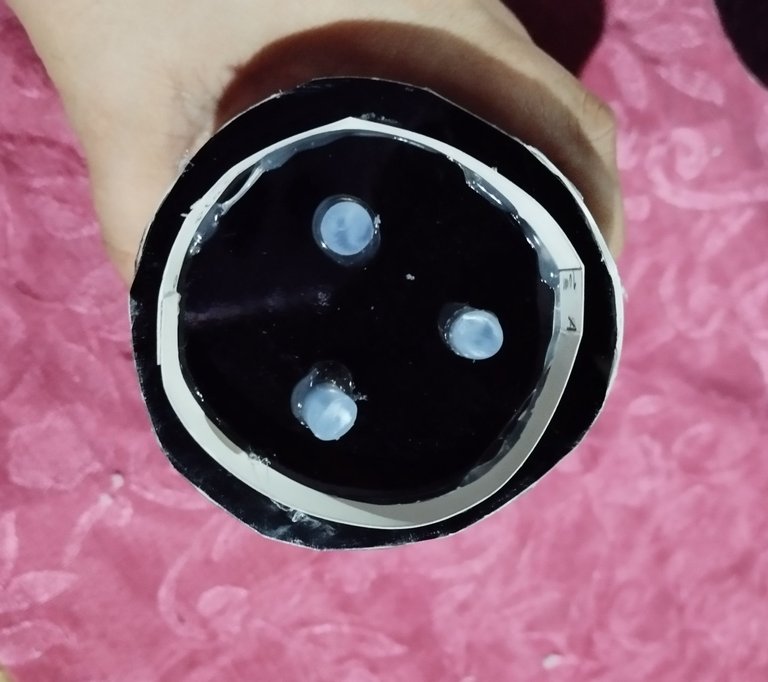
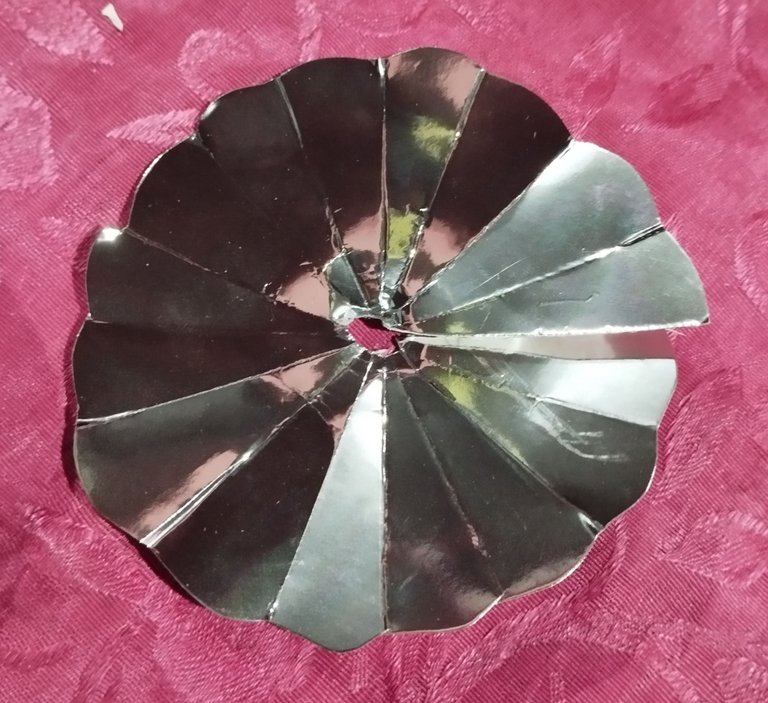
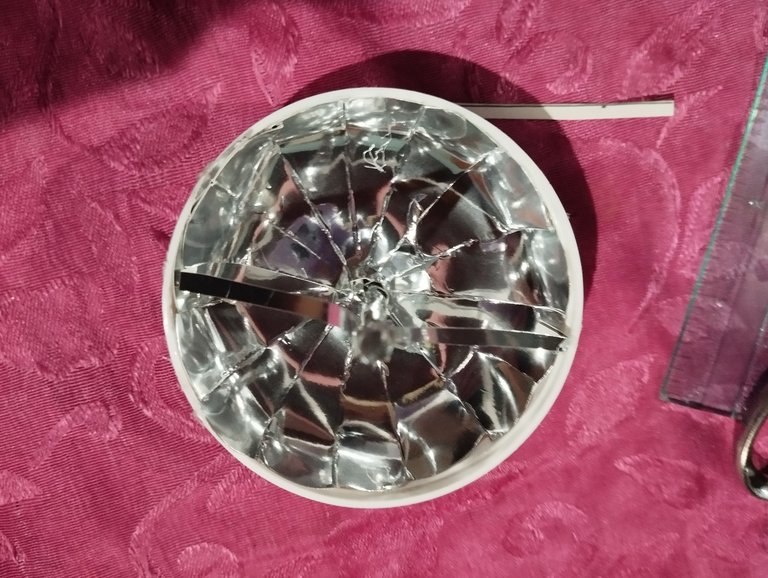
#5 Para la parte interior de la antena 📡, hice un círculo 🛞 con muchas líneas diagonales atravesadas para hacer divisiones, y luego recorté los extremos en forma de flor, y esta parte le pegué con silicón a la parte interior, hice cuatro tiritas plateadas
para hacer los cables de la antena📡. Luego con las piezas azules que había cortado para las ventanas ,pensé que la forma más fácil era recortar cuadritos en vez de hacer los los cortes de la ventana con bisturí, ya me iba a tomar más tiempo hacer los cortes perfectos 🪟, así que corté 4 tiras por cada rectángulo, y luego corté pequeños cuadritos para los paneles de las ventanas y los pegué a las piezas plateadas. Después de tener las cuatros ventanas para darle más soporte un Foami negro en la parte de atrás.
English Version
#5 For the inside of the antenna 📡, I made a circle 🛞 with many diagonal lines through it to make divisions, and then I cut the ends into a flower shape, and I glued this part with silicone to the inside, I made four silver strips
to make the antenna cables📡. Then with the blue pieces I had cut for the windows, I thought the easiest way was to cut out squares instead of making the window cuts with a scalpel, it would take me longer to make the perfect cuts 🪟, so I cut 4 strips for each rectangle, and then I cut small squares for the window panels and glued them to the silver pieces. After having the four windows to give it more support, a black Foami on the back.
 |  |  |
| 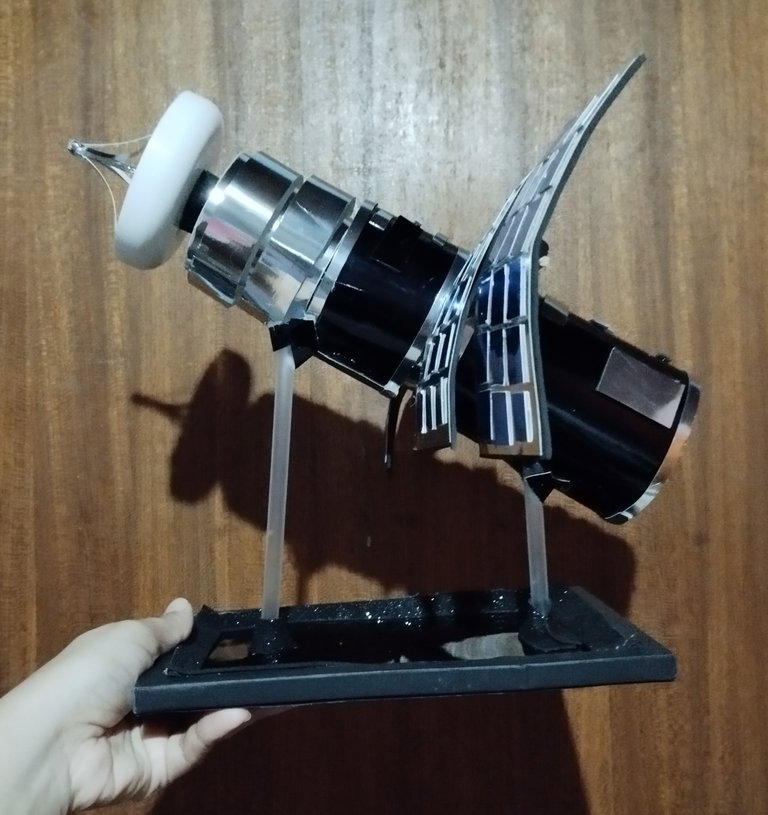 |  |
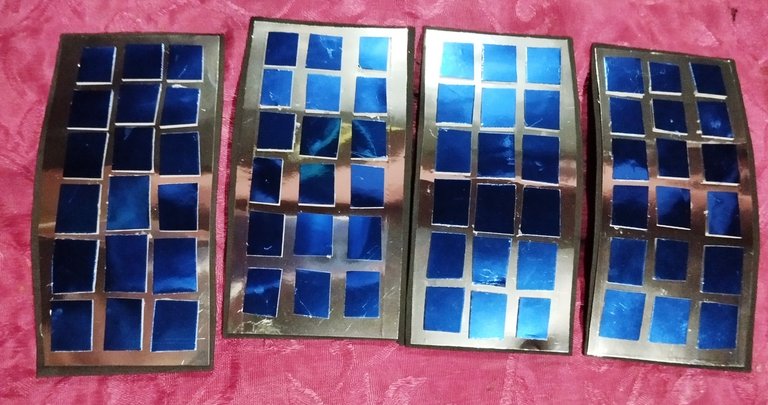
#6 Para hacer los soportes de las ventanas o paneles usé una barrita de silicón cortada a la mitad y la pegue en el medio del aro plateado interno, y pegué dos paneles en cada lado, y para asegurarlo bien agregué un retazo de cartulina negra por la parte de atrás,ya más tarde le agregué unos la mitad de una palitos de altura metiéndola debajo de los tubitos de silicón y le dió mucho más soporte. luego hice la base, usé una base de cartulina negra que venía en una caja para laptop y que me daba perfecto para usarla, corté un palito de base para globo ,haciéndole en desnivel ,de esta manera quedará el satélite flotando de manera diagonal, y lo pegué con silicón a la base, le agregué unas tiritas de foami brillante a la base para darle mejor aspecto. Ya con la base lista pegué desde la parte inferior del satélite con suficiente pega los palitos de la base. Luego en foami negro , pegué retazos cuadrados y rectangulares de cartulina plateada, negra y azul para hacer pequeñas piezas y compartimientos en la superficie del satélite para que esté tenga más detalles y quedarán un pocos sobresalientes con el grosor del Foami.
English Version
#6 To make the window or panel supports I used a silicone bar cut in half and glued it in the middle of the inner silver ring, and glued two panels on each side, and to secure it well I added a scrap of black cardboard to the back, and later I added about half a stick in height putting it under the silicone tubes and it gave it much more support. then I made the base, I used a black cardboard base that came in a laptop box and that was perfect for me to use it, I cut a base stick for a balloon, making it uneven, this way the satellite will float diagonally, and I glued it with silicone to the base, I added some strips of shiny foam to the base to give it a better look. With the base ready, I glued the base sticks from the bottom of the satellite with enough glue. Then on black foam, I glued square and rectangular scraps of silver, black and blue cardboard to make small pieces and compartments on the surface of the satellite so that it has more details and there will be a few protruding ones with the thickness of the Foam.
 |  |  |
| 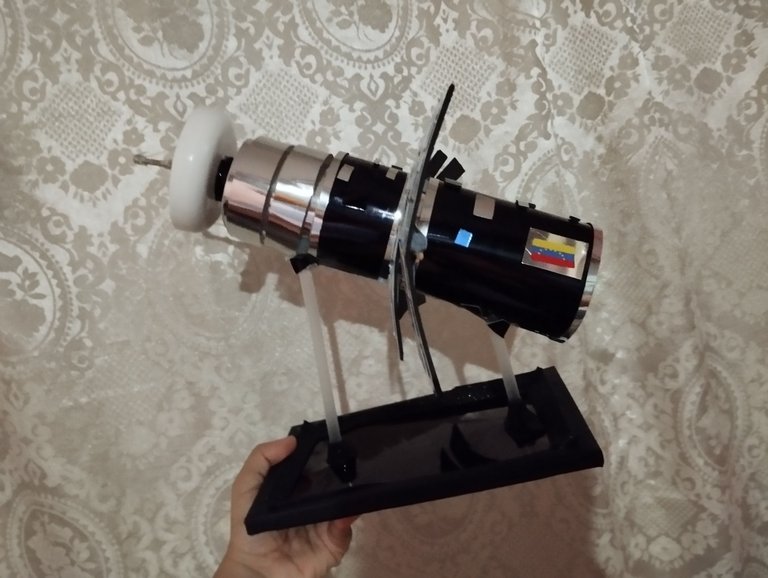 |
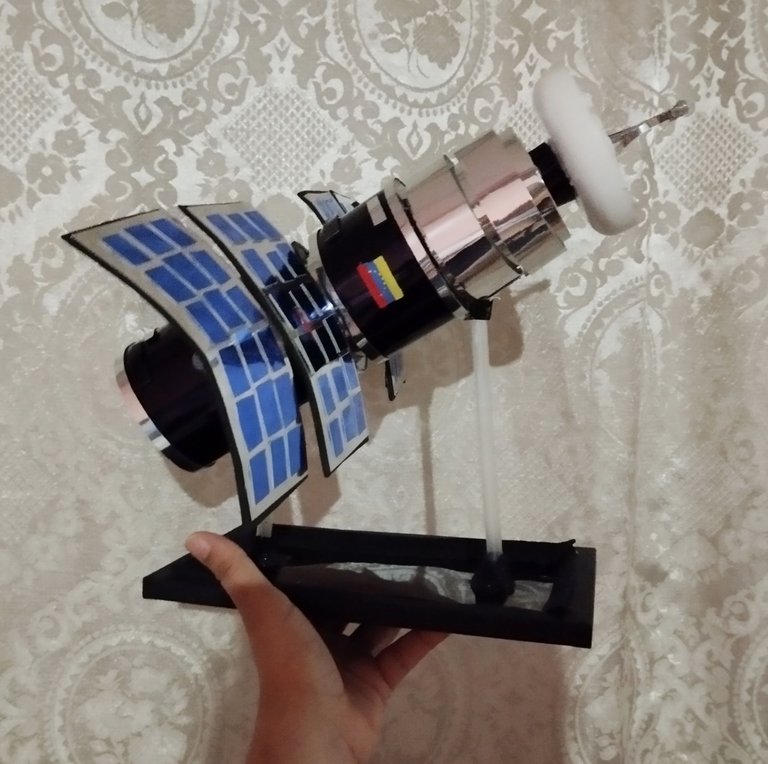
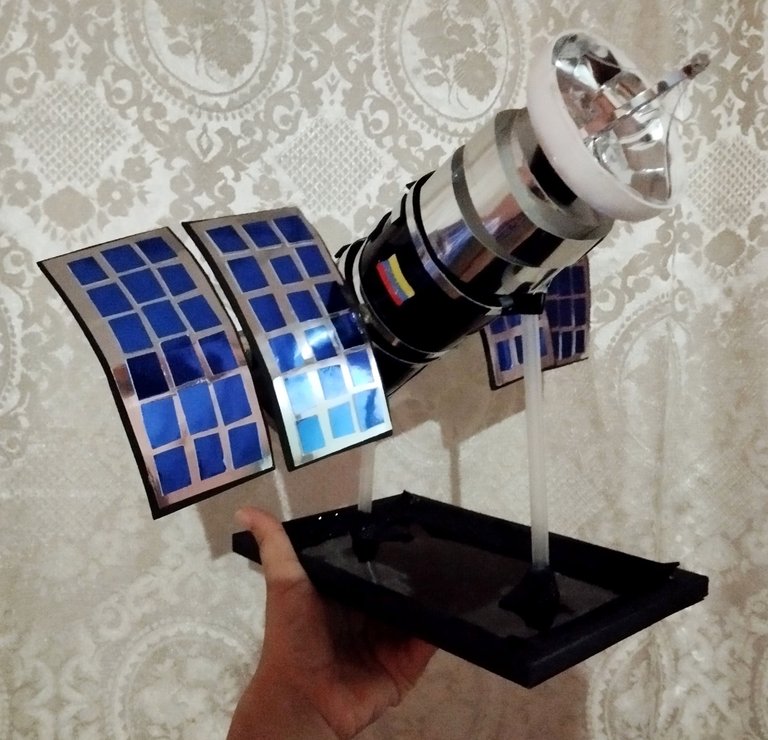
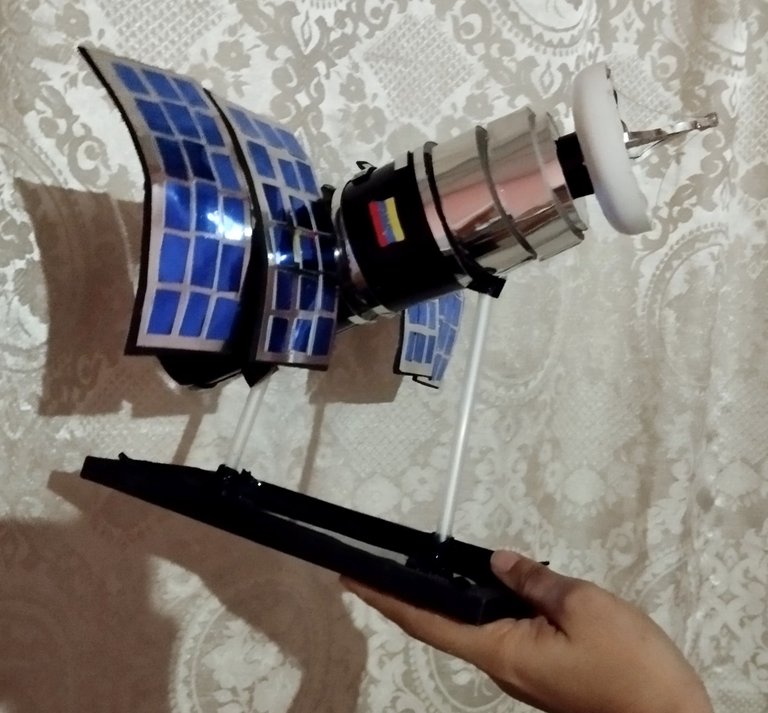
# y listo ! Este es el resultado de este proyecto, encontré una cinta tricolor que resultó buenísima para hacer mini banderas y se la coloque para que fueran como la identificación y quedó aún más bonito. Duré muchas más horas que las que quería unas 7 horas y me pasa que cuando empiezo algo quiero terminarlo el mismo día para ver el resultado y ya estaba cansada porque me llevo mucho trabajo recortar y armar sin saber si iba a verse de un aspecto bien prolijo y no tanto improvisado y gasté más materiales de lo que tenía pensado por lo que fue muy satisfactorio
Ver lo bonito que quedó ☺️😍.
Muchas gracias por leerme! A ustedes manualistas y artesanos tengo una pregunta ❔ como hacen para sacar el presupuestos cuando le piden maquetas ? Ya que llevan mucho más detalles,trabajo y los materiales, se me hace algo complicado sacar un buen costo en dónde no termine perdiendo más dinero por los materiales que por el trabajo ☺️💜✨ Espero que les haya gustado el post!
Fotos tomadas por mí en mi equipo Redmi note 12 editadas en Pics art y gif realizado en app creador de GIFs texto traducido en Google traductor.
English Version
# And that's it! This is the result of this project. I found a tricolor ribbon that turned out great for making mini flags and attached it to act as identification, and it turned out even prettier. I spent many more hours than I wanted—about 7 hours. It happens to me that when I start something, I want to finish it the same day to see the result. I was already tired because it took a lot of work to cut and assemble, not knowing if it would look really neat and not so improvised. I used more materials than I had planned, so it was very satisfying.
Seeing how beautiful it turned out ☺️😍.
Thank you so much for reading! I have a question for you crafters and artisans: ❔ How do you get quotes when they ask you for models? Since they involve a lot more detail, work, and materials, it's a bit difficult for me to get a good price where I don't end up losing more money on the materials than on the labor. ☺️💜✨ I hope you enjoyed the post!
Photos taken by me on my Redmi Note 12 device, edited in Pics Art, and GIFs created using the GIF creator app, with text translated using Google Translate.

Muy buen trabajo, me trajo recuerdos de cuando realizaba maquetas para la escuela jaja nunca me salian o me las rompian, que crueles 💔 te quedo genial, bastante realista 👌
Muchas gracias buhito 🦉, noooo que triste 😢 que te pasará eso , me pasaba que cuando yo hacía las mías estaba súper tensa por miedo a que me las dañaran antes de que me la evaluarán así que estába como un portero cuidando q nadie las tocará 😂