

Hello friends of Hive DIY! What cool things are you doing today? I send you a hug to the corner of the world where you are. Up the good spirits to continue creating fantastic things ✌️🤓🎨🖌️
This is my first DIY post!!! I am a plastic artist and I have always thought of hand painting clothes to create unique designs as pieces of art... I have tried several times in the past but I have no record of it, stamped and dyed several flannels and shoes 😋🙃
Today I bring something that I wanted to do for a long time; I wanted to dye my own flannel with the TIE-DYE technique. I finally got the courage and was able to discover for myself that it really is very easy to do.
This technique is very good to give life to our old clothes, to give color and renew our wardrobe a little; you can dye flannels, pants, beach sarongs, hats, bags, even curtains and thus be fashionable with this trend that has returned. You can also do it totally in your style, customizing your pieces with your favorite colors.
Here I show you a fairly simple and recreational step by step that you can follow. I was surprised with the result and really enjoyed the whole process. It is an ideal project to do with children, teenagers will love it and will have a lot of fun creating their own designs. So no excuses, do it yourself at home! 👌✌️🤓
STEP BY STEP
Step 1:
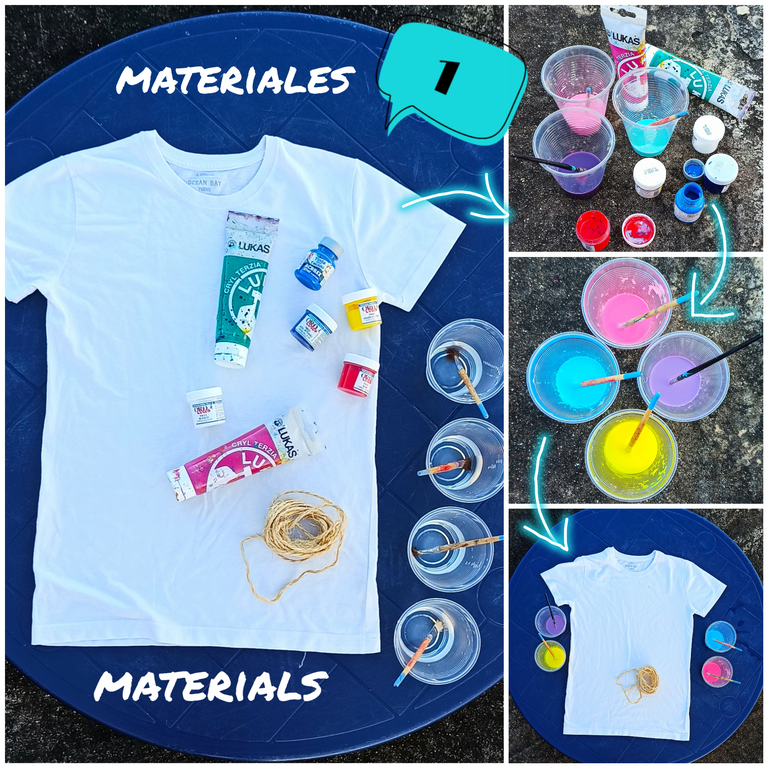
Prepare the work area and have all the materials to be used at hand.
Materials:
- White flannel
- Fabric paint your favorite colors
- Disposable cups with water
- Brushes
- Rope
- Scissor
Mix the desired colors for your flannel in the glasses with water. With the brush take a little fabric paint and place it in the glass with water, stir until it dissolves well, add more paint until you achieve the desired shade. If you want to mix colors to have unique colors (as in my case), add a little paint of the secondary color or colors to the glass with water until you achieve the desired color. You can use as many colors as you like to tint your piece. It can be just one color; in my case I used 4 colors, one per division, if so, I recommend not placing more than 2 cm of water in each glass, for a flannel size S or M it is enough. And have a container with water aside in case you need to add more to dilute the color a little or to prepare more mixture; the idea is that the paint remains as an ink that the fabric absorbs easily.
Step 2:
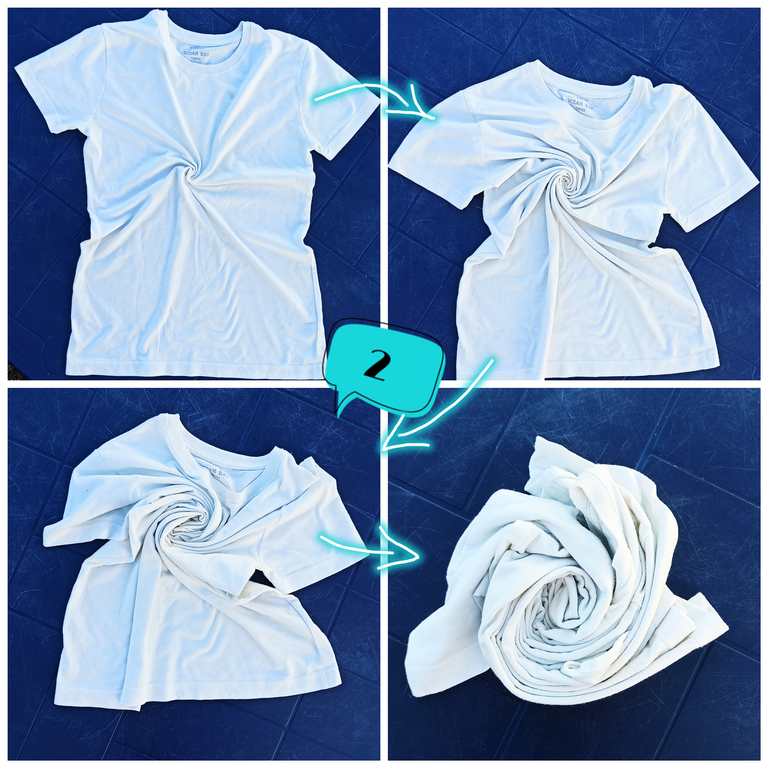
Spread the flannel well, locate the center and with your hands begin to roll the fabric into a swirl. Go turning by hand until you manage to roll the entire piece as evenly as possible.
Step 3:
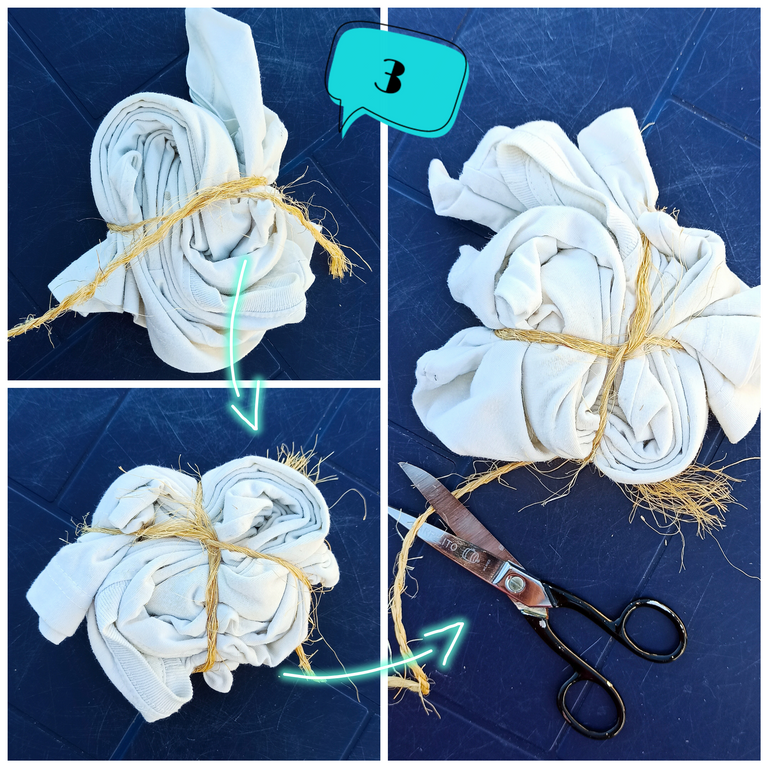
Tie the flannel with string as if it were a gift, adjusting the protruding edges so that it is as round as possible. The idea is that it remains with a circular shape so that in the end the design can be appreciated.
Step 4:
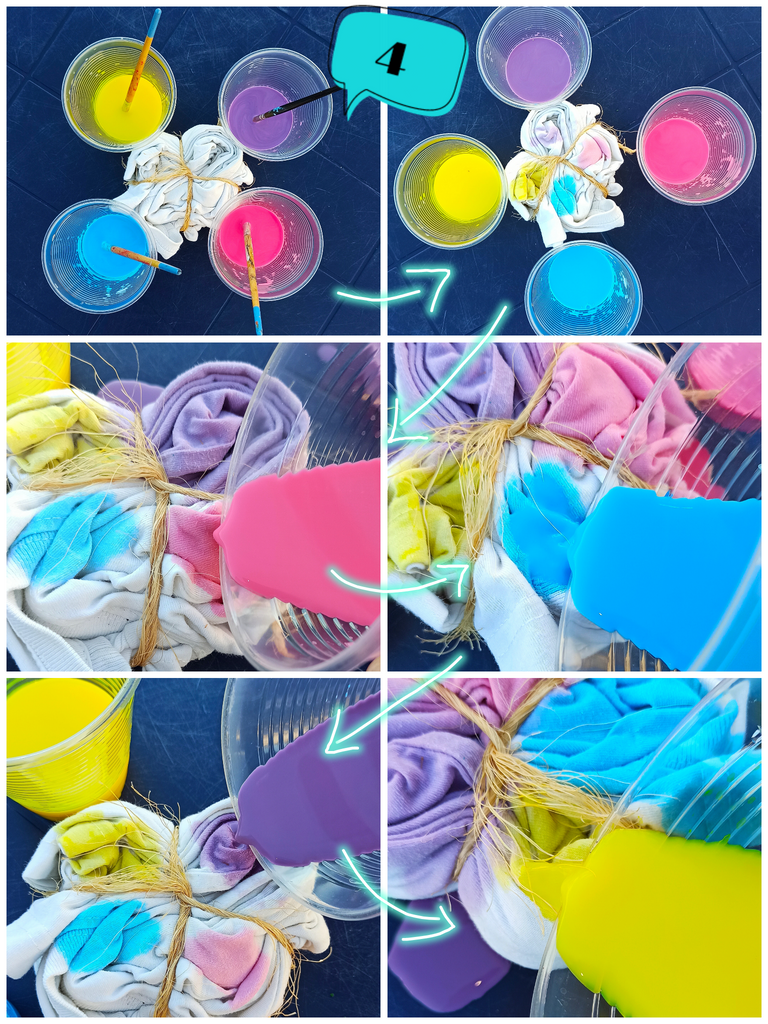
On the first side of the piece, slowly pour the contents of each glass over the selected area, one by one.
Step 5:
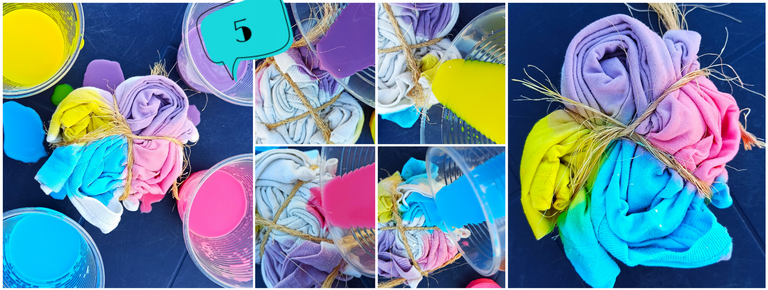
Turn the piece over, on the second side stain repeating the procedure carefully until all the fabric has absorbed the paint and there are no blank spaces.
Step 6:
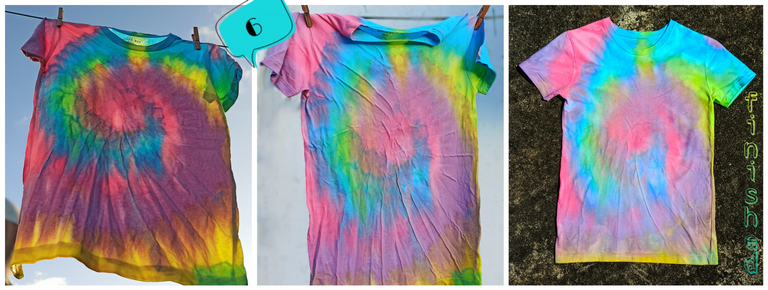
Untie the rope and spread the flannel out in the sun until it dries well. At this point you can already appreciate your TIE-DYE design.
Note: I did not use a dryer. I don't know how the results are.
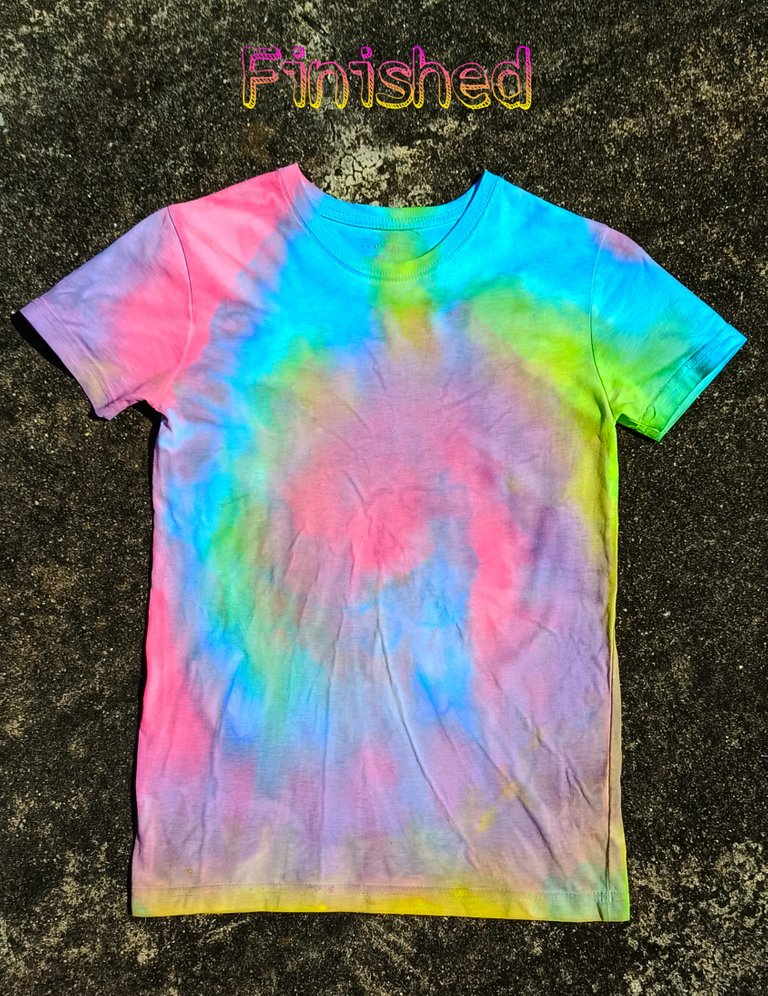
I hope you give it a try and enjoy using your creation! 👌🤓🤗👍🎨💓😁
Finally, I want to remind you that my sisters @marylucy, @belizanaterah, my father @wanderlinder and I found ourselves raising money for a CT scan that my mother needs, it costs $ 395; It is to determine the progress that has been made after completing chemotherapy and may she be temporarily discharged on January 25. There are many expenses that we have had to cover since my mother was diagnosed with cancer a little over a year ago, all the treatment and tests have led us to look for other ways to get money, like our posts on this platform. For that we ask you to collaborate supporting our publications, we thank you infinitely 🤗😊💓
Greetings and thanks for taking the time to read me, I hope to return soon with a new publication of my works, hoping to generate only good things and to be able to share them with you.

One important thing that I want to inform you is that I am available to receive any request for Illustrations, drawings or paintings that you wish, on the subject of your preference. Here is my facebook link so you can see much more of my work https://www.facebook.com/profile.php?id=100010719663846
(All photographs, drawings and artistic works are my own, I thank you for not reproducing or copying them without my authorization)

¡Hola amigos de Hive DIY! ¿Qué cosas geniales hacen hoy? Les envío un abrazo al rincón del mundo donde estén. Arriba el buen ánimo para continuar creando cosas fantásticas ✌️🤓🎨🖌️
¡¡¡Ésta es mi primera publicación DIY!!! Soy artista plástico y siempre he pensado en pintar a mano ropa para crear diseños únicos como piezas de arte... Hice varios intentos en el pasado pero no tengo registro de ello, timbré, estampé y teñí varias franelas y zapatos😋🙃
Hoy traigo algo que quería hacer desde hace mucho; quería teñir mi propia franela con la técnica TIE-DYE. Por fin me animé y pude descubrir por mi misma que realmente es muy fácil de hacer.
Esta técnica es muy buena para darle vida a nuestras prendas viejas, para dar color y renovar un poco nuestro guardarropa; puedes teñir franelas, pantalones, pareos playeros, sombreros, bolsos, hasta cortinas y así estar a la moda con esta tendencia que a vuelto. Además lo puedes hacer totalmente a tu estilo, personalizando tus piezas con tus colores favoritos.
Aquí les muestro un paso a paso bastante sencillo y recreativo que pueden seguir. Yo me sorprendí con el resultado y disfrute mucho todo el proceso. Es un proyecto ideal para hacer con los niños, a los adolescentes les encantará y se divertirán mucho creando sus propios diseños. Así que no hay excusas, ¡hágalo usted mismo en casa! 👌✌️🤓
PASO A PASO
Paso 1:
Preparar el área de trabajo y tener a mano todos los materiales a utilizar.
Materiales:
- Franela blanca
- Pintura de tela de tus colores favoritos
- Vasos desechables con agua
- Pinceles
- Cuerda
- Tijera
Mezclar en los vasos con agua los colores deseados para su franela. Con el pincel tome un poco de pintura de tela y colóquela en el vaso con agua, revuelva hasta que se disuelva bien, añada más pintura hasta lograr el tono deseado. Si desea mezclar colores para tener colores únicos (como en mi caso) vaya añadiendo al vaso un poco de pintura del color o colores secundarios hasta lograr el color deseado. Puede usar la cantidad de colores que desee para teñir su pieza. Puede ser solo un color; en mi caso utilicé 4 colores, uno por división, si es así, recomiendo no colocar más de 2 cm de agua en cada vaso, para una franela talla S ó M es suficiente. Y tener a parte un envase con agua por si necesita agregar más para diluir un poco el color o para preparar más mezcla; la idea es que la pintura quede como una tinta que la tela absorba fácilmente.
Paso 2:
Extienda la franela bien, ubique el centro y con sus manos comience a enrollar la tela en forma de remolino. Vaya girando con la mano hasta lograr enrollar toda la pieza lo más uniforme que pueda.
Paso 3:
Amarre la franela con cuerda como si fuera un regalo, acomode los bordes que sobre salen de modo que quede lo más redondo posible. La idea es que quede con una forma circular para que al final el diseño pueda apreciarse.
Paso 4:
En la primera cara de la pieza vierta lentamente el contenido de cada vasos sobre el área seleccionada, uno por uno. Cada color en un lugar.
Paso 5:
Voltee la pieza, en la segunda cara tiña repitiendo el procedimiento cuidadosamente hasta que toda la tela haya absorbido la pintura y no queden espacios en blanco.
Paso 6:
Desamarre la cuerda y extienda la franela al sol hasta que seque bien. En este punto ya puede apreciar su diseño TIE-DYE.
(Nota: No sé cómo quede el diseño en secadora).
¡Espero que lo intentes y disfrutes usar tu creación! 👌🤓🤗👍🎨💓😁
Para finalizar les quiero recordar que mis hermanas @marylucy , @belizanaterah , mi papá @wanderlinder y yo nos encontramos reuniendo dinero para una Tomografía Computarizada que mi mamá necesita, cuesta 395$; es para determinar el progreso que se ha logrado luego de finalizar la quimioterapia y pueda ser dada de alta temporal el próximo 25 de enero. Son muchos los gastos que hemos tenido que cubrir desde que mi mamá fue diagnosticada con cáncer hace poco más de un año, todo el tratamiento y los exámenes nos han llevado a buscar otras formas de conseguir dinero, como nuestras historias en esta plataforma, por esa razón les pedimos un aporte en la medida que puedan colaborar apoyándo nuestras publicaciones, se lo agradecemos infinitamente 🤗😊💓
Saludos y gracias por tomarte el tiempo para leerme, espero volver pronto con una nueva publicación de mis trabajos, esperando generar solo cosas buenas y poder compartirlas con ustedes.
Una cosa importante que les quiero informar es que me encuentro disponible para recibir cualquier pedido de Ilustraciones, dibujos o pinturas que ustedes deseen, del tema de su preferencia. Les dejo por acá mi enlace de facebook para que vean mucho más de mi trabajo https://www.facebook.com/profile.php?id=100010719663846
(Todas las fotografías, dibujos y trabajos artísticos son de mi autoría, les agradezco no reproducirlas o copiarlas sin mi autorización)
This look cool idea 😅🤗👌👌👌🍻 I must try also this one 👌👌
Yes, try it and tell me how it went. It's super easy 😁👍👌
When I see your work....then yes it looks easy ... I think you make it look easy when you know art lot 😅👌👌👌👌🍷🍷
Está bien chidori 〜(꒪꒳꒪)〜.
¡Estoy feliz con mi franela Tie-dye! 🤩 Tienes que intentarlo, es súper fácil 👌
Excelente 🙌
Thanks ☺️😁😋😊🙃
Hermoso 😍 amiga! Me encantó tu trabajo, sabes mi madre también tuvo cáncer y fue un proceso difícil tanto para ella como para nosotros, el apoyo es muy importante siempre darle mucho ánimos y amor.
En oración por la salud 🙏 de tu madre!
Muchas gracias amiga! Ha sido un año duro pero no nos ha faltado el apoyo de la familia y el amor entre nosotros. Mi madre es una luchadora y eso nos ha dado fuerzas para mantenernos firmes en los momentos más difíciles. Gracias por tus palabras de aliento 🤗 Amén! Bendiciones para ti, tu madre y toda tu familia 🙏
Waaoo bellísimo
Gracias 😄😋
Congratulations @natera.mig! You have completed the following achievement on the Hive blockchain and have been rewarded with new badge(s):
Your next target is to reach 300 replies.
You can view your badges on your board and compare yourself to others in the Ranking
If you no longer want to receive notifications, reply to this comment with the word
STOPCheck out the last post from @hivebuzz:
Support the HiveBuzz project. Vote for our proposal!
Thank you very much 😊
Me acabo de enterar que esa son pinturas para telas 😄😄 yo tengo bastante porque hago manualidades pero como no le paró a lo que dice el frasco yo lo compro y ya. Bueno ya sé que son para telas y voy a intentar tu técnica para renovar unas cuantas franelas de mi clóset. Por cierto que tú franela quedo muy bonita, Felicidades, que pases un feliz y bendecido día 🙏 saludos
Jeje... Pues sí, aprovecha las pinturas de tela para renovar tu ropa. Me alegra que te gustara mi franela, seguro que si lo intentas te sorprenderás con el resultado, te darás cuenta que es súper fácil y divertido de hacer. Gracias por tu comentario. Bendiciones también para tí.