Eng
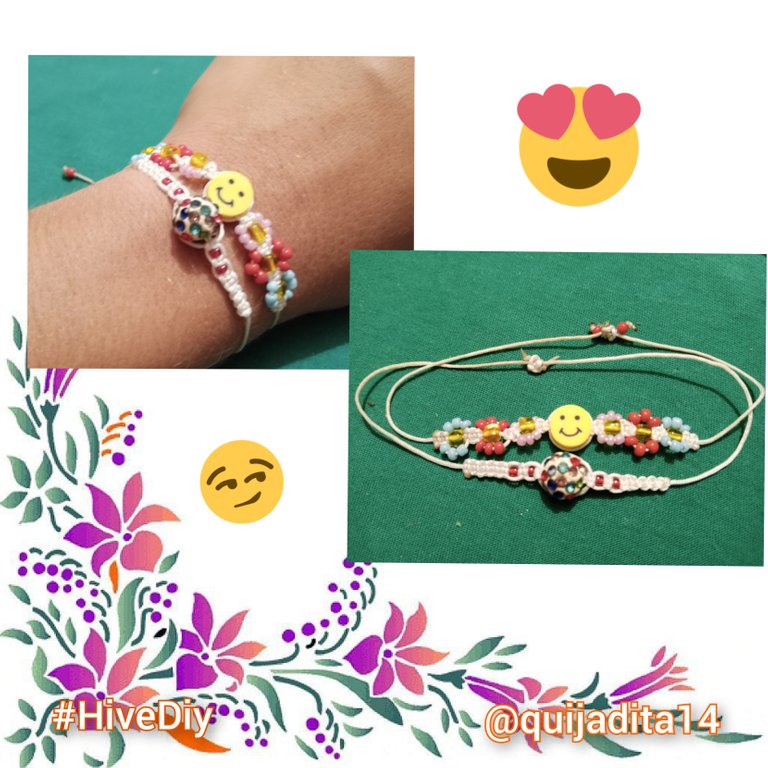
Good morning family, I hope you are very well today! I want to show you these beautiful easy and simple designs to make our macramé bracelets, the first is flowers and a happy face in the center and the second is a ball of fire centered with two red ones on the sides, ideal to combine and wear them on our wrist , this is a garment that complements any outfit and also how cute we look when we wear accessories that complement us and enhance our colors, that is why I invite you to see how it is done and how easy it is to do.
Esp
Buenos días familia, espero se encuentren muy bien hoy! Quiero mostrarles estos lindos diseños fáciles y sencillos para realizar nuestros brazaletes con macramé, el primero es de flores y una carita feliz de centro y el segundo es una bola de fuego centrada con dos rojas a los lados, ideales para combinar y lucirlos en nuestra muñeca, esta es una prenda que complementa cualquier conjunto y además que lindas nos vemos cuando llevamos accesorios puestos que nos complementen y realcen nuestros colores, es por ello que los invito a ver como se realiza y lo fácil que son de hacer.

Eng
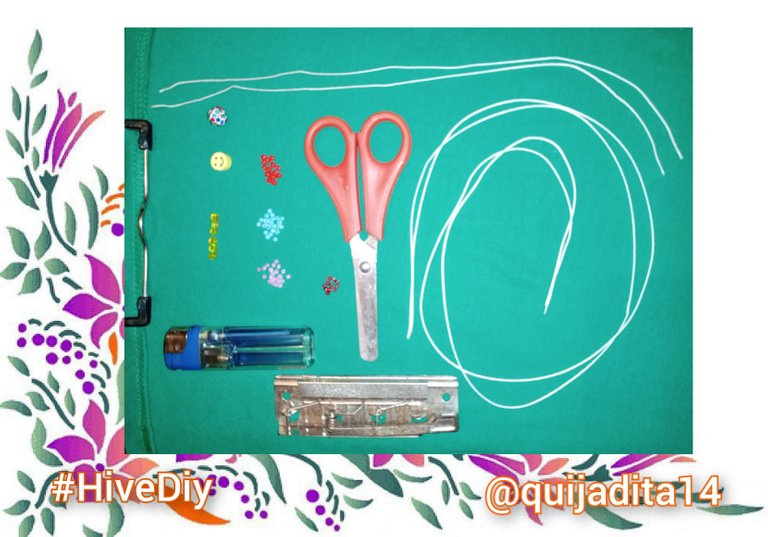
🛠️The materials I used were:
😋 tinderbox
😋 Snap Hook
😋 Scissor
😋Table with hook
😋2 pieces of Chinese thread of 30 centimeters
😋2 pieces of Chinese thread of 60 centimeters
😋1 fireball
😋1 smiley face
😋 6 small yellow jewelery stones
😋 12 small pastel pink jewelery stones
😋 12 small pastel blue jewelery stones
😋 12 small pastel orange rhinestones
😋 4 small red jewelry stones
Esp
🛠️Los materiales que utilice fueron:
😋Yesquero
😋Gancho a presión
😋Tijera
😋Tabla con gancho
😋2 piezas de hilo chino de 30 centímetros
😋2 piezas de hilo chino de 60 centímetros
😋1 bola de fuego
😋1 carita feliz
😋6 piedras de bisutería pequeñas color amarrillo
😋12 piedras pequeñas de bisutería color rosa pastel
😋12 piedras pequeñas de bisutería color azul pastel
😋12 piedras pequeñas de bisutería color naranja pastel
😋4 piedras pequeñas de bisutería color rojas
Eng
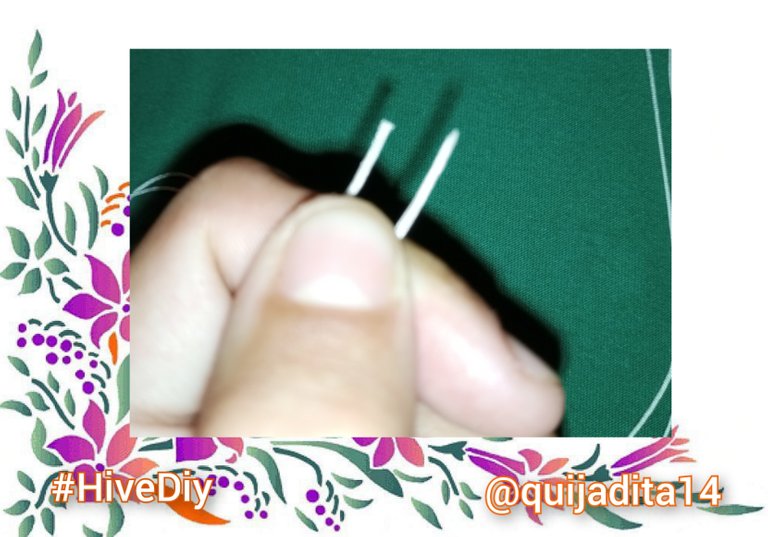
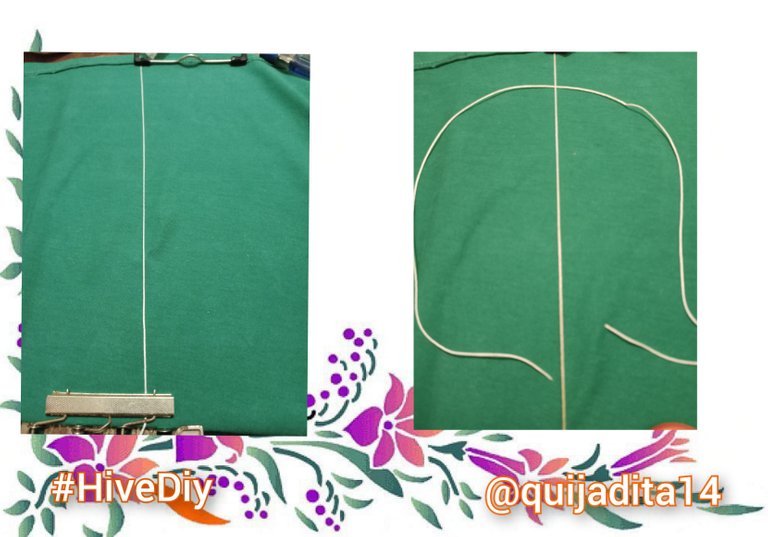
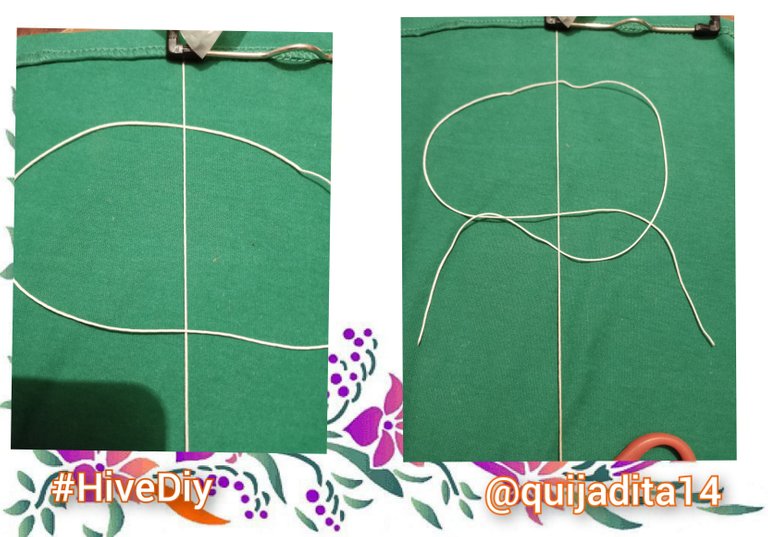
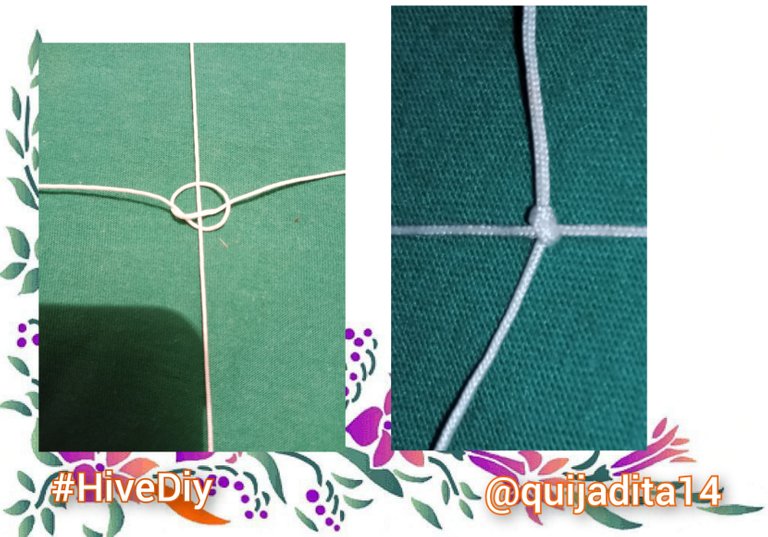
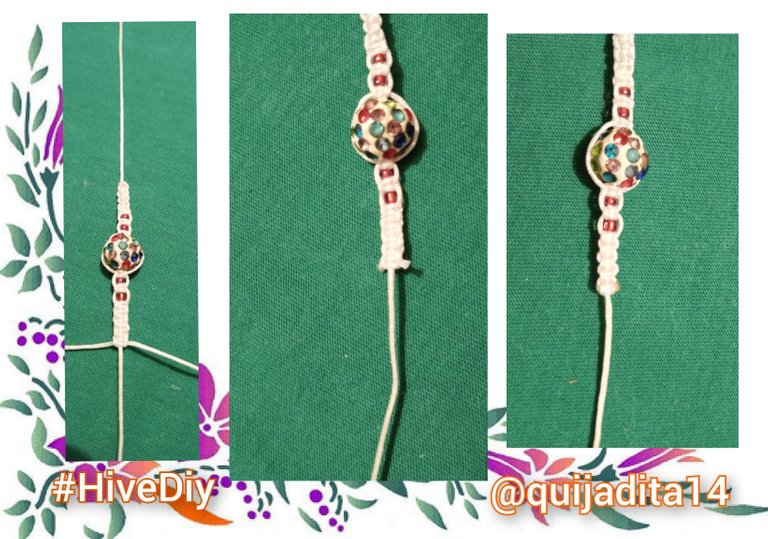
Before starting to make the bracelets we are going to burn all the ends of the Chinese thread with the tinderbox, this will help us to make the Chinese thread pass through the stones more easily, here in the image you can differentiate the burned end from the cut end without burning Now yes, we start by taking a 30 centimeter piece of Chinese thread and we are going to fasten one end of the table with a hook while we fasten the lower surface with the pressure hook, in the way shown in the image, now we take a 24-inch piece of Chinese thread and we're going to pass it behind the 12-inch Chinese thread, then we take the left end to pass it to the right side over the 12-inch Chinese thread, then we take the other end of the right and we pass it to the right under the 30-centimeter Chinese thread, once we have this we can see that some waves are formed as it appears in the image, well, we will pass the tip of the left end through the right wave and that of the right to the left from bottom to top, in this way we will form the knot, we must tighten little by little and measure the distance that we are going to leave to then be able to hold the bracelet, that is why before making zar the total closure of the knot they can mark the distance so that the bracelet is not short, once we have that measure we tighten the knot strongly so that it does not come undone, we are going to repeat this same step but in an inverted way, it is In other words, if this time the left to right went over the 30-centimeter Chinese thread, now it would have to go under it and the one from right to left over the top and so, it is a pattern that they must follow, they must follow the same when going placing the stones as this exchange will shape the knot and keep it straight.
Esp
Antes de comenzar a realizar los brazaletes vamos a quemarle todas las puntas al hilo chino con el yesquero, esto nos ayudara a que el hilo chino pase a través de las piedras más fácil, acá en la imagen pueden diferenciar la punta quemada de la punta cortada sin quemar. Ahora sí, comenzamos tomando una pieza de hilo chino de 30 centímetros y un extremo lo vamos a sujetar de la tabla con gancho mientras que la superficie inferior la sujetamos con el gancho a presión, de la manera que se muestra en la imagen, ahora tomamos una pieza de hilo chino de 60 centímetros y lo vamos a pasar por detrás del hilo chino de 30 centímetros, luego tomamos el extremo de la izquierda para pasarlo al lado derecho por encima del hilo chino de 30 centímetros, luego tomamos el otro extremo de la derecha y lo pasamos hacia la derecha por debajo del hilo chino de 30 centímetros, una vez que tenemos esto nos podemos fijar que se forman unas ondas como aparece en la imagen bueno, pasaremos la punta del extremo izquierdo por la onda derecha y la de la derecha por la izquierda de abajo hacia arriba, de esta manea formaremos el nudo, debemos ir apretando poco a poco y midiendo la distancia que le vamos a dejar para luego poder sujetar el brazalete, es por ello que antes de realizar el cierre total del nudo pueden marcar la distancia para que no les quede corto el brazalete, una vez que ya tenemos esa medida apretamos con fuerza el nudo para que no se deshaga, este mismo paso lo vamos a repetir pero de manera invertida, es decir, si esta vez la izquierda a derecha paso por encima del hilo chino de los 30 centímetros, ahora le tocara pasar por debajo y al de derecha a izquierda por arriba y así, es un patrón que deben seguir, esto mismo deben seguir al ir colocando las piedras ya que este intercambio le dará forma al nudo y lo mantendrá derecho.
Eng
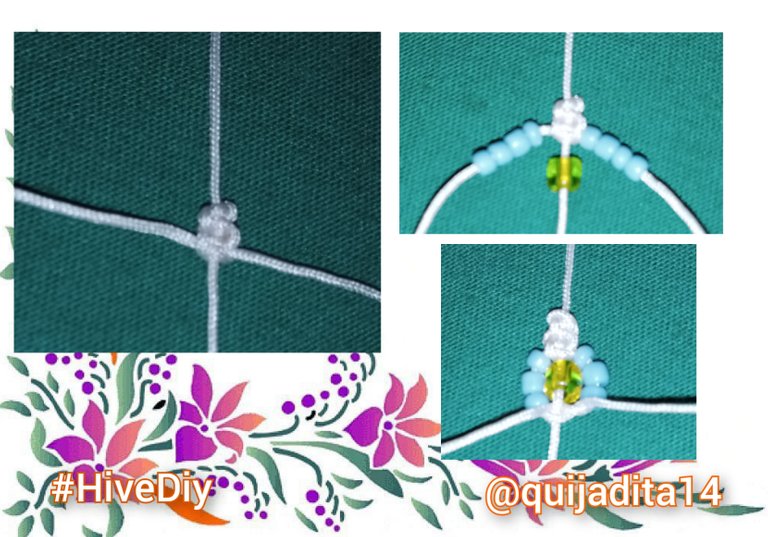
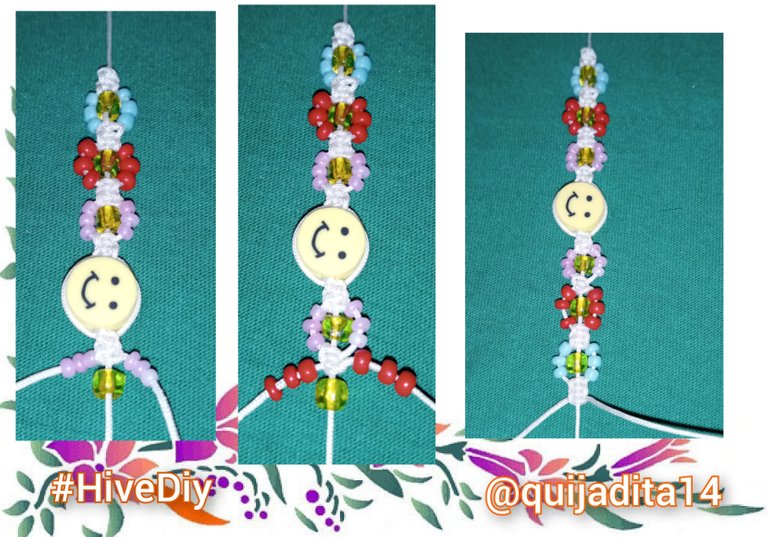
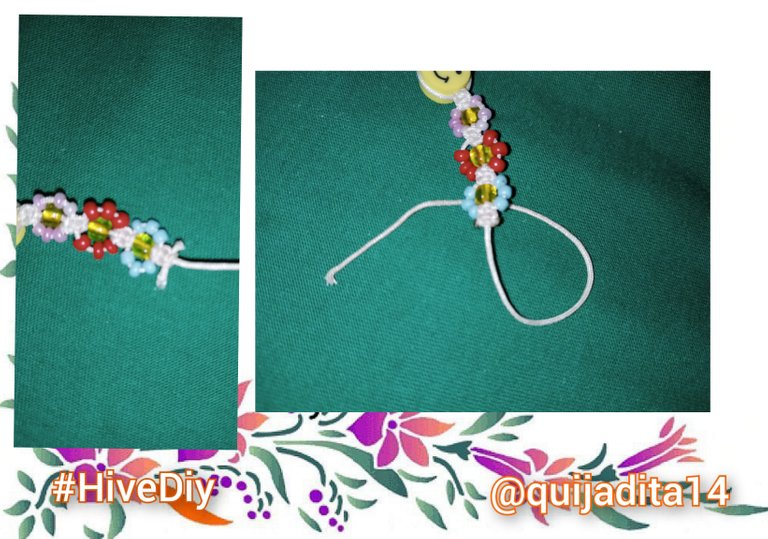
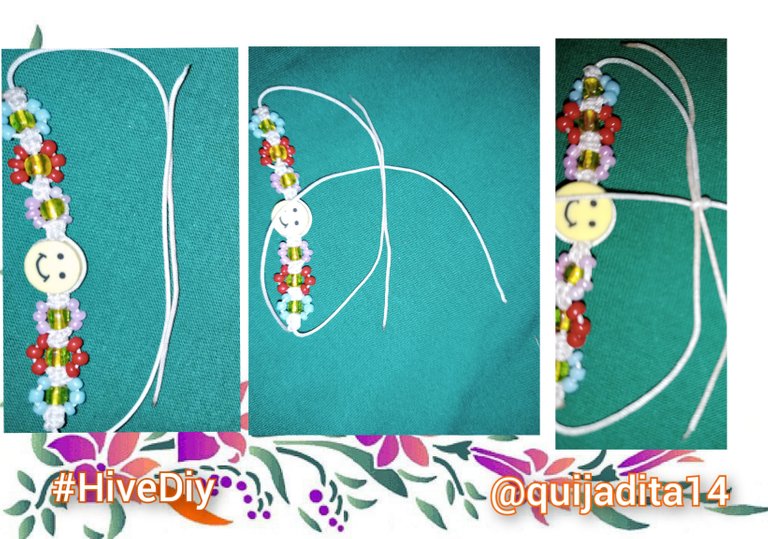
Once we have mastered the pattern that we must follow, we are going to make 4 knots and begin to place the small pastel blue jewelry stones at the ends, on each side we will place 3 stones which will be the flower petals and in the middle Chinese thread we will to place a yellow one which will be the center of our flower, then we will make a first knot, following the pattern that we have and we will close it carefully to give the shape to our flower, once the first flower is ready we will make the other 3 knots to complete the 4 knots of distance that we have, we return and at the ends we will place the pastel orange stones and in the center the yellow one, we repeat the same step of 4 knots to make our second flower, for the third flower we place in the ends the pastel pink stones and in the center the yellow stone and we make 4 knots again following the pattern, when our three flowers are ready we are going to place in the h ilo chino del centro the happy face, we make our 4 knots again, and we follow the pattern of the flowers again, only we will start with the pastel pink flower, then with the pastel orange and finally the pastel blue, concluding with the 4 knots of distance that we carry.
Esp
Una vez dominado el patrón que debemos seguir vamos a realizar 4 nudos y comenzamos a colocar en los extremos las piedras pequeñas de bisutería azul pastel, de cada lado colocaremos 3 piedras lo cuáles serán los pétalos de la flor y en el hilo chino del medio vamos a colocar una amarrillo el cual será el centro de nuestra flor, luego haremos un primer nudo, siguiendo el patrón que llevamos y lo vamos a cerrar cuidadosamente para darle la forma a nuestra flor, una vez lista la primera flor vamos a realizar los otros 3 nudos para completar los 4 nudos de distancia que llevamos, volvemos y en los extremos colocaremos las piedras color naranja pastel y en el centro la amarrilla, volvemos a repetir el mismo paso de 4 nudos para realizar nuestra segunda flor, para la tercera flor colocamos en los extremos las piedras color rosa pastel y en el centro la piedra color amarillo y volvemos a realizar 4 nudos siguiendo el patrón, cuando ya estén listas nuestras tres flores vamos a colocar en el hilo chino del centro la carita feliz, volvemos a realizar nuestros 4 nudos, y seguimos el patrón de las flores nuevamente , solo que comenzaremos con la flor rosa pastel, luego con la anaranjada pastel y por último la azul pastel, concluyendo con los 4 nudos de distancia que llevamos.

Eng
When we finish with the 4 knots we are going to have Chinese thread at the ends, we are going to cut it as close to the knot as we can with the scissors and then we are going to burn it, sticking it to the knot with the tip of the tinderbox so that it is fixed and don't come undone
Esp
Cuando finalizamos con los 4 nudos nos va a quedar hilo chino en los extremos, vamos a cortarlo lo más pegado al nudo que podamos con las tijeras y luego lo vamos a quemar, pegándolo al nudo con la punta del yesquero para que este quede fijado y no se deshaga.
Eng
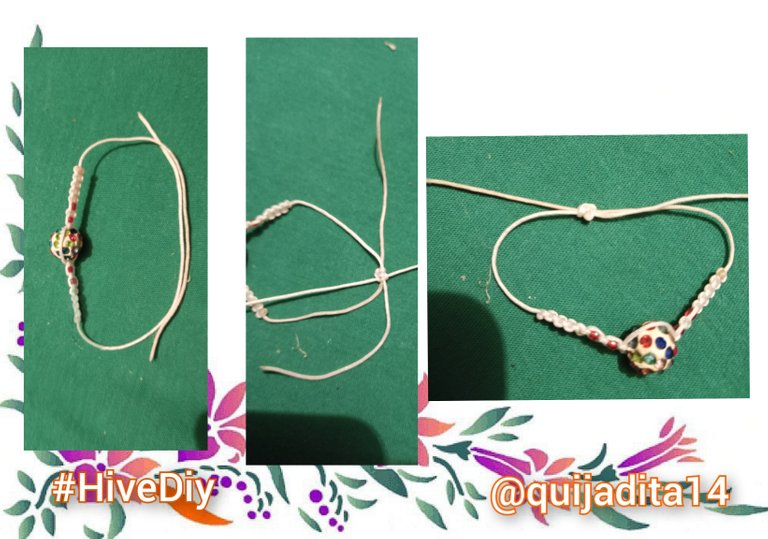
We take our bracelet and we are going to place the ends that were left over from the 30 centimeters we are going to cut it with the measure of our wrist and we will add a few centimeters to be able to make the closing knot, that is why we are going to place our bracelet in the way that is shown in the image to make a sliding macramé knot, which is the same pattern that we use to make our bracelet, so having it located in this way we take 10 centimeters that were left over from the 30 centimeters of Chinese thread and we are going to pass it behind these two ends of the bracelet, we will pass one end from left to right below and one from right to left above and then we are going to invert it to make a two-point macramé knot, we will cut the ends that are left over to burn the tips, as an additional touch you can add two leftover jewelry stones and make a simple knot and burn the tip, as a decorative way. And ready we have finished our first bracelet.
Esp
Tomamos nuestro brazalete y vamos a colocar los extremos que nos sobraron de los 30 centímetros lo vamos a cortan con la medida de nuestra muñeca y le añadiremos unos centímetros para poder realizar el nudo de cierre, es por ello que vamos a ubicar nuestro brazalete dela forma que se muestra en la imagen para realizar un nudo macramé corredizo, que él es mismo patrón que utilizamos para realizar nuestro brazalete, entonces al tenerlo ubicado de esta manera tomamos 10 centímetros que nos sobraron de los 30 centímetros de hilo chino y lo vamos a pasar por detrás de estos dos extremos del brazalete, pasaremos un extremo de izquierda a derecha por debajo y uno de derecha a izquierda por arriba y luego lo vamos a invertir para realizar un nudo macramé de dos puntos, cortaremos los extremos que nos sobraron para quemar las puntas, como toque adicional pueden agregar dos piedras de bisutería que les sobren y realizar un nudo sencillo y quemar la punta, como manera decorativa. Y listo hemos terminado nuestro primer brazalete.
Eng
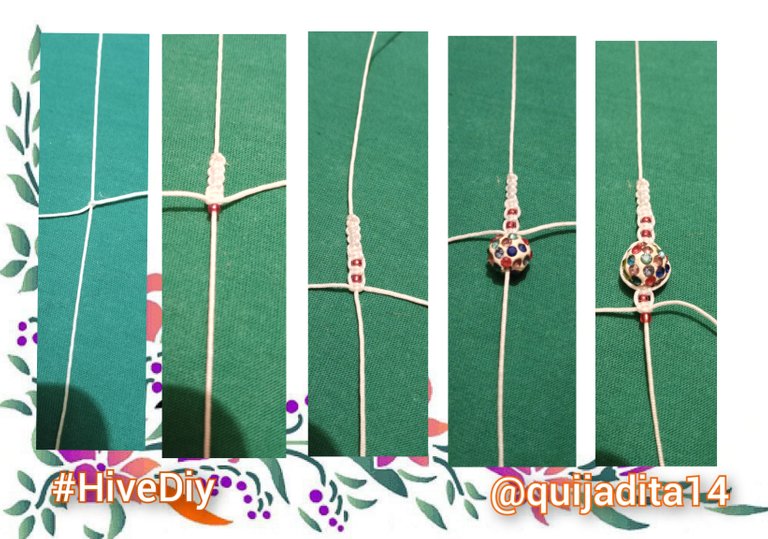
For our second bracelet we will use the same pattern to make the knots, that is, we will place the 30-centimeter piece of thread attached to the table with a hook and the lower end with the snap hook, we will take another 60-centimeter piece and we will pass it below the 30-centimeter one, we take the end that is on the right and we will pass it to the left side above the 30-centimeter Chinese thread forming a wave and we take the one on the left side and we will pass it to the right under the thread Chinese of 30 centimeters forming a wave, each end of the thread must pass through nothing on its side in the direction it is going, that is, the one from right to left will go from top to bottom and the one from left to right from bottom to top to form the flat macramé knot, we are going to repeat this but on the contrary, that is, the one that went through the top now touches the bottom and the one below touches the top, if it will be the pattern, we will make 10 knots first, remember mid go the distance to leave Chinese thread to hold the bracelet to the wrist, after having these first 10 knots we are going to take a small red jewelery stone and we are going to pass it through the Chinese thread in the middle, we will make 2 knots following the pattern and insert another small red jewelery stone through the middle Chinese thread, we make another two knots and place the fire stone, we again make another 2 knots, we again place another small red jewelery stone, 2 knots again and the small red jewelery stone and we make the last 10 knots to finish our bracelet.
Esp
Para nuestro segundo brazalete utilizaremos el mismo patrón para realizar los nudos, es decir, ubicaremos la pieza de hilo de 30 centímetros sujetado de la tabla con gancho y el extremo inferior con el gancho a presión, tomamos a otra pieza de 60 centímetros y la pasaremos por debajo de la de 30 centímetros, tomamos el extremo que quedo en la derecha y lo pasaremos a el lado izquierdo por encima del hilo chino de 30 centímetros formando una onda y tomamos el de lado izquierdo y lo pasamos a la derecha por debajo del hilo chino de 30 centímetros formando una onda, cada extremo de hilo debe pasar por la nada de su lada en la dirección que va, es decir, el de derecha izquierda pasara de arriba hacia abajo y el de izquierda a derecha de abajo hacia arriba para formar el nudo plano de macramé, esto lo vamos a repetir pero al contrario, es decir, el que paso por arriba ahora le toca por debajo y el de abajo le toca por arriba, en si se será el patrón, haremos 10 nudos primero, recuerden medir la distancia para dejar hilo chino para sujetar el brazalete a la muñeca, luego de tener estos 10 primeros nudos vamos a tomar un piedra de bisutería pequeña de color rojo y la vamos a pasar por el hilo chino del medio, realizaremos 2 nudos siguiendo el patrón y volvemos a meter otra piedra de bisutería pequeña de color rojo por el hilo chino del medio, realizamos otros dos nudos y colocamos la piedra de fuego, realizamos nuevamente otros 2 nudos, volvemos a colocar otra piedra de bisutería pequeña color rojo, 2 nudos nuevamente y la piedra de bisutería pequeña de color rojo y realizamos los últimos 10 nudos para terminar nuestro brazalete.
Eng
Once all the knots are finished we are going to cut the left and right ends that are left over, cutting them as close to the knot as we can, then we are going to burn them and with the tip of the tinderbox we are going to fix them to the knot so that it is well sealed and don't come undone.
Esp
Una vez terminado todos los nudos vamos a cortar los extremos de izquierda y derecha que nos sobran, cortándolos lo más pegados al nudo que podamos, luego los vamos a quemar y con la punta del yesquero los vamos afincar al nudo para que quede bien sellado y no se deshaga.
Eng
We will place our bracelet as it appears in the image to make the slipknot, we will make this knot with the same pattern that we have been working on, we will pass 10 centimeters that were left over from the 30 centimeters behind the ends of the bracelet, we will pass one end of the 10 centimeters from left to right above the Chinese thread that is in the center and from right to left below, then we will invest it and we will obtain our slipknot, it only remains to cut what is left over, burn the ends and fix them with the tip of the tinderbox so that our knots do not undo and that's it, we have finished our second bracelet.
Esp
Colocaremos nuestro brazalete como aparece en la imagen para realizar el nudo corredizo, realizamos este nudo con el mismo patrón que hemos estado trabajando, pasaremos 10 centímetros que nos sobraron de los 30 centímetros por detrás de los extremos del brazalete, pasaremos un extremo de los 10 centímetros de izquierda a derecha por encima del hilo chino que se encuentra en el centro y de derecha izquierda por debajo, luego lo haremos investido y ya obtendremos nuestro nudo corredizo, solo queda cortar lo que nos sobro, quemamos los extremos y fijarlos con la punta del yesquero para que no se deshaga nuestros nudos y listo hemos terminado nuestro segundo brazalete.
Eng
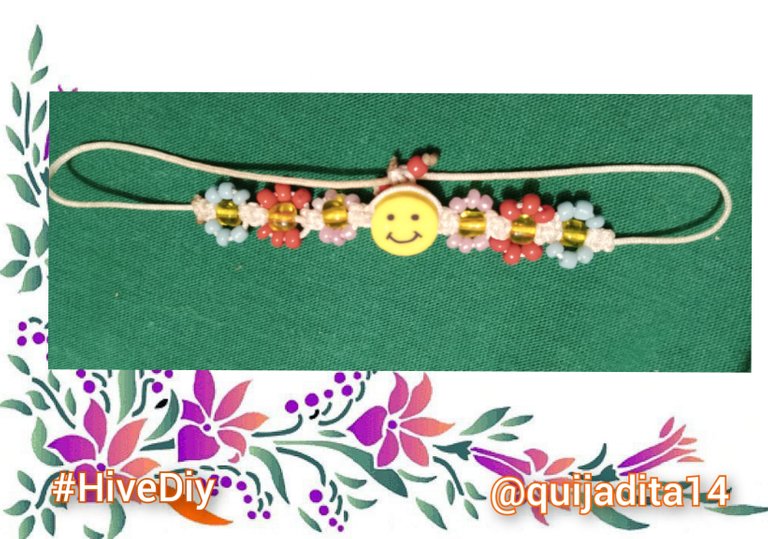
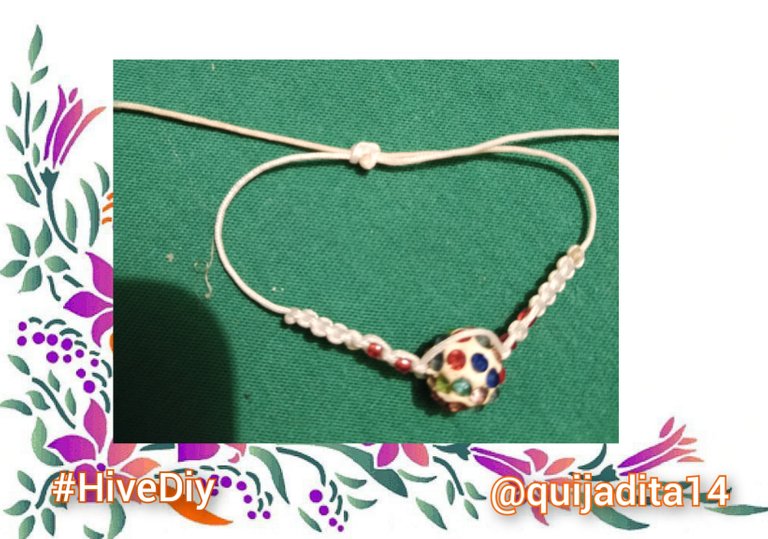
Here you can see how beautiful our two bracelets have been, ready to wear and show off.
Esp
Acá pueden apreciar lo lindo que han quedado nuestros dos brazaletes, listos para usar y lucir.

Eng
All the photographs are my own, taken with an Infinix Hot 11 Play, edited in InCollage and the text was translated in Google translator, here I leave the source of the text separator.
Source
Esp
Todas las fotografías son de mi autoría, tomadas con un Infinix Hot 11 Play, editadas en InCollage y el textro fue traducido en Google traductor, acá les dejo la fuente del separador de texto.
Fuente
Dear @quijadita14, we need your help!
The Hivebuzz proposal already got important support from the community. However, it lost its funding a few days ago and only needs a few more HP to get funded again.
May we ask you to support it so our team can continue its work this year?
You can do it on Peakd, ecency,
https://peakd.com/me/proposals/199
Your support would be really helpful and you could make a difference.
Thank you!
Está hermosa
Muy lindo y original...me encantó
🎆🎇🎉🎊🦋🌲🥰🌳🐞🐝🌴💐🌵🪴☺️😘🍀☘️🌹🥀🍃🌿🌺🌷🌻🌾🌼😊👍🏼🍄🍂🍁🌹🥀🌺🌷🌸💮🏵️🎊🎉🎇🎆
Thank you for sharing this amazing post on HIVE!
Your content got selected by our fellow curator @rezoanulvibes & you just received a little thank you via an upvote from our non-profit curation initiative!
You will be featured in one of our recurring curation compilations and on our pinterest boards! Both are aiming to offer you a stage to widen your audience within and outside of the DIY scene of hive.
Join the official DIYHub community on HIVE and show us more of your amazing work and feel free to connect with us and other DIYers via our discord server: https://discord.gg/mY5uCfQ !
If you want to support our goal to motivate other DIY/art/music/homesteading/... creators just delegate to us and earn 100% of your curation rewards!
Stay creative & hive on!