Hoolaa mis hermosos Hivers creativos! ♥️
Hello my beautiful Creative Hivers! ♥️
Feliz inicio de semana, bendiciones de Dios para ustedes! Espero que todos se encuentren muy bien! El foami es un material que se ha vuelto muy popular estos último tiempos y su evolución ha logrado que se puedan hacer muchas más cosas de la que pensamos, el día de hoy chicas me gustaría enseñarles cómo hacer lindos accesorios para el cabello, no dejen de ver este tutorial de hoy, ya que aprenderemos de forma muy fácil, cómo elaborar unos lindos lazos para el cabello, el material que por lo general se usa, son el listón, pero esta vez, este tipo de lazo para el cabello se hará con foami escarchado, ya veras lo bello que quedan, el foami al ser un material tan económico y fácil de trabajar, podrás crear infinidades de diseños en lazos, haciendo lindas combinaciones con las texturas de foami pero en este caso te mostraré como hacer solo tres modelos muy elegantes para el cabello de tus niñas y para ti misma. Mira este tutorial, y aprende en minutos, cómo hacer estos lindos lazos, vamos!
Happy start to the week, God's blessings to you! I hope all of you are okey! Foami is a material that has become very popular in recent times and its evolution has made it possible to do many more things than we think, today girls I would like to teach you how to make beautiful hair accessories, do not stop See this tutorial today, since we will learn in a very easy way, how to make beautiful hair bows, the material that is usually used is the ribbon, but this time, this type of hair bow will be made with frosty foami, you will see how beautiful they are, foami being such an economical material and easy to work with, you will be able to create infinite designs in bows, making nice combinations with foami textures but in this case I will show you how to make only three models Very elegant for your girls' hair and for yourself. Watch this tutorial, and learn in minutes, how to make these cute bows, come on!

Materiales que necesitas:
- Foami escarchado ( del color de tu preferencia)
- Tijeras.
- Silicón.
- Ganchos para el cabello.
- Palillos de altura.
Materials you need:
- Frosted Foami (in the color of your choice)
- Pair of scissors.
- Silicone.
- Hairpins.
- High halls.
- Height sticks.
Pasos a seguir!


Paso 01.
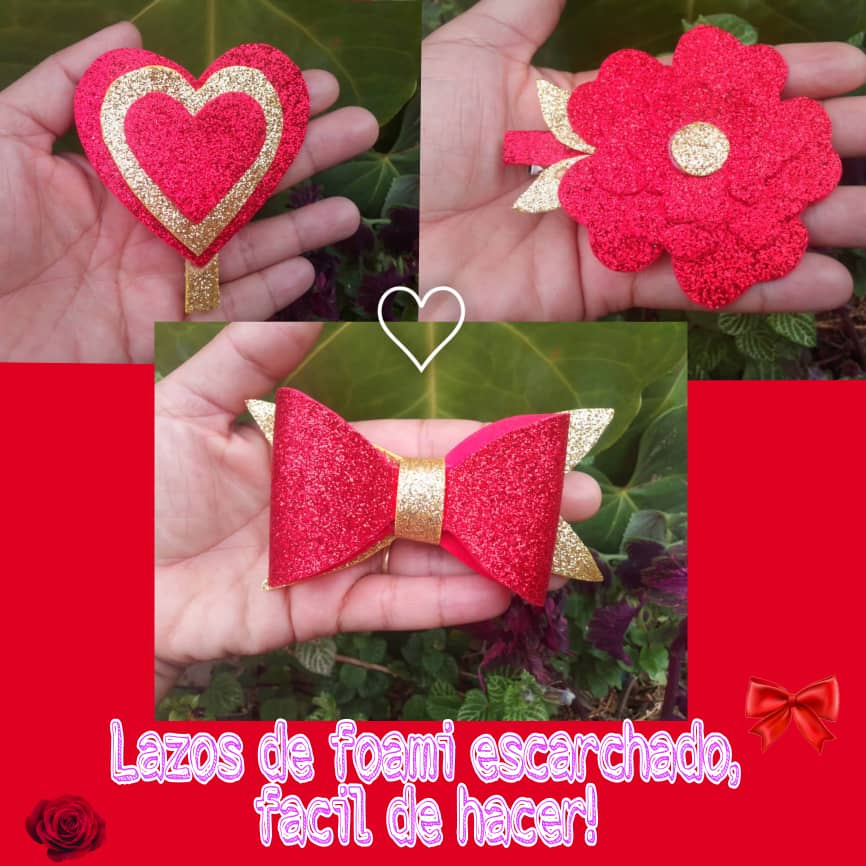
El primer modelo que haremos será de corazon, entonces con un molde de dicha forma la trazamos sobre el foami escarchado al revés con un palillo de altura, en mi caso utilice un color rojo y dorado pero tú puedes utilizar el color que más te guste, haremos un corazón más pequeño para el medio del lazo y uno aún más pequeño para la parte de arriba y pegamos con silicón bcalienteestos tres corazones desde el más grande hasta el mas pequeño.
Step 01.
The first model that we will make will be a heart, then with a mold of that shape we trace it on the frosted foami in reverse with a height toothpick, in my case I used a red and gold color but you can use the color that you like the most, We will make a smaller heart for the middle of the bow and an even smaller one for the upper part and glue these three hearts from the largest to the smallest with silicone bhot.


Paso 02.
En el segundo modelo de lazo, marcamos el molde de un liston sobre el foami dorado y sobre el foami rojo marcamos dos ovalos un una cinta de foami dorado. Luego lo armamos pegando la pieza de foami rojo en el centro del listón dorado y cubrimos el medio con la tira de foami dorado. Pegamos su gancho de cabello.
Step 02.
In the second bow model, we mark the mold of a ribbon on the gold foami and on the red foami we mark two ovals on a gold foami ribbon. Then we put it together by gluing the piece of red foami in the center of the gold ribbon and covering the middle with the strip of gold foami. We glue her hair clip.


Paso 03.
Continuamos con el tercer diseño, este lo haremos con tres moldes de flores de varios tamaños. Utilizamos el palillo de altura para trazar su forma en este caso sobre el foami rojo y pegamos, cortamos un círculo dorado para el centro, un tallo de foami rojo y las hojas de foami dorado. Pegamos todas estás piezas al gancho de cabello.
Step 03.
We continue with the third design, we will do this with three flower molds of various sizes. We use the height stick to trace its shape in this case on the red foami and paste, we cut a golden circle for the center, a red foami stem and the golden foami leaves. We glue all these pieces to the hair clip.
🎀♥️🌹 Resultado! 🌹♥️🎀
Listo mis bellos amigos! Aquí les muestro este hermoso resultado. Espero te haya gustado mi trabajo el día de hoy y que este post le sea de utilidad en algún momento, con tu propia creatividad harás estos lazos de varios colores.!!
MReady my beautiful friends! Here I show you this beautiful result. I hope you liked my work today and that this post will be useful to you at some point, with your own creativity you will make these multi-colored bows.!!


☺ Gracias por tu linda visita a mi post! ☺
Dios te bendiga y Dios te guarde! Cuídate mucho! Te mando un fuerte abrazo desde la distancia,que tengas un hermosa y exitosa semana! Nos leemos en el próximo post.
God bless you and God keep you! Take care! I send you a big hug from a distance, have a beautiful and successful week! We read in the next post.
All the images in this post are my own. Taken from my Smooth 6.5 device and edited in the PicsArt App! Translated text in Google translator.