
Como padres estoy segura que a todos nos ha tocado alguna vez ayudar a nuestros hijos en sus proyectos escolares, sobre todo cuando se trata de manualidades, y es que generalmente piden cosas que es imposible que un niño pueda realizar solo, cosa con la que nunca he estado de acuerdo pues los docentes saben que el niño no realiza la actividad, sino sus padres, en algunos casos con ayuda del niño, pero al final, es trabajo para los padres, no para el niño, pero no tenemos alternativa, pues de estas actividades dependen las calificaciones de nuestros hijos.
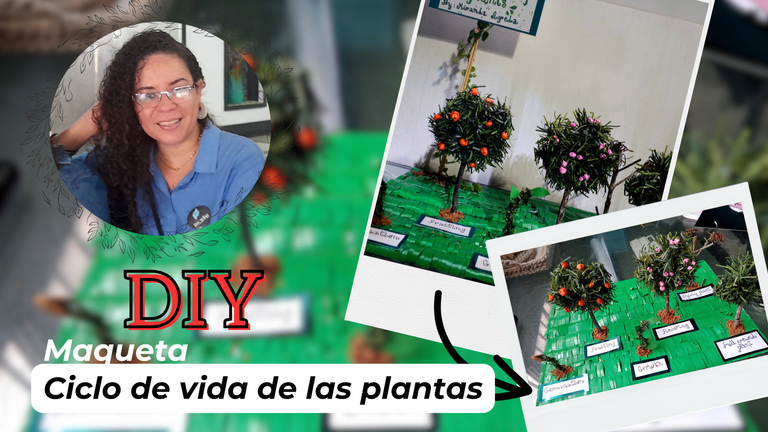
Y ahora sí, descargada mi frustración con respecto a este tipo de actividades, hoy les vine a compartir el proceso de elaboración de una maqueta sobre el ciclo de vida de las plantas para la materia de inglés, de Miranda. Y siiiii, una maqueta para inglés, un poco más de sinsentido, pero había que hacerla, y por si les sirve en casa les comparto el paso a paso y los materiales que usamos.
As parents I am sure that all of us have had to help our children in their school projects, especially when it comes to crafts, and usually they ask for things that it is impossible for a child to do alone, which I have never agreed with because teachers know that the child does not do the activity, but their parents, in some cases with the help of the child, but in the end, it is work for the parents, not for the child, but we have no choice, because of these activities depend on the grades of our children.
And now, my frustration with this type of activities unloaded, today I came to share with you the process of making a scale model about the life cycle of plants for Miranda's English class. And yes, a model for English, a little more nonsense, but it had to be done, and in case it is useful at home I share with you the step by step and the materials we used.
En mi caso siempre he tratado que los niños participen en la elaboración de cualquier actividad de la escuela de acuerdo a su edad, por suerte, Miranda ya está grande y puede ayudar mucho más en este tipo de proyectos, así que fue un trabajo en equipo.
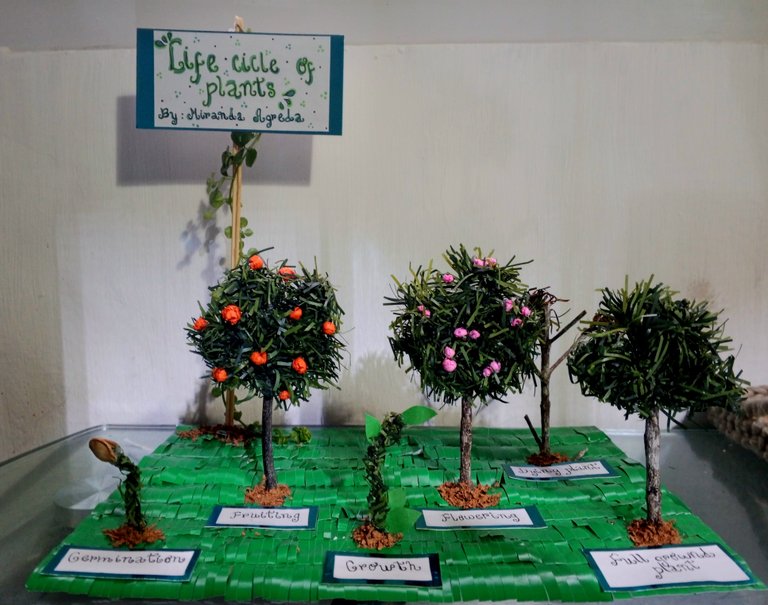
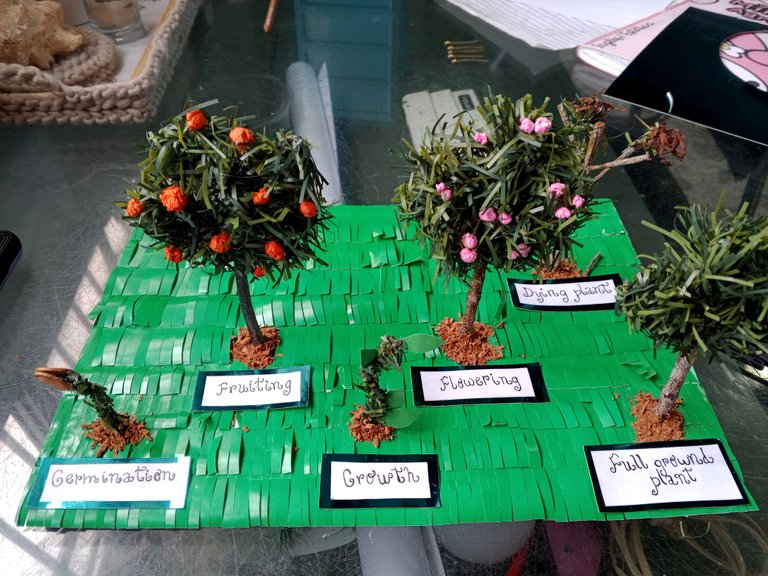
La idea de este proyecto era plasmar en la maqueta las distintas etapas de las plantas, desde su germinación hasta que la planta muere, así que aquí vamos con el proceso de elaboración de esta maqueta.
In my case I have always tried to get the children to participate in the elaboration of any school activity according to their age, luckily, Miranda is already grown up and can help much more in this kind of projects, so it was a team work.
The idea of this project was to capture in the scale model the different stages of plants, from germination until the plant dies, so here we go with the process of making this scale model.
Materiales
Cartón
Papel lustrillo verde
Ramitas de árbol
Trocitos de guirnaldas navideñas
Papel de seda rosado
Papel de seda naranja
Palitos de altura
Cartulina metalizada
Hoja blanca
Marcadores
Rotulador negro
Corcho rallado
Semillas de auyama
Pega en barra
Pega blanca
Pistola de silicón
Tijera
Cutter
Regla
Lápiz
Materials
Cardboard
Green glossy paper
Tree branches
Pieces of Christmas wreaths
Pink tissue paper
Orange tissue paper
Tall sticks
Metallic cardboard
White sheet
Markers
Black marker pen
Grated cork
Pumpkin seeds
Glue stick
White glue
Silicone gun
Scissors
Cutter
Ruler
Pencil
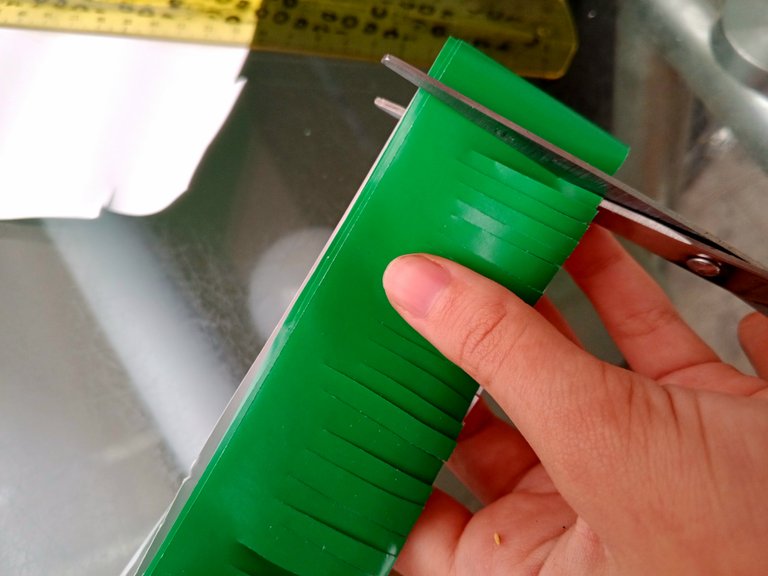
Lo primero que hicimos fue realizar la base de la maqueta, y para esto utilizamos cartón grueso, de esas cajas donde vienen los productos del supermercado y recortamos una pieza acorde a lo que llevaría la maqueta.
Para cubrirla usamos el papel lustrillo verde para simular el césped, así que Miranda se encargó de marcar y cortar tiras en este material para luego hacerle algunos cortes con la tijera creando una especie de flecos como ven en las fotos.
The first thing we did was to make the base of the model, and for this we used thick cardboard, one of those boxes where the products come from the supermarket and we cut a piece according to what the model would take.
To cover it we used green lustrillo paper to simulate grass, so Miranda was in charge of marking and cutting strips in this material to then make some cuts with the scissors creating a kind of bangs as you can see in the photos.


El siguiente paso fue pegar el papel verde sobre el cartón con ayuda de la pega en barra, superponiendo uno sobre el otro, cubriendo todo el cartón.
The next step was to glue the green paper onto the cardboard with the help of the glue stick, superimposing one on top of the other, covering the entire cardboard.


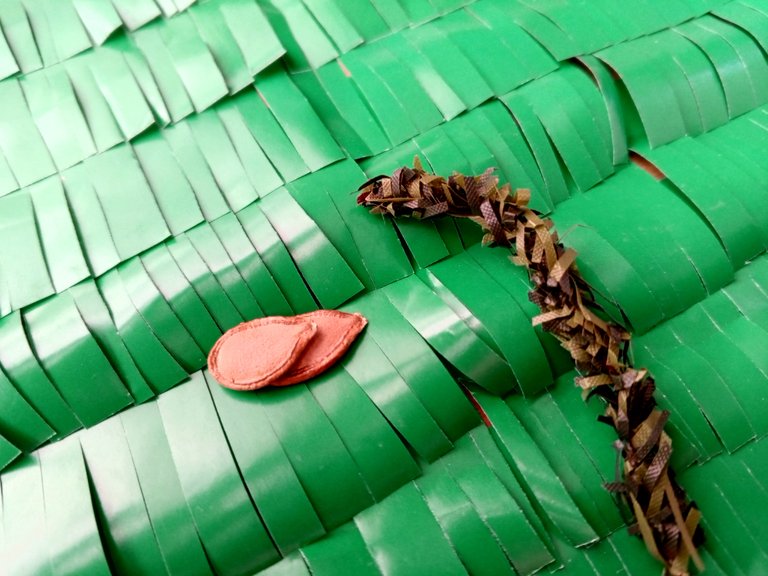
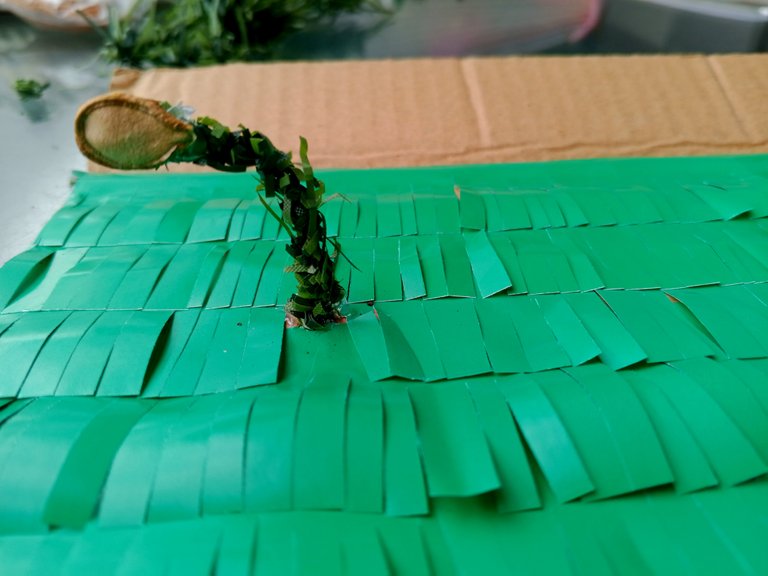
El siguiente paso fue representar la etapa de la germinacion, para lo que se me corrió utilizar un trocito de guirnalda de navidad, recortando todos los flequillos, dejando el alambre apenas cubierto de verde, y en la punta pegué una semilla de auyama por ambos lados del alambre y de esta forma estaba lista la primera fase del ciclo de las plantas.
The next step was to represent the germination stage, for which I used a piece of Christmas garland, cutting all the bangs, leaving the wire just covered with green, and at the end I glued a pumpkin seed on both sides of the wire and thus was ready the first phase of the cycle of the plants.
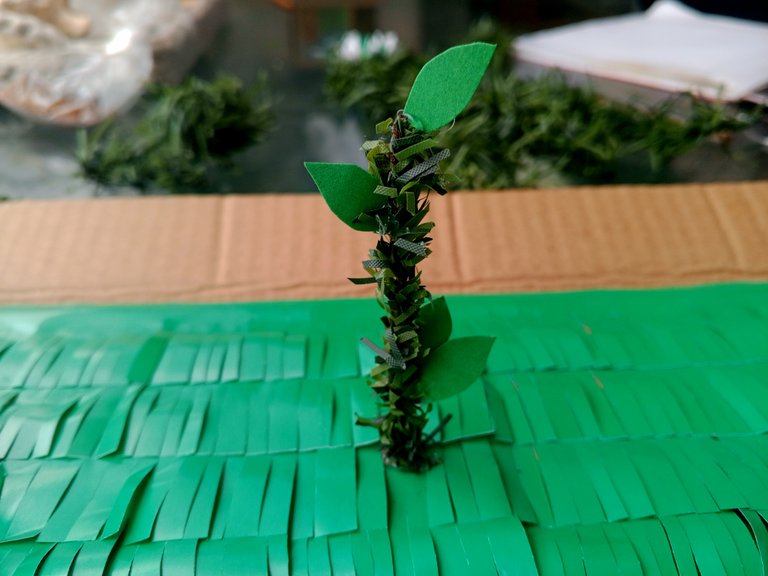
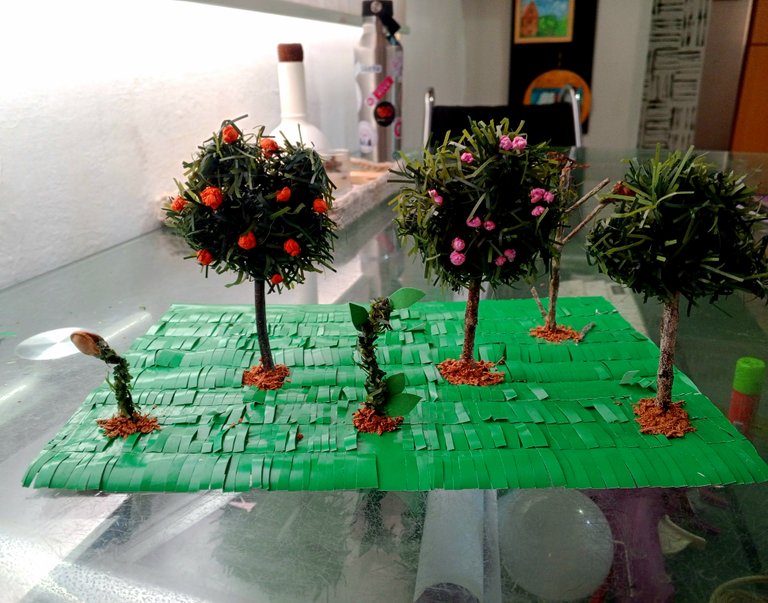
La siguiente etapa a representar es la del crecimiento de la planta, y otra vez utilicé una ramita de la quirnalda, le recorté los flequillos, y en esta oportunidad hice unas pequeñas hojas en cartulina verde, las que pegué con la pistola de silicón, y de esa manera quedó lista la pequeña planta en crecimiento.
The next stage to represent is the growth of the plant, and again I used a twig from the garland, I cut the bangs, and this time I made some small leaves in green cardboard, which I glued with the silicone gun, and that way the little growing plant was ready.
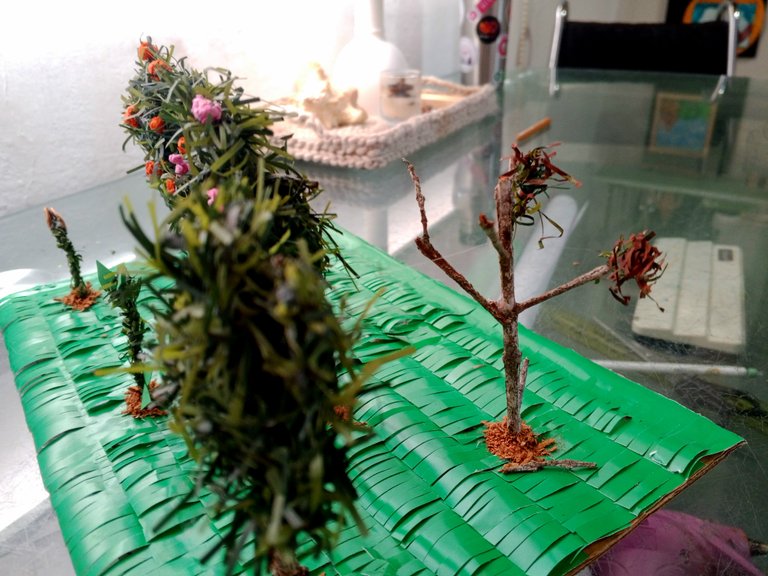
La etapa que seguía era la transformación en una planta adulta, para lo que usé una de las ramitas que Miranda recogió del patio y le fui dando forma a la copa del árbol con ramitas de guirnalda, las que fui pegando con silicón a la ramita, y de esa manera tenía lista otra etapa del ciclo de vida de las plantas.
The next stage was the transformation into an adult plant, for which I used one of the twigs that Miranda picked up from the yard and I was shaping the top of the tree with garland twigs, which I glued with silicone to the twig, and that way I had another stage of the life cycle of the plants ready.

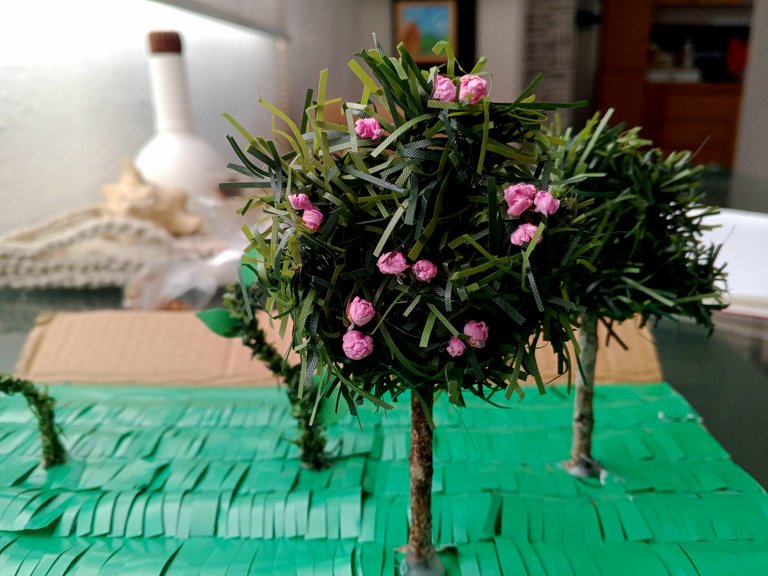
Otra etapa que debía representarse es la de la floración, y para esto hicimos otro árbol igual que el anterior, solo un poco más "frondoso", para el que Miranda hizo bolitas de papel de seda rosadas, que es el color de las flores del árbol de duraznos, que fue el que escogimos para hacer.
Estas bolitas las pegó Miranda con pega líquida en distintas partes del árbol.
Another stage that had to be represented is the flowering stage, and for this we made another tree just like the previous one, only a little "leafier", for which Miranda made little balls of pink paper, which is the color of the flowers of the peach tree, which was the one we chose to make.
These balls were glued by Miranda with liquid glue on different parts of the tree.
Seguidamente venía el turno de la etapa de la producción de frutos o fructificacion, y en este caso, a otro arbolito Miranda le hizo bolitas naranjas en papel de seda, que simulaban los duraznos.
Then it was the turn of fruit production or fruiting, and in this case, Miranda made little orange balls in tissue paper, which simulated peaches.
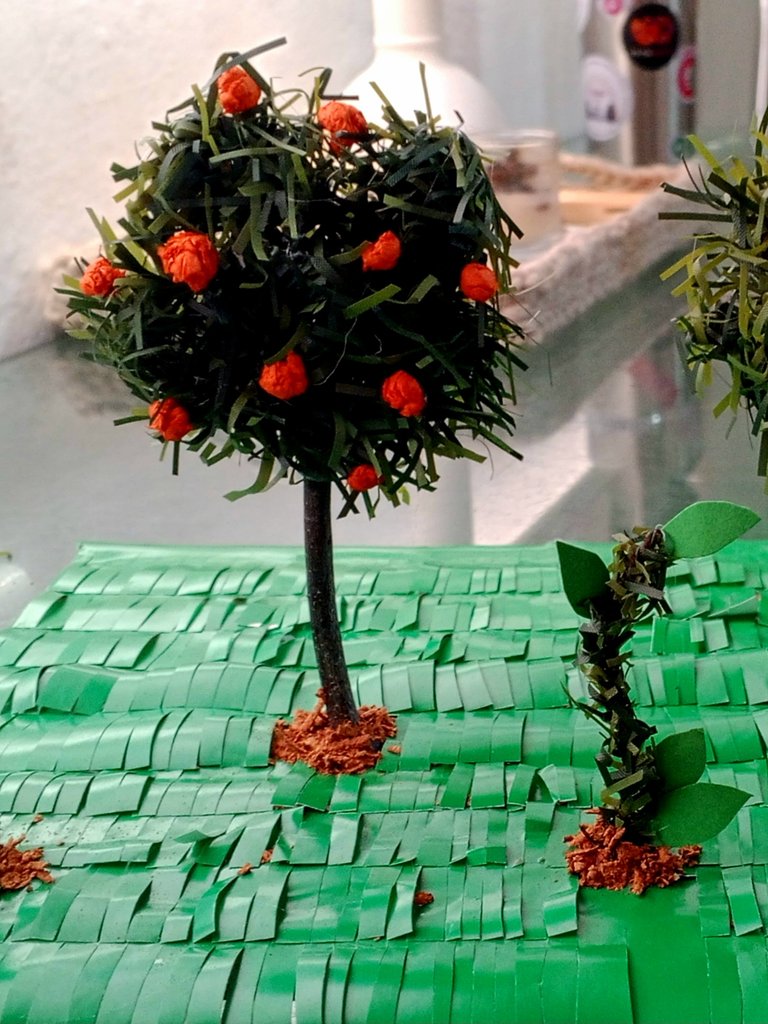
Por último, la etapa final en el ciclo de vida de las plantas es la muerte, y para esto usamos una ramita seca a la que le pegamos algunos trocitos de guirnalda pintadas de marrón.
Finally, the final stage in the life cycle of the plants is death, and for this we use a dry twig to which we glue some pieces of garland painted brown.
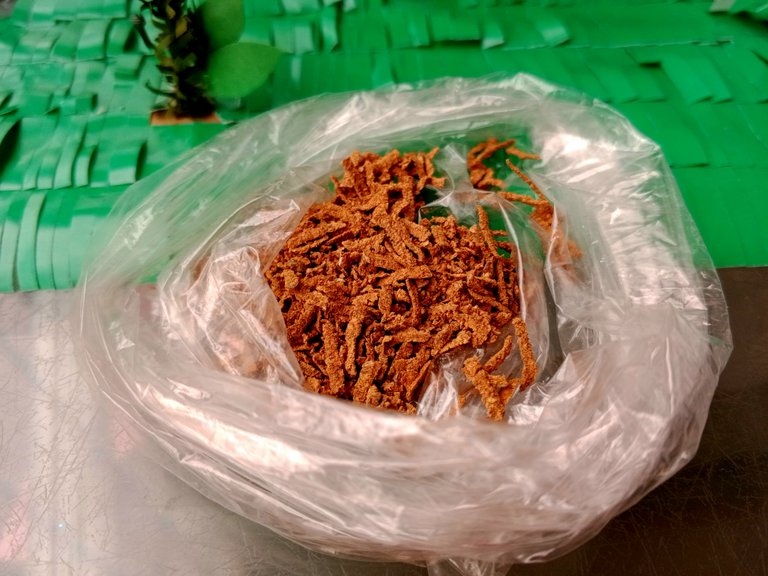
A medida que íbamos realizando cada plantita las íbamos fijando con el silicón caliente a la base verde, pero como ven en las fotos, cometí un error colocando las primeras etapas en la parte de atrás, y al final tuve que cambiarlas hacia el frente ya que los árboles más grandes tapaban a los pequeños, y una vez que cada planta estuvo en su lugar, agregamos pega blanca en la base junto con un poco de corcho rallado para simular la tierra.
As we were making each plant we were fixing them with hot silicone to the green base, but as you can see in the photos, I made a mistake placing the first stages in the back, and in the end I had to change them to the front because the bigger trees were covering the small ones, and once each plant was in place, we added white glue to the base along with some grated cork to simulate the soil.

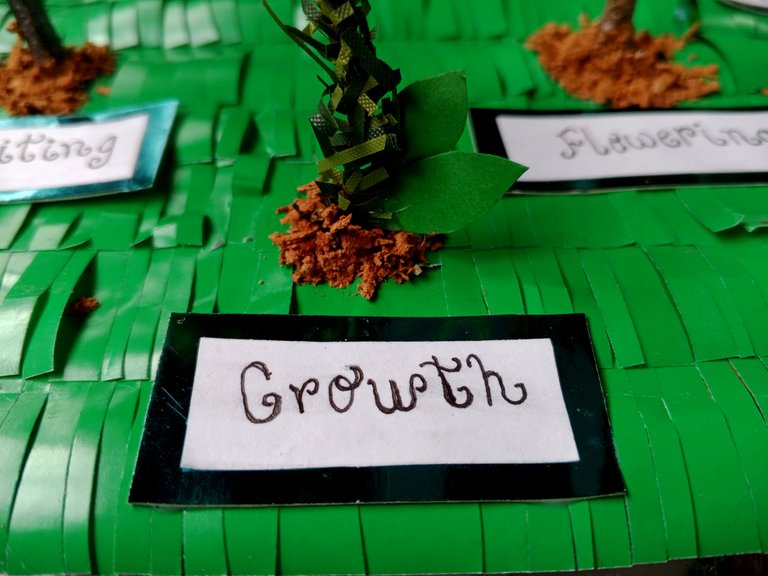
El siguiente paso fue realizar un pequeño hablador identificando cada etapa, para colocar en la base de cada arbolito, y para esto Miranda recortó trocitos de cartulina metalizada, mientras yo escribía en el papel el nombre en inglés de cada etapa, primero con un lápiz y luego remarcando con el rotulador negro.
Finalmente pegamos cada nombre sobre la cartulina metalizada con pega en barra, y luego cada hablador en su respectivo lugar con pega blanca.
The next step was to make a small talker identifying each stage, to place at the base of each tree, and for this Miranda cut out pieces of metallic cardboard, while I wrote on the paper the English name of each stage, first with a pencil and then highlighting it with the black marker.
Finally, we glued each name on the metallic cardboard with glue stick, and then each speaker in its respective place with white glue.
Por último necesitábamos identificar la maqueta, tanto con el nombre del proyecto como con el nombre de Miranda, así que en la hoja blanca los escribí y decoré con marcadores y el rotulador negro, pegué esto sobre un rectángulo de cartulina metalizada, y luego el identificador lo pegué en dos palitos de altura que fijé luego a la base de la maqueta, y para finalizar le agregué una ramita de una plantita natural y todo estuvo listo.
Finally we needed to identify the model, both with the name of the project and Miranda's name, so on the white sheet I wrote and decorated them with markers and the black marker, I glued this on a rectangle of metallic cardboard, and then I glued the identifier on two sticks that I then fixed to the base of the model, and finally I added a twig of a natural plant and everything was ready.

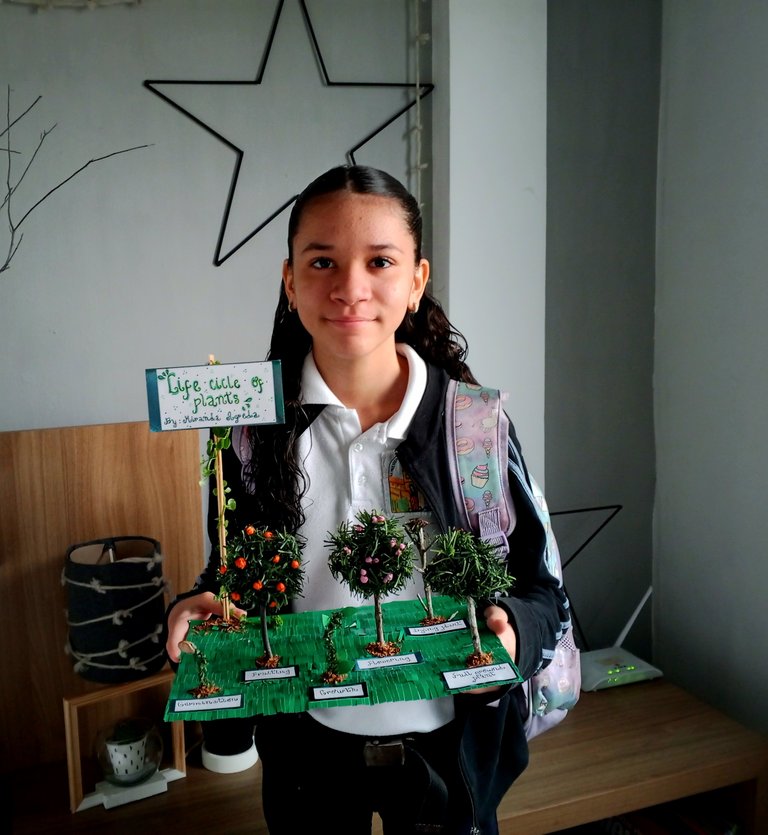
Miranda por su parte debía aprenderse en inglés, la explicación de lo que representamos en la maqueta y gracias a Dios le fue genial, obtuvo Logro Excelente que es la nota más alta, y por supuesto llegó a casa súper feliz. Así que decidí compartir con ustedes todo el proceso por si necesitan realizar algo similar en casa para sus niños.
Miranda had to learn in English the explanation of what we represented in the model and thank God she did great, she got Excellent Achievement which is the highest grade, and of course she came home super happy. So I decided to share with you the whole process in case you need to do something similar at home for your children.

Posted Using INLEO
Saludos amiga, esto me recuerda los trabajo del liceo, mi hermana le encanta hacer este tipo de trabajo, este ciclo de vida de plantas quedo bien representado.
Muchas gracias amiga, la verdad yo me quejo, pero me divierto haciéndolo jaja
Ay sí amiga! Al menos Miri está más grande y puede ayudar, pero es verdad que es un trabajo más para los padres. Al final quedó preciosa y Miri lindísima en la última foto con su maqueta 💕
Gracias ami bella, a mi me gusta hacerlas la verdad pero igual me molesta que las pidan jaga es divertido hacerlas.
Jajaja, y a última hora. Lo bueno es que pudieron resolver. Prepárate para más maquetas en inglés
Viste y a pesar de la carrera quedó fue bella jaja
Pulling this off was not easy but we love how you were able to complete this project against all odds. Well done and thanks for sharing.
selected by @ibbtammy
Thank you so much, I enjoyed the proyect 💗
Te quedaron muy bien estos árboles, es una maqueta para lucirse en clase. Te felicito, es genial poder apoyar a nuestros hijos en sus tareas escolares.
Muchas gracias amiga bella, yo me quejo, pero estos proyectos me gustan mucho jeje
Mi mamá pasaba por la misma frustración jajaja, de todos conmigo no llevo tanto trabajo desde pequeña yo ingeniaba mis manualidades. Les quedó muy bonita y creativa amiga!
Contigo tu mami debía estar feliz. Yo es que soy muy perfecionista y mamá gallina sobre todo, creo que tienen 5 años aún 🥺
Imagínese UD, primera vez que veo una maqueta en inglés, quedó muy lindo amiga. 🤗🤗🤗
Ya llevo dos, hace unos años le pidieron una a Matías de un área de la casa, hicimos una sala con muebles y demás. Ese me tocó con @claudimar jaja
Congratulations @rlathulerie! You have completed the following achievement on the Hive blockchain And have been rewarded with New badge(s)
Your next target is to reach 1100 posts.
You can view your badges on your board and compare yourself to others in the Ranking
If you no longer want to receive notifications, reply to this comment with the word
STOPCheck out our last posts:
Jejeje, hay amiga, eso es cierto, la nota es de los padres incluso, porque con la intención de que los niños salgan bien prácticamente hacemos estos trabajos, aunque el año pasado en 5 to grado a la maestra de ese grupo le puse la queja sobre eso, de que ellos deben hacer esos trabajos en el colegio y no en la casa, y ahora en 6 to trabajan más en el aula, claro eso no quiere decir que no existan cosas que tengamos que hacer con ellos, afortunadamente están más grandes las niñas.
Y bueno olvidando todo lo anterior, quedó bien bonita la maqueta, estoy segura que Miranda ayudó bastante porque ellos necesitan también aprender a realizar sus trabajos de manera independiente y más ahora que van a otro nivel escolar. Bien merecida la nota para las dos 🤗🤗🤗
Ami siii ella ayudó bastante, aunque no le exigí tanto porque tenía que estudiarse eso en inglés pero tu sabes, yo me quejo, pero me encanta hacer las manualidades jajaja
!discovery 30
This post was shared and voted inside the discord by the curators team of discovery-it
Join our Community and follow our Curation Trail
Discovery-it is also a Witness, vote for us here
Delegate to us for passive income. Check our 80% fee-back Program
Mi mama tambien me ayudaba a armar las maquetas jaja es trabajo para los padres, sin duda, pero te quedo muy hermosa, ame los arboles frutales, para tirarse un rato abajo de ellos y beber algo rico 😍
Thank you so much
Muy bonito, un hermoso trabajo, las tareas de las escuelas, siempre ponen a uno a inventar y crear, y claro, las mamas son las que corren con todo eso, pero claro, los hijos también deben participar, ya que asi van aprendiendo hacerlo por su cuenta.
Así es amiga, ella se pone conmigo, aunque tu sabes, a mi las manualidades me gustan jajaja y las maquetas más porque las cositas mini se ven cuchis, así que este proyecto sí lo disfruté
WOW! Really amazing and nicely done, bravo and keep it up