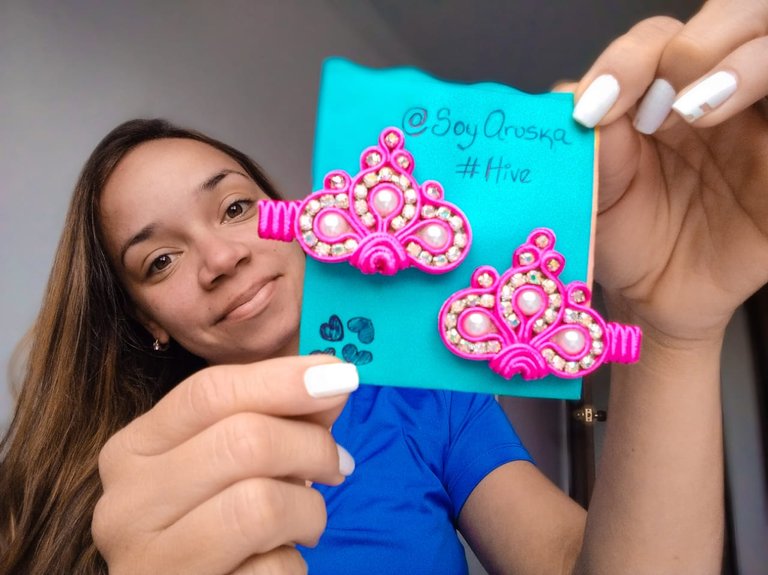

Hoy estoy muy feliz de mostrarle este proyecto, que me encantó realizar.
La técnica soutache es muy popular, ya que es muy artística y versátil para diseñar accesorios. Esta técnica se trata de ir realizando la forma con el cordón y crear el diseño que deseamos. Hoy realicé unos ganchitos para el cabello, que sirven para mujeres y niñas, son muy bellos.
Today I am very happy to show you this project, which I loved doing.
The soutache technique is very popular as it is very artistic and versatile for designing accessories. This technique is about making the shape with the cord and creating the design we want. Today I made some hair clips, which are used for women and girls, they are very beautiful.
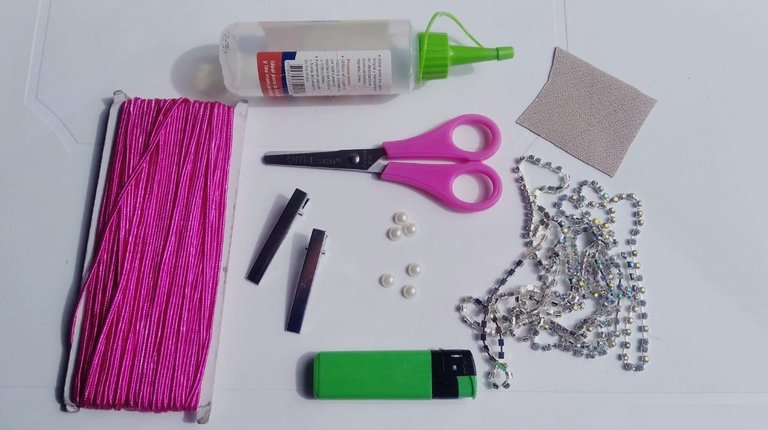
Materiales:
- Cordón de hilo soutache.
- Strass tornasol.
- 2 pinzas tipo caimán.
- Silicón frío.
- Yeskero.
- Tres perlas planas.
- Semi-cuero o fieltro.
Materials:
- Soutache thread cord.
- Strass litmus.
- 2 alligator clips.
- Cold sylicon.
- Yeskero.
- Three flat pearls.
- Semi-leather or felt.

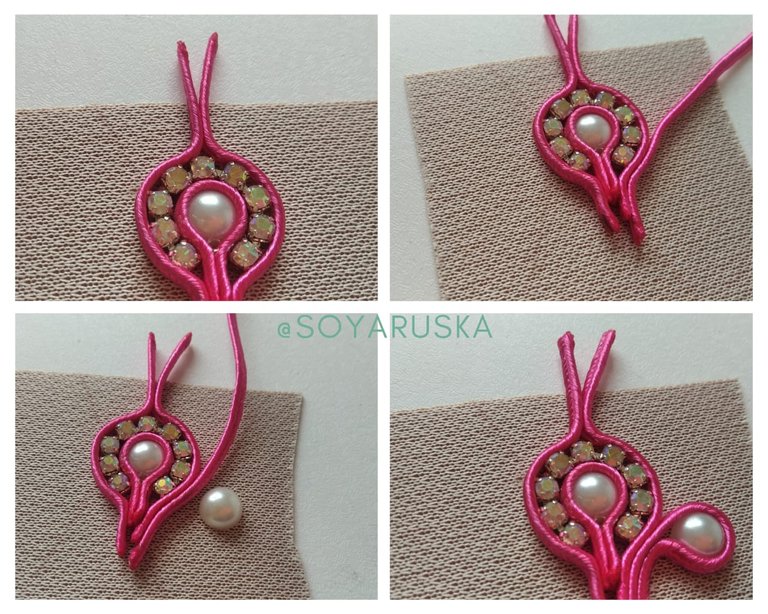
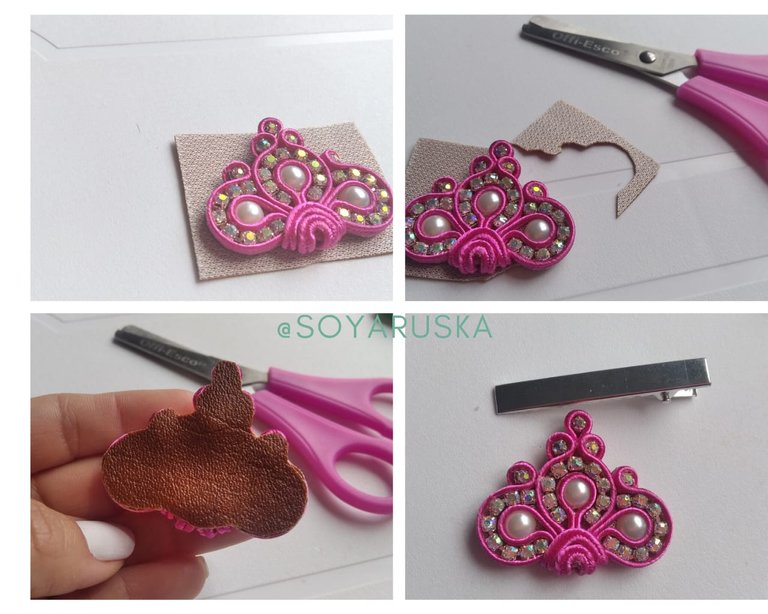
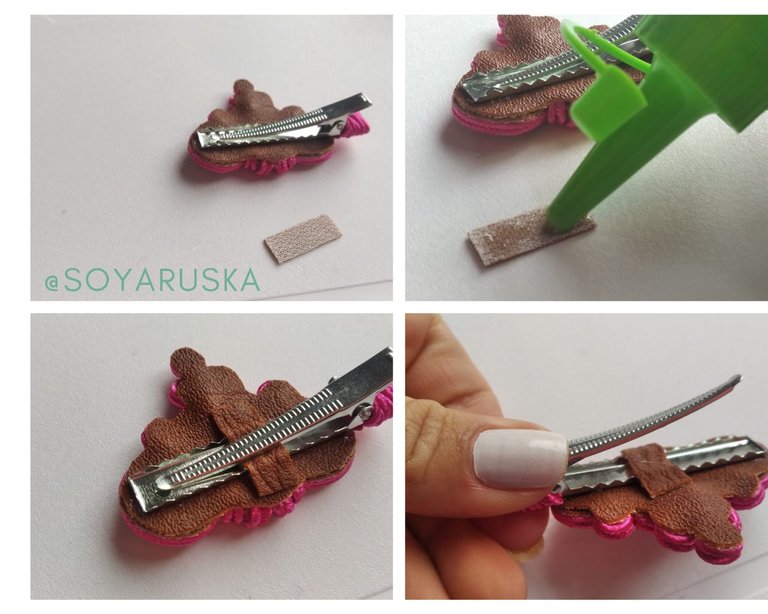
Vamos a pegar nuestra perla preferiblemente en el medio de nuestro semi-cuero vamos a usar un pedacito aproximadamente de 8x8 cm.
Luego de pegar nuestra perla, vamos a bordearla con 4cm de cordón hacía abajo, acto seguido vamos a colocar en la parte de arriba pegándolo hacía el cordón nuestro strass, específicamente 8 strass corridos.
Es importante ir quemando las puntas de nuestro cordón soutache para que no se deshilache.
We are going to glue our pearl preferably in the middle of our semi-leather we are going to use a piece of approximately 8x8 cm.
After gluing our pearl, we are going to border it with 4cm of cord downwards, then we are going to place on the top part, gluing it to the cord our rhinestones, specifically 8 running rhinestones.
It is important to burn the tips of our soutache cord so that it does not fray.

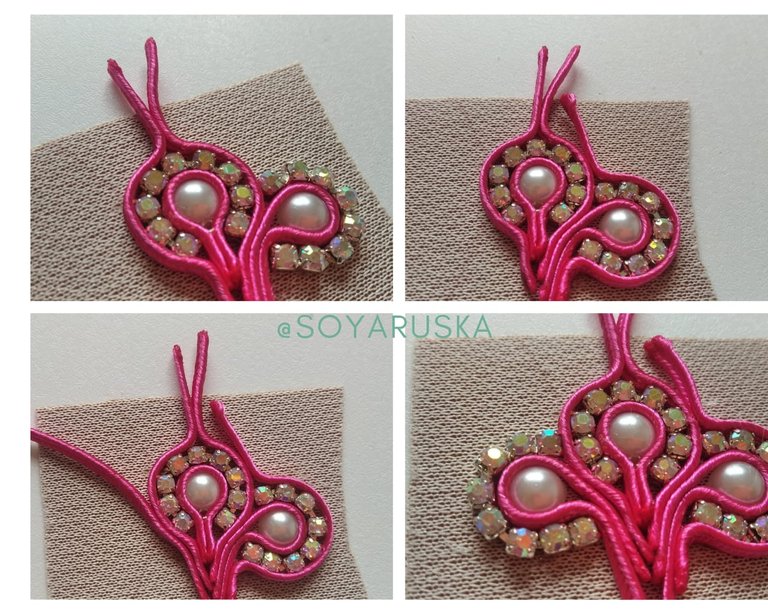
Seguimos ahora de abajo hacía arriba, vamos a bordear con nuestro cordón. Vamos a cortar dos pedazos de 6cm, y lo vamos a pegar con suficiente silicón, dejando en la parte de arriba los cordones sueltos.
Ahora con otros dos pedazos también de 6cm, vamos a pegarlo en nuestra base, y pegaremos en la parte de abajo otra perla, de esa forma la bordeamos con el hilo.
We now continue from the bottom up, we are going to skirt with our cord. We are going to cut two pieces of 6cm, and we are going to glue it with enough silicone, leaving the loose laces at the top.
Now with two other 6cm pieces, we are going to glue it on our base, and we will glue another pearl on the bottom, in that way we border it with the thread.
Ahora en la perla de abajo vamos a pegar nuestro strass, también 8 strass corridos. Seguido de eso vamos a poner otro cordón de 6 cm de abajo hacía arriba, dejando el sobrante en la parte superior sin pegar.
Hacemos lo mismo del otro lado.
Now in the pearl below we are going to glue our rhinestones, also 8 running rhinestones. Following that, we are going to put another 6 cm cord from the bottom to the top, leaving the excess on the top without gluing.
We do the same on the other side.
Vamos a recortar todo nuestro trabajo, cuidando de no romper nuestros cordones.
Recortamos el excedente que sobra en la parte de abajo y los quemamos.
Now we are going to cut all our work, taking care not to break our laces.
We trim the excess that is left on the bottom and burn them.

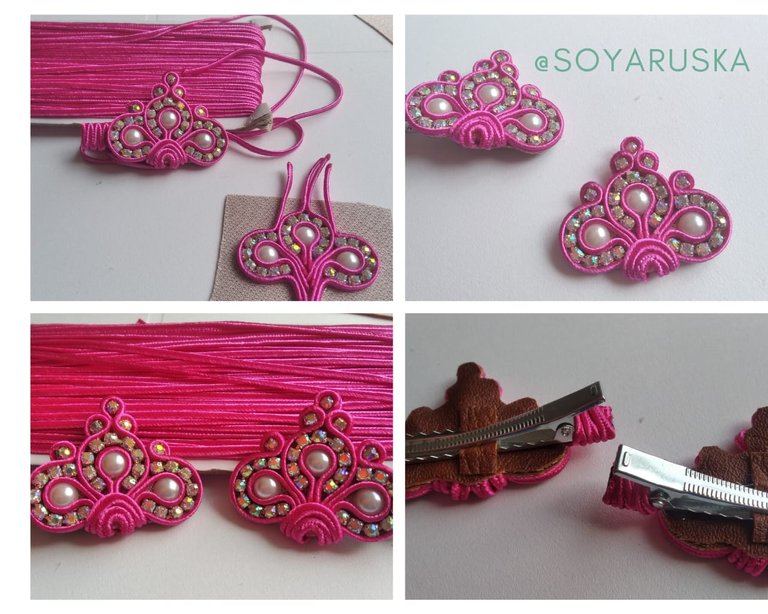
Con los hilos que sobraron en la parte de arriba vamos a darle un detalle con strass.
Le ponemos silicón, y pegamos un strass, escondiendo el cordón por la parte trasera.
Para darle el toque de altura, en los dos de arriba vamos a agregar otro, cortamos un pedacito de cordón de 3cm y le pegamos un strass, y lo pegamos en el medio de los dos de arriba.
With the leftover threads at the top we are going to give it a detail with rhinestones.
We put silicone on it, and glue a rhinestone, hiding the cord from the back.
To give it a touch of height, in the two above we are going to add another, cut a 3cm piece of cord and glue a rhinestone to it, and glue it in the middle of the two above.
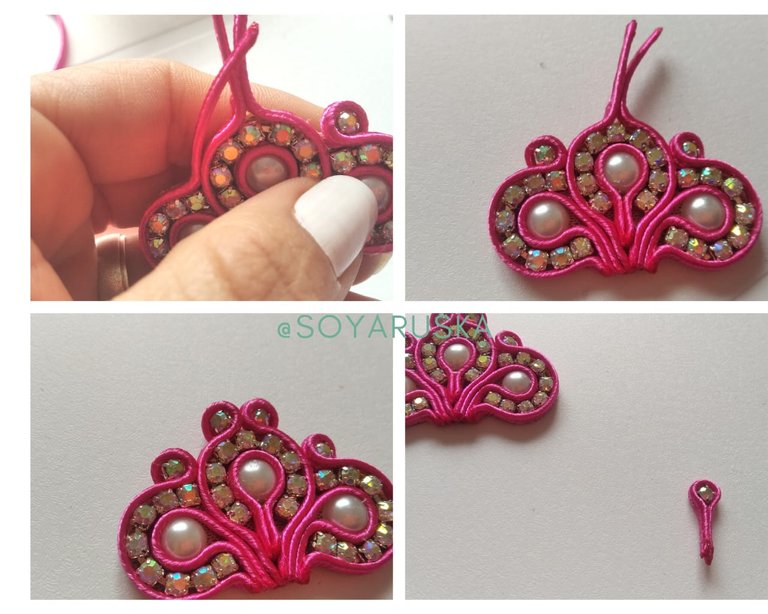
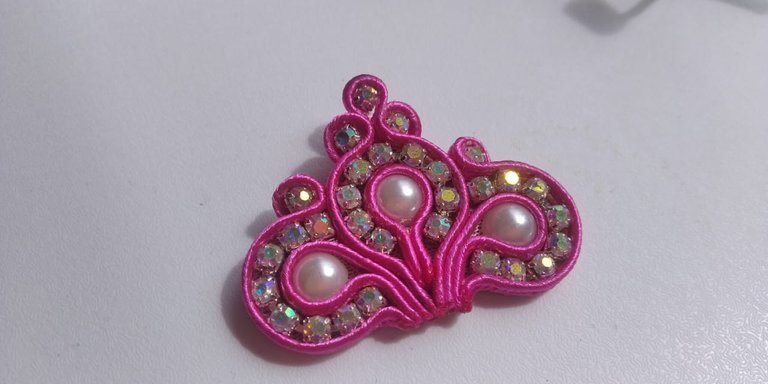
Ya empezamos a ver nuestra corona más linda.
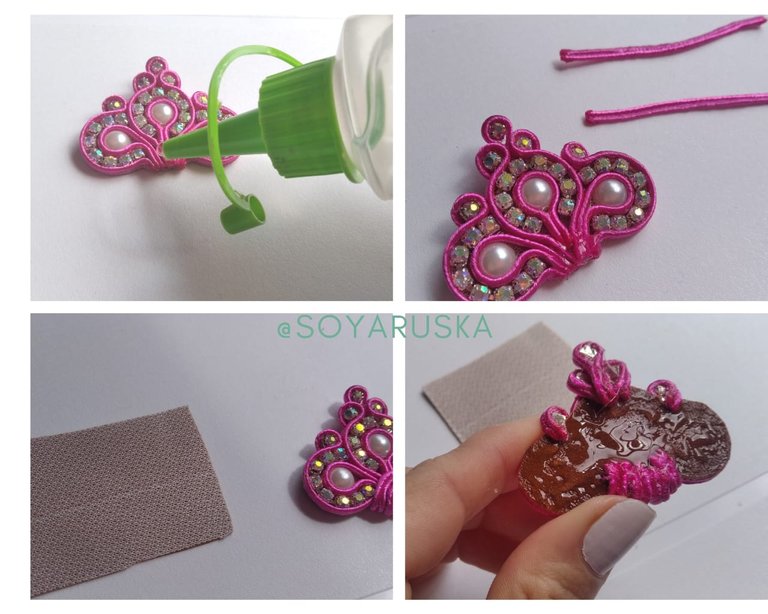
Vamos a ir rematando los detalles para que quede mejor, ahora cortamos dos cordones de 4cm, y vamos a pegarlo en la parte del frente para sellar nuestros cordones base.
Ahora que ya están listos, le pondremos suficiente silicón en la parte trasera para pegarlo a otro trozo de semi-cuero y así tapar todos los detalles y que quede más presentable nuestro trabajo.
We are already beginning to see our most beautiful crown.
We are going to finish off the details so that it looks better, now we cut two 4cm cords, and we are going to glue it on the front part to seal our base cords.
Now that they are ready, we will put enough silicone on the back to stick it to another piece of semi-leather and thus cover all the details and make our work more presentable.

Luego de que este bien pegado, vamos a recortarlo, igual con mucho cuidado, este es un trabajo muy delicado, entonces, hay que hacerlo despacio.
Seguimos midiendo nuestro gancho para pegarlo.
After it is well glued, we are going to cut it, just as carefully, this is a very delicate job, so it must be done slowly.
We continue to measure our hook to glue it.
Como el gancho debe quedar un poco por fuera para poder abrirlo y cerrar, vamos a dejar 1 centímetro del gancho por fuera. Para que quede más bonito lo voy a forrar con el cordón para que tenga mejor presencia.
As the hook must be a little outside to be able to open and close it, we are going to leave 1 centimeter of the hook on the outside. To make it more beautiful, I am going to cover it with the cord so that it has a better presence.
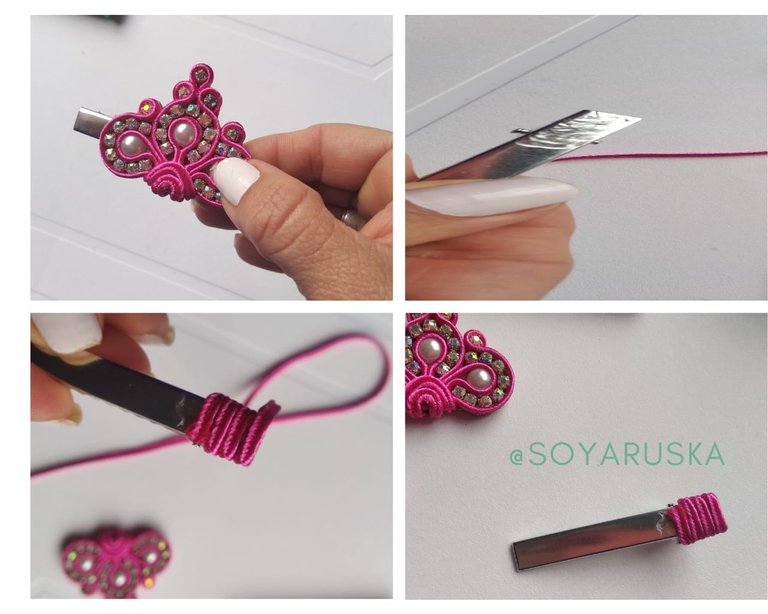
Con nuestro ganchito forrado, vamos a pegarlo a nuestra corona.
Le ponemos suficiente pega para que quede bien fijado.
With our lined hook, we are going to glue it to our crown.
We put enough glue so that it is well fixed.
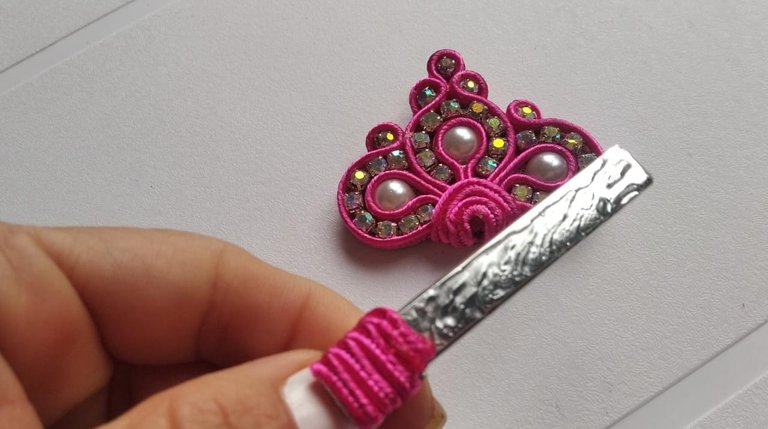
Ahora vamos a darle el toque final
Recortaremos un trocito de semi-cuero para pegarlo en la parte de adentro de nuestro gancho y así quede más asegurado.
Este paso pueden no hacerlo, pero de esta forma ya quedaría más fijo y sin riesgos de que se despegue rápido.
What an excitement how this is left!
Now let's put the finishing touch on it
We will cut out a piece of semi-leather to stick it on the inside of our hook and thus it is more secure.
They may not do this step, but in this way it would be more fixed and without the risk of it taking off quickly.
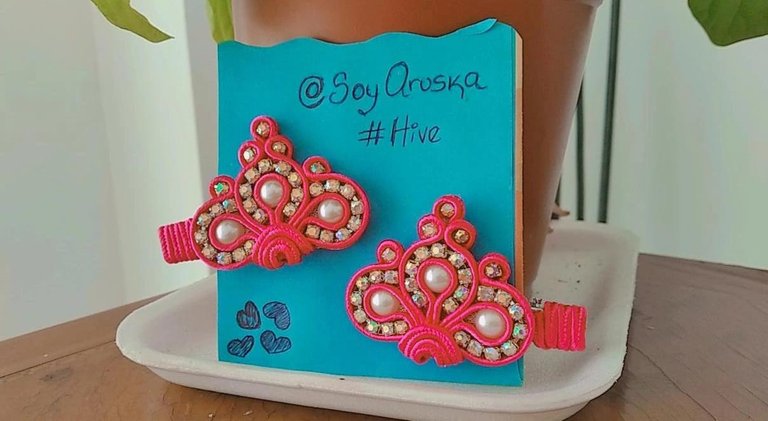
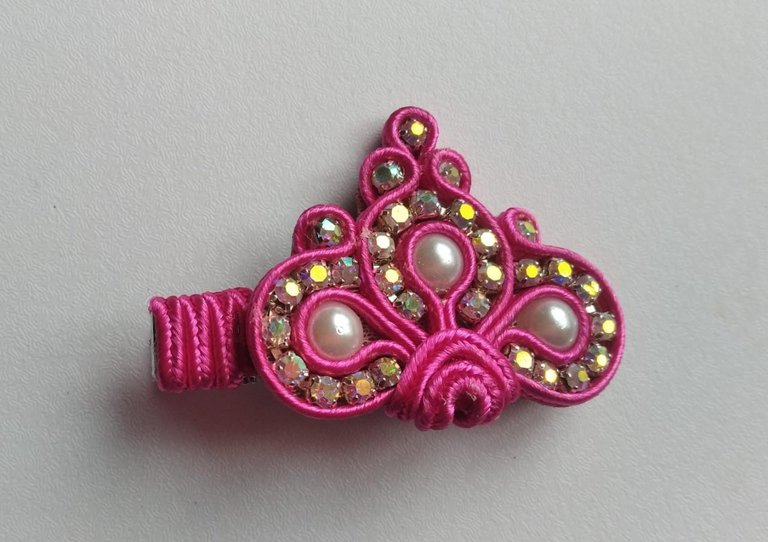
We repeat the same procedure to make the second hook and thus finish our pair of crowns.
Este proyecto me encantó, espero les haya gustado, siempre disfruto mucho mostrarles parte de mi trabajo.
Ready we have some beautiful hooks for adults and girls!
I loved this project, I hope you liked it, I always enjoy showing you part of my work.


Todas las fotografías fueron tomadas por mi, con mi celular Xiaomi 7A, los collages los realicé en Canva al igual que mis separadores.
Nos leemos pronto.
All the photographs were taken by me, with my Xiaomi 7A cell phone, I made the collages in Canva as well as my dividers.
We read soon.
Solo puedo decir Waaaoooo, me encantò lo que haces, te felicito y te invito a seguir haciendo cosas bellas como esa.
¡Muchas gracias!, esos comentarios son muy motivadores. Un abrazo.
Que bellos y que talento tienes para las manualidades. Me encantaron los ganchos de corona.
Gracias, Bey... La verdad lo disfruto mucho.
Estos son hermosos. Haces un trabajo excelente. Me encantan. ¿Tienes un sitio web en el que los vendes? Son súper bonitos. Yo hacía pinzas para el pelo hace mucho tiempo pero ahora me dedico sobre todo a la pintura, la tinta y los sellos (y alguna otra técnica mixta). Pero estos son creativos. Me los pondría sin dudarlo.
Creo que @ryzeonline los apreciaría. Le encanta la gente creativa y la belleza también.
Bien hecho.
con amor
Cyn
WOho, que lindo tu mensaje. Me hiciste sonreír de alegría. Tengo una cuenta de Instagram @Taru.accesorios :) Gracias por tu apoyo y tus palabras. Un fuerte abrazo.
Te encontré y te seguí en Instagram. Hermoso trabajo. Un gran abrazo de vuelta ❤️❤️❤️
The rewards earned on this comment will go directly to the person sharing the post on Twitter as long as they are registered with @poshtoken. Sign up at https://hiveposh.com.
¡Guao, qué bonito y delicado queda eso! ¡Es precioso!
Graciiiias, que bonito que te gustó, es un honor.
Muy laborioso proceso pero de resultados muy llamativos
ASÍ ES, bastante trabajo pero vale la pena.
Muchas Gracias, May :)
Graciiiias 😋
Esta muy bonito y muy bien explicado.
Muchas gracias :)
Thank you for sharing this amazing post on HIVE!
Your content got selected by our fellow curator @rezoanulvibes & you just received a little thank you via an upvote from our non-profit curation initiative!
You will be featured in one of our recurring curation compilations and on our pinterest boards! Both are aiming to offer you a stage to widen your audience within and outside of the DIY scene of hive.
Join the official DIYHub community on HIVE and show us more of your amazing work and feel free to connect with us and other DIYers via our discord server: https://discord.gg/mY5uCfQ !
If you want to support our goal to motivate other DIY/art/music/homesteading/... creators just delegate to us and earn 100% of your curation rewards!
Stay creative & hive on!
Thanks you :)
Que lindooo¡ cada paso es un arte¡❤
Gracias, qué lindo tu mensaje.
It turned out interesting ;))
thanks you so much.