Hello, hello my wonderful Hive Diy family! I wish that wherever you are you are happy, healthy and full of blessings, always accompanied by your creativity and crafts that can not miss, I hope the rest of this week is also productive and full of good things.♡
No sé si han notado mi leve ausencia, porque apesar de no dejar de publicar por lo mínimo una vez a la semana, últimamente no he podido publicar más de eso, así me doy una vuelta por aquí de rato en rato, todo esto se debe a que este mes de marzo inicié clases y nos han estado sobrecargando de tarea y más tarea, por lo que no he estado más de una vez por semana, pero lo importante es seguir compartiendo con ustedes y no los abandonaré, así que semana a semana haré una que otra manualidad que estaré compartiendo con ustedes, con mucho entusiasmo y dedicación, más aún ahora que tengo está semana que viene libre.
I don't know if you have noticed my slight absence, because in spite of posting at least once a week, lately I have not been able to post more than that, so I'll be around here from time to time, all this is because this month of March I started classes and they have been overloading us with homework and more homework, so I have not been here more than once a week, but the important thing is to continue sharing with you and I will not abandon you, so week by week I will make one or another craft that I will be sharing with you, with much enthusiasm and dedication, even more now that I have this next week off.
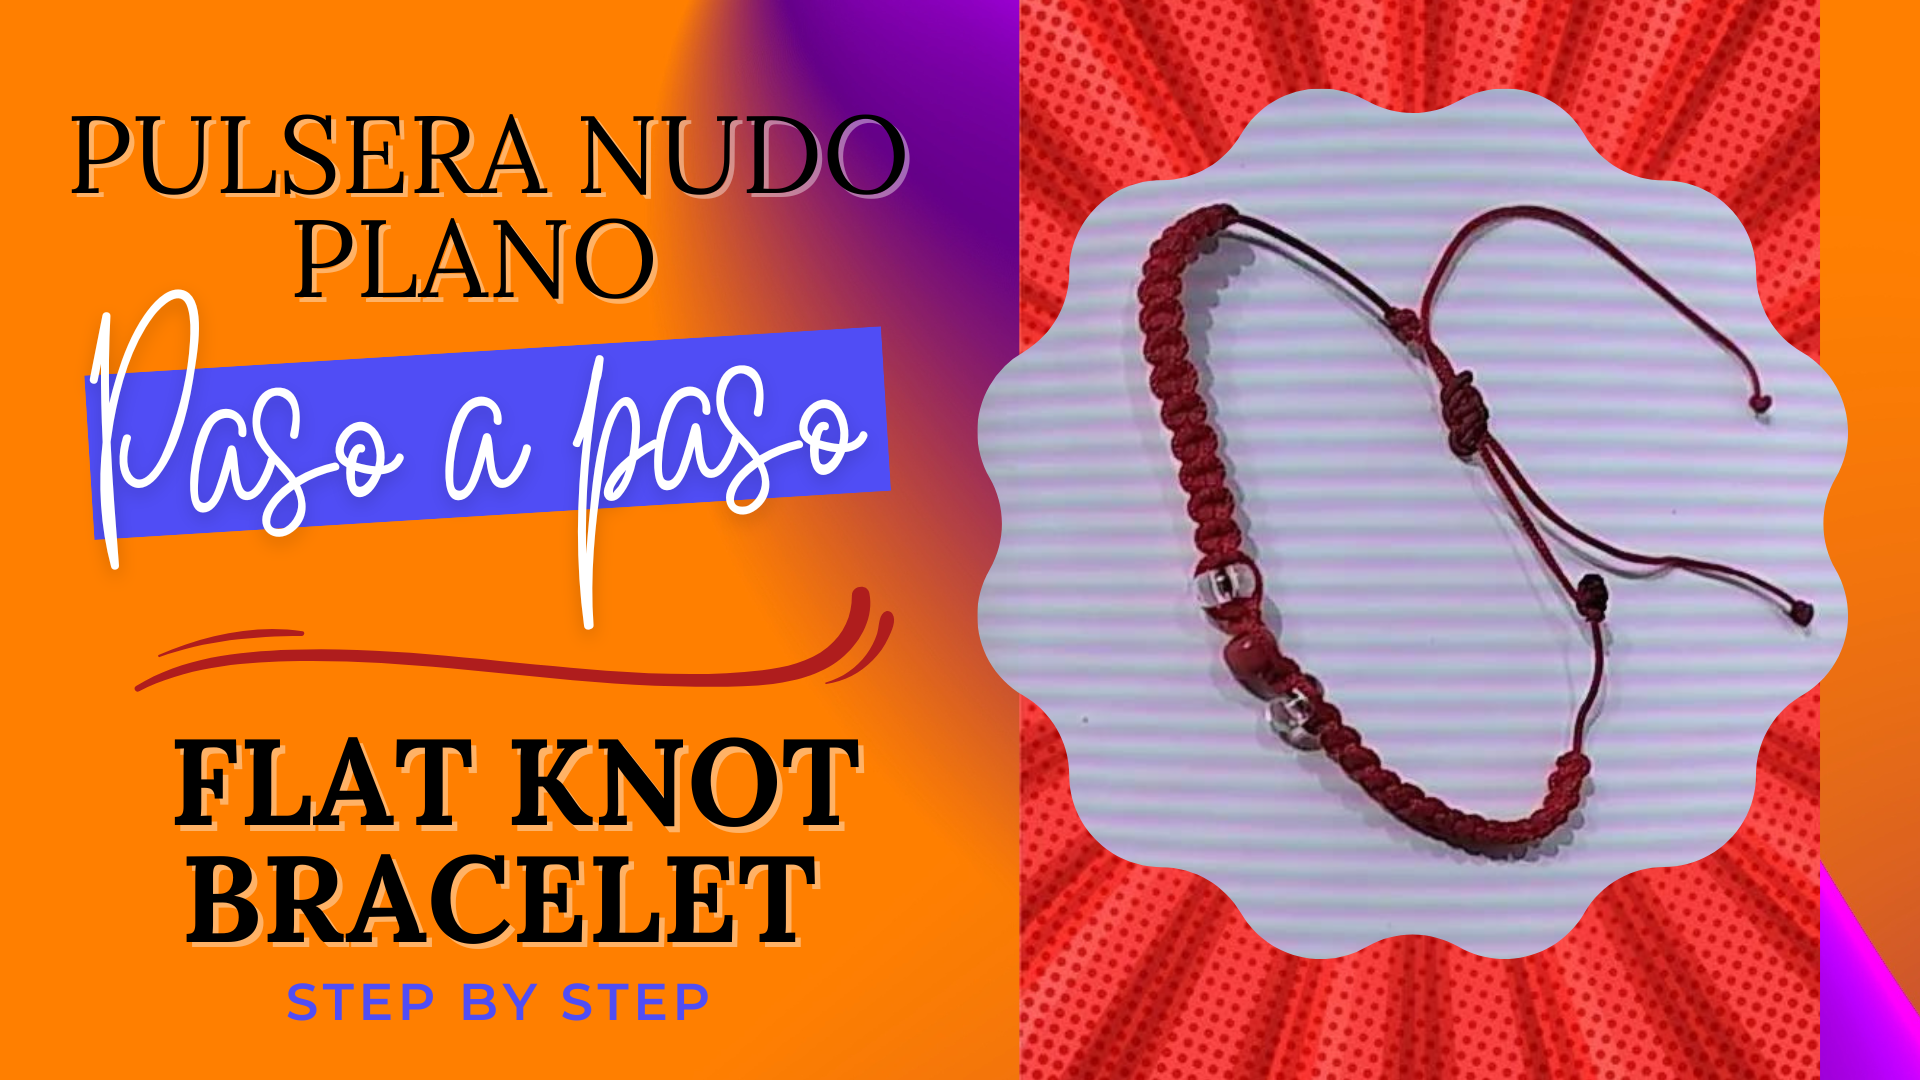
Está vez les traigo un Diy muy fácil, pero igual de hermoso, dónde les mostraré el paso a paso de como realice una linda y sencilla pulsera de macramé, dónde utilizó materiales fáciles de adquirir, para que puedan hacerla también. Además es un modelo clásico y sencillo que no pierde el estilo con el paso del tiempo, así aplicó el tejido de nudo plano, ahora sin más rodeos, les indico los materiales y luego el procedimiento realizado.
This time I bring you a very easy Diy, but just as beautiful, where I will show you step by step how to make a nice and simple macrame bracelet, where I used easy to acquire materials, so you can make it too. It is also a classic and simple model that does not lose style over time, so I applied the flat knot weaving, now without further detours, I indicate the materials and then the procedure performed.
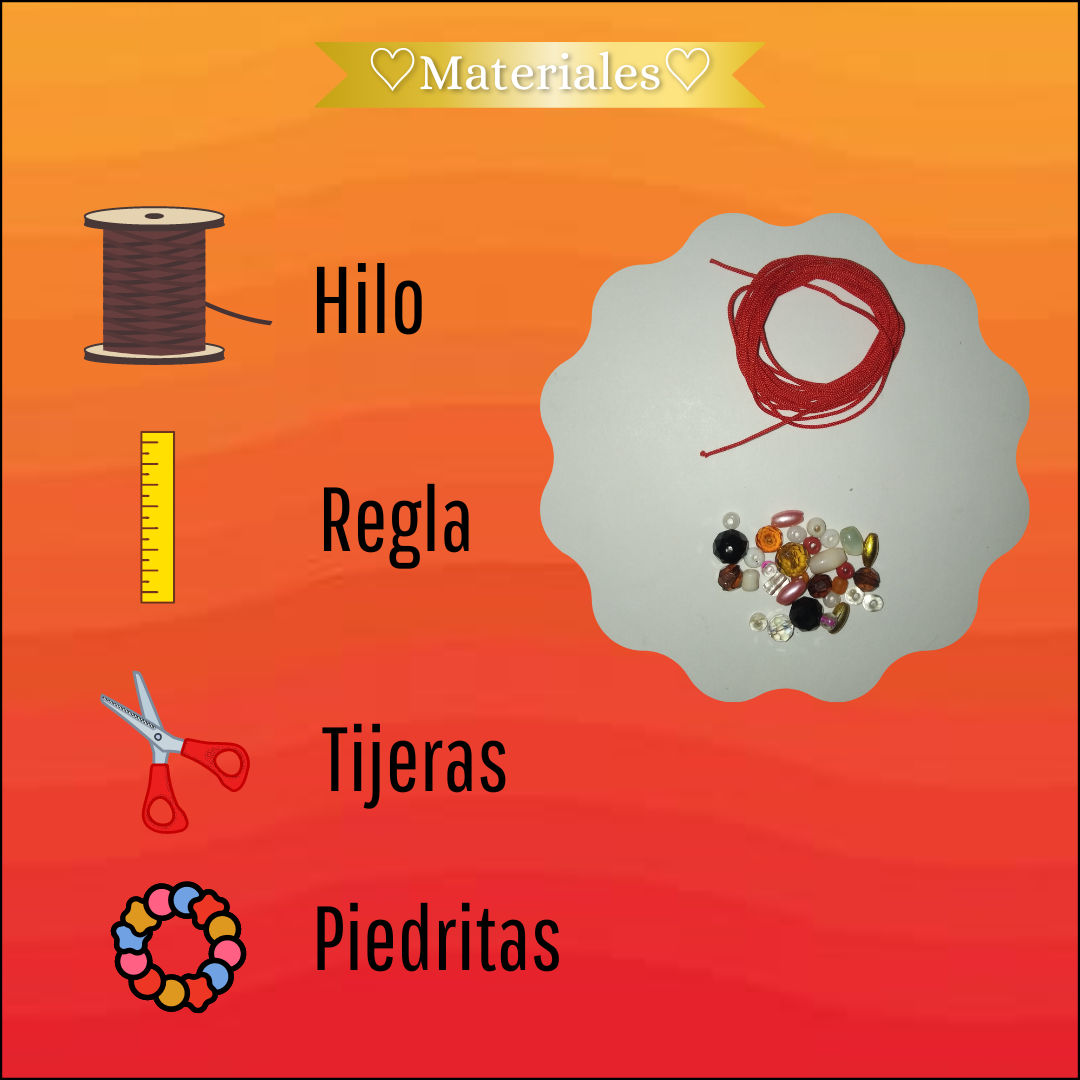
♡Materials♡
- Hilo para pulseras a nuestro gusto
- Encendedor/Yesquero
- Cinta
- Piedritas de bisutería
- Tijera
- Regla
- Thread for bracelets to our liking
- Lighter/Yesquero
- Ribbon
- Jewelry stones
- Scissors
- Ruler
♡Step by Step♡
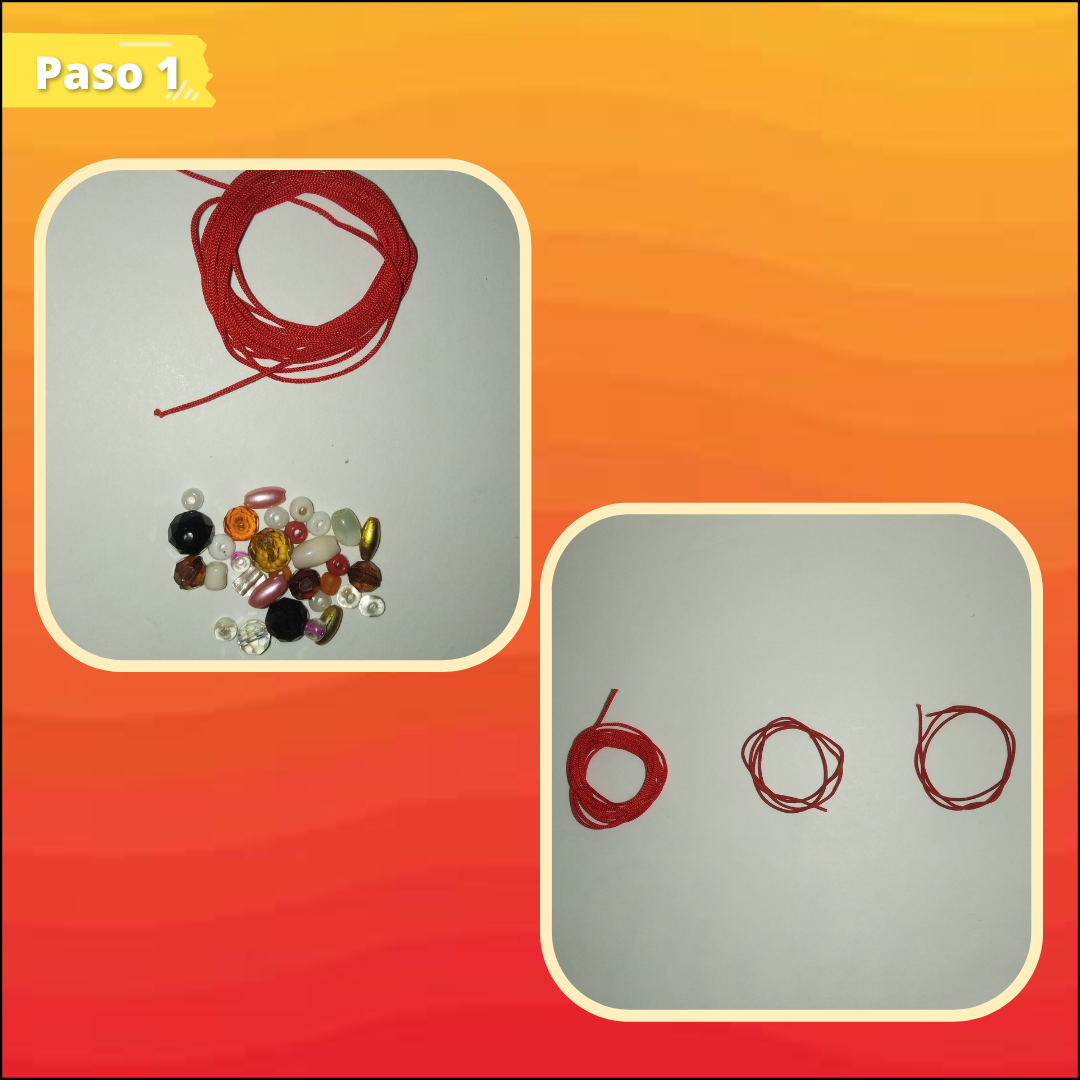
Paso 1:
Step 1:
Para comenzar vamos a tomar nuestro hilo, como antes mencioné de nuestra preferencia, ya que existen de muchos tipos, dependiendo de la textura y el grosor, así recortaremos al medir con nuestra regla tres hilos de diferentes tamaños, el primero será el de nuestra base, podemos calcular con nuestra muñeca, añadiendo unos 8 cm o más, de esta manera yo elegí de 20 cm, el siguiente es de 18 cm, este nos serviría para hacer el nudo corredizo pequeño, y por último vamos a triplicar la medida del primero e incluso pueden añadir un poco más, ya que con este se va a tejer la pulsera.
To begin we will take our thread, as I mentioned before of our preference, as there are many types, depending on the texture and thickness, so we will cut by measuring with our ruler three threads of different sizes, the first will be the one of our base, we can calculate with our wrist, adding about 8 cm or more, this way I chose 20 cm, the next is 18 cm, this would serve us to make the small slip knot, and finally we will triple the measure of the first and can even add a little more, as this is going to weave the bracelet.
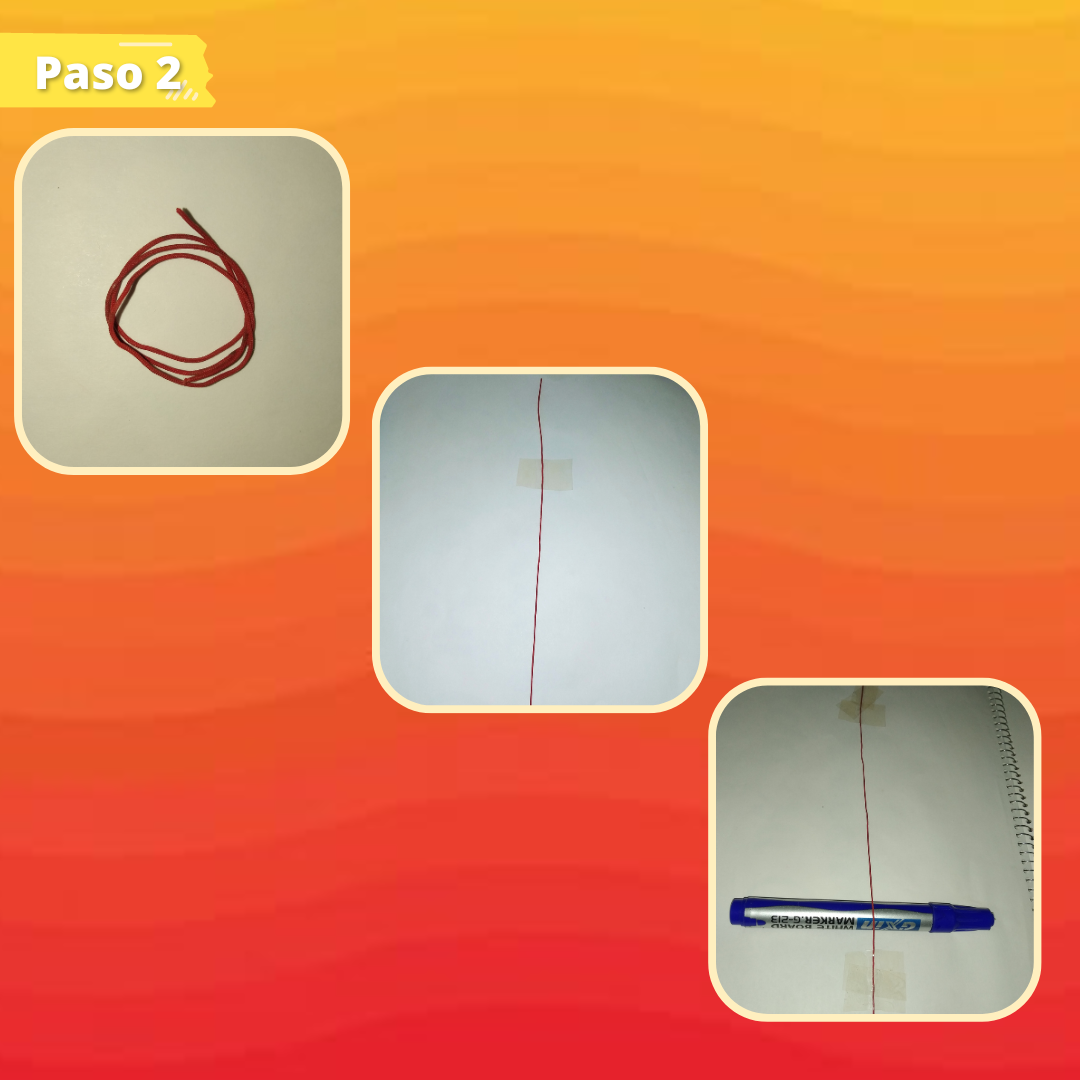
Paso 2:
Step 2:
Luego vamos a tomar nuestro hilo inicial de 20 cm de largo y lo acomodaremos en una superficie plana sosteniendo a este con cinta adhesiva, para proseguir se va colocar algo debajo del hilo, como un marcador o alguna otra cosa que cumpla la misma función de levantar este un poco, y así, al final de este colocaremos nuevamente cinta, para sostenerlo.
Then we will take our initial 20 cm long thread and we will place it on a flat surface holding it with adhesive tape, and then we will place something under the thread, such as a marker or something else that fulfills the same function of lifting it a little, and so, at the end of it we will place tape again, to hold it.
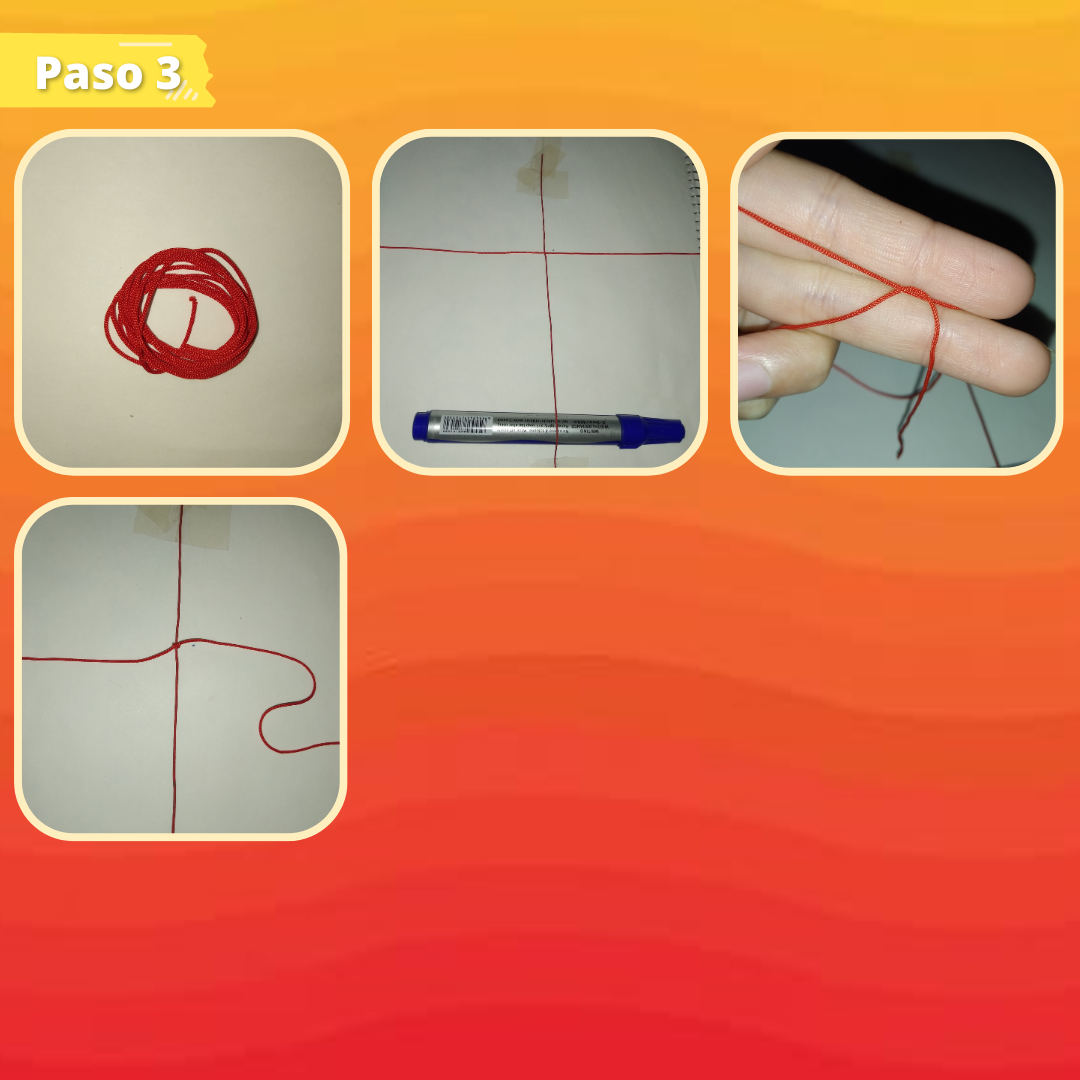
Paso 3:
Step 3:
Cómo siguiente paso, vamos a medir aproximadamente 7cm u 8cm en la parte inferior y superior, todo depende del largo que quieran esto, para abrirla y cerrarla, así tomaremos nuestro hilo más largo y lo pasaremos por debajo del anterior, de manera que quede a la mitad y procederemos a hacer un nudo normal, pasando un hilo por encima de otro y jalando, como se aprecia en la imágen.
As a next step, we will measure approximately 7cm or 8cm at the bottom and top, it all depends on the length you want this, to open and close it, so we will take our longest thread and pass it under the previous one, so that it is in the middle and proceed to make a normal knot, passing one thread over the other and pulling, as shown in the image.
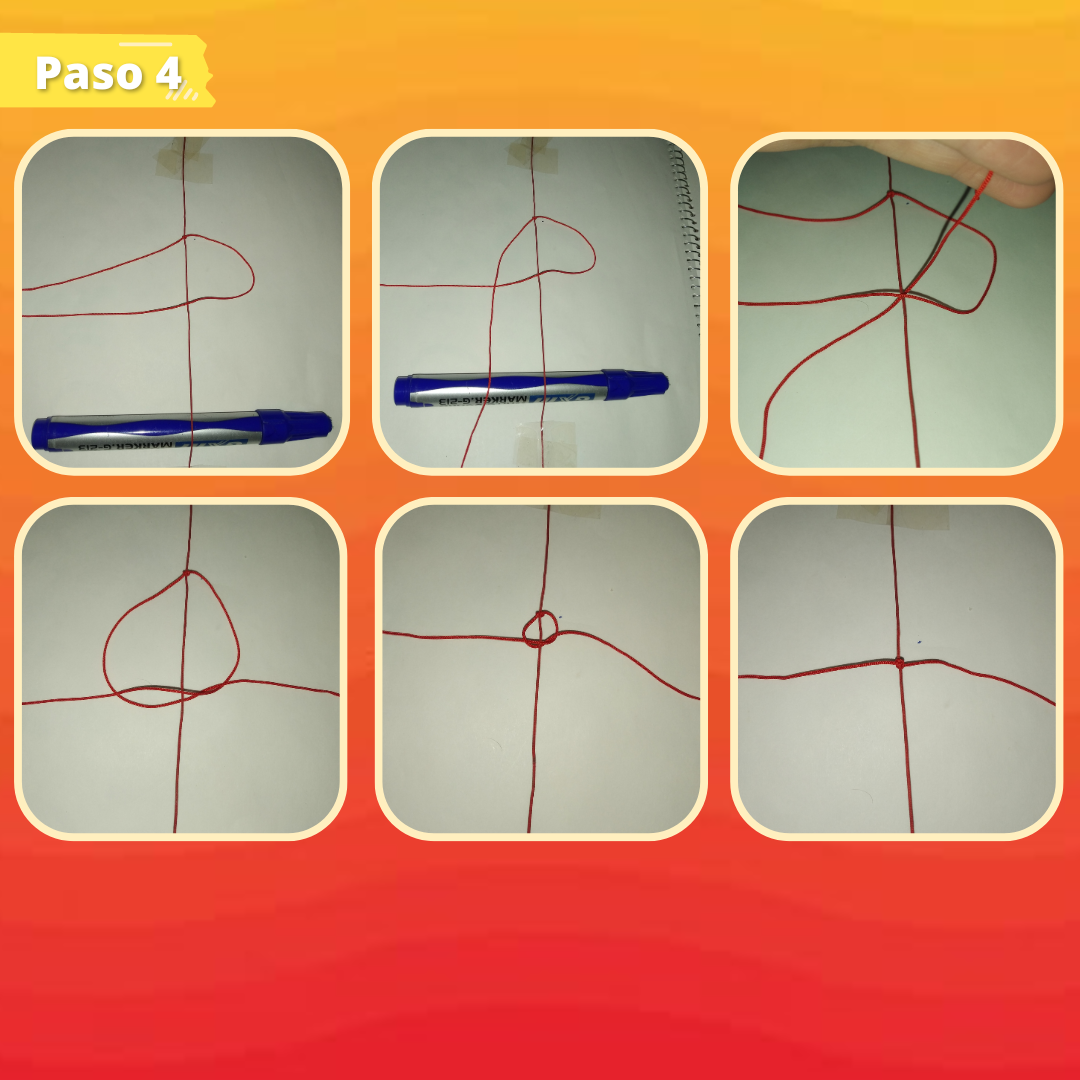
Paso:4
Step 4:
Ahora para comenzar el tejido, vamos a tomar un extremo del hilo largo y lo acomodaremos hacía al otro lado formando una clase de "P" pasando este por encima, luego el que está de ese lado lo pasamos por encima de ese y lo colocamos hacía abajo, para seguir tomamos ese mismo y lo pasamos por debajo de los otro dos para hacer un nudo y apretamos muy bien.
Now to begin the weaving, we will take one end of the long thread and we will place it on the other side forming a kind of "P" passing it over, then the one on that side we pass it over that one and we place it down, to continue we take the same one and we pass it under the other two to make a knot and we tighten it very well.
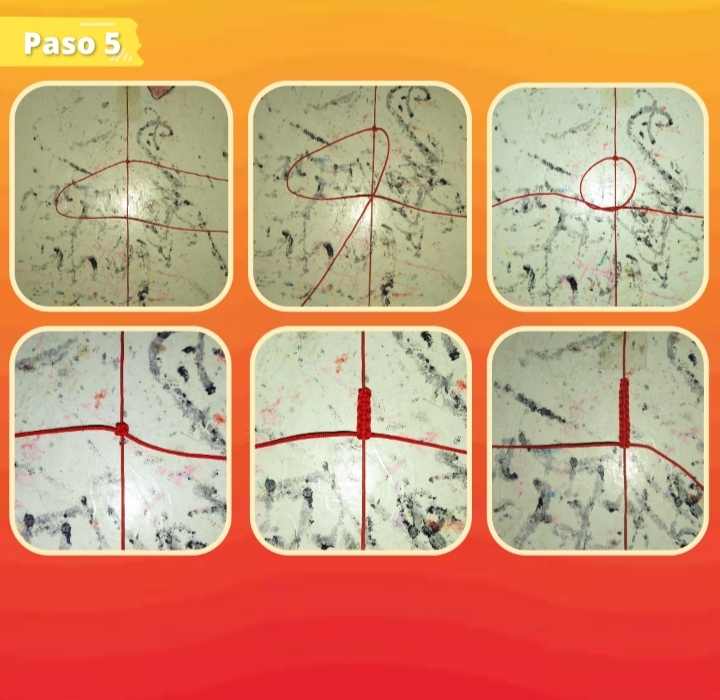
Paso 5:
Step 5:
Para continuar vamos a repetir el mismo procedimiento, pero ahora tomando el hilo del otro lado, de esta manera iremos intercalando los lados uno por uno, primero derecha, luego izquierda y así sucesivamente iremos tejiendo y apretando cuidadosamente, hasta llegar a la mitad del largo que deseamos.
To continue we will repeat the same procedure, but now taking the yarn from the other side, in this way we will interweave the sides one by one, first right, then left and so on we will weave and tighten carefully, until we reach half the length we want.
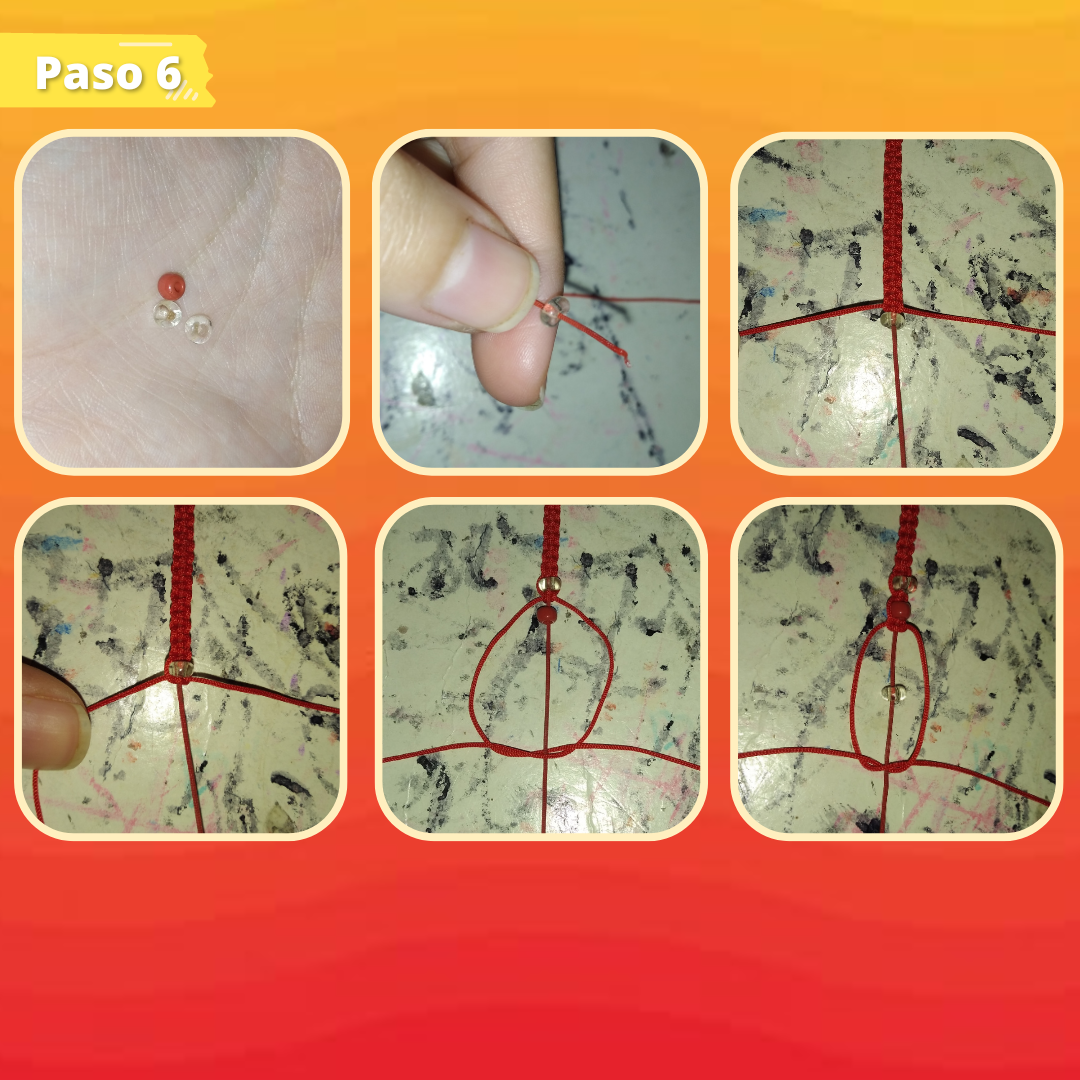
Paso 6:
Step 6:
Ahora vamos a tomar nuestras piedritas, pueden ser corazones, estrellas o como en mi caso, simplemente piedras pequeñitas, yo tome tres, que combinan con el color de la pulsera, y así solté la cinta de la parte de abajo y ahí en el hilo central metí la primera, luego seguí tejiendo donde quede una vez, metí la otra y nuevamente hice el otro nudo, por último puse la última perla y seguimos tejiendo normalmente siguiendo el mismo orden.
Now we are going to take our little stones, they can be hearts, stars or as in my case, just small stones, I took three, which match the color of the bracelet, and so I released the tape from the bottom and there in the central thread I put the first one, then I continued weaving where it was once, I put the other one and again made the other knot, finally I put the last pearl and we continue weaving normally following the same order.
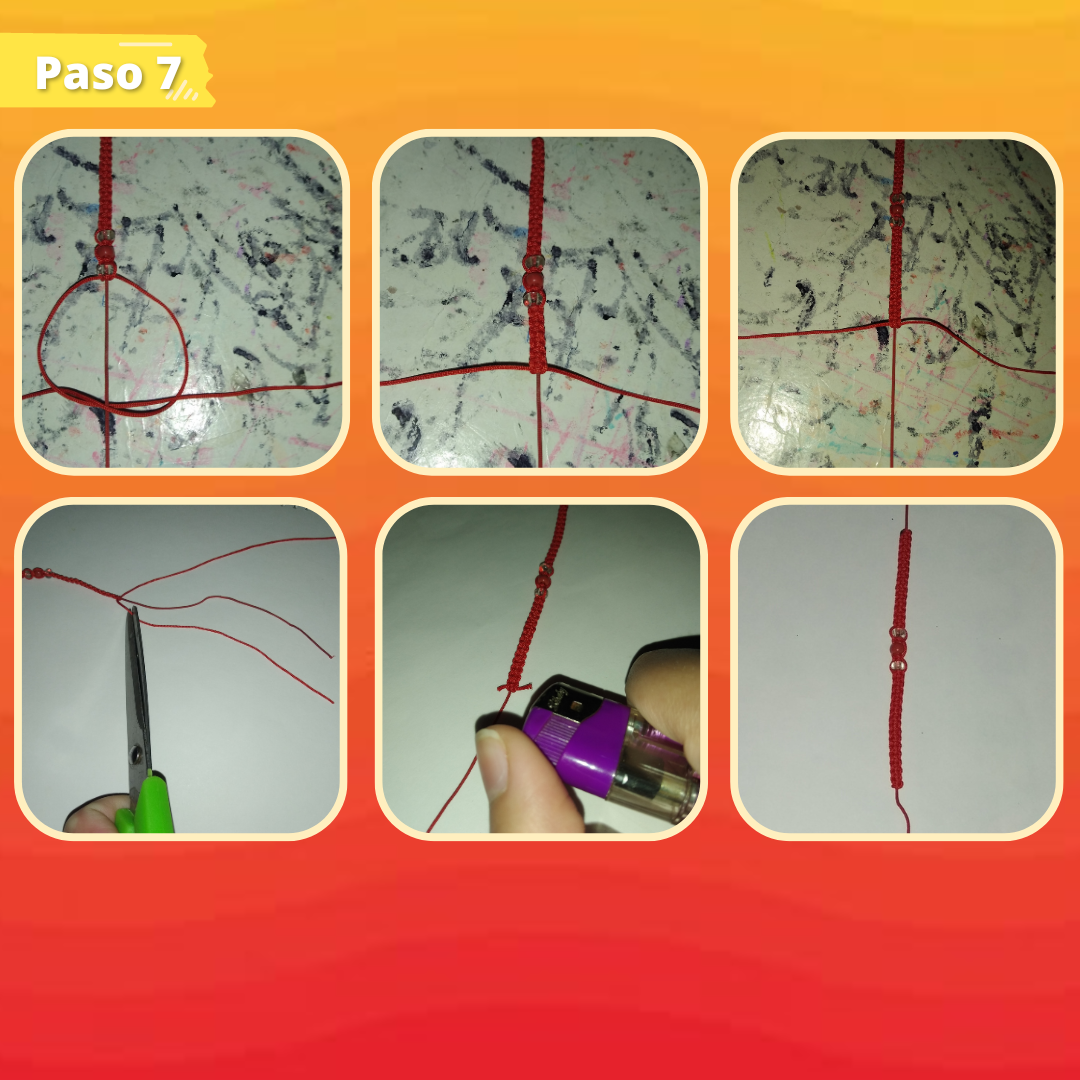
Paso 7:
Step 7:
Al terminar la otra mitad, procedemos a recortar con cuidado la parte sobrante del hilo largo en ambos lados, de manera que queden pequeños, pero visibles, ya que con la ayuda de nuestro encendedor o yesquero vamos a quemar con sumo cuidado los extremos y aplastaremos.
When the other half is finished, we proceed to carefully trim the excess part of the long thread on both sides, so that they are small, but visible, since with the help of our lighter or tinder we will carefully burn the ends and flatten them.
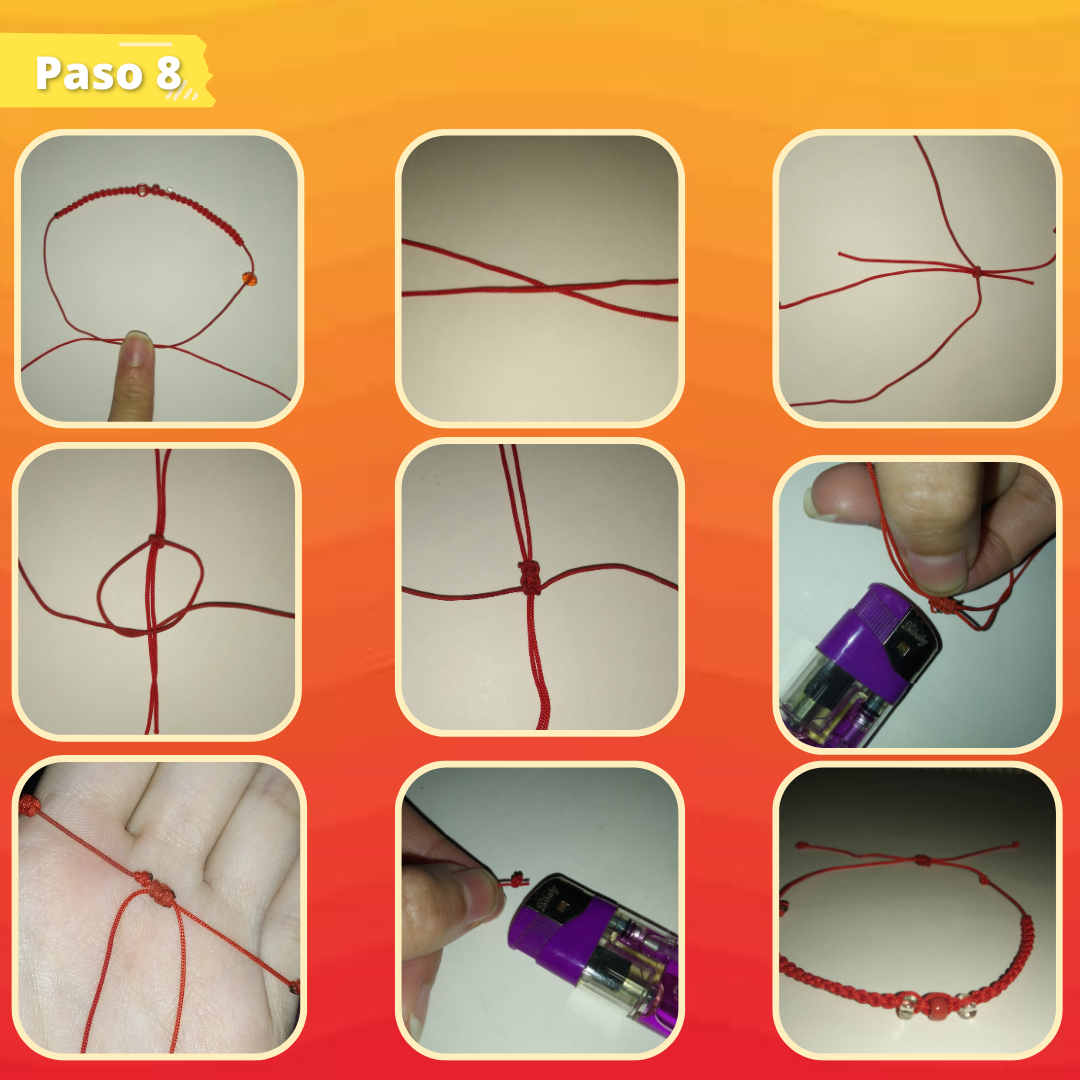
Paso 8:
Step 8:
Por último, tomaremos los extremos que quedan y los cruzaremos en la parte de abajo, intentando que queden uno paralelo a otro, vamos a tomar nuestro otro hilo restante de 18cm y lo pasaremos por debajo y comenzaremos a hacerlo lo mismo que en la pulsera, pero está vez más pequeño con unas 3 o 6 vueltas como ustedes prefieran, así cortamos lo sobrante y nuevamente con el yesquero quemamos estos con cuidado, para culminar haremos unos nudos en la parte inferior y quemaremos los extremos otra vez, para que esto no se salga, así está parte nos permitirá abrir y cerrar nuestra pulsera sin problemas y cómodamente.
Finally, we will take the remaining ends and cross them at the bottom, trying to keep them parallel to each other, we will take our other remaining 18cm thread and pass it underneath and start doing the same as in the bracelet, but this time smaller with about 3 or 6 turns as you prefer, so we cut the excess and again with the tinder burn these carefully, to finish we will make a few knots at the bottom and burn the ends again, so that this does not come out, so this part will allow us to open and close our bracelet smoothly and comfortably.
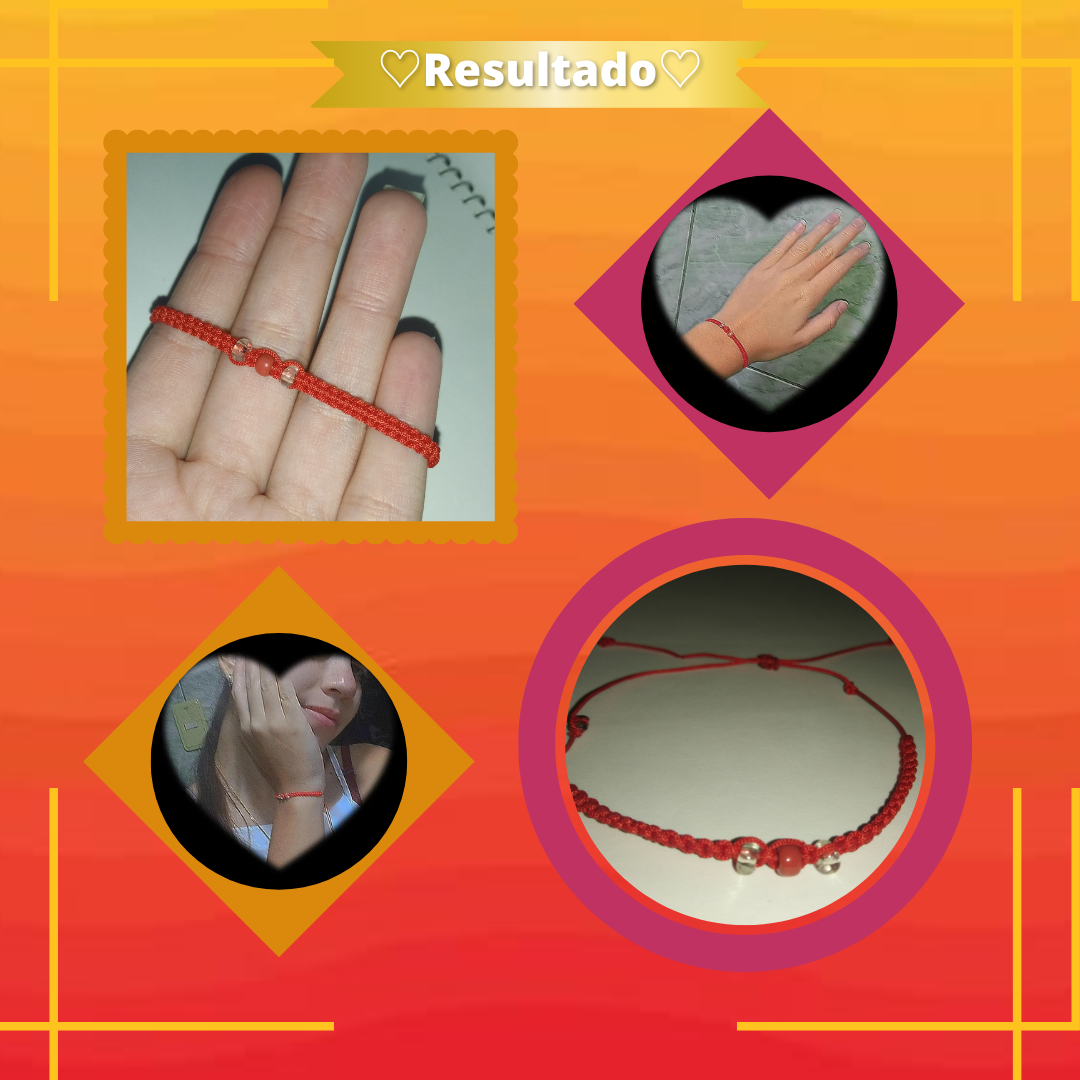
¡Y listo! Tendremos lista nuestra pulsera personalizada que podemos hacer desde casa, muy linda para lucir en cualquier ocasión, son cómodas y sencillas, pero hermosas sin duda. Lo mejor de hacerla en casa, es que podemos elegir el color, el tamaño, el hilo e incluso las piedras y otras decoraciones extras a nuestro gusto, haciendo que nos guste aún más, así que espero que se animen a hacerlas y que también les haya gustado.
And that's it! We will have ready our personalized bracelet that we can make at home, very nice to wear on any occasion, they are comfortable and simple, but beautiful without a doubt. The best thing about making it at home, is that we can choose the color, size, thread and even stones and other extra decorations to our liking, making us like it even more, so I hope you are encouraged to make them and that you also liked it.
Me despido con un gran abrazo y esperando leerlos prontito, felíz y bendecido día, bye queridos.♡
I say goodbye with a big hug and hope to read you soon, happy and blessed day, bye dear ones.♡
¡Gracias por leer mi gente hermosa!♡
Thank you for reading my beautiful people!♡
Photos of my authorship taken from my Xiaomi Redmi 7 phone, edited in the free version of Canva.
Traductor: Deepl
Hola amiga, una pulsera que es muy usada y que bueno que nos trae como elaborarla. Esto es un lindo detalle para los amigos y familia.
Hola, así mismo, sirve incluso para regalar a nuestro seres queridos y es un lindo detalle sencillo.💗
Hola, así mismo, sirve incluso para regalar a nuestro seres queridos y es un lindo detalle sencillo.💗
☺️❤️