Hello my creative Hive Diy family! We start the month with the best attitude and the best foot Happy and blessed September to all! Hopefully this month will be filled everywhere with lots of blessings, crafts, abundant creativity, productivity and desire to create our Diy's that we love so much to share, my best wishes for this new month to each of you.♡
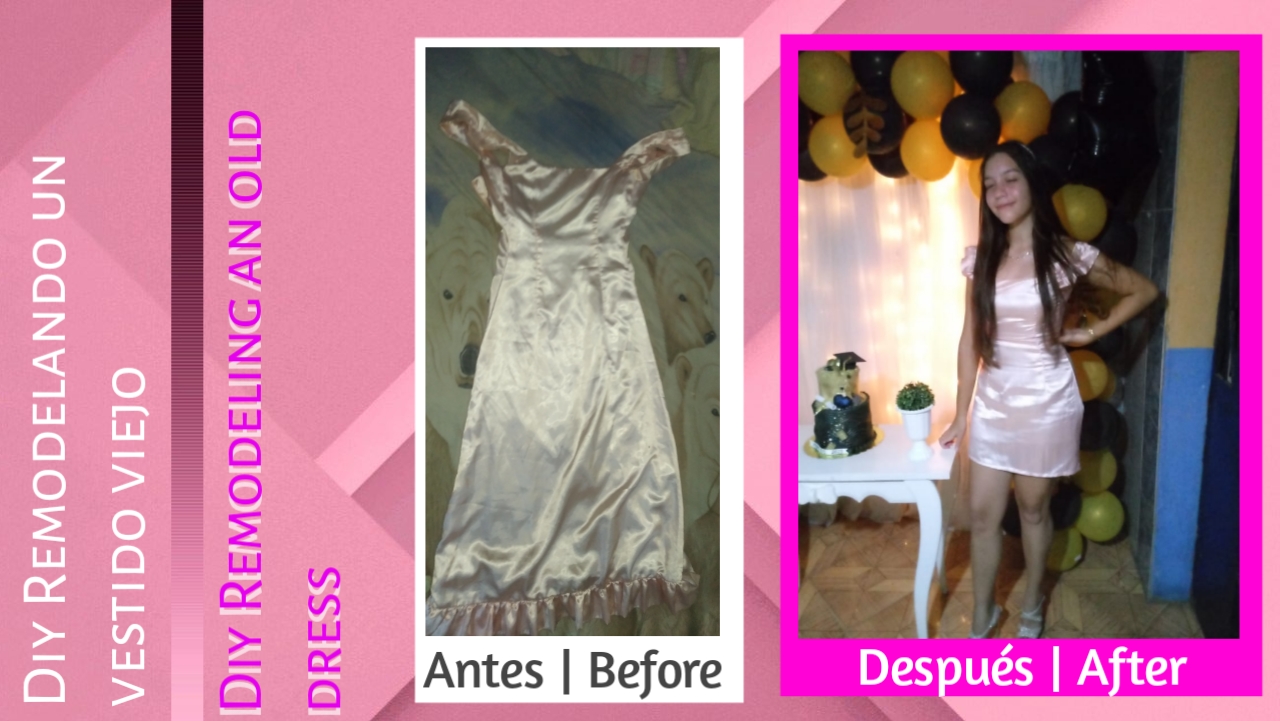
El día de hoy vengo con muchas ganas de mostrarles cómo reutilice un vestido viejo que me obsequio una de mis primas, así le hice unos cambios para llevar el diseño a la actualidad y hacer que me gustará aún más, para ponerme este en una ocasión especial, como lo fue mi fiesta de graduación. Siempre me ha gustado reciclar prendas de ropa o cambiarlas, es increíble poder crear una nueva prenda apartir de otra, o mejorar la anterior, es un pasatiempo del cual antes me encargaba más, ahorita ando un poco ocupada con distintas cosas, pero de vez en cuando hago algunas cositas de costura, ya que coser me trae mucha calma y me permite distraerme un poco cuando estoy aburrida.
Today I want to show you how I reused an old dress that one of my cousins gave me as a gift, so I made some changes to bring the design to the present and make me like it even more, to wear it on a special occasion, as it was my graduation party. I've always liked to recycle clothes or change them, it's amazing to create a new garment from another, or improve the previous one, it's a hobby that I used to be more in charge of, now I'm a little busy with different things, but from time to time I do some sewing things, since sewing brings me a lot of calm and allows me to distract myself a little when I'm bored.
Así que con mucho gusto les mostraré un sencillo paso a paso, de cómo logré transformar este vestido largo, a uno más moderno y bonito, a continuación los materiales a utilizar primeramente.
So I will gladly show you a simple step by step, how I managed to transform this long dress, to a more modern and beautiful, then the materials to use first.
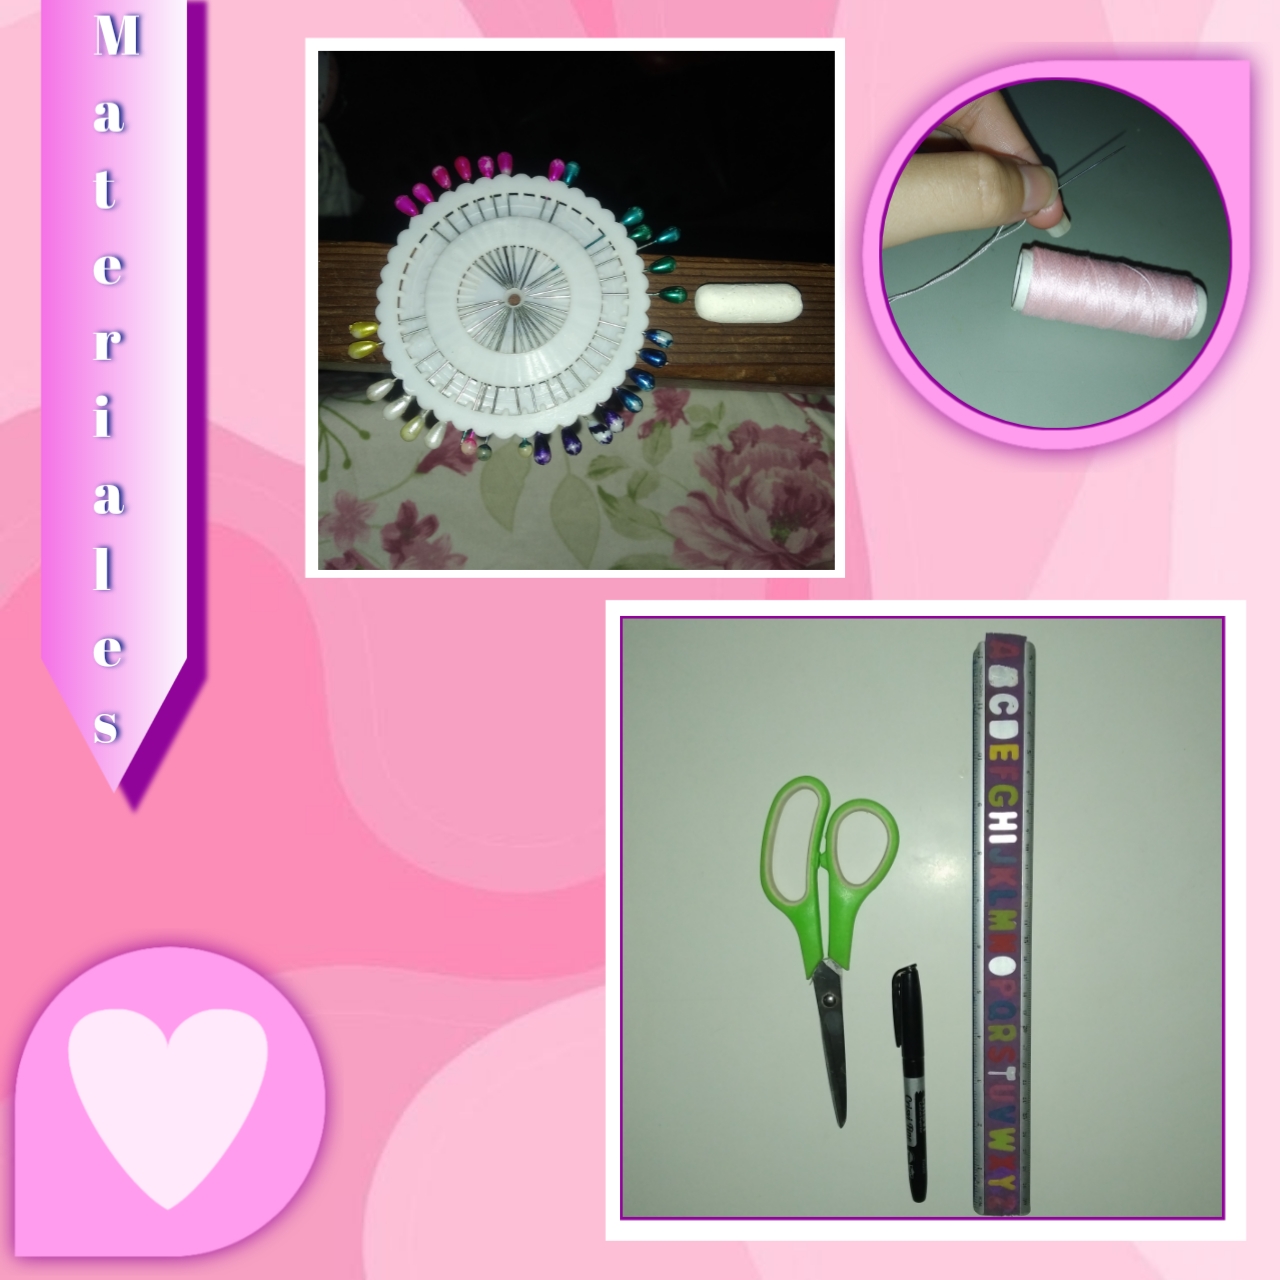
♡📑Materials📑♡
- Tiza
- Hilo
- Aguja
- Tijera
- Regla
- Marcador
- Alfileres
- Chalk
- Thread
- Needle
- Scissors
- Ruler
- Marker
- Pins
♡🧵👣Step by Step👣🧵♡
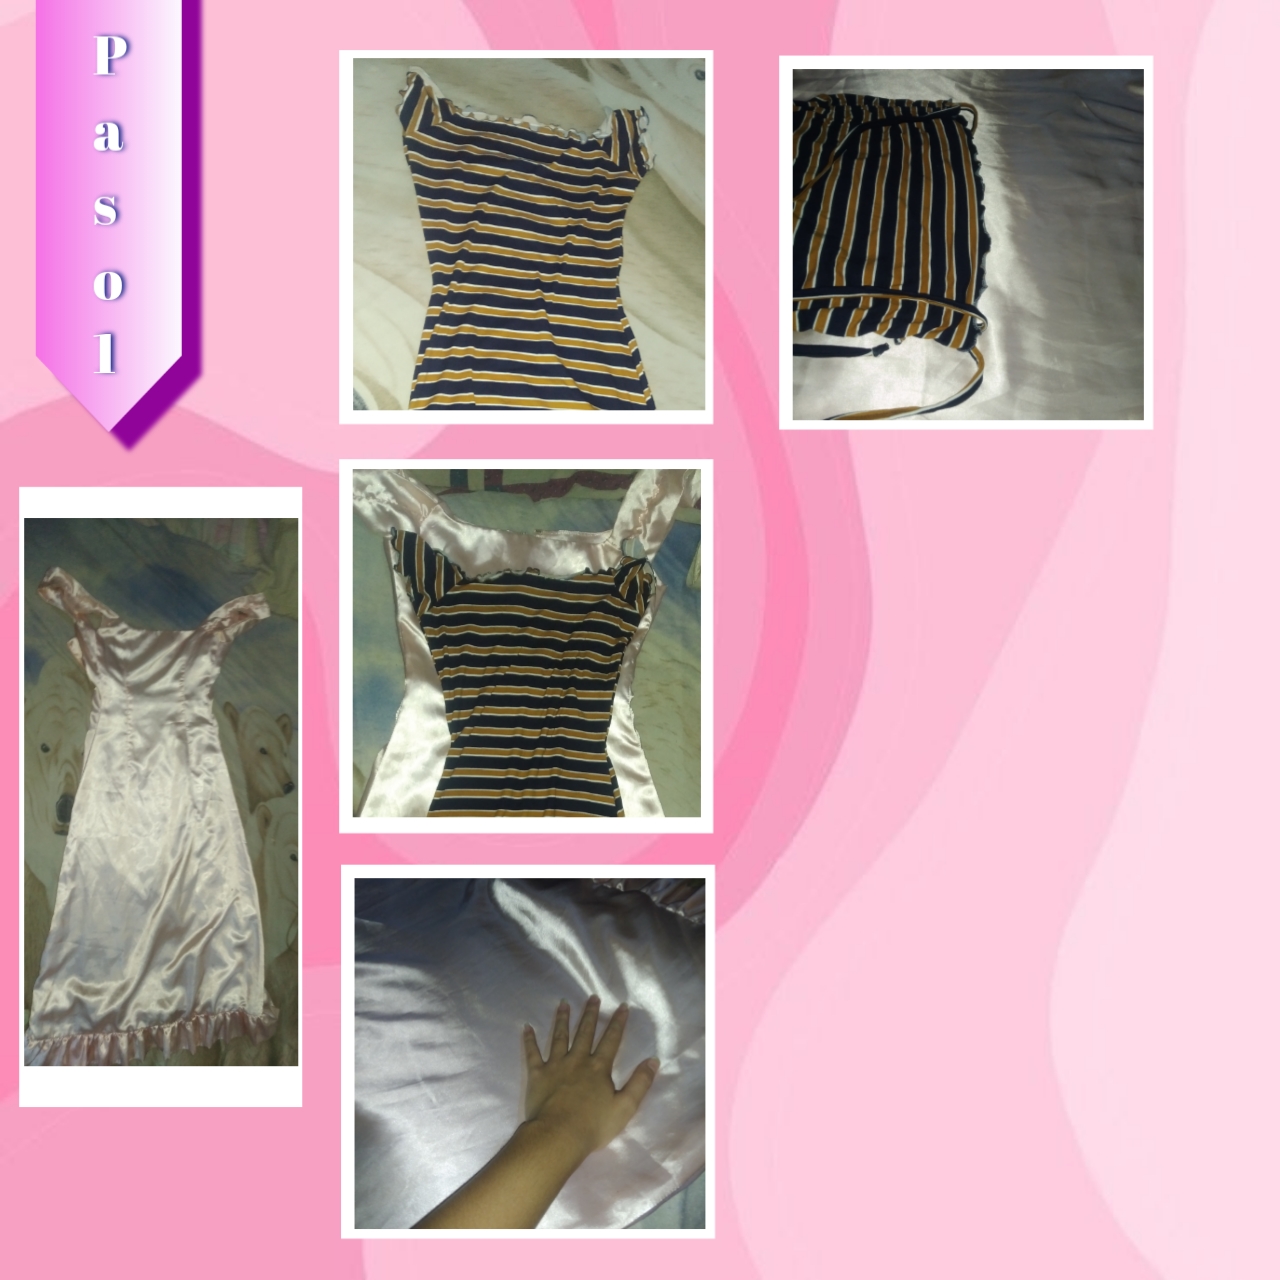
Paso 1
Step 1:
Vamos a comenzar tomando nuestro vestido a remodelar, al igual que uno de nuestros vestidos que nos guste como nos queda, de largo y ajustado pues, así lo utilizaremos como una guía a seguir, para esto tomaremos nuestro vestido ejemplar encima del otro y acomodaremos cuidadosamente, estirando muy bien para evitar arrugas e igualmente estando pendiente de que no se mueva de su lugar, para cortar con más precisión.
We will begin by taking our dress to be remodeled, as well as one of our dresses that we like the way it fits, in length and fit, so we will use it as a guide to follow, for this we will take our exemplary dress on top of the other and we will carefully arrange it, stretching it very well to avoid wrinkles and also being aware that it does not move from its place, to cut more accurately.
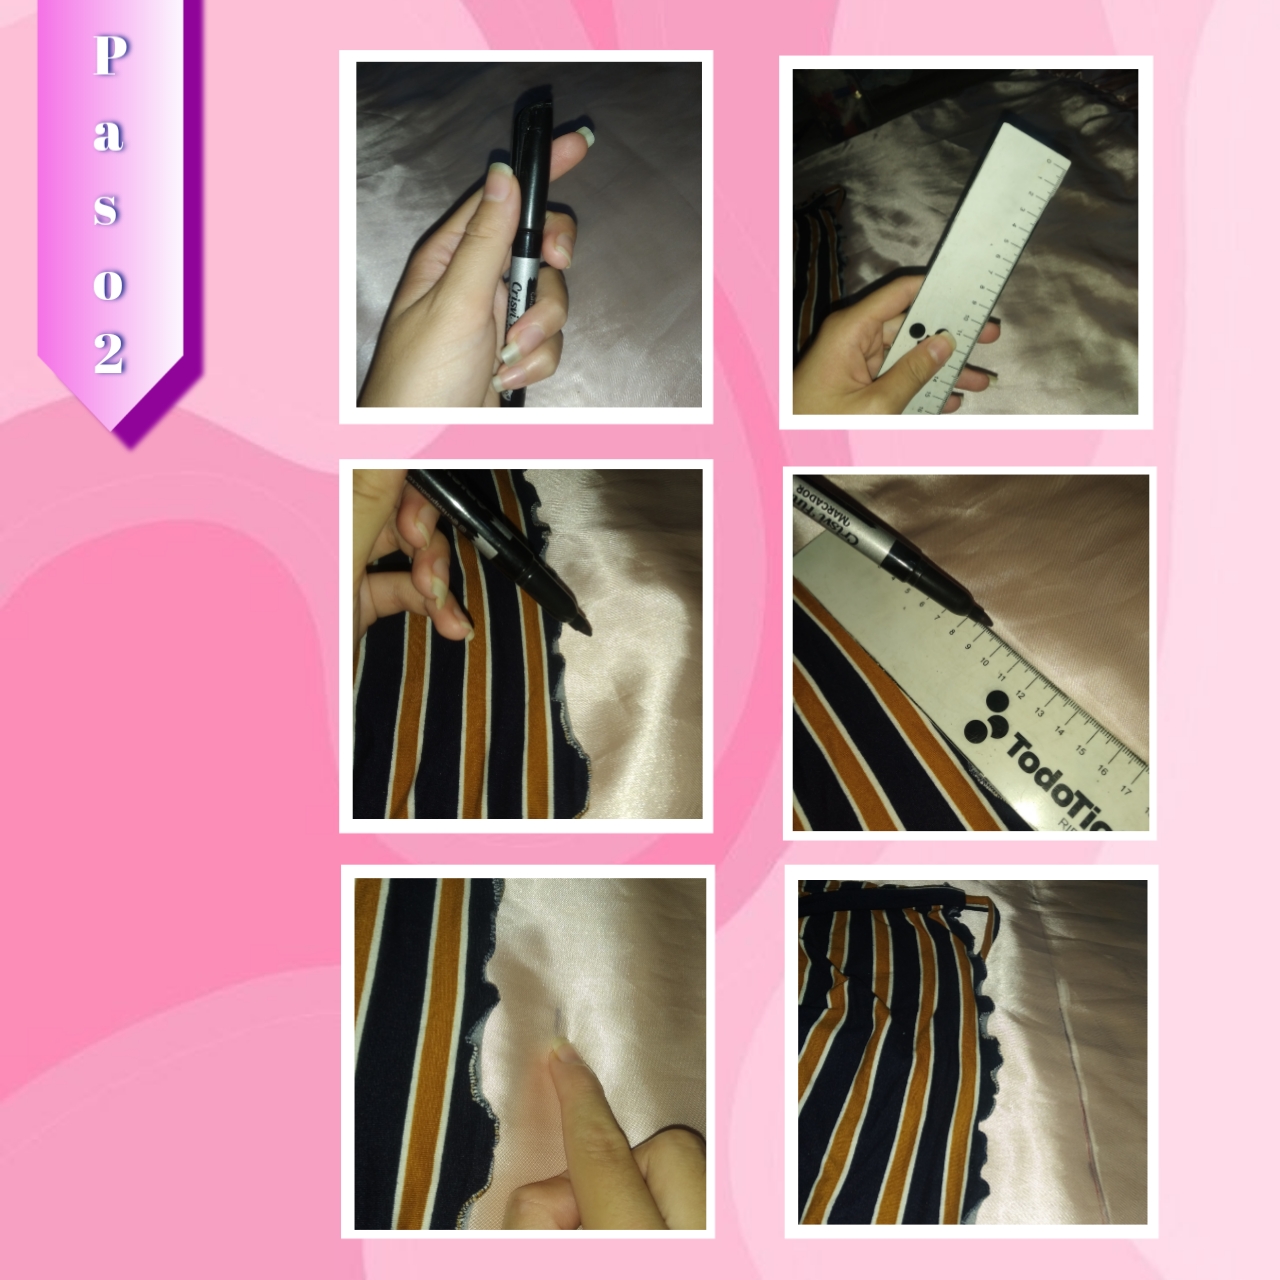
Paso 2
Step 2:
Ahora bien, antes de recortar necesitamos algo más exacto, por lo tanto tomaremos una tiza blanca, en este caso utilice marcador, para que ustedes pudieran visualizar bien cada cosa, porque lo ideal es un trozo de jabón o una tiza, así hacemos una pequeña línea y proseguimos a tomar una regla para apoyarnos de ella, seguidamente comenzaremos a trazar bien la línea recta hasta el borde de cada lado, está la hice un poco más abajo de la medida del vestido, tomando en cuenta que debemos hacer un pequeño dobladillo y que son distintas telas.
Now, before cutting out we need something more accurate, so we will take a white chalk, in this case use a marker, so that you could visualize each thing well, because the ideal is a piece of soap or chalk, so we make a small line and then we take a ruler to lean on it, then begin to draw well the straight line to the edge of each side, I did it a little below the size of the dress, taking into account that we must make a small hem and that they are different fabrics.
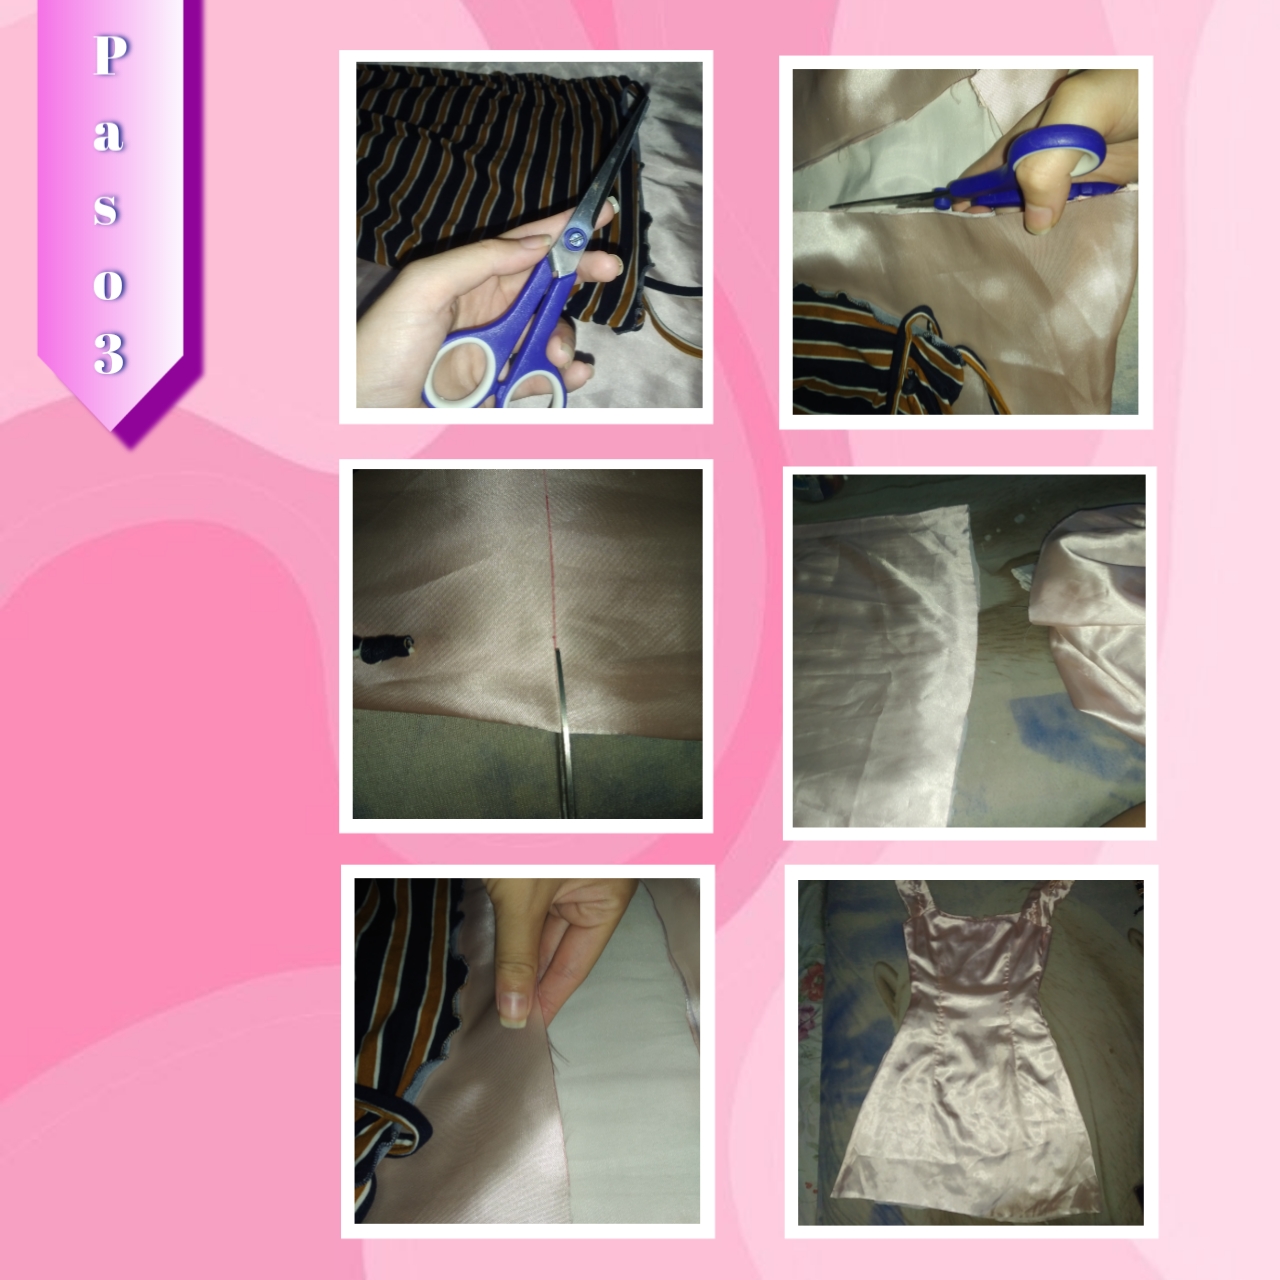
Paso 3:
Step 3:
Está vez si vamos con el recorte del vestido, para esto estiraremos y acomodaremos bien para evitar un mal corte, seguido tomamos nuestra tijera y empezamos a recortar de forma recta e igualmente cuidadosa, por mi parte, primero corte la parte de arriba, luego el forro (lo pique un poco más corto) y por último la otra capa de tela de abajo, es decir, cortando por el orden de las capas para mayor precisión, así hasta recortar todo. Cabe señalar que no me quedo tan derecho, debo admitir que no soy muy buena con las tijeras, pero se hizo el intento, lo importante es que no se verá con el dobladillo.
This time if we go with the trimming of the dress, for this we will stretch and accommodate well to avoid a bad cut, then we take our scissors and begin to cut straight and equally careful, for my part, first cut the top, then the lining (I cut it a little shorter) and finally the other layer of fabric below, that is, cutting in the order of the layers for accuracy, and so on until trimming everything. It should be noted that I did not get it so straight, I must admit that I'm not very good with scissors, but the attempt was made, the important thing is that it will not be seen with the hem.
Paso 4:
Step 4:
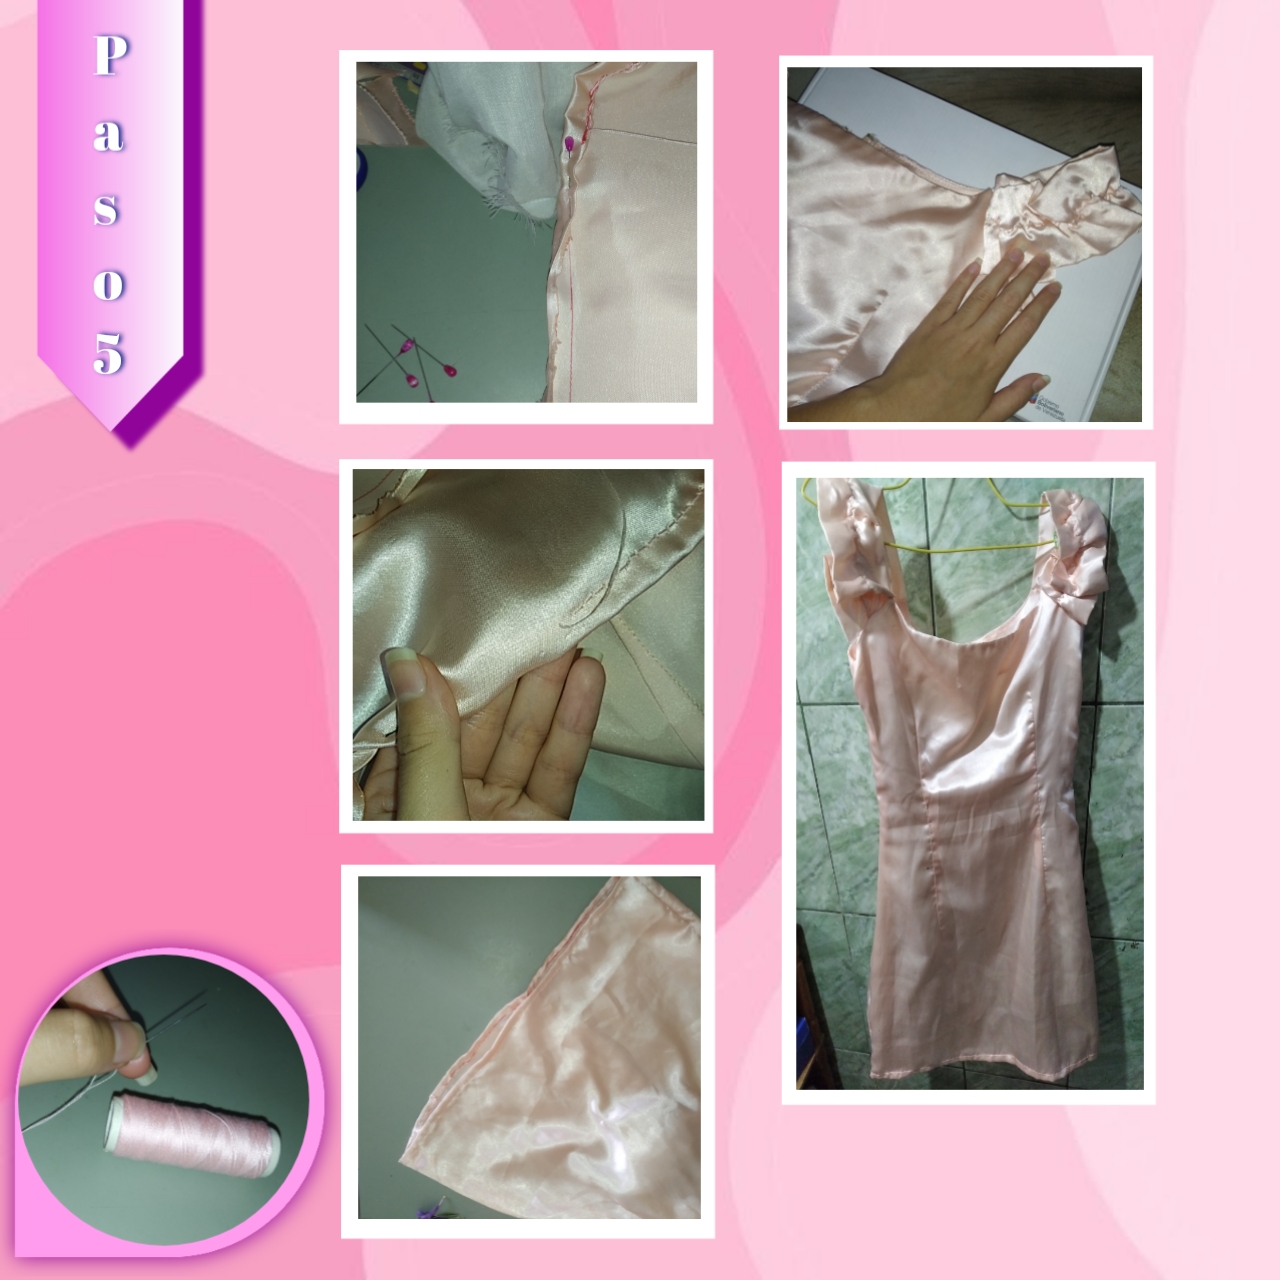
Procedemos a agregar los últimos detalles, así me lo probé, tome una medida con los dedos de las manos en ambos lados desde abajo, marqué con una regla y un lapicero una línea en diagonal guiandome por la medida que tomé, después agregué alfileres por fuera de toda la línea, para que no se moviera de su lugar la tela, tomé mi aguja e hilo de color rosa y seguí cosiendo a mano hasta culminar con está línea, de está manera hice igualmente en el otro lado.
We proceed to add the last details, so I tried it on, I took a measurement with my fingers on both sides from below, I marked with a ruler and a pencil a diagonal line guided by the measurement I took, then I added pins outside the entire line, so that the fabric would not move from its place, I took my needle and pink thread and continued sewing by hand until I finished with this line, in the same way I did the same on the other side.
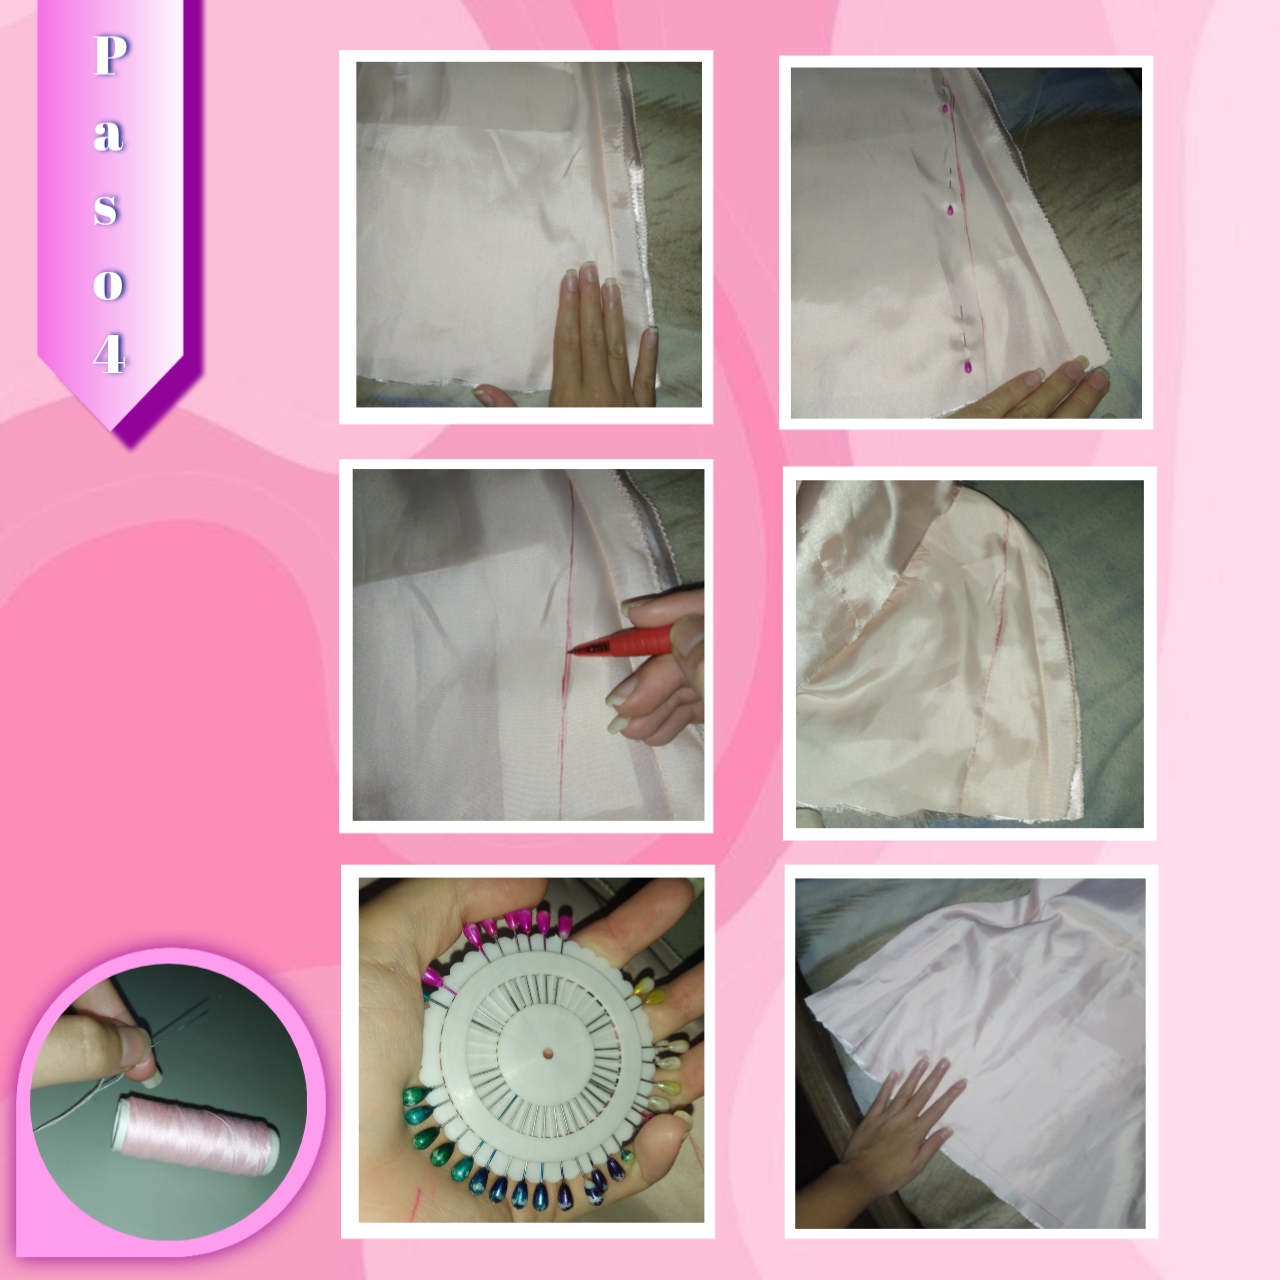
Paso 5:
Step 5:
Ahora para continuar con el dobladillo, primero hice una línea recta aproximadamente de 2.4cm de ancho por todo el largo del vestido, en la parte de abajo, luego con la ayuda de una plancha comencé doblando está desde abajo hacía arriba con una medida de más o menos 0.5cm de ancho, por el mismo largo, después eleve está hacía arriba sin soltar y planche para que se mantuviera en su lugar. Por último agregué alfileres para sostener y cosí por todo esto, dejando un pequeño borde, así para terminar le puse una pequeña elástica a las mangas (ya que estaban anchas) y ya quedó.
Now to continue with the hem, first I made a straight line about 2.4cm wide along the entire length of the dress, at the bottom, then with the help of an iron I started folding it from the bottom up with a measure of about 0.5cm wide, for the same length, then I raised it up without letting go and ironed it to keep it in place. Finally I added pins to hold and sewed all over it, leaving a small border, so to finish I put a little elastic on the sleeves (since they were wide) and that was it.
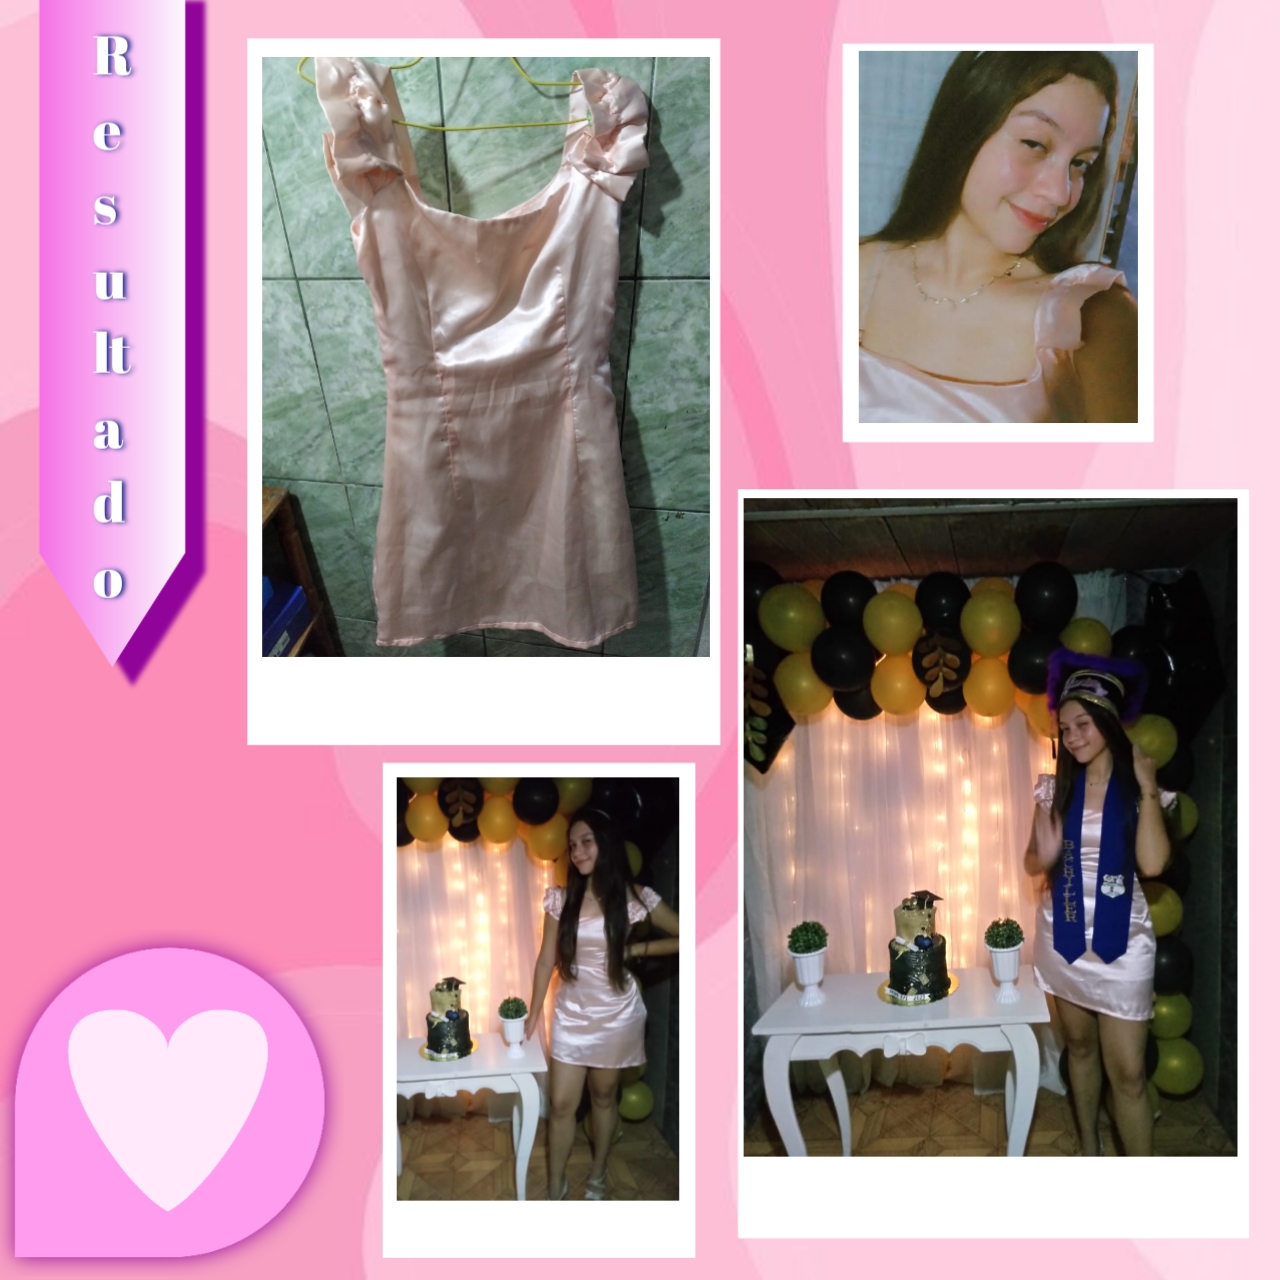
De está manera, obtenemos cómo resultado un nuevo vestido, hermoso, más cómodo y sencillo, para utilizar en alguna ocasión especial de nuestras vidas, es una forma muy fácil, además de sencilla de darle un cambio evidente a la prenda que le estamos dando una segunda vida. Me encanta cambiar cositas y dar toques distintos, he hecho otros pequeños proyectos, pero no he tenido la oportunidad de traerlos por acá, espero el siguiente poder compartirlo con ustedes, uno un poco más elaborado tal vez.
This way, we get as a result a new dress, beautiful, more comfortable and simple, to use in some special occasion of our lives, it is a very easy and simple way to give a clear change to the garment that we are giving a second life. I love to change little things and give different touches, I have done other small projects, but I have not had the opportunity to bring them here, I hope the next one I can share with you, one a little more elaborate maybe.
Ya culminado el tutorial está publicación a llegado a su fin, espero les haya gustado el resultado y que les sirva para tener una idea de que hacer con esos vestidos viejos que están guardados, para darles una segunda vida, tal vez sea una señal ja, ja, ja.
I hope you liked the result and that it helps you to have an idea of what to do with those old dresses that are stored, to give them a second life, maybe it's a sign ha, ha, ha, ha.
🤍Hasta el siguiente Diy ¡Gracias por leer!🤍
🤍Until the next Diy Thanks for reading!🤍
Photos of my authorship taken from my Xiaomi Redmi 7 phone, edited in the free version of PixeLab
Wow, you truly have transformed the dress. Nice work
That's right! Thank you, Regards💗
!DIY
!discovery 26
🥺💙
🤗
✨💙
This post was shared and voted inside the discord by the curators team of discovery-it
Join our Community and follow our Curation Trail
Discovery-it is also a Witness, vote for us here
Delegate to us for passive income. Check our 80% fee-back Program
Graciasss 💜, saludos ✨
You can query your personal balance by
!DIYSTATSTe quedo muy lindo este trabajo de restauración, definitivamente hiciste un excelente trabajo y la modelo se ve que quedo muy feliz. Saludos @stefania16 ✨
!DIY
Muchas gracias por apreciarlo y sii, quedé contenta con el resultado, saludos y un abrazo.💟✨
You can query your personal balance by
!DIYSTATS❤️ Thanks ❤️
Your level lowered and you are now a Red Fish!
Check out our last posts:
🤧❤️