Hello good night my creative Hive Diy family! I hope you are excellent here, have a happy and blessed day, I wish you a nice Friday. I also wish you good health, happiness, love, productivity and of course the creativity that we need to create and do things with love, my best wishes to all my family.♡
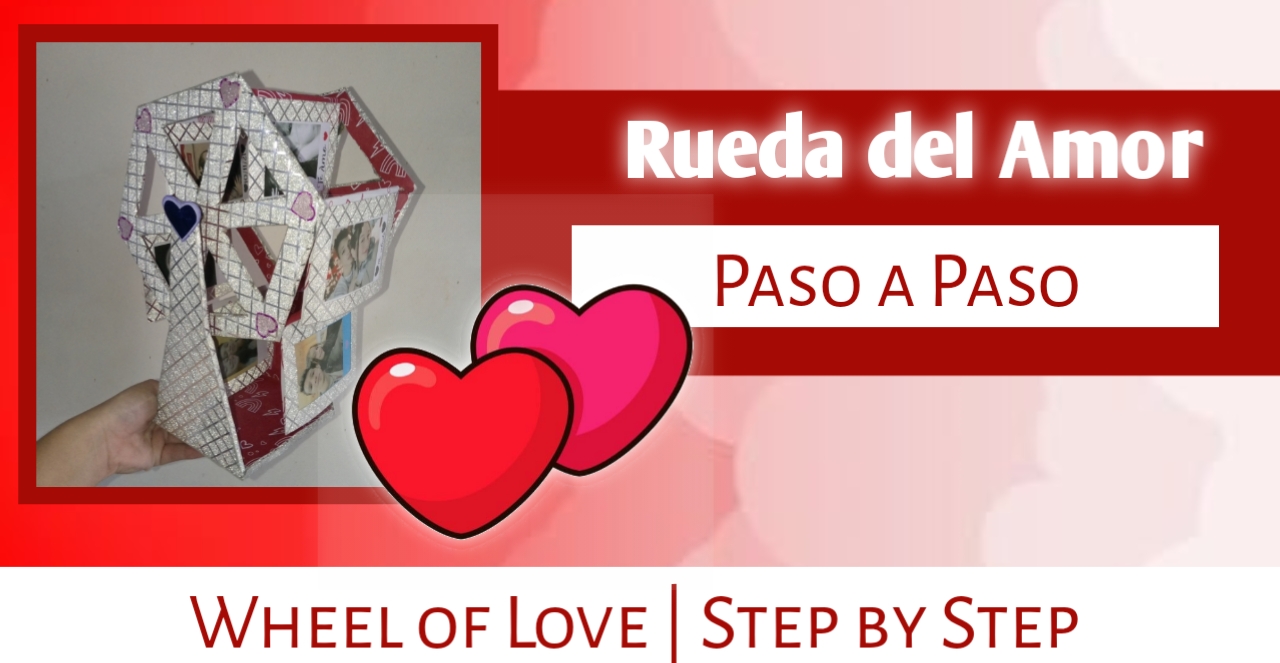
La noche de hoy me encuentro muy entusiasmada por poder compartirles una manualidad que me llevó cierto trabajo y tiempo, pero que aún así es fácil de hacer y sobretodo hermosa, resalta en lo único y diferente que es. Es una rueda de la fortuna o como quise llamarle "❤️Rueda del amor❤️", la cuál contiene fotos que son retirables y da vueltas efectivamente como una rueda de la fortuna, es un regalo muy especial, lleno de sentimiento y amor, así que si te gusta el resultado, quédate y te mostraré con mucho gusto el paso a paso que realice.
Tonight I am very excited to be able to share with you a craft that took me some work and time, but still easy to make and above all beautiful, it stands out in how unique and different it is. It is a wheel of fortune or as I wanted to call it "❤️Rueda of amor❤️", which contains photos that are removable and turns effectively as a wheel of fortune, it is a very special gift, full of feeling and love, so if you like the result, stay and I will gladly show you the step by step that I made.
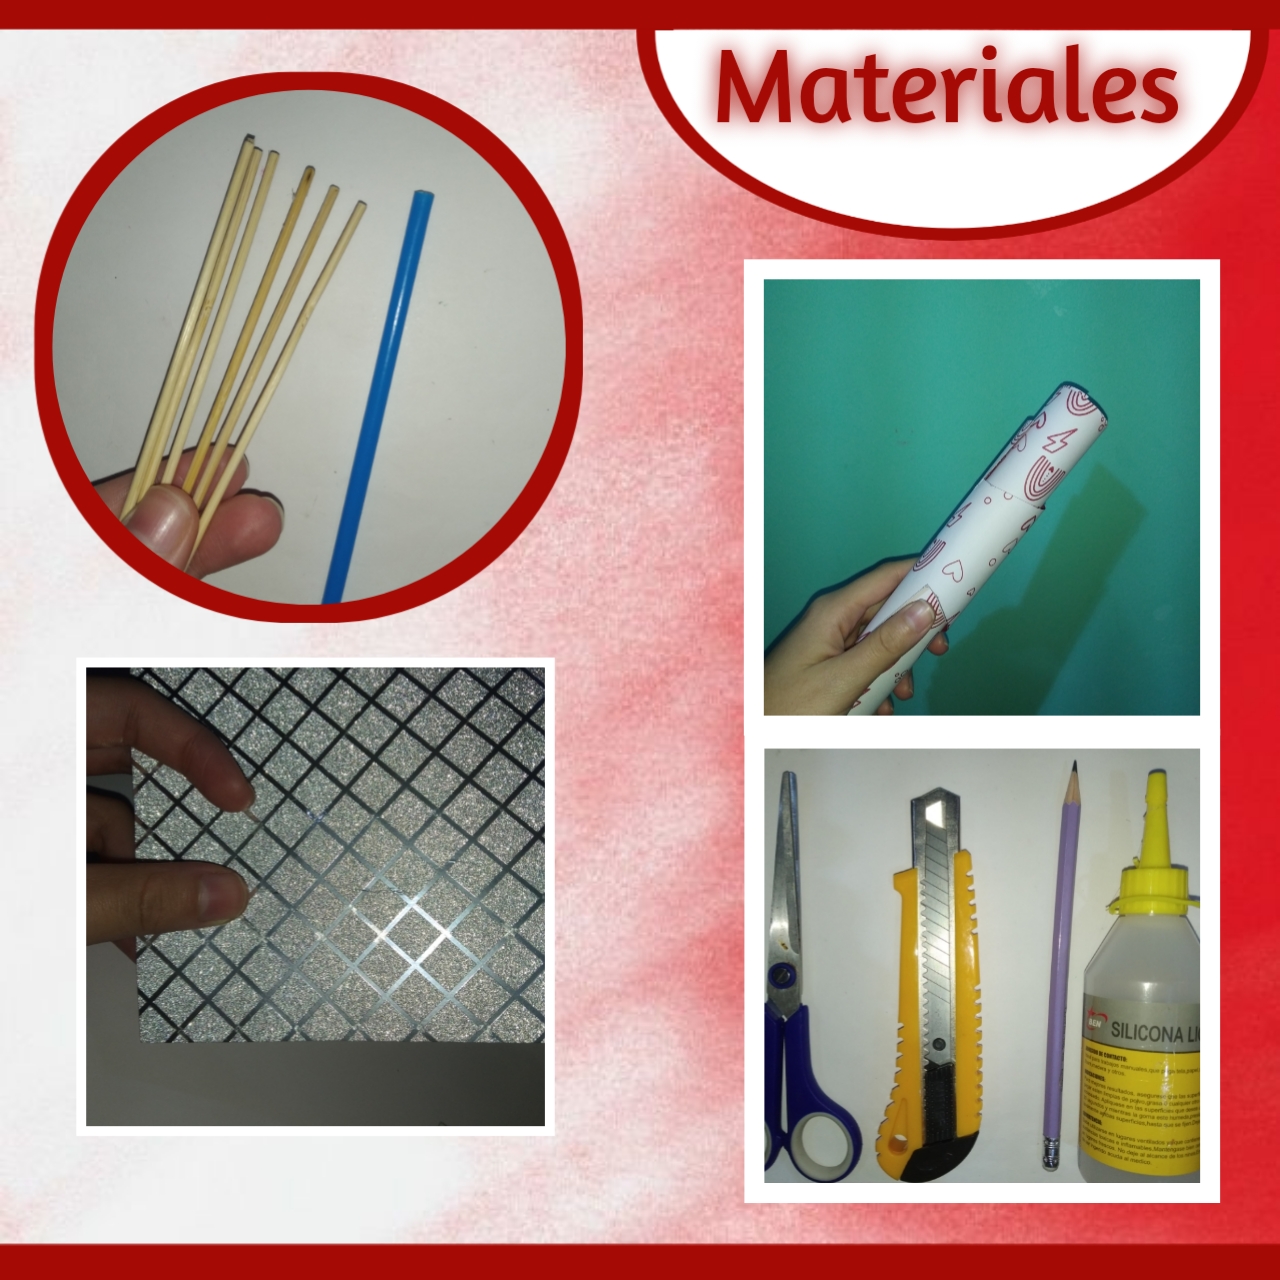
♡📎📃Materials📃📎♡
- Cartulinas
- Cartón
- Silicón
- Palito de altura
- Pitillo
- Cutter/exacto
- Regla
- Lápiz
- Tijeras
- 6 fotos
- Cardboard
- Cardboard
- Silicone
- Height stick
- Straw
- Cutter/acto cutter
- Ruler
- Pencil
- Scissors
- 6 photos
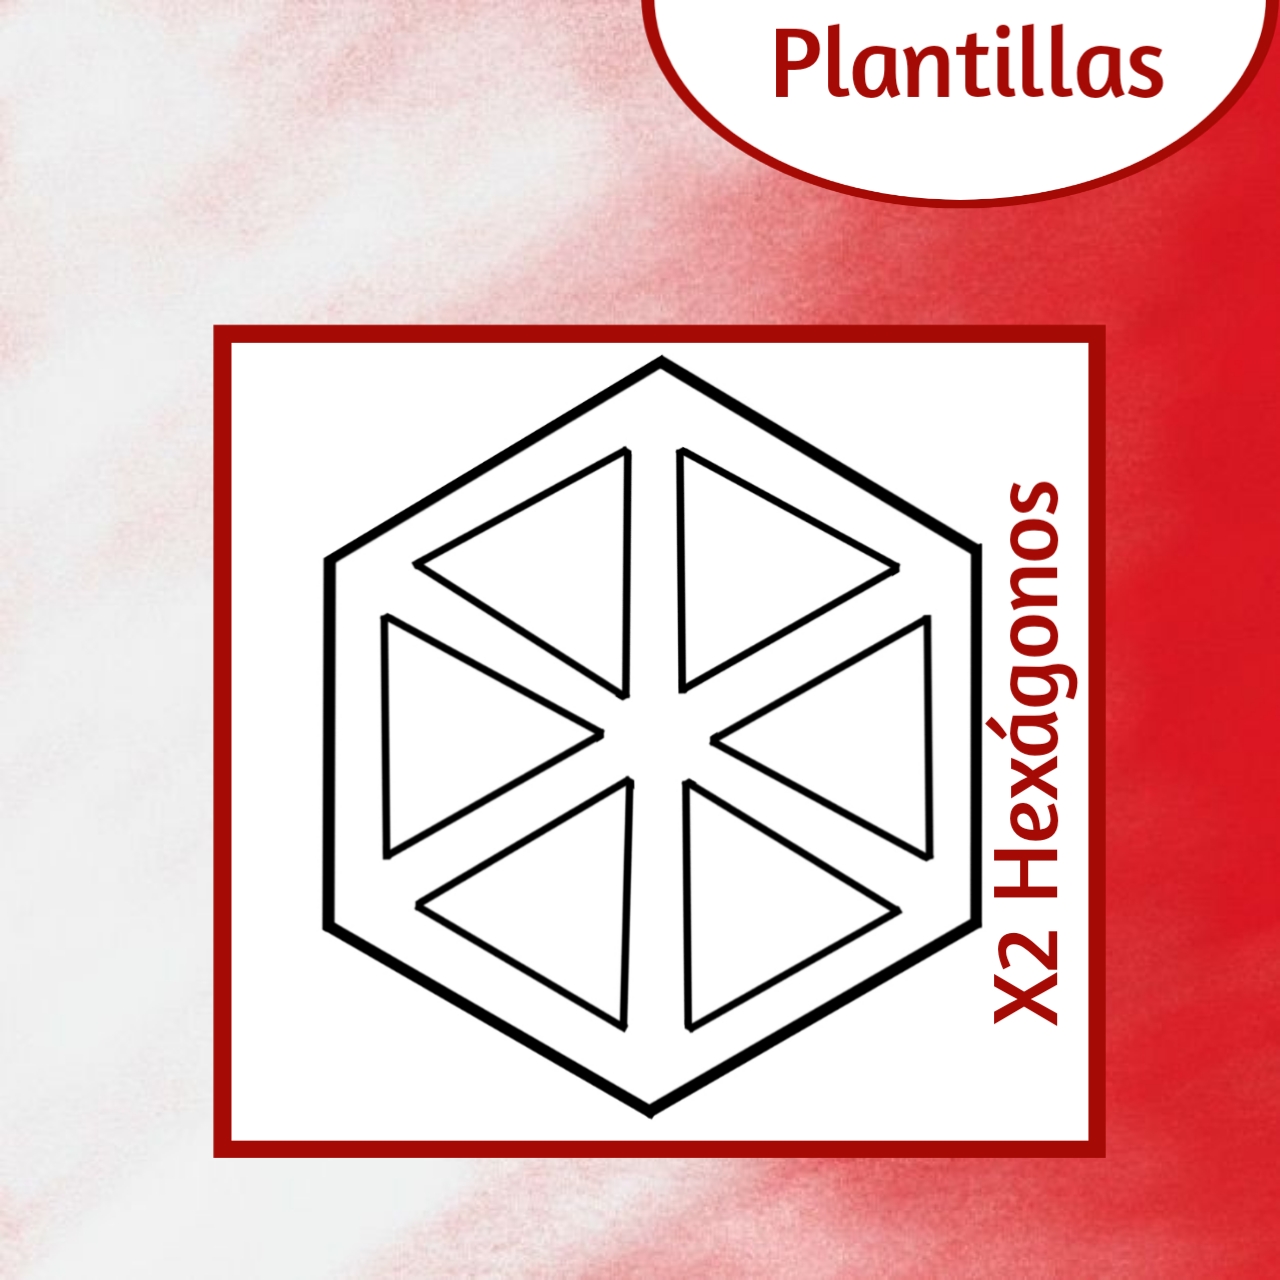
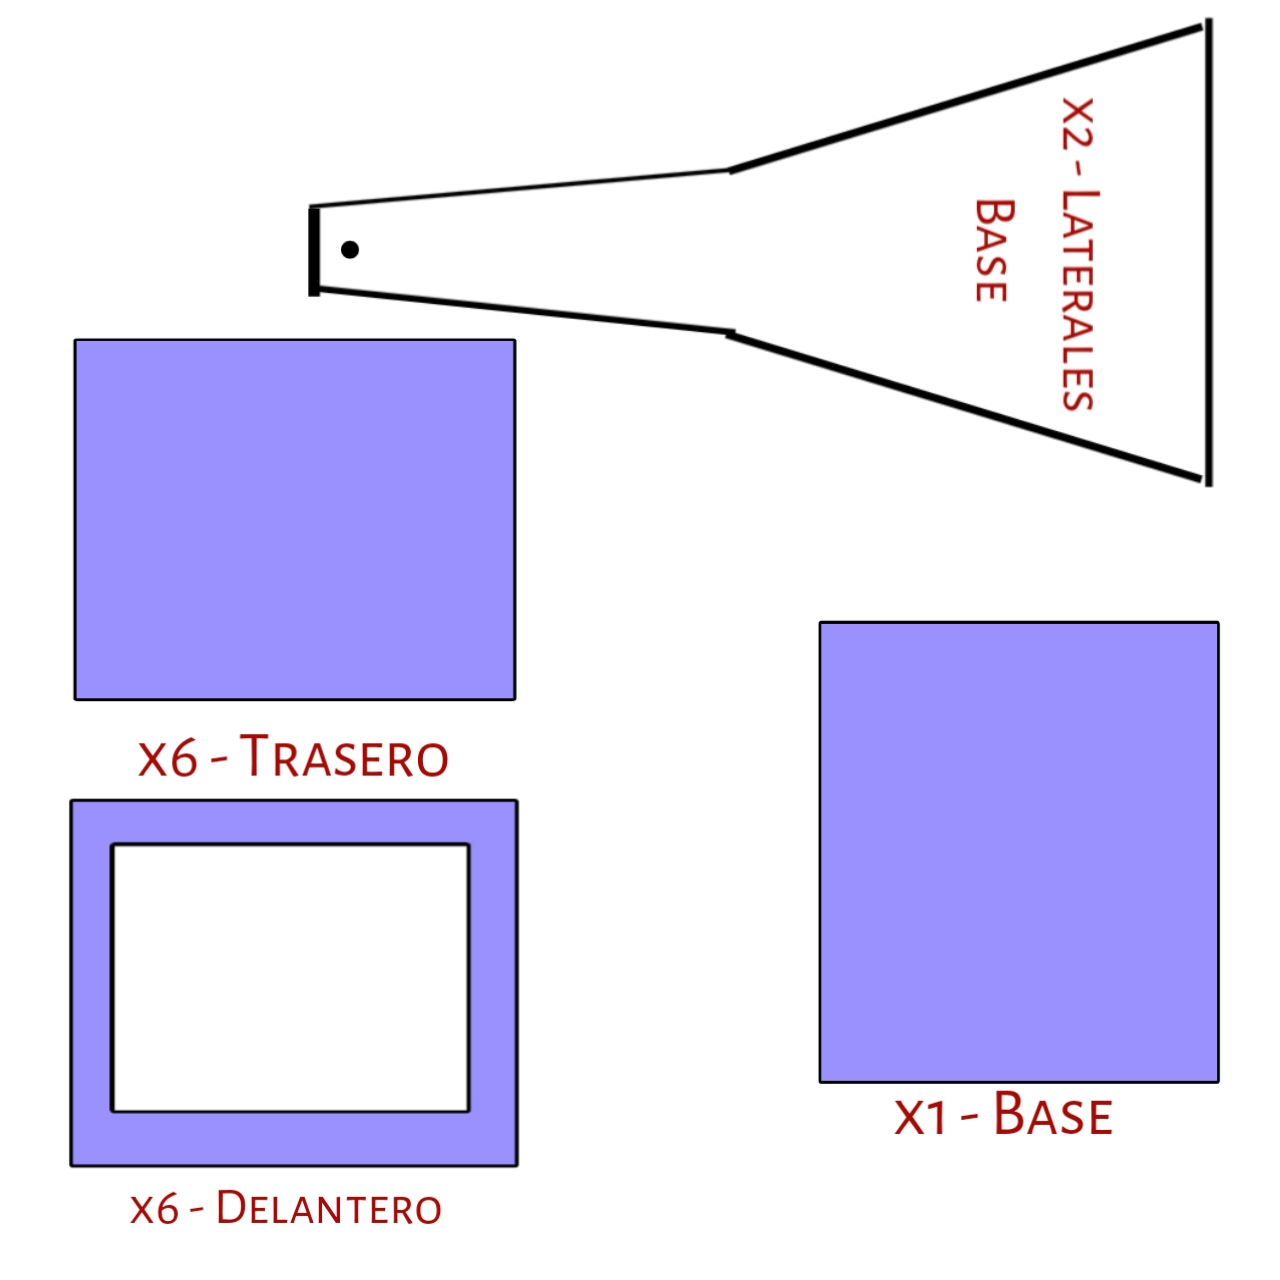
♡✨Templates✨♡
♡📎❤️Step by Step❤️📎♡
Paso 1:
Step 1:
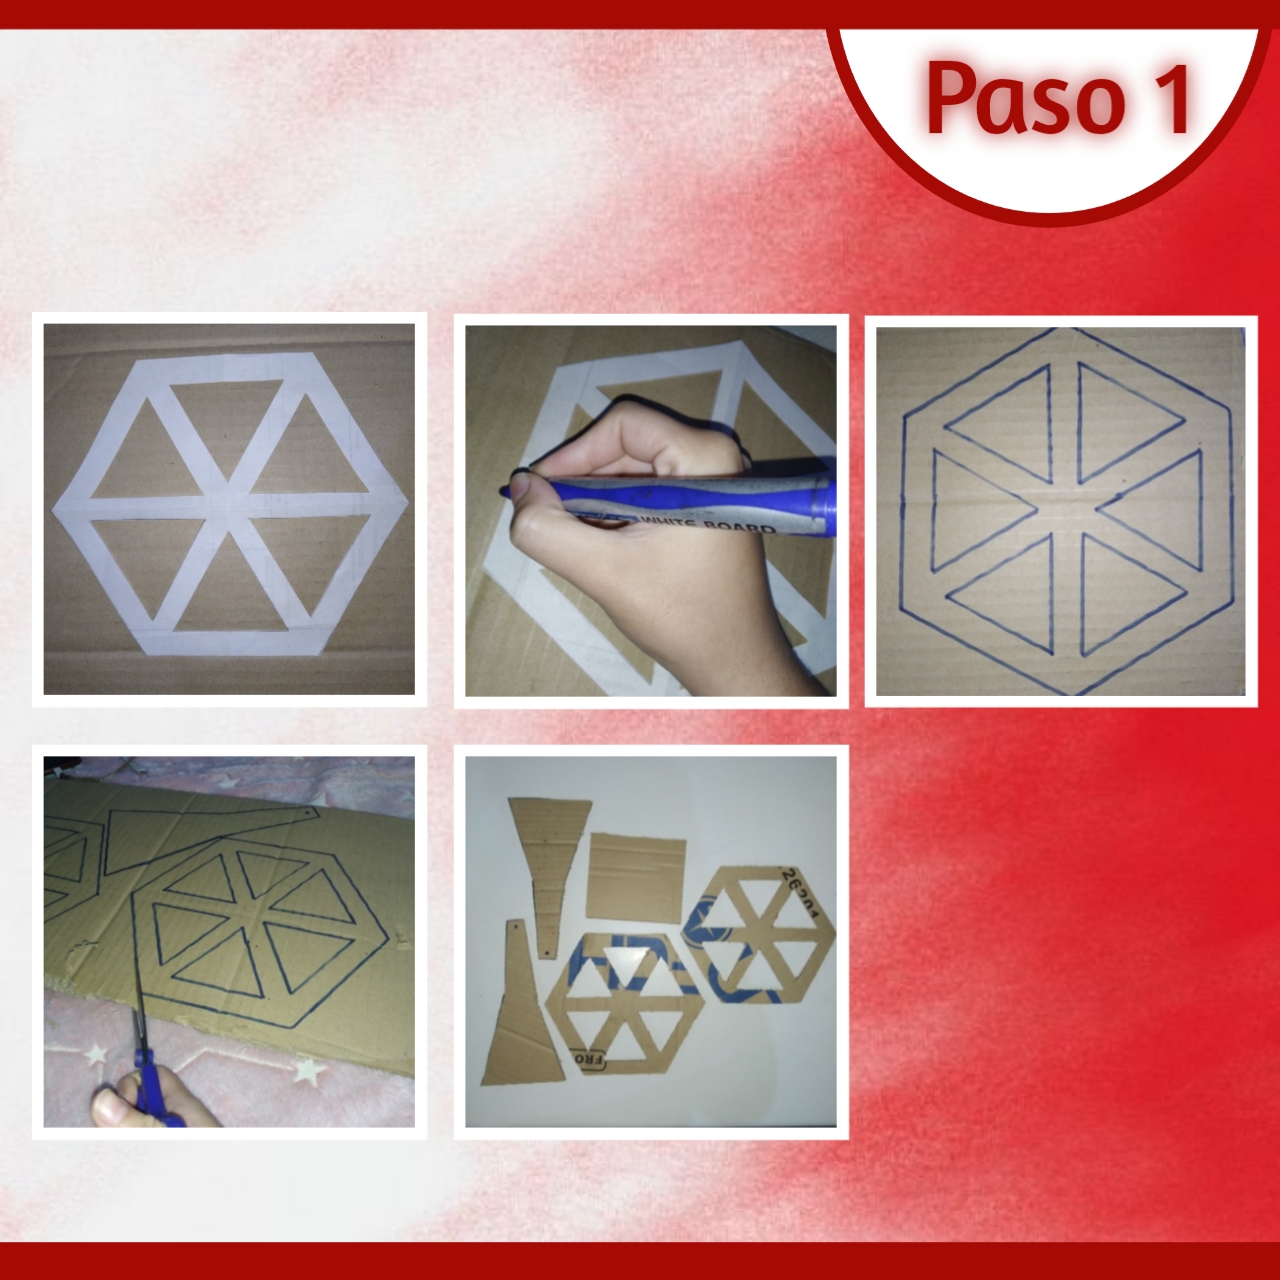
Primero comenzaremos tomando nuestras plantillas (se las dejó arriba), también el cartón con el que haremos está manualidad, de está manera colocamos encima las plantillas, tomamos nuestro lápiz y marcamos muy bien cada una de ellas, yo en este caso utilice marcador para que se apreciará mejor en la cámara, después tomamos nuestras tijeras y/o exacto y recortamos con mucho cuidado y precisión cada pieza.
First we will begin by taking our templates (we left them above), also the cardboard with which we will make this craft, in this way we place the templates on top, we take our pencil and mark each one of them very well, in this case I used marker so that it will be better appreciated in the camera, then we take our scissors and / or exact and cut out very carefully and accurately each piece.
Paso 2:
Step 2:
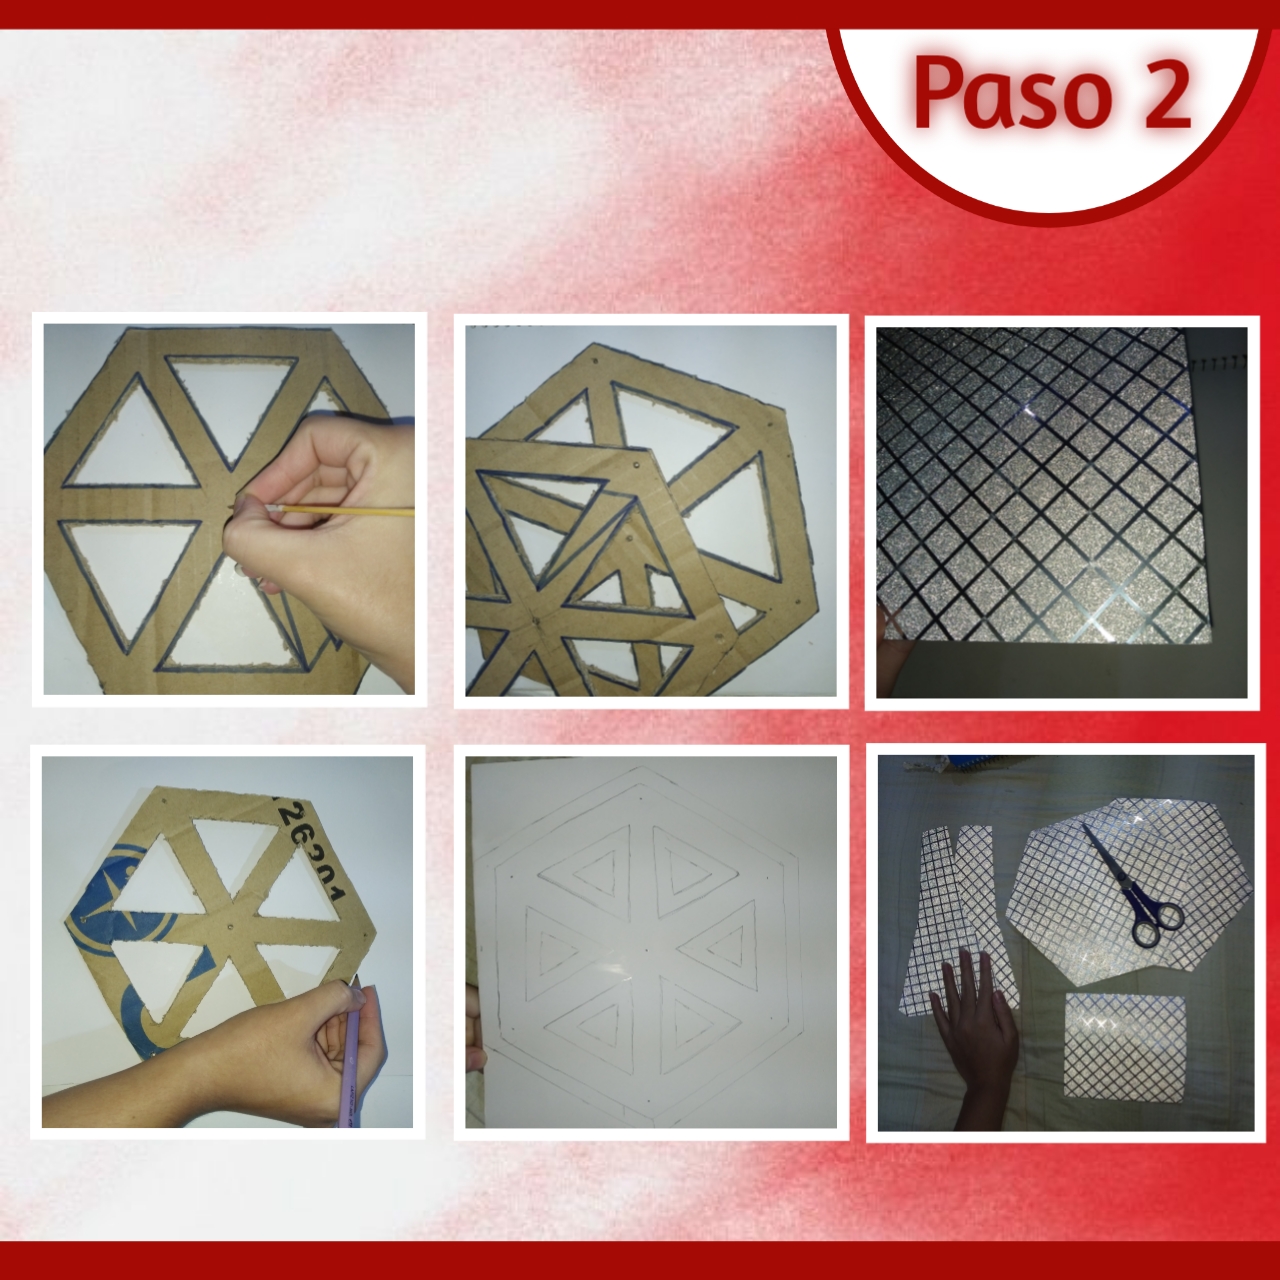
Ya al tener nuestras piezas recortadas, continuamos tomando nuestros dos hexágonos y con la ayuda de un palito de altura haremos unos cuantos orificios (7 en total); uno en el centro de la pieza y los demás en cada esquina, centrando lo más que se pueda, así con ambas piezas, también haremos el orificio que está marcado en dos piezas de la base. Ahora vamos a tomar nuestra cartulina principal, yo está vez use una plateada escarchada, así colocaremos nuestras piezas y marcaremos todas (si van a utilizar la misma cartulina por dentro sacan todo doble), cabe mencionar que le agregué 1cm más de cada lado a todas las plantillas (para forrar), así continúe recortando.
Once we have our pieces cut out, we continue taking our two hexagons and with the help of a height stick we will make a few holes (7 in total); one in the center of the piece and the others in each corner, centering as much as possible, so with both pieces, we will also make the hole that is marked on two pieces of the base. Now we are going to take our main cardboard, this time I used a silver frosted one, so we will place our pieces and mark all (if you are going to use the same cardboard inside take out all double), it is worth mentioning that I added 1cm more on each side to all the templates (for lining), so continue cutting.
Paso 3:
Step 3:
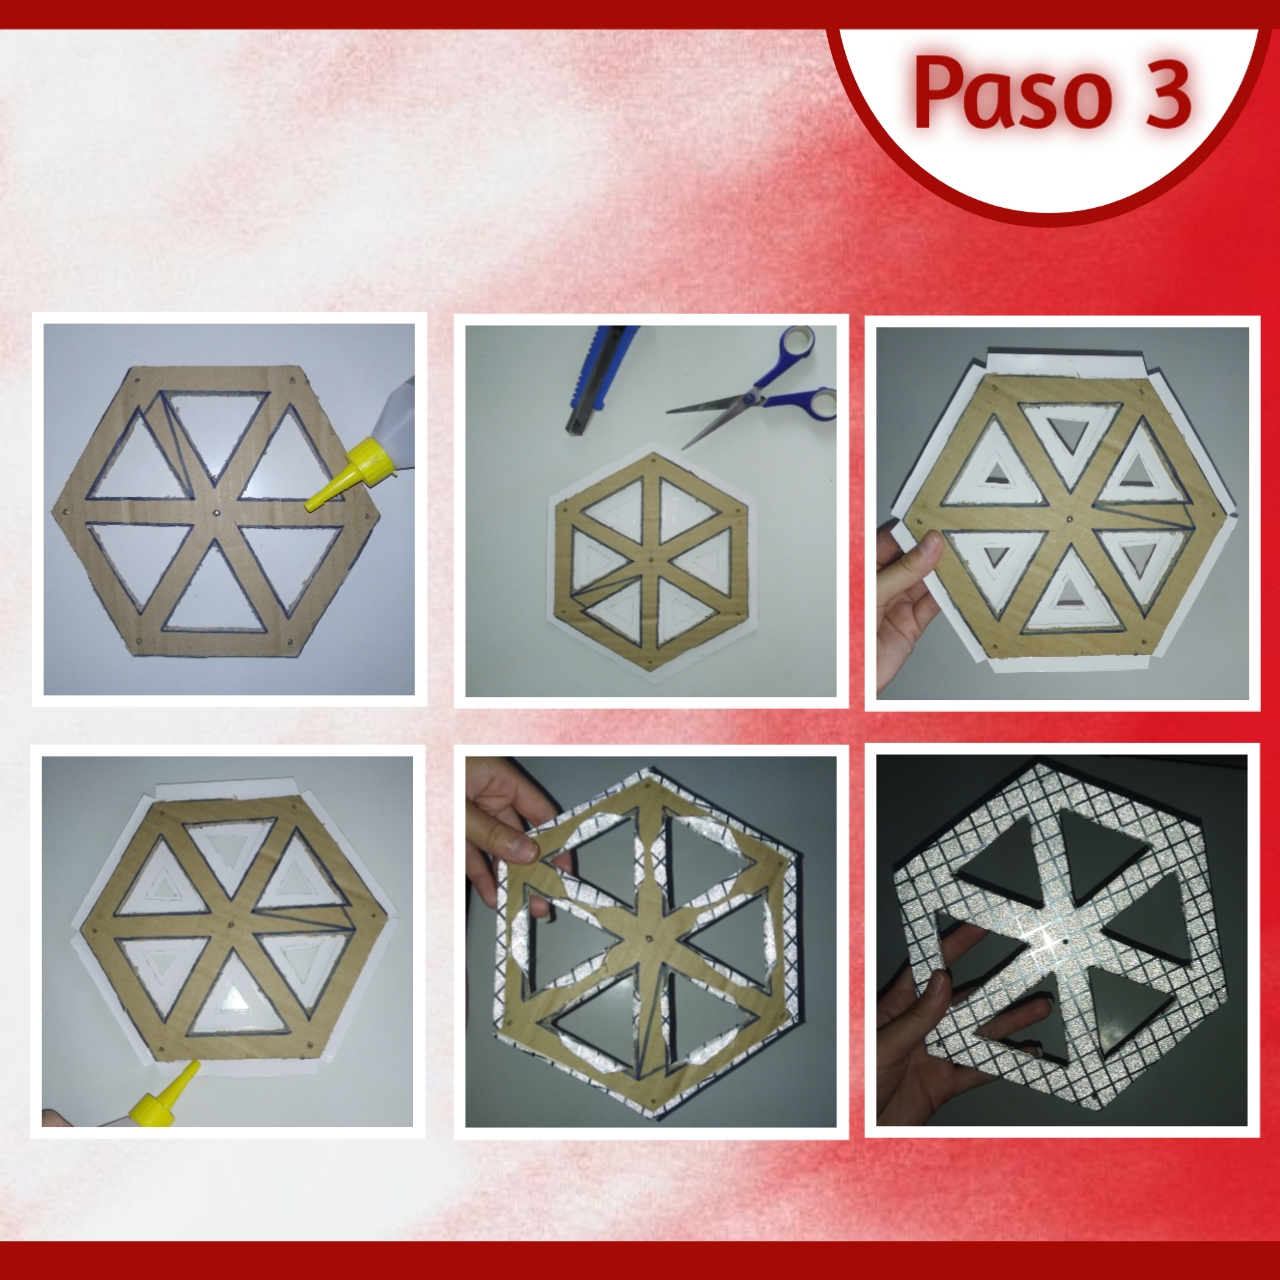
Después agarraremos nuestro silicón de preferencia o el que tengamos a la mano y se lo agregamos a la pieza en uno de los lados, así pegaremos estás encima de la pieza en cartulina que le corresponde a cada una. Proseguimos recortando los orificios con cutter y tijera, además haremos unos pequeños cortes en forma de triángulo en las esquinas, para forrar.
Then we will take our silicone of preference or the one we have at hand and add it to the piece on one of the sides, so we will glue you are on top of the piece of cardboard that corresponds to each one. We continue cutting out the holes with cutter and scissors, we will also make some small triangle-shaped cuts in the corners, for lining,
Marcaremos los dobleces muy bien, puede ser con la ayuda de la punta de una tijera o con la parte trasera del cutter, luego agregamos silicón y pegamos lo mejor posible a la parte de atrás,, además marcamos de nuevo los orificios, como pueden ver.
We will mark the folds very well, it can be with the help of the tip of a scissors or with the back of the cutter, then we add silicone and glue as well as possible to the back, and mark the holes again, as you can see.
Paso 4:
Step 4:
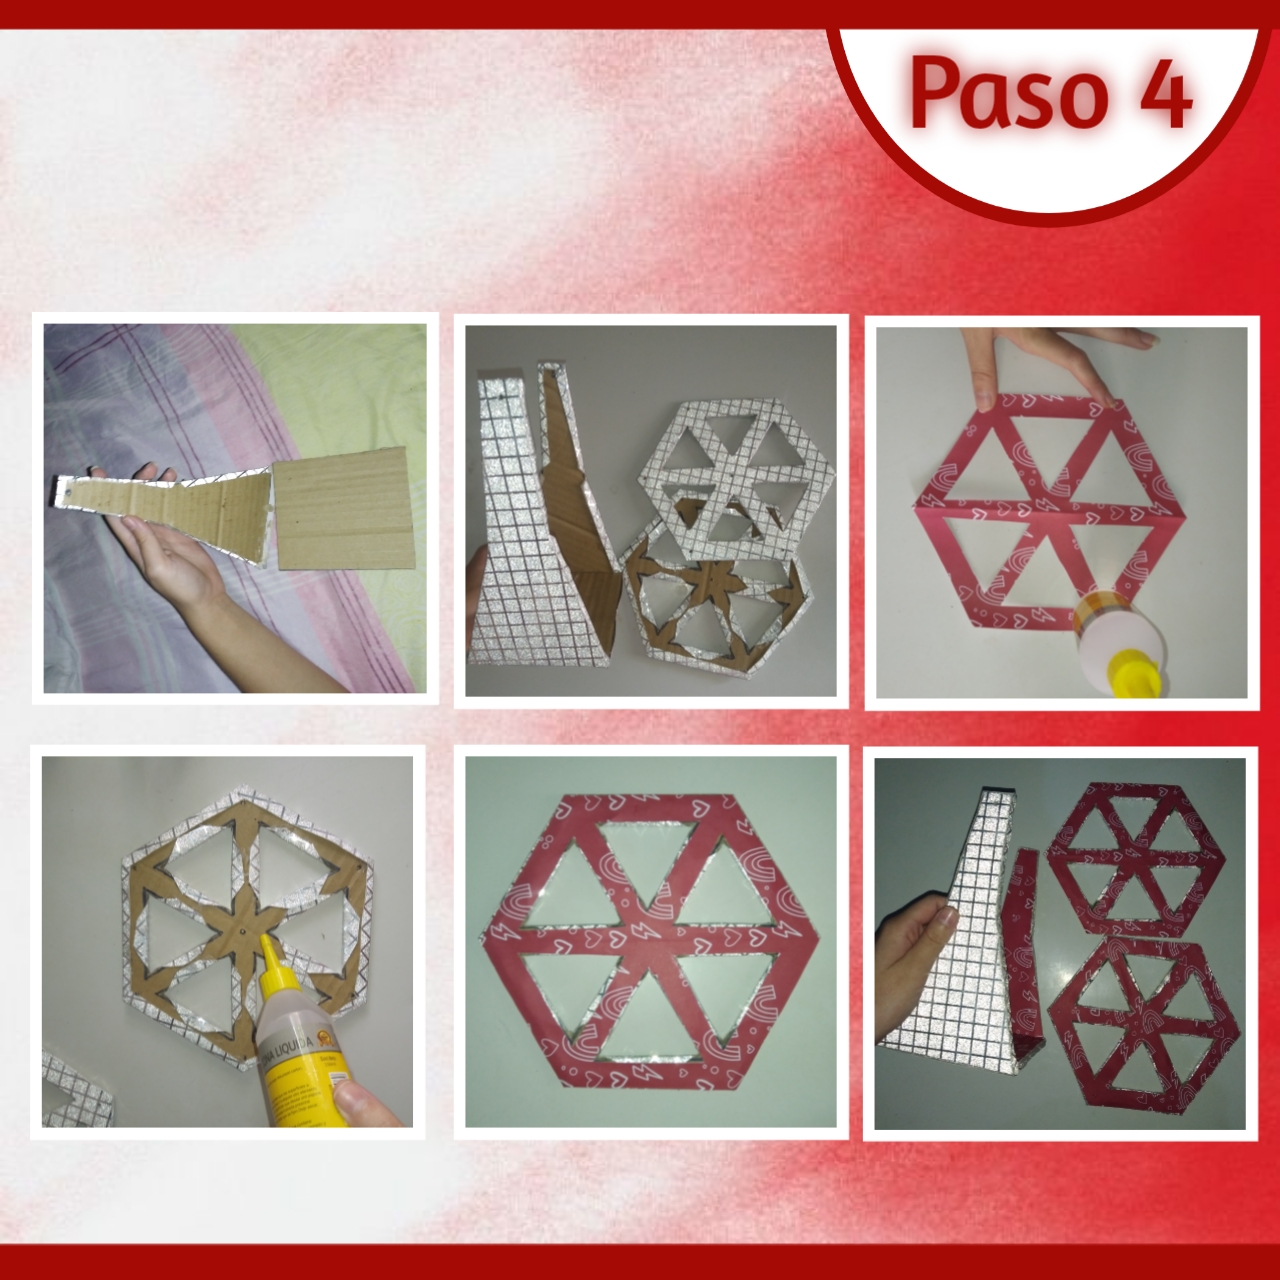
Ahora bien, iniciaremos a armar la base, de está forma, tomamos la pieza del rectángulo e igualmente las dos altas de la base, así uniremos estás al rectángulo frente con frente, como pueden ver. Teniendo nuestras tres piezas ya, como yo quise forrarlo por dentro con otra cartulina, este es el momento en el que marco cada pieza de nuevo, recortó y pego con silicón encima, hasta forrar muy bien cada una, si ustedes desean pueden forrarlo con la misma de lado y lado.
Now, we will start to assemble the base, in this way, we take the rectangle piece and also the two high pieces of the base, so we will join them to the rectangle face to face, as you can see. Having our three pieces already, as I wanted to line it inside with another cardboard, this is the moment in which I mark each piece again, cut and glue with silicone on top, until lining each one very well, if you wish you can line it with the same side and side.
Paso 5:
Step 5:
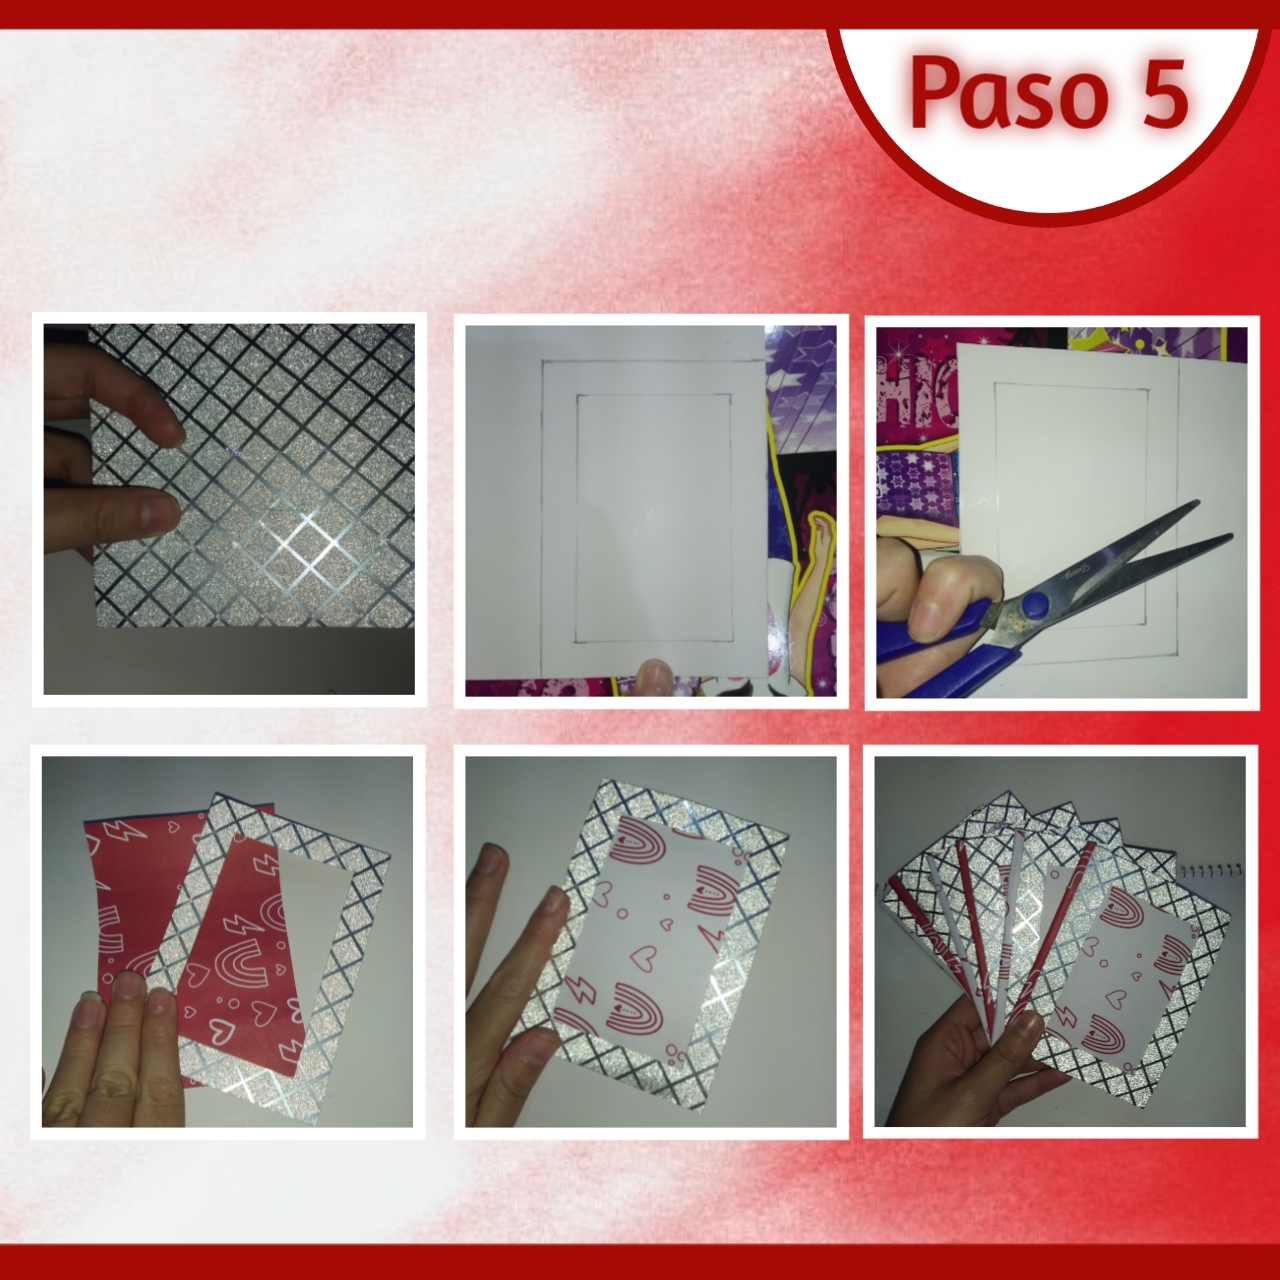
Para este paso tomaremos nuevamente las cartulinas usadas anteriormente, así sobre la cartulina escarchada plateada pondremos el molde del marco de la foto, marcaremos con un lápiz y recortaremos, así pues con la otra cartulina sacaremos un rectángulo del mismo tamaño; es decir que solo debemos marcar y recortar el contorno. Ya con estás dos piezas agregaremos silicón a una de estas, solo en el borde y las uniremos acomodando lo mejor posible, formando nuestro pequeño marco para foto, de estos haremos 6 exactamente, por cierto les agregué unos pequeños tubos de cartulina arriba.
For this step we will take again the cardboard used previously, so on the silver frosted cardboard we will put the mold of the photo frame, we will mark with a pencil and cut out, so with the other cardboard we will make a rectangle of the same size; that is to say that we only have to mark and cut out the outline. Now with these two pieces we will add silicone to one of these, only on the edge and we will join them together, arranging them as best as possible, forming our small photo frame, we will make exactly 6 of these, by the way I added some small cardboard tubes on top.
Paso 6:
Step 6:
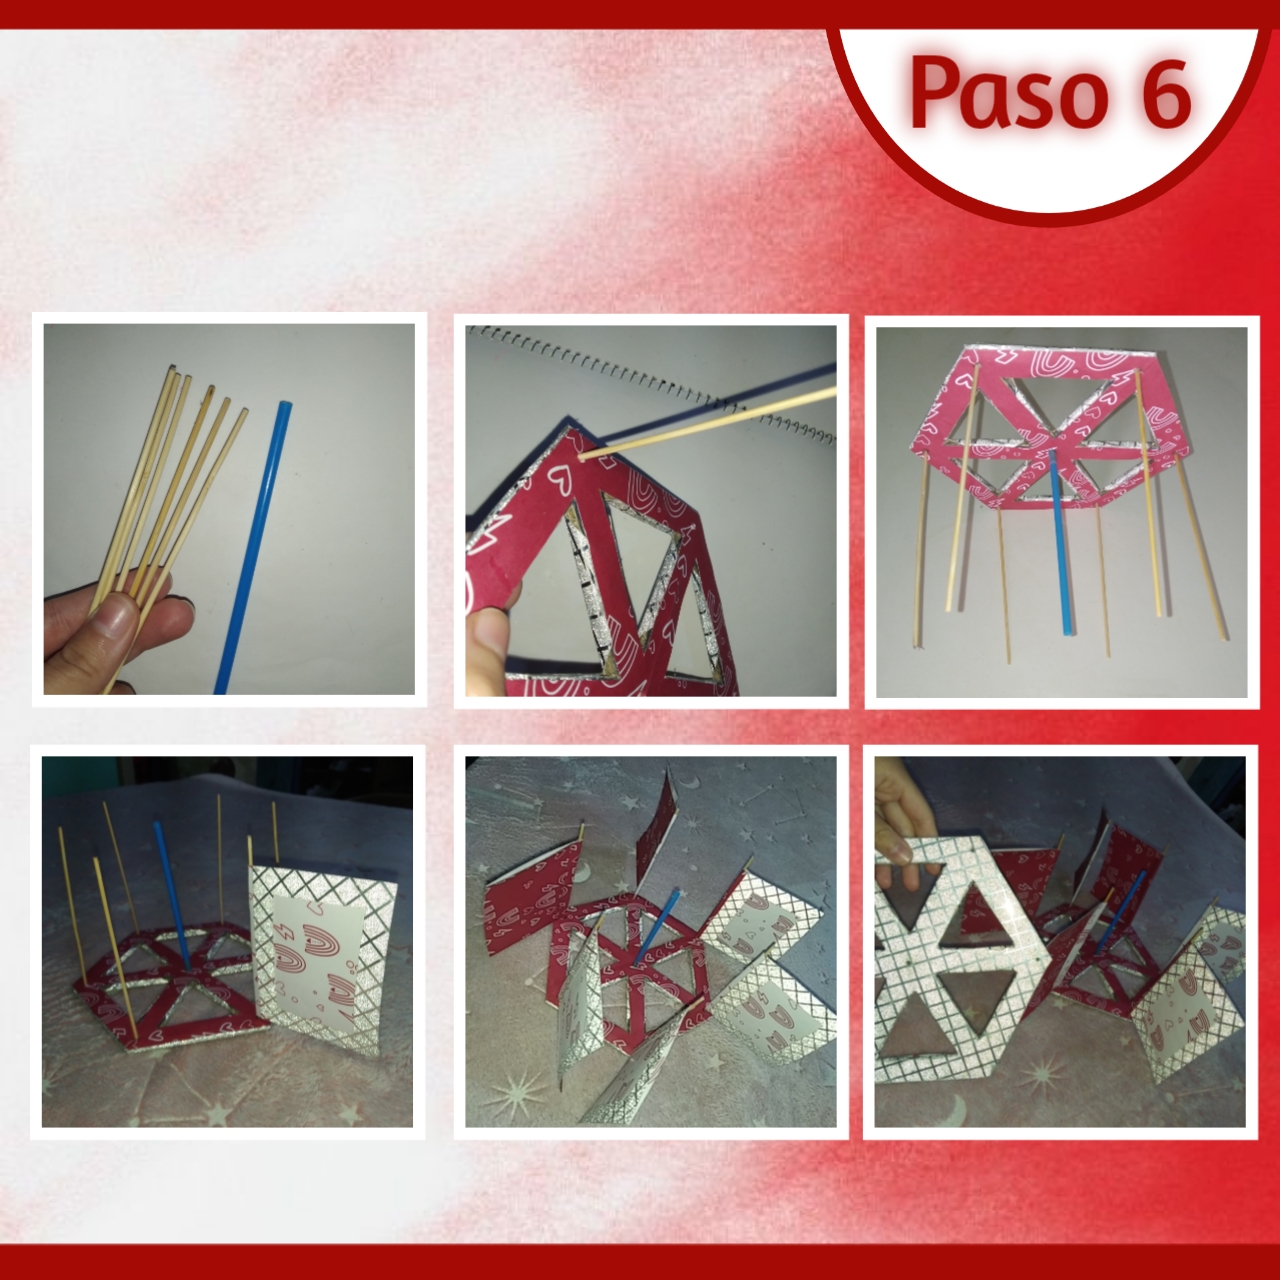
Ya es momento de comenzar a armar todo, teniendo nuestras piezas a la mano, tomaremos primero un hexágono, además de 6 palitos de altura y un pitillo un poquito más grueso que los palitos, estos deben medir un poco más que las fotos, como 2cm u 3cm más de largo, así introduciremos cada palito de madera en cada agujero, antes agregando un poco de silicón y sosteniendo, igualmente colocaremos el pitillo en el centro.
Now it's time to start assembling everything, having our pieces at hand, we will first take a hexagon, plus 6 sticks high and a straw a little thicker than the sticks, these should measure a little more than the photos, as 2cm or 3cm longer, so we will introduce each wooden stick in each hole, before adding a little silicone and holding, also place the straw in the center.
Seguimos tomando los marcos de las fotos y los introduciremos en cada palito, al poner todos agregamos otra vez silicón a cada punta de los palillos y uniremos a el otro hexágono, encajando cada palillo en los agujeros, hasta pegar súper bien.
We continue taking the photo frames and insert them in each stick, when we put all of them we add silicone again to each end of the sticks and we will join them to the other hexagon, fitting each stick in the holes, until it sticks super well.
Paso 7:
Step 7:
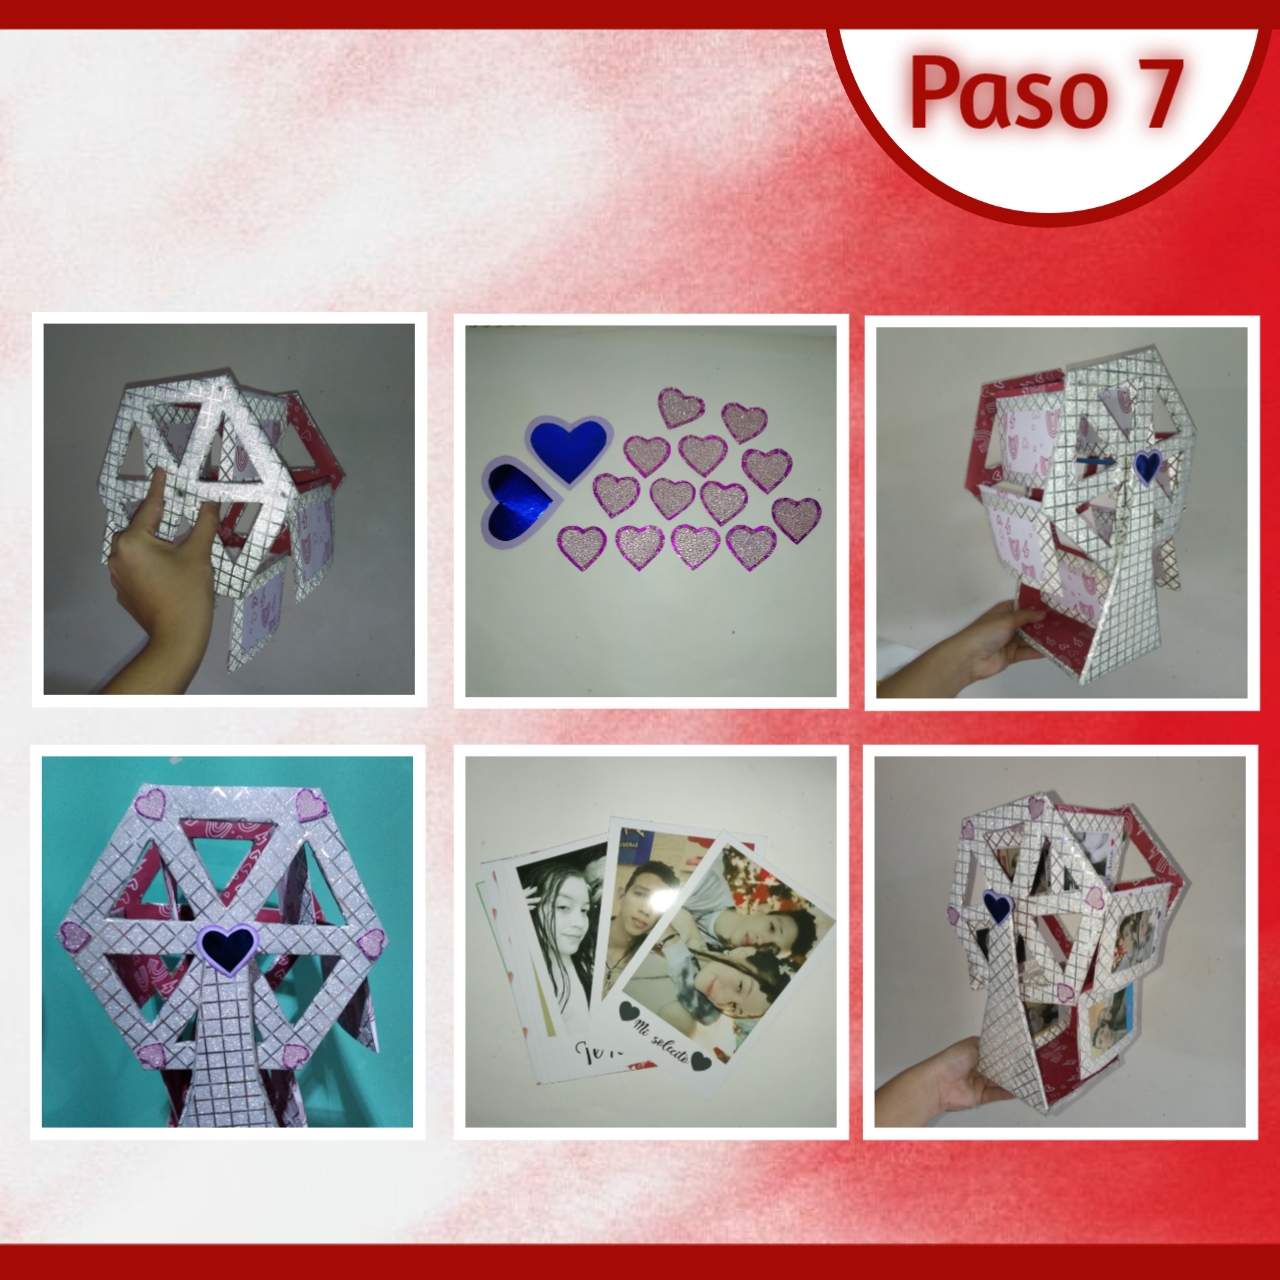
Ahora mismo, tenemos nuestra rueda armada, por lo tanto vamos a tomar otro palito de altura está vez completo y lo introduciremos primero en uno de los orificios de la base, pasando ese sigue colocar la rueda en el medio y pasar también el palillo por el orificio de la rueda y por consiguiente el pitillo, hasta llegar al otro extremo y pasar los dos huecos restantes, aquí es dónde acomodaremos en el centro, recortaremos excedentes y agregaremos silicón al palillo uniéndose a ls base y así es como el palillo permite que la rueda gire y haga el cambio de fotos, ya está listo el mecanismo.
Right now, we have our wheel assembled, therefore we will take another stick of height this time complete and we will introduce it first in one of the holes of the base, passing that continues to place the wheel in the middle and also pass the stick through the hole of the wheel and therefore the straw, until you reach the other end and pass the two remaining holes, this is where we will accommodate in the center, trim excess and add silicone to the stick joining the base and this is how the stick allows the wheel to rotate and make the change of photos, the mechanism is ready.
Por último, pero no menos importante vamos con los últimos arreglos para decorar, haremos 2 corazones grandes y 12 pequeños, así para cubrir los hoyos que se ven un poco, pegaremos los grandes en el centro de cada uno de los hexágonos y los pequeños en cada punta dónde están los hoyos y para finalizar colocaremos nuestras fotos dentro y ya estaría lista.
Last but not least we will make the last arrangements to decorate, we will make 2 big hearts and 12 small ones, so to cover the holes that are a little bit visible, we will glue the big ones in the center of each one of the hexagons and the small ones in each point where the holes are and finally we will place our photos inside and it would be ready.
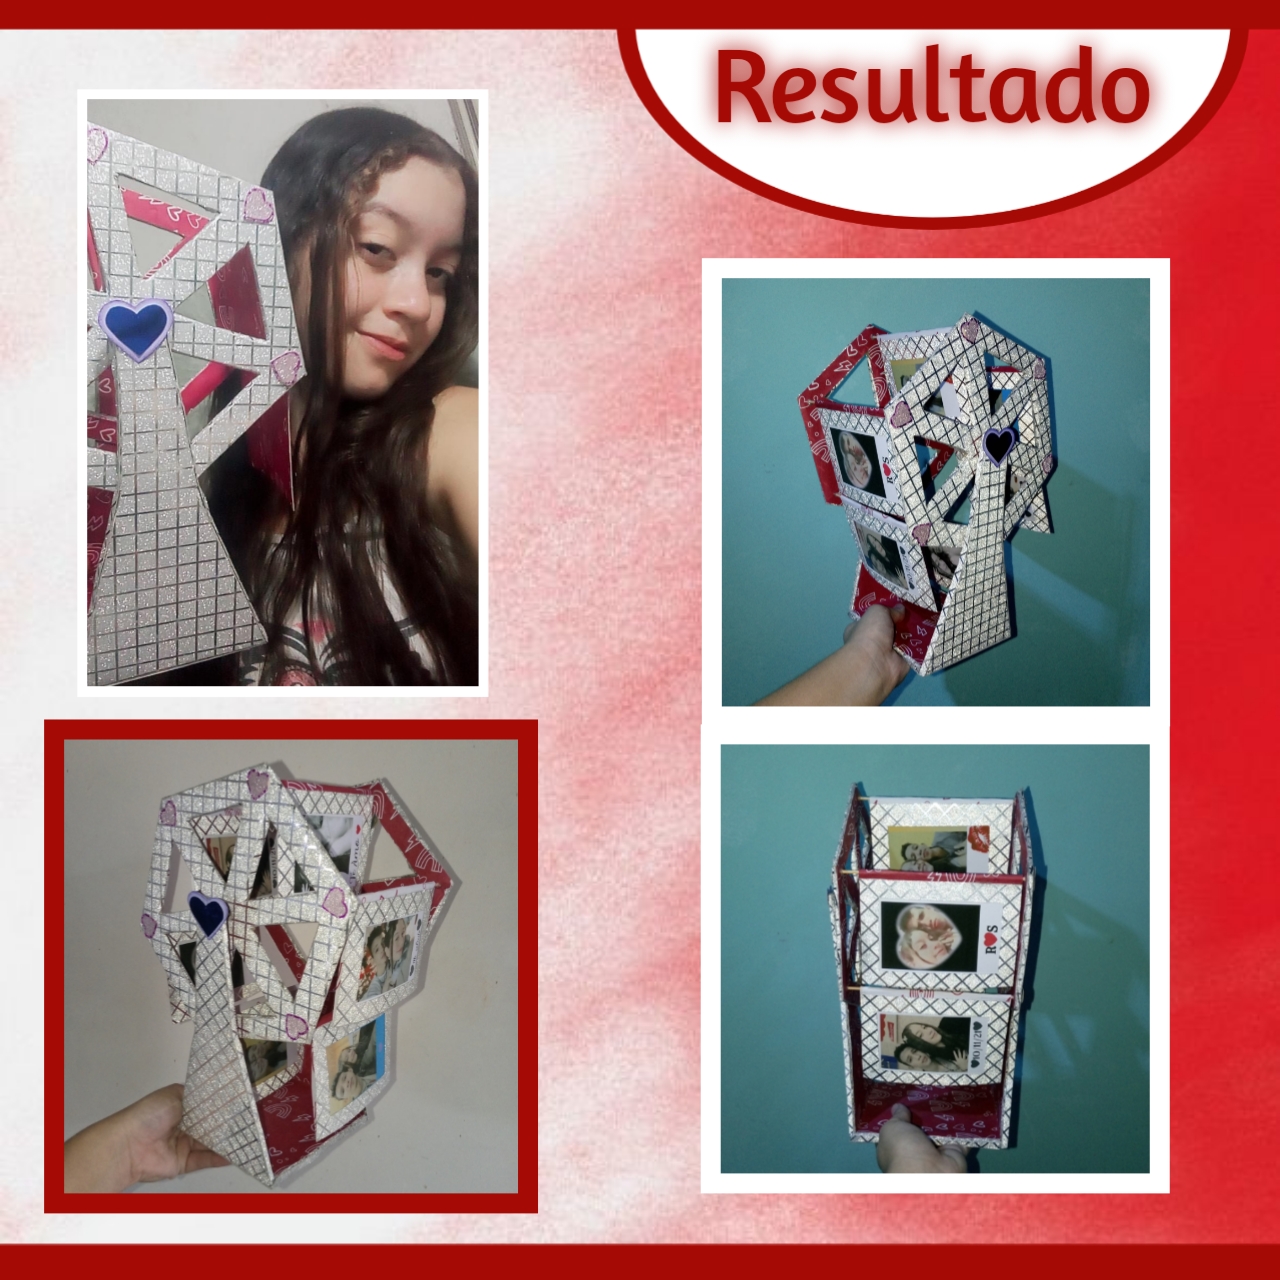
Así es como en unos cuantos pasos podemos obtener una hermosa y asombrosa ❤️Rueda del amor❤️ llena de fotos con nuestra persona o personas especiales; este es un hermoso regalo lleno de amor que a cualquiera le encantará, es muy versátil a la hora de escoger colores y diseños, lo que quiere decir, que es personalizado y adaptable a nuestra necesidad. Si necesitas un regalo precioso único y especial, este es el indicado, se lo puedes obsequiar a tu pareja, a algún amigo, padres, familiares, entre otros, solo tengan seguro que que es para alguien muy especial.🥺❤️
This is how in a few steps we can get a beautiful and amazing ❤️Rueda from amor❤️ full of photos with our special person or persons; this is a beautiful gift full of love that anyone will love, it is very versatile when choosing colors and designs, which means, it is personalized and adaptable to our need. If you need a unique and special precious gift, this is the right one, you can give it to your partner, a friend, parents, relatives, among others, just be sure that it is for someone very special.🥺❤️
En definitiva disfruté mucho el procesó, el resultado porsupuesto y mucho más haber podido compartir esto con ustedes, les hice este paso a paso con mucho amor, así que espero que les guste, comenten y compartan. Un gran abrazo, felíz fin de semana para todos familia.🤍❤️
All in all I really enjoyed the process, the result of course and much more to have been able to share this with you, I made this step by step with a lot of love, so I hope you like it, comment and share. A big hug, happy weekend to all family.🤍❤️
❤️🤍¡Gracias por leer! Hasta una próxima manualidad🤍❤️
❤️🤍Thanks for reading! See you for a future craft🤍❤️
Photos of my authorship taken from my Xiaomi Redmi 7 phone, edited in the free version of PixeLab
Un creativo diseño la verdad, muy original, se necesita de mucha paciencia para poder hacer cada paso, te felicito, te quedo muy bien, saludos.
Se ve muy divertido de hacer y el resultado final es increible, que original y creativa idea para exhibir las fotos mas importantes 😍 me encanto esta idea ❤️
Wow, está hermosa!