Hello, helloo! How are you? my creative people of Hive Diy🖤, I hope you are feeling wonderful, healthy and happy. Have a very good afternoon everyone dear family, I wish you a productive afternoon full of blessings and other positive things in our lives, I also wish you lots of creativity and ideas to share.
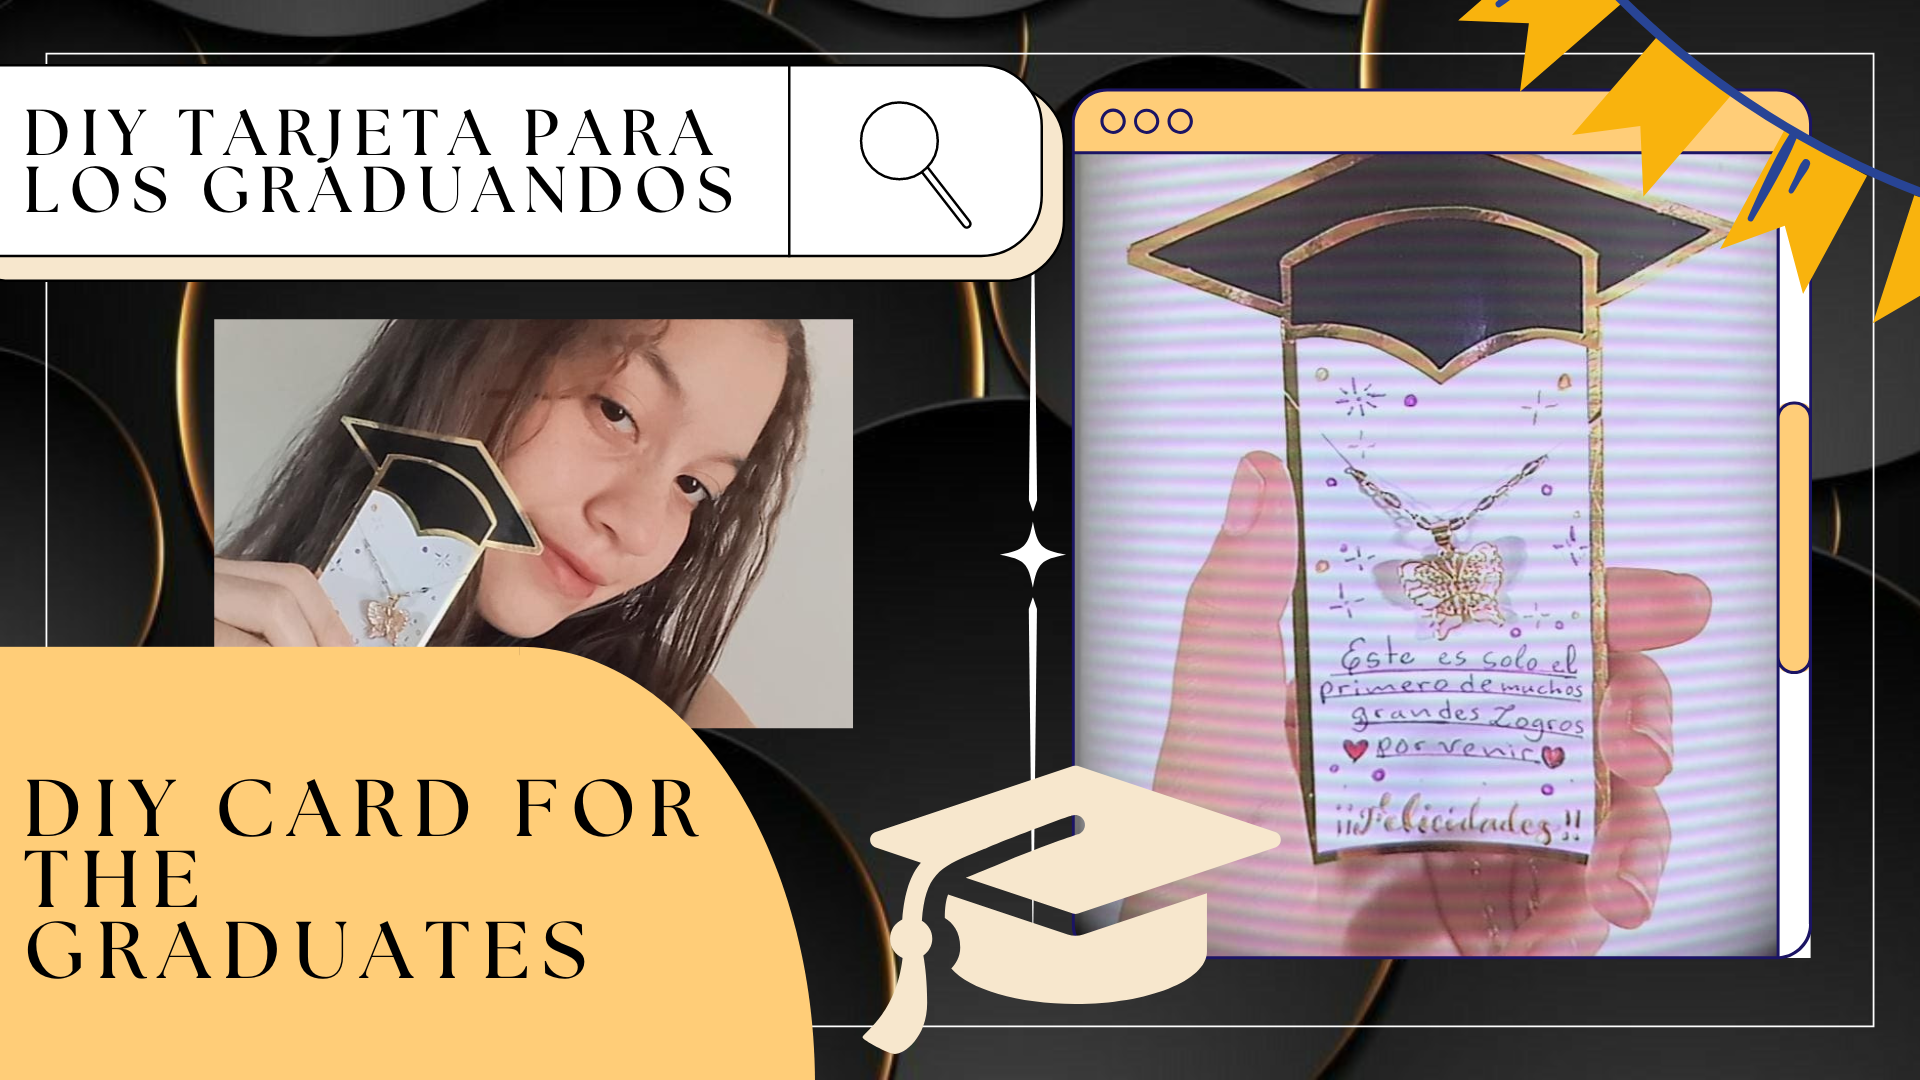
¡Sean más que bienvenidos a una nueva manualidad! Les quiero enseñar el paso a paso de como realice una hermosa tarjeta con múltiples funciones como tarjeta tipo soporte para regalar collares, zarcillos, entre otros, además puede funcionar bastante bien como un marcapáginas para libros e incluso como una tarjeta de dedicatoria normal.
You are more than welcome to a new craft! I want to show you the step by step of how to make a beautiful card with multiple functions as a card holder type card to give necklaces, Earrings, among others, it can also work quite well as a bookmark for books and even as a normal dedication card.
Está la he hecho con temática de graduación, ya que en Venezuela están muy cerca las graduaciones en todos los niveles académicos, así que es una gran idea para obsequiar en las próximas fechas a esos graduandos queridos, síganme para que aprendan a hacerlas, es algo fácil y rápido de hacer.
I have made this one with a graduation theme, since in Venezuela graduations are very near at all academic levels, so it is a great idea to give as a gift to those dear graduates, follow me to learn how to make them, it is something easy and quick to do.

♡📎🌷Templates🌷📎♡
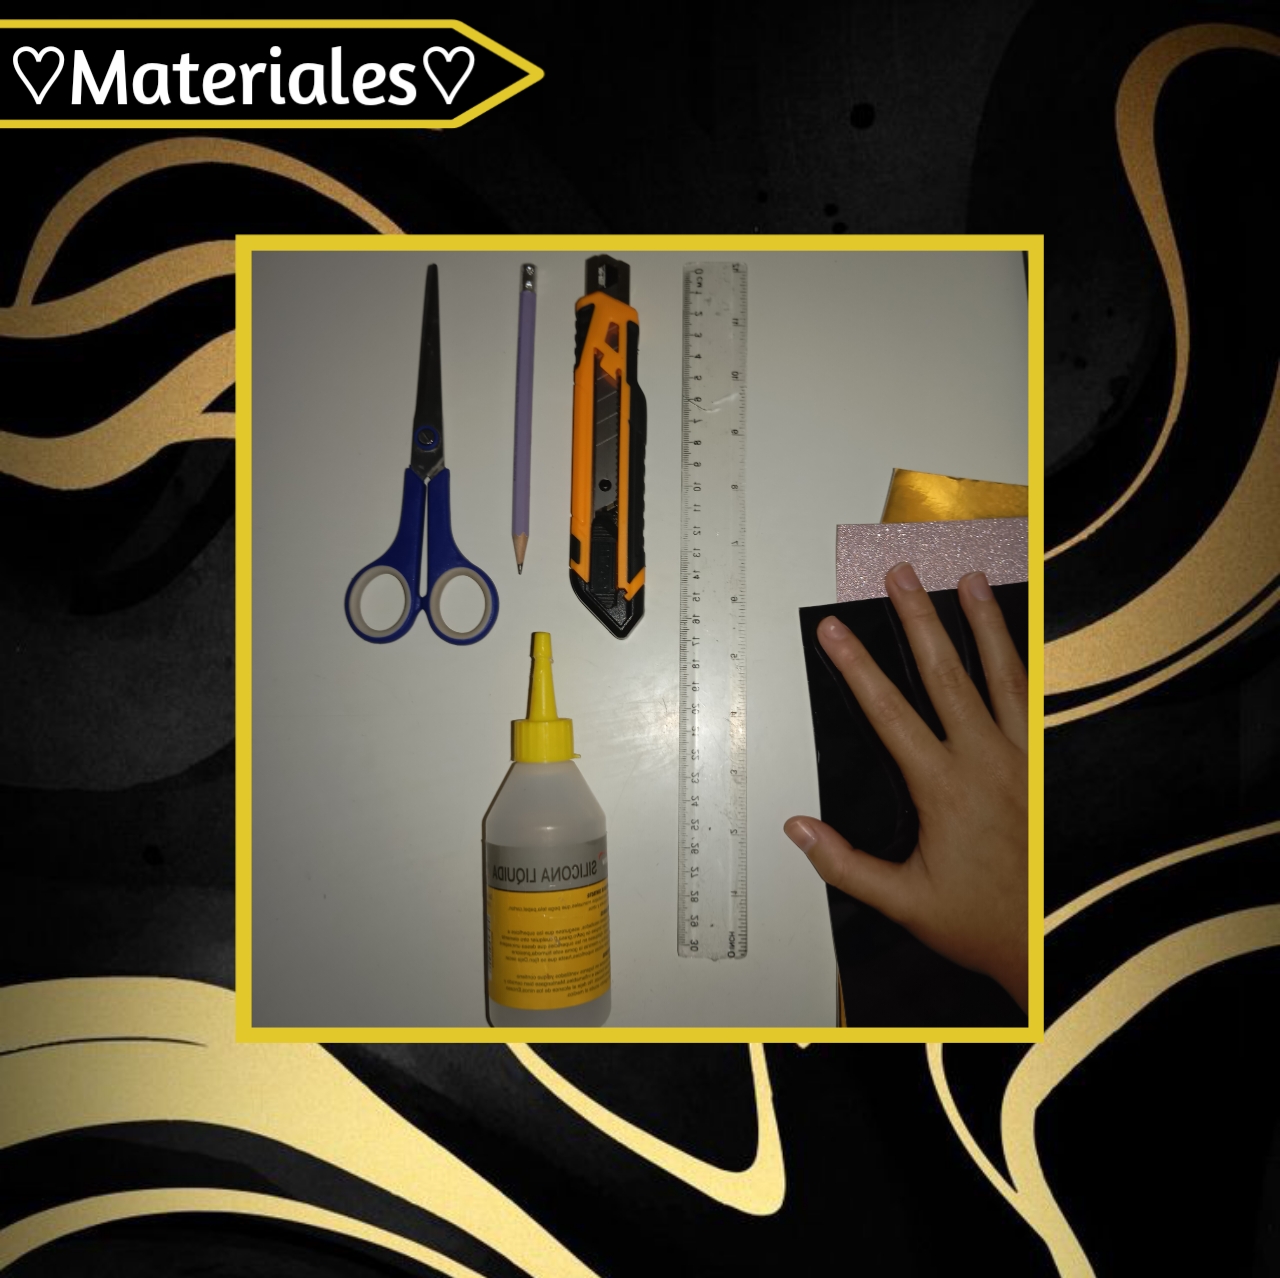
♡🖤✨Materials✨🖤♡
- Cartulinas en color; Dorado, Blanco y Negro o de preferencia
- Silicón
- Lápiz
- Regla
- Tijera
- Cutter/exacto
- Colored cardstock; Gold, Black and White or preferably
- Silicone
- Pencil
- Ruler
- Scissors
- Cutter/acto cutter
♡🖤✨Step by Step✨🖤♡
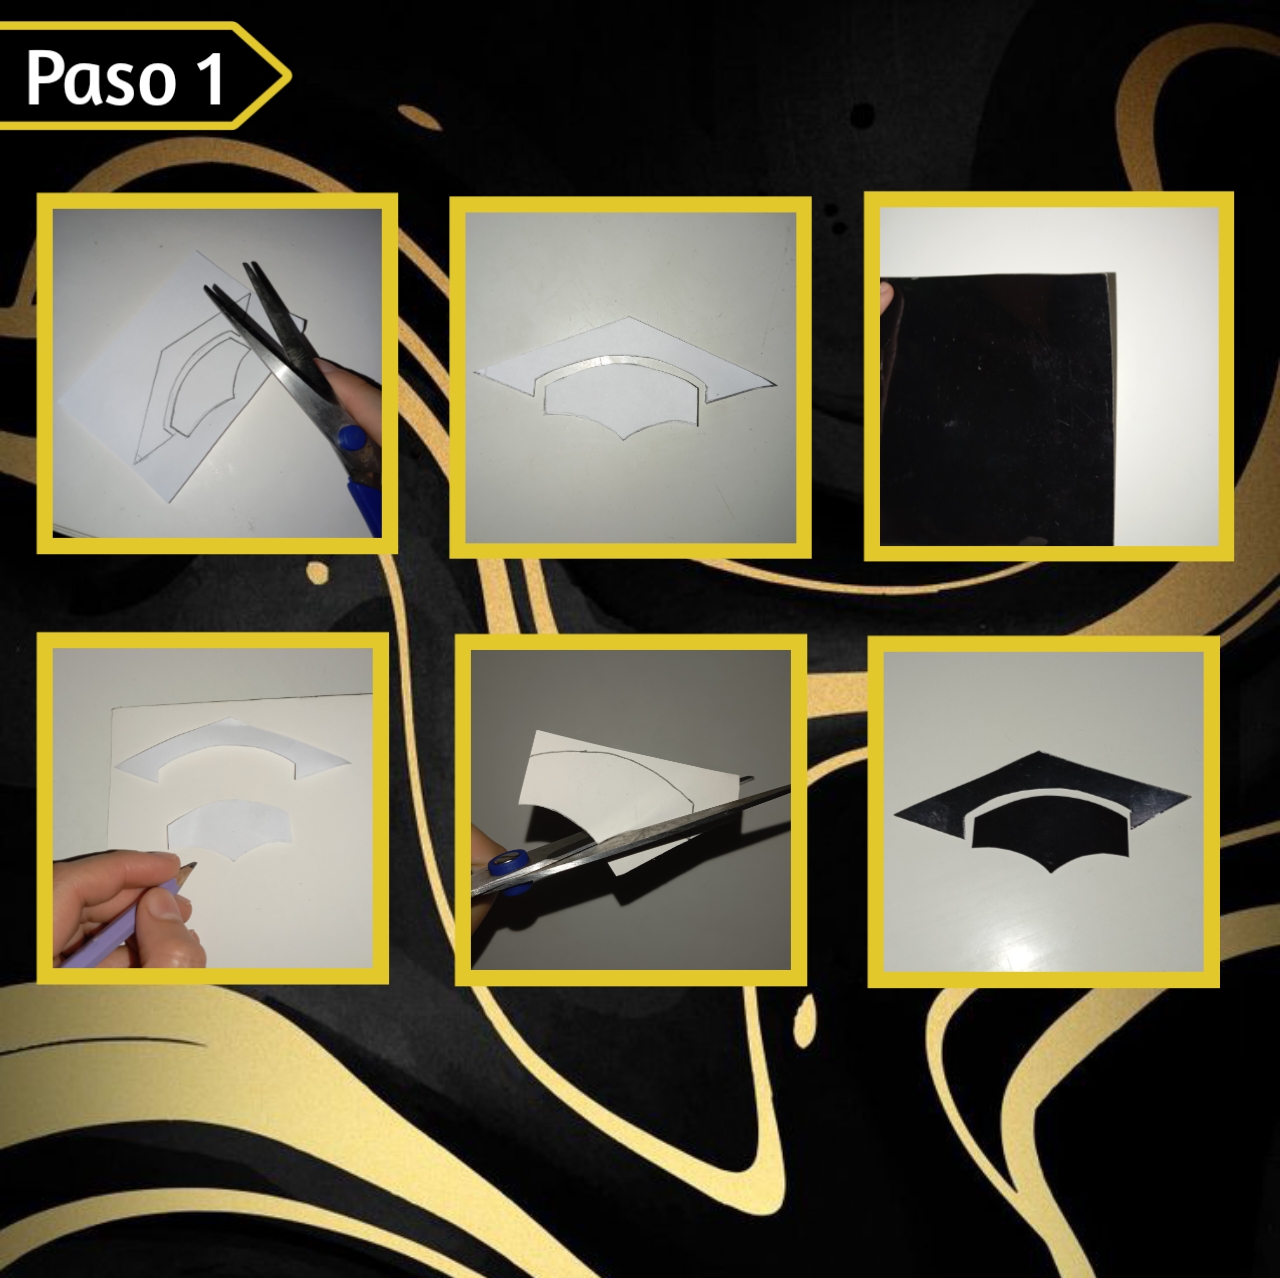
Paso 1:
Step 1:
Empezamos marcando y recortando las plantillas que les dejé arriba, en específico el rectangulo y el birrete, así iniciaremos con el birrete, para este tomaremos la cartulina negra, le daremos la vuelta, colocamos la plantilla correspondiente, tomamos nuestro lápiz y marcamos, así proseguimos a recortar estás dos piezas del birrete con una tijera o el exacto.
We start by marking and cutting out the templates that I left above, specifically the rectangle and the biretta, so we start with the biretta, for this we take the black cardboard, turn it over, place the corresponding template, take our pencil and mark, so we proceed to cut out these two pieces of the biretta with scissors or the exact one.
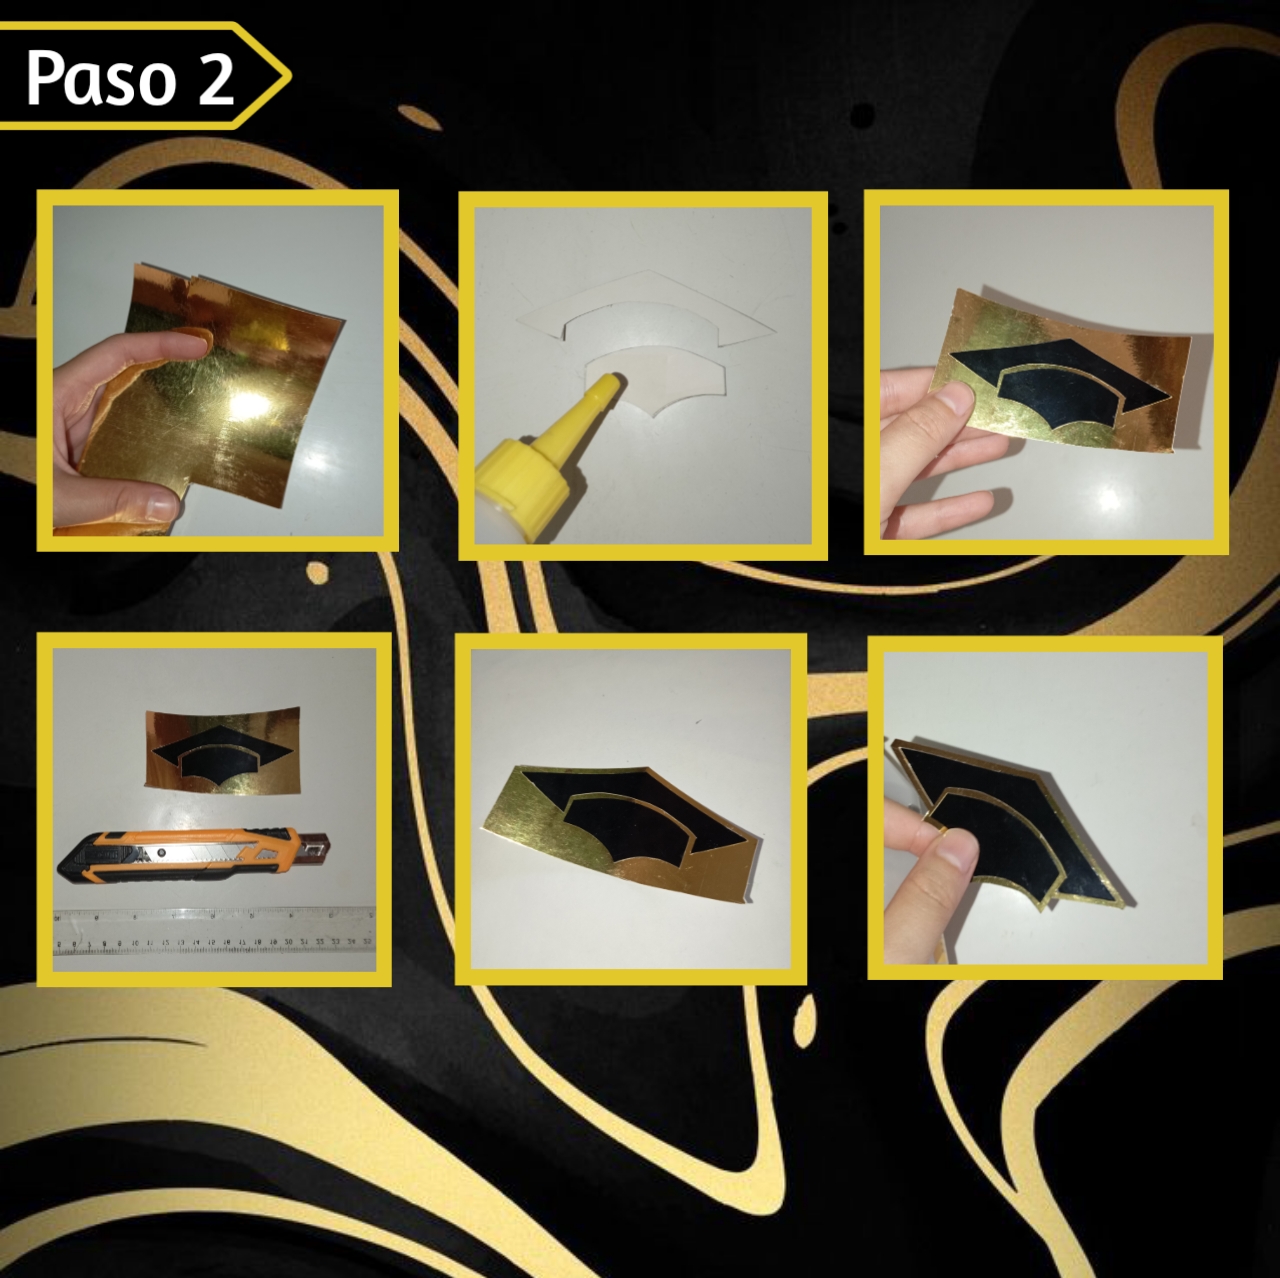
Paso 2:
Step 2:
Continuamos con los detalles del birrete, para esto tomamos la cartulina dorada y las piezas anteriores, a las cuáles le agregaremos silicón, en este caso al frío para pegarlas muy bien, una por una, sobre la cartulina dorada, formando el birrete completo. Luego agarramos nuestra regla y exacto, para recortar la figura dejando un borde de más o menos 0.5mm, por todo el contorno.
We continue with the details of the biretta, for this we take the golden cardboard and the previous pieces, to which we will add silicone, in this case cold to glue them very well, one by one, on the golden cardboard, forming the complete biretta. Then we will take our ruler and cut out the figure, leaving a border of about 0.5mm, all around the contour.
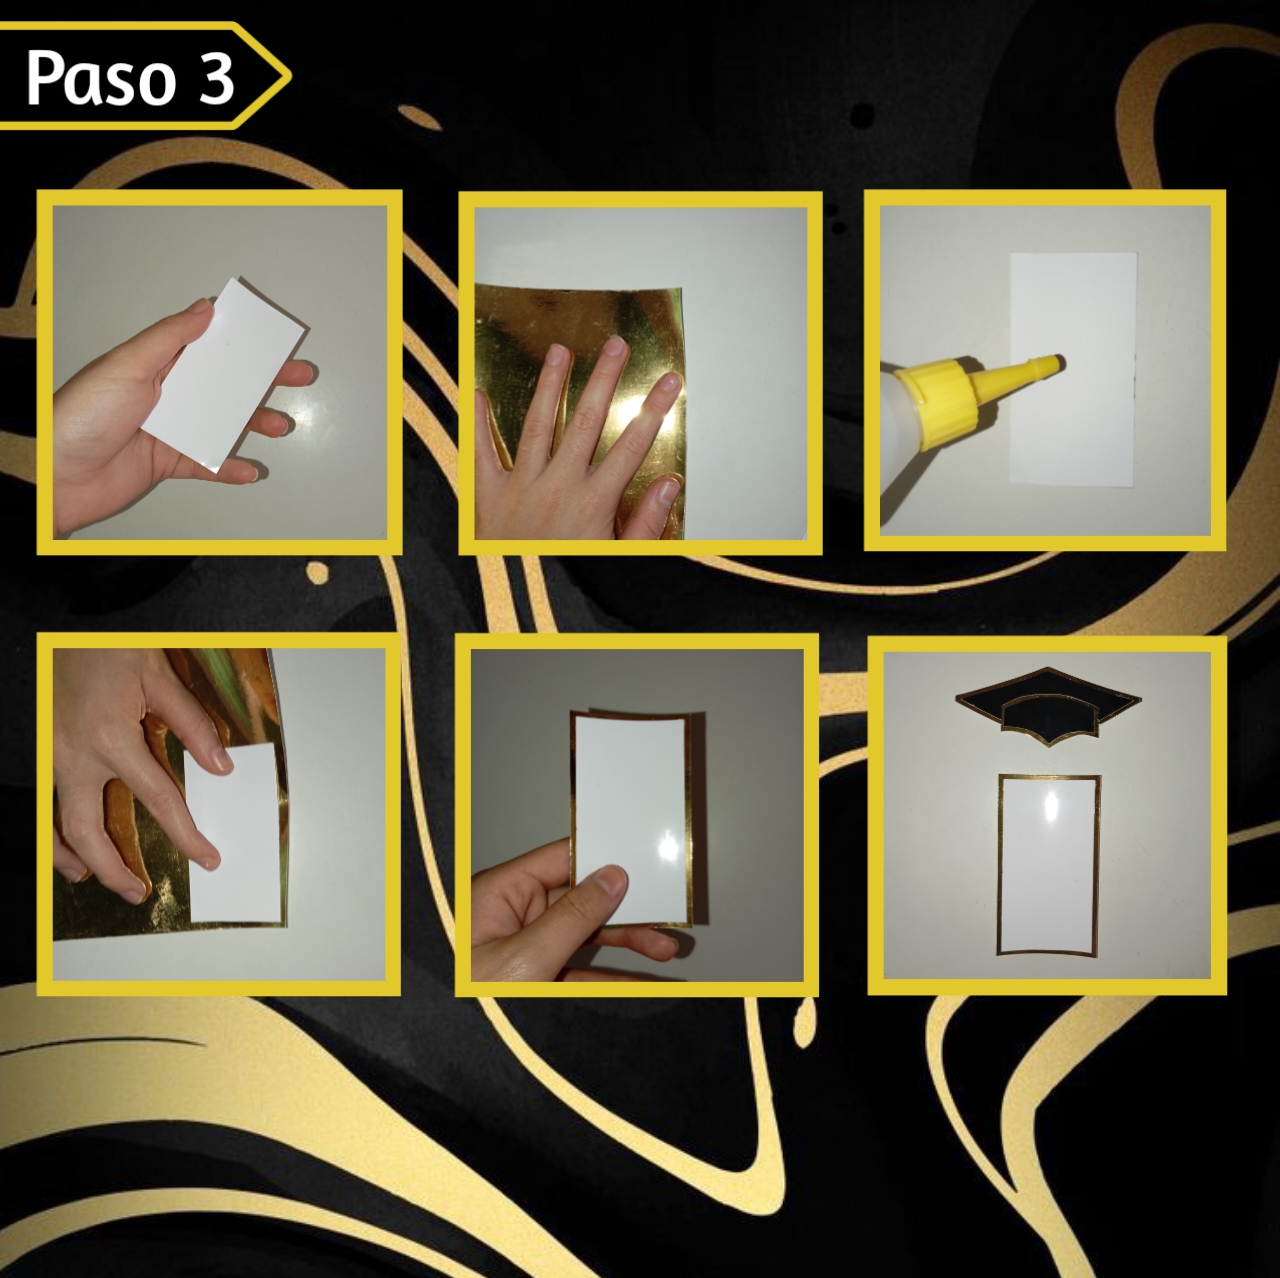
Paso 3:
Step 3:
Ahora bien, vamos a marcar y recortar nuestro rectángulo en color de cartulina blanca, este puede ser del tamaño de nuestra preferencia yo hice uno mediano. Así, también tomaré la cartulina en color dorado, le agregaremos silicón al rectángulo y lo pegaremos encima del dorado, luego recortaremos con el exacto y la regla dejando también un borde de aproximadamente 0.5cm, así ya tendremos nuestras dos piezas.
Now, we are going to mark and cut out our rectangle in white cardboard color, this can be the size of our preference, I made a medium one. So, I will also take the cardboard in gold color, we will add silicone to the rectangle and paste it on top of the gold one, then we will cut with the exact and the ruler leaving also a border of approximately 0.5cm, so we will have our two pieces.
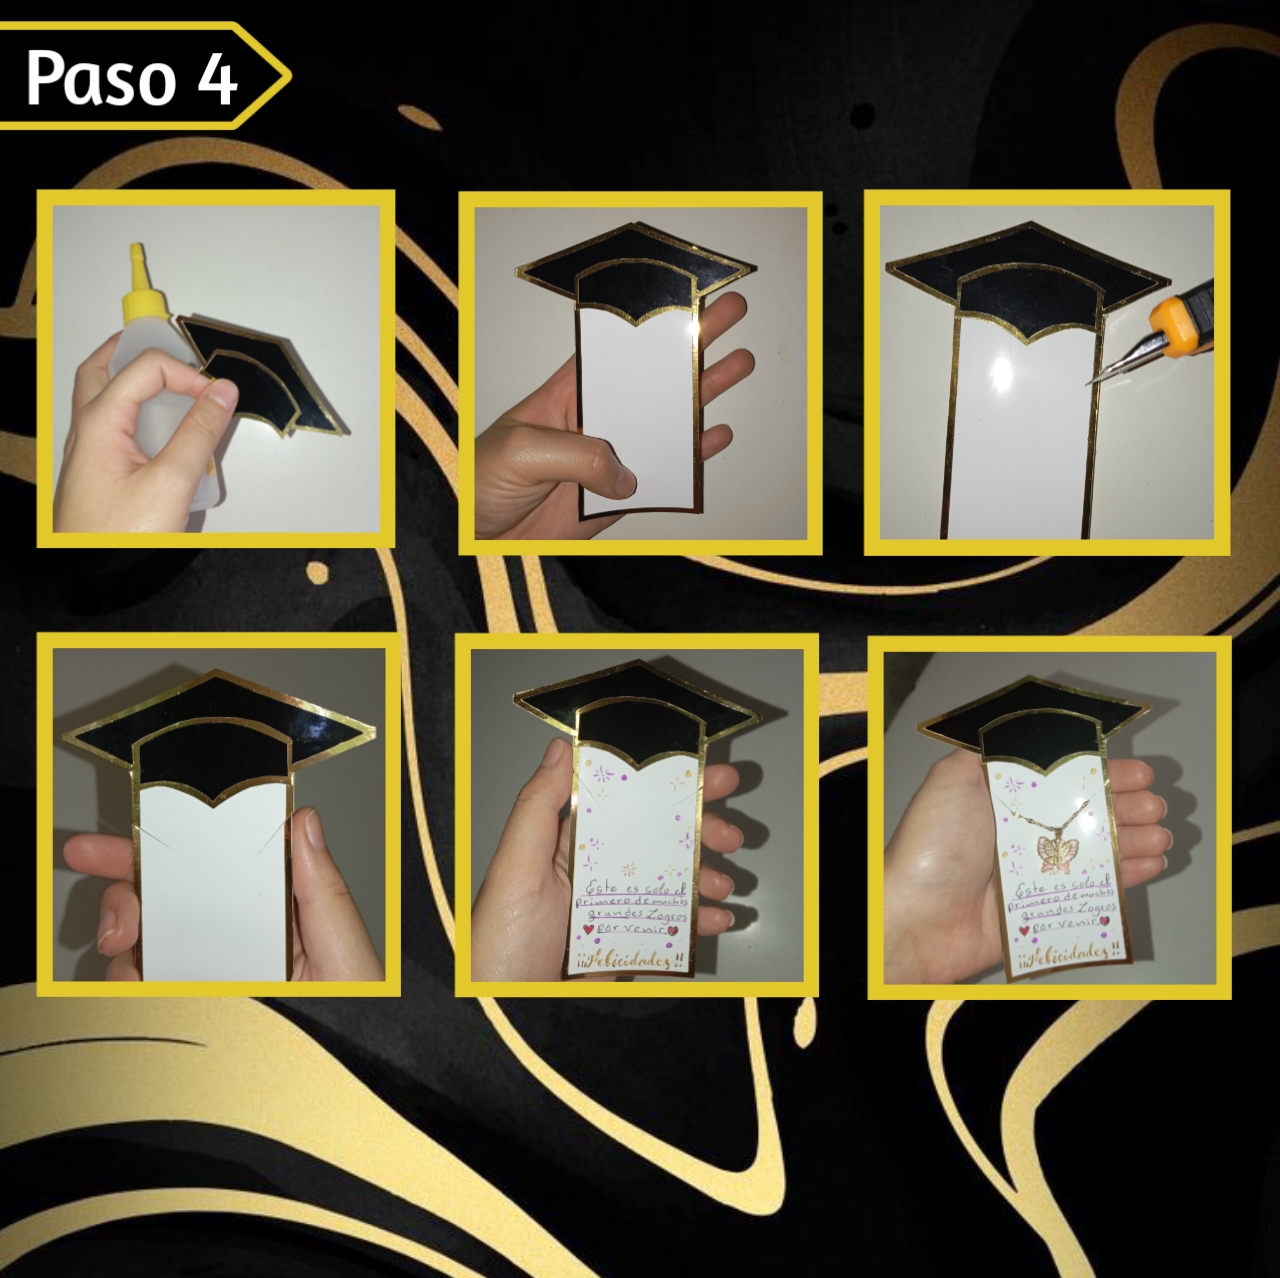
Paso 4:
Para finalizar tomaremos nuestro birrete y lo pegaremos a la pieza del rectángulo, en la parte superior con silicón dejando presionado muy bien por unos cuantos segundos hasta que pegue correctamente. Seguidamente, tomaremos nuestro exacto y haremos dos pequeños cortes diagonales a ambos lados, que es donde pondremos el collar en este caso, por último nos queda decorar a nuestro gusto, yo coloqué una frase y rellené espacios con pequeños detalles.
Finally, we will take our biretta and glue it to the rectangle piece, on the upper part with silicone, leaving it pressed very well for a few seconds until it sticks properly. Next, we will take our exact piece and make two small diagonal cuts on both sides, which is where we will put the necklace in this case, finally we have to decorate it as we like, I placed a phrase and filled spaces with small details.
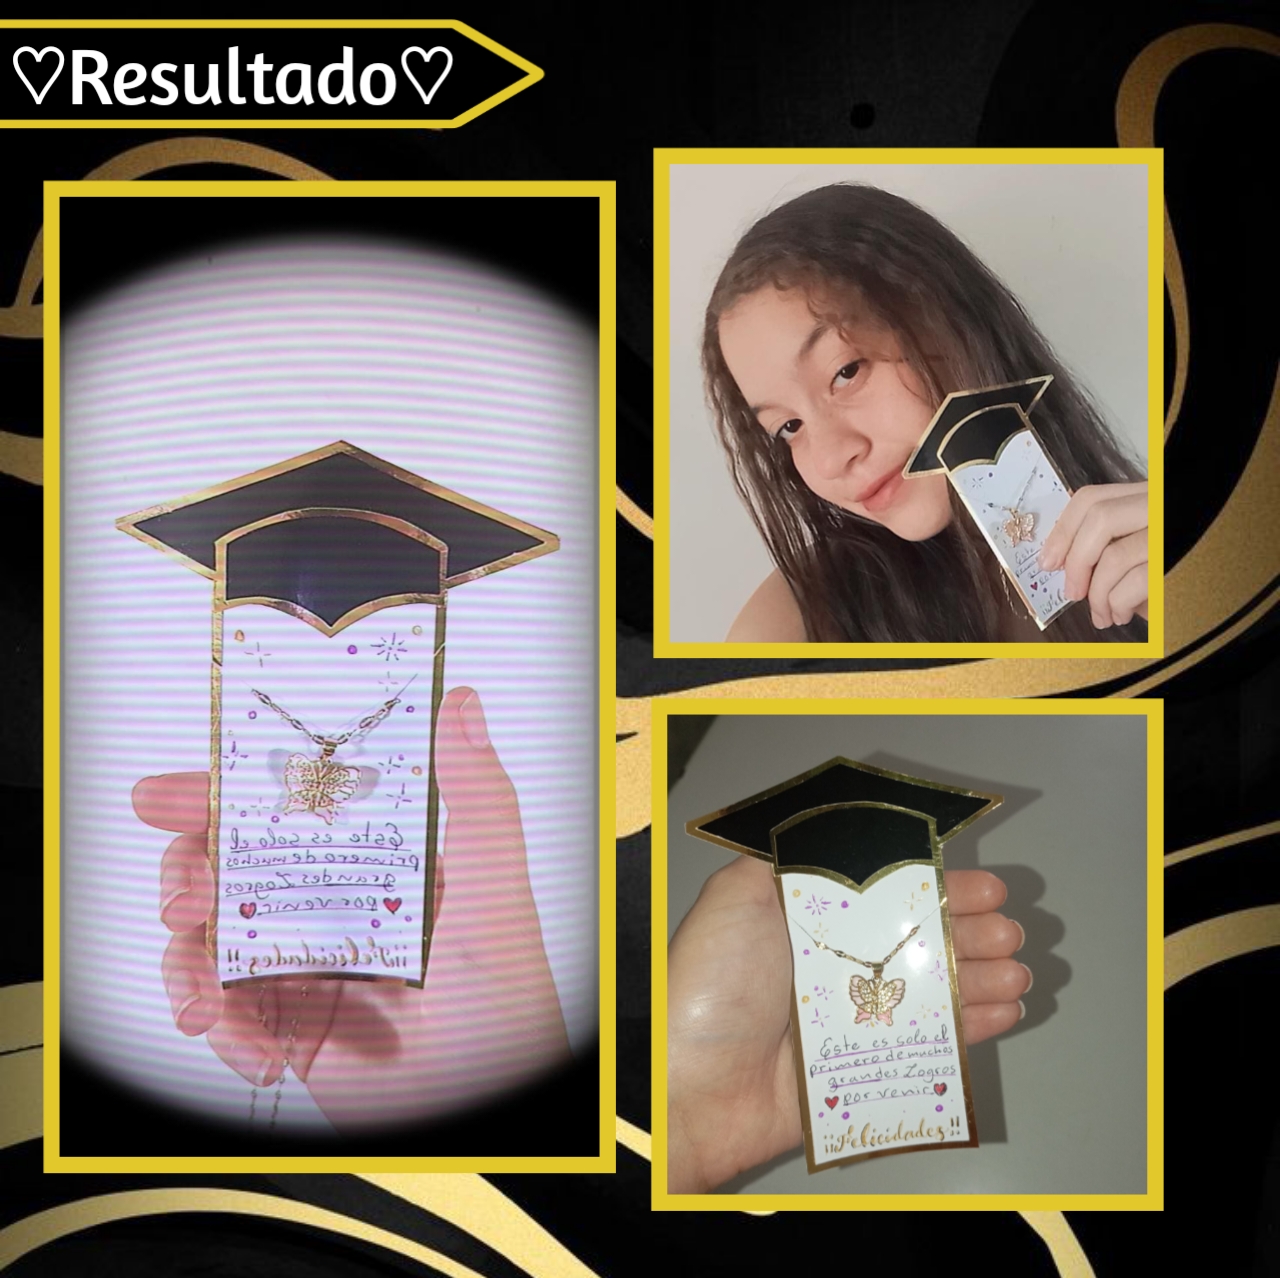
Así concluimos con una bonita opción para regalar collares y zarcillos con mucho cariño y personalidad, con un diseño hecho a mano por nosotros mismos, además hay más ideas de como utilizar este diseño, las ideas que les mencioné anteriormente son solo algunas opciones, solo es cuestión de creatividad.🎓✨
So we conclude with a nice option to give necklaces and earrings with lots of love and personality, with a handmade design by ourselves, there are also more ideas on how to use this design, the ideas I mentioned above are just some options, it's just a matter of creativity.🎓✨
Esto es todo por hoy, hasta aquí llega el paso a paso de la tarde de hoy, encantada de compartir con ustedes me despido. Agradezco que se tomen el tiempo de leer y poder apreciar las manualidades que hago semanalmente, muchas gracias por el apoyo, un abrazo familia.🖤
That's all for today, here comes the step by step of today's afternoon, delighted to share with you I say goodbye. I appreciate you taking the time to read and appreciate the crafts I do weekly, thank you very much for the support, a hug family.🖤
🖤✨¡Gracias por leer! Hasta el próximo Diy creativo✨🖤
🖤✨Thanks for reading! Until the next creative Diy✨🖤
Photos of my authorship taken from my Xiaomi Redmi 13C phone, edited in the free version of PixeLab and the cover in Canva.
Hermosa tarjeta para hacer un delicado detalle para los graduando, gracias por compartirnos esta gran idea, Ya se acercan las promociones.
Siii, se acerca el momento de celebrar con los próximos graduados y sirve para acompañar nuestro regalito de forma única. Muchas gracias, saludos.✨
Lindo detalle para los graduandos, muy genial y con poco materiales. Saludos.
Sii, es buena idea ya que tiene poca inversión, gracias, bendiciones.❤️
Gracias por compartir y apoyar amiga.😍💜
Que practica y asombrosa idea, de verdad que se ven muy hermosas, gracias por compartir
Tu comunidad artesana ahora es testigo

Gracias por apreciarlo, saludos.✨