Hello my creative people of Hive Diy! I hope you are very well, here I start wishing you a wonderful day, afternoon or evening, depending on where you are and at what time you see this post, I also wish you to have a very nice week, full of productivity.
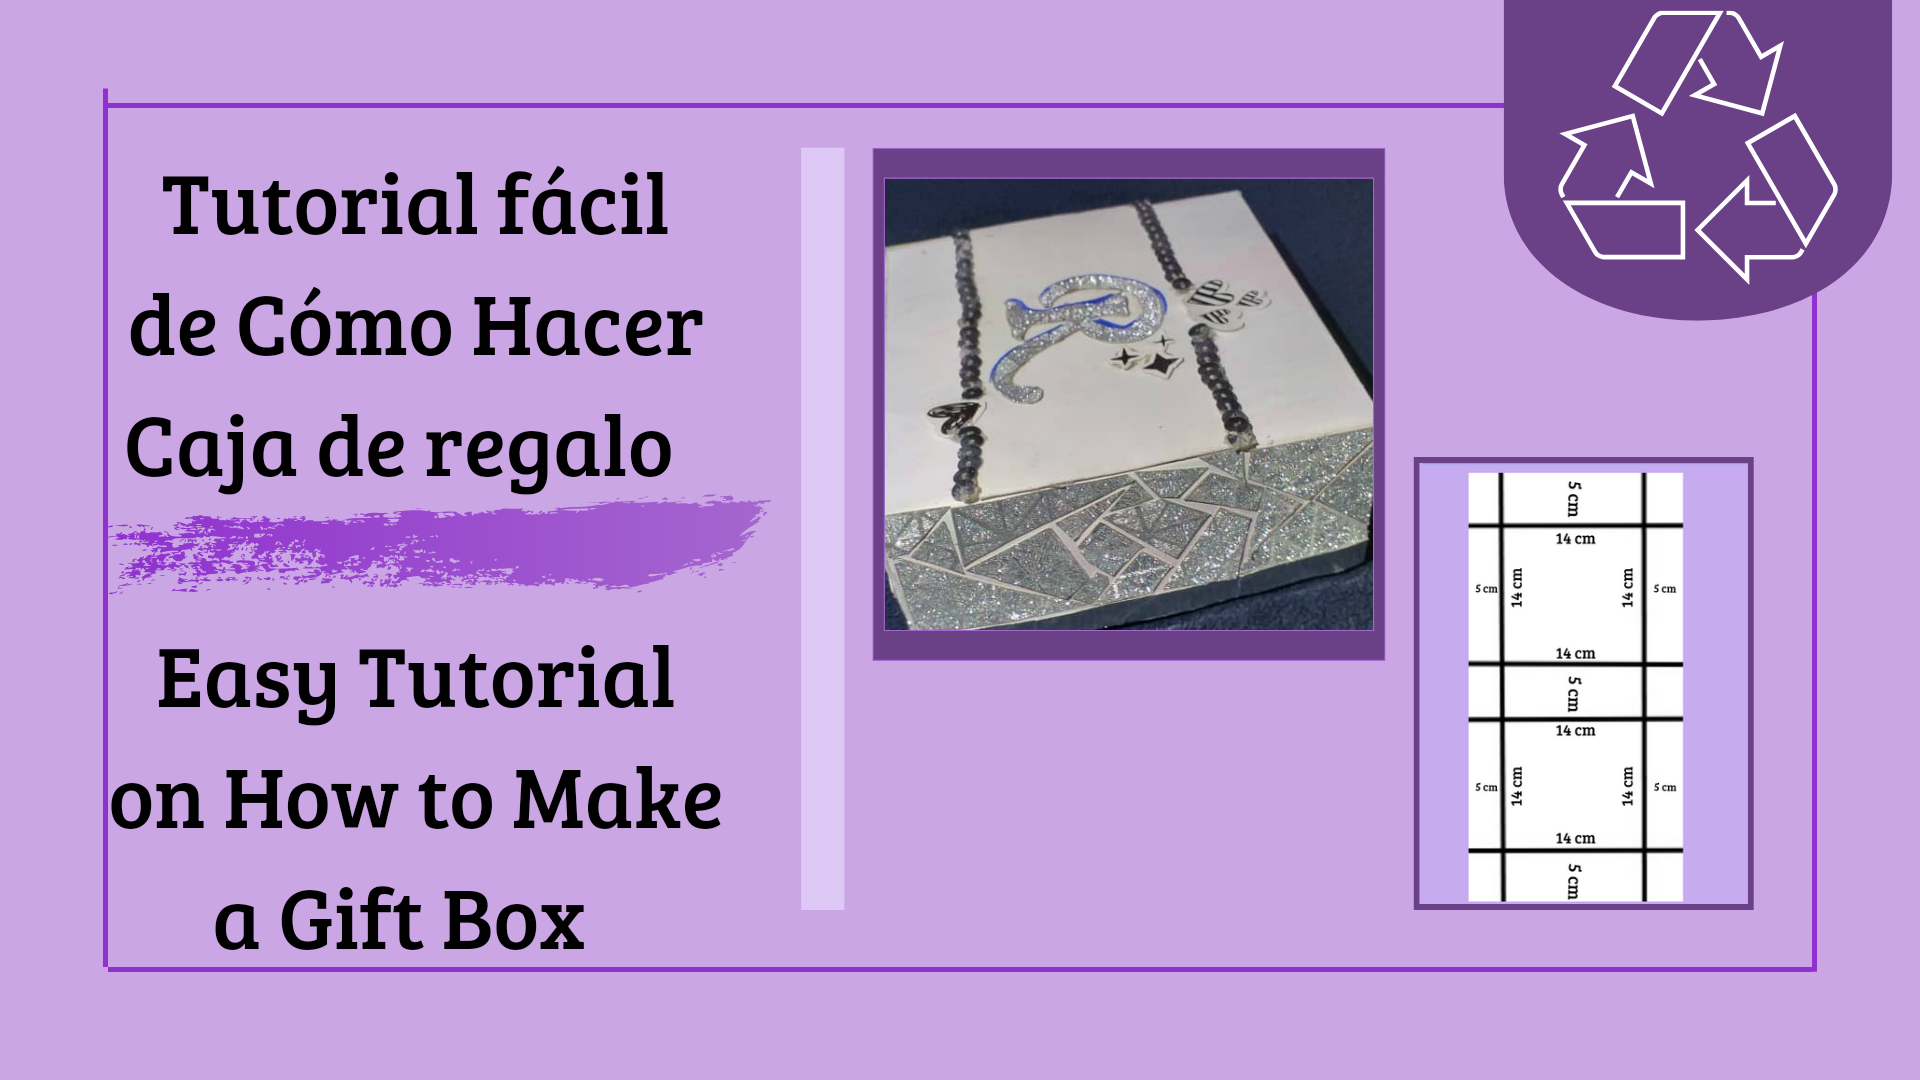
This time I want to show you the process of how to make a cardboard box, from recyclable material, in this case, I started everything with a cereal box, you can adjust this box to the size you want, it is very easy to make as well as very useful, it can be used to store things and even to give as a gift, best of all is that we can decorate it to our liking, varying motifs to our choice.
A continuación les indicaré los materiales que utilicé:
The materials I used are listed below:
- Regla
- Lápiz
- Tijera
- Caja de cereal
- Pintura al frío
- Silicón (frío o caliente)
- Pega blanca escolar
- Pequeños detalles a agregar en la decoración, cómo: cartulina, lentejuelas, perlas, formas de cartulina, entre otros a su elección.
- Ruler
- Pencil
- Scissors
- Cereal box
- Cold paint
- Silicone (cold or hot)
- White school glue
- Small details to add to the decoration, such as: cardboard, sequins, beads, cardboard shapes, among others of your choice.
A continuación sigo con el proceso paso a paso de como la realicé:
Below is the step-by-step process of how I made it:
Paso 1:
Step 1:
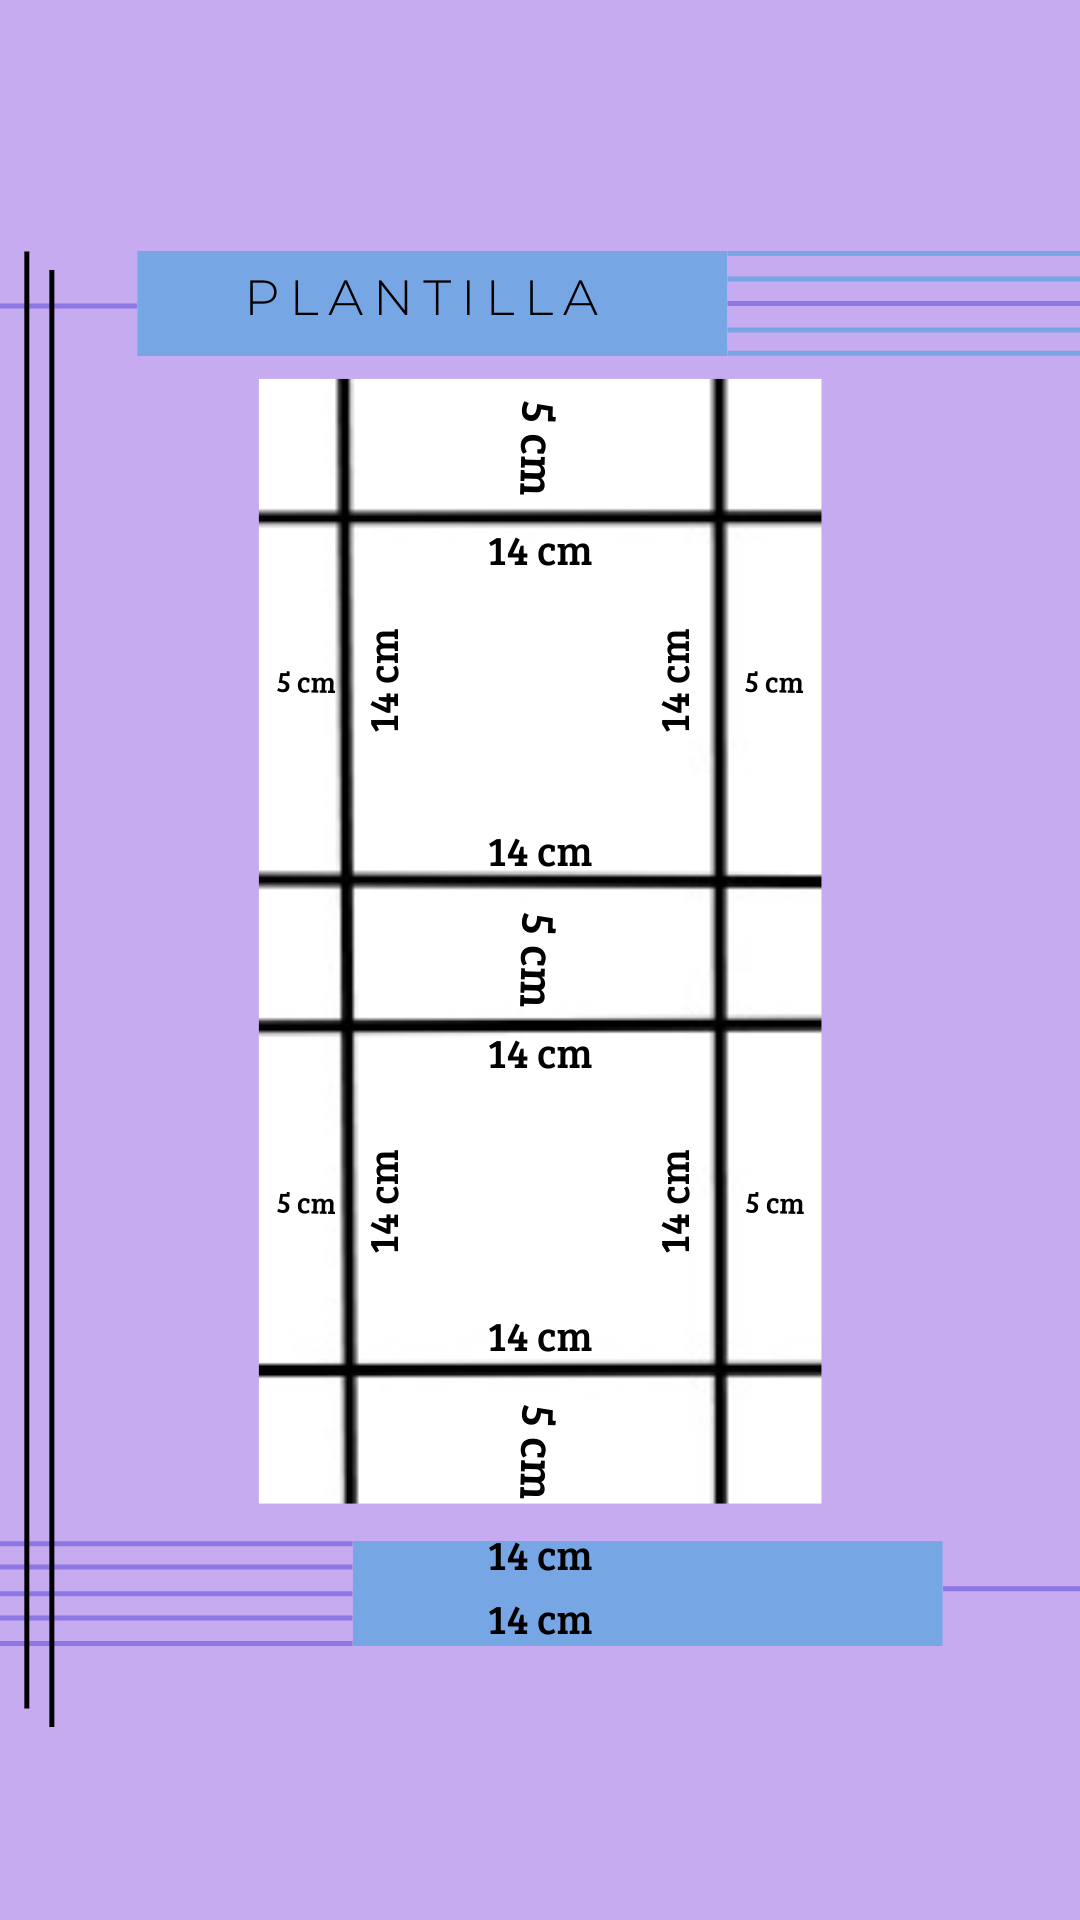
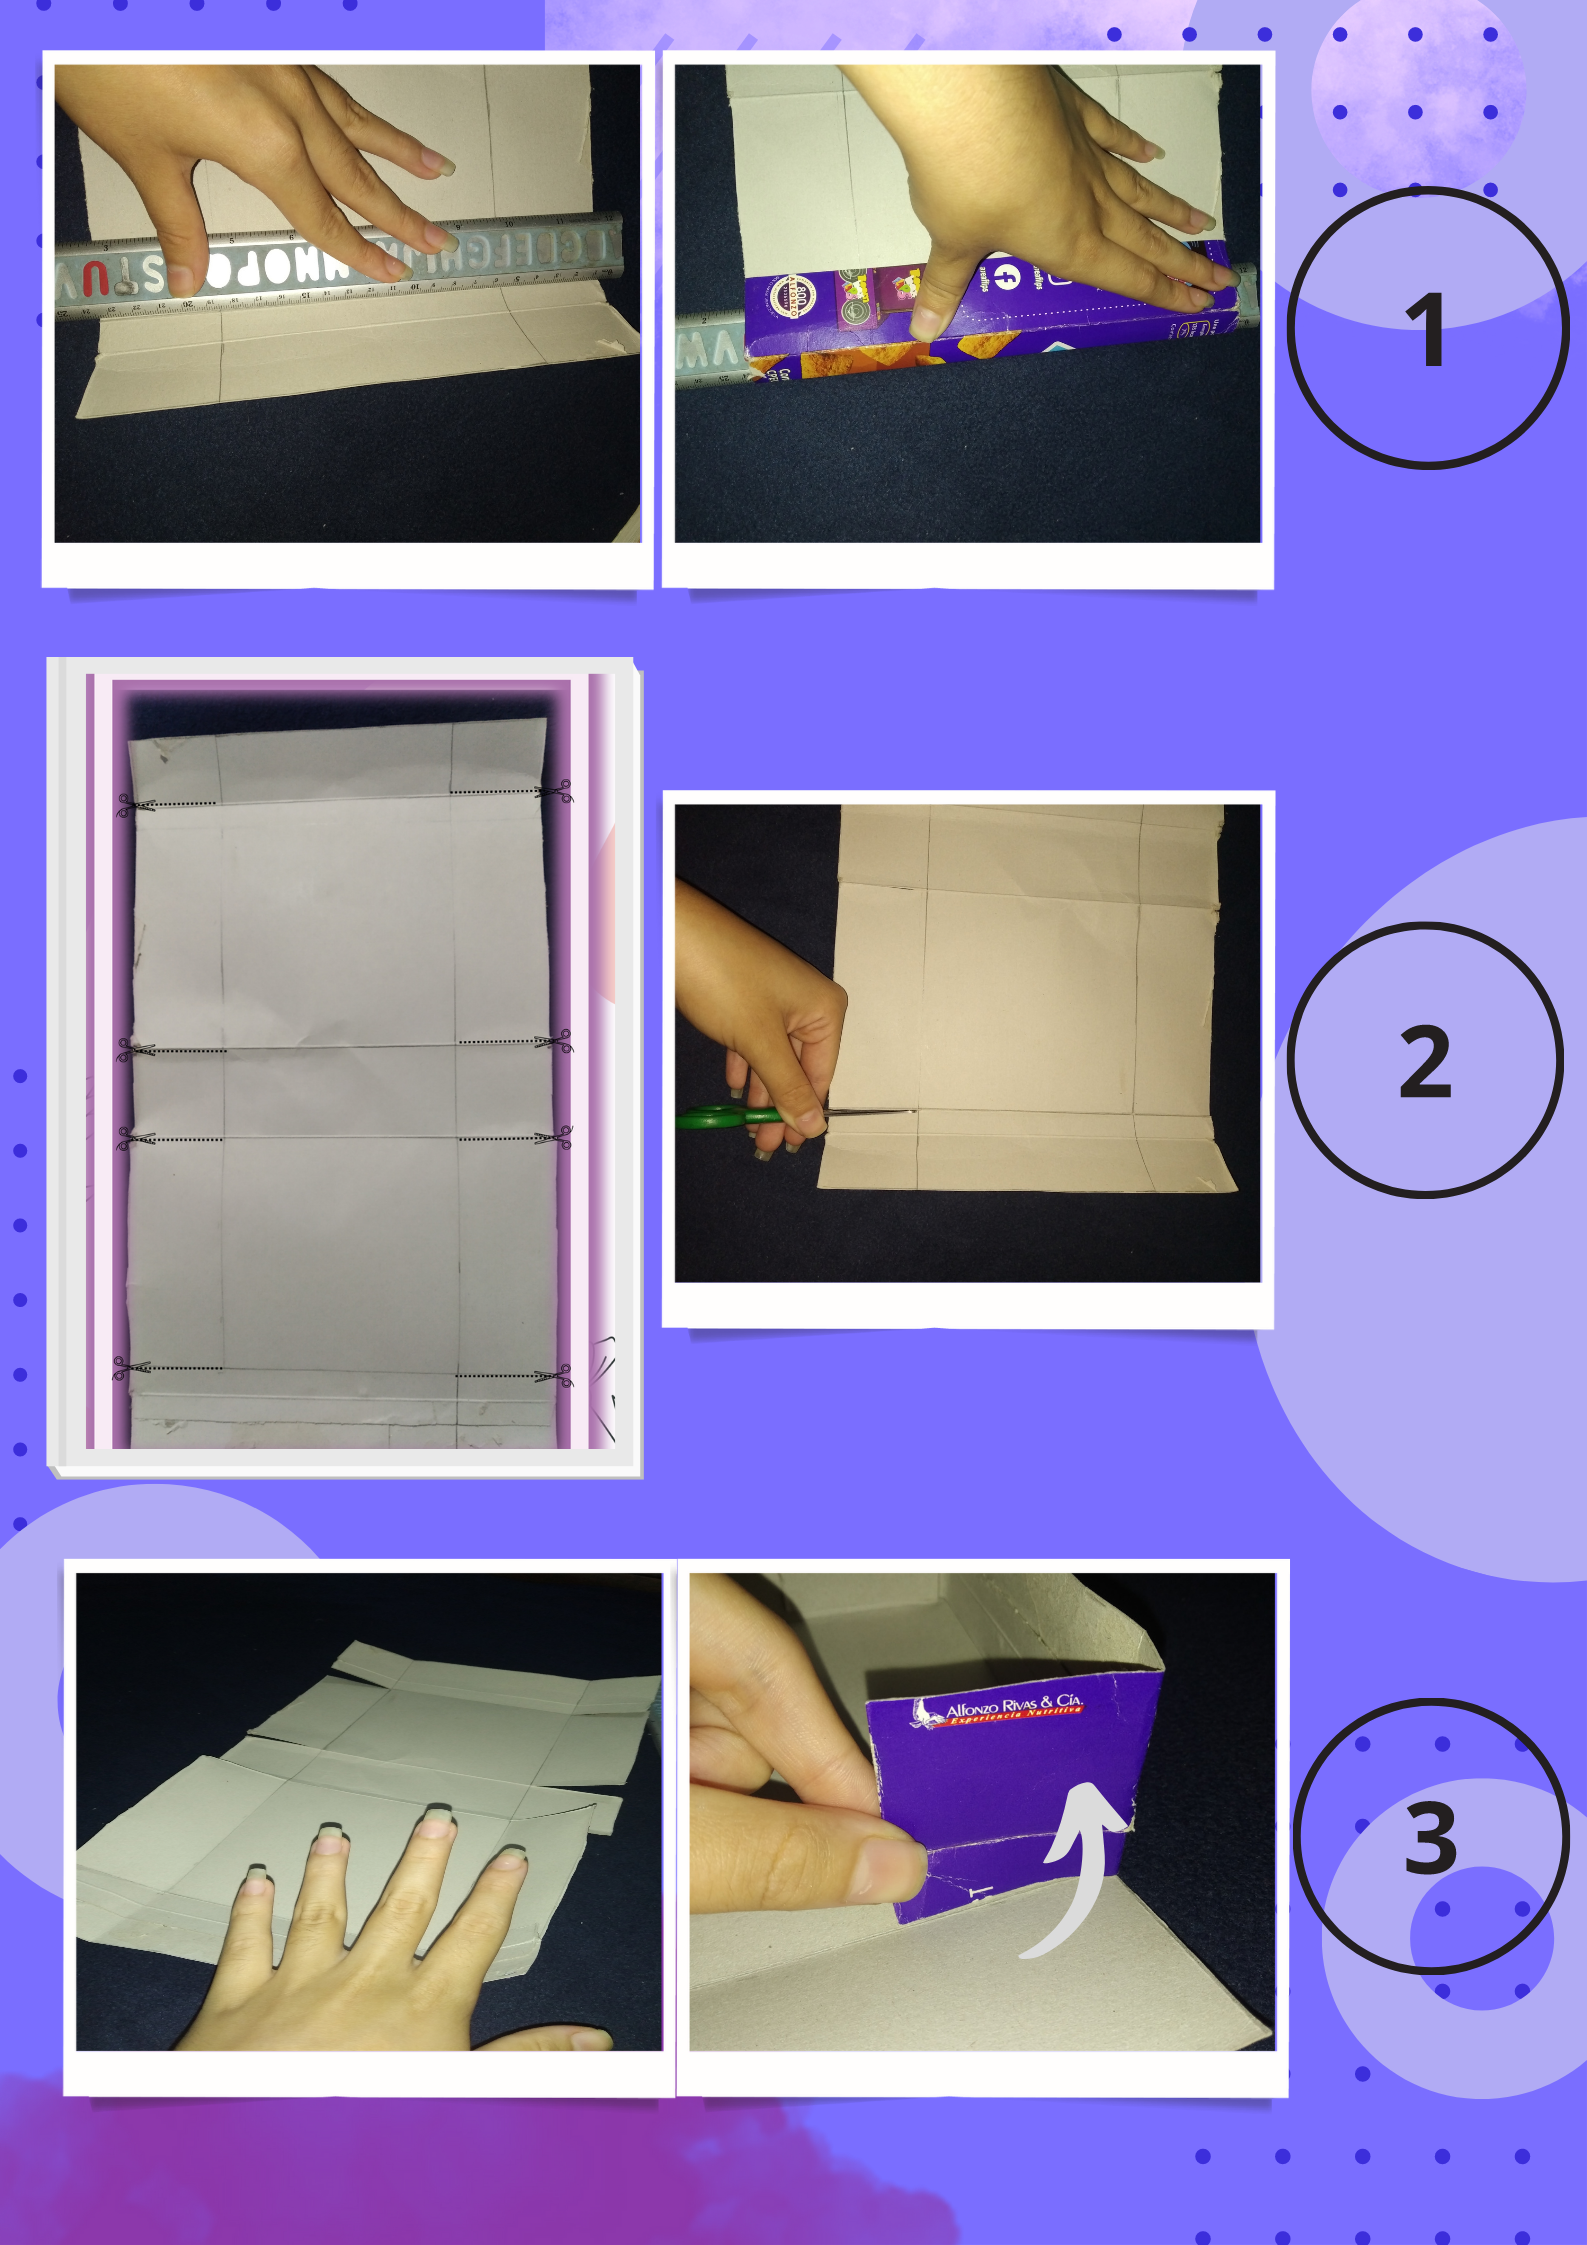
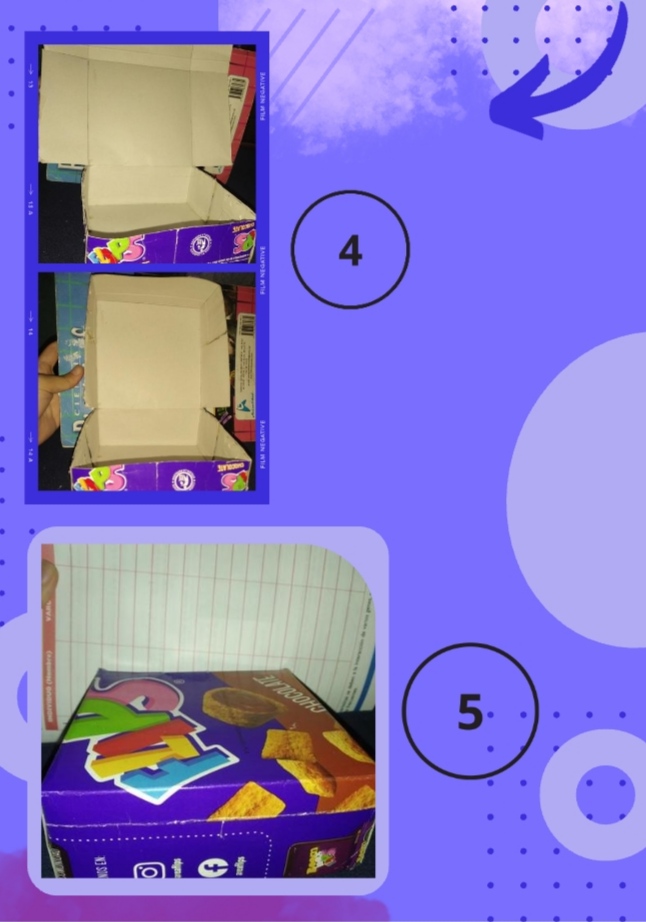
Cómo les dije partimos de una caja de cereal, la cual vamos a abrir completa, siendo delicados, dónde tenemos que marcar dos cuadrados iguales en el centro, aquí yo me guíe de la línea central de 5 cm (está la pueden hacer del tamaño que gusten, al igual que el cuadrado) para marcar ambos cuadrados a los lados, después solo queda marcar 5 cm por todos los lados, y luego solo recortar los excedentes de los lados, para solo tener este rectángulo. Todo como lo pueden apreciar en la imagen, también les dejo el dibujo que hice de la plantilla para que la vean mejor, intente que se asemeje lo mejor posible.
As I said we start from a cereal box, which we are going to open completely, being delicate, where we have to mark two equal squares in the center, here I was guided by the central line of 5 cm (you can make it the size you like, like the square) to mark both squares on the sides, then just mark 5 cm on all sides, and then just cut the excess sides, to only have this rectangle. Everything as you can see in the image, I also leave the drawing I made of the template so you can see it better, try to make it as similar as possible.
paso 2:
Step 2:
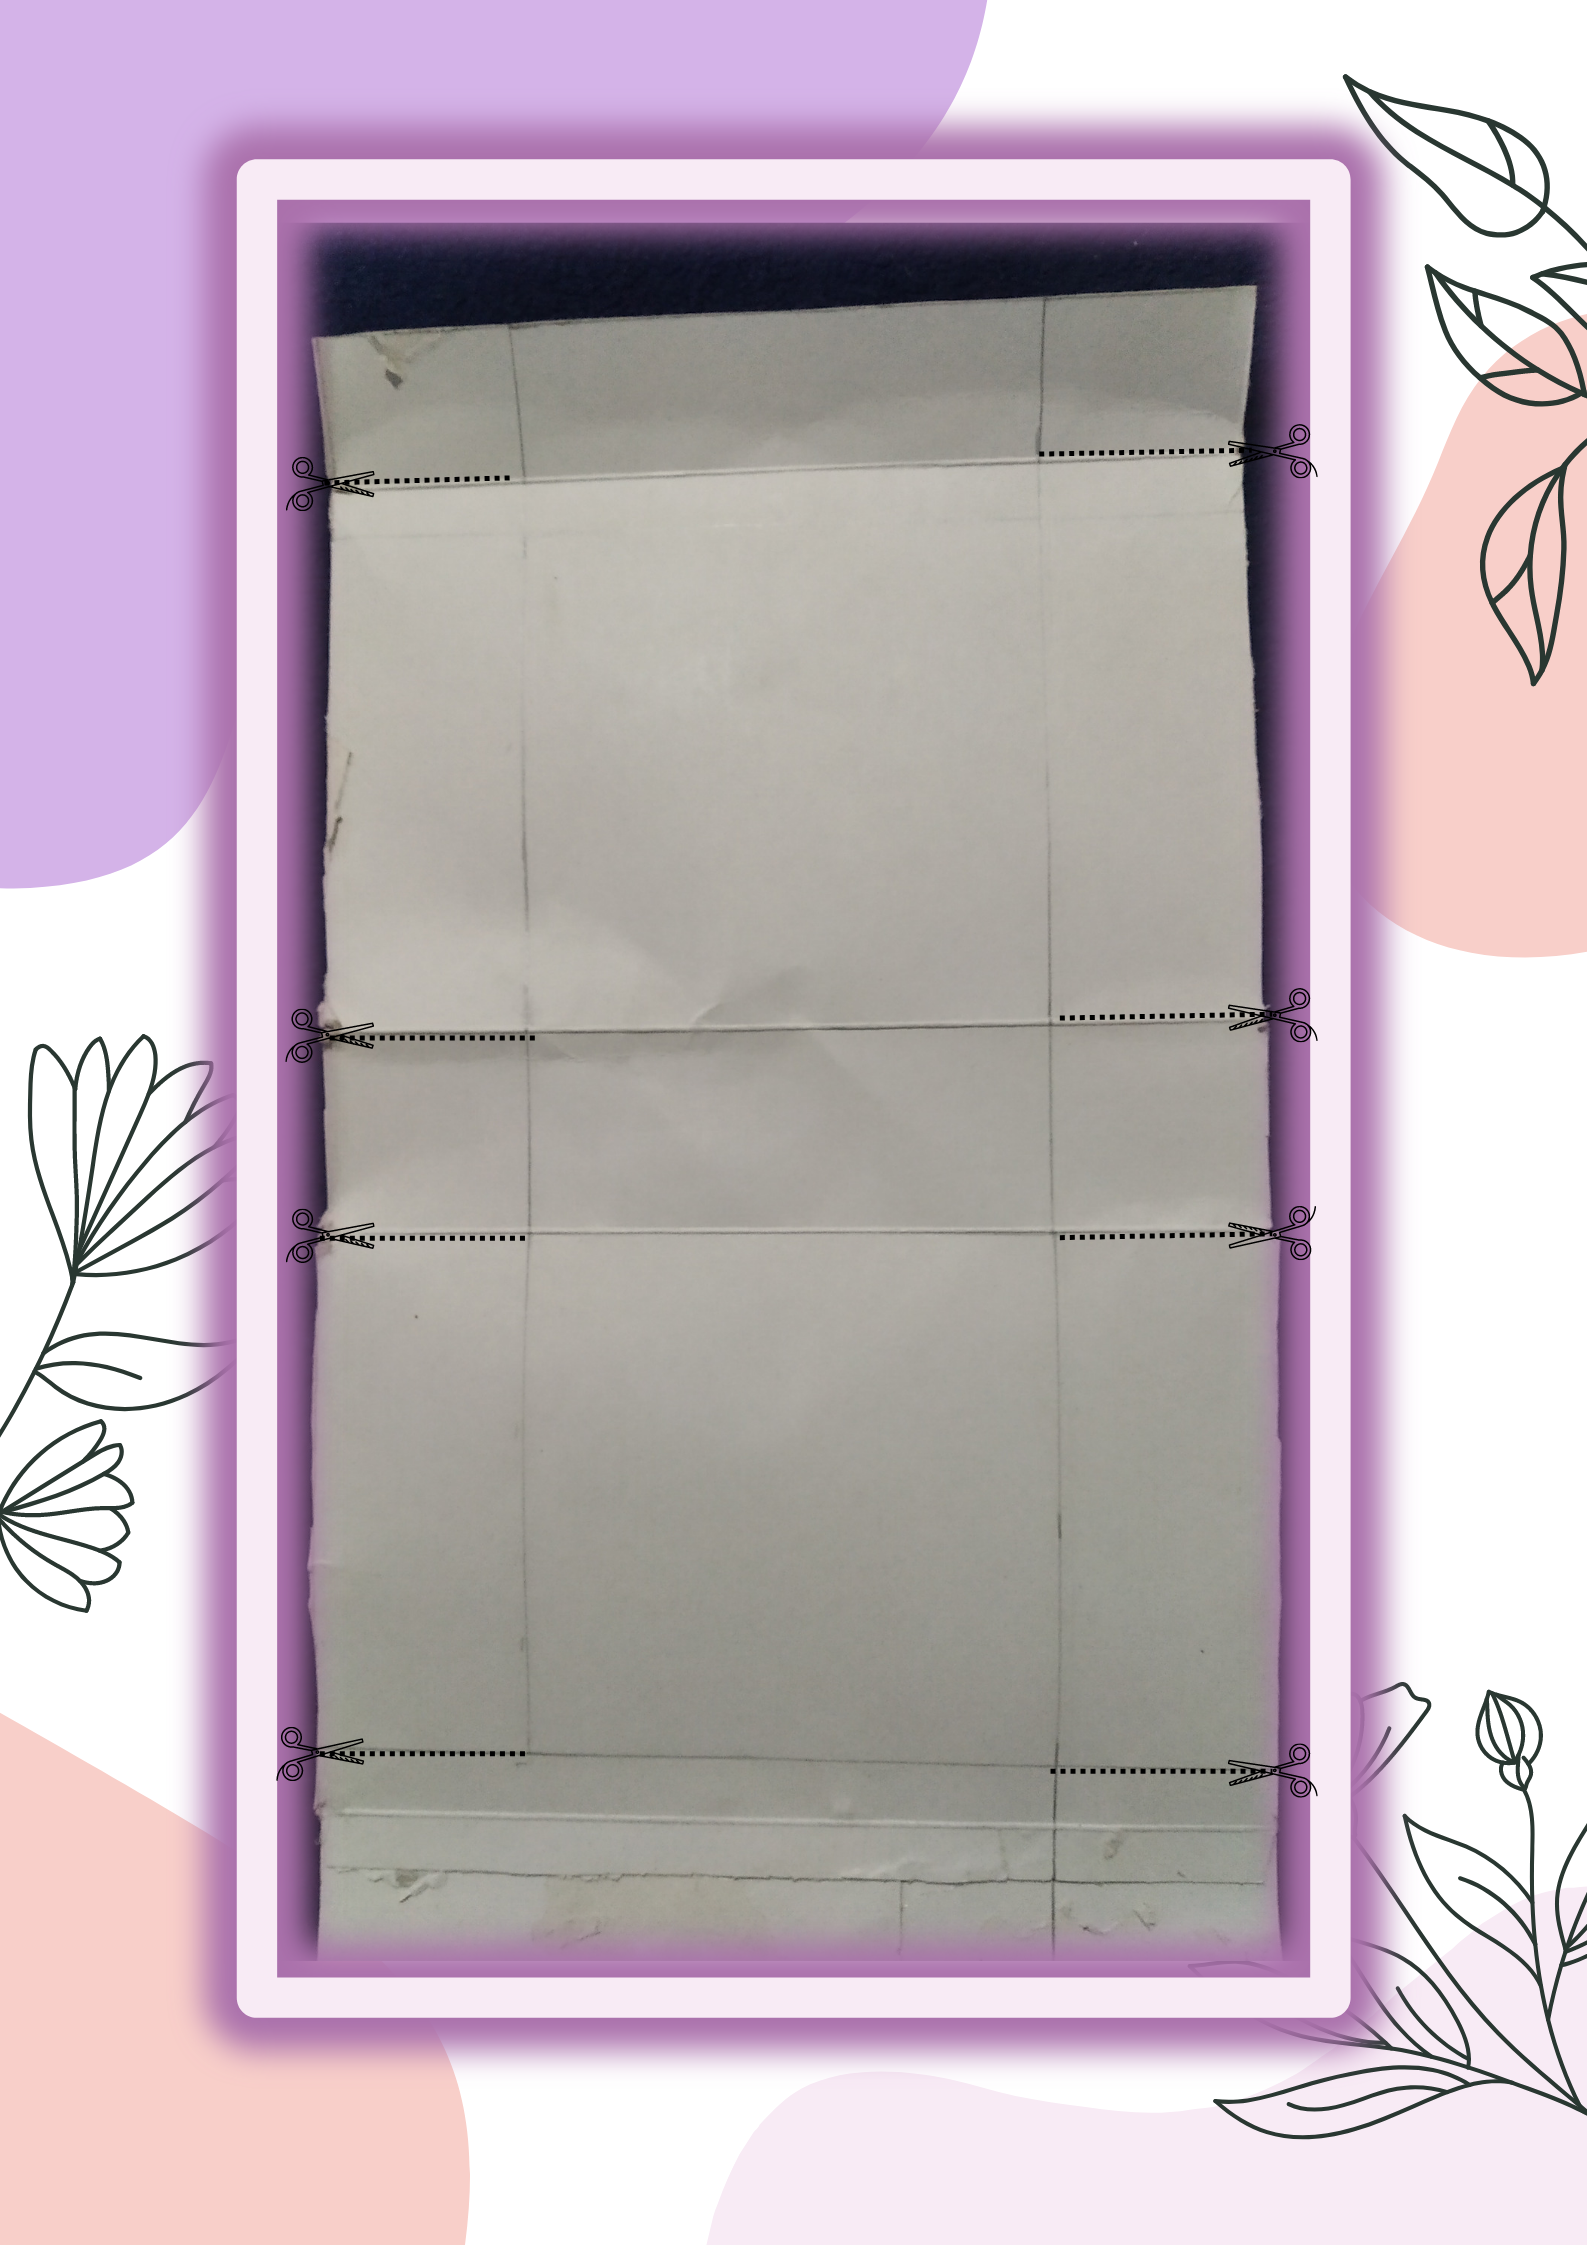
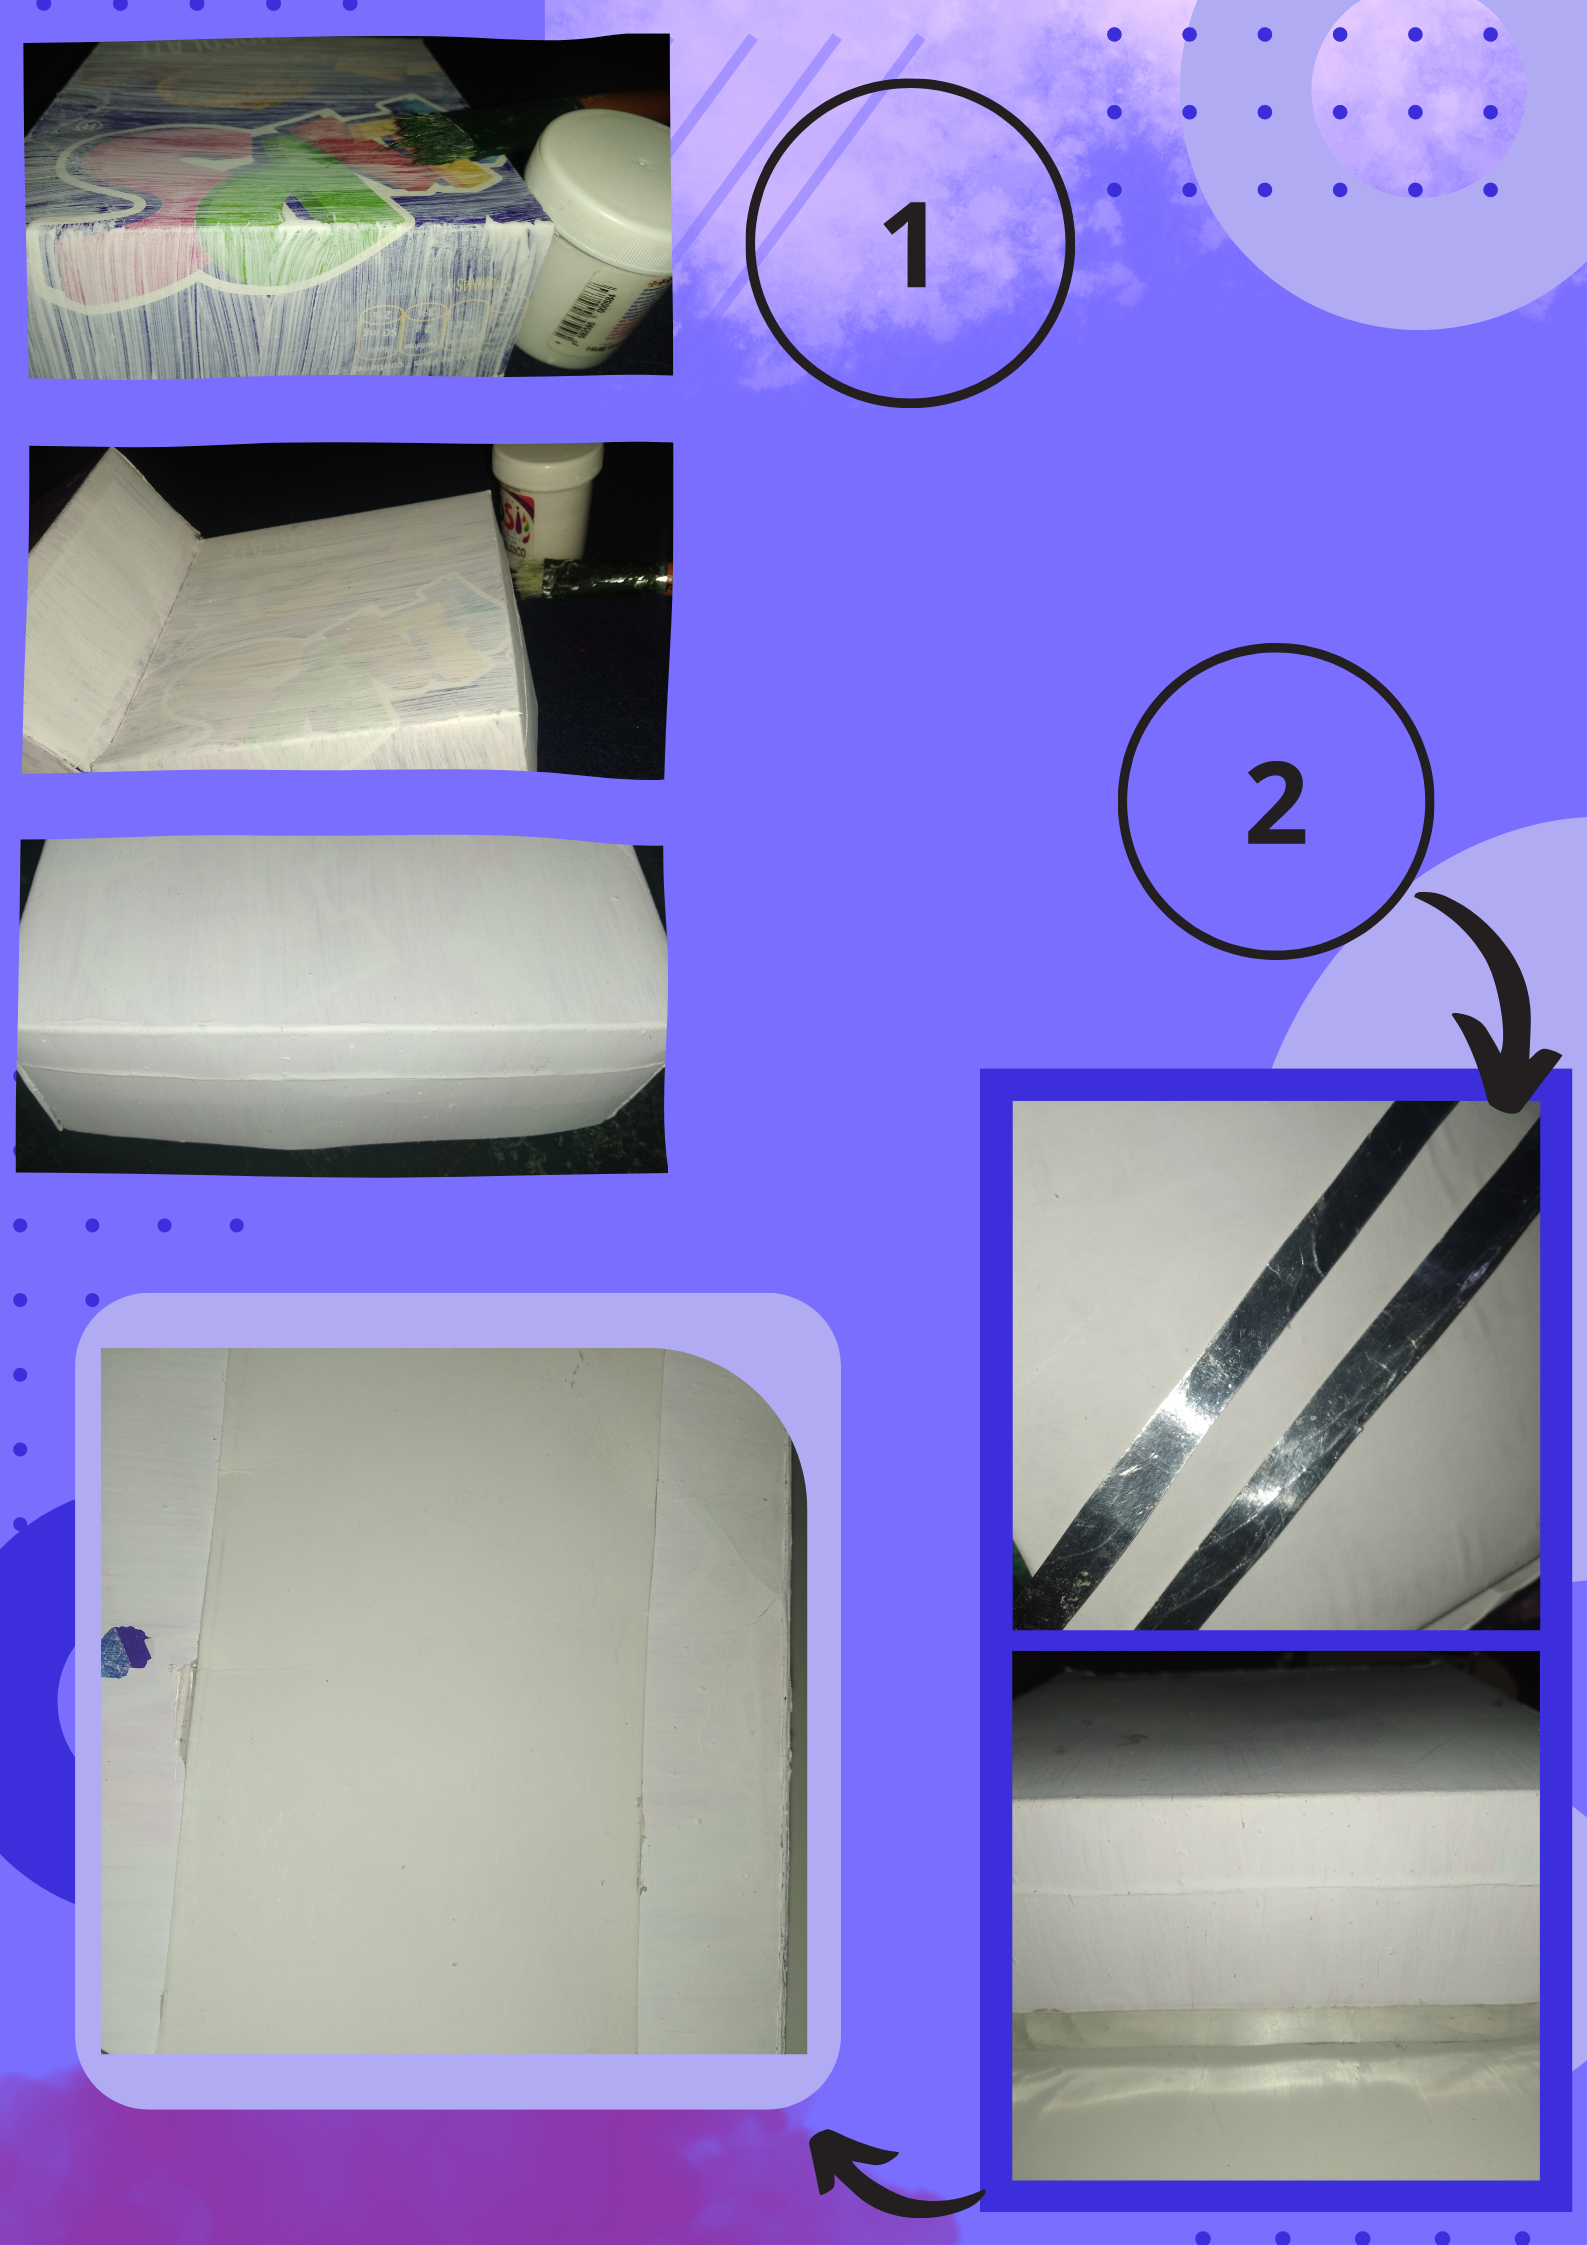
Ya teniendo todo marcado muy bien, vamos a doblar las líneas con una regla o lo que gusten, enseguida empezamos a recortar las líneas sin tocar el cuadrado, aquí en la imagen les muestro dónde exactamente, para así tener las solapas para unir las esquinas y formar la caja. Simplemente quedaría unir todas las esquinas con silicón (de su preferencia) de la manera en que se muestra, por la parte de abajo, y así mismo la de arriba que será nuestra tapa y así de fácil ya tendríamos nuestra caja armada, solo faltando decorar y forrar.
Once everything is well marked, we are going to fold the lines with a ruler or whatever you like, then we start to cut the lines without touching the square, here in the image I show you where exactly, so we have the flaps to join the corners and form the box. All that is left to do is to join all the corners with silicone (of your choice) as shown, on the bottom side, and also on the top, which will be our lid, and just like that we would have our box ready, only needing to decorate and cover it.
Paso 3:
Step 3:
Ahora mi parte favorita, a poner toda nuestra creatividad y empeño, dándole nuestro toque, después de tener la caja ya armada, podemos decorarla como queramos, ya sea pintando o incluso forrando con papel de nuestra elección, yo decidí pintarla con pintura al frío, en mi caso blanca. Comencé a pintarla con un pincel, dejando secar capa, tras capa, fue un proceso un poco largo, fueron aproximadamente 7 capas de color blanco, ya que el color de la caja era oscuro, por lo que varía, ya al tenerla pintada completamente del color deseado, viene la parte donde le agregaremos pequeños detalles de decoración, yo primeramente recorte dos tiras de cartulina color plateado, y las pegue por el borde de abajo de la tapa, luego recorte un rectángulo de cartulina blanca un poco más pequeño solo de un lado y la pegue con silicón.
Now my favorite part, to put all our creativity and effort, giving it our touch, after having the box already assembled, we can decorate it as we want, either painting or even lining it with paper of our choice, I decided to paint it with cold paint, in my case white. I began to paint it with a brush, letting dry layer after layer, it was a little long process, there were approximately 7 layers of white, since the color of the box was dark, so it varies, and having it completely painted the desired color, comes the part where we will add small decorative details, I first cut two strips of silver cardboard, and glue them on the bottom edge of the lid, then cut a rectangle of white cardboard a little smaller only on one side and glue it with silicone.
Paso 4:
Step 4:
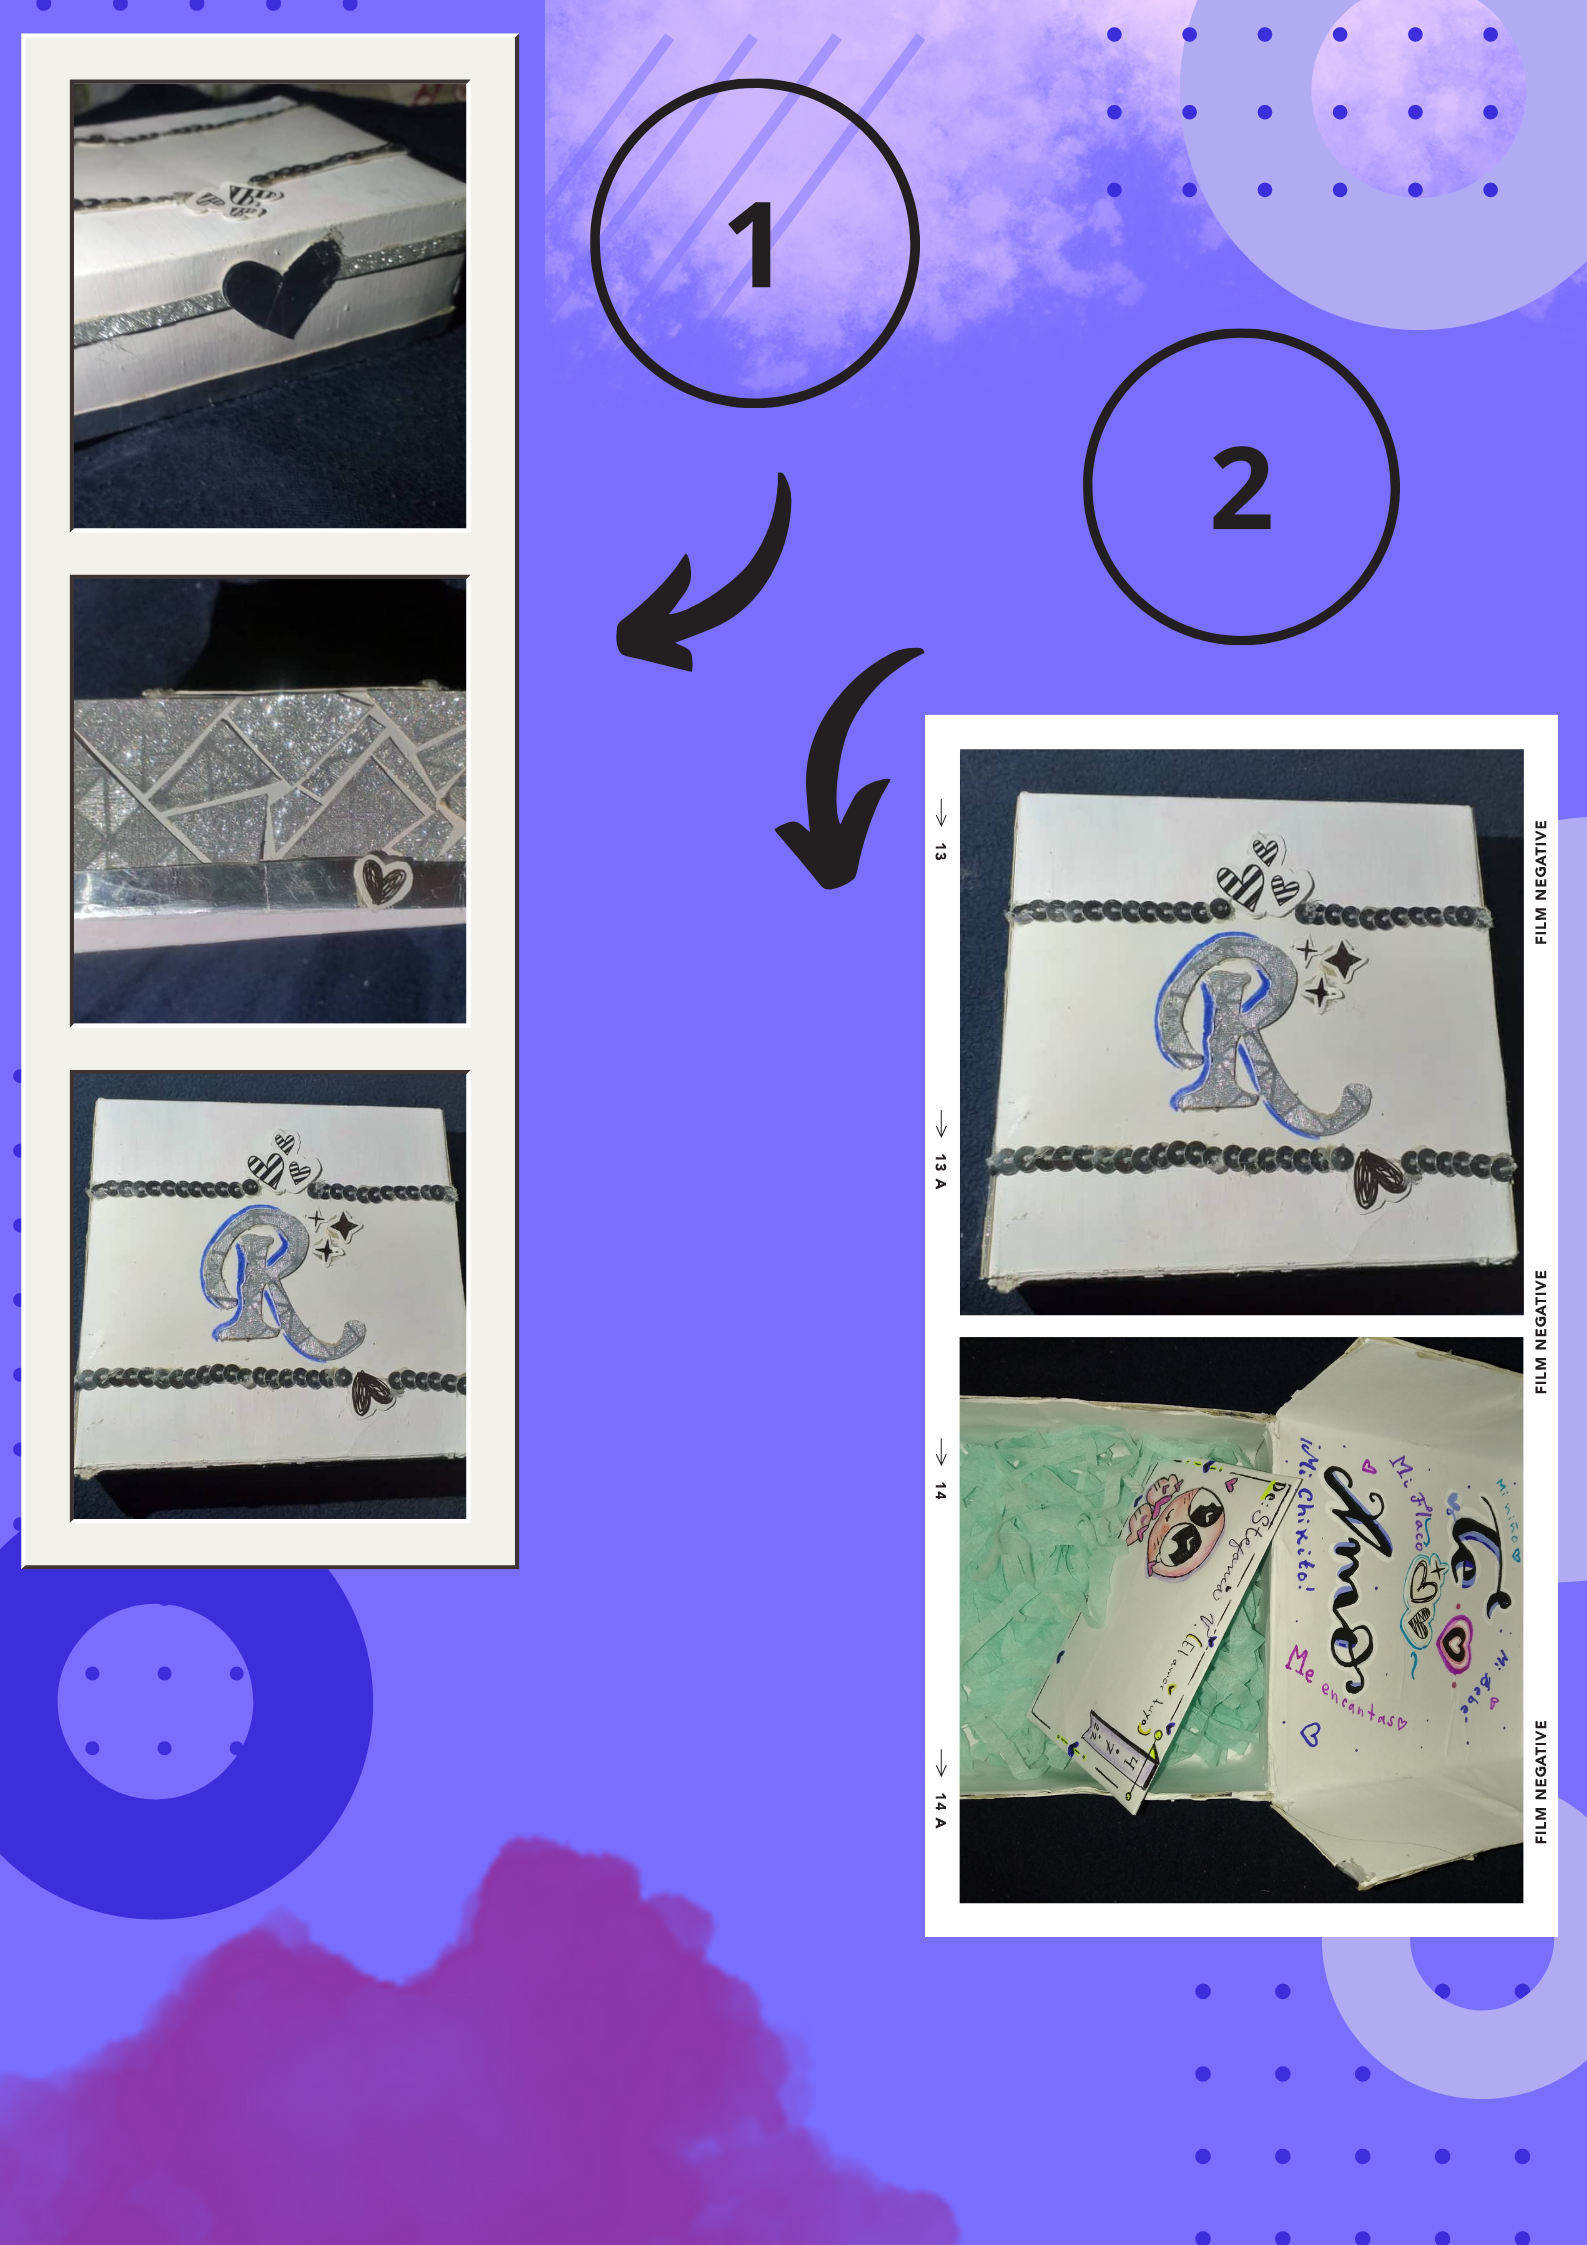
Así mismo, seguí a colocar lentejuelas de color plateado, mi idea inicial era pegarle en ese borde de la cartulina blanca, dos tiras de cartulina gris con brillitos, una arriba y otra debajo, pero buscando ví la lentejuelas, las coloque solo para tener una idea y me gustó, así que pegue está tira de lentejuelas por la parte de arriba e igual la de abajo, se me dificulto un poco pegarlas, pero quedaron divinas, también tenía trozos de una caja vieja, color blanco que tenía dibujos de corazones y tipo destellos por todos lados, también letras y así, recorte algunos corazones, destellos y letras, para pegarlas, tenía que aprovecharlos, de paso como pueden ver en la imagen con el silicón despegue un poco de la pintura en la tapa, y ahí para ocultarlo pegue un corazón, y después hice lo mismo arriba. Después con las cartulina gris con destellos y un lindo diseño (está cartulina me encanta, necesito comprar otra, me quedaban pequeños trozos), quise hacer una clase de mosaico, recorte triángulos y formas al azar, y fuí pegando uno a uno, cuadrandolos para que quedara bien, así hice a los dos lados de afuera de la tapa, y me fascinó, esto brilla muy bonito. Después solo por delante le agregué un corazón en el centro con dos tiras de cartulina plateada a los lados, y con la cartulina gris de brillitos, saque una letra, la cuál es la inicial de la persona a la que se la regalé, y está la pegue en la parte de arriba de la tapa, porque sentía que le faltaba algo, también le puse un tipo de sombra azul oscuro con marcador a la letra, después por detrás pegué unas letras, que formaban la palabra "Encantas" y con pintura al frío negra agregué "Me" formando " Me encantas" y dibuje un corazón, después con el marcador azul lo delinee con cierta separación. Cabe señalar, que por la parte de adentro la forre con papel blanco, pegándole con pega blanca lo mejor posible, así adentro con pintura al frío (también puede ser con marcador) dibuje la frase "Te Amo" al igual que un corazón, luego solo agregué tiras de papel seda como relleno, agregué unos dulces y una cartita.
Likewise, I continued to place silver sequins, my initial idea was to paste on the edge of the white cardboard, two strips of gray cardboard with glitter, one above and one below, but I saw the sequins, I placed them just to get an idea and I liked it, so I glued this strip of sequins on the top and the bottom, it was a little difficult to paste them, but they were divine, I also had pieces of an old white box that had drawings of hearts and kind of sparkles on all sides, also letters and so, I cut some hearts, sparkles and letters, to paste them, I had to take advantage of them, as you can see in the image with the silicone I peeled off a little of the paint on the lid, and there to hide it I glued a heart, and then I did the same on the top. Then with the gray cardboard with sparkles and a nice design (I love this cardboard, I need to buy another one, I had small pieces left), I wanted to make a kind of mosaic, I cut out triangles and random shapes, and I went gluing one by one, squaring them so that it looked good, so I did on the two sides outside the lid, and I was fascinated, this shines very nice. Then just on the front I added a heart in the center with two strips of silver cardboard on the sides, and with the gray glitter cardboard, I made a letter, which is the initial of the person I gave it to, and I glued it on the top of the lid, because I felt it was missing something, I also put a kind of dark blue shadow with a marker on the letter, then on the back I glued some letters, which formed the word "Encantas" and with black cold paint I added "Me" forming "Me encantas" and drew a heart, then with the blue marker I outlined it with some separation. It should be noted that I lined the inside with white paper, sticking it with white glue as best as possible, so inside with cold paint (can also be with marker, drew the phrase "I love you" as well as a heart, then I just added strips of tissue paper as filling, added some candy and a little card.
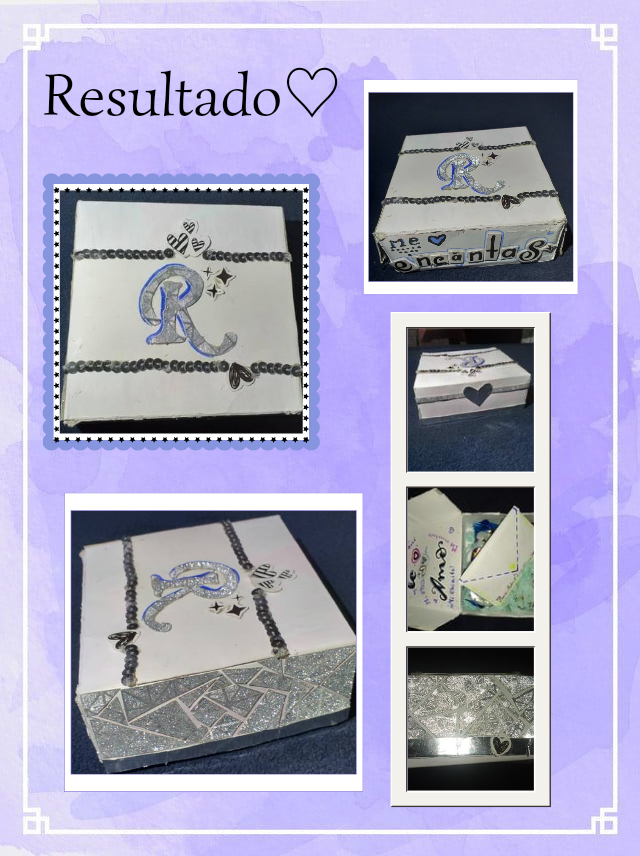
Y eso es todo, ya estaría lista, espero se animen a hacerla, la verdad me encantó el resultado, este regalito lo hice para dárselo a una persona especial (mostrándoles un poco lo cursi que puedo llegar a ser), y le encanto tanto como a mi, puedo decir, que disfrute del proceso, al igual que me estrese un poco con algunas cositas y errores, por ejemplo pegue la letra al revés de por dónde abría la caja JAJAJS, ya que está la tenía cerrada y pensé que estaba bien, así que ojito con estos pequeños errores, de eso se aprende.
And that's all, it would be ready, I hope you are encouraged to do it, I really loved the result, I did this little gift to give it to a special person (showing a little how corny I can be), and she loved it as much as me, I can say, I can say that I enjoyed the process, but I was a little stressed with some little things and mistakes, for example I glued the letter upside down from where I opened the box JAJAJS, since it was closed and I thought it was fine, so be careful with these little mistakes, you can learn from them.
Gracias por leer y llegar hasta aquí, ¡les mando un abrazo! Hasta la próxima queridos lectores♡.
Thank you for reading and making it this far, I send you a hug! Until next time dear readers
Thank you for sharing this amazing post on HIVE!
Your content got selected by our fellow curator @rezoanulvibes & you just received a little thank you via an upvote from our non-profit curation initiative!
You will be featured in one of our recurring curation compilations and on our pinterest boards! Both are aiming to offer you a stage to widen your audience within and outside of the DIY scene of hive.
Join the official DIYHub community on HIVE and show us more of your amazing work and feel free to connect with us and other DIYers via our discord server: https://discord.gg/mY5uCfQ !
If you want to support our goal to motivate other DIY/art/music/homesteading/... creators just delegate to us and earn 100% of your curation rewards!
Stay creative & hive on!
Holaa, muchas gracias por tomar mi post en cuenta, me parece maravilloso su trabajo, y tomaré todo en cuenta gracias
💗
Congratulations @stefania16! You have completed the following achievement on the Hive blockchain and have been rewarded with new badge(s):
Your next target is to reach 2000 upvotes.
You can view your badges on your board and compare yourself to others in the Ranking
If you no longer want to receive notifications, reply to this comment with the word
STOPSupport the HiveBuzz project. Vote for our proposal!
Hola amiga @stefania16, encantada con esa caja de cartón convertida en caja de regalos. Nos enseña a utilizar los desechos sólidos como es el cartón.
Holaa, es una idea para reusar materiales reciclables, darle nueva vida a algo es muy gratificante, gracias por su comentario.💗✨