Hello my dear creative Hive Diy family! Happy and blessed Thursday, you are all welcome to a new publication - craft, I hope you are certainly well, that you have a lot of health, wellness and that in your lives never lack creativity, productivity and of course crafts.♡
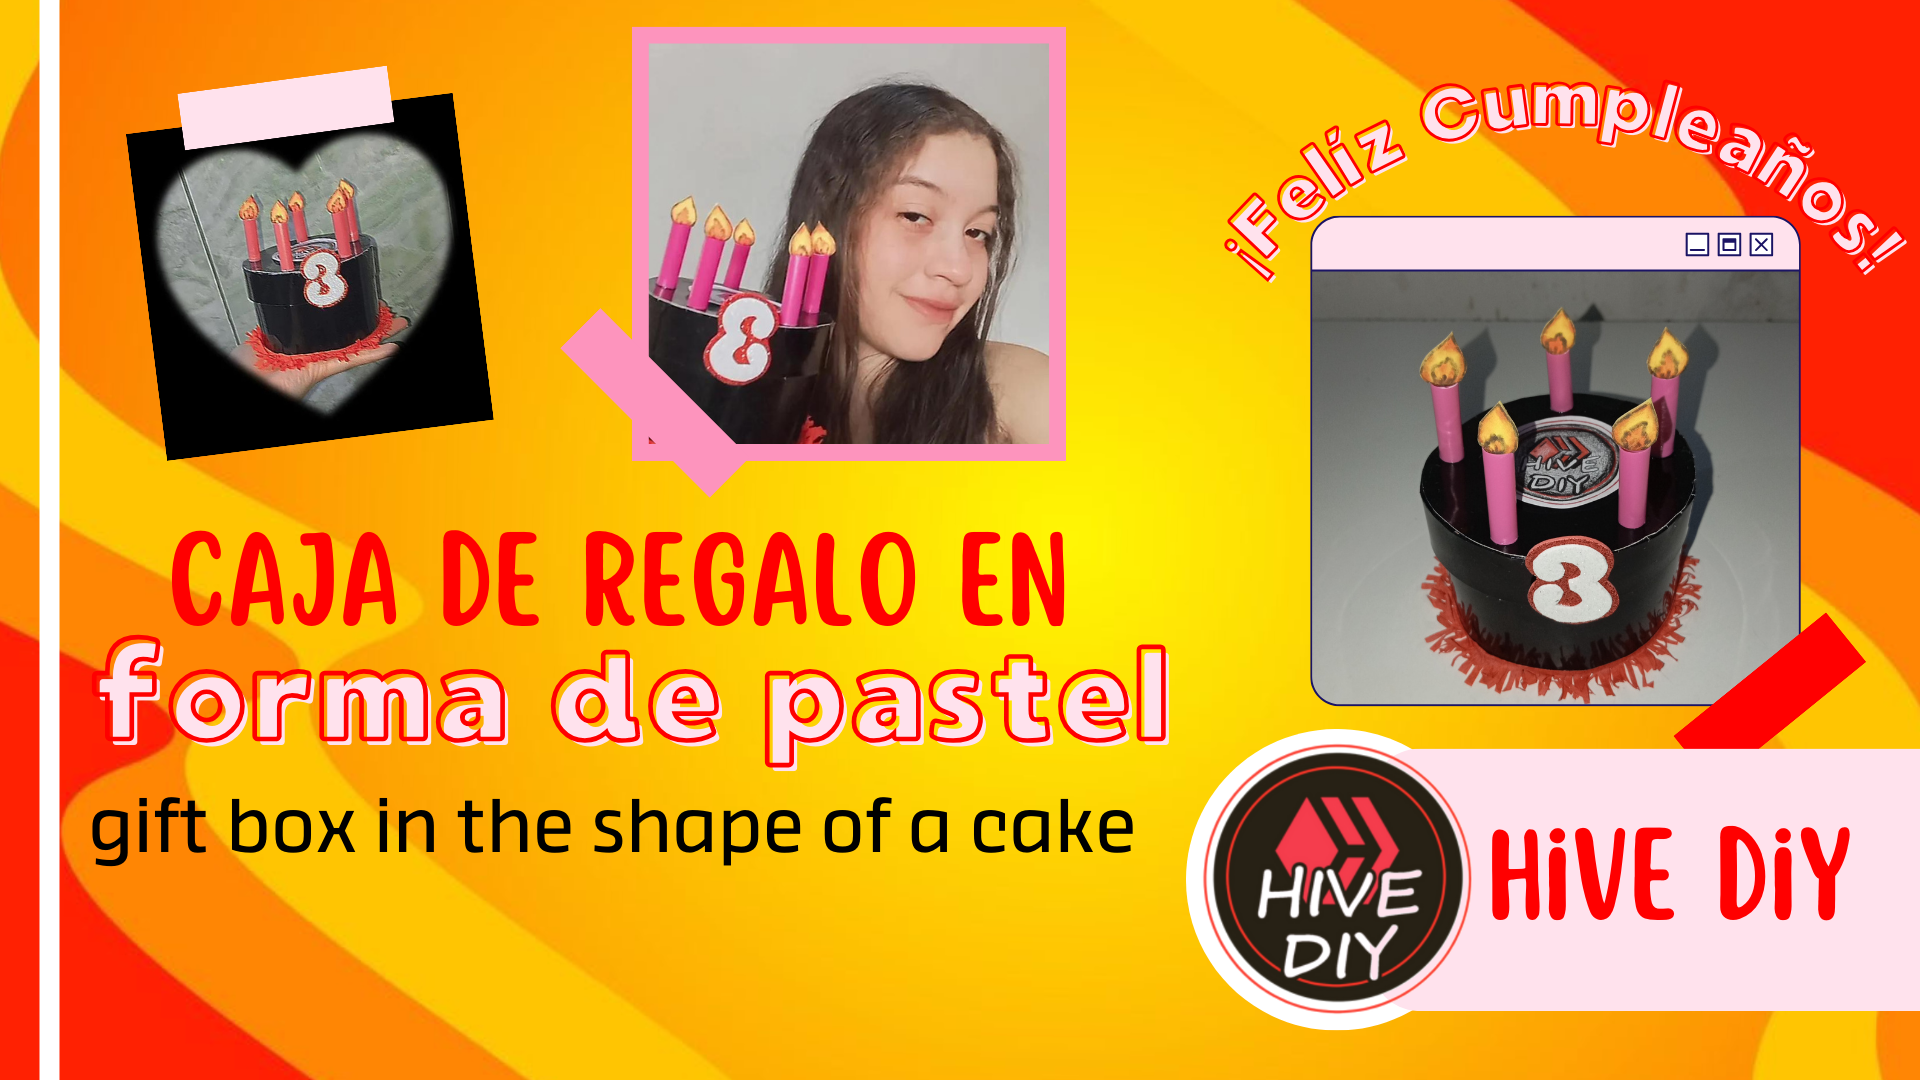
¡Buenas tardes a todos! Es está ocasión, les tengo un DIY espectacular que les prepare con mucho amor, en honor al 3er cumpleaños de Hive Diy, que fue hace una semana y unos cuantos días, pero aún la celebración sigue y no podía dejar la oportunidad de celebrar el cumpleaños de mi comunidad favorita, nuestro rincón creativo, así que le deseo un ¡Felíz cumpleaños a Hive Diy! Que sean muchos años más creando y compartiendo lo que nos apasiona hacer a mano.🎉🎈
Good afternoon everyone! This time, I have a spectacular DIY that I prepared with love, in honor of the 3rd birthday of Hive Diy, which was a week and a few days ago, but still the celebration continues and I could not miss the opportunity to celebrate the birthday of my favorite community, our creative corner, so I wish a Happy Birthday to Hive Diy! May it be many more years of creating and sharing what we are passionate about doing by hand.🎉🎈
Cómo estamos celebrando este aniversario de la comunidad, el tema de la manualidad obviamente será de cumpleaños. De está manera les presento el Diy de como hacer: Una hermosa caja en forma de pastel. Cabe señalar que es personalizable y la podemos ajustar a nuestro tamaño deseado, está vez nuestro motivó fue el 3er aniversario de Hive Diy, por lo tanto la decore referente a esto.🧡
As we are celebrating this anniversary of the community, the theme of the craft will obviously be birthday. This way I present the Diy of how to make: A beautiful box in the shape of a cake. It should be noted that it is customizable and we can adjust it to our desired size, this time our motivation was the 3rd anniversary of Hive Diy, so I decorated it referring to this.🧡
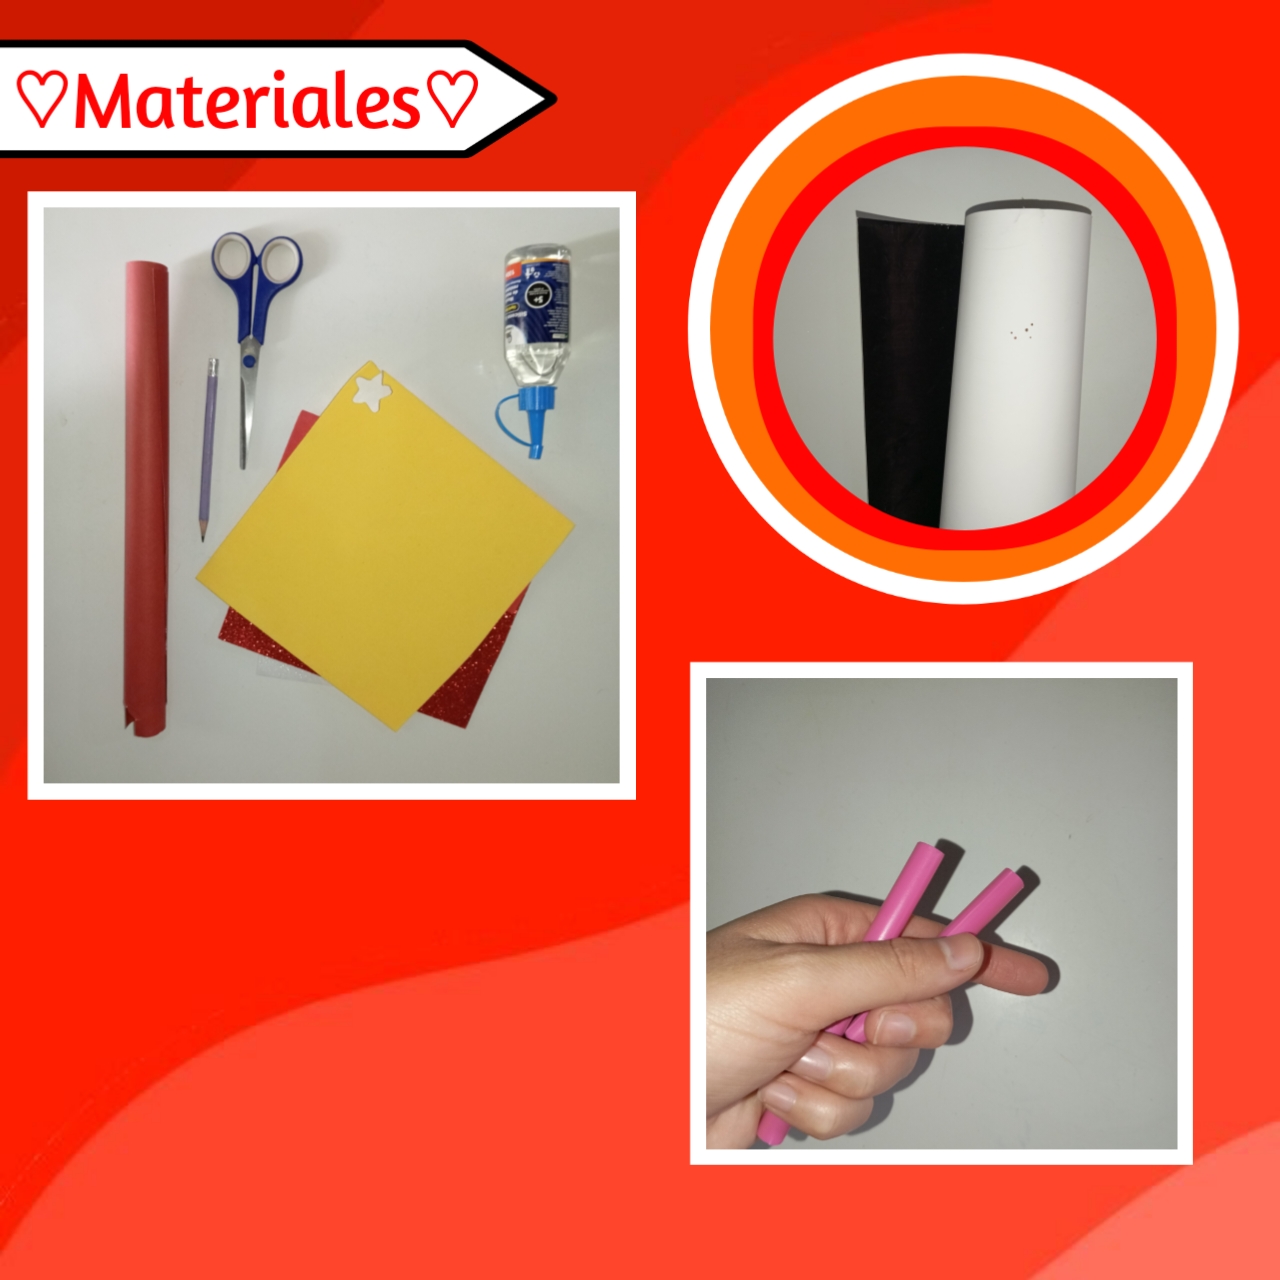
♡📎🍁Materials🍁📎♡
- Cartulinas
- Pitillo grueso
- Foami
- Papel Crepe
- Silicón
- Regla
- Lápiz
- Tijera
- Cardboard
- Thick straw
- Foami
- Crepe paper
- Silicone
- Ruler
- Pencil
- Scissors
♡🍁❤️Step by Step❤️🍁♡
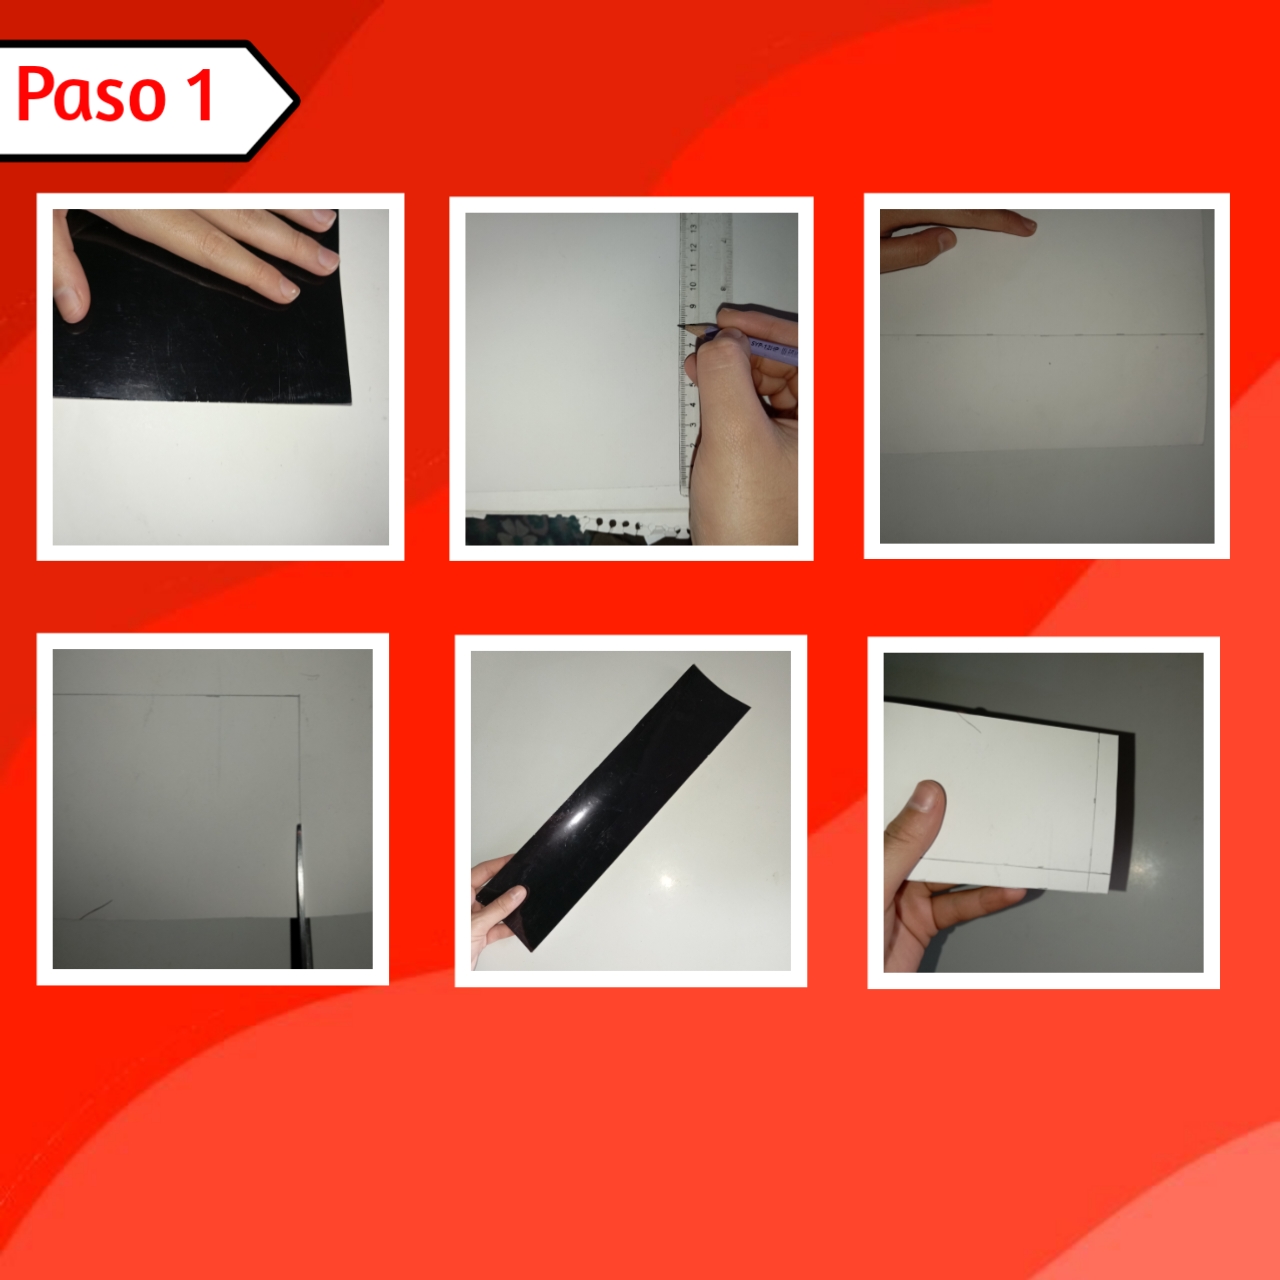
Paso 1
Step 1:
Para iniciar utilizaremos la cartulina del color de nuestra preferencia, así la extenderemos, le damos la vuelta y marcaremos con nuestra regla y un lápiz un rectángulo largo, con el alto sue queramos, más 1cm, yo de ancho en total lo hice de 8cm y el largo más o menos de 43cm, está porque es una caja pequeña. Continúe recortando está pieza y agregando un borde de 1cm, este en horizontal, el vertical es solo para guiarse al pegar.
To start we will use the cardboard of the color of our preference, so we will extend it, turn it over and mark with our ruler and a pencil a long rectangle, with the height we want, plus 1cm, I did a total width of 8cm and the length more or less of 43cm, this is because it is a small box. Continue cutting this piece and adding a 1cm border, this in horizontal, the vertical is just to guide you when gluing.
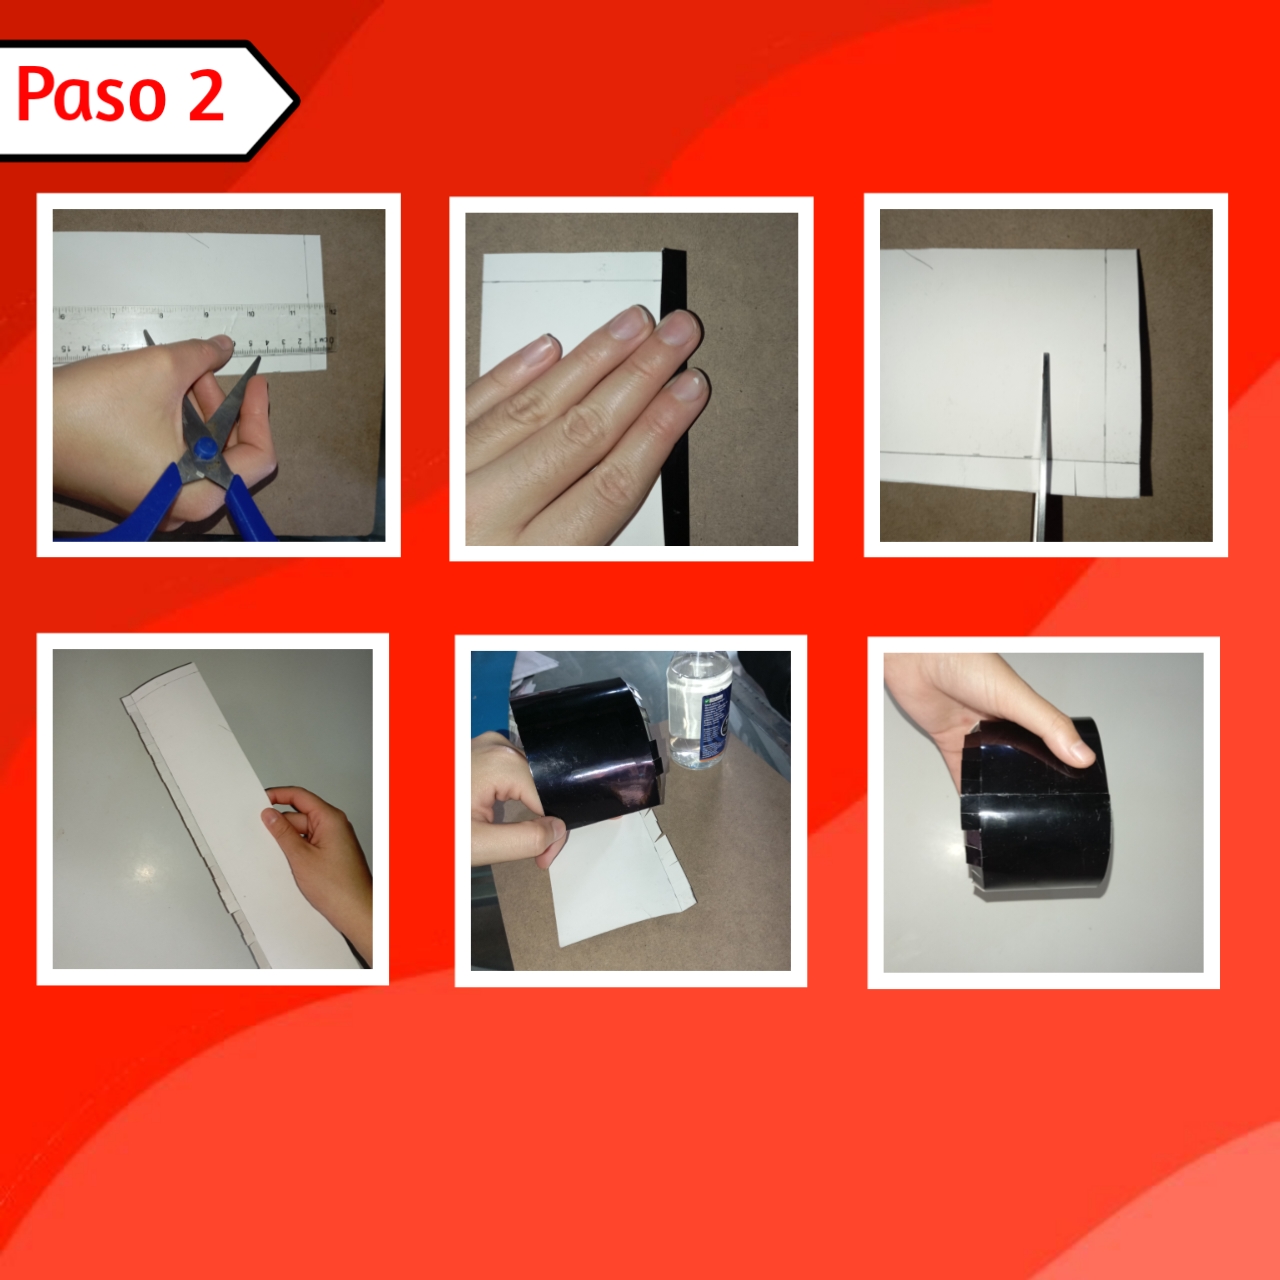
Paso 2:
Step 2:
Ahora bien, tomaremos una tijera y con el apoyo de una regla que siga la línea recta, vamos a remarcar el doblez por completo, luego lo doblamos igualmente a mano, para asegurarnos de sue quede bien. Seguimos con la tijera, de esta forma haremos pequeños cortes rectos llegando hasta el final del doblez, estos de 1cm más o menos, así por todo lo largo, luego formaremos nuestro círculo uniendo los extremos de ambas puntas con silicón.
Now, we will take a scissors and with the support of a ruler that follows the straight line, we will mark the fold completely, then we fold it also by hand, to make sure it fits well. We continue with the scissors, in this way we will make small straight cuts reaching the end of the fold, these of 1cm more or less, and so for the entire length, then we will form our circle joining the ends of both ends with silicone.
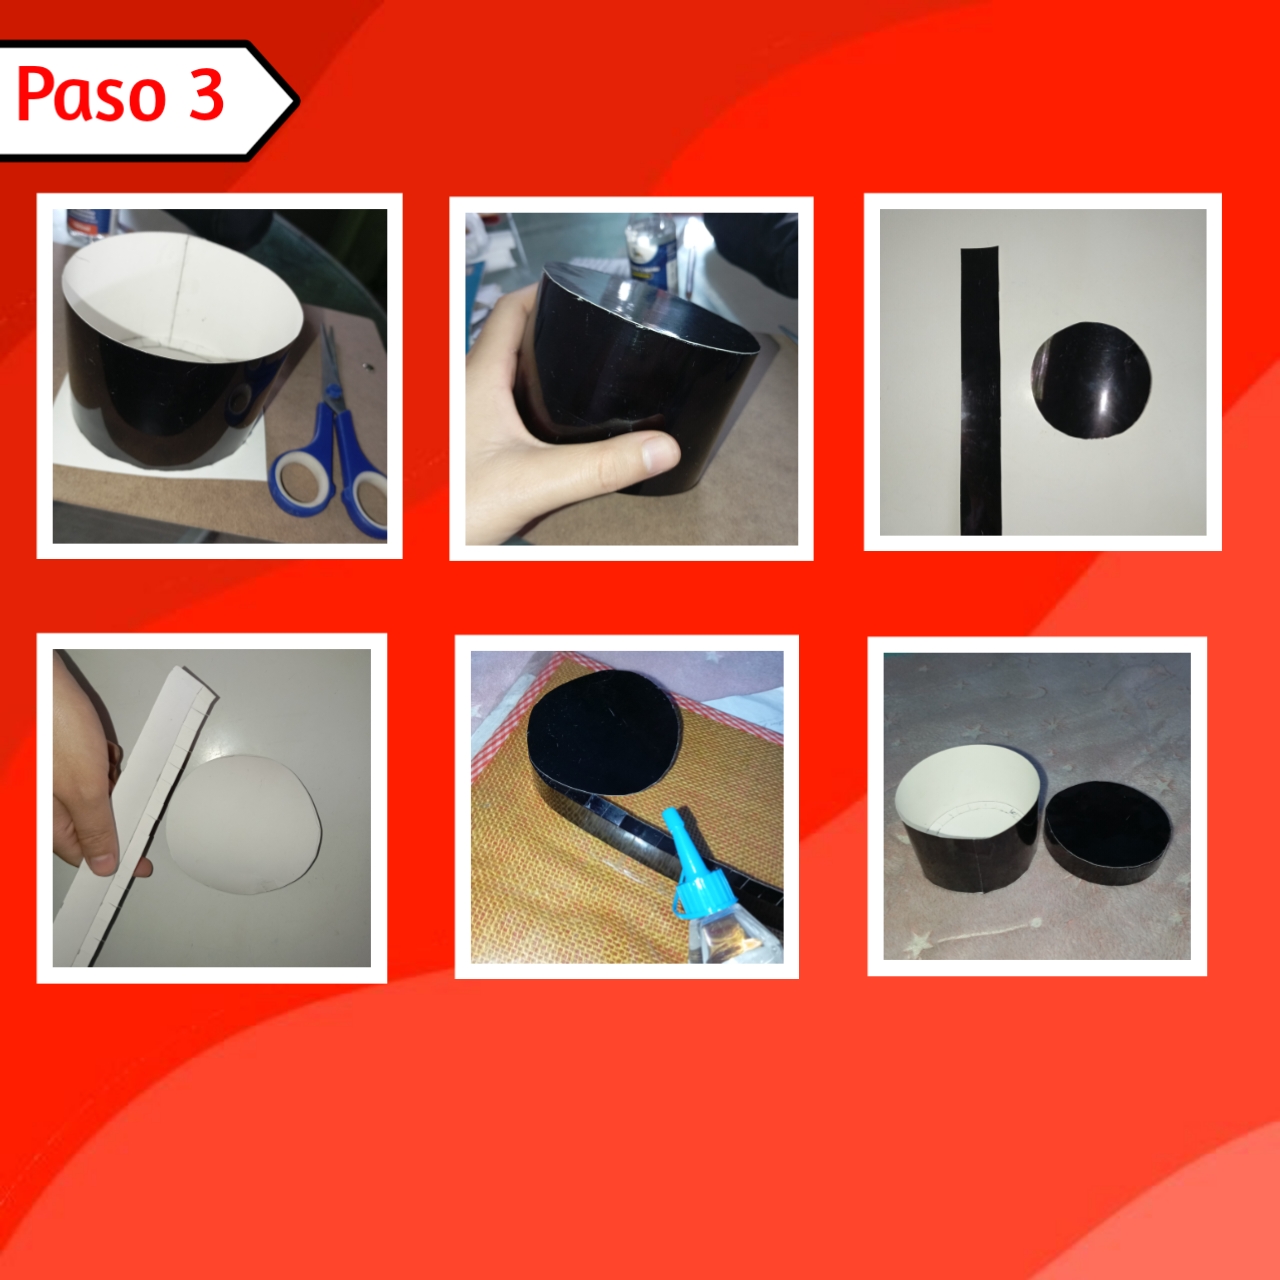
Paso 3:
Step 3:
Después agregaremos silicón a las solapas que hicimos y pegaremos nuestro cilindro sobre un cuadrado de la misma cartulina, presionando unos cuantos segundos, así también recortamos muy bien los excedentes y ya está lista la base. Por otro lado marcaremos un círculo levemente más pequeño y una tira de más o menos 3.5cm incluyendo el doblez con las solapas, así repetimos el mismo proceso hasta obtener nuestra tapa de la caja.
Then we will add silicone to the flaps we made and glue our cylinder on a square of the same cardboard, pressing a few seconds, so we also cut the excess very well and the base is ready. On the other side we will mark a slightly smaller circle and a strip of about 3.5cm including the fold with the flaps, and repeat the same process until we get our box lid.
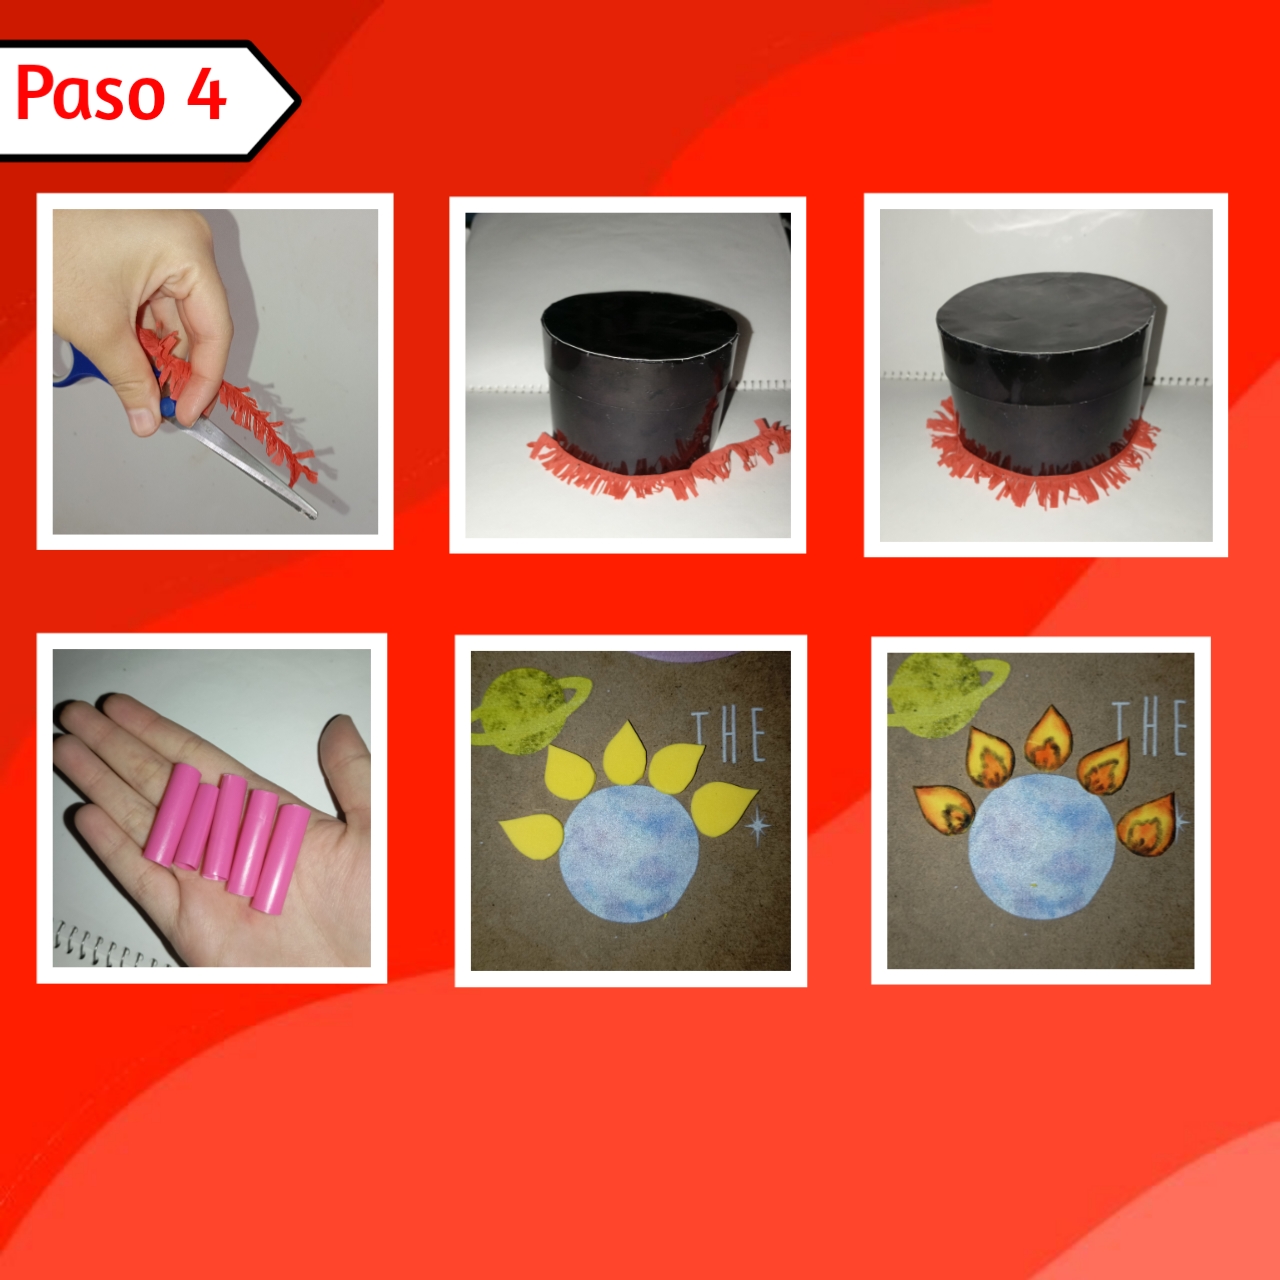
Paso 4:
Step 4:
Con nuestra caja ya hecha vamos a decorar, así tomamos papel crepé y haremos una tira con faralao, que vamos a pegar en todo el borde de la parte de abajo con silicón hasta cubrir todo el cilindro. Ahora para las velas vamos a recortar nuestro pitillo en varias partes pequeñas, del tamaño que queramos, además en foami de color amarillo marcaremos y recortaremos la ""llama" de la vela, así también tomé unos colores para darle un efecto profundo y un poquito más realista.
With our box already made we are going to decorate, so we take crepe paper and we will make a strip with faralao, which we will glue all around the edge of the bottom with silicone to cover the entire cylinder. Now for the candles we are going to cut our straw in several small parts, the size we want, also in yellow foami we will mark and cut the "flame" of the candle, so I also took some colors to give a deep effect and a little more realistic.
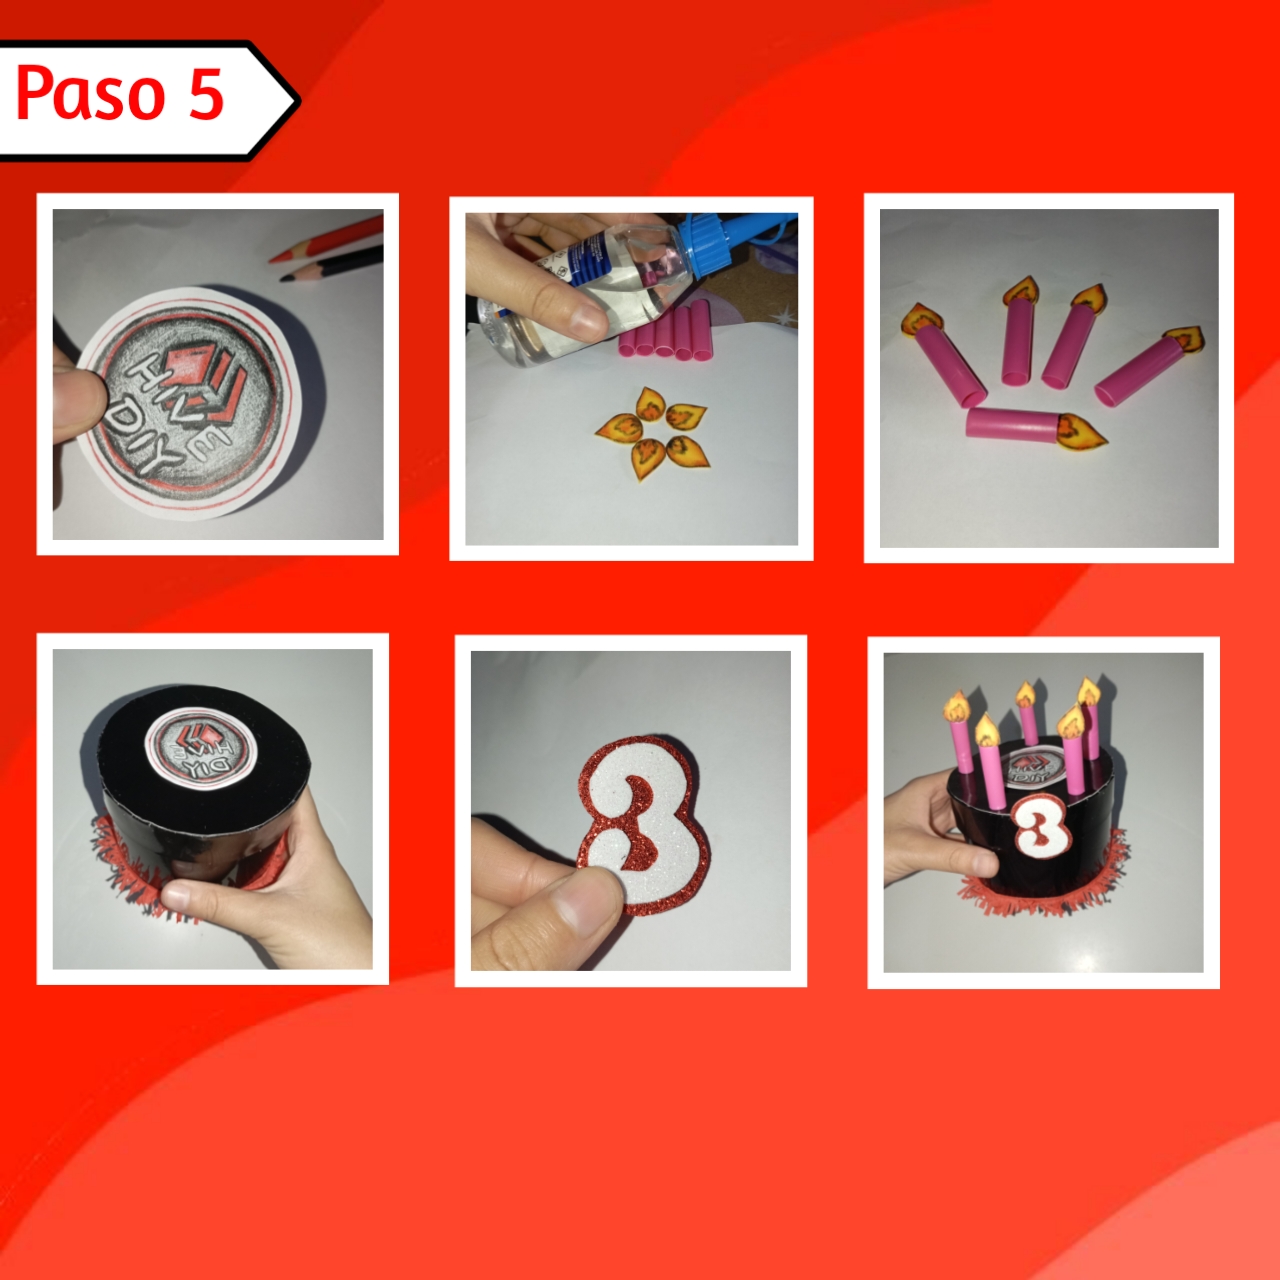
Paso 5:
Step 5:
Continuamos con los detalles finales, así hice un pequeño dibujo a mano del logo de Hive Diy y continúe pegando las llamas a los palitos con silicón para poder formar las velas. Ya teniendo los detalles manuales listos, pegué el logo de la comunidad en el centro de la tapa y seguidamente las velas alrededor, para culminar agregué el número #3 y ya está lista.
We continued with the final details, so I made a small hand drawing of the Hive Diy logo and continued gluing the flames to the sticks with silicone to form the candles. Once I had the manual details ready, I glued the logo of the community in the center of the lid and then the candles around it, to finish I added the number #3 and it's ready.
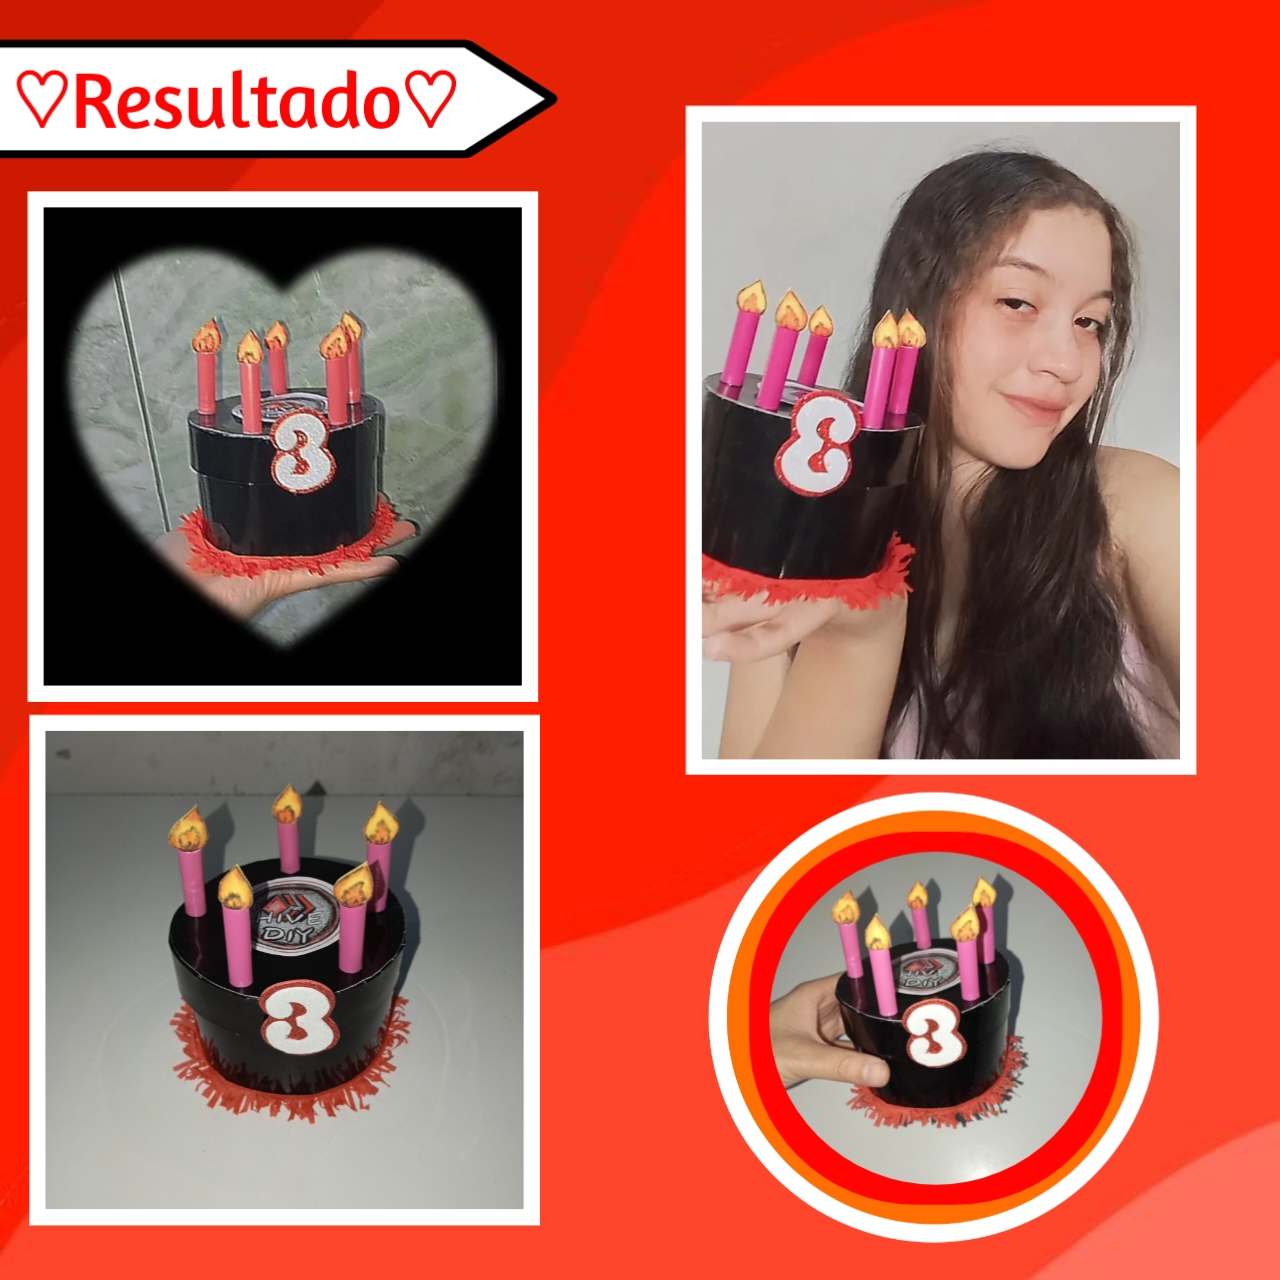
Así es como en unos sencillos pasos podremos tener como resultado una hermosa y funcional caja, que podemos decorar con la temática de nuestra preferencia e incluso la podemos adaptar a cualquier tamaño que deseemos. Es una caja especial en forma de torta (pastel), que junto a un regalo especial es perfecta para obsequiar a los cumpleañeros, en está ocasión, está es para Hive Diy con mucho cariño, espero les guste mucho.🍁✨
This is how in a few simple steps we can have as a result a beautiful and functional box, which we can decorate with the theme of our preference and we can even adapt it to any size we want. It is a special box in the shape of a cake, which together with a special gift is perfect to give to birthday boys and girls, this time, this is for Hive Diy with love, I hope you like it very much.🍁✨
Esto es todo por el DIY de hoy, espero y les haya gustado tanto el resultado como el proceso paso a paso.Me despido con un fuerte abrazo y deseando con emoción unos ¡Felices tres años a Hive Diy! Que sean muchísimos más creando y compartiendo nuestra creatividad en familia.❤️🧡
That's all for today's DIY, I hope you liked both the result and the step by step process, I say goodbye with a big hug and wishing with emotion Happy three years to Hive Diy! May it be many more creating and sharing our creativity as a family.❤️🧡
🍁❤️¡Gracias por leer! Nos vemos luego por aquí❤️🍁
🍁❤️Thanks for reading! See you later❤️🍁
Photos of my authorship taken from my Xiaomi Redmi 13C phone, edited in the free version of PixeLab and Canva
Muy linda tu pastel en forma de caja para celebrar el cumpleaños de nuestra querida comunidad, bello detalle. Éxitos...
!discovery 35
Muchas gracias amiga, también me encantó el pastel que hiciste para la comunidad, quedó espectacular, saludos.❤️
This post was shared and voted inside the discord by the curators team of discovery-it
Join our Community and follow our Curation Trail
Discovery-it is also a Witness, vote for us here
Delegate to us for passive income. Check our 80% fee-back Program
Thanks 🥺❤️
a very nice touch for the community. Thanks for your step by step.
❤️✨
Qué bella caja de regalo, imposible no usarla luego para otra cosa luego, para guardar nuestras cositas... Felicitaciones bella
Graciasss querida, así es, ya tengo planes para ella, me gusta la idea de guardar cositas en una caja con temática de nuestra querida Blockchain.
Saludos y muchas gracias por el apoyo, un abrazo.❤️✨
a community encouraging first-hand content, and each individual living their best life.
🥺❤️
Saludos @stefania16, que lindo detalle la caja es hermosa y un obsequio muy original.
Feliz jueves!
¡Holaa! Muchas gracias por la apreciación, un abrazo e igualmente felíz día.❤️
Esta genial la cajita, bonitamente decorada como un pastel digno para celebrar los 3 años de la comunidad. Me parece muy tierna y deliciosa forma de celebrarlo jeje 🦉❤️
Ciertamente, es con mucho cariño, saludos.💙✨
Que hermosura, de verdad que sino veo el tutorial no me lo creo. Que lindo detalle para celebrar el 3 er aniversario de esta maravillosa comunidad. Y que sean muchísimos años más. 🤗🎉
¡Que así sea! Muchas gracias por su comentario, saludos.🥺💗
Es un regalo que de seguro sorprende por simular con este diseño de cajita lo mas delicioso de una fiesta, la torta, muy ingeniosa esta idea!🎉🥰
Siii, lo mejor es que la podemos personalizar a nuestro gusto, saludos.✨
Te quedó super, me gusta mucho,
Holii, muchas gracias corazón.❤️
Tu caja de regalo fue asombrosa, nos encantó como usaste los colores de la comunidad para poder celebrar ese momento que tuvimos, muchas gracias por este detalle para la comunidad.
Escrito por lionsaturbix / Written by lionsaturbix
¡¡¡Buen trabajo!!! Gracias por publicar tu excelente contenido en Hive Diy.
¡Muchísimas gracias por apreciarlo! Fue un placer, un pequeño detalle con mucho amor, saludos.❤️✨