Hello to all my creative Hive Diy friends! I'm happy to be here again with my weekly post, I wish you a happy and blessed Friday, as well as the rest of the week, full of productivity, creativity and lots of new ideas.♡
El día de hoy les traigo una tarjeta en 3D plegable fácil y rápida de hacer, especial para acompañar con cualquier regalo y sorprender con ello, nada mejor que una linda tarjeta creativa, llena de sorpresas y mucho cariño. Así mismo, es totalmente personalizada, por lo que pueden hacerla del color que quieran, al igual que los dibujos y el mensaje, todo es a su elección, ahora con mucho gusto les mostraré el paso a paso para que puedan sorprender con una espectacular tarjeta, útil en cualquier ocasión.
Today I bring you a 3D folding card easy and quick to make, especially to accompany any gift and surprise with it, nothing better than a nice creative card, full of surprises and lots of love. Likewise, it is fully customized, so you can make it in the color you want, as well as the drawings and the message, everything is your choice, now I will gladly show you the step by step so you can surprise with a spectacular card, useful on any occasion.
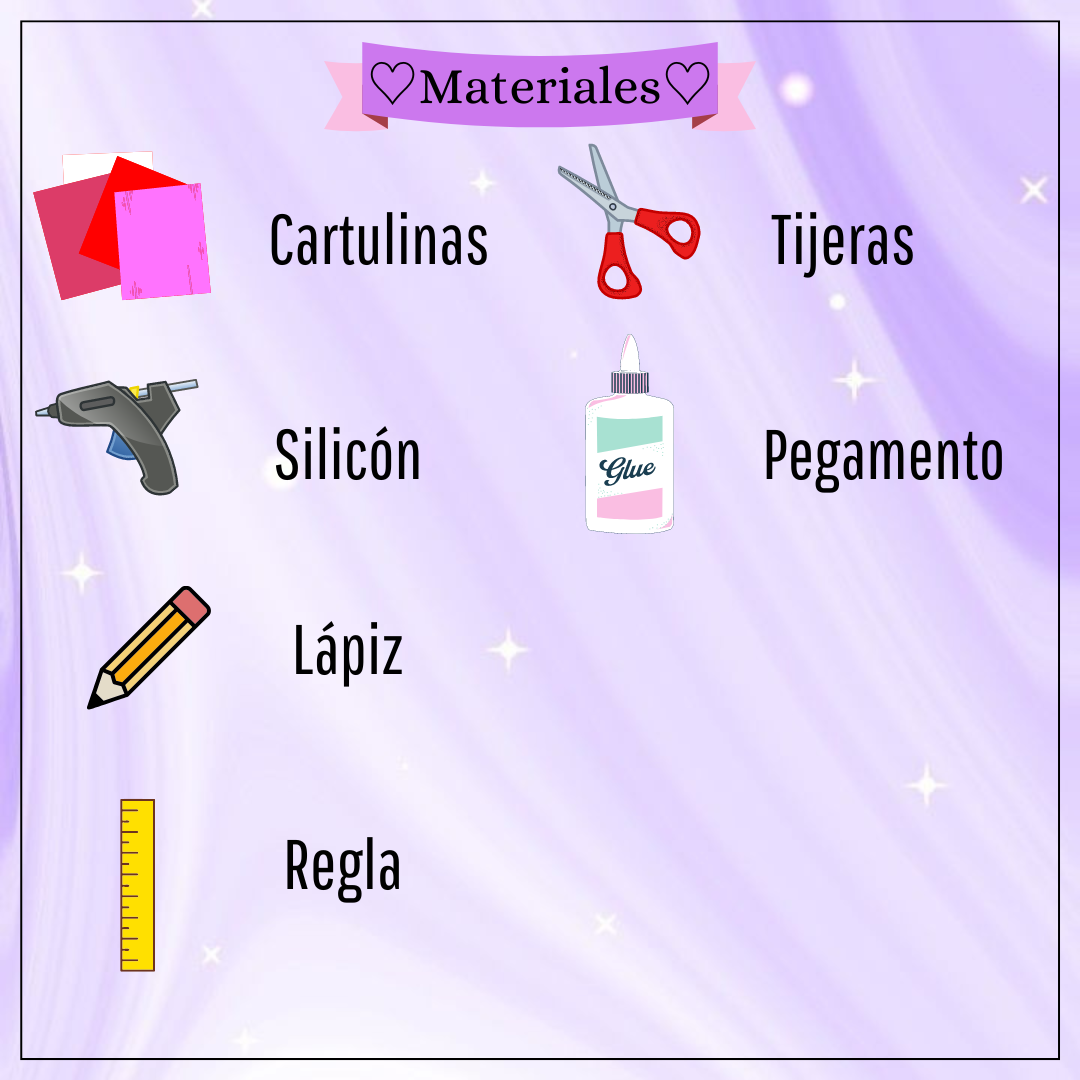
♡Materials♡
- Cartulina de color a nuestra elección
- Cartulina decorativa
- Pegamento o silicón
- Marcadores y colores
- Lápiz
- Tijera
- Regla
- Color cardboard of our choice
- Decorative cardboard
- Glue or silicone
- Markers and colors
- Pencil
- Scissors
- Rule
Step by step
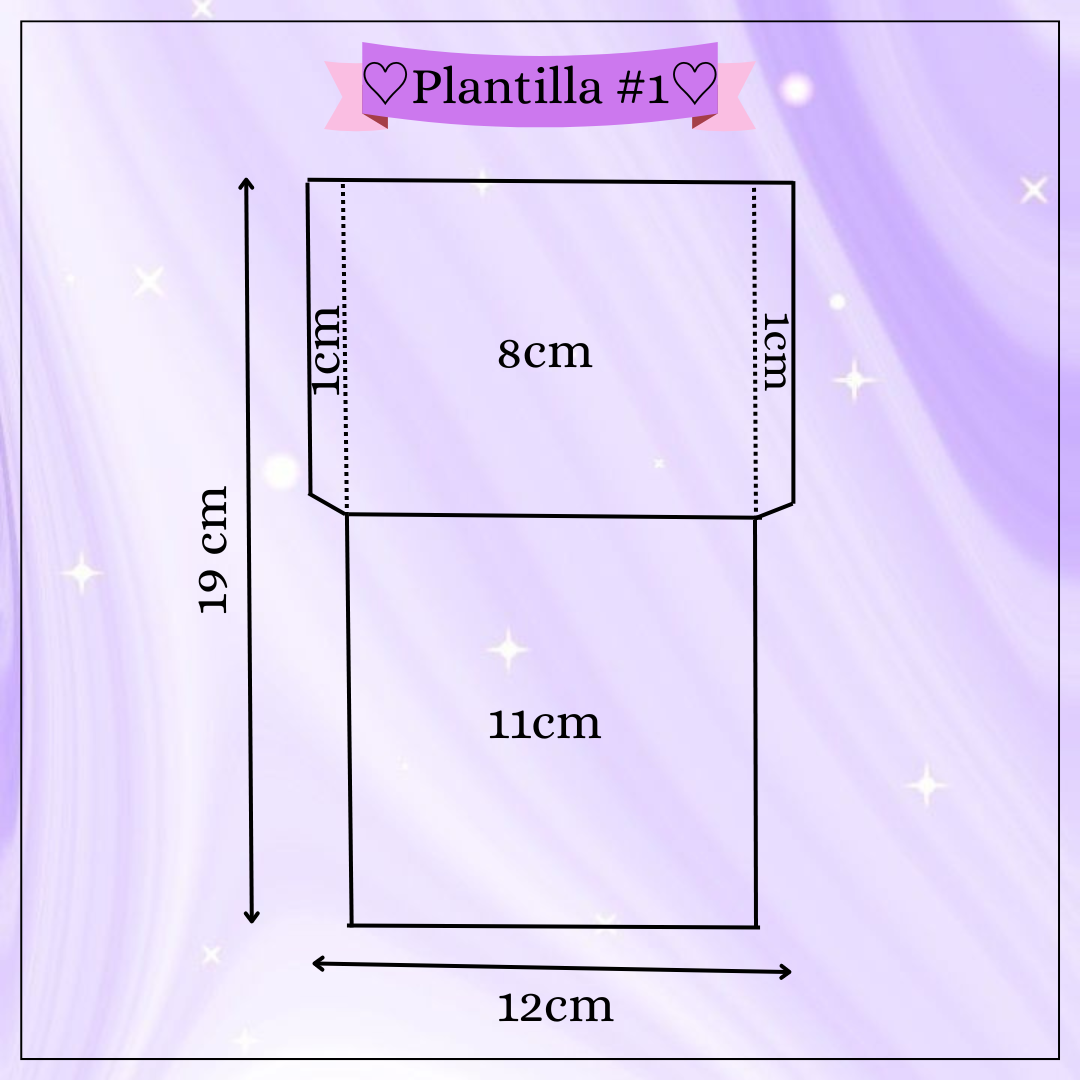
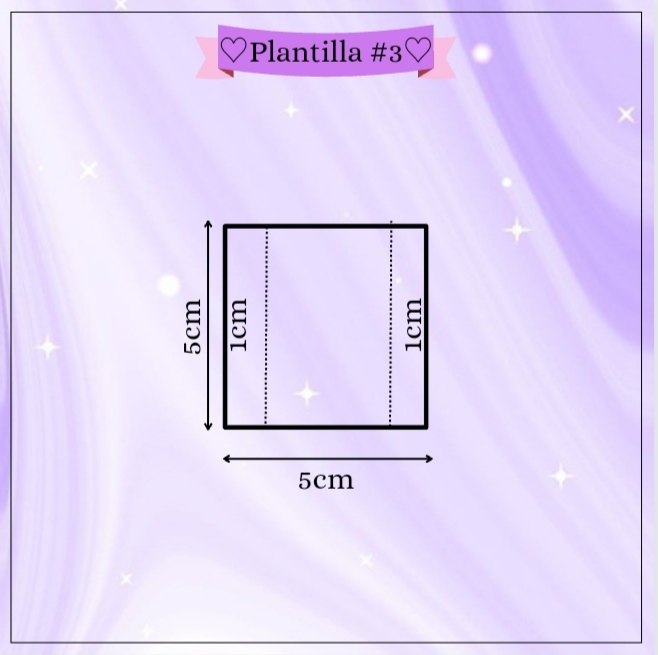
Antes de empezar les dejaré las planillas para que se guíen mejor, de igual manera les muestro como hacerlas a continuación.♡
Before I start, I will leave you with the templates to guide you, but I will also show you how to make them below.♡
Paso 1:
Step 1:
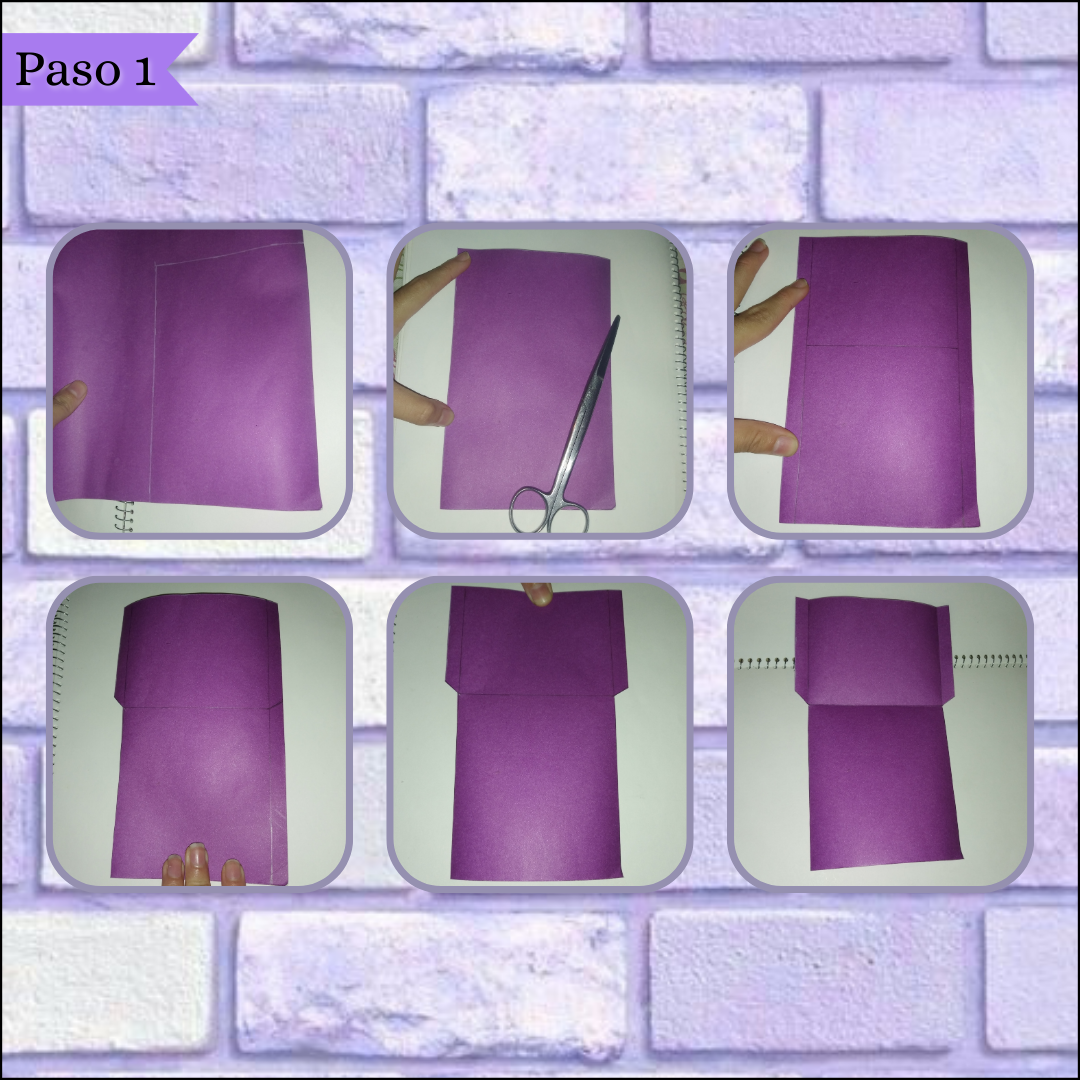
Para comenzar con nuestra primera pieza, vamos a recortar un rectángulo de nuestra cartulina unicolor de 19cm x 12cm, en el cuál de inmediato marcamos una línea de 1cm a cada lado y hacemos un dobles justo a los 8cm de largo en manera horizontal, quedando del otro lado 11cm de largo. Ahora con la ayuda de una regla y un lápiz vamos a marcar una pequeña diagonal a cada lado del rectángulo en la separación de 1cm, dónde nuestro punto de partida será el dobles y apuntaremos está línea un poco hacía arriba, así de cada lado, para luego recortar el excedente desde abajo y solo dejar esas solapas arriba.
To start with our first piece, we are going to cut a rectangle of our unicolor cardboard of 19cm x 12cm, in which we immediately mark a line of 1cm on each side and make a double just at 8cm long horizontally, leaving the other side 11cm long. Now with the help of a ruler and a pencil we are going to mark a small diagonal on each side of the rectangle in the separation of 1cm, where our starting point will be the double and we will point this line a little upwards, so on each side, and then cut the excess from below and just leave those flaps up.
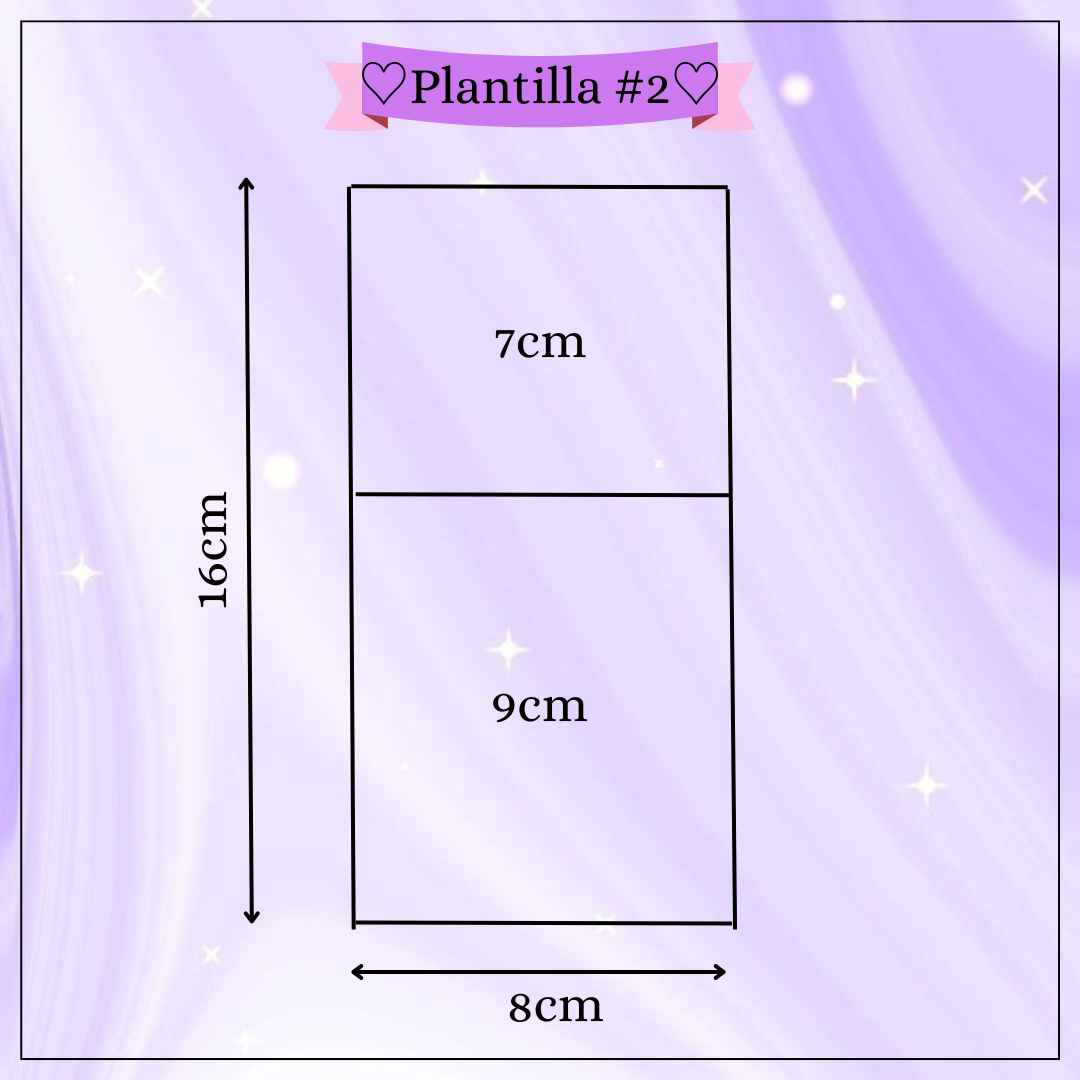
Paso 2:
Step 2:
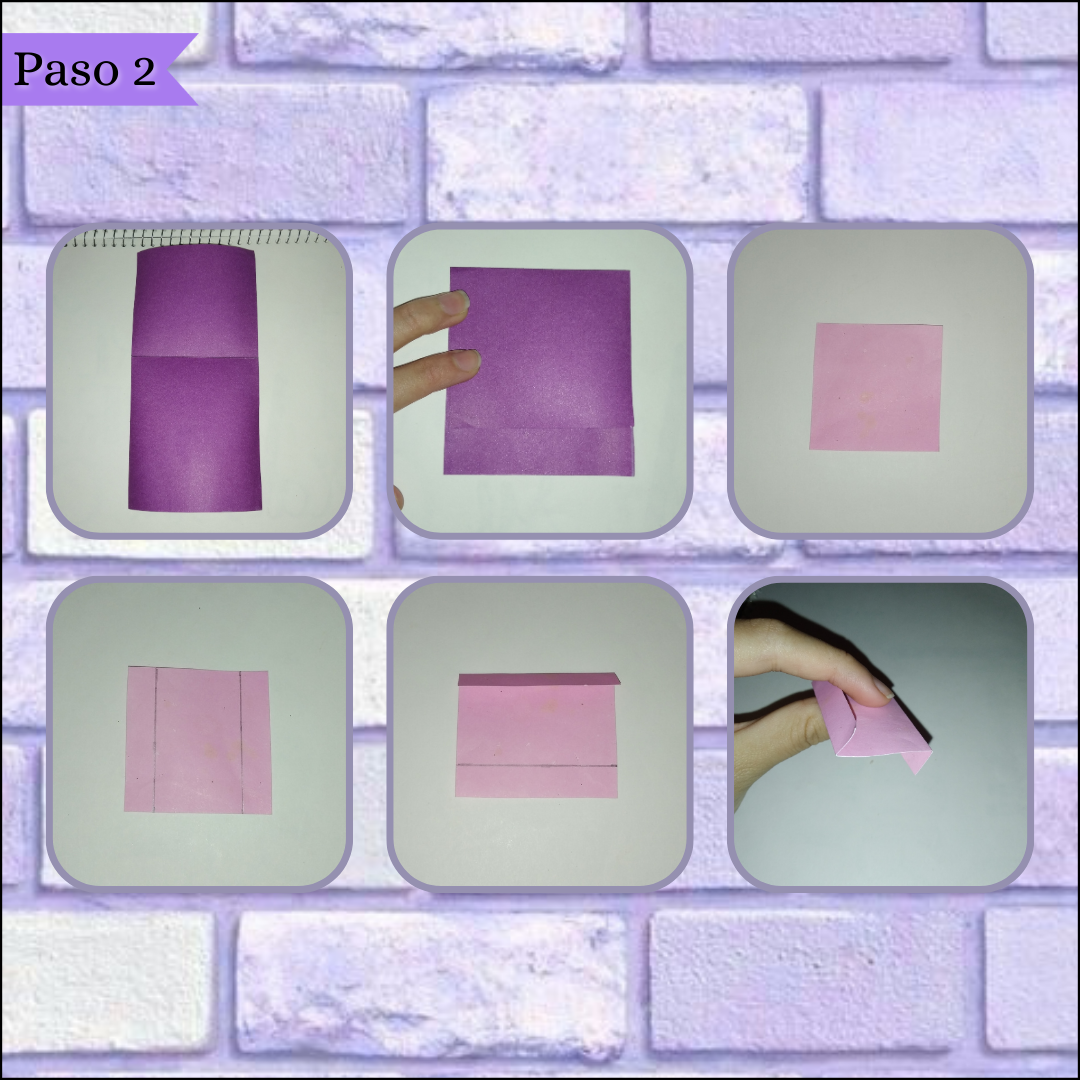
Ahora bien, vamos con la segunda pieza, para hacerla comenzaremos recortando otro rectángulo, está vez de 16cm x 8cm, luego para continuar haremos un dobles nuevamente, pero está vez a los 7cm de largo, igualmentemente con una línea horizontal, quedando del otro lado 9cm de largo. Proseguimos a hacer nuestra última pieza, la más pequeña, dónde solo necesitamos cualquier trozo de cartulina dura o algún cartón delgado, en está recortaremos un simple cuadrado de 5cm x 5cm, para luego hacer en ambos lados una línea de 1cm de ancho y por último con el apoyo de una regla, pasamos la punta de una tijera en estás líneas para hacer el dobles, así podremos una hacía atrás y otra hacía delante, para formar está última pieza que se puede observar en la imágen, está es la pieza que hará la magia y se mantendrá en movimiento, por lo que debe ser un poco resistente.
Now, let's go with the second piece, to make it we will start cutting another rectangle, this time of 16cm x 8cm, then to continue we will make a double again, but this time at 7cm long, equally with a horizontal line, leaving on the other side 9cm long. We continue to make our last piece, the smallest, where we only need any piece of hard cardboard or thin cardboard, in this we will cut a simple square of 5cm x 5cm, and then make on both sides a line of 1cm wide and finally with the support of a ruler, We pass the tip of a scissors on these lines to make the double, so we can one back and one forward, to form this last piece that can be seen in the image, this is the piece that will do the magic and will keep moving, so it must be a little resistant.
Paso 3:
Step 3:
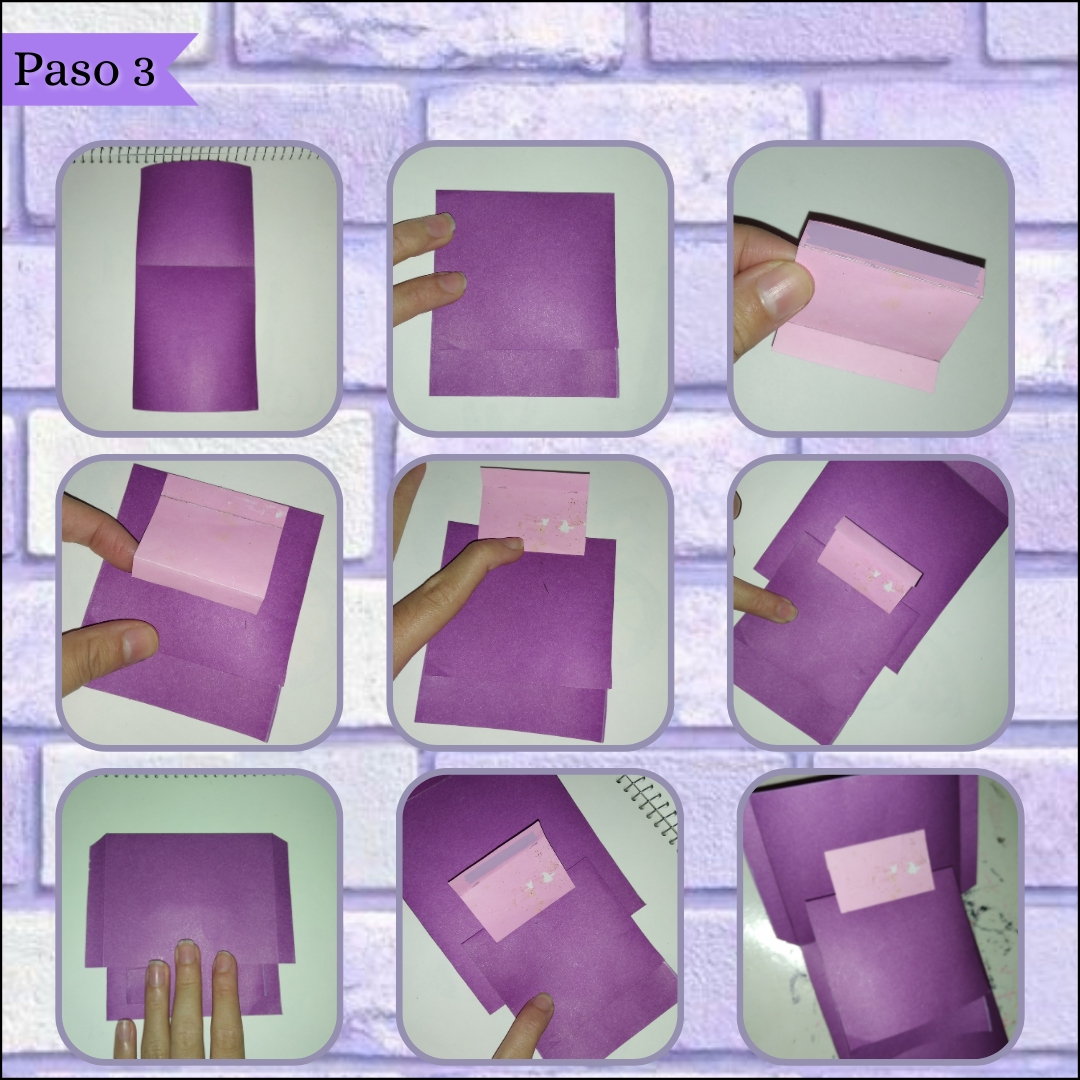
A continuación empezaremos el armado de la tarjeta, vamos a tomar la segunda pieza y doblamos completamente justo por la línea de este, teniendo así una separación más larga que otra, o sea dos, luego tomamos nuestra pieza más pequeña y la tendremos como se muestra en la imágen, para así agregar silicón en la solapa de arriba y pegar en la segunda pieza justo al borde de está, de manera centrada. Después el restante lo acomodamos hasta arriba, para tomar la pieza grande y unir ambas, nos guiaremos alineando la línea de la solapa de la pieza con el borde de la pieza grande, centrando está y agregando silicón solo en la última solapa que resta de 1cm, para culminar con el armado solo faltaría esparcir silicón en las solapas que quedan arriba y pegar cuidadosamente hacía adentro.
Next we will begin the assembly of the card, we will take the second piece and fold it completely along the line of this one, thus having a longer separation than the other, that is two, then we take our smaller piece and we will have it as shown in the image, to add silicone on the top flap and glue on the second piece just to the edge of this one, in a centered way. Then the remaining piece is placed on top, to take the large piece and join both, we will be guided by aligning the line of the flap of the piece with the edge of the large piece, centering it and adding silicone only on the last remaining flap of 1cm, to finish with the assembly we only need to spread silicone on the flaps that remain above and glue carefully inward.
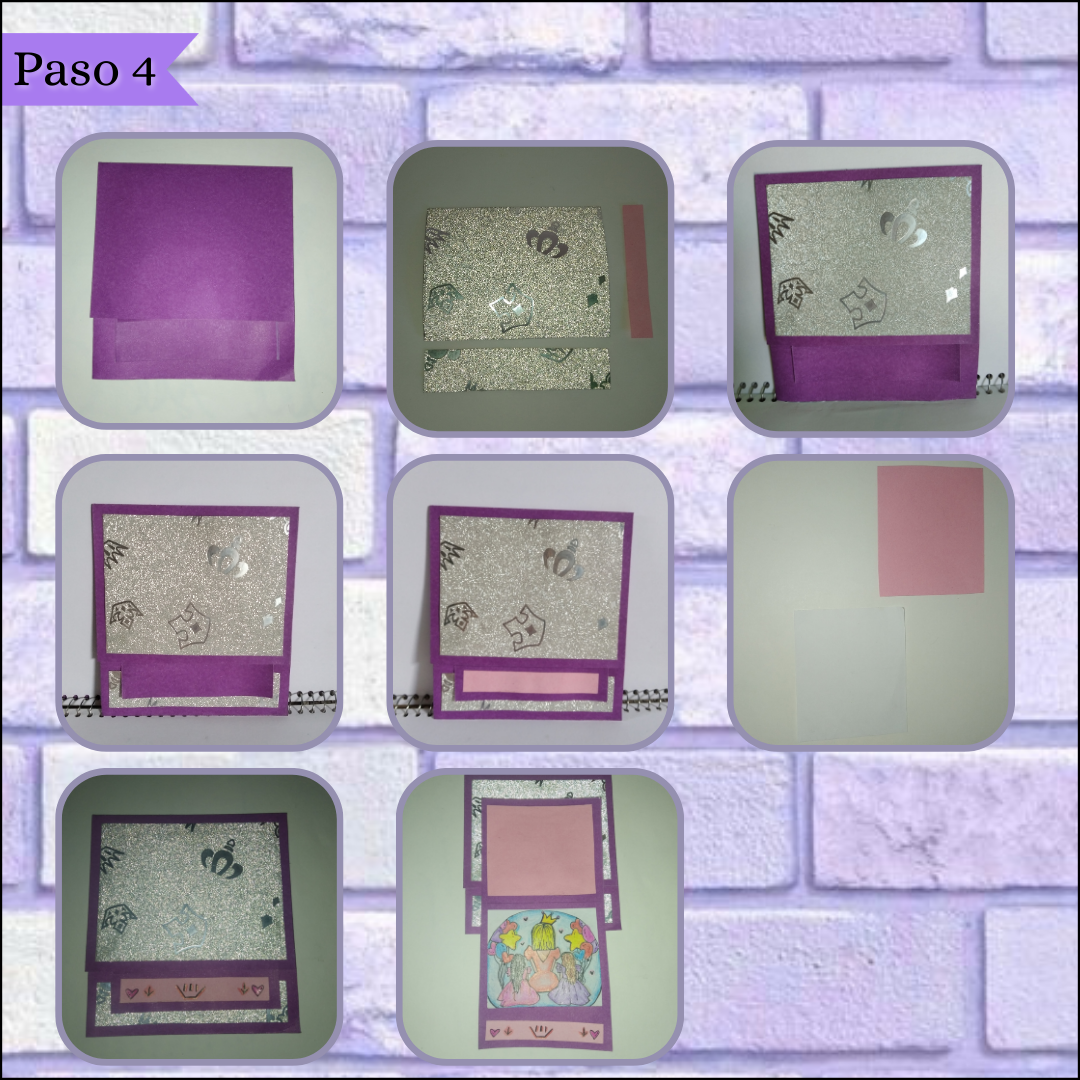
Paso 4:
Step 4:
Como último paso, para decorar, recortaremos en la cartulina decorada un tipo de rectángulo un medio centímetro menos del que se ve en la parte de arriba, así haremos exactamente lo mismo con las otras piezas, dónde nos resta un rectángulo largo y pequeño para jalar y otro rectángulo largo un poco más grande. Ahora bien, para anexar nuestro mensaje especial recortaremos dos cuadrados nuevamente un medio centímetro más pequeño que los cuadrados de la parte de adentro, estos en cualquier color, por último podemos agregar dibujos o lo que queramos y vamos a pegar con silicón muy bien, para culminar en la parte de afuera donde se va a jalar, colocaremos una flecha hacía abajo que indiqué jalar.
As a last step, to decorate, we will cut in the decorated cardboard a kind of rectangle a half centimeter less than the one you see on the top, so we will do exactly the same with the other pieces, where we have a long and small rectangle to pull and another long rectangle a little bit bigger. Now, to attach our special message we will cut two squares again a half centimeter smaller than the squares on the inside, these in any color, finally we can add drawings or whatever we want and we will paste with silicone very well, to finish on the outside where it will be pulled, we will place an arrow down to indicate pull.
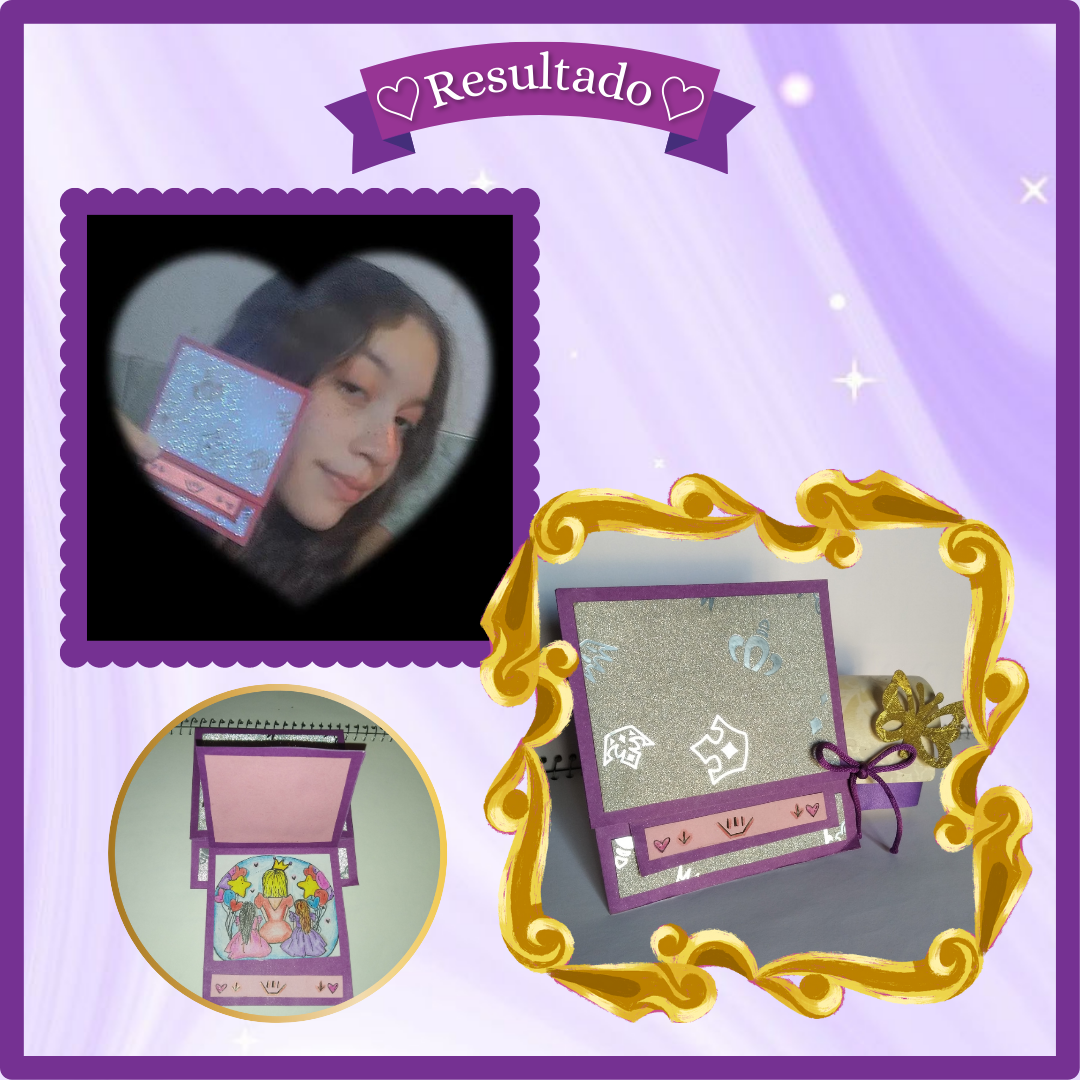
¡Y listo! De manera fácil, rápida y sencilla tenemos lista nuestra tarjeta 3D plegable, que solamente consta de jalar y se muestra la sorpresa, es perfecta para obsequiar a alguna persona especial, una tarjeta única y creativa, que sin duda les puede sorprender y encantar a muchos, sobre todo porque es personalizada y hecha a mano con mucho amor por nosotros mismos, así que anímense a sorprender y regalar algo totalmente diferente y especial, es una idea perfecta para marcar la diferencia.♡
And that's it! In an easy, quick and simple way we have ready our 3D folding card, which only consists of pulling and the surprise is shown, it is perfect to give to a special person, a unique and creative card, which certainly can surprise and delight many, especially because it is personalized and handmade with love by ourselves, so be encouraged to surprise and give something totally different and special, it is a perfect idea to make a difference.♡
Y ya estoy es todo por la manualidad del día de hoy, porsupuesto me complace compartir con ustedes este lindo tutorial sencillo y un poco rápido, espero que puedan recrearlo y hacerlo como más les guste, les agradezco por acompañarme en esta nueva oportunidad y terminó para despedirme, deseándoles un gran fin de semana al igual que un excelente comienzo de semana ¡Que tengan días bendecidos! Adiós mis queridos lectores.♡
And that's it for today's craft, of course I am pleased to share with you this nice, simple and a little quick tutorial, I hope you can recreate it and do it as you like, I thank you for joining me in this new opportunity and finished to say goodbye, wishing you a great weekend as well as an excellent start of the week Have blessed days! Goodbye my dear readers.♡
Gracias por leer.♡
Thank you for reading.♡
Photos of my authorship taken from my Xiaomi Redmi 7 phone, edited in the free version of Canva.
@tipu curate
Upvoted 👌 (Mana: 45/55) Liquid rewards.
Graciass✨
Muchas gracias 💗
Congratulations @stefania16! You have completed the following achievement on the Hive blockchain And have been rewarded with New badge(s)
Your next target is to reach 70 posts.
You can view your badges on your board and compare yourself to others in the Ranking
If you no longer want to receive notifications, reply to this comment with the word
STOPTo support your work, I also upvoted your post!
Check out our last posts:
Support the HiveBuzz project. Vote for our proposal!
De maravilla, vamos por muchas más ✨🧡
De nada @stefania16.
Por cierto, también necesitamos tu ayuda. ¿Podemos pedirle que apoye nuestra propuesta para que nuestro equipo pueda continuar con su trabajo?
Puedes hacerlo en peakd, ecency,
https://peakd.com/me/proposals/248
¡Muchas gracias!
Muy lindo tu trabajo amiga @stefania16 felicidades y muchos éxito.
Hola, muchas gracias, saludos ✨
Qué hermosa tarjeta!! 🌷 me encanta el efecto que hace cuando se abre!! Te felicito por esta idea tan interesante🌸
Gracias, contiene una linda sorpresa 💗, muchas gracias, saludos.❤️✨