Good afternoon my dear creative Hive Diy family! Have a nice and blessed start of the week, I hope this week is going great for you, may it be a greatly blessed and productive week, full of good things, also of creativity, happiness and lots of health for each one.♡
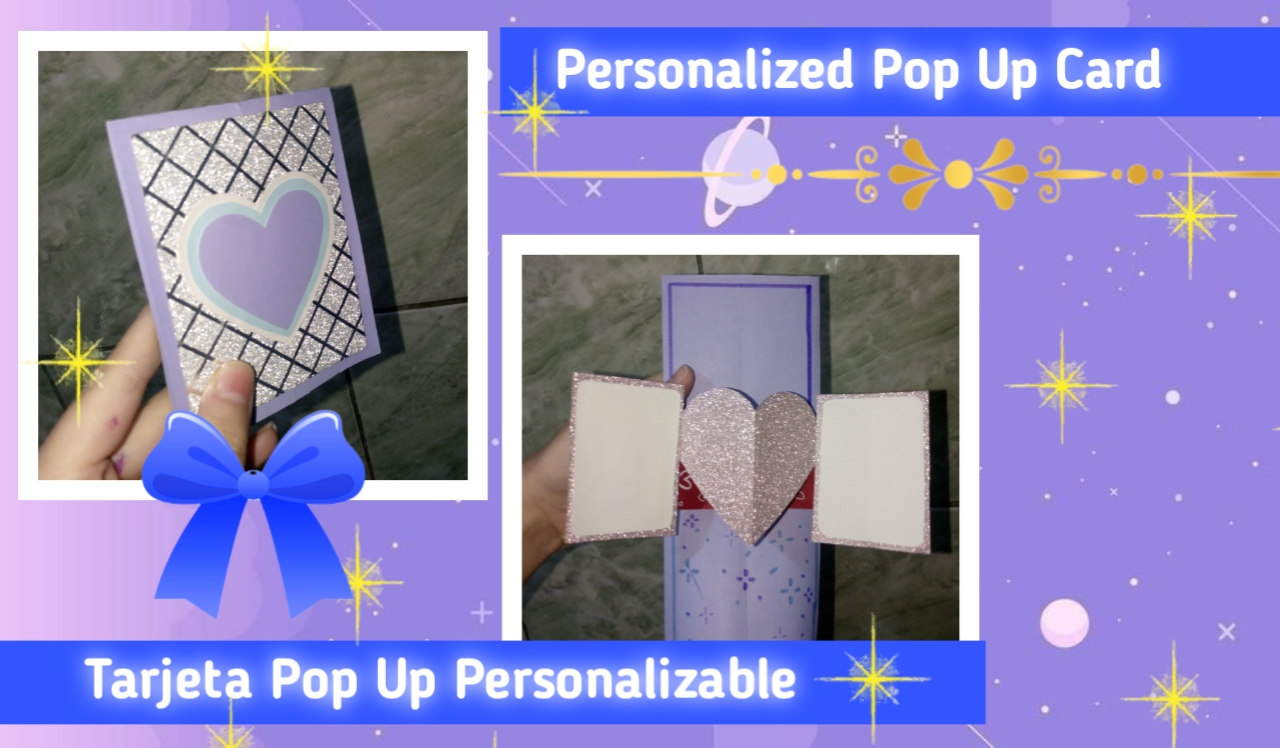
Sean bienvenidos a una nueva manualidad, está vez les traigo el tutorial de cómo hacer una hermosa tarjeta Pop Up personalizada, porque no hay nada mejor que recibir un regalo con una linda tarjeta, es la mejor compañía para un regalo, hace la sorpresa aún más única y especial, sobre todo si la hacemos nosotros mismos e incluye valor sentimental para nuestros seres queridos. Así, les traigo un paso a paso del proceso que realicé para obtener está hermosa tarjeta como resultado, a continuación.
Welcome to a new craft, this time I bring you the tutorial on how to make a beautiful personalized Pop Up card, because there is nothing better than receiving a gift with a nice card, it is the best company for a gift, it makes the surprise even more unique and special, especially if we make it ourselves and includes sentimental value for our loved ones. So, I bring you a step by step process I did to get this beautiful card as a result, below.
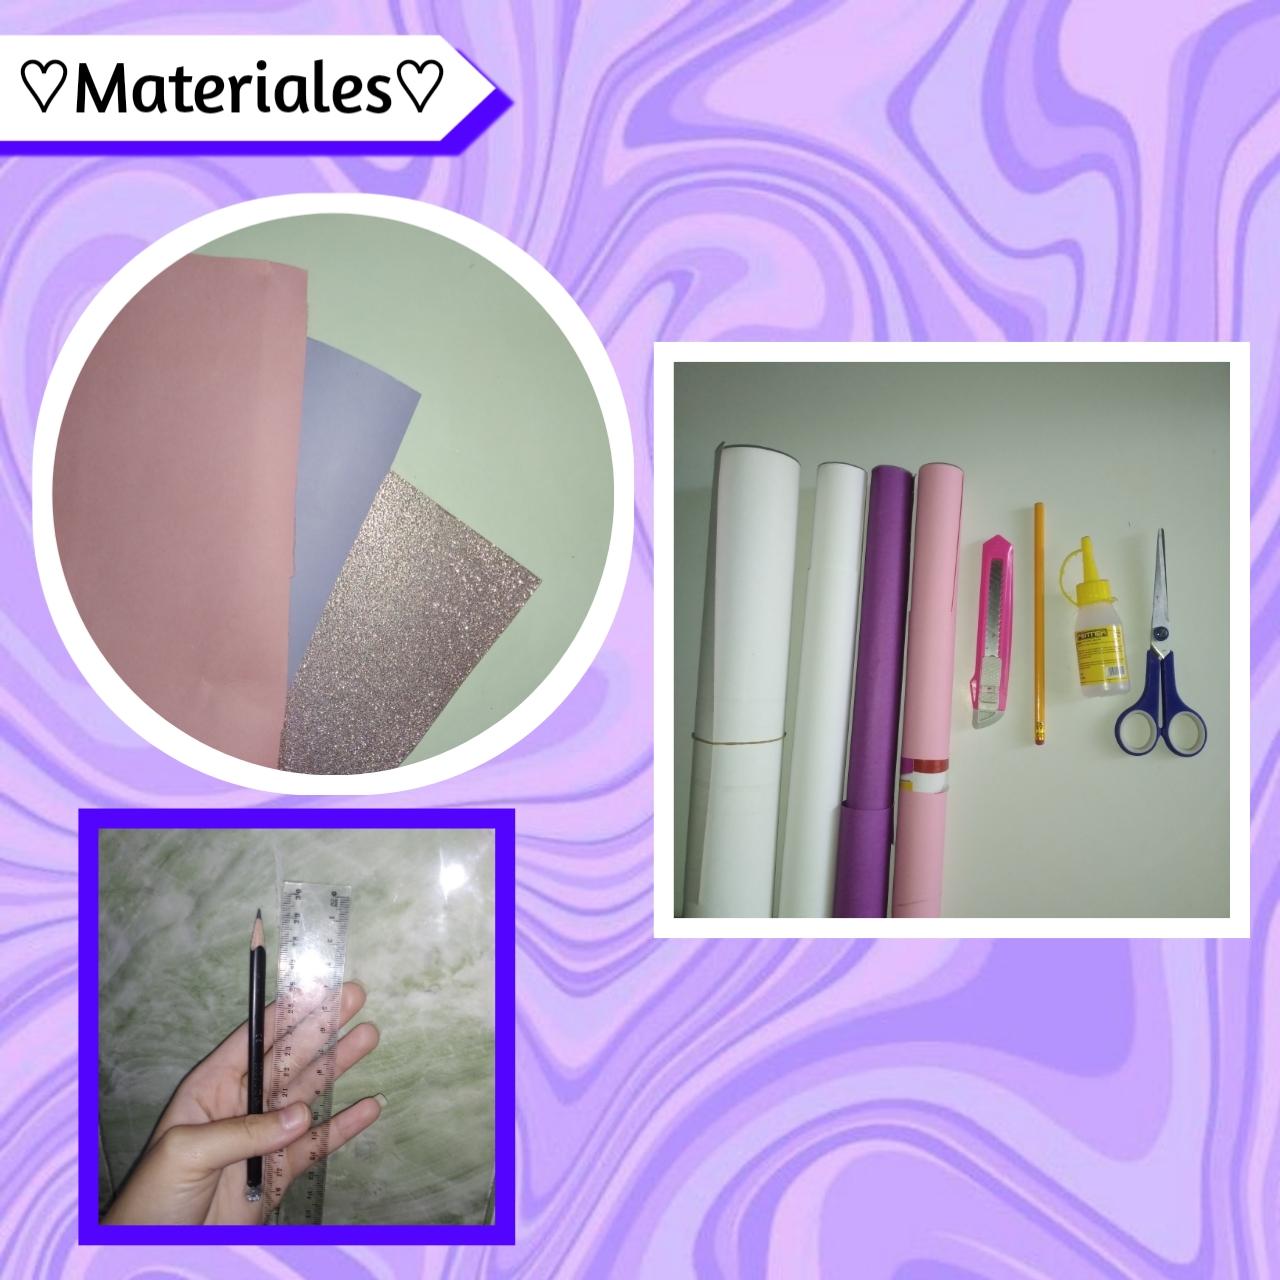
♡✨📑 Materials📑✨♡
- Cartulinas
- Silicón
- Cinta doble cara
- Regla
- Lápiz
- Tijeras
- Cardboard
- Silicone
- Double-sided tape
- Ruler
- Pencil
- Scissors
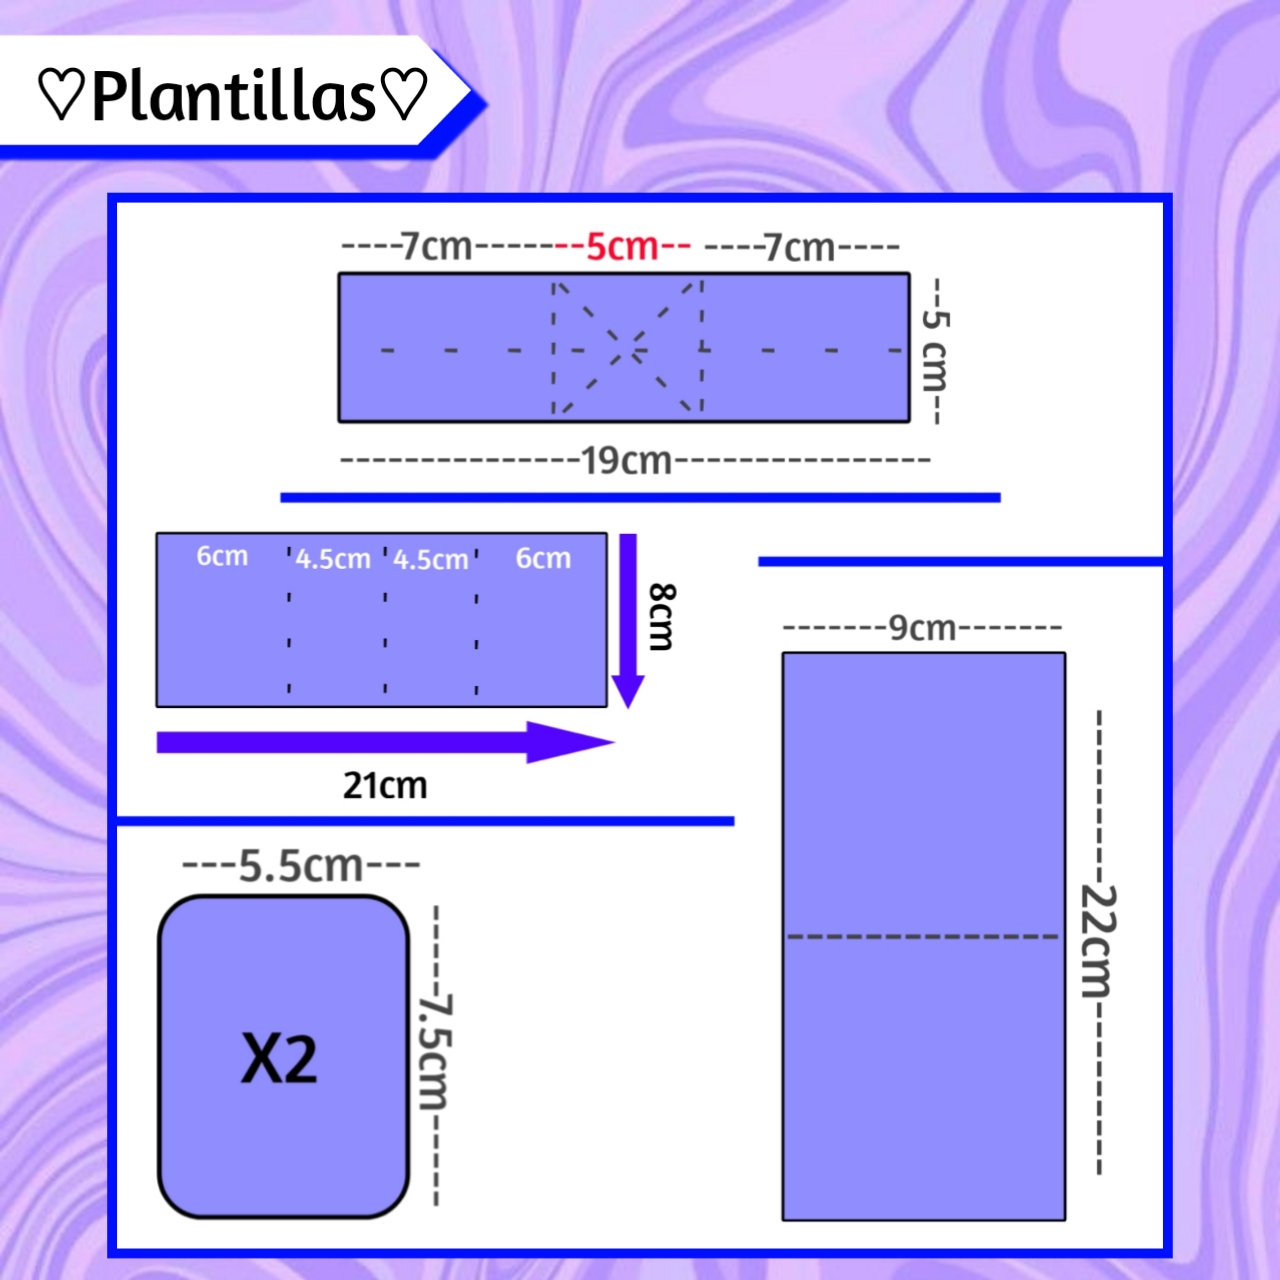
♡💜💙Templates💙💜♡
♡📌📎Step by Step📎📌♡
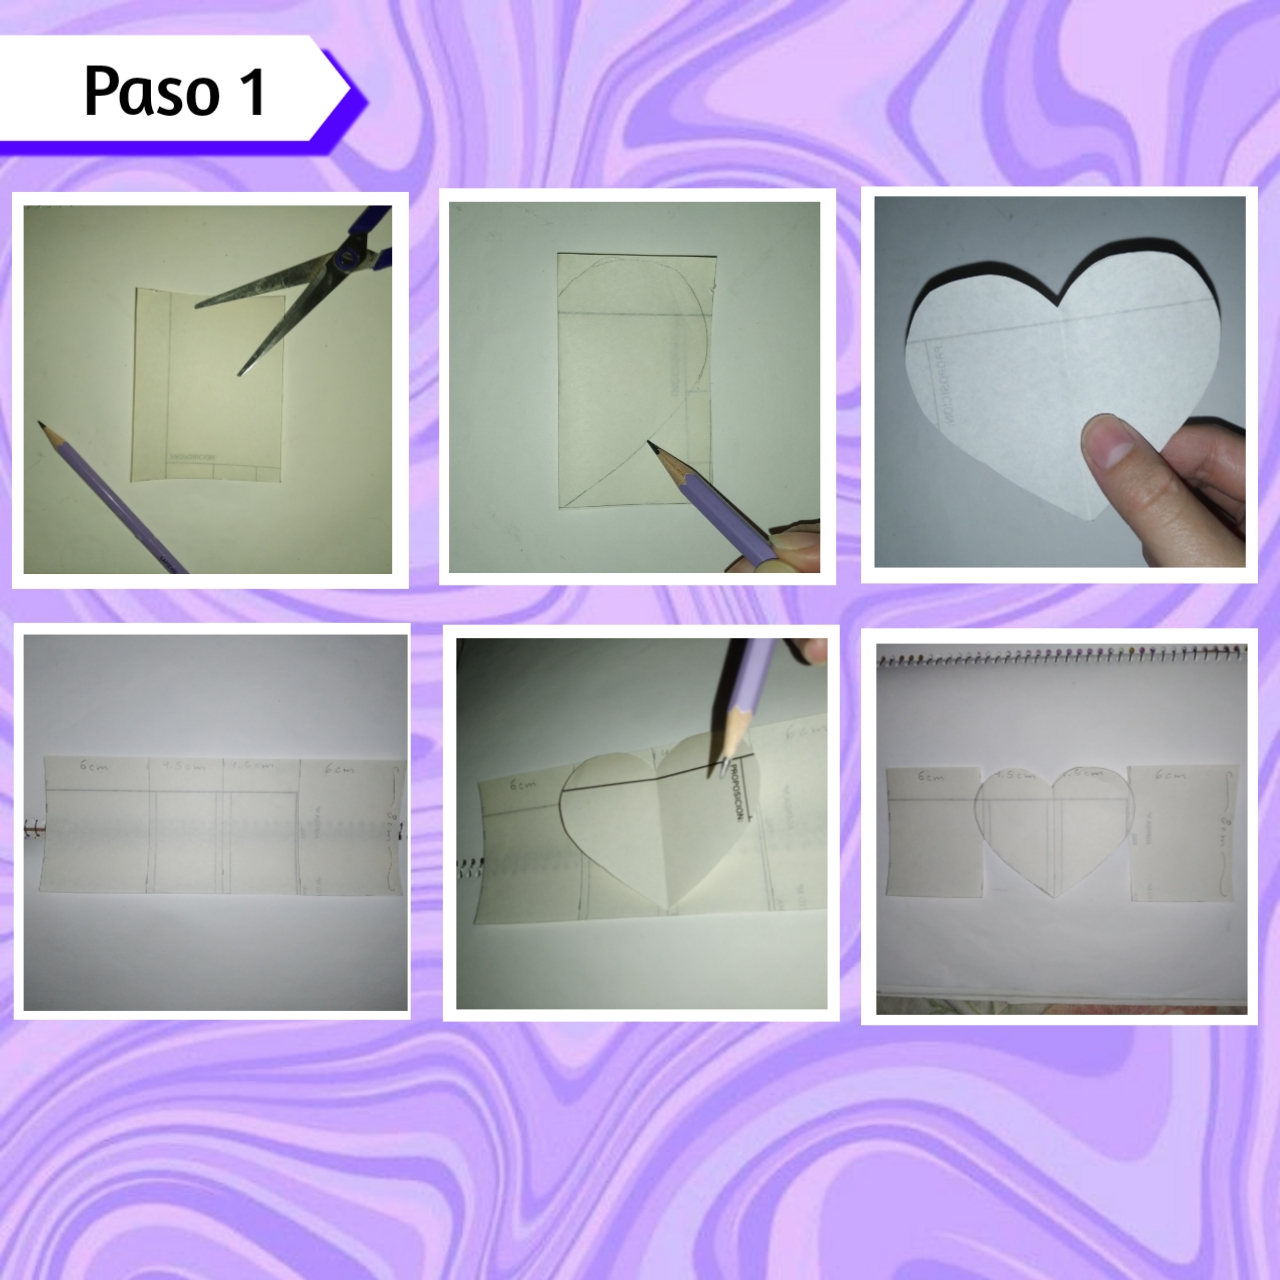
Paso 1:
Step 1:
Para empezar debemos sacar un corazón mediante a cierta medida, así marque y recorte un rectángulo en papel, con una medida de 10cm x 8cm, el cuál doble justo a la mitad (a los 5cm), luego tomé un lápiz y dibuje toda la mitad del corazón, también la recorte con ayuda de una tijera, hasta obtener el corazón completo. Por otro lado volví a marcar un rectángulo, pero está vez más alargado, con las medidas de: 21cm x 8cm, el cuál tiene dobleces en ambas esquinas de 6cm a cada lado, y en el medio se divide a la mitad quedando en el centro, dos divisiones de 4.5cm, igualmente les dejé las plantillas al principio.
To start we must draw a heart by a certain measure, so mark and cut out a rectangle on paper, with a measure of 10cm x 8cm, which fold right in half (at 5cm), then I took a pencil and drew the entire half of the heart, also cut it with the help of scissors, to get the whole heart. On the other hand I marked a rectangle again, but this time more elongated, with the measures of: 21cm x 8cm, which has folds in both corners of 6cm on each side, and in the middle is divided in half leaving in the center, two divisions of 4.5cm, also I left the templates at the beginning.
Continuamos tomando el corazón y colocándolo encima de este rectángulo justo en el centro, alineando este con la división de en medio, marcamos con un lápiz el contorno del corazón y se recorta la los extremos de el medio, como pueden ver en la imágen, está será nuestra plantilla.
We continue taking the heart and placing it on top of this rectangle right in the center, aligning it with the division in the middle, we mark with a pencil the outline of the heart and cut the ends of the middle, as you can see in the image, this will be our template.
Paso 2:
Step 2:
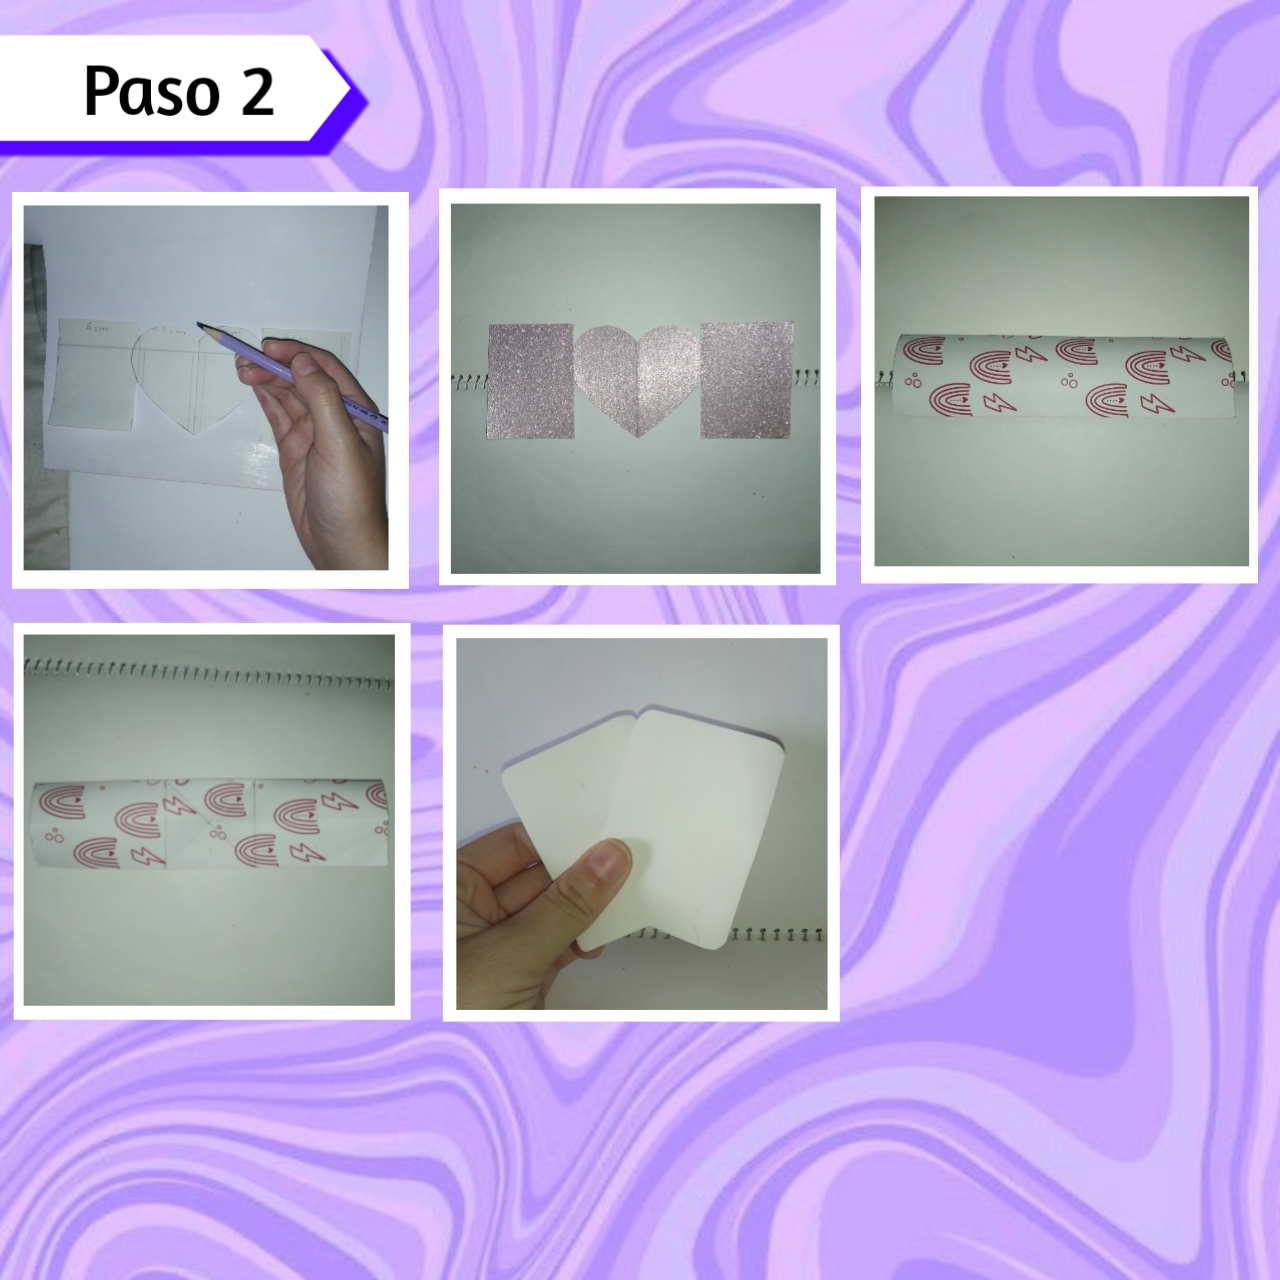
Tomamos una cartulina, yo en este caso utilicé una de color rosa escarchada, le di la vuelta y encima le ponemos la plantilla anterior, así con la ayuda de nuestro lápiz marcaremos toda está figura y también recortaremos con la tijera muy bien. Continuamos recortando un rectángulo de 5cm de ancho por 19cm de largo, así en los extremos haremos un dobles de 7cm a cada lado, permitiendo que quede 5cm en el medio, en el cuál haremos dos dobleces diagonales. También haremos dos rectángulos pequeños de 5.5cm x 7.5cm, a estos le recortaremos un poco los bordes o como prefieran.
We take a cardboard, in this case I used a frosted pink one, turn it over and put the previous template on top, so with the help of our pencil we will mark all this figure and we will also cut with the scissors very well. We continue cutting a rectangle of 5cm wide by 19cm long, so at the ends we will make a double of 7cm on each side, allowing 5cm in the middle, in which we will make two diagonal folds. We will also make two small rectangles of 5.5cm x 7.5cm, to these we will trim the edges a little or as you prefer.
Paso 3:
Step 3:
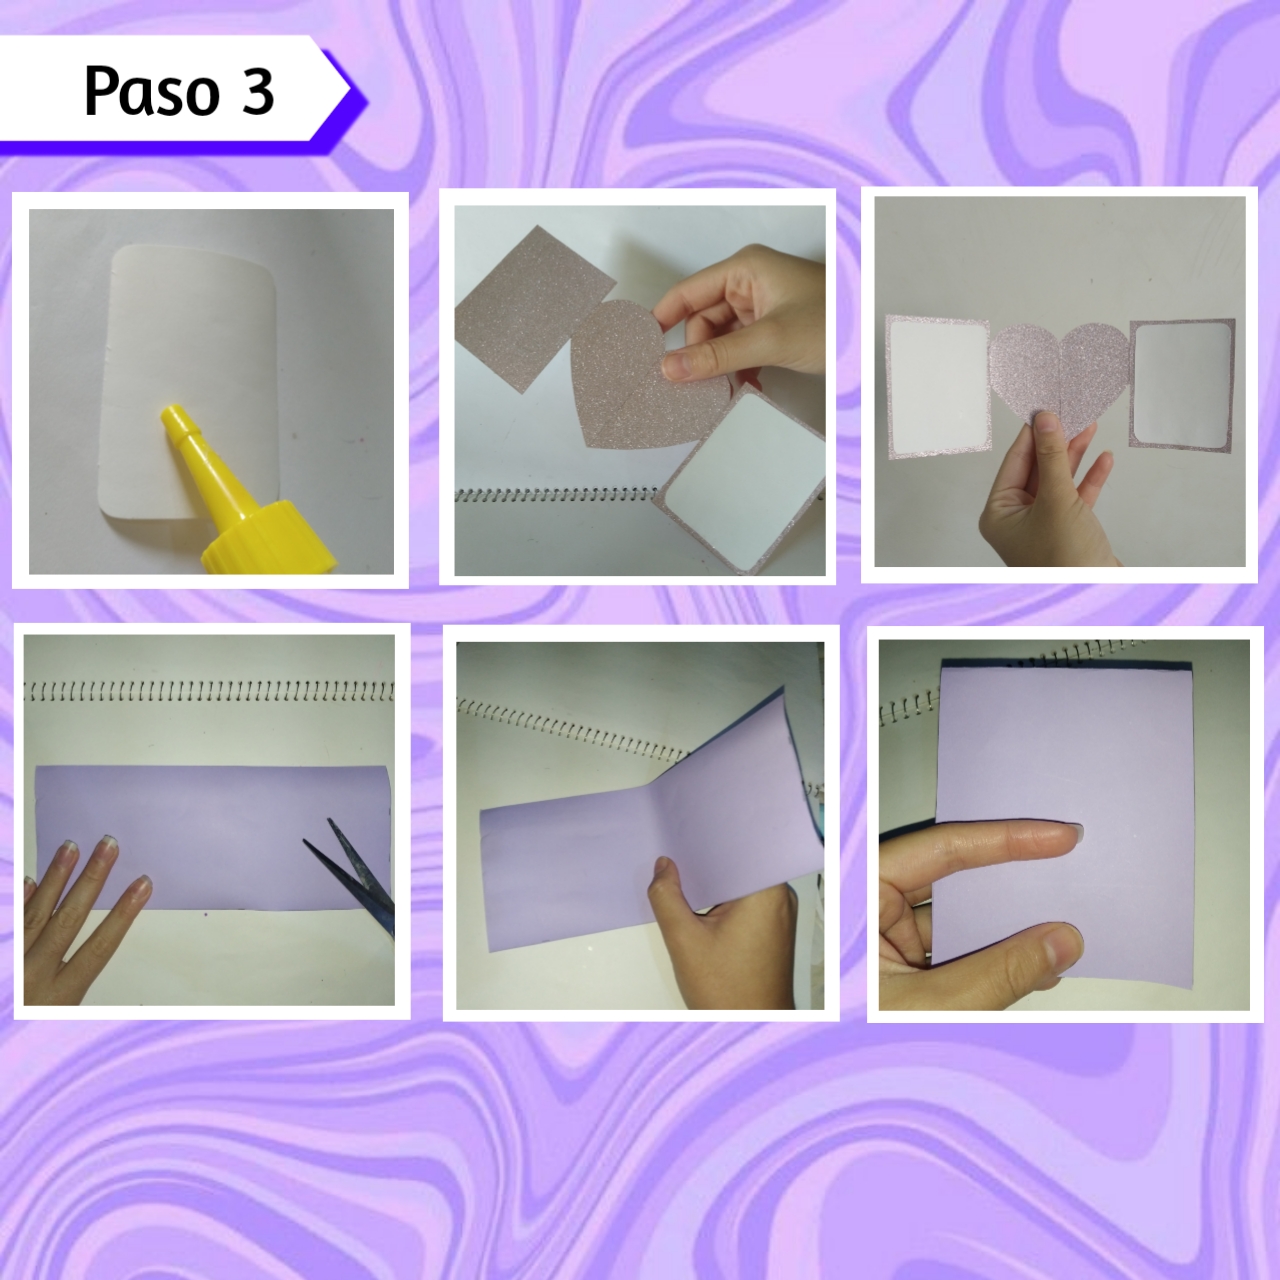
Ahora bien, vamos a tomar los rectángulos anteriores, así tomaremos nuestro silicón y agregaremos este por una de las caras del rectángulo, lo esparcimos y seguidamente pegaremos uno en cada rectángulo de la pieza del corazón, centrando y dejando un espacio similar a cada lado. Después con cartulina nuevamente vamos a marcar y recortar un rectángulo de 9cm x 22cm, así este lo vamos a doblar justo a la mitad muy bien.
Now, we are going to take the previous rectangles, so we will take our silicone and add it on one of the sides of the rectangle, spread it and then glue one on each rectangle of the heart piece, centering and leaving a similar space on each side. Then with cardboard again we will mark and cut out a rectangle of 9cm x 22cm, this way we will fold it right in the middle very well.
Paso 4:
Step 4:
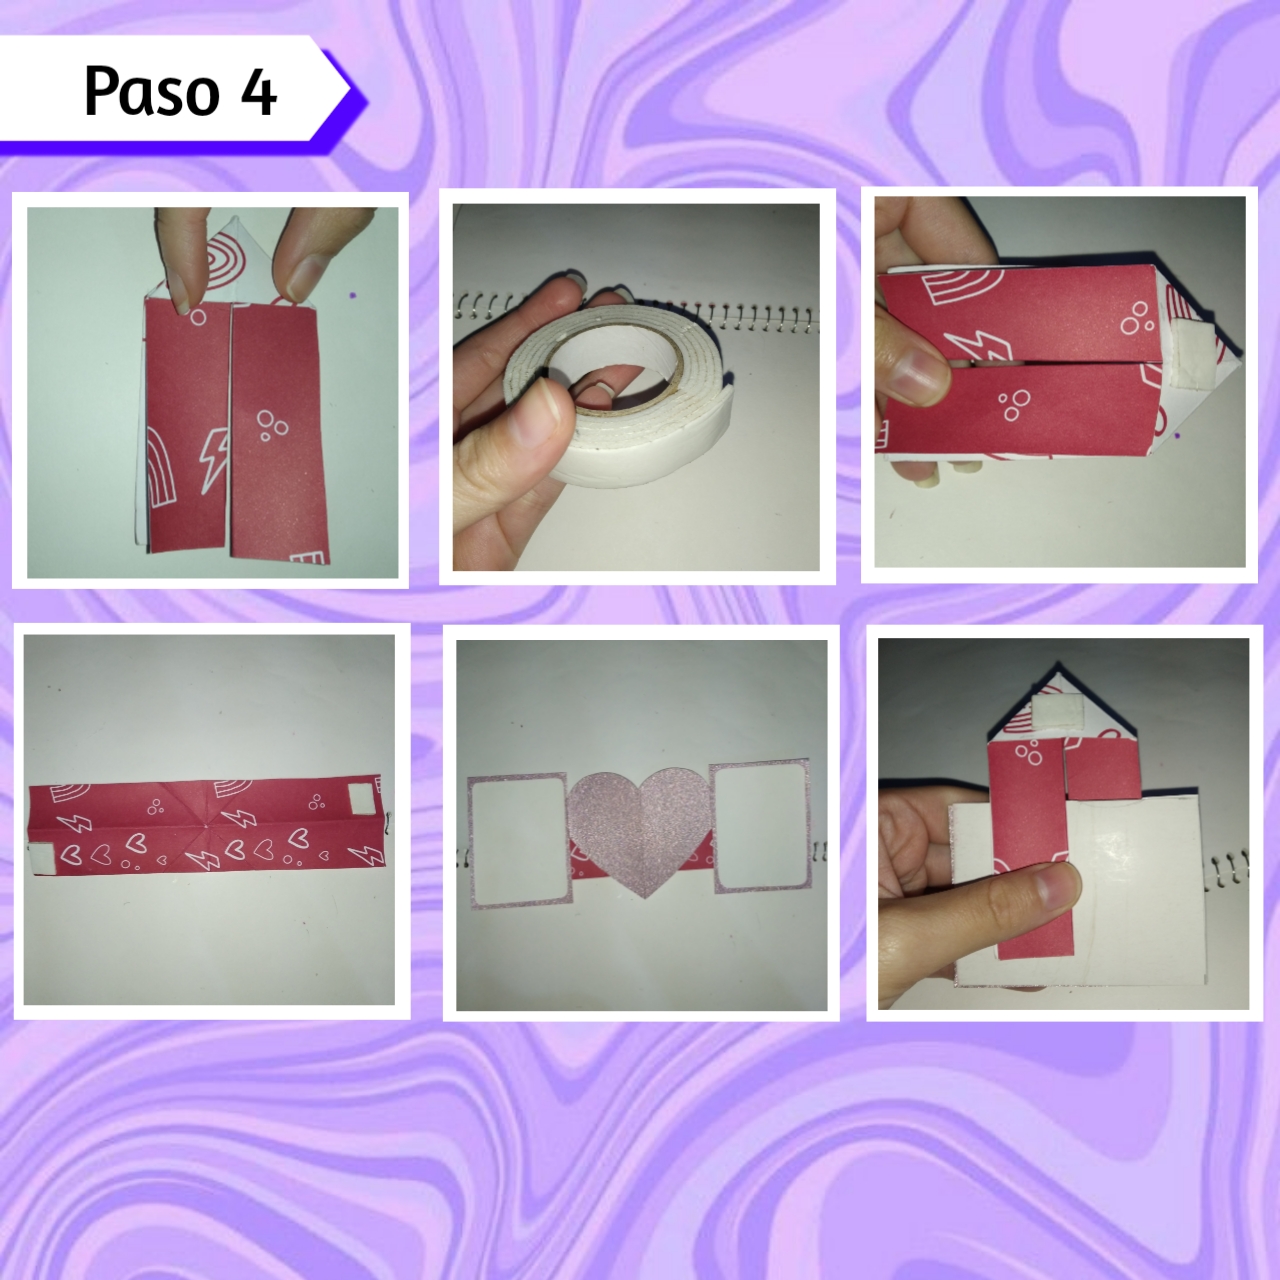
Seguimos tomando de nuevo nuestro rectángulo alargado (el que tiene el dobles en "x"), así doblaremos hasta que quede la forma que les muestro en la primera imágen, luego tomaremos nuestra cinta doble cara y en esa misma forma, vamos a pegar en el pequeño triángulo que se ve, un pequeño cuadro de cinta o incluso un triángulo que cubra la superficie por delante y por detrás. Después extendemos está nuevamente y del lado contrario pegaremos un poco de cinta, en la esquina superior derecha y la esquina inferior izquierda, así tomamos nuestra pieza con el corazón y la pegaremos encima de está cinta, colocando el corazón en todo el centro, pegando muy bien, luego al cerrar está pieza, quedará con la forma del principio, está pieza es la que hará la magia.
We continue taking again our elongated rectangle (the one with the double "x"), and we will fold it until we get the shape shown in the first image, then we will take our double-sided tape and in that same shape, we will paste on the small triangle that you can see, a small square of tape or even a triangle that covers the surface front and back. Then we extend it again and on the opposite side we will paste a little tape, in the upper right corner and the lower left corner, so we take our piece with the heart and paste it on top of this tape, placing the heart in the center, pasting very well, then when we close this piece, it will be with the shape of the beginning, this piece is the one that will make the magic.
Paso 5:
Step 5:
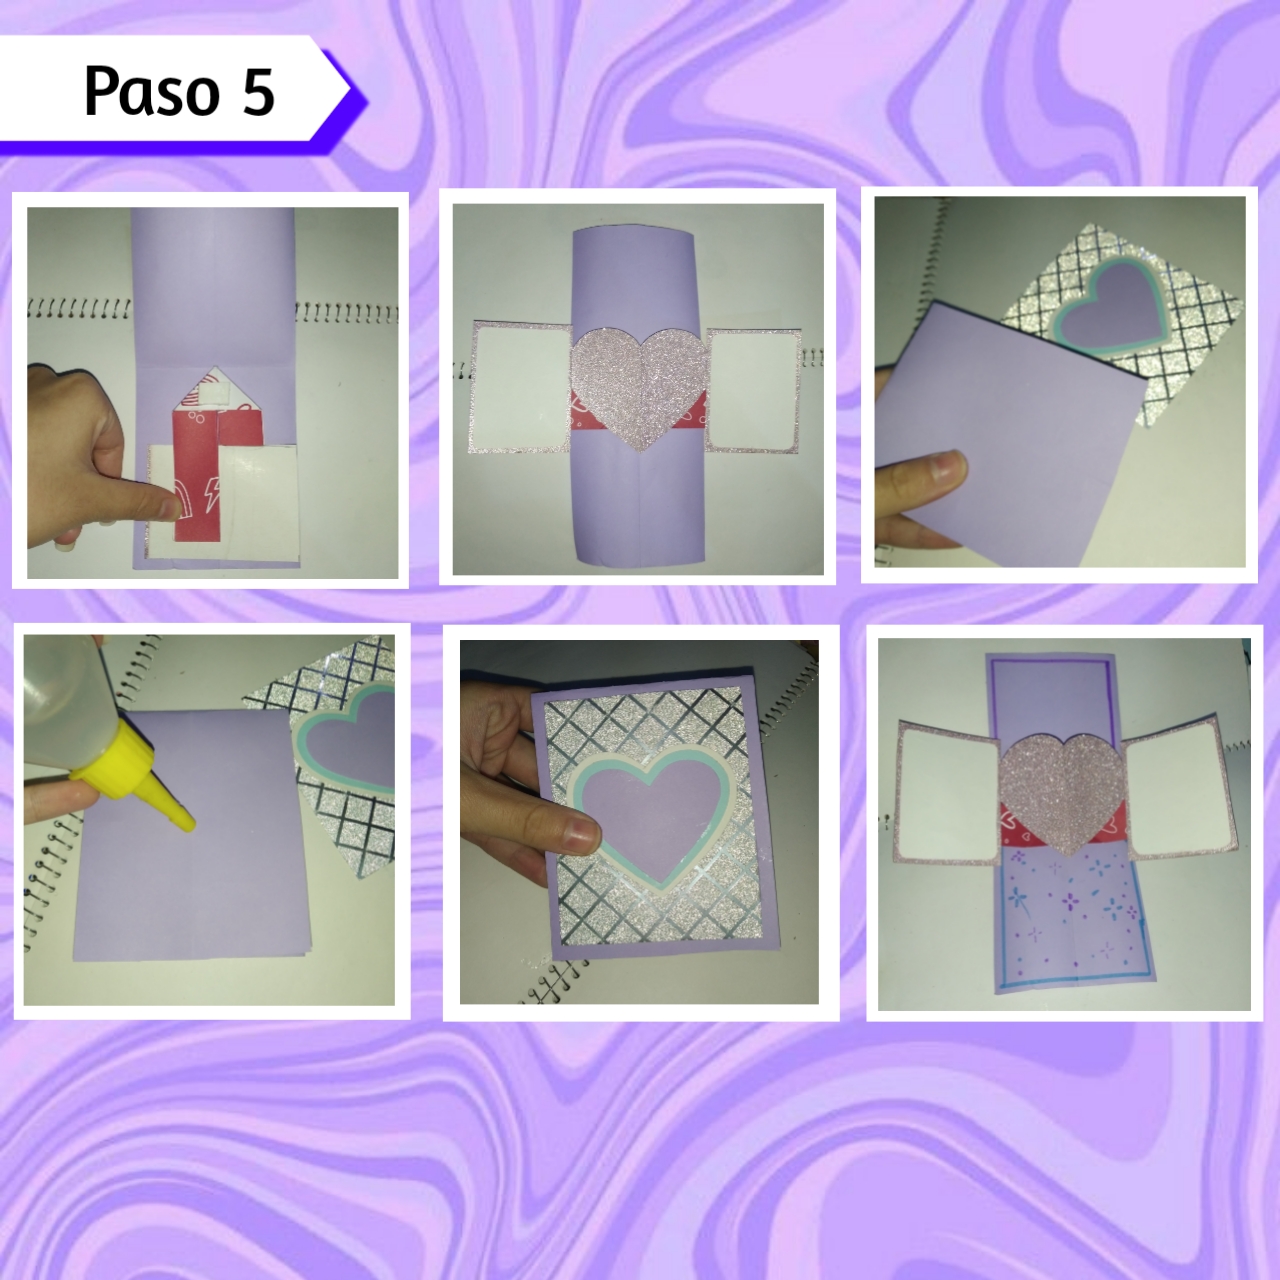
Ahora nos toca armar la última parte, para esto, vamos a tomar el último rectángulo que nos queda, el que doblamos a la mitad (la tarjeta) y la pieza anterior, así está pieza la pegaremos justamente en el medio, en la la parte de adentro de la tarjeta por ambos lados, así ya quedaría nuestro efecto Pop Up. Para culminar esta manualidad toca decorar, recorte un rectángulo de 8cm x 10cm, 1cm menos de cada lado, comparado al de la tarjeta, así también hice un corazón con varias capas y pegue ambos sobre la portada de la tarjeta, colocando el corazón arriba, quedó sencillo, pero hermoso.
Now we have to assemble the last part, for this, we will take the last rectangle we have left, the one we folded in half (the card) and the previous piece, so this piece will be glued right in the middle, in the inside of the card on both sides, so our Pop Up effect will be ready. To finish this craft it's time to decorate, I cut a rectangle of 8cm x 10cm, 1cm less on each side, compared to the card, so I also made a heart with several layers and glued both on the cover of the card, placing the heart on top, it was simple, but beautiful.
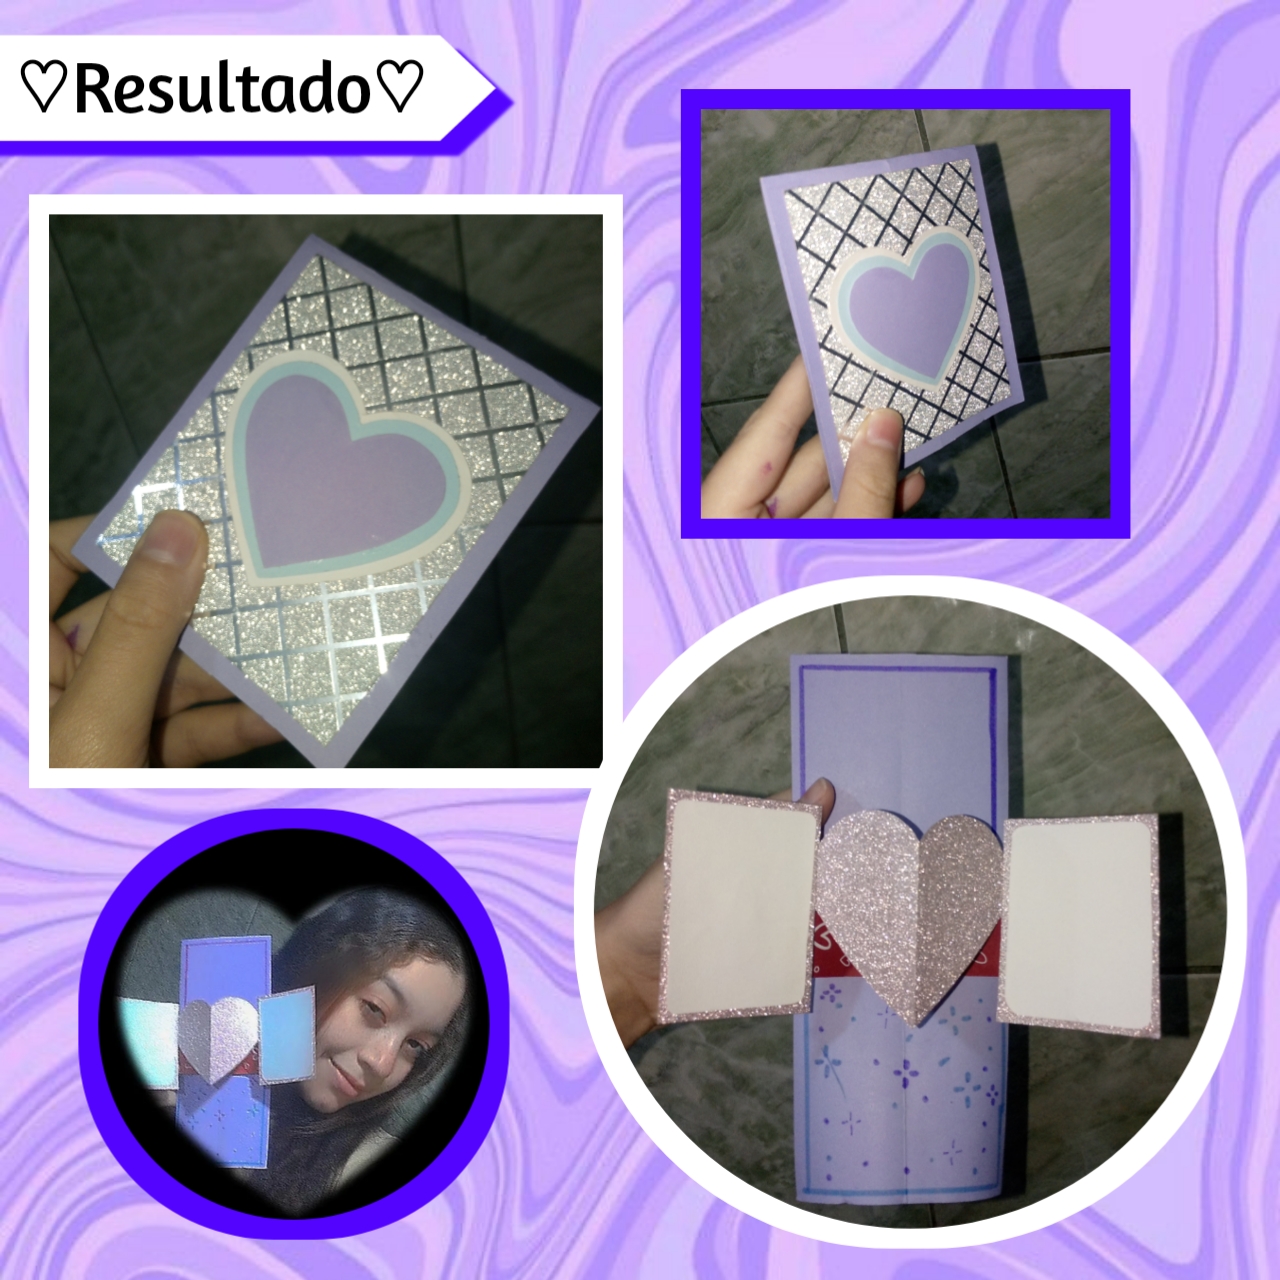
De está manera es como obtenemos una hermosa tarjeta Pop Up, con efecto sorpresa, está tarjeta es un acompañante ideal para un regalo lleno de amor, al abrirla, se estira el precioso corazón y da el aspecto sorpresa. Así tiene adentro espacios en blanco para hacer un dibujo o escribir algún mensaje de amor o bien sea de cariño, que se muestra al abrir. Es una tarjeta fácil de de hacer y bastante creativa, porsupuesto todo es personalizable para que lo hagan a su total gusto, de acuerdo, a los colores e incluso tamaños.
This is how we get a beautiful Pop Up card, with surprise effect, this card is an ideal companion for a gift full of love, when opened, the precious heart is stretched and gives the surprise aspect. It has inside blank spaces to make a drawing or write a message of love or affection, which is shown when you open it. It is an easy to make and quite creative card, of course everything is customizable so that you can make it to your liking, according to the colors and even sizes.
Hemos llegado al final de está manualidad, de corazón espero les haya gustado, la recreen y que compartan y comenten, estaré encantada de responder sus comentarios. Les agradezco una vez más por llegar hasta el final, un abrazo enorme para ¡Mí Familia Creativa!💙✨
We have reached the end of this craft, I sincerely hope you liked it, that you recreate it and that you share and comment, I will be happy to answer your comments. I thank you once again for making it to the end, a big hug for my Creative Family!
♡💙💜Thanks for reading!💜💙♡
Photos of my authorship taken from my Xiaomi Redmi 7 phone, edited in the free version of PixeLab
A complete and detailed tutorial. I love the idea of creating a personalized Pop Up card, especially because it adds a unique and special touch to any gift.
❤️❤️❤️
Una tarjeta muy bonita y perfecta para muchas cosas cuando uno esté buscando ese regalo, además me gusto la manera como fuiste armando y dándole ese toque único que permite que sea muy llamativa, además los corazones lucen bien y esta muy completa. La guardare para cualquiera ocasión.
Sii, es una compañía perfecta y diferente, da el mejor aspecto sorpresa. Me alegra que te haya gustado, gracias por comentar.✨
Excelente detalle!
¡Gracias amiga! ❤️
Que preciosura de tarjeta, está bellísima y perfecta para una fecha especial 😊
Así es, muchas gracias amiga, me alegra que te haya gustado.✨