✦ This is a series of tutorials on the different techniques I used to create Lady Oscar's Captain of the French Imperial Guard uniform. At the end of this post you will find the list of all the materials and tools used. Enjoy! ✦
🇪🇸 ~ ¡Hola mis amores!, espero no aburrirlos con el tema del Cosplay, porque tengo mucha tela para cortar de este tema, y quiero traer a mi blog aquí en Hive varios proyectos (tanto viejos como los mas nuevos), algunos desglosados en tutoriales y otros a modo de procesos o experiencias.
🇺🇸 ~ Hello my loves! I hope not to bore you with the subject of Cosplay, because I have a lot of fabric to cut from this topic, and I want to bring to my blog here in Hive several projects (both old and newer), some broken down into tutorials and others by way of processes or experiences.
Los formatos tutoriales serán exclusivamente para la "Comunidad de Hive DIY", y como me encuentro en proceso de renovación o "Remake" de varios trajes me parece una oportunidad imperdible para compartir conocimientos sobre el manejo de materiales relativamente comunes para resolver distintos tipos de propuestas y diseños en caso no puedas encargar materiales vía internet o quieras mantener un presupuesto moderado.
The tutorial formats will be exclusively for the "Hive DIY Community", and as I am in the process of renovation or "Remake" of several costumes I find it an unmissable opportunity to share knowledge about the handling of relatively common materials to solve different types of proposals and designs in case you can not order materials via the internet or want to keep a moderate budget.
Así que para comenzar, traigo un método para simular relieves metálicos sobre tela: Pero el proceso es algo largo así que vamos a dividirlo en 4 partes, comenzando por "¿Cómo hacer plantillas de arabescos o figuras complejas?" ⚜ ✨
So to start, I bring a method to simulate metallic reliefs on fabric: But the process is a bit long so let's divide it into 4 parts, starting with "How to make templates of arabesques or complex figures?" ⚜ ✨
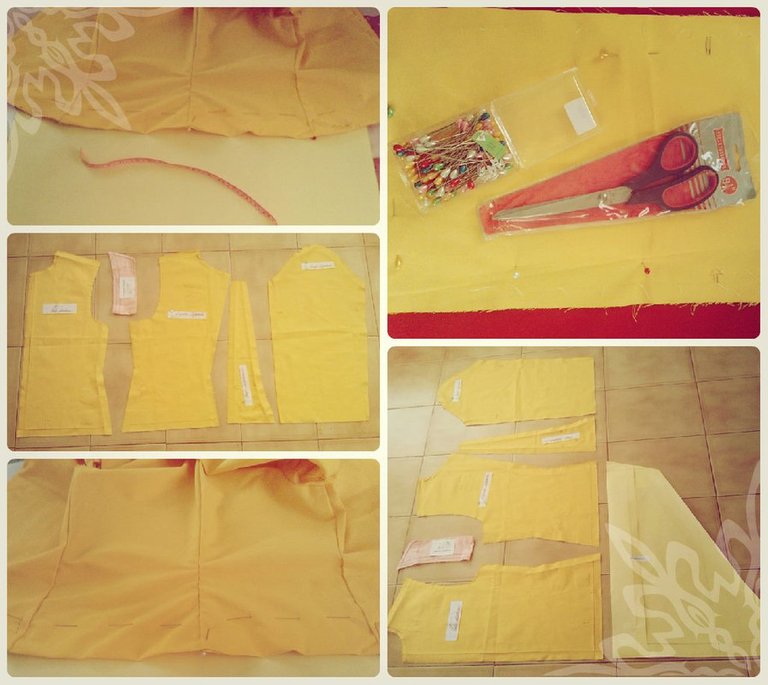
✦ The first thing I did was to make the patterns for the jacket. For that I used my mom's jacket, traced its parts on paper, and then transferred the patterns to a test fabric, and when I tried on the prototype and confirmed that it was correct, I replicated the parts of the front to start the "embroidery" design ✦
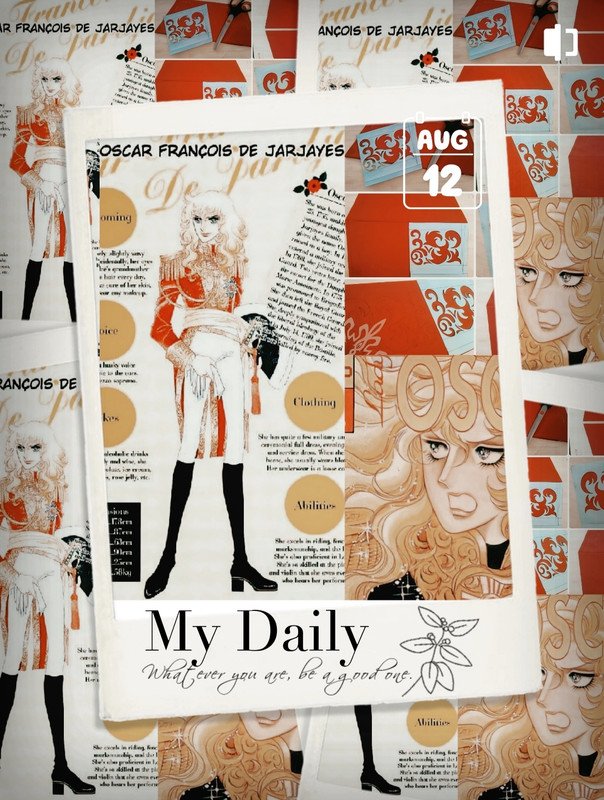
El proyecto que ven a continuación es un uniforme militar francés, específicamente uno de los que usa el personaje de Oscar François de Jarjayes en la obra de Riyoko Ikeda: "The Rose of Versailles" (ベルサイユのばら - Berusaiyu no Bara).
The project you see below is a French military uniform, specifically one worn by the character of Oscar François de Jarjayes in Riyoko Ikeda: "The Rose of Versailles" (ベルサイユのばら - Berusaiyu no Bara).
El diseño que escogí recrear aparece exclusivamente en la versión manga y por eso la mayoría de sus referencias son en blanco y negro; todos los detalles y colores guía los obtuve de una única referencia a color que es una ficha técnica del personaje. En ella vemos que tiene un intrincado bordado en el pecho de la chaqueta, y ese fué el principal reto que asumí:
The design I chose to recreate appears exclusively in the sleeve version and that's why most of its references are in black and white; all the details and guide colors I got from a single color reference which is a technical sheet of the character. In it we can see that he has an intricate embroidery on the chest of the jacket, and that was the main challenge I took on:
Pasa que ese tipo de apliques de hilo no se consiguen en mi país, no de ese tamaño ni con ese diseño, y mucho menos en la calidad necesaria, también en el momento que comencé este proyecto no tenía facilidades para pedir estos materiales textiles por internet (problemas con la aduana). Por eso investigando por internet y siguiendo la experiencia de otros Cosplayers (específicamente mi atelier favorito "ptytb.art.atelier" en Instagram) conocí la técnica del bordado en relieve con silicón caliente.
It happens that this kind of thread appliques are not available in my country, not in that size or with that design, and much less in the quality needed, also at the time I started this project I had no facilities to order these textile materials online (problems with customs). So researching online and following the experience of other Cosplayers (specifically my favorite atelier "ptytb.art.atelier" on Instagram) I met the technique of embossed embroidery with hot silicone.
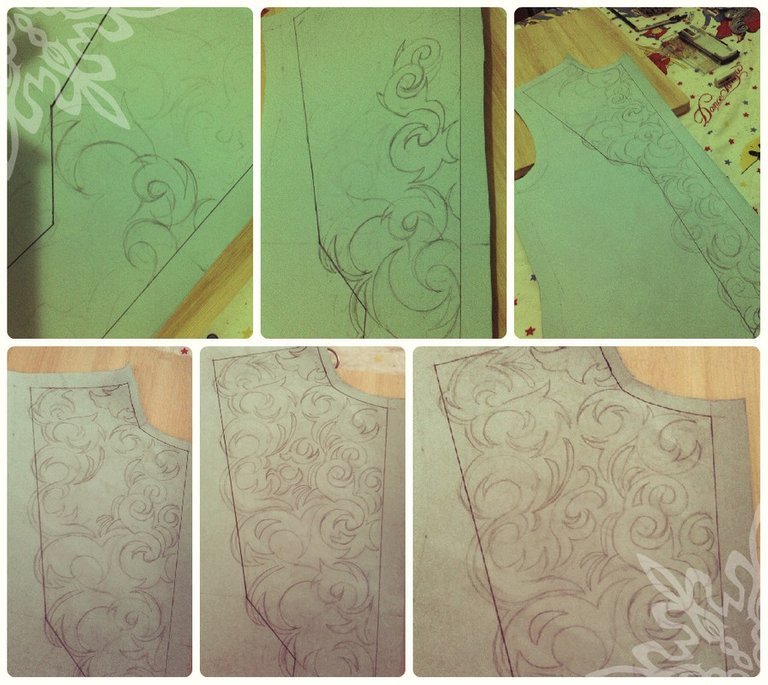
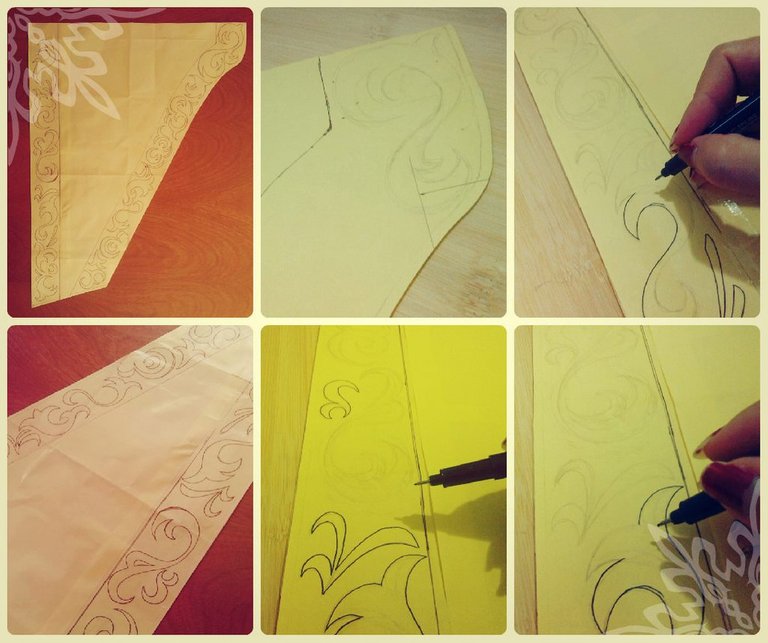
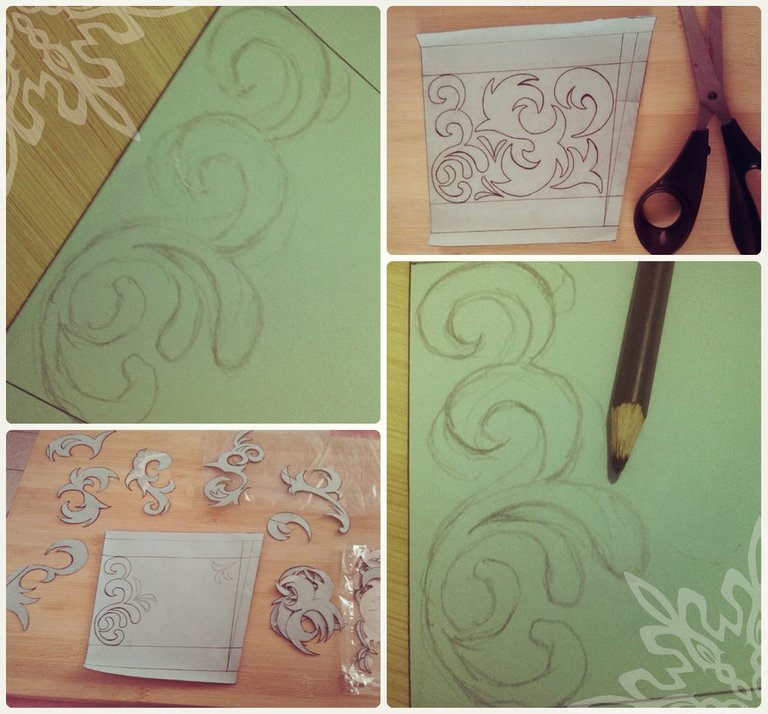
✦ I drew everything by hand little by little with an ordinary pencil, then I went over it with a B2 and corrected the dimensions little by little ✦
Cuando obtuve las replicas del patrón frontal de la chaqueta, marque el margen de costura que debía respetar, y también el límite para el diseño. Busque en internet ejemplos de arabescos y formas de bordado que tuvieran un aire naturalista pero sin ángulos suaves, porque quería que el diseño inspirara fuerza.
When I got the replicas of the front pattern of the jacket, I marked the stitch allowance that I had to respect, and also the limit for the design. I searched the internet for examples of arabesques and embroidery shapes that had a naturalistic feel but without soft angles, because I wanted the design to inspire strength.
✦ We only need to do one side, because this will become a template that we will replicate on both sides exactly, so there is no need to do two ✦
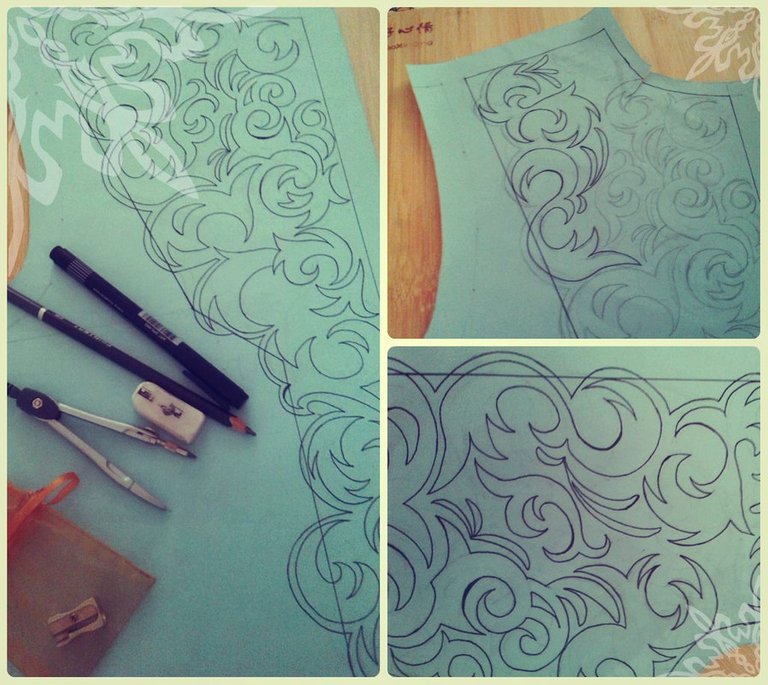
Este fue un proceso largo y minucioso, pero absolutamente necesario. Repase todo con estilógrafo (también funciona un marcador fino, pero no usen bolígrafo, no lo recomiendo porque no les dejara reparar líneas de manera limpia), y después de esperar 1 o 2 horas a que la tinta secara totalmente, borre las líneas guías del lápiz.
This was a long and painstaking process, but absolutely necessary. I went over everything with a stylograph (a fine marker also works, but don't use a ballpoint pen, I don't recommend it because it won't let you repair lines cleanly), and after waiting 1 or 2 hours for the ink to dry completely, I erased the pencil guide lines.
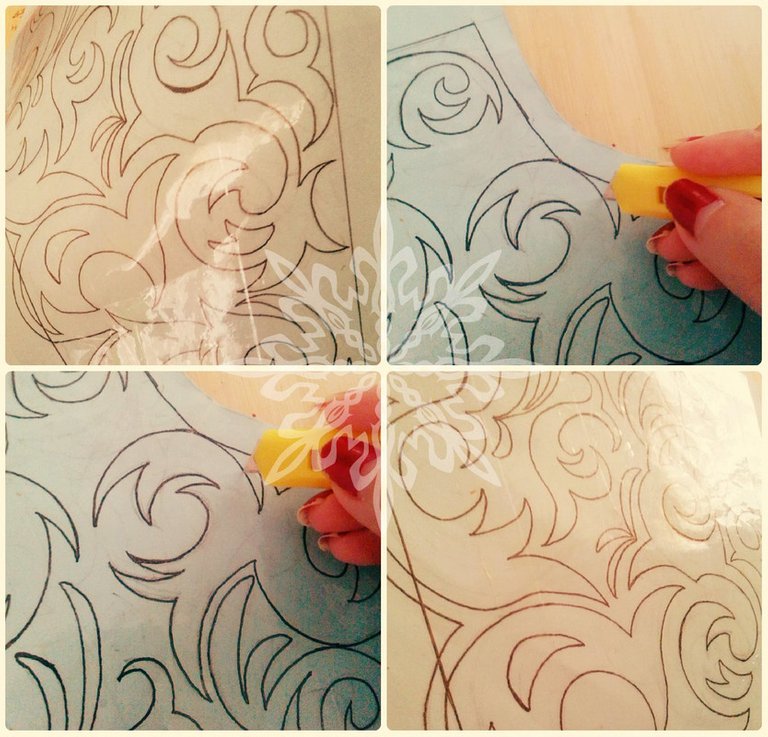
✦ Why use adhesive tape instead of paper to cover books? Because that contact paper is too thick and contains too much adhesive, also that glue expires over time and hinders the smooth passage of the cutter ✦
Ahora este es el momento de la magia: Con MUCHA PACIENCIA, vamos a utilizar cinta de embalar gruesa transparente, y vamos a forrar todo el patrón con ella, lentamente y con cuidado de que no se formen arrugas o burbujas de aire.
Now this is the moment of magic: With VERY PATIENCE, we are going to use thick transparent packing tape, and we are going to line the whole pattern with it, slowly and carefully so that no wrinkles or air bubbles are formed.
✦ I recommend doing this step on the floor if you do not have a special cutting template, but only if your floor is smooth with no irregularities ✦
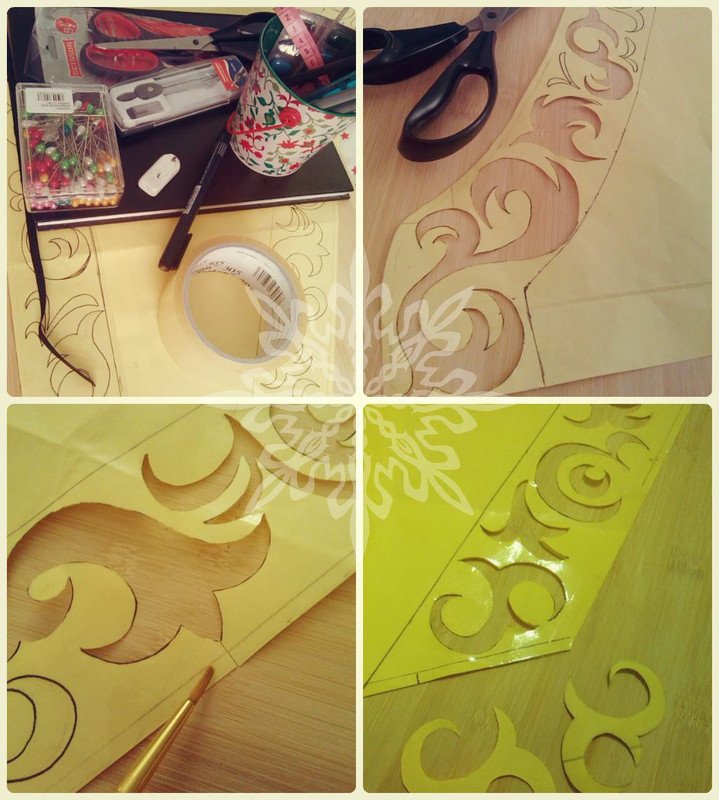
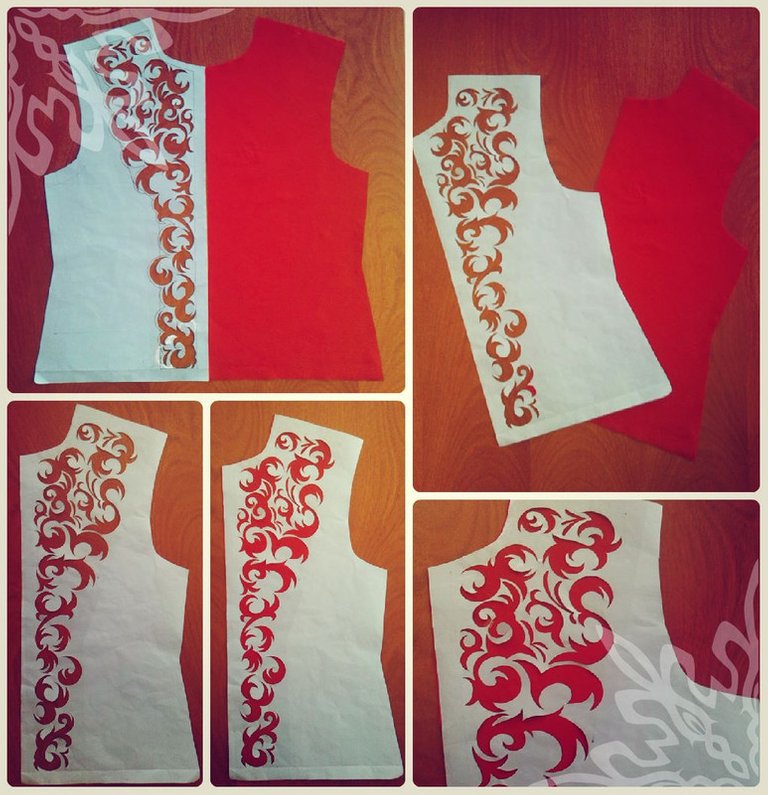
Al forrar el patrón con cinta adhesiva eso asegura que desde las secciones mas anchas a las mas estrechas, incluyendo los piquitos y decoraciones mas pequeñas NO se van a romper, rasgar o deformar. Cabe destacar que puedes utilizar distintos tamaños de cutter e incluso un bisturí si puedes conseguir uno.
Lining the pattern with masking tape ensures that from the widest to the narrowest sections, including the smallest piquitos and decorations will NOT break, tear or deform. It should be noted that you can use different sizes of cutters and even a scalpel if you can get your hands on one.
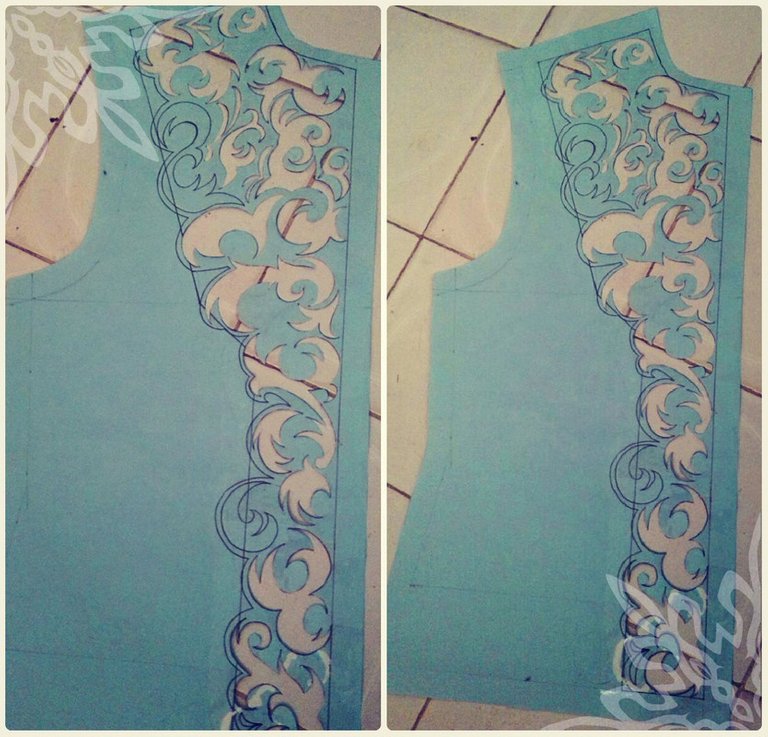
✦ We will repeat the same series of steps for the lower back section of the jacket. Here I used a different color of bond paper because I couldn't see the pencil lines as well with the blue one ✦
Vamos a repetir la misma serie de pasos para la sección baja de la espalda de la chaqueta. Aquí utilice un color de papel bond diferente porque con el azul no veía tan bien las líneas del lápiz.
We will repeat the same series of steps for the lower back section of the jacket. Here I used a different color of bond paper because I couldn't see the pencil lines as well with the blue one.
✦ In the pictures you can see the width of the adhesive tape I used, I recommend it 100% ✦
Algo importante que deben tener presente es que todas las figuras "sobrantes" mientras cortamos con el cutter NO DEBEN DESECHARSE. Mas adelante serán realmente útiles para refinar los resultados.
An important thing to keep in mind is that all the "leftover" figures while cutting with the cutter MUST NOT BE DISCARDED. Later on they will be really useful to refine the results.
✦ Re-using these cut-outs for the following parts of the jacket also ensures consistency in the separate chest designs ✦
Para los puños de las mangas pude darme mucha libertad creativa, escogiendo las figuras que mas me gustaban. En esta parte y la siguiente verán los primeros usos útiles de haber guardado todas las figuras que recortamos del patrón principal mientras creábamos nuestra plantilla.
For the sleeve cuffs I was able to give myself a lot of creative freedom, choosing the shapes I liked the most. In this and the next part you will see the first useful uses of having saved all the shapes we cut out of the main pattern while creating our template.

✦ Obviously there will always be centimeters occupied by the reliefs in the material that we can't control, but that can be solved by leaving the arabesques a little more spaced out ✦
Este método también permite que en la primera etapa donde solo dibujamos a lápiz, podamos asegurarnos de que habrá suficiente espacio para los apliques que queremos utilizar entre los arabescos. En este caso pude medir los espacios entre el diseño del cuello para apliques de media perla de 0.5cm.
This method also allows that in the first stage where we only draw in pencil, we can make sure that there will be enough space for the appliqués we want to use between the arabesques. In this case I was able to measure the spaces between the neck design for half pearl appliques of 0.5cm.
✦ Las herramientas y materiales utilizadas en este tutorial fueron: Lápiz, borrador, tijeras, papel bond de distintos colores, cinta adhesiva de embalar gruesa, estilógrafos o marcador fino, cutter, tela para patronar, alfileres y ejemplos variados de diseños de arabescos / The tools and materials used in this tutorial were: Pencil, eraser, scissors, bond paper of different colors, thick packing tape, stylographs or fine marker, cutter, pattern fabric, pins and various examples of arabesque designs ✦
¡Y este es el resultado final!, una plantilla económica, resistente y super detallada que podremos transferir limpiamente con un solo intento. Para guardarla solo debemos enrollarla y meterla en una cajita, para que no se estropee con el tiempo sugiero no doblarla, pero pueden doblarla si quieren.
**And this is the final result, an economical, resistant and super detailed stencil that we can transfer cleanly with a single attempt. To store it we just have to roll it up and put it in a little box, so that it does not spoil over time I suggest not to fold it, but you can fold it if you want.
Este método sirve para transferir cualquier diseño que crees y replicarlo, en madera, papel o otras superficies (también para decorar las paredes de cualquier espacio). ¡Espero lo hayan disfrutado!, estén pendientes de la continuación de esta serie, aun no llegamos a la mejor parte 🥰 ✌
This method serves to transfer any design you create and replicate it, on wood, paper or other surfaces (also to decorate the walls of any space). I hope you enjoyed it!, stay tuned for the continuation of this series, we have not yet reached the best part 🥰 ✌
✦ Special Note: The collages of this series were originally published on my old FB Cosplay account. I lost the original photos of this project, I'm sorry for the low quality of the material, if you've been following me for a while or have seen other notes you'll know that I always try to make the photos beautiful, neat and very bright. Have a little patience and stay with me >u<)7 I promise it will be worth it! 💕
¡Muchas gracias por leer!
📷 Herramientas: Lumix Panasonic DMC-FH2/Smartphone 📷
🚨 ¡Por favor no tomes, edites ni re-publiques mi material sin mi permiso! 🚨
💌 ¿Deseas ponerte en contacto conmigo? Tesmoforia 🍓#8715 💌
✨ Translation done with Deepl ✨


😮 que nivel de dedicacion tan pro!

Super halaga de recibir un comentario así de un artista como tu, muchas gracias Melo -semueredefeels- 😍 😍 😍
¡Felicidades! Esta publicación obtuvo upvote y fue compartido por @la-colmena, un proyecto de Curación Manual para la comunidad hispana de Hive que cuenta con el respaldo de @curie.
Si te gusta el trabajo que hacemos, te invitamos a darle tu voto a este comentario y a votar como testigo por Curie.
Si quieres saber más sobre nuestro proyecto, acompáñanos en Discord: La Colmena.
¡MUCHAS GRACIAS LOS AMO MUCHO! 💙 💙 💙
Wow! Esos detalles se nota que llevan trabajo y mucha paciencia 😅 El resultado valió la pena 👏
Muchas gracias @Glowshine 💖