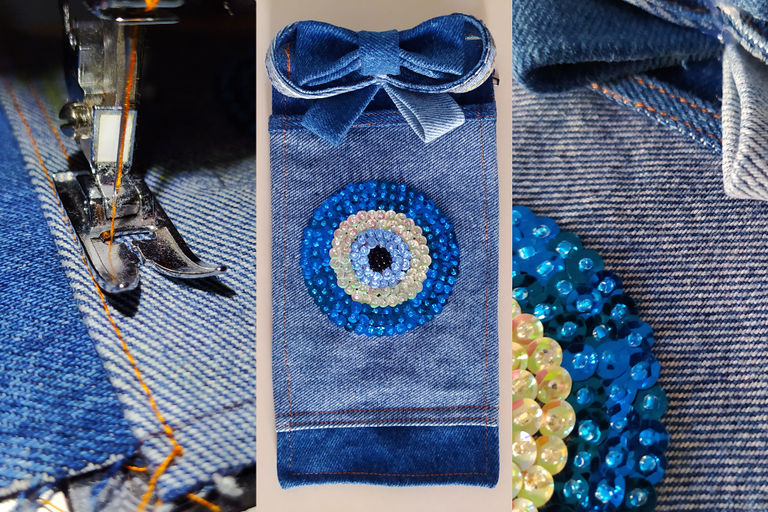
✦ I'm cleaning out my boxes of materials and I'm really sad to throw away the little scraps of denim, so I've given them a second chance in this little project; find pencil and paper to write down everything you need, and I hope you enjoy it! - Collage and Edition made in FotoJet, photos by @Tesmoforia ✦

🇪🇸 ~ En el capítulo anterior realizamos un bordado en lentejuelas con forma de "Nazar", me daba mucha pena guardarlo en la obscuridad de algún cajón o la caja de "pruebas y practicas de costura" así sin más, y pensé en qué podría instalarlo como un aplique, y como las piezas utilitarias siempre son bienvenidas, ¡vamos a realizar un estuche con tela denim reciclada! 👌 🌟
🇺🇸 ~ In the previous chapter we made a sequin embroidery in the shape of “Nazar”, I was too embarrassed to keep it in the darkness of some drawer or the “sewing tests and practices” box just like that, and I thought what could I install it as a applique, and as utilitarian pieces are always welcome, let's make a case with recycled denim fabric! 👌 🌟
« 𝕋 𝕆 𝕆 𝕃 𝕊 • & • 𝕄 𝔸 𝕋 𝔼 ℝ 𝕀 𝔸 𝕃 𝕊 »

💡 ✨ Los materiales y herramientas que necesitas para elaborar este proyecto son: Marcador punta fina, regla escolar, cinta métrica, tijera, alfileres o pinzas de costura, hilo regular, aguja regular, máquina de coser (opcional), tela denim, pistola de silicón caliente, barra de silicón, cierre de mínimo 20 centímetros.
💡 ✨ The materials and tools you need to make this project are: Fine point marker, school ruler, tape measure, scissors, pins or sewing clips, regular thread, regular needle, sewing machine (optional), denim fabric, hot silicone gun, silicone stick, zipper of at least 20 centimeters.
• 𝕊𝕋𝔼ℙ 𝔹𝕐 𝕊𝕋𝔼ℙ 𝕋𝕌𝕋𝕆ℝ𝕀𝔸𝕃 •
« Multipurpose case with recycled materials »
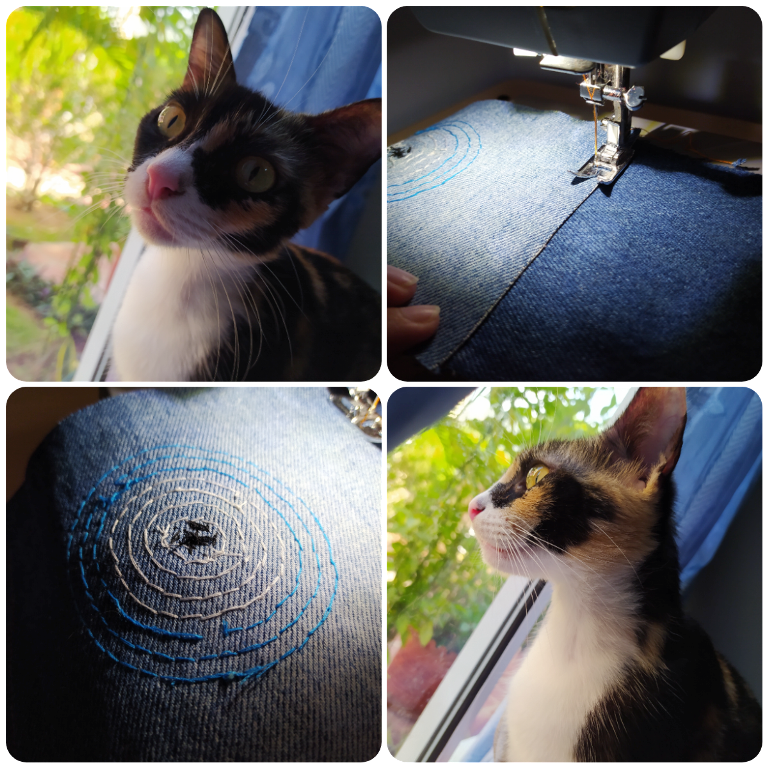
✦ This chapter includes a cameo of Galatea! ✦
✦ PARTE UNO: Necesitaras un rectángulo de tela denim de 48 cm x 14 cm, ésta será el cuerpo del estuche. La sección del bordado que también hara la función de bolsillo frontal debe medir 19 x 14 cm, estas indicaciones incluyen los centímetros de costura. Ahora doblaras la sección de tela mas grande por la mitad, y ubicaras la tela con el bordado boca abajo a 4 cm del borde inferior del centro del recorte de tela más grande. Coseras en línea recta a mano o con máquina de coser con puntada número 3 (previamente elaboraras un pequeño ruedo en la tela que tiene l bordado, doblando dos veces hacia dentro y pasando doble costura).
• PART ONE: You will need a rectangle of denim fabric 48 cm x 14 cm, this will be the body of the case. The embroidery section that will also act as the front pocket should measure 19 x 14 cm, these directions include the sewing inches. Now fold the larger fabric section in half, and place the fabric with the embroidery facing down 4 cm from the bottom edge of the center of the larger fabric cutout. You will sew in a straight line by hand or with a sewing machine with stitch number 3 (previously you will elaborate a small ruffle in the fabric that has the embroidery, folding it twice inwards and double stitching).
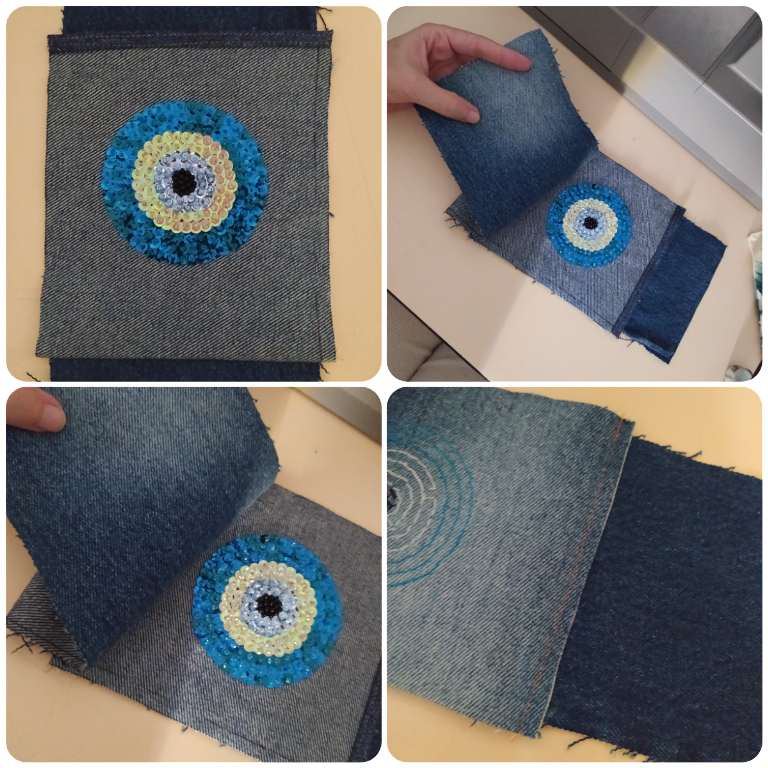
✦ PARTE DOS: Voltearás la pieza del bolsillo-bordado como se aprecia en la imagen. No te preocupes si no es una línea recta perfecta, a continuación vamos a asegurar la parte inferior del bolsillo.
• PART TWO: You will flip the pocket-embroidery piece over as shown in the picture. Don't worry if it's not a perfect straight line, next we will secure the bottom of the pocket.

✦ You can use any color yarn you like but I chose orange yarn because it makes a nice contrast ✦
✦ PARTE TRES: Para reforzar y por motivos estéticos, vamos a pasar una doble costura recta en la parte inferior del bolsillo, justo como se aprecia en las imágenes guía.
• PART THREE: To reinforce and for aesthetic reasons, we are going to pass a double straight seam at the bottom of the pocket, just as shown in the guide images.
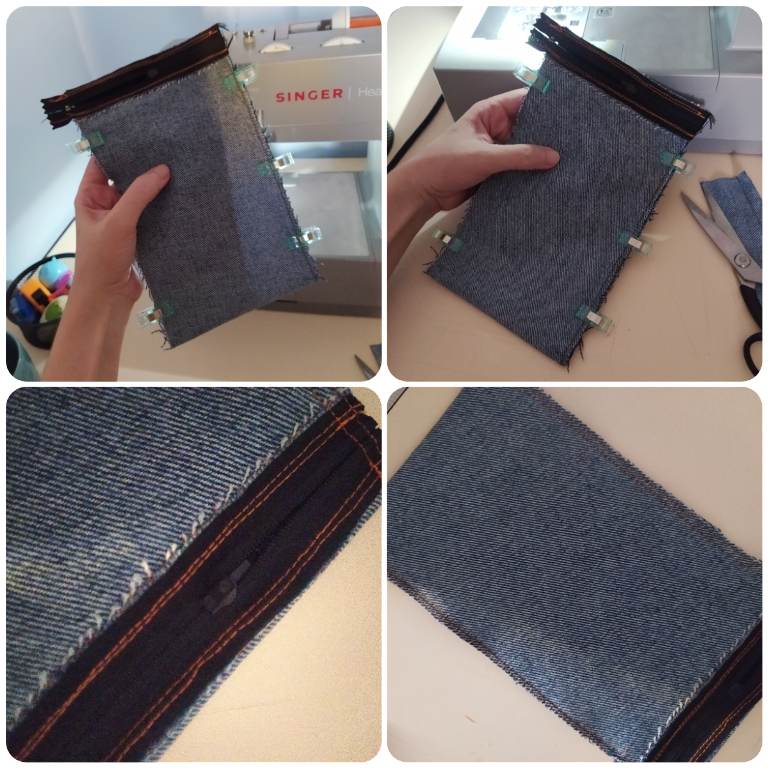
✦ PARTE CUATRO: Lista la instalación del bolsillo con el bordado, vamos a instalar el cierre de forma sencilla y básica, y luego cerraremos la pieza con ayuda de las pinzas de costura, y coseremos a mano o en a máquina de coser a 1 cm de distancia del borde.
• PART FOUR: Ready the installation of the pocket with the embroidery, we will install the zipper in a simple and basic way, and then we will close the piece with the help of the sewing clamps, and we will sew by hand or on a sewing machine at 1 cm distance from the edge.
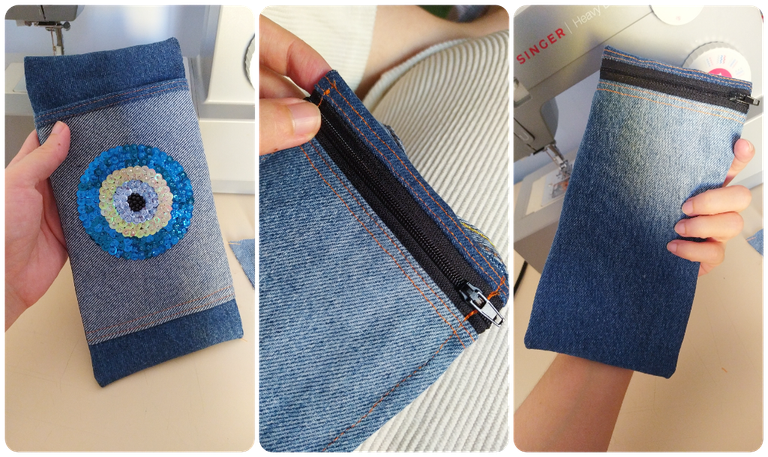
✦ PARTE CINCO: Con mucho cuidado, vamos a voltear el estuche y estiraremos muy bien todos sus lados y bordes, cuida especialmente las esquinas.
• PART FIVE: With great care, we will turn the case over and stretch all sides and edges very well, taking special care of the corners.
✦ This part got me very excited! I didn't know what decoration to put, I was thinking about some glitter but then I saw this little piece of ribbon and I went crazy with love 🌼 ✦
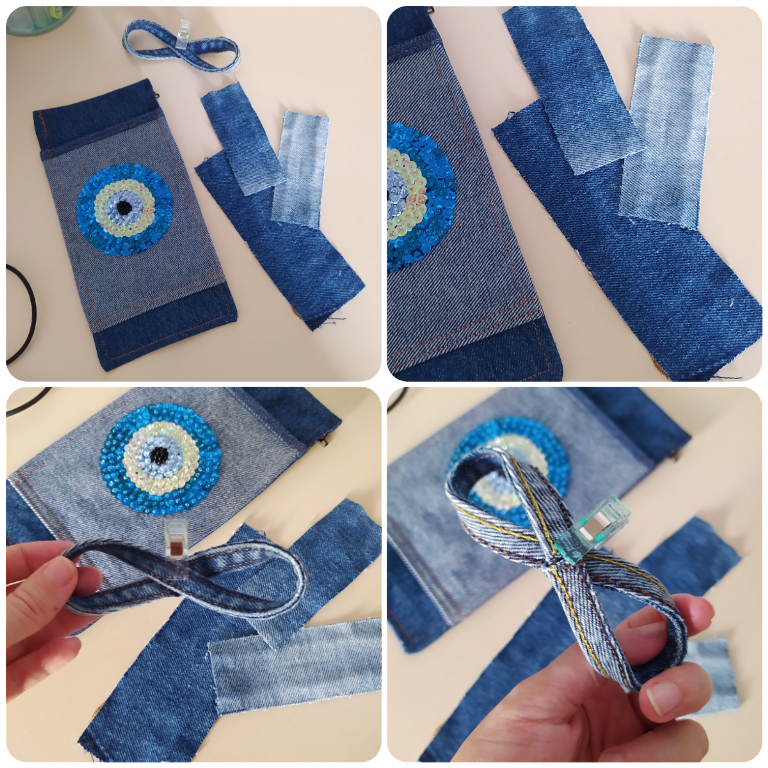
✦ PARTE SEIS: Antes de continuar, vamos a elaborar con retazos un lazo decorativo, para hacerlo necesitas 2 rectángulos de 4 x 10 cm (parte inferior del lazo), 1 rectángulo de 6 x 16 cm (cuerpo principal central del lazo), un rectángulos pequeño de 4 x 6 (sección que cierra el centro del lazo principal), y una tira de la parte con doble costura del jean reciclado, de 13 cm de largo (base y parte inferior que enmarca el lazo).
• PART SIX: Before continuing, we are going to make a decorative ribbon with scraps, to do this you need 2 rectangles of 4 x 10 cm (lower part of the ribbon), 1 rectangle of 6 x 16 cm (main central body of the ribbon), a small rectangle of 4 x 6 cm (section that closes the center of the main ribbon), and a strip of the double-stitched part of the recycled jean, 13 cm long (base and lower part that frames the ribbon).
✦ The final dimensions of this assembled decoration are 10.5 cm long, 6.5 cm high, and 3 cm wide ✦
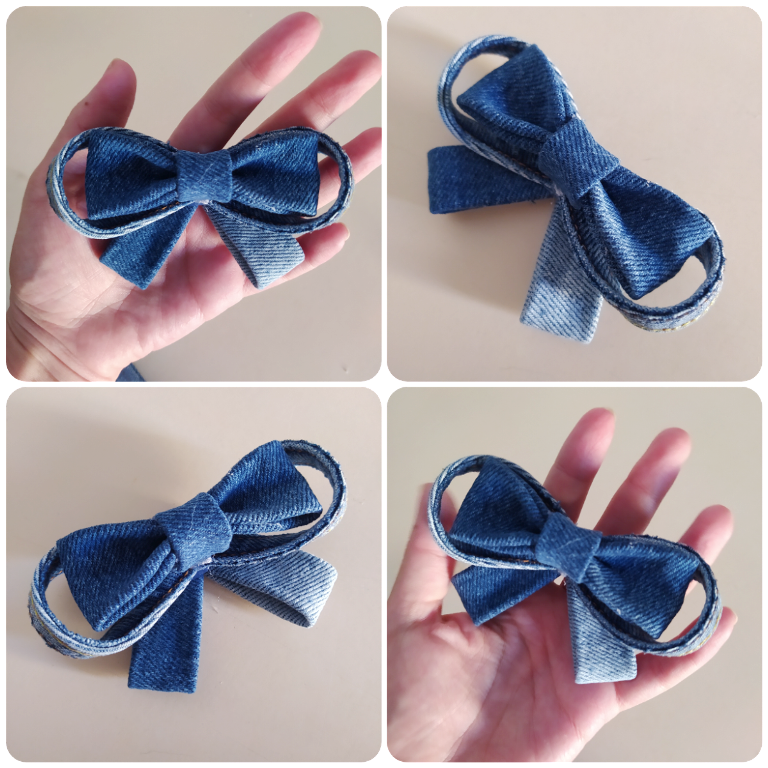
✦ PARTE SIETE: Para ensamblar y unir todas las piezas, sigue las instrucciones del paso anterior para identificar cada una, y ármalas utilizando la pistola de silicón. Utiliza hilo y aguja solo en la parte del lazo principal antes de cerrar toda la pieza, no sobre esfuerces tus manos ya que el denim es una tela bastante densa.
• PART SEVEN: To assemble and join all the pieces, follow the instructions in the previous step to identify each one, and assemble them using the silicone gun. Use thread and needle only in the main loop part before closing the whole piece, do not overexert your hands as denim is a very dense fabric.

✦ The bow glue it to the case with more hot silicon. I'm not used to glue things because I prefer to sew them but I'm happy to try new things and see that they do stay strong and clean ✦
✦ PARTE OCHO (FINAL): Antes de instalar el lazo en el estuche, y solo si quieres aunque lo recomiendo muchisimo, es pasar una costura ajustada por todo el rededor de la pieza, esto la hara mas estable y mucho mas bonita, aunque sin la costura final tambien se ve bien, tendrá un aspecto "acolchadito".
• EIGHTH PART (FINAL): Before installing the loop in the case, and only if you want to, although I highly recommend it, is to pass a tight seam all around the piece, this will make it more stable and much more beautiful, although without the final seam it also looks good, it will have a “quilted” aspect.
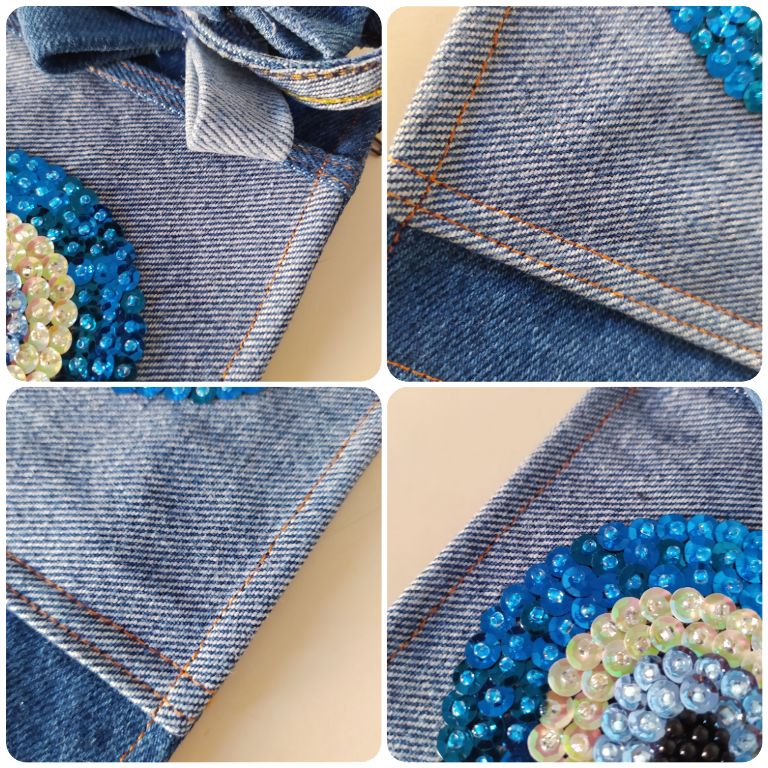
✦ Zooming in on project seams, it's good to practice straight stitch once in a while! ✦

"¿Cómo podría elevar la calidad de este proyecto?, ¡no me gustan las cosas tan simples!" - Puedes elevar la calidad de esta propuesta agregando una capa de guata acolchada y un poco de forro tafeta. Por fuera, este pequeño estuche se vería como una almohada suavecita, le daría un extra de protección a los objetos que guardes en el, y el forro tafeta le daría una terminación delicada en el interior.
“How could I elevate the quality of this project?, I don't like things so simple!” - You can elevate the quality of this proposal by adding a layer of quilted wadding and some taffeta lining. On the outside, this little case would look like a soft pillow, give extra protection to the items you keep in it, and the taffeta lining would give it a delicate finish on the inside.
« F I N A L ✦ R E S U L T »
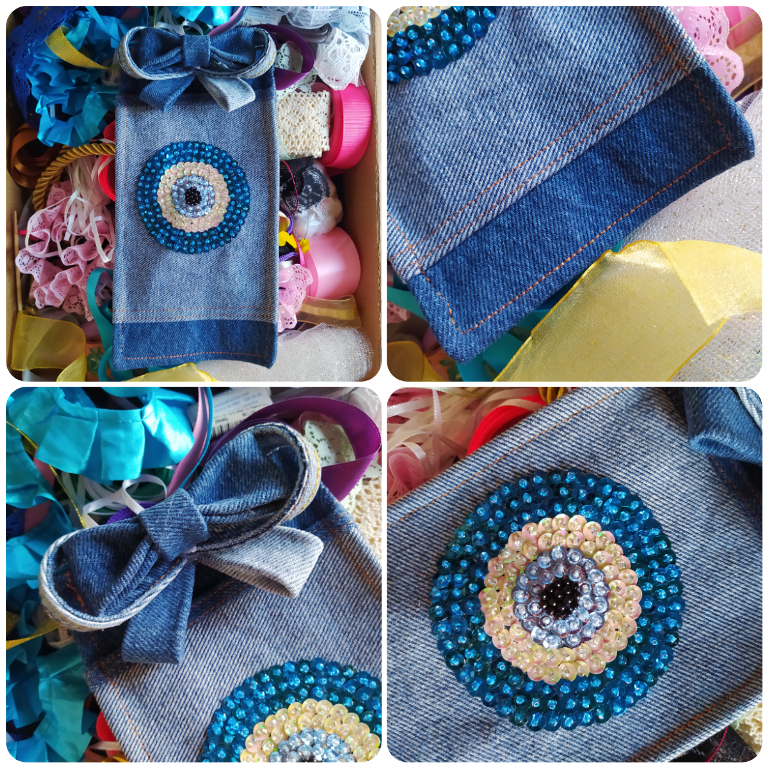
✦ The bottom is one of my material boxes, I hope to be able to buy a plastic organizer for all those tapes soon ✦

✦ I want to be more spontaneous in my projects and do things like this, without too much planning, just spontaneous and happy creativity, without anguish for the outcome ✦
✦ RESUMEN ✦ Éste es un proyecto espontaneo que puedes realizar con el tipo de tela que mas te guste, las mas aconsejables son las telas que tienen cuerpo como las telas de tapiceria, denim y sinteticas como el semi-cuerpo. ¡Puedes prescindir del cierre!, y coserla como si fuera una pequeña funda para almohada, solo con un pequeño broche o cintas al final y... ... ... ESPERA, mejor hago 2 proyectos mas para ilustrarte mejor :3c ¡REGRESO POR AQUI PRONTO! 🚀 ✨
✦ SUMMARY ✦ This is a spontaneous project that you can make with the type of fabric you like the most, the most advisable are the fabrics that have body like upholstery fabrics, denim and synthetics like semi-body. You can dispense with the zipper and sew it as if it were a small pillowcase, only with a small brooch or ribbons at the end and... ... ... HOLD ON, I better make 2 more projects to illustrate you better :3c BACK HERE SOON! 🚀 ✨
 | | |
|---|

Aprovechare esta notita final para agradecer a todas las personas que votan y comentan mis aventuras crafteriles, cada notificación alegra mi corazon y las palabras de apreciación y comentarios de los curadores son indescriptiblemente valiosas para mi 🥰 🐝 💛 Siempre lo he dicho, estar en Hive se siente como nueva vida, aquí hay un flujo constante de buen contenido y dinámicas muy humanas, me gusta ver a todos compartiendo desde su mundo particular lo que les apasiona, pero sin esa carrera sin sentido de "hacer todo y de todo como sea lo mas rapido posible pasándole por encima a lo que sea y quien sea".
I will take this final note to thank all the people who vote and comment on my crafterile adventures, each notification gladdens my heart and the words of appreciation and comments from the curators are indescribably valuable to me 🥰 🐝 💛 I've always said it, being in Hive feels like new life, here there is a constant flow of good content and very human dynamics, I like to see everyone sharing from their particular world what they are passionate about, but without that meaningless race of “doing everything and anything as fast as possible overlooking whatever and whomever.”
Gracias a todos los lideres de comunidad (incluyendo también en las que no participo), a los moderadores y curadores por todo su buen trabajo, espero que ustedes especialmente se encuentren bien, gracias por todo su esfuerzo, que créanme, no pasa desapercibido 🫂 Se les quiere y admira mucho, ¡un súper abrazo! ヾ (☆ '∀' ☆)
Thanks to all the community leaders (including also those in which I do not participate), to the moderators and curators for all your good work, I hope you especially are well, thanks for all your effort, which believe me, does not go unnoticed 🫂 You are loved and admired very much, super hug! ヾ (☆ '∀' ☆)
~ You must login to the site first, then click on the text above ~


✨ 🍓 All texts and images by @Tesmoforia 🍓 ✨
📸 Tools: Xiaomi Redmi Note 8 📲 Snow 🎬 Remini 🌓 FotoJet 📐
🚨 ¡Please do not take, edit or republish my material without my permission! 🚨
💌 ¿Do you wish to contact me? [email protected] 💌
🌙 Banner, signature and separators by Keili Lares
Te quedó súper bonito ✨ me encantó sobretodo el detalle del lazo y cómo lo hiciste, aparte explicaste cada paso muy bien
Muchas gracias Mandy ! ! 💙 El lazo no estaba en los planes pero al juntar todos los pedacitos fue super lovely y un must 💘
Que hermoso te quedo, tiene multiples propositos, el lazo es divino, es creativo y original, me gusto mucho tu trabajo, saludos y bendiciones
Hola XieXie (me encanto tu username, auxilio, suena a nombre de personaje de novela china ancestral) muchas gracias por esa apreciación tan bonita, igualmente para ti ! ! 💜 💜 💜
Just delightful!! I always love the tutorials you put together💙👛
~ blushing ~ ( っ˶´ ˘ `)っ