✨🌹🦋Hola amigos, amantes de la creatividad. Espero que hayan tenido un buen comienzo de semana.🦋🌹✨
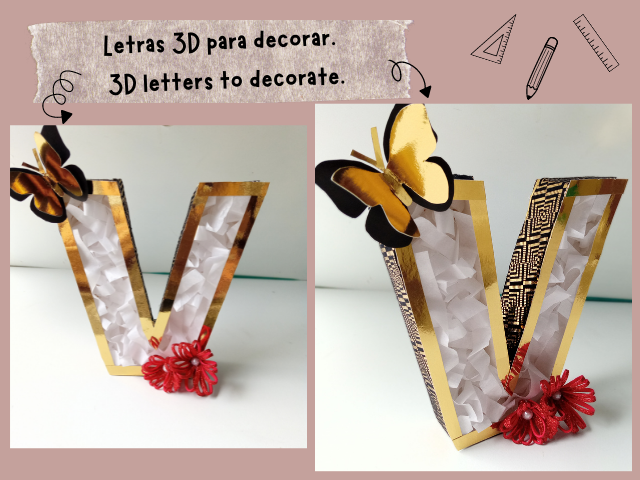
En esta ocasión comparto con ustedes una bonita y sencilla decoración con letras 3D. Hace tiempo que quería hacer este tipo de letras, pero siempre lo veía muy complicado y la verdad es que fue bastante sencillo a la hora de montar la letra, supongo que otra letra puede ser un poco más complicada pero la verdad es que haciéndola con paciencia quedará muy bien.
Por otro lado, puse unos detalles muy bonitos que también les mostraré cómo hacerlos en el paso a paso por si se animan. No quise hacerlo muy cargado de detalles, quería que tuviera un estilo sencillo y elegante. Este tipo de letras son muy bonitas para decorar una habitación, para un evento, un cumpleaños, etc.
🔸A continuación, los dejo con el paso a paso:
✨🌹🦋Hello friends, lovers of creativity. I hope you have had a good start of the week.🦋🌹✨
This time I share with you a nice and simple decoration with 3D letters. For some time I wanted to make this type of letters but I always saw it very complicated and the truth is that it was quite simple when it came to assemble the letter, I guess another letter may be a little more complicated but the truth is that doing it with patience will look great.
On the other hand, I put some very nice details that I also showed you how to make them in the step by step in case you feel like it. I didn't want to make it too full of details, I wanted it to have a simple and elegant style. This kind of letters are very nice to decorate a room, for an event, a birthday,etc.
🔸Here I leave you with the step by step:
♥️ESPERO QUE TE GUSTE,
¡Empecemos!
♥️I HOPE YOU LIKE IT,
Let's start!

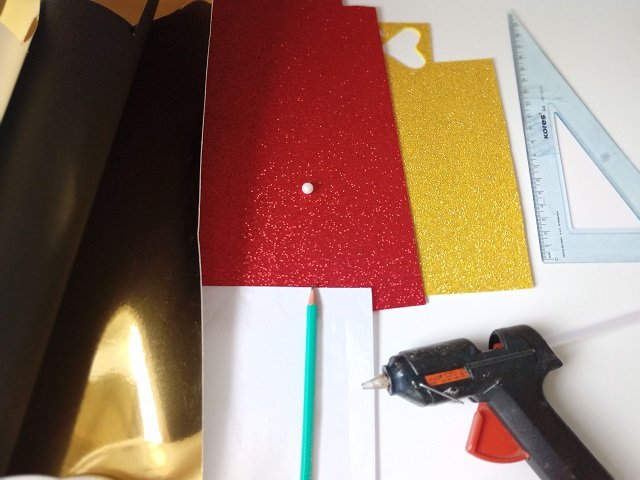
🦋 MATERIALES | 🦋 MATERIALS
- Cartulina metalizada dorada.
- Cartulina escolar negra.
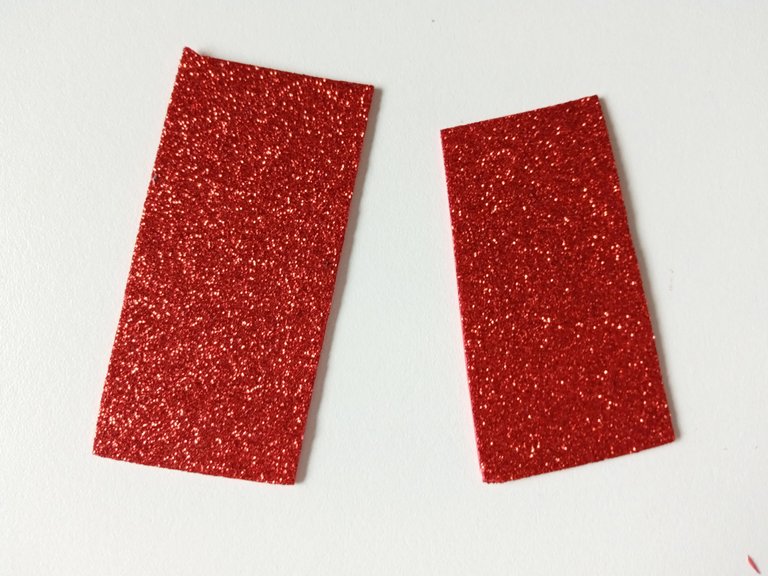
- Foami escarchado rojo.
- Papel de seda blanco.
- 2 perlas blancas (opcional).
- Silicón caliente.
- Hoja blanca.
- Tijeras.
- Lápiz.
- Regla.
- Gold metallic cardboard.
- Black school cardboard.
- Red frosty foami.
- White tissue paper.
- 2 white pearls (optional).
- Hot silicone.
- white sheet
- Scissors.
- Pencil.
- Rule.
🌹 PROCEDIMIENTO | 🌹 PROCESS
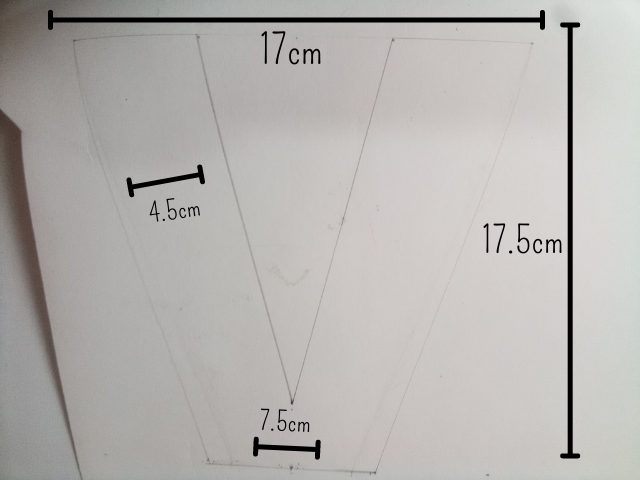
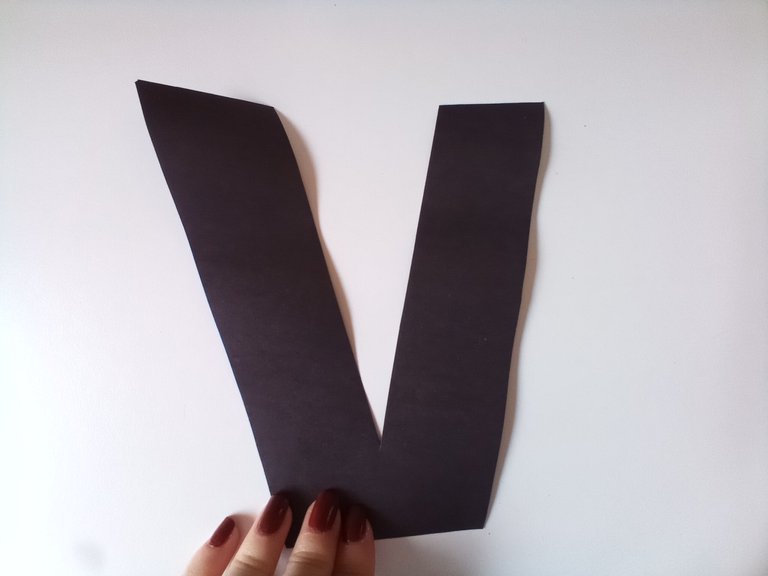
- PASO 1:
Comenzamos eligiendo la letra que vamos a utilizar. A continuación, dibujamos la letra con la altura y el ancho deseados en la cartulina metalizada dorada. En mi caso, tomé las siguientes medidas: 17,5 cm de largo y 17 cm de ancho. A continuación, trazamos la letra según las medidas previamente seleccionadas y la recortamos. Una vez hecho esto, marcamos las mismas medidas en la cartulina escolar negra y recortamos.
🔸A continuación, les dejo las imágenes con todas las medidas que tomé para mi letra:
- STEP 1:
We start by choosing the letter we are going to use. Then, we draw the letter with the desired height and width on the gold metallic cardboard. In my case, I took the following measurements: 17.5 cm long and 17 cm wide. Then, we trace the letter according to the previously selected measurements and cut it out. Once this is done, we mark the same measurements on the black school cardboard and cut out.
🔸Below, I leave you the images with all the measurements I took for my letter:

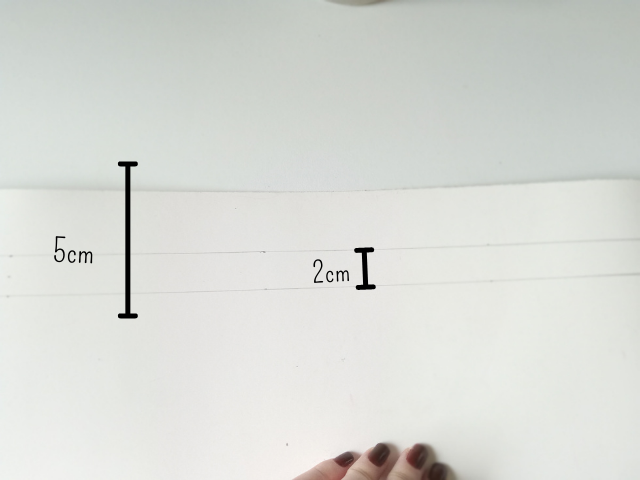
- PASO 2:
Luego, medimos todo el borde de nuestra letra, en mi caso 81,7 cm. Dibujamos una tira con estas medidas en la cartulina metálica dorada, con un ancho de 5 cm que dividiremos trazando una línea de 2 cm. Recortamos, doblamos la pestaña de 2 cm y cortamos en triángulos.
🔸A continuación, te dejo las imágenes para que te guíes:
- STEP 2:
Then, we measure the entire edge of our letter, in my case: 81.7 cm. We draw a strip with these measurements on the gold metallic cardboard, with a width of 5 cm that we will divide by drawing a line of 2 cm. Cut out, fold the 2 cm tab and cut into triangles.
🔸Here are the images to guide you:

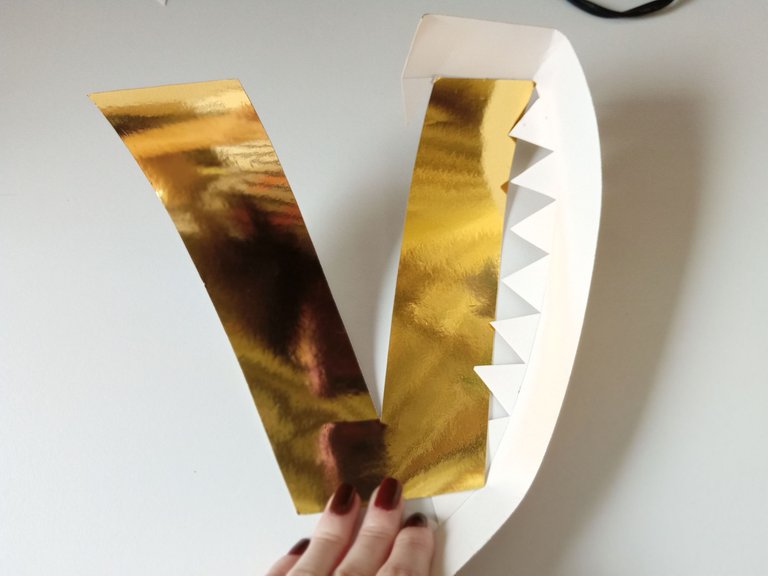
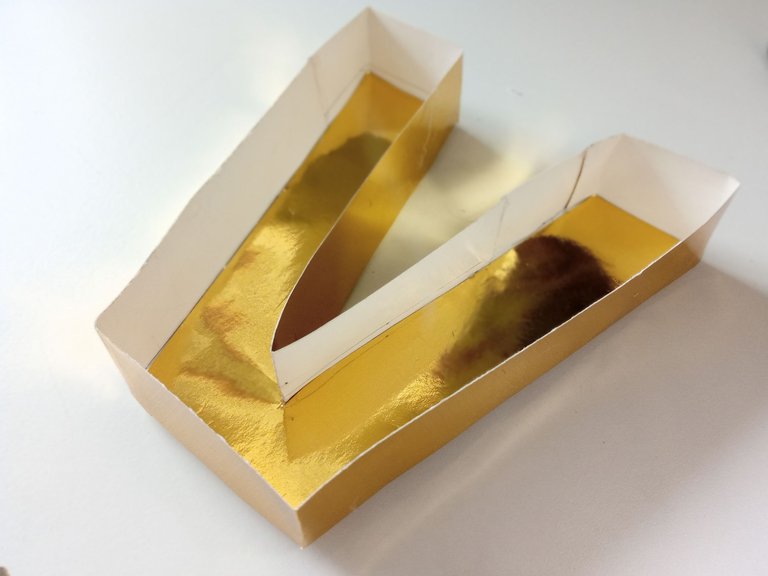
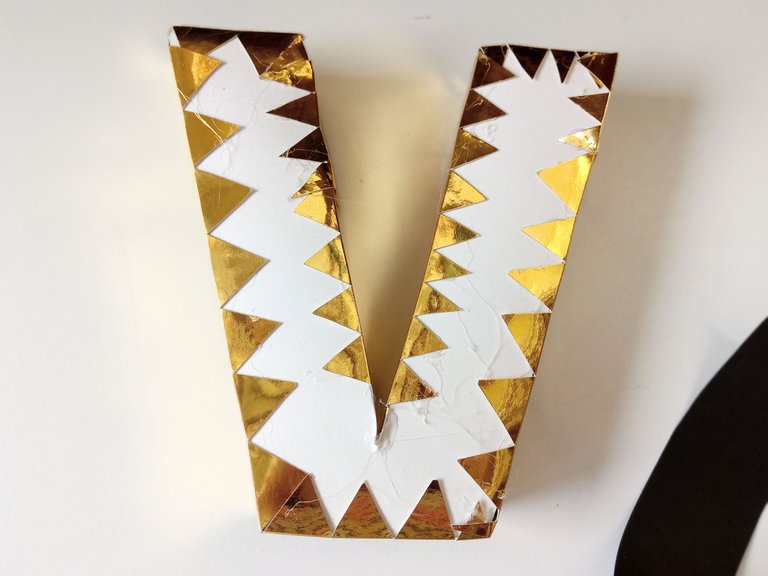
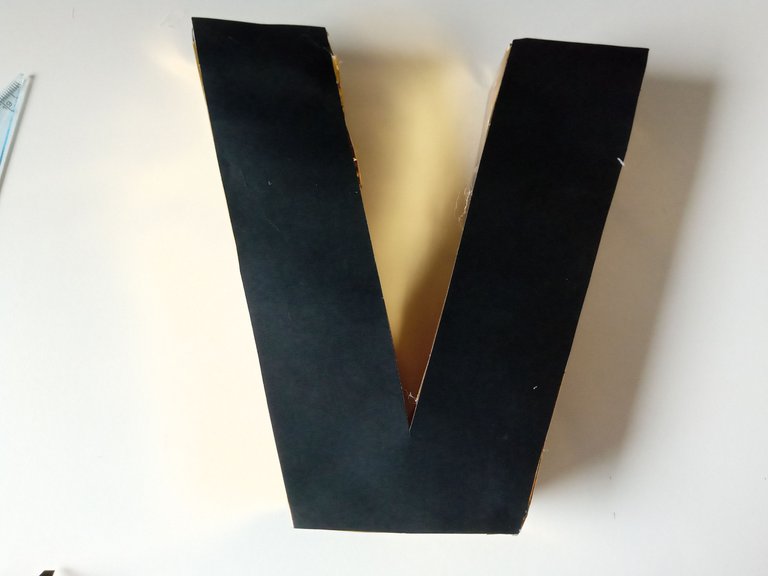
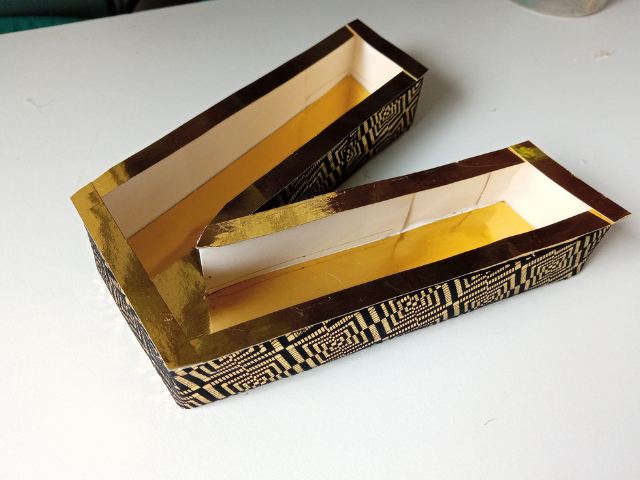
- PASO 3:
Ahora podemos empezar con el armado de nuestra letra en 3D. Para las paredes debemos pegar por todo el borde de la parte trasera de la letra que hemos hecho con cartulina metalizada dorada los triángulos que cortamos previamente. Una vez hecho esto, pegamos la letra de cartulina escolar negra sobre los triángulos para que no se vean, así como les muestro en las siguientes imágenes:
- STEP 3:
Now we can begin to assemble our 3D letter. For the walls we must glue all around the edge of the back of the letter that we made with frosted gold cardboard the triangles that we previously cut. Once that is done, we glue the black school cardboard letter over the triangles so that they are not visible as shown in the following images:
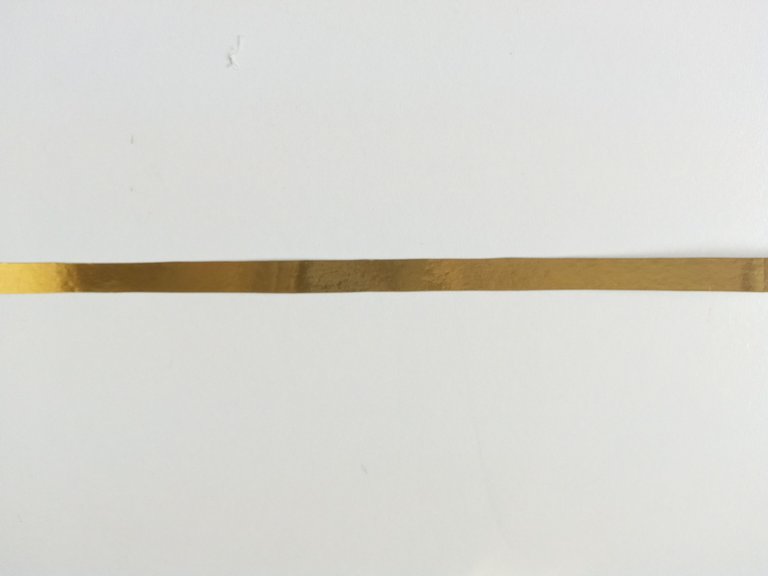
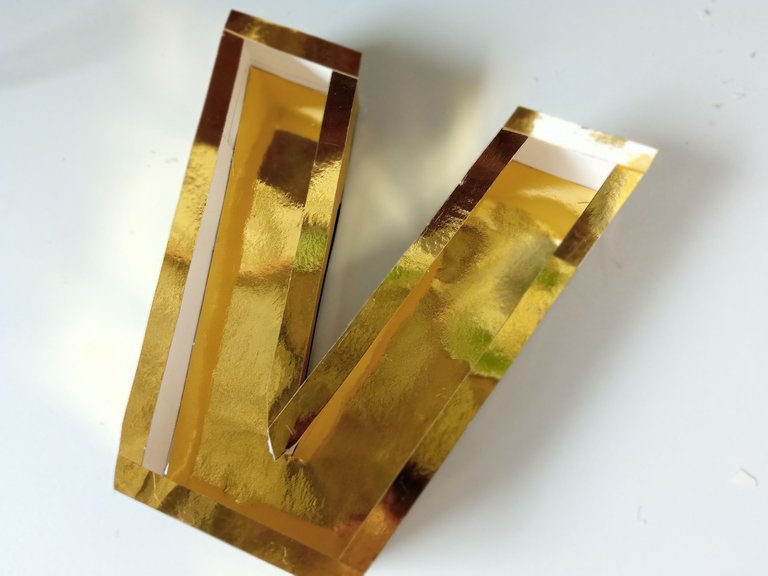
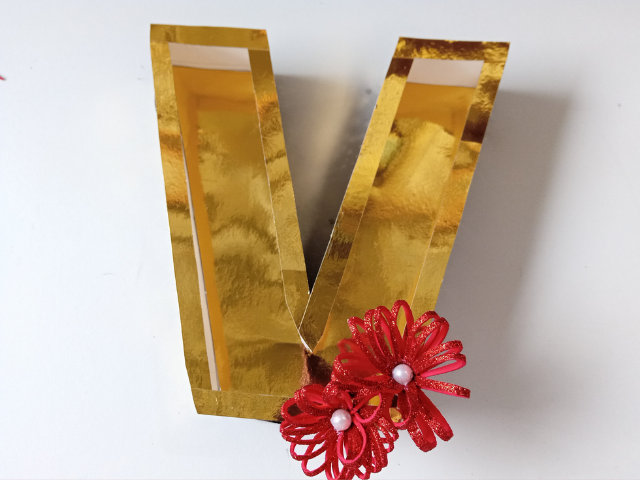
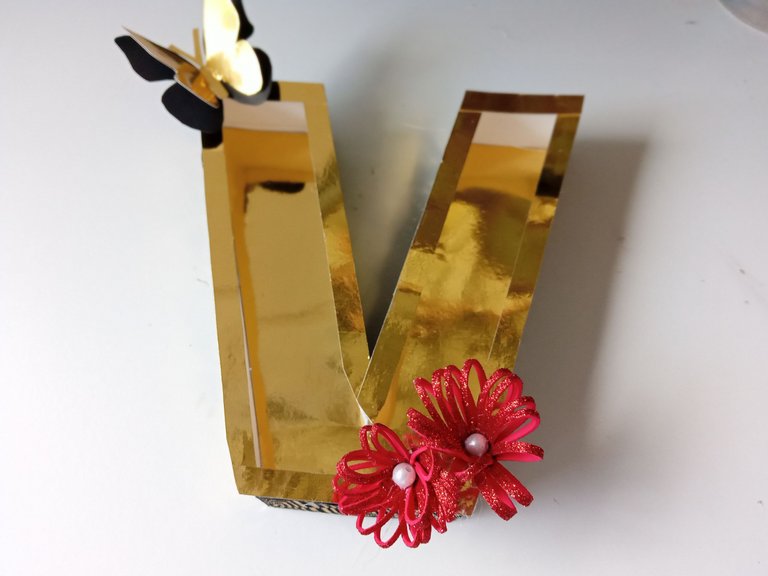
- PASO 4:
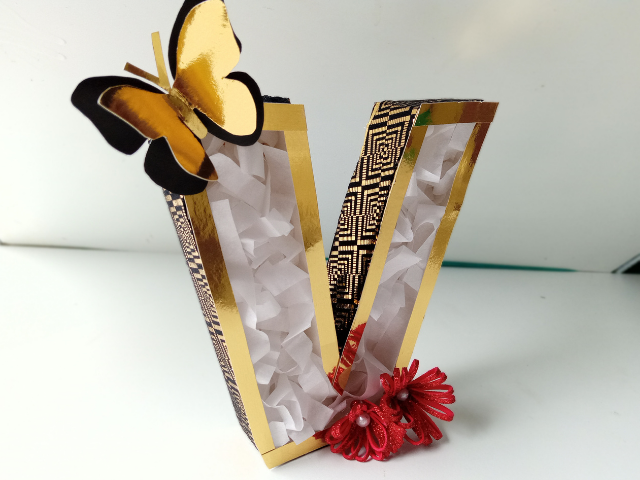
Para terminar, corta tiras de 1 cm de ancho con cartulina dorada y pega por todo el borde de la letra.
Además, pegué una cinta decorada en las paredes, esto es opcional.
- STEP 4:
To finish, cut 1 cm wide strips with gold cardboard and glue all around the edge of our letter.
In addition, I glued a decorated ribbon on the walls, this is optional.
✨ DECORACIONES | ✨ DECORATIONS
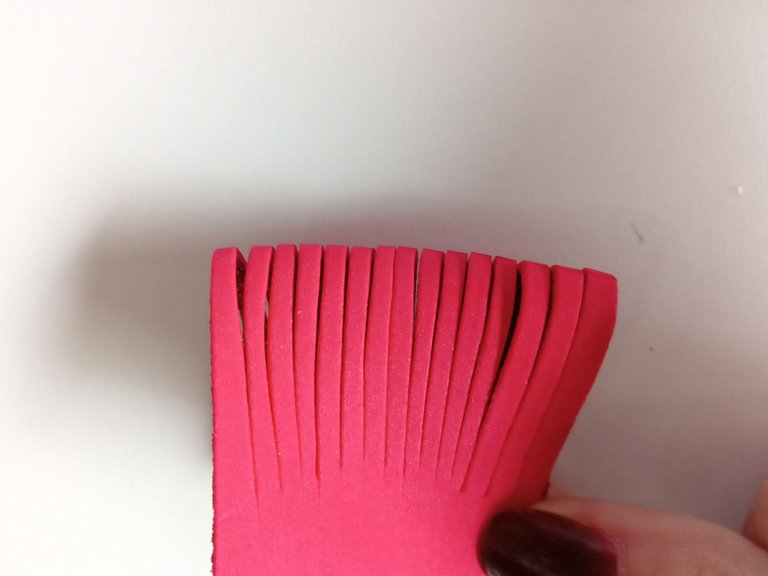
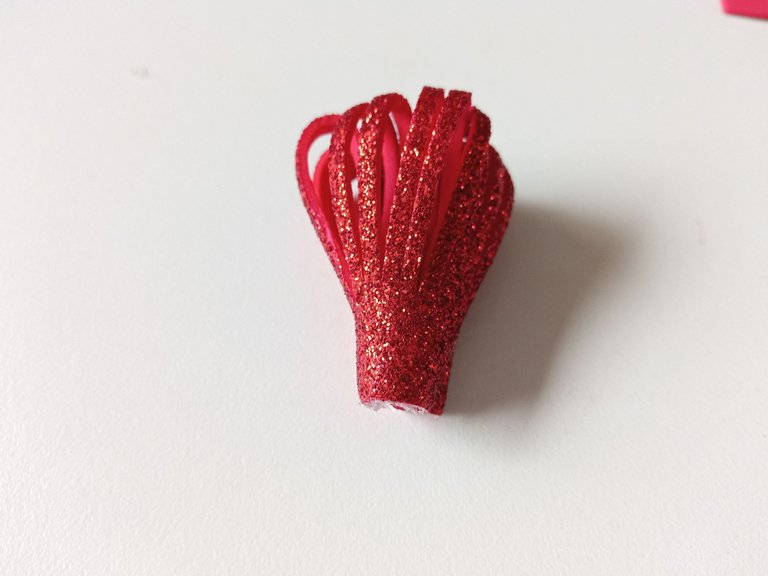
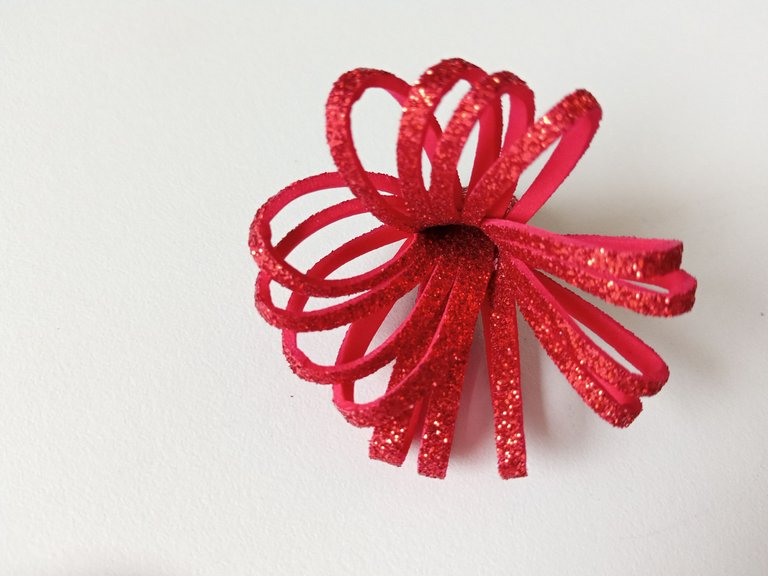
🌹 Para las flores: recorta rectángulos de diferentes tamaños, dobla a la mitad por el lado opuesto y corta en tiras sin llegar al borde. Una vez hecho esto, doblar, esta vez por el lado del escarchado y pegar dejando un pequeño extremo sin pegar. A continuación, pega formando un cilindro.
🌹 For the flowers: cut out rectangles of different sizes, fold in half on the opposite side, cut into strips without reaching the edge. Once this is done, fold this time on the frosting side and glue leaving a small end unglued. Then glue forming a cylinder.
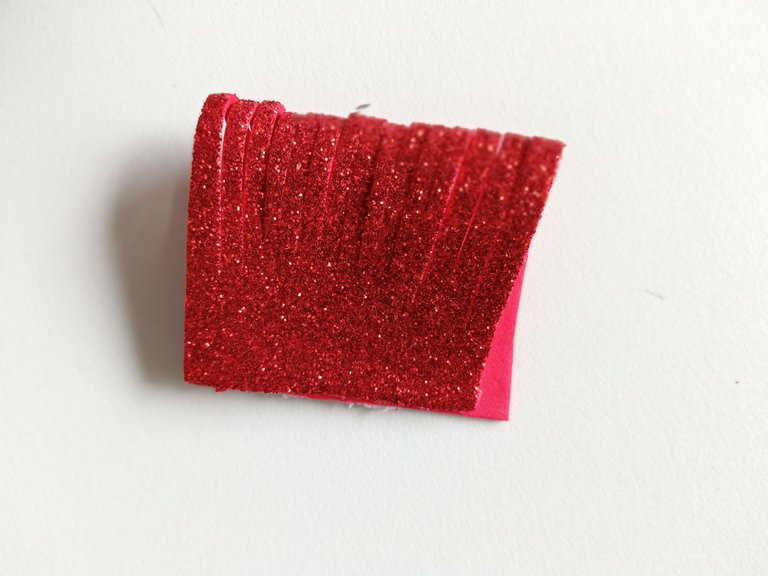
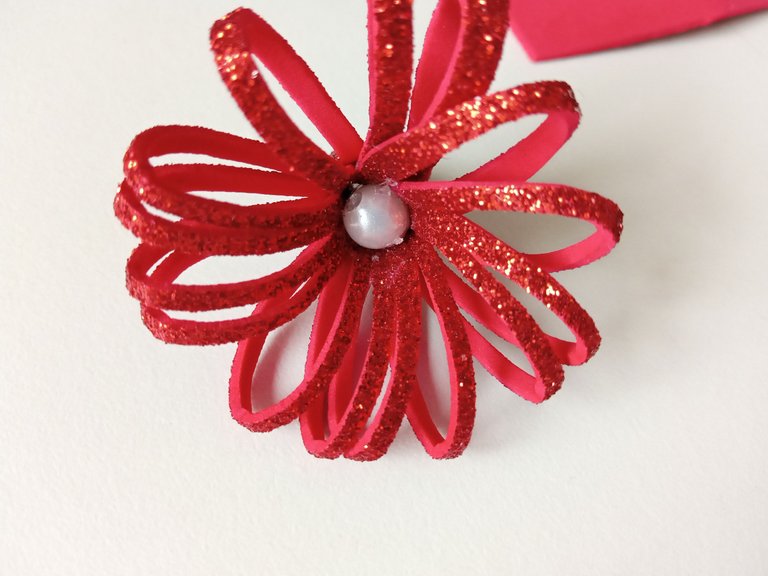
Para terminar, abre los pétalos y pega una perla blanca en el centro. Repite el proceso con el otro rectángulo.
To finish, open the petals and glue a white pearl in the center. Repeat the process with the other rectangle.
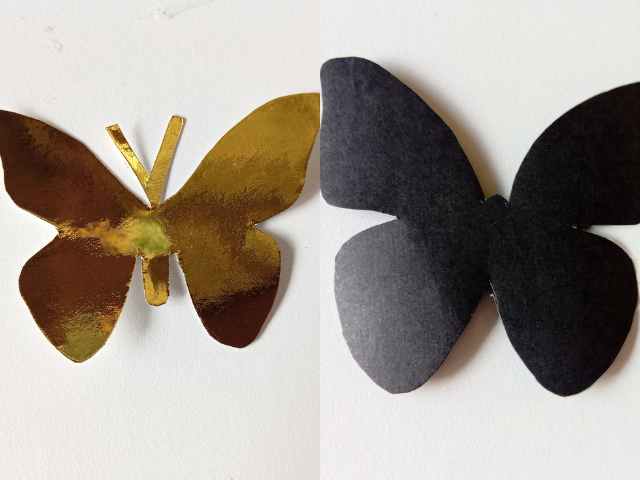
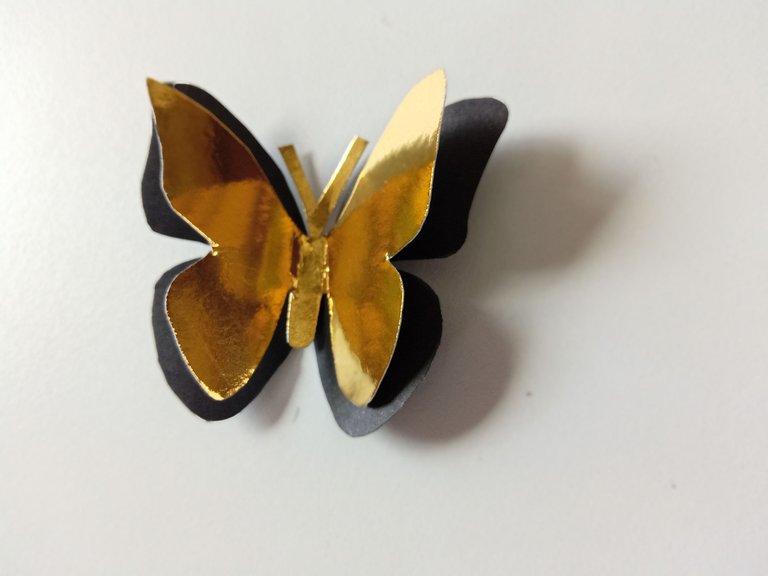
🦋 Para la mariposa: dibujar el patrón de una mariposa, recortar, calcar este patrón en la cartulina escolar negra y en la cartulina metalizada dorada, una con antenas y la otra sin ellas, unirlas con un poco de pegamento en medio y doblar hasta los extremos del cuerpo de la mariposa.
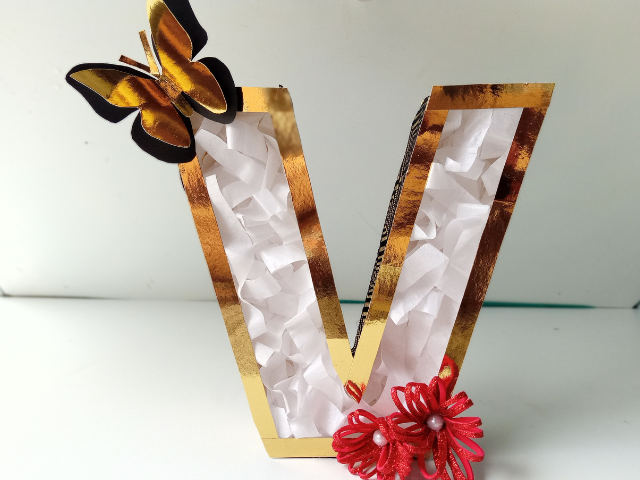
Por último, rellena la letra con tiras de papel de seda.
🦋 For the butterfly: draw the pattern of a butterfly, cut out, trace this pattern onto the black school cardstock and onto the gold metallic cardstock, one with antennae and the other without, join them together with a little glue in between and fold to the ends of the butterfly's body.
Finally, fill the letter with strips of tissue paper.
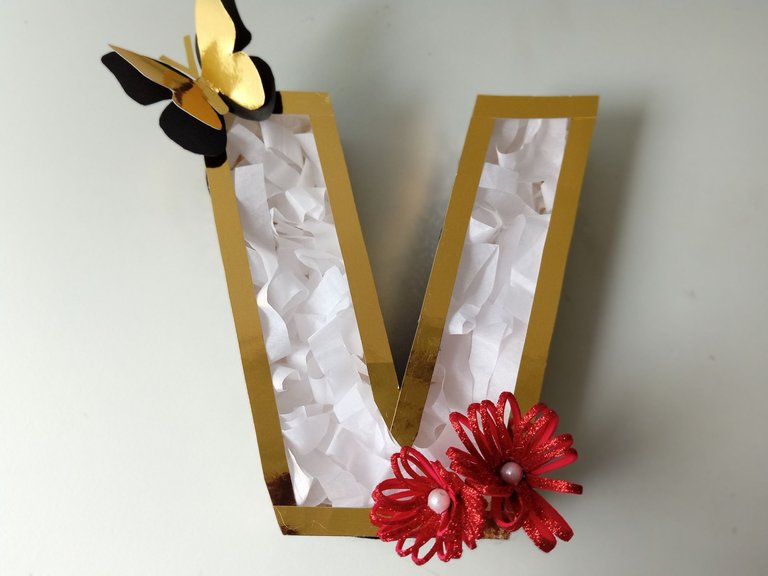
🦋🌹✨¡Y listo!✨🌹🦋 Habremos terminado esta linda decoración de letra 3D, muy sencilla y fácil de elaborar. Ideal para una celebración de cumpleaños, evento especial o simplemente para decorar una habitación. quedan muy lindas y dan un aspecto elegante al ambiente.
🔸Próximamente le traeré nuevas ideas con letras 3D. Hasta la próxima.
🦋🌹✨¡And ready!✨🌹🦋 We will have finished this nice 3D letter decoration, very simple and easy to make. Ideal for a birthday celebration, special event or simply to decorate a room. They look very nice and give an elegant look to the environment.
🔸Soon I will bring you new ideas with 3D letters. See you next time.


Todas las fotografías son de mi propiedad.
Separador y Fotos editadas en Canva
All photographs are my property.
Photos edited in Canva
The rewards earned on this comment will go directly to the people sharing the post on Twitter as long as they are registered with @poshtoken. Sign up at https://hiveposh.com.
Te quedó hermosa amiga @valenpba. Te felicito por tu bonito trabajo lleno de delicadeza. Definitivamente los colores metalizados quedan espléndidos con negro, pues resaltan mucho, me encantó tu combinación.
Saludos.
Amiga hiciste una hermosa pieza decorativa.
Felicitaciones por tu buen trabajo.
Gracias por compartirlo.
Bendiciones.
Muchas gracias por tus lindas palabras.✨
Me alegra mucho que te haya gustado. 😊
Bendiciones, Saludos.💕
Holaaa amiga @dayadam ✨🌼 muchas gracias por leer y comentar mi post con lindas palabras.
Sí, la verdad que estoy enamorada de esa cartulina metalizada preciosa y elegante, resalta mucho con tonos oscuros y como dices el resultado es delicado y elegante.
Muchas gracias por tus lindas palabras que animan mucho. Saludos.
Thank you for sharing this amazing post on HIVE!
non-profit curation initiative!Your content got selected by our fellow curator @rezoanulvibes & you just received a little thank you via an upvote from our
You will be featured in one of our recurring curation compilations and on our pinterest boards! Both are aiming to offer you a stage to widen your audience within and outside of the DIY scene of hive.
Join the official DIYHub community on HIVE and show us more of your amazing work and feel free to connect with us and other DIYers via our discord server: https://discord.gg/mY5uCfQ !
If you want to support our goal to motivate other DIY/art/music/homesteading/... creators just delegate to us and earn 100% of your curation rewards!
Stay creative & hive on!
Muchas Graciass @rezoanulvibes Y @diyhub Por el apoyo. 💕😊
You're welcome! Keep up the good work!
Muy bonito trabajo, quedo muy delicado, con una buena decoración, gracias por compartirlo, saludos.
Muchas gracias por leer y comentar con tan bonitas palabras. Saludos. 😊👋🏻
Un abrazo. 🤗🌷💚Hola @valenpba, que trabajo tan hermoso y prolijo, me encanta el toque de la mariposa y las flores en otro tono, la cartulina metalezada le aparta un toque de distinción.
Muchas gracias por tan lindas palabras.Hola @adonisr. 😊✨
Así es, la cartulina metalizada dorada aporta una apariencia muy elegante, la verdad que estoy enamorada. 🤭
Saludos.✨🌼