✨¡Hola amigos amantes de la creatividad! Espero que estén todos bien.✨
🔸Sin más que añadir, a continuación los dejo con el paso a paso:
✨¡Hello friends who love creativity! I hope you are all well.✨
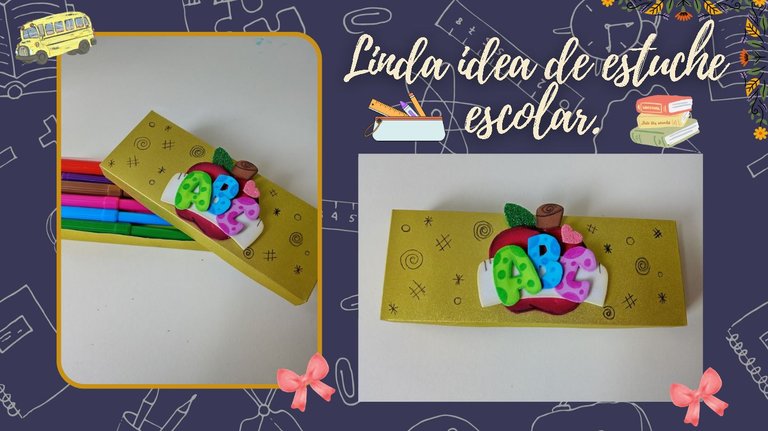
I hope you are having a great week. For my part, I am happy to stop by here to share a new creation with you. On this occasion, I am sharing with you the step-by-step instructions for making a nice idea for a school pencil case. The times I have made pencil cases, I have been delighted with the results, because I imagine my inner child happy to have something like this, haha. I really liked this idea for the little ones' homework area or for a gift for the teacher, because I think that if they carry it in their bag, it will not be something that will last very long, unless it is made with a more resistant material.
🔸Without more to add, then I leave you with the step by step:
♥️ESPERO QUE TE GUSTE,
¡Empecemos!
♥️I HOPE YOU LIKE IT,
Let's start!

✂️ MATERIALES | ✂️ MATERIALS
- Cartulina escarchada dorada.
- Foami escarchado verde y rosa.
- Foami rojo, marrón, blanco,
- verde, azul y morado.
- Pinturas y marcadores.
- Hoja blanca.
- Pegamento.
- Tijeras.
- Regla.
- Lápiz.
- Golden frosted cardboard.
- Green and pink frosted foam.
- Red, brown, white,
- green, blue and purple foam.
- Paints and markers.
- White sheet.
- Glue.
- Scissors.
- Ruler.
- Pencil.
🌟 PROCEDIMIENTO | 🌟 PROCESS
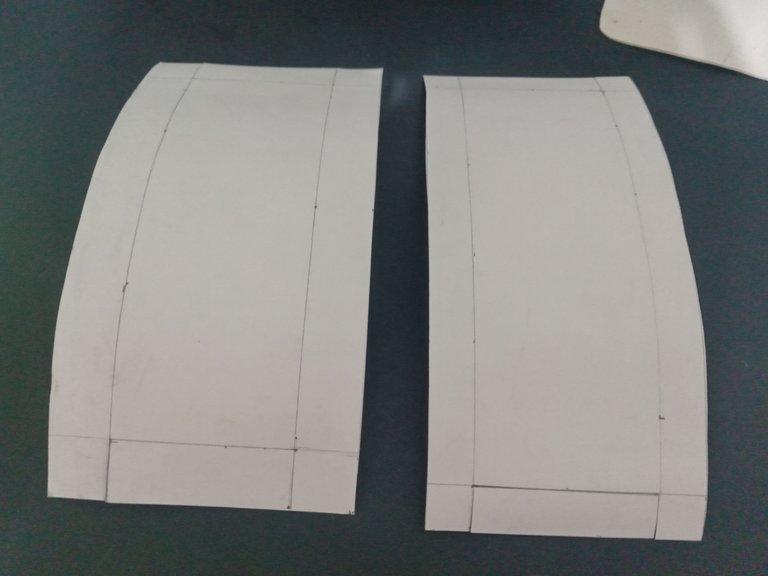
✨PASO 1:
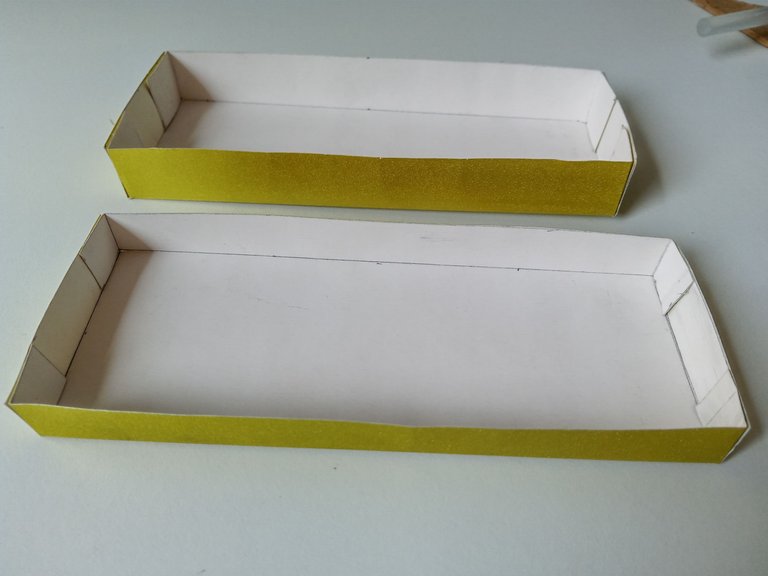
Lo primero que hice fue trazar y cortar en cartulina escarchada dorada, las medidas para el estuche, pero recuerden que pueden elaborarlo un poco más grande o pequeño según su gusto o para lo que necesiten.
✂️Para la base:
✨Base de 15.9 cm x 5.9 cm.
✨Paredes de la base y pestañas de 2 cm.
✂️Para la tapa:
✨Parte central de 16 cm x 6 cm.
✨Paredes y pestañas de 1.5 (pero pueden ser del mismo tamaño o hasta 1 cm).
✨STEP 1:
The first thing I did was trace and cut the measurements for the case out of gold frosted cardboard, but remember that you can make it a little bigger or smaller depending on your taste or for what you need.
✂️For the base:
✨ Base 15.9 cm x 5.9 cm.
✨ Base walls and 2 cm tabs.
✂️For the lid:
✨ Central part 16 cm x 6 cm.
✨ Walls and 1.5 tabs (but they can be the same size or up to 1 cm).
 |  |
|---|
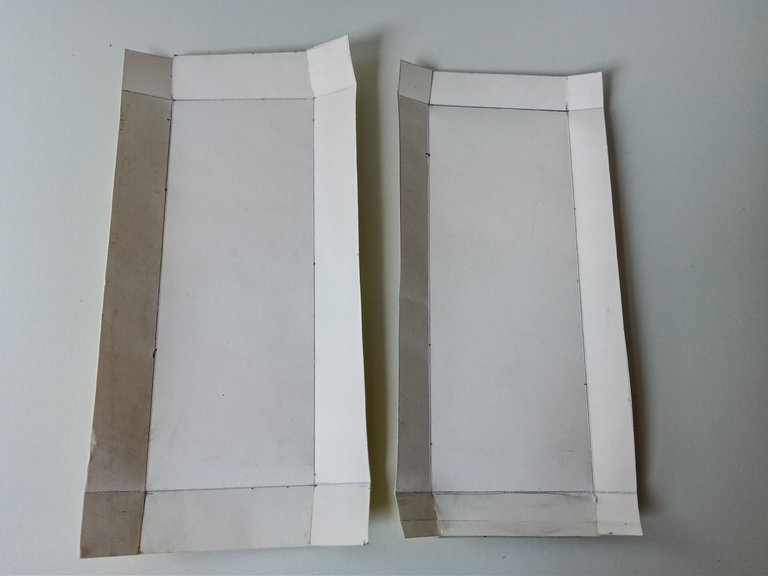
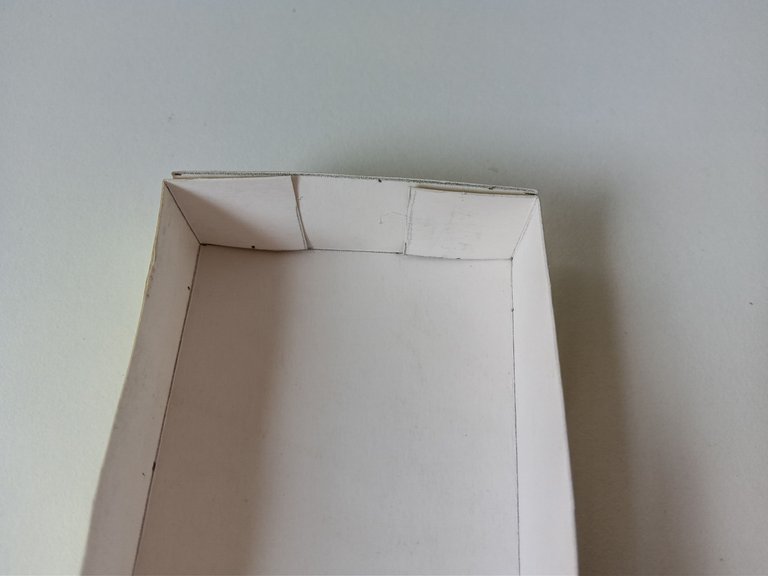
✨PASO 2:
Seguidamente, recortamos las piezas, pasamos la parte trasera de la tijera para remarcar los dobleces y que sea mucho más fácil a la hora de doblar cada pared o pestaña y así formar el estuche de una manera más cómoda. Pegamos las pestañas por dentro de las paredes y ya estaría listo el estuche.
✨STEP 2:
Next, we cut out the pieces, we passed the back of the scissors to mark the folds and make it much easier when folding each wall or tab and thus form the case in a more comfortable way. We glued the tabs inside the walls and the case would be ready.
 |  |  |
|---|
✨PASO 3:
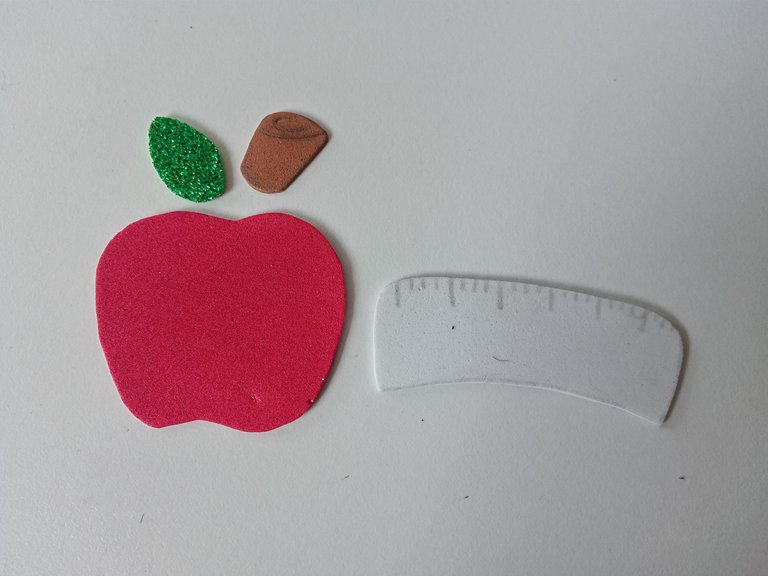
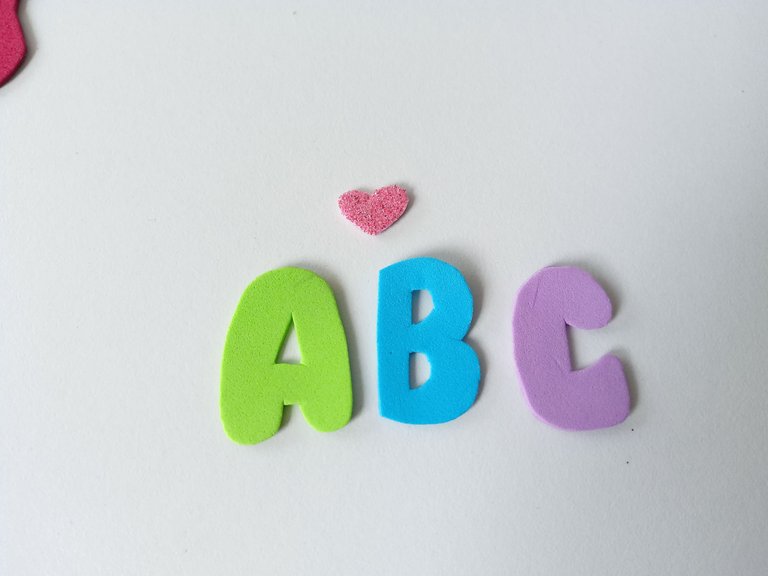
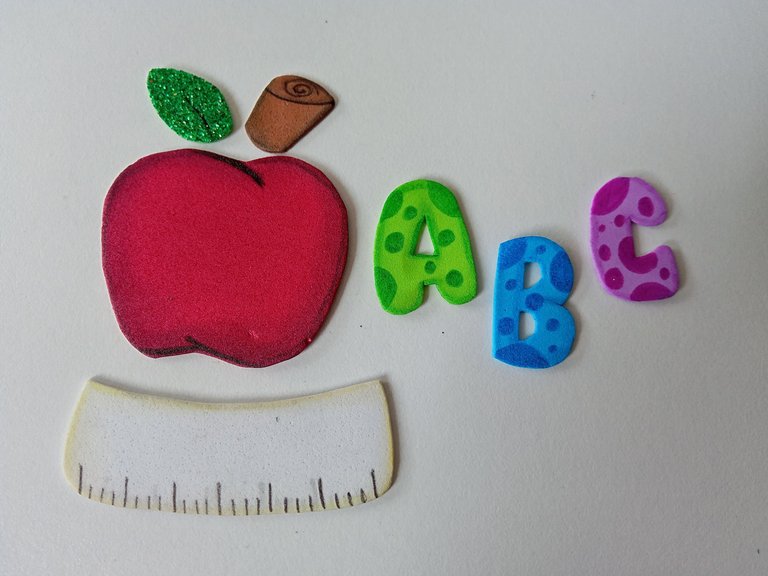
Ahora sí, es momento de dar vida con la decoración. Así que tomé la hoja blanca, dibujé la idea que tenía en mente de una manzana y un par de letras y luego, transferí a los colores correspondientes de foami, como explico a continuación:
✨Cuerpo de la manzana 5.5 cm x 4.5 cm en foami rojo.
✨Tronco de 2 cm x 1.5 cm en foami marrón.
✨Hoja de 2 cm x 1.5 cm en foami escarchado verde.
✨Letras de 3 cm x 2 cm en foami verde, azul y morado.
✨Regla de 7 cm x 2.5 cm en foami blanco.
✨Corazón de 1 cm en foami escarchado rosa.
✨STEP 3:
Now, it's time to bring it to life with the decoration. So I took the white sheet, drew the idea I had in mind of an apple and a couple of letters and then, transferred them to the corresponding colors of foam, as explained below:
✨Body of the apple 5.5 cm x 4.5 cm in red foam.
✨Trunk 2 cm x 1.5 cm in brown foam.
✨Leaf 2 cm x 1.5 cm in green frosted foam.
✨Letters 3 cm x 2 cm in green, blue and purple foam.
✨Ruler 7 cm x 2.5 cm in white foam.
✨Heart 1 cm in pink frosted foam.
 |  |
|---|
✨PASO 4:
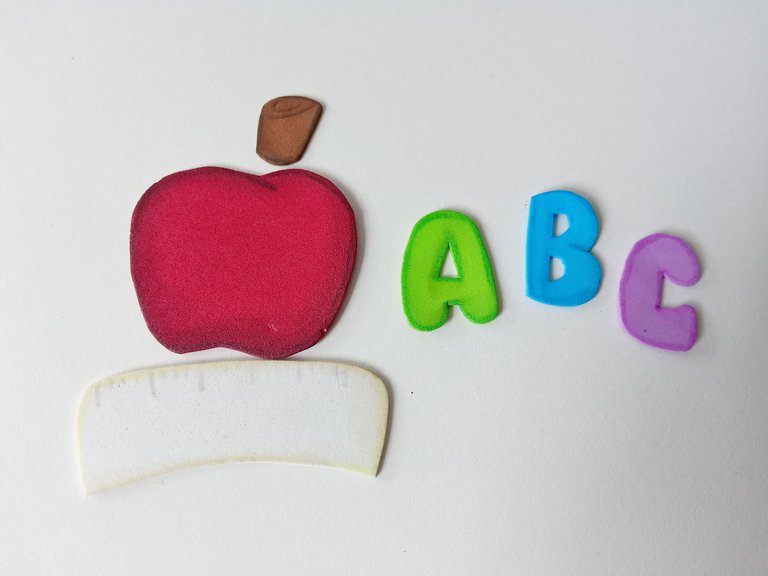
Al tener todas las piezas recortadas, es momento de dar color a los bordes solo a las piezas de foami liso, utilizando pinturas o marcadores que hagan contraste, ya sea un tono diferente o más oscuro. Luego, con ayuda de un pañito, difuminamos y dejamos secar.
✨STEP 4:
Once all the pieces have been cut out, it is time to color the edges only of the plain foam pieces, using paints or markers that contrast, either a different or darker shade. Then, with the help of a cloth, we blend and let it dry.
✨PASO 5:
Al estar secas las piezas, es momento de dibujar los detalles con marcador. En este caso, di un poco más de detalle a la manzana, al tronco, a la hoja y las líneas de los centímetros a la regla. En cuanto a las letras, les hice con un tono más oscuro de cada color, círculos de diferente tamaño.
✨STEP 5:
Once the pieces are dry, it's time to draw the details with a marker. In this case, I gave a little more detail to the apple, the trunk, the leaf, and the centimeter lines on the ruler. As for the letters, I made circles of different sizes with a darker shade of each color.
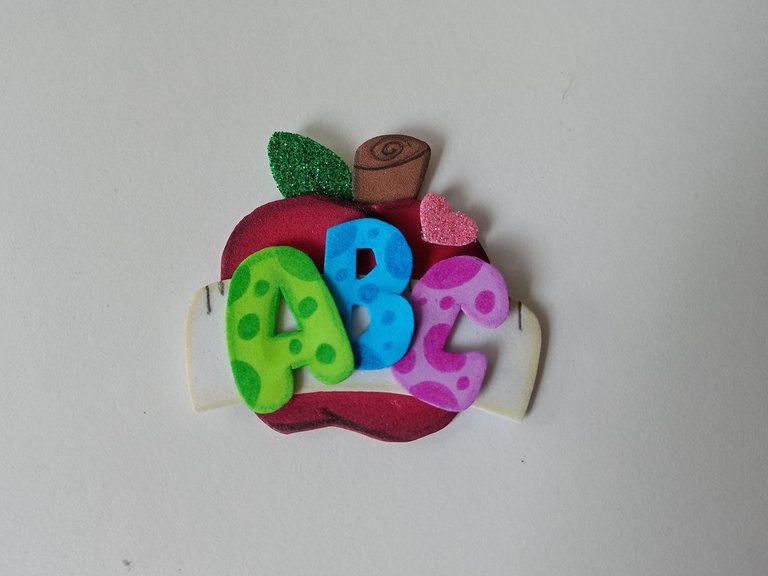
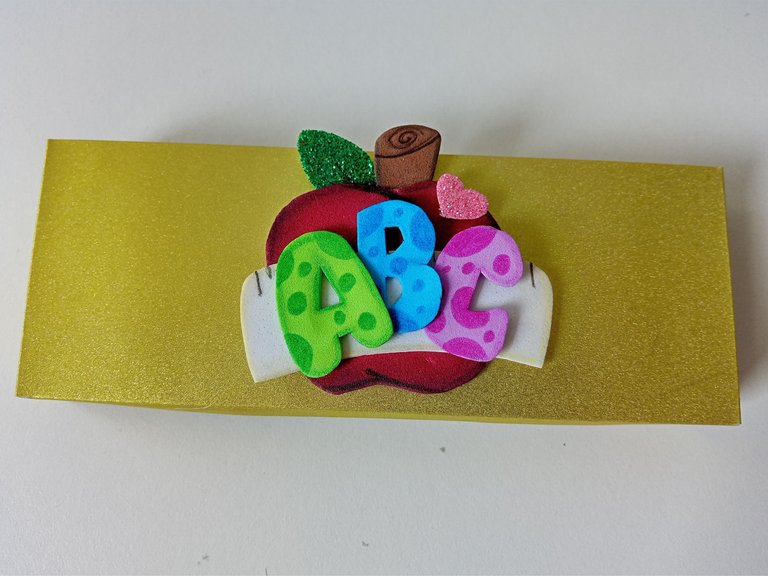
✨PASO 6:
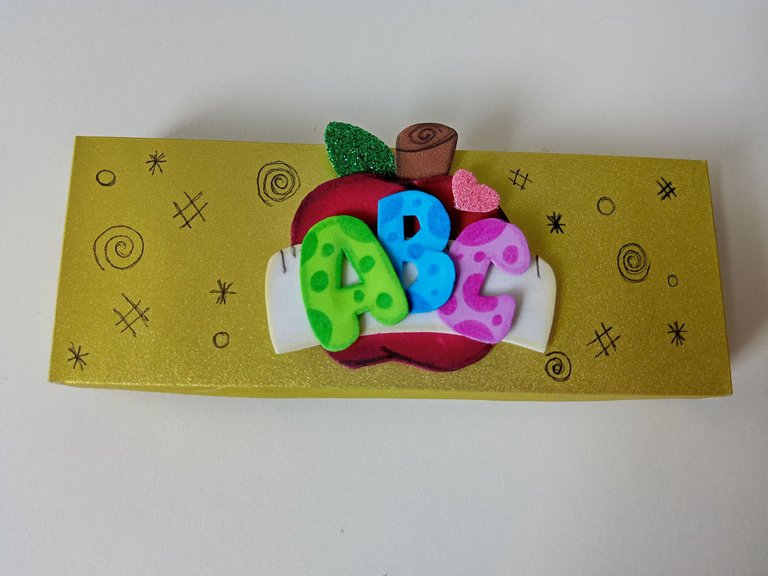
Al estar secas las piezas, es momento de comenzar a pegar. En mi caso comencé pegando la manzana, luego la regla, el corazón y, por último, las letras sobre la regla. Seguidamente, pegué en el centro del estuche, de forma horizontal, y, además, para que la tapa del estuche no se viera tan vacía, dibujé con marcador negro algunos asteriscos, numerales, círculos y espirales.
✨STEP 6:
Once the pieces are dry, it's time to start gluing. In my case, I started by gluing the apple, then the ruler, the heart, and finally, the letters on the ruler. Next, I glued them in the center of the case, horizontally, and, also, so that the cover of the case didn't look so empty, I drew some asterisks, numerals, circles, and spirals with a black marker.
 |  |  |
|---|
✨This is how you can make this cute case for your little ones, to give to teachers, or for your offices with a theme you like. Remember that you can adapt it to your tastes and preferred materials. I hope you liked the step-by-step instructions and are encouraged to make them.
❤️Until the next post.
✨RESULTADO: | ✨RESULT:
 | |
|---|

Todas las fotografías son de mi propiedad.
Separador y Fotos editadas en Canva
All photographs are my property.
Photos edited in Canva
Posted Using INLEO
Ami esto está bellísimo para Miranda para poner en el escritorio, me encanta el trabajo en el foamy, estas hecha una experta!
Glad to see you do what makes you happy. The pencil case looks great, well done and thanks for sharing.
¿ᴺᵉᶜᵉˢᶦᵗᵃˢ ᴴᴮᴰ? ᵀᵉ ˡᵒ ᵖʳᵉˢᵗᵃᵐᵒˢ ᶜᵒⁿ @ruta.loans
Me encantó el detalle de las letras y la manzana. Es un estuche súper lindo para guardar los lápices y colores en casa.
Muchas gracias Marlu! Así es, un detalle bonito ya sea para los niños o maestras ✨
Muy bello estuche escolar, gracias por regalarnos tu idea.
Que hermoso cada detalle ami😍😍
Indeed your creation is very impressive, the colours brings out the beauty more. Nicely done and good job
Muchas gracias amigo! Aprecio el comentario ✨
Muchas gracias amiga ! Me alegra que te haya gustado 🤭💕
Amé este estuche amiga! Quedó muy bonito 🥰🥰
Te quedó demasiado demasiado bello Ami, me encanta el toque con la manzana 😍😍
Muchas gracias mi Vane 🤭