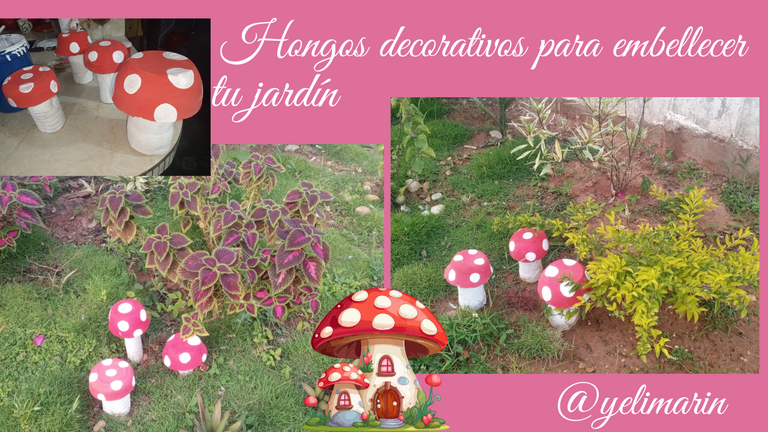
Hola amigos, feliz año nuevo para todos, deseo que lo hayan disfrutado junto a sus seres queridos y yo aprovechando que estamos iniciando este 2025, quiero compartirles un bello adorno que realicé para embellecer mi jardín, ha quedado hermoso y he amado el resultado.
Cuando comencé a construir mi jardín, quise incorporarle algunos adornos, que destacaran y que se mantuviesen en la intemperie, así que opté por estos hongos que me parece que se ven muy lindos y le han gustado a muchas personas.
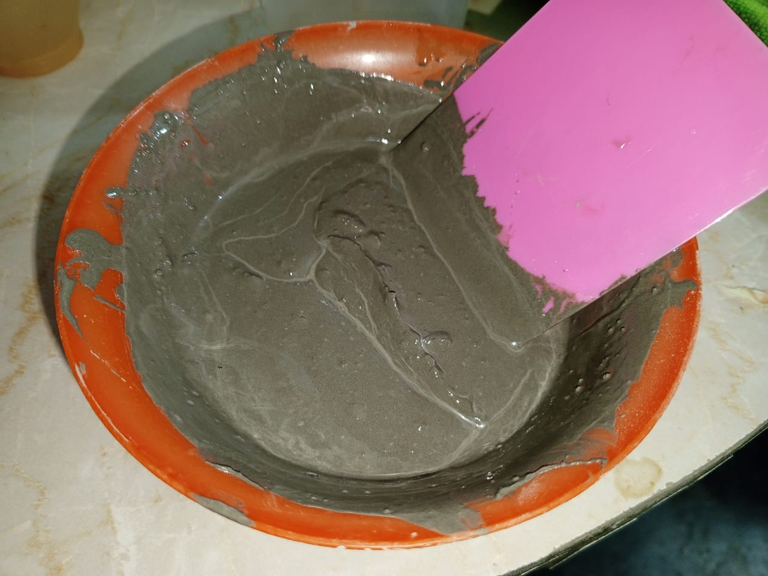
Tenía un cemento y un ripio que me había sobrado de una construcción que estaba haciendo, así que lo preparé yo misma como si estuviese preparando arroz, y digo esto por la distribución de las cantidades, por lo que por dos medidas de cemento incorporé 4 medidas de ripio.
Hello friends, happy new year to all, I hope you have enjoyed it with your loved ones and I taking advantage that we are starting this 2025, I want to share with you a beautiful ornament that I made to beautify my garden, it has been beautiful and I have loved the result.
When I started to build my garden, I wanted to incorporate some ornaments that would stand out and that would stand out in the open, so I chose these mushrooms that I think look very nice and have been liked by many people.
I had some cement and some gravel left over from a construction I was doing, so I prepared it myself as if I were preparing rice, and I say this because of the distribution of the quantities, so for two measures of cement I incorporated 4 measures of gravel.
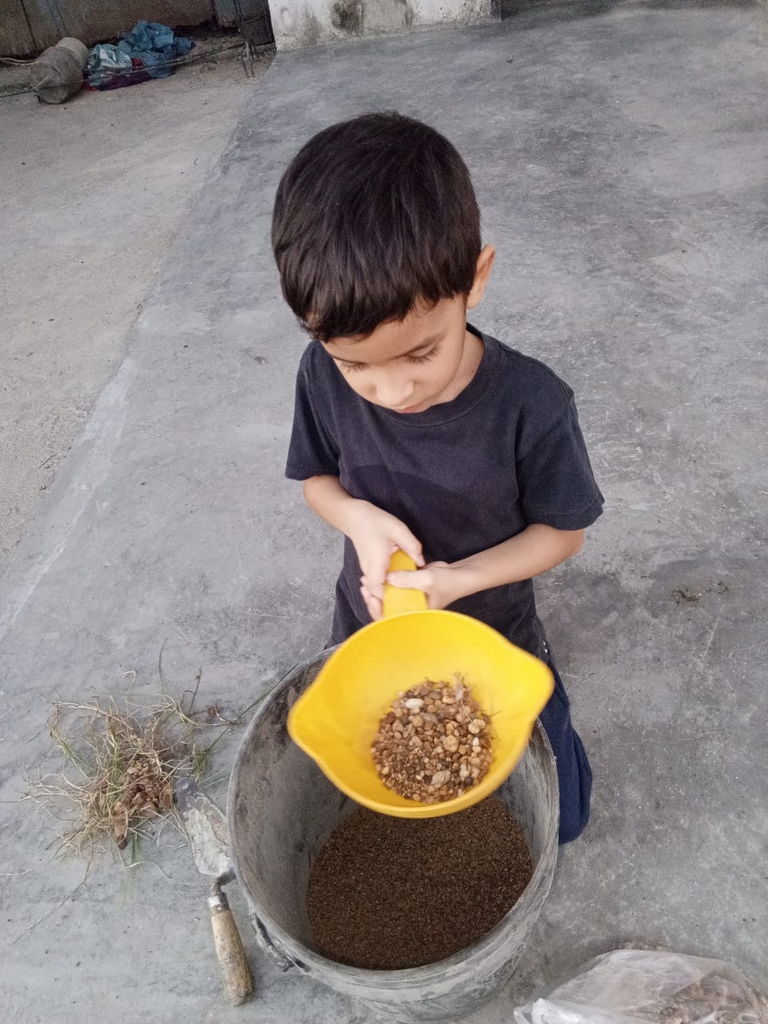
Estas medidas las realicé utilizando un pote de arroz chino y llené el tobito pequeño de albañilería, ayudándome de una cuchara de albañilería y el agua la fui agregando poco a poco hasta tener una mezcla compacta, pero más líquida que sólida. De estos hongos hice unos 12 aproximadamente, pero los hice por parte y mejorando la técnica.
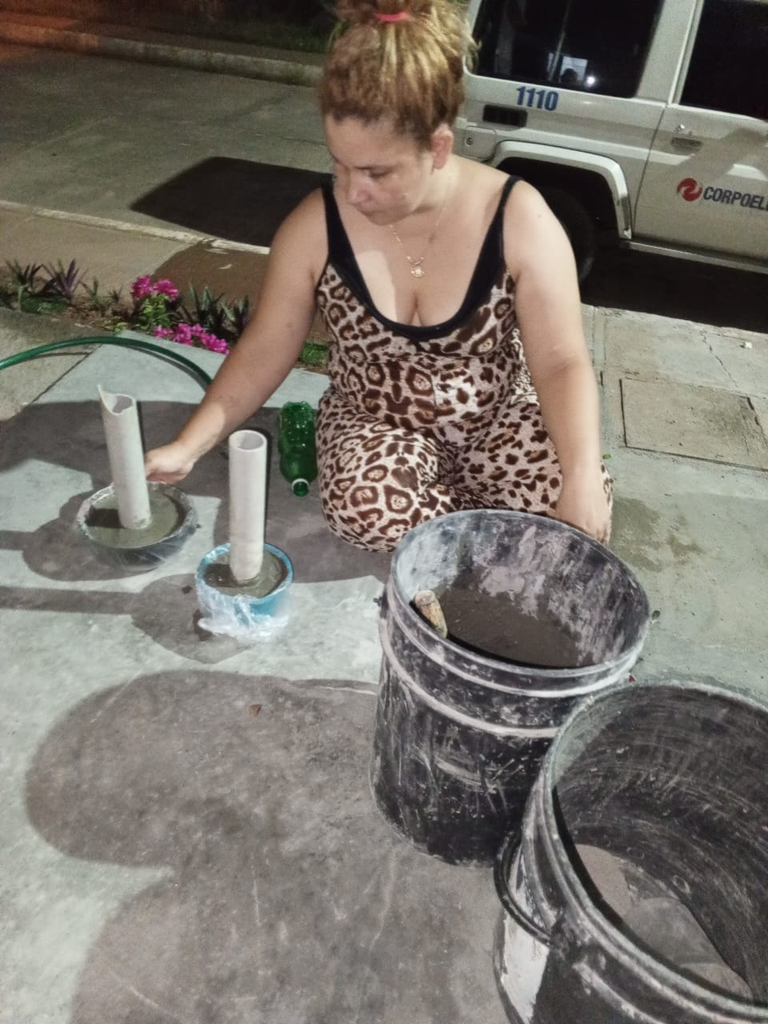
Los primeros que hice, los hice utilizando de base del hongo un pedazo de tubo de desagüe de 2 pulgadas, esos que se usan para los desagües de aguas negras. Este tubo lo piqué de tres alturas diferentes para que al colocarlo me quedara uno más alto que el otro. Pero la parte superior del honguito lo hice colocándole una bolsa plástica al molde, evitando que se me pegara cuando lo fuese a despegar.
Pero esto no fue buena idea porque cuando quite la bolsa quedaron todas las marcas de la bolsa y se veía mal, no con la textura lisa que yo buscaba y para corregirlo, tuve que preparar una pasta con cemento y corregir esas grietas, lo que me dio más trabajo.
I made these measurements using a Chinese rice pot and filled the small masonry nozzle, using a masonry spoon and adding the water little by little until I had a compact mixture, but more liquid than solid. I made about 12 of these mushrooms, but I did them by parts and improving the technique.
The first ones I made, I made them using a piece of 2-inch drainage pipe, those used for sewage drains, as the base of the mushroom. I cut this pipe in three different heights so that when I placed it, one would be higher than the other. But the top of the mushroom was made by placing a plastic bag over the mold, to prevent it from sticking when I was going to take it off.
But this was not a good idea because when I removed the bag all the marks of the bag were left and it looked bad, not with the smooth texture I was looking for and to correct it, I had to prepare a paste with cement and correct those cracks, which gave me more work.


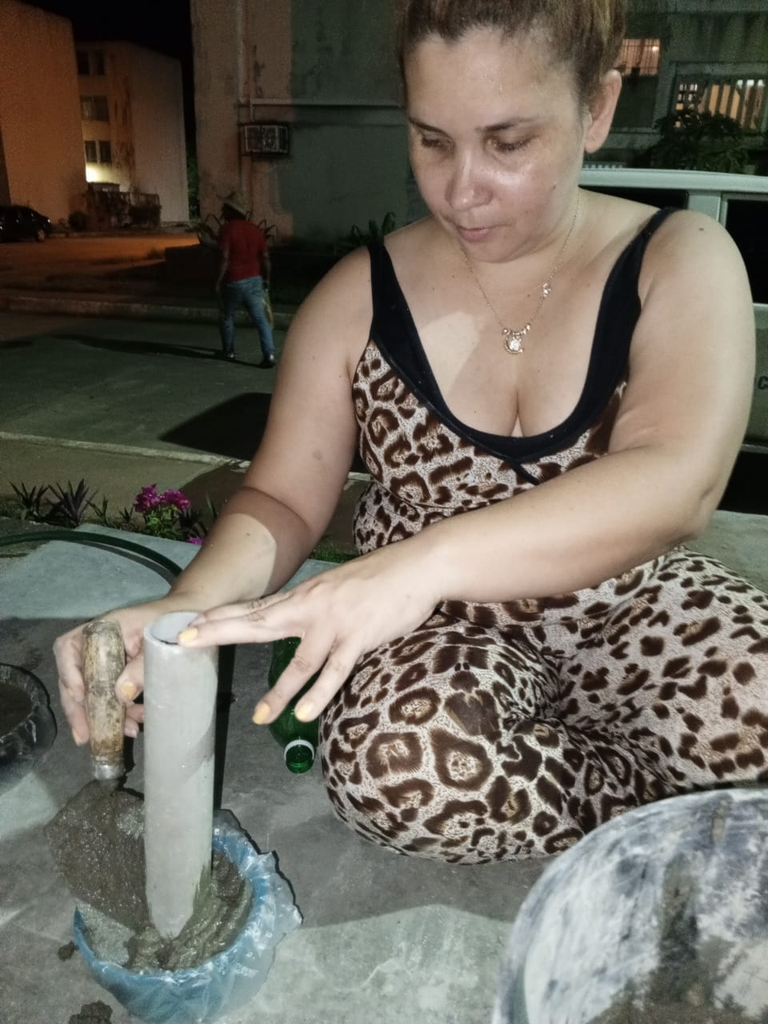
Otra cosa que debes evitar hacer es utilizar moldes de metal. Yo utilicé una ollita pequeña que tenía la forma perfecta para la parte superior del honguito, pero para sacar el cemento de allí al endurecer me costó muchísimo. Así que no cometas estos errores.
He visto videos de personas que realizan este arte con cemento utilizando una media panti y de verdad que se les ve muy fácil de moldear, así que yo improvisando y corrigiendo errores anteriores, utilicé como base de mi hongo, una botella de refresco de dos litros, una de 1,5 litros y otra de 1 litro, porque cómo les comenté cada uno debe ser más pequeño que el otro y en esta oportunidad utilicé unos envases de sopa plásticos que tenía de diferentes tamaños y le dio la medida perfecta.
Una de las cosas que hice esta vez fue engrasar con aceite el molde plástico antes de echarle la mezcla de cemento y al secarse pude despegarla con mucha facilidad. Así que esta vez teniendo la mezcla de cemento preparada, corté la punta de la botella y la parte de abajo, quedándome solo la forma de tubo plástico.
Another thing to avoid doing is using metal molds. I used a small pot that had the perfect shape for the top of the mushroom, but to get the cement out of there when it hardened it was very difficult. So don't make these mistakes.
I have seen videos of people who make this art with cement using a pantyhose and they really look very easy to mold, so I improvised and correcting previous mistakes, I used as the base of my mushroom, a two liter soda bottle, a 1.5 liter and a 1 liter, because as I said each one should be smaller than the other and this time I used some plastic soup containers that I had of different sizes and gave the perfect measure.
One of the things I did this time was to grease the plastic mold with oil before pouring the cement mixture and when it dried I was able to take it off very easily. So this time having the cement mixture ready, I cut the tip of the bottle and the bottom, leaving only the plastic tube shape.


Coloqué el molde de sopa engrasado y coloqué encima la base de la botella con lo que era la punta dentro del envase y por la parte de abajo que estaba abierta fui llenándolo con la mezcla de cemento, levantando un poco la botella en algunos momentos a fin de que la mezcla quedara tanto en el envase plástico como en la base de la botella y se fijaran como uno solo.
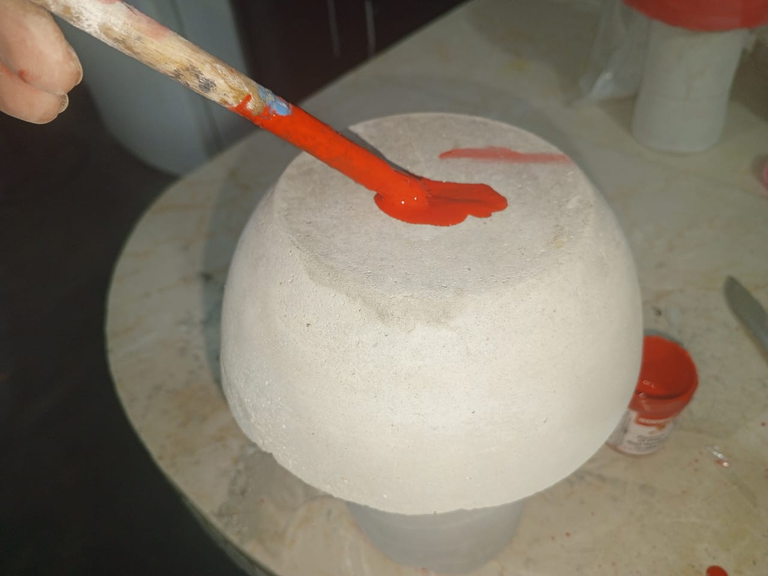
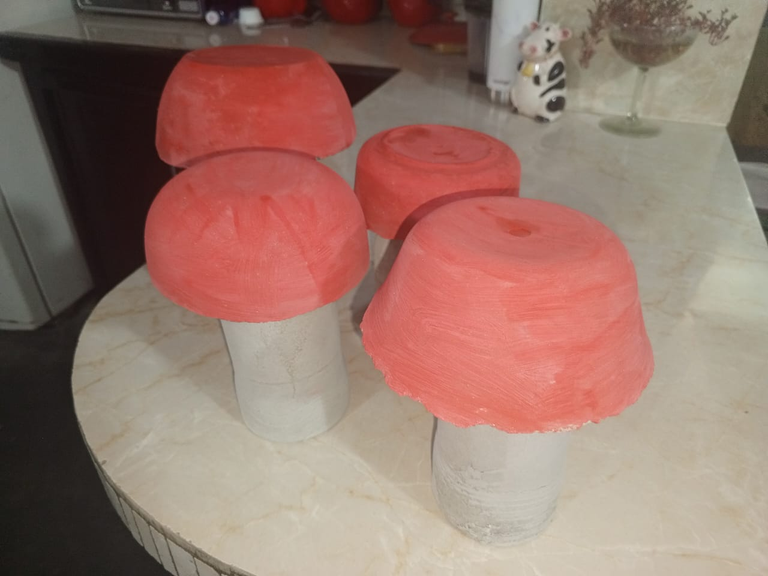
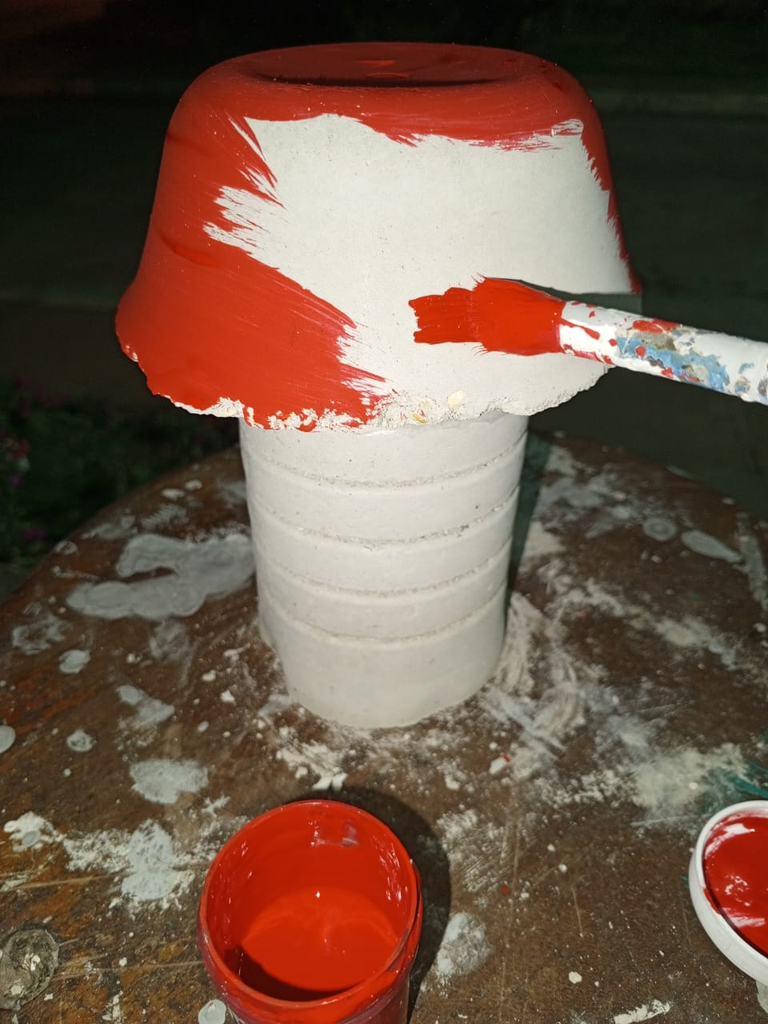
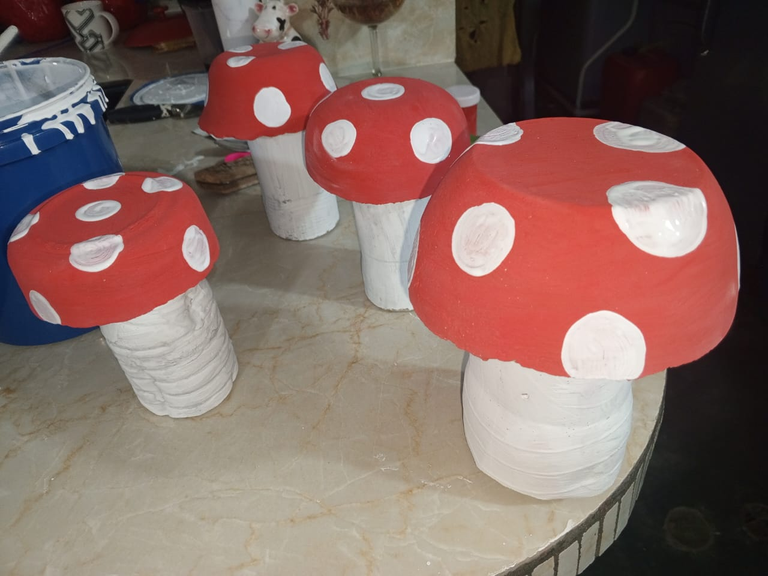
Finalmente, llene mis envases y con mucho cuidado los fui colocando cerca de la pared y los fui dejando secar por dos días, luego los despegue, corté el plástico de la botella plástica y me quedaron perfectos, con una base muy bonita, luego los pinté con pintura al frío roja, la base en color blanco y los lunares también en blancos y al secarse los coloqué en mi jardín de tres en tres, haciendo juego con las alturas.
El resultado quedó muy bonita, estoy muy contenta con ellos y mi jardín cada día se ve más hermoso. Espero te sirva mi explicación y puedas recrearlo. Si es de tu gusto puedes echarles barniz y de esta forma van a durar mucho más tiempo con sus colores vivos. Gracias por haber llegado hasta el final, soy Yeli Marín y nos leemos en la próxima publicación, Abrazos.
I placed the greased soup mold and placed on top the base of the bottle with the tip inside the container and the bottom part that was open I filled it with the cement mixture, lifting the bottle a little at times so that the mixture remained both in the plastic container and in the base of the bottle and they were fixed as one.
Finally, I filled my containers and very carefully I placed them near the wall and let them dry for two days, then I peeled them off, cut the plastic from the plastic bottle and they were perfect, with a very nice base, then I painted them with red cold paint, the base in white and the polka dots also in white and when they dried I placed them in my garden in threes, matching the heights.
The result was very nice, I am very happy with them and my garden looks more beautiful every day. I hope you find my explanation useful and that you can recreate it. If you like you can varnish them and this way they will last much longer with their vivid colors. Thank you for making it to the end, I'm Yeli Marín and I'll see you in the next publication, Hugs.


Wow! This is so beautiful, the mushrooms look so real and they truly beautified your garden, fantastic work friend.
Gracias por su apoyo. Feliz año nuevo.
Qué bellos te quedaron, amo estos proyectos, veo que disfrutas mucho en tu jardín, felicidades, el amor por las plantas es muy bello.
Gracias, si, quedaron muy bonitos, quedé muy contenta con el resultado y día a día avanzamos con el jardín. Feliz año nuevo.
Excelente trabajo amiga.
Están muy llamativos y la forma de hongo es muy emblemática de los jardines. Te quedaron preciosos.
Gracias, si, quedé muy contenta con el resultado, todavia hay unos que están por pintar, para luego colocarlos en el jardín. Feliz año nuevo.