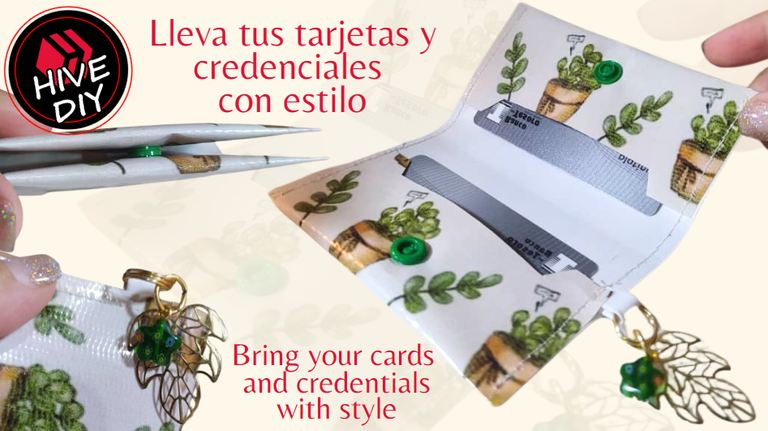
Mi Proyecto de hoy es un Porta tarjetas o credenciales, con mucho estilo. Un diseño simple y funcional, combinado con un detalle de Bisutería, esto tiene la intención de solo meterlo en el bolsillo de atrás de nuestro pantalón, por ejemplo, y que el accesorio de bisutería cuelgue afuera aportando mucha elegancia con el dorado del alambrismo.
Me complace mucho saludarles a toda la Comunidad de Hive y en especial a la Comunidad de Hive Diy, como sabrán adoro crear accesorios que sean funcionales y resuelvan una situación aportando belleza, bien sea para nosotras o para nuestro hogar. Adicionalmente, veo en cada proyecto la posibilidad de poder hacerlo para venderlos o obsequiarlo.
My project today is a card or credential holder, with a lot of style. A simple and functional design, combined with a Jewelry detail, this is intended to just be put in the back pocket of our pants, for example, and for the jewelry accessory to hang outside, providing a lot of elegance with the gold wire.
I am very pleased to greet the entire Hive Community and especially the Hive Diy Community, as you know I love creating accessories that are functional and solve a situation by providing beauty, either for us or for our home. Additionally, I see in each project the possibility of being able to do it to sell or give as a gift.

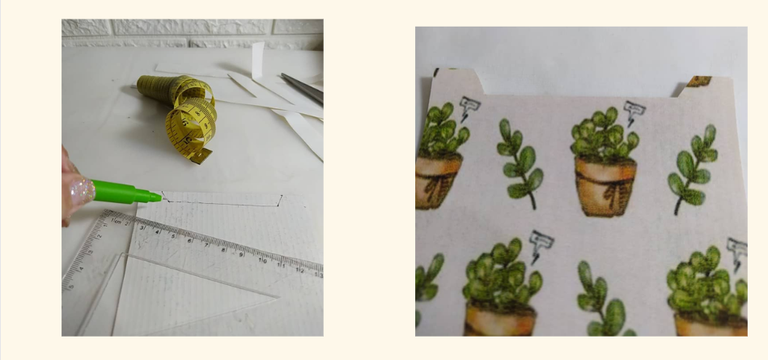
El protagonista de este proyecto Diy en una vinil que tengo guardado desde hace tiempo entre mis materiales, de tamaño carta, con materos y plantas. En una oportunidad lo compré en una exposición de materiales, entre otras cosas y nunca lo había utilizado.
Dado que su tamaño no es muy grande, debía usarlo en algún proyecto pequeño, y pensé en realizar este Porta Tarjetas o Credenciales. Para aportarle un Plus, le realicé un accesorio en Bisutería, y estos son los materiales que utilicé:
The protagonist of this Diy project is a vinyl that I have kept for a long time among my materials, letter size, with pots and plants. On one occasion I bought it at a materials exhibition, among other things, and I had never used it.
Since its size is not very large, I had to use it in a small project, and I thought about making this Card or Credential Holder. To give it a Plus, I made an accessory in Costume Jewelry, and these are the materials I used:
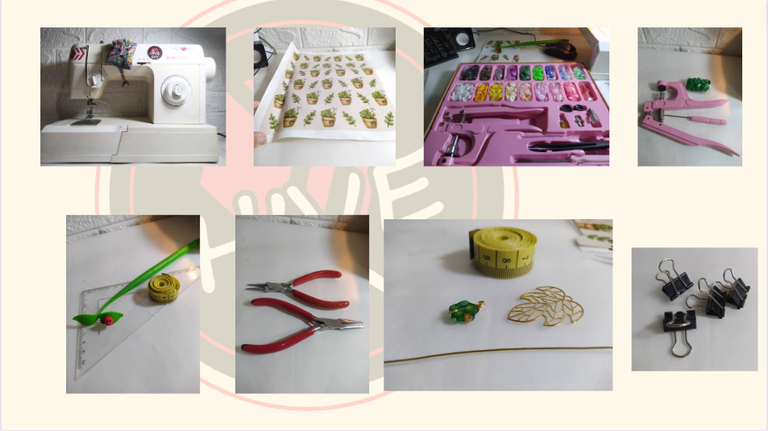
- Máquina de coser
- Vinil
- Broches plásticos de presión y sus herramientas
- Regla, cinta métrica, tijera y bolígrafo
- Pinzas de bisutería
- Alambre de bisutería, hoja dorada y detalle en acrílico
- Clips de presión para sostener
- Sewing machine
- Vinyl
- Plastic snaps and their tools
- Ruler, tape measure, scissors and pen
- Jewelry tweezers
- Jewelry wire, gold leaf and acrylic detail
- Snap clips to hold

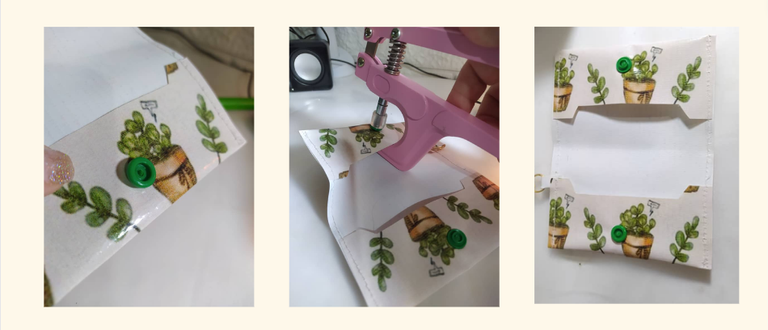
Primero recorté los bordes blancos del vinilo para tener un rectángulo de 24 cms por 9,5 cms. Reservé una de las tiras del borde blanco que recorté para utilizarlo más adelante. NOTA: Realmente guardé todas las tiras blancas que recorté, es que no puedo botarlas, siempre guardo estos restos de materiales porque puedo utilizarlos en otros proyectos.
First I cut out the white edges of the vinyl to have a 24 cm by 9.5 cm rectangle. I reserved one of the white border strips that I cut out for later use. NOTE: I actually saved all the white strips that I cut out, I can't throw them away, I always save these leftover materials because I can use them in other projects.
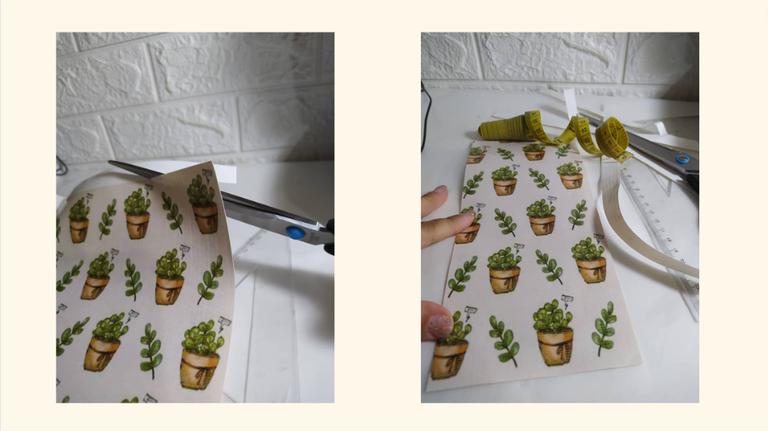
Voy a realizar este dibujo en cada extremo. Marco de la esquina hacia abajo 1 cms, entro 2 cms hacia adentro y en la parte de arriba entro 1,5 cms. Esto lo repito en ambas esquinas, uno los puntos y recorto. Todo esto lo repito en ambos extremos del rectángulo de vinilo.
I'm going to make this drawing at each end. Corner frame down 1 cm, inward 2 cm and 1.5 cm in at the top. I repeat this in both corners, join the points and cut out. I repeat all this at both ends of the vinyl rectangle.
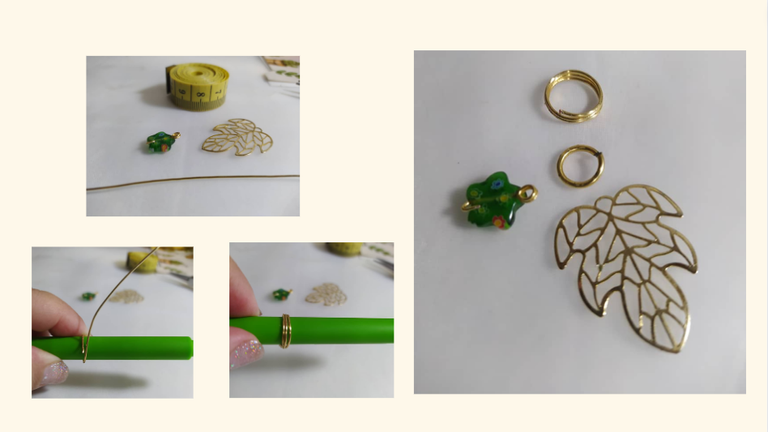
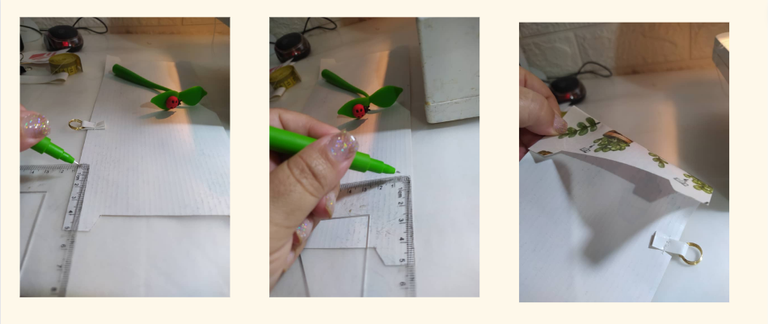
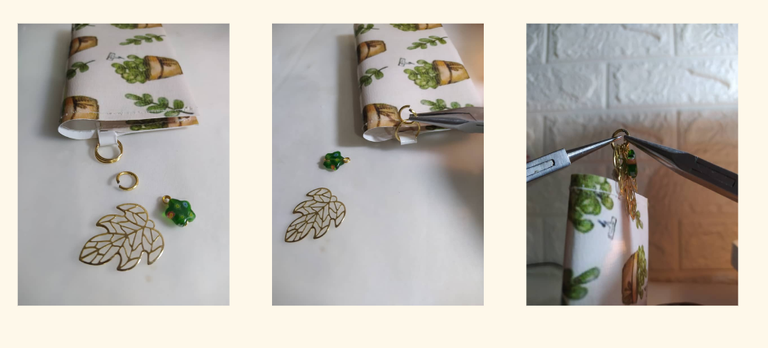
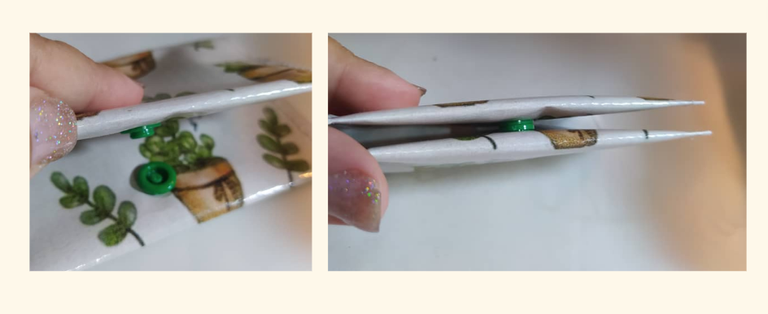
Con el alambre de bisutería voy a realizar un aro de 3 vueltas, para que destaque bastante el dorado en el diseño y al mismo tiempo le de más fuerza y seguridad al accesorio para que no se caiga. Para hacer el aro simplemente di vueltas el alambre en el bolígrafo y al dar las 3 vueltas lo corté.
Tengo un acrílico de color verde, es como una hojita muy linda, al cual ya le había colocado un alambre para conectar, y lo otro es un dije en forma de hoja dorada.
With the jewelry wire I am going to make a 3-turn ring, so that the gold in the design stands out a lot and at the same time gives more strength and security to the accessory so that it does not fall. To make the ring I simply twisted the wire around the pen and after making the 3 turns I cut it.
I have a green acrylic, it is like a very pretty little leaf, to which I had already placed a wire to connect, and the other is a pendant in the shape of a gold leaf.
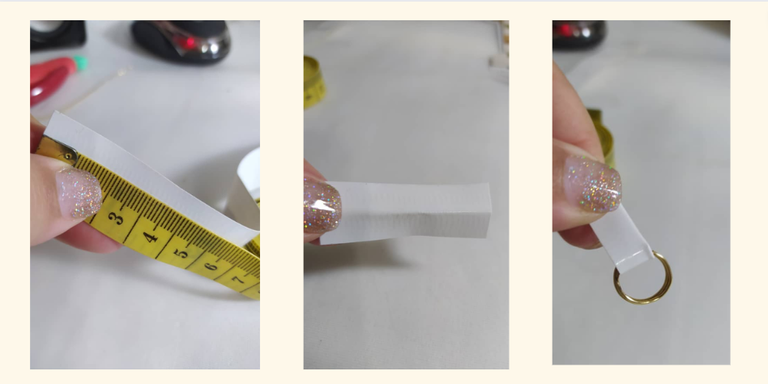
Con la tira blanca del vinil que recorté inicialmente, corté una tira de 4 cms por 2 cms, y lo doblé por la mitad para pasarlo por el aro de 3 vueltas que realicé en el paso anterior.
With the white strip of vinyl that I cut out initially, I cut a strip measuring 4 cm by 2 cm, and folded it in half to pass it through the 3-turn hoop that I made in the previous step.
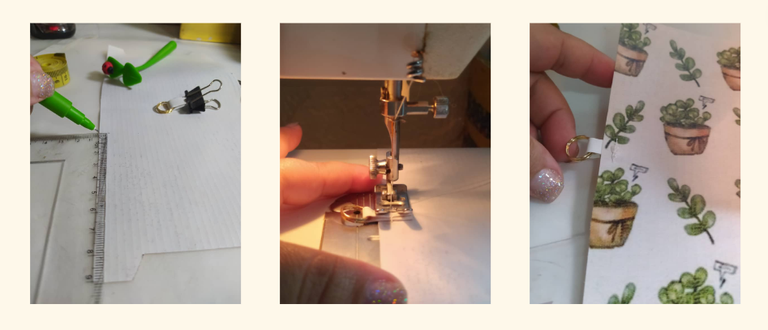
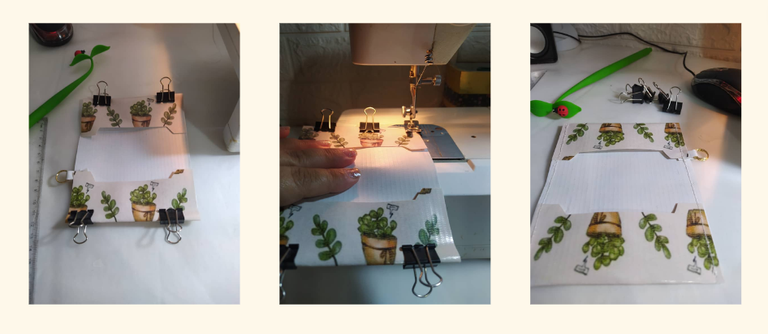
En el rectángulo de vinil estampado, marco 9 cms desde uno de sus bordes, y a esa altura coloco la pieza de la tira blanca con el aro, y uno esto con una costura recta en la máquina de coser.
On the printed vinyl rectangle, I mark 9 cm from one of its edges, and at that height I place the white strip piece with the ring, and join this with a straight seam on the sewing machine.
En el rectángulo de vinil estampado, ahora marco 5 cms en cada extremo, y doblo igualmente cada extremo. Con esto estaré formando los dos bolsillos para las tarjetas o credenciales.
On the printed vinyl rectangle, I now mark 5 cm on each end, and fold each end equally. With this I will be forming the two pockets for cards or credentials.
Los dos bolsillos que formé, los mantengo en posición con clips de presión, y voy a pasar una costura recta en cada borde, pasando por los dos bolsillos. Simplemente una costura recta del lado izquierdo y otra costura recta del lado derecho, es todo.
The two pockets I formed, I hold in position with snap clips, and I'm going to stitch a straight seam on each edge, going through the two pockets. Just a straight seam on the left side and another straight seam on the right side, that's all.
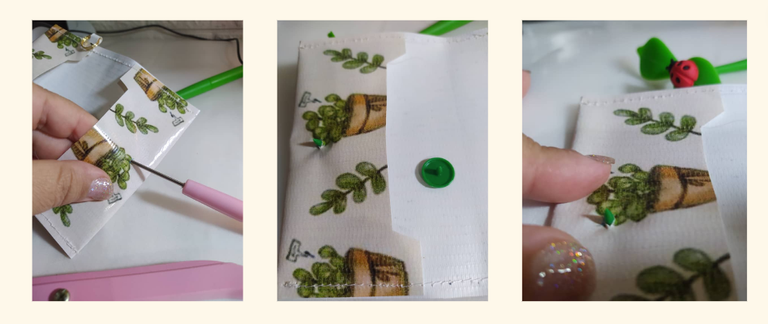
Para el sistema de abrir y cerrar voy a utilizar los broches plásticos de presión, y es que me encanta poder utilizarlos cada vez que puedo. Elegí el color verde para acompañar el diseño estampado. Lo que necesitaré serán dos partes del broche que son de punta, y las otras dos partes que son para hacer el broche de presión. Adicionalmente, el punzón para perforar y el alicate para cerrar los botones.
For the opening and closing system I am going to use the plastic snaps, and I love being able to use them every time I can. I chose the color green to accompany the printed design. What I will need are two parts of the clasp that are pointed, and the other two parts that are to make the snap. Additionally, the punch to pierce and the pliers to close the buttons.

Marco en el centro de uno de los bolsillos, perforo con el punzón, introduzco el broche con punta del lado de adentro para que salga la punta como se aprecia en la imagen.
I mark in the center of one of the pockets, I pierce with the punch, I insert the brooch with a point on the inside so that the point comes out as seen in the image.
Coloco la otra pieza del broche de presión, y ahora con el alicate de presión, presiono y ya queda este lado listo.
I place the other piece of the snap, and now with the pressure pliers, I press and this side is ready.
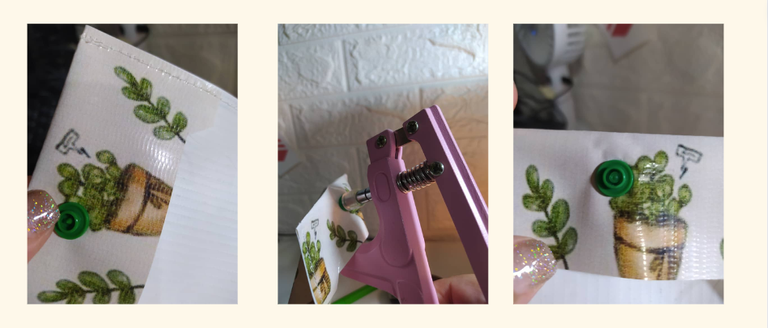
En el otro extremo hago lo mismo, y van a quedar de la siguiente forma:
At the other end I do the same, and they will look like this:
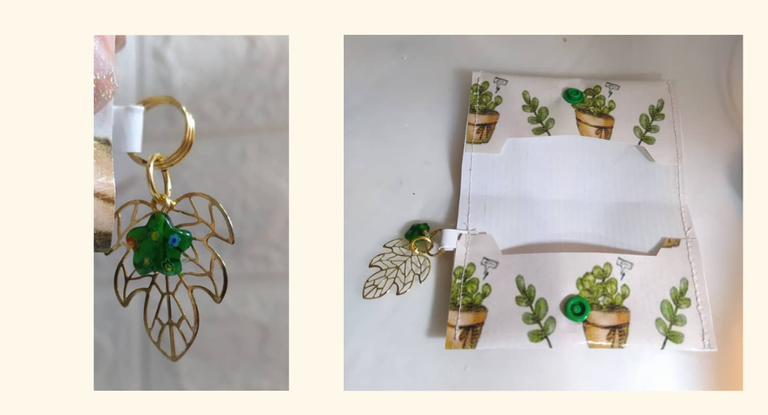
Ahora voy a armar mi accesorio de bisutería, con un aro de alambre grueso y mis pinzas de bisutería, lo abro e introduzco el aro de 3 vueltas, la flor de acrílico verde y la hoja dorada, cierro con las pinzas y listo.
Now I am going to assemble my jewelry accessory, with a thick wire hoop and my jewelry tweezers, I open it and insert the 3-loop hoop, the green acrylic flower and the gold leaf, I close it with the tweezers and that's it.
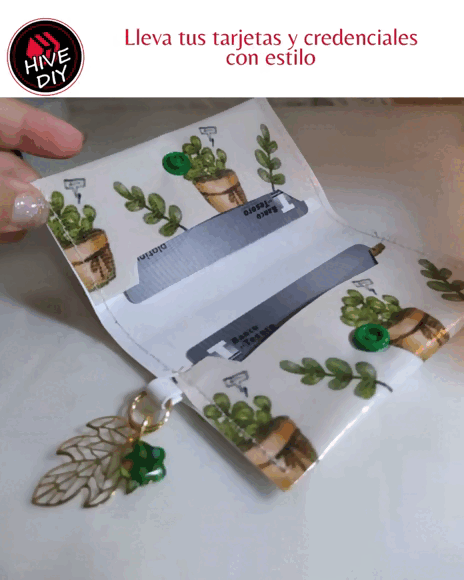
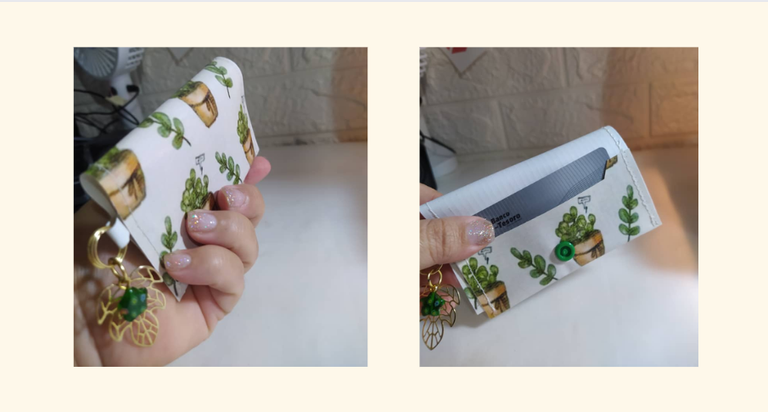
Este es el plus, el accesorio de bisutería quedó realmente bello. Imagina que esto cuelgue del bolsillo de tu pantalón o camisa, es de lujo total. Tenerlo en la cartera o bolso, y al sacarlo para acceder a una de las tarjetas o credenciales es algo que te hará lucir muy bien.
This is the plus, the jewelry accessory turned out really beautiful. Imagine this hanging from your pants or shirt pocket, it is total luxury. Having it in your wallet or bag, and taking it out to access one of the cards or credentials is something that will make you look very good.
Aquí metí unas tarjetas para que veas que quedan muy cómodas, no es un diseño apretado que dificulte usarlo. Es muy cómodo y hay el espacio suficiente para meter más tarjetas, credenciales, y hasta algún billete doblado por si acaso, como decía mi papá que siempre tuviese un billete guardo aparte por si alguna emergencia.
Here I put some cards so you can see that they fit very comfortably, it is not a tight design that makes it difficult to use. It is very comfortable and there is enough space to put more cards, credentials, and even a folded bill just in case, as my dad said to always have a bill kept aside in case of an emergency.
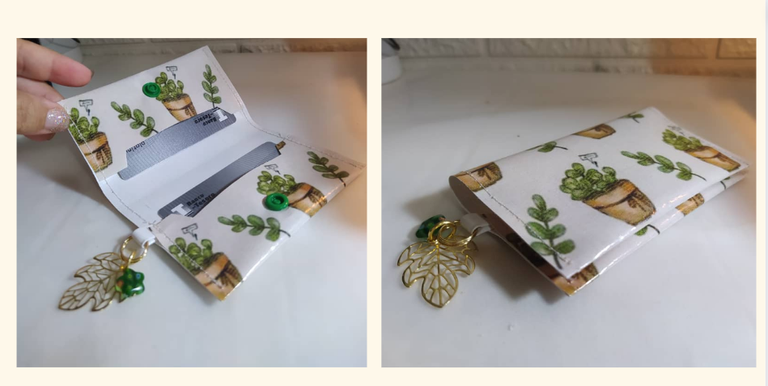
Como puedes ver la mecánica de los broches de presión quedan del lado de adentro únicamente, no del lado de afuera ya que me restaría espacio para guardar. Es muy fácil de abrir y cerrar con este sistema.
As you can see, the mechanics of the snaps are only on the inside, not on the outside since that would reduce storage space. It is very easy to open and close with this system.
Es muy cómo su tamaño como puedes ver, realmente puedo usarlo en algún bolsillo. El vinil como material para este proyecto es ideal porque no se deshilacha, no necesito colocar una cinta ni nada en su borde, es un material ideal para un Diy como este que les presenté hoy.
It's very big as you can see, I can really use it in some pocket. Vinyl as a material for this project is ideal because it does not fray, I do not need to place a tape or anything on its edge, it is an ideal material for a DIY like this one that I presented to you today.
Deseo que les haya gustado este Proyecto Diy, y que los inspire a realizarlo, como pudieron ver son pocas costuras y de no tener máquina de coser, podrías hacerlo fácilmente con costura a mano, si tienes una bonita puntada.
I hope you liked this Diy Project, and that it inspires you to do it, as you could see there are few seams and if you don't have a sewing machine, you could easily do it with hand sewing, if you have a nice stitch.

---------- ❤️❤️❤️❤️ ----------
Las fotos las tomé con mi teléfono Redmi Note 8
Apps que utilicé:
Canva Pro para la Portada, banner y collage.
Utilicé el Traductor Google
Mi redes sociales:
Discord: YennysYaneth#0189
Twitter: @yennysferm
Instagram: @yennysyaneth
---------- ❤️❤️❤️❤️ ----------
I took the photos with my phone Redmi Note 8
Apps I used:
Canva Pro for the Cover, banner and collage.
I used Google Translate
My social networks:
Discord: YennysYaneth#0189
Twitter: @yennysferm
Instagram: @yennysyaneth
👏 Keep Up the good work on Hive ♦️ 👏
❤️ @equipodelta suggested sagarkothari88 to upvote your post ❤️
🙏 Don't forget to Support Back 🙏
Lo amé... Ya sabes mamá, tienes que hacerme uno 😍😍💋
Y tú sabes que si... Te amo bebé 😍 Dios te bendiga hija
Está precioso y muy práctico!
Súper practico amiga. Lo colocas en el bolsillo del jean y luce la bisutería, es un bello accesorio que todas podemos hacer fácilmente.
Gracias por pasar y comentar
That's just soooooo pretty! I'd like to have one (人 •͈ᴗ•͈). I also love how you design it like that. A holder that can be put in a pocket is awesome!
It is a simple project, the protagonist itself is the materials.
Thanks for coming and commenting
Que belleza amiga, excelente idea de emprendimiento tambien. Yo quiero una.
Hola Witness... Te cuento que puse el vídeo en mi estado de WhatsApp y me pidieron 3. No lo esperaba, pero es genial.
Cosas que pasan cuando estamos en la energía creadora.
Gracias por pasar y comentar
Que linda que te quedo, muy bien decorada y bien hecha 😍 esto puede servir para transportar el DNI sin tener miedo de perderlo jaja excelente idea ❤️
Hola amiga, quedó genial para cambiar de cartera y tener en cuenta esto con lo más importante los credenciales y las tarjetas, y listo. Lo demás sería lo que queremos llevar demás, pero lo más importante aquí.
Gracias por pasar y comentar
quedo increíble, genial tu proyecto
Gracias amigo @fixie
Quedo demasiado bello y muy útil amiga.
El estampado y materiales hermosos.
Muchas veces los materiales lo son todo. Este proyecto es muy sencillo, lo que lo hace lucir es la calidad de los materiales.
Bueno... Cuando se puede... A veces toca improvisar.
Gracias por pasar y comentar
Luce muy sobrio y bonito, es bastante agradable.
Quedó genial, no pensé que iba a quedar tan lindo. Los materiales suman demasiado porque el proyecto en si es muy sencillo.
Gracias por pasar y comentar
Hace tiempo que no trabajo con vinil pero despues de ver todo tu proceso, literal quiero correr al Castillo y comprar el mínimo de muchos colores y estampados diferentes solo para hacer este diseño de tarjetero 👁 👄 👁 💘 No solo te ha quedado hermoso y funcional, OMG te felicito por esta maquetación tan preciosa y la manera en que muestras cada item y cada paso, ¡te admiro! Tienes una nueva fan 💚 💚 💚
Hola amiga saludos quede totalmente enamorada del diseño se ve muy elegante..a mi me encantan los cactus y siento que el diseño pega con mi personaliad
Congratulations @yennysferm71! You have completed the following achievement on the Hive blockchain And have been rewarded with New badge(s)
Your next target is to reach 2500 comments.
You can view your badges on your board and compare yourself to others in the Ranking
If you no longer want to receive notifications, reply to this comment with the word
STOPCheck out our last posts: