¡Saludos 👋 Queridos 💞 Amigos de #HiveDiy😘! // Greetings 👋 Dear 💞 Friends of #HiveDiy😘!
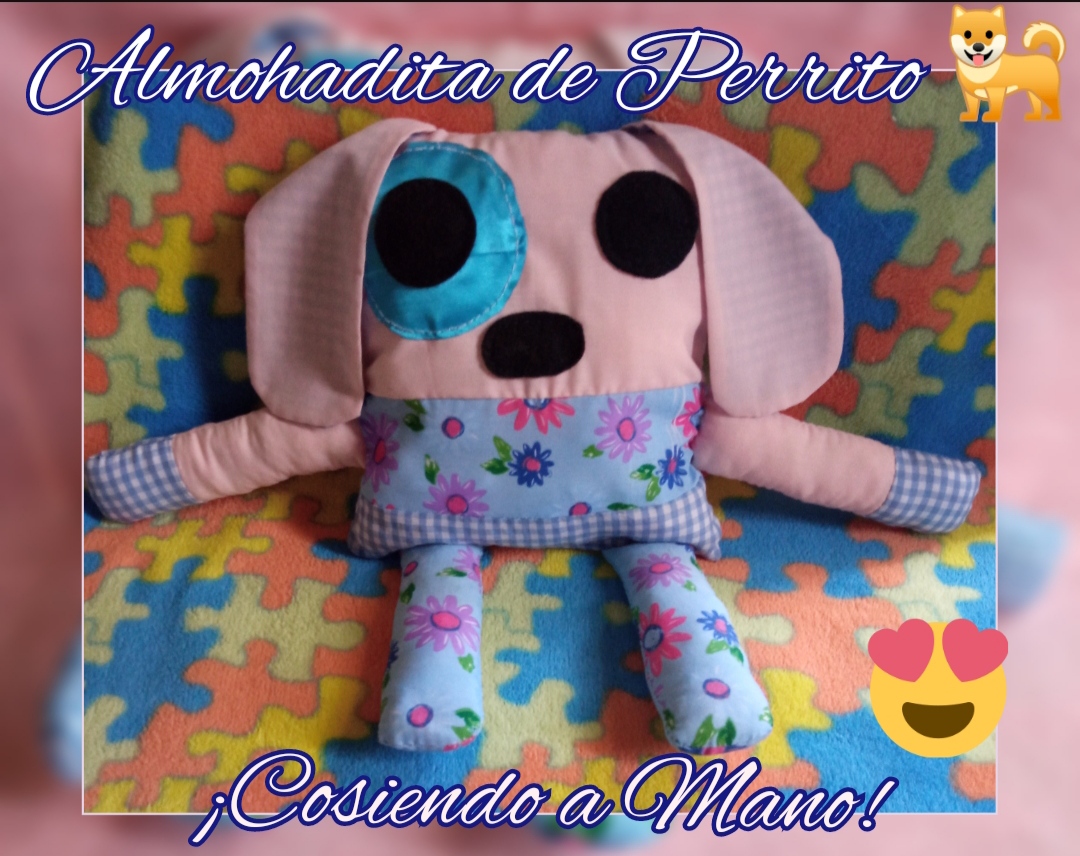
Hola espero se encuentren bien 🙂, mis disculpas por haberme ausentado un tiempo de esta maravillosa comunidad, como saben cada día la situación económica está difícil y me tocó salir de casa para trabajar y casi no tengo tiempo para hacer mis trabajos manuales, pero saque un tiempito para lograr coser a mano una hermosa 🥰 almohadita de perrito 🐕que le voy obsequiar a mi sobrina que acaba de nacer.
Hello I hope you are well 🙂 my apologies for having been absent for a while from this wonderful community, as you know every day the economic situation is difficult and I had to leave home to work and I have almost no time to do my crafts, but I took a little time to sew by hand a beautiful 🥰 puppy pillow 🐕that I will give to my niece who was just born.
Les cuento que esta almohadita es súper fácil de hacer la pueden elaborar con retazos de telas y además la pueden hacer del tamaño que deseen. Yo la hice pequeña para mi sobrina Paula que solo tiene días de nacida.
I tell you that this pillow is super easy to make, you can make it with fabric scraps and you can also make it the size you want. I made it small for my niece Paula who is only days old.
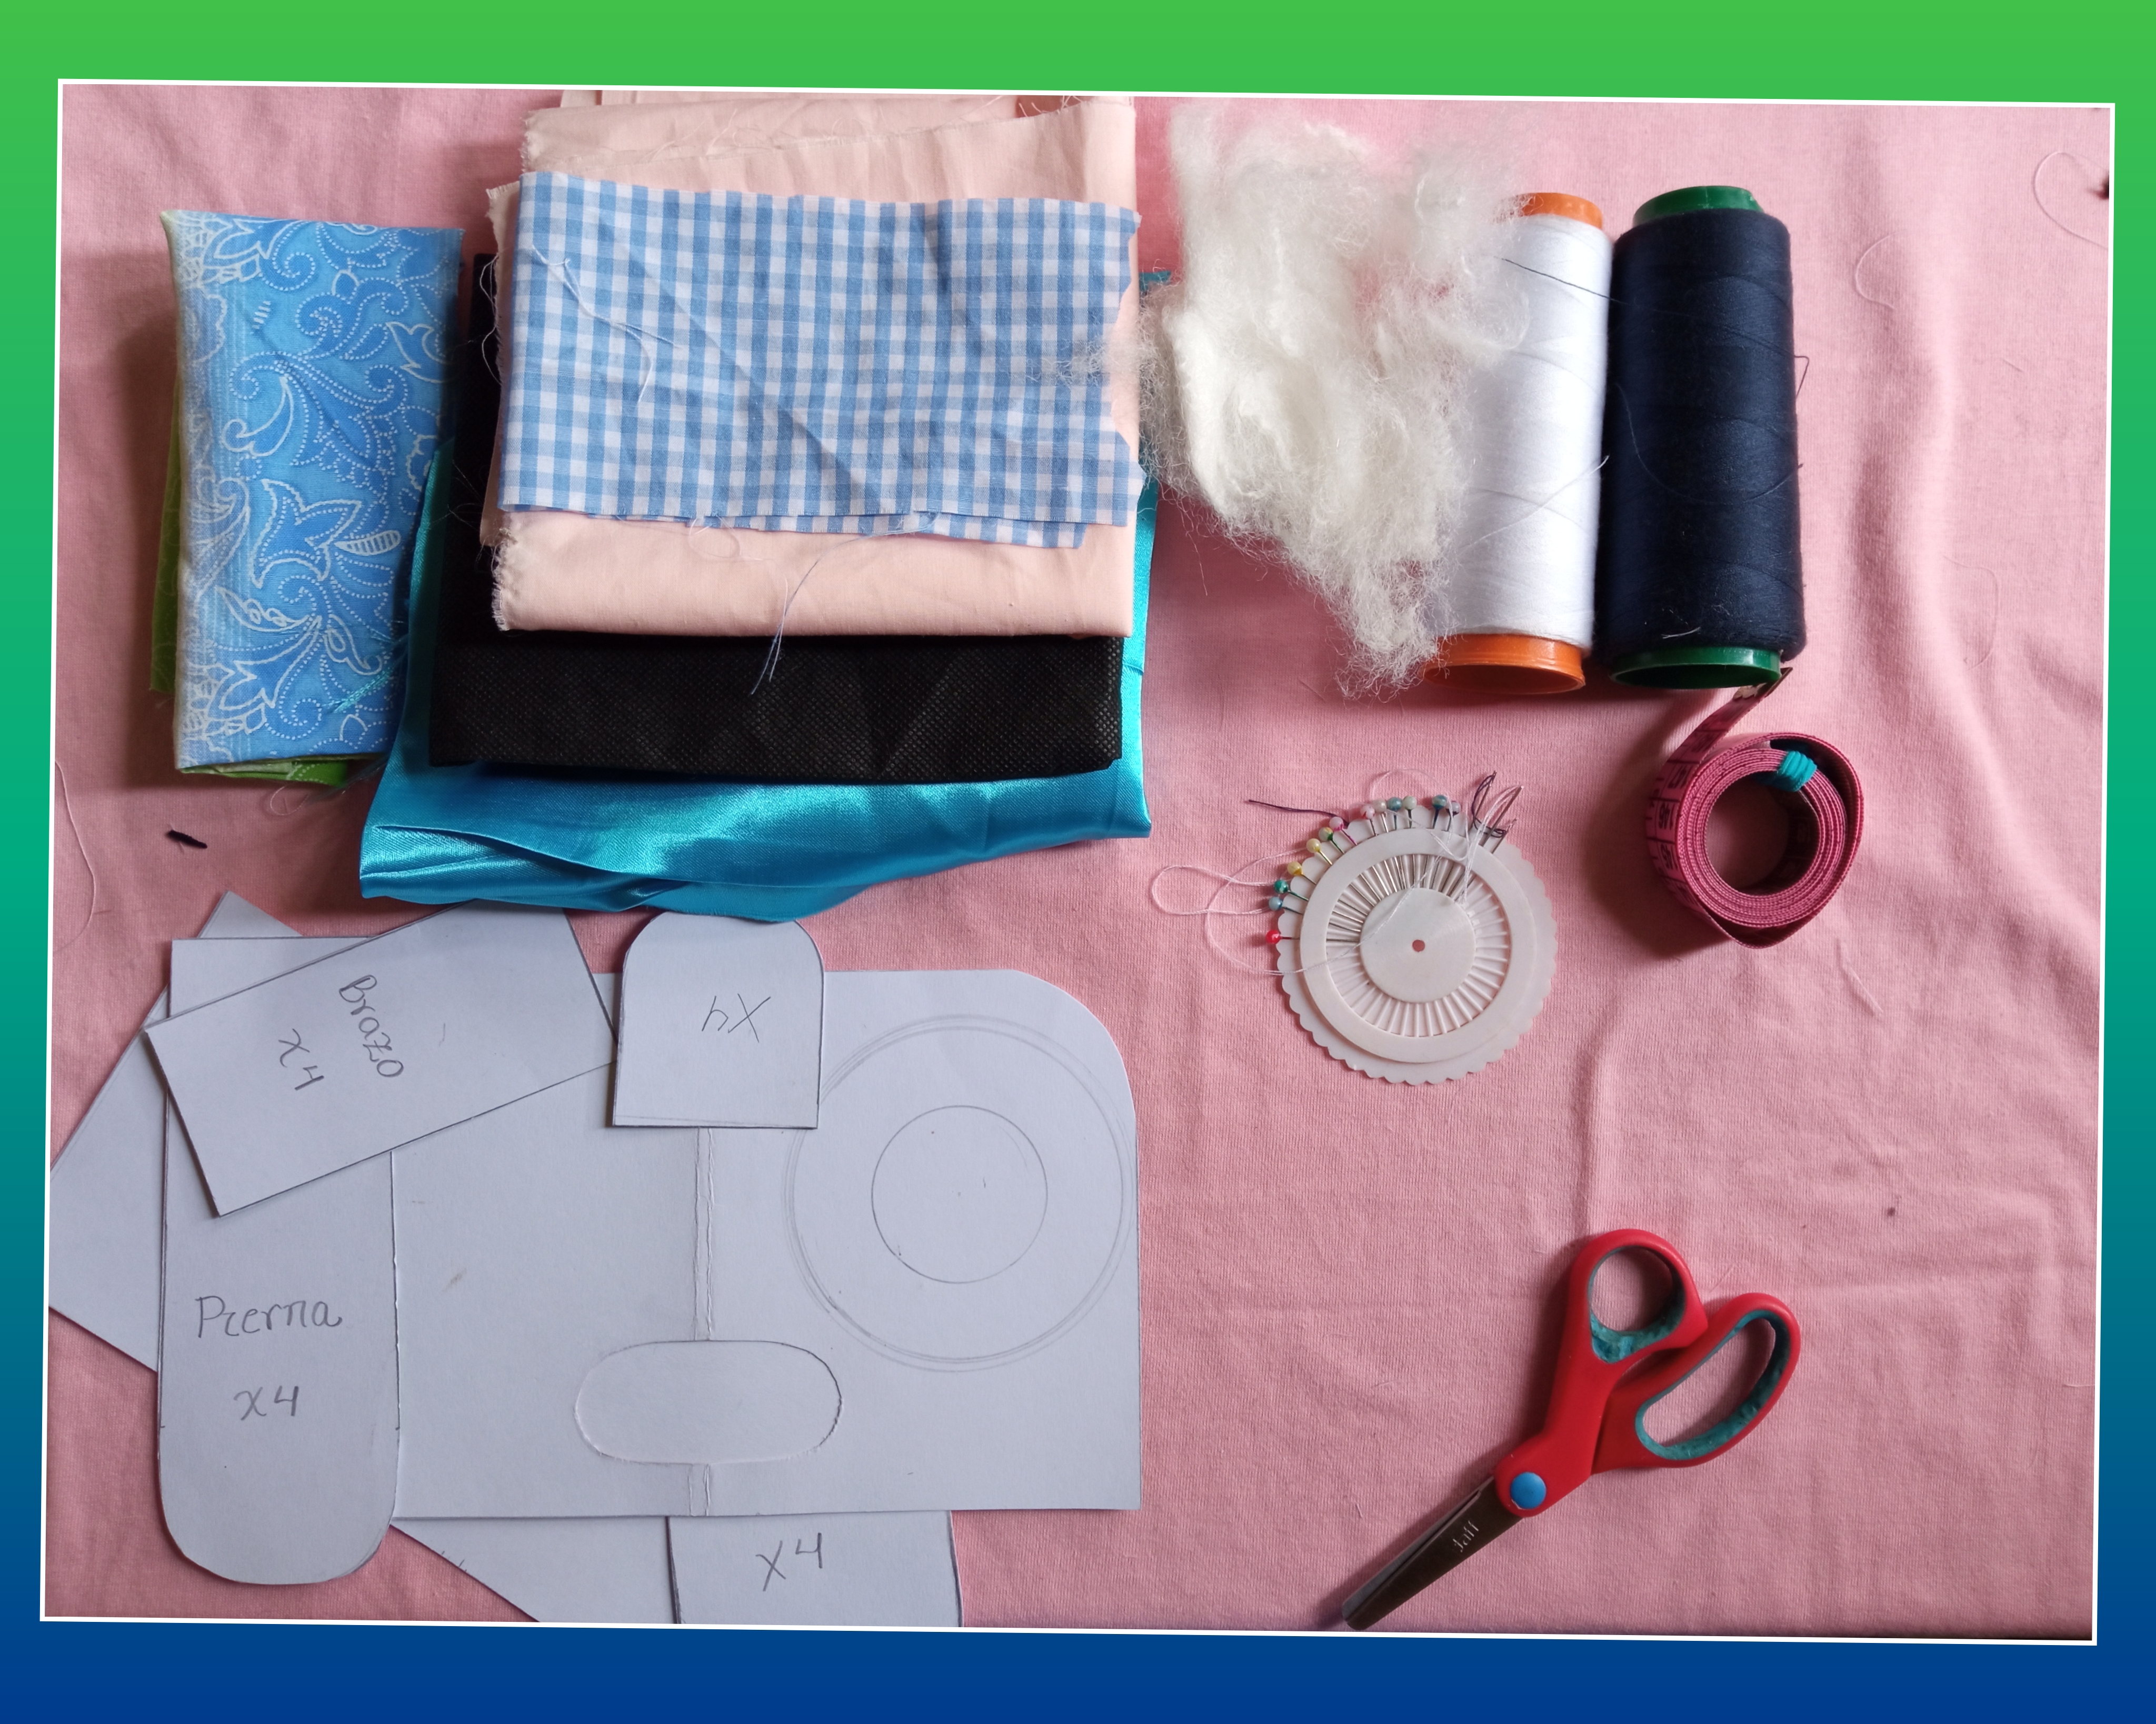
Antes de comenzar con este tutorial les voy a detallar los materiales que utilice.
Before starting with this tutorial I will detail the materials I used.
🐕 Materiales:🐕
- Retazo de tela estampada azul en cuadros.
- Retazo de tela estampada en flores.
- Tela de color rosada.
- Tela de color azul claro.
- Tela de color negro.
- Hilos de color negro y blanco.
- Aguja de coser.
- Tijera.
- Cartulina para sacar el patrón.
- lápiz.
- Relleno.
🐕 Materials:🐕
- Blue checkered printed fabric patchwork.
- Piece of fabric printed in flowers.
- Pink fabric.
- Light blue fabric.
- Black fabric.
- Black and white threads.
- Sewing needle.
- Scissors.
- Cardboard to draw the pattern.
- Pencil.
- Stuffing.
🐕 Elaboración:🐕 // 🐕 Elaboration:🐕
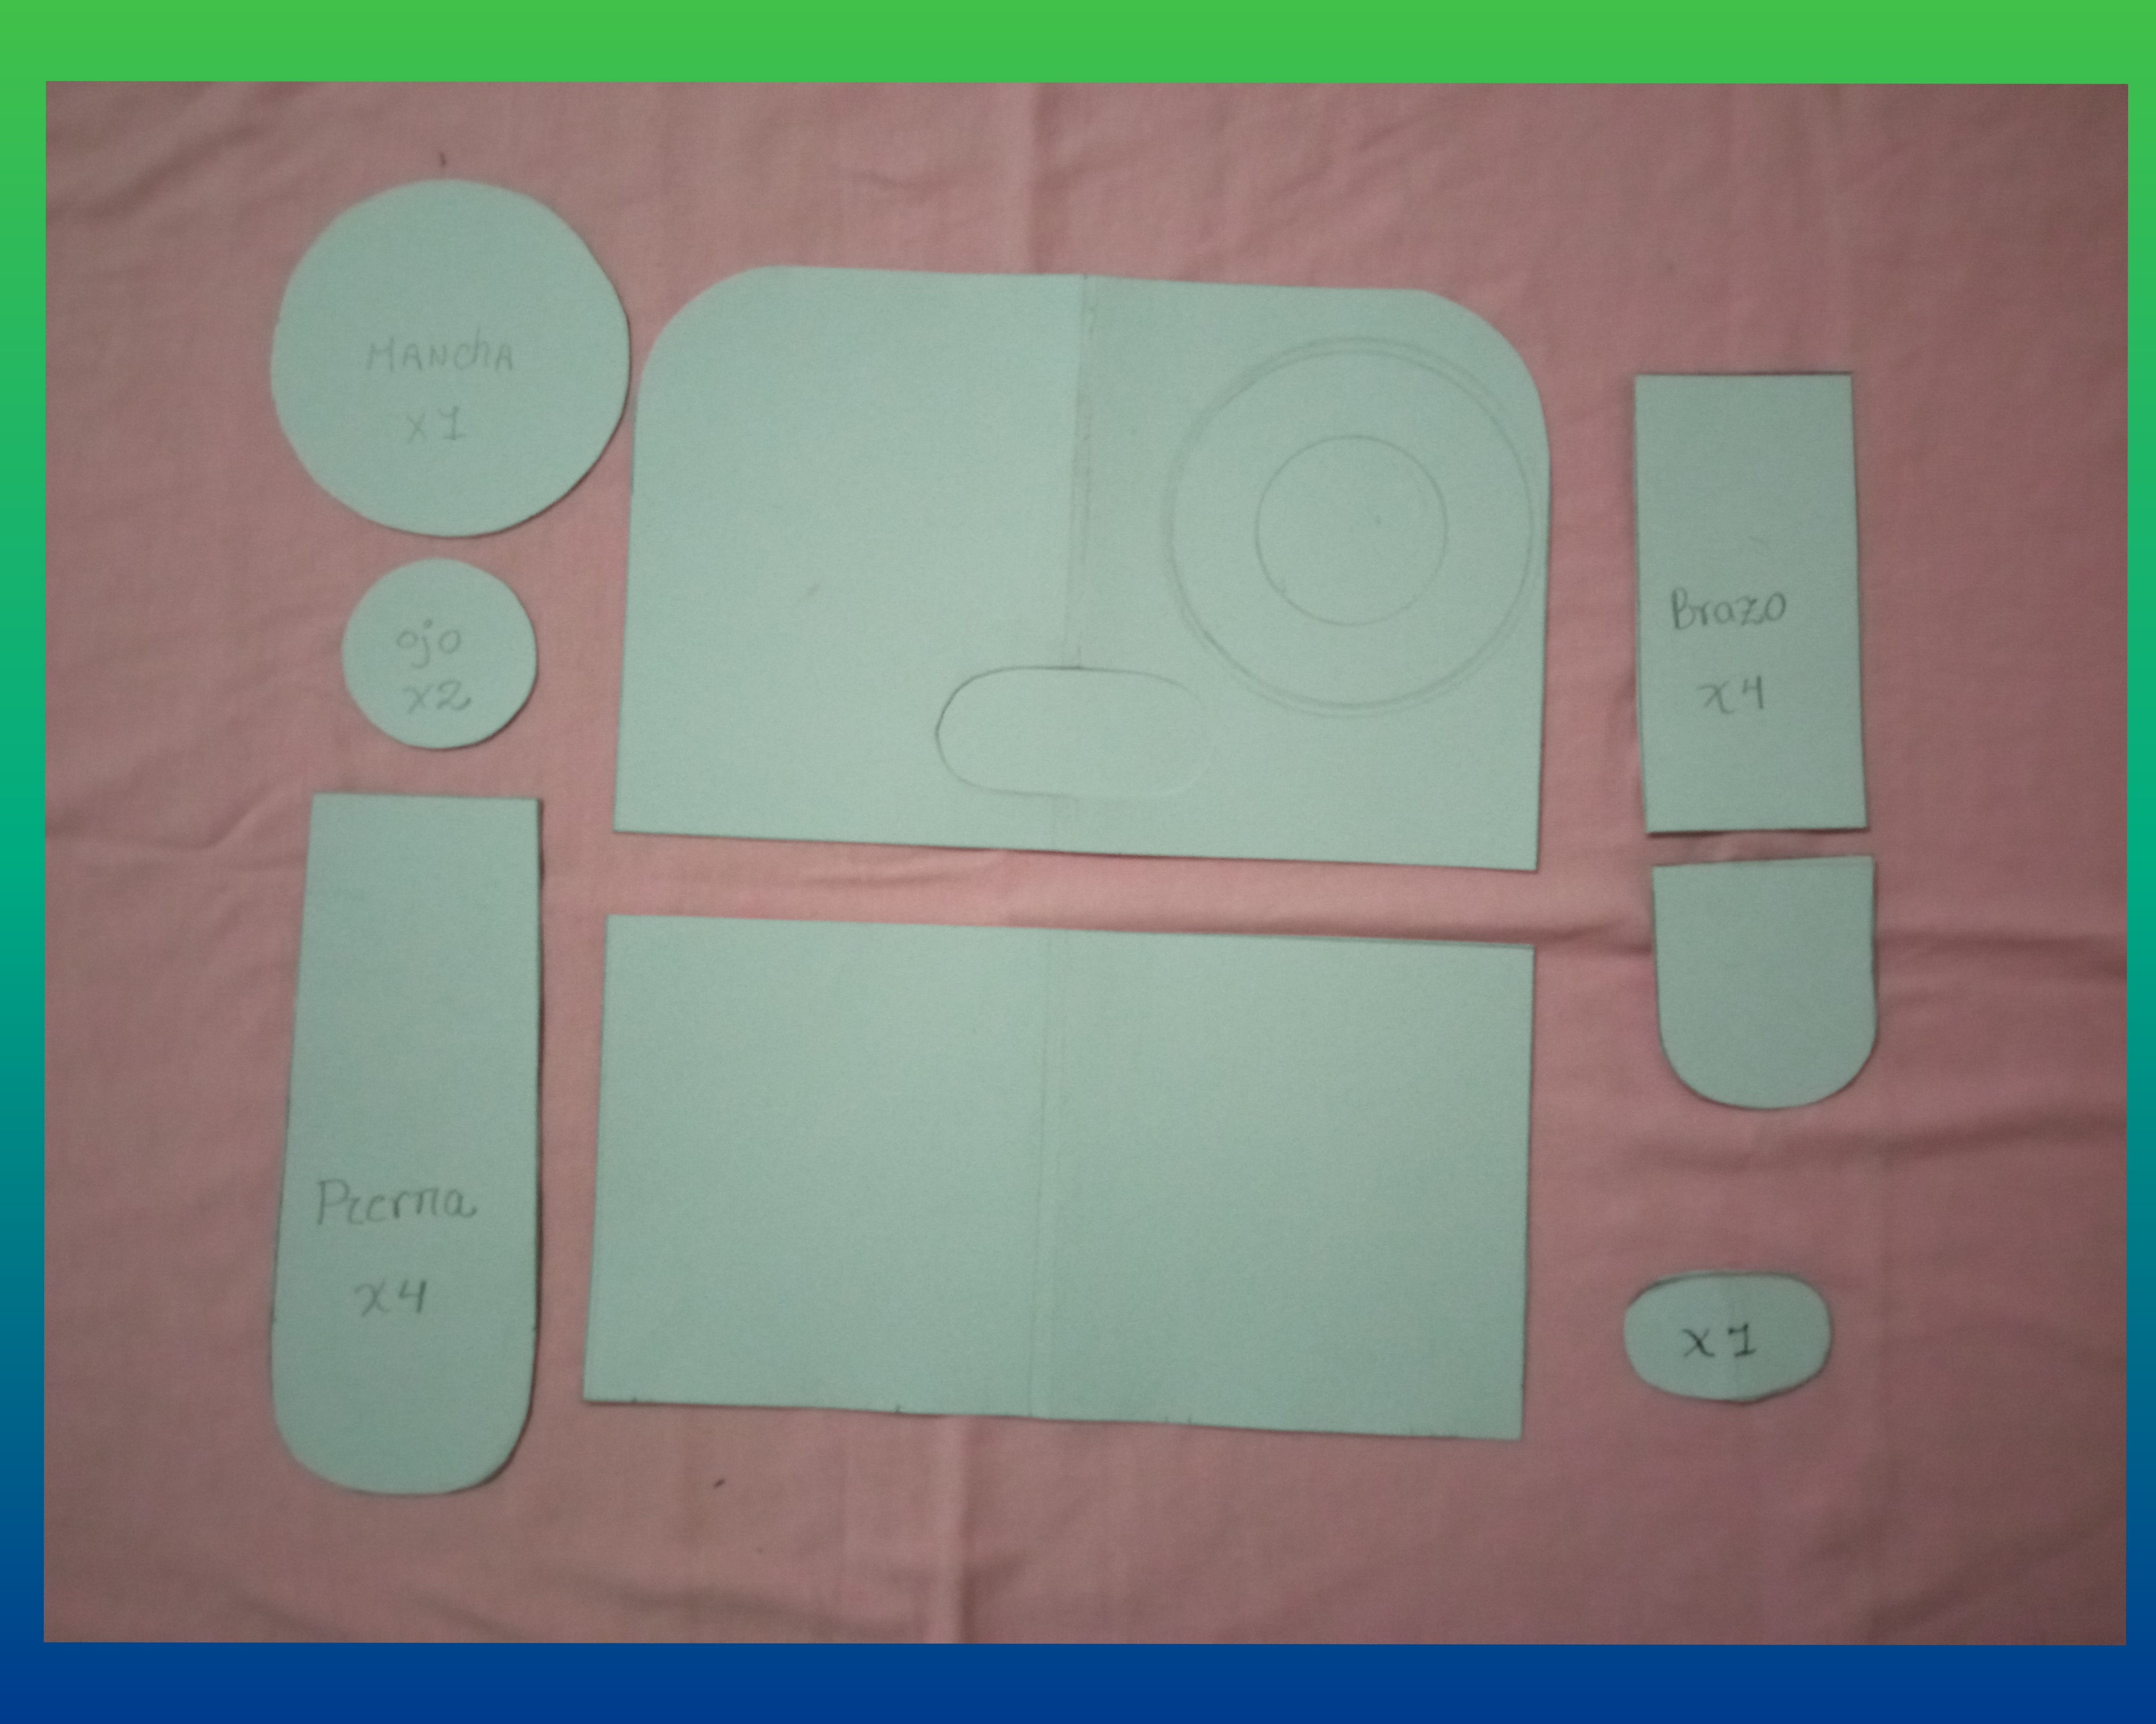
Paso 1:
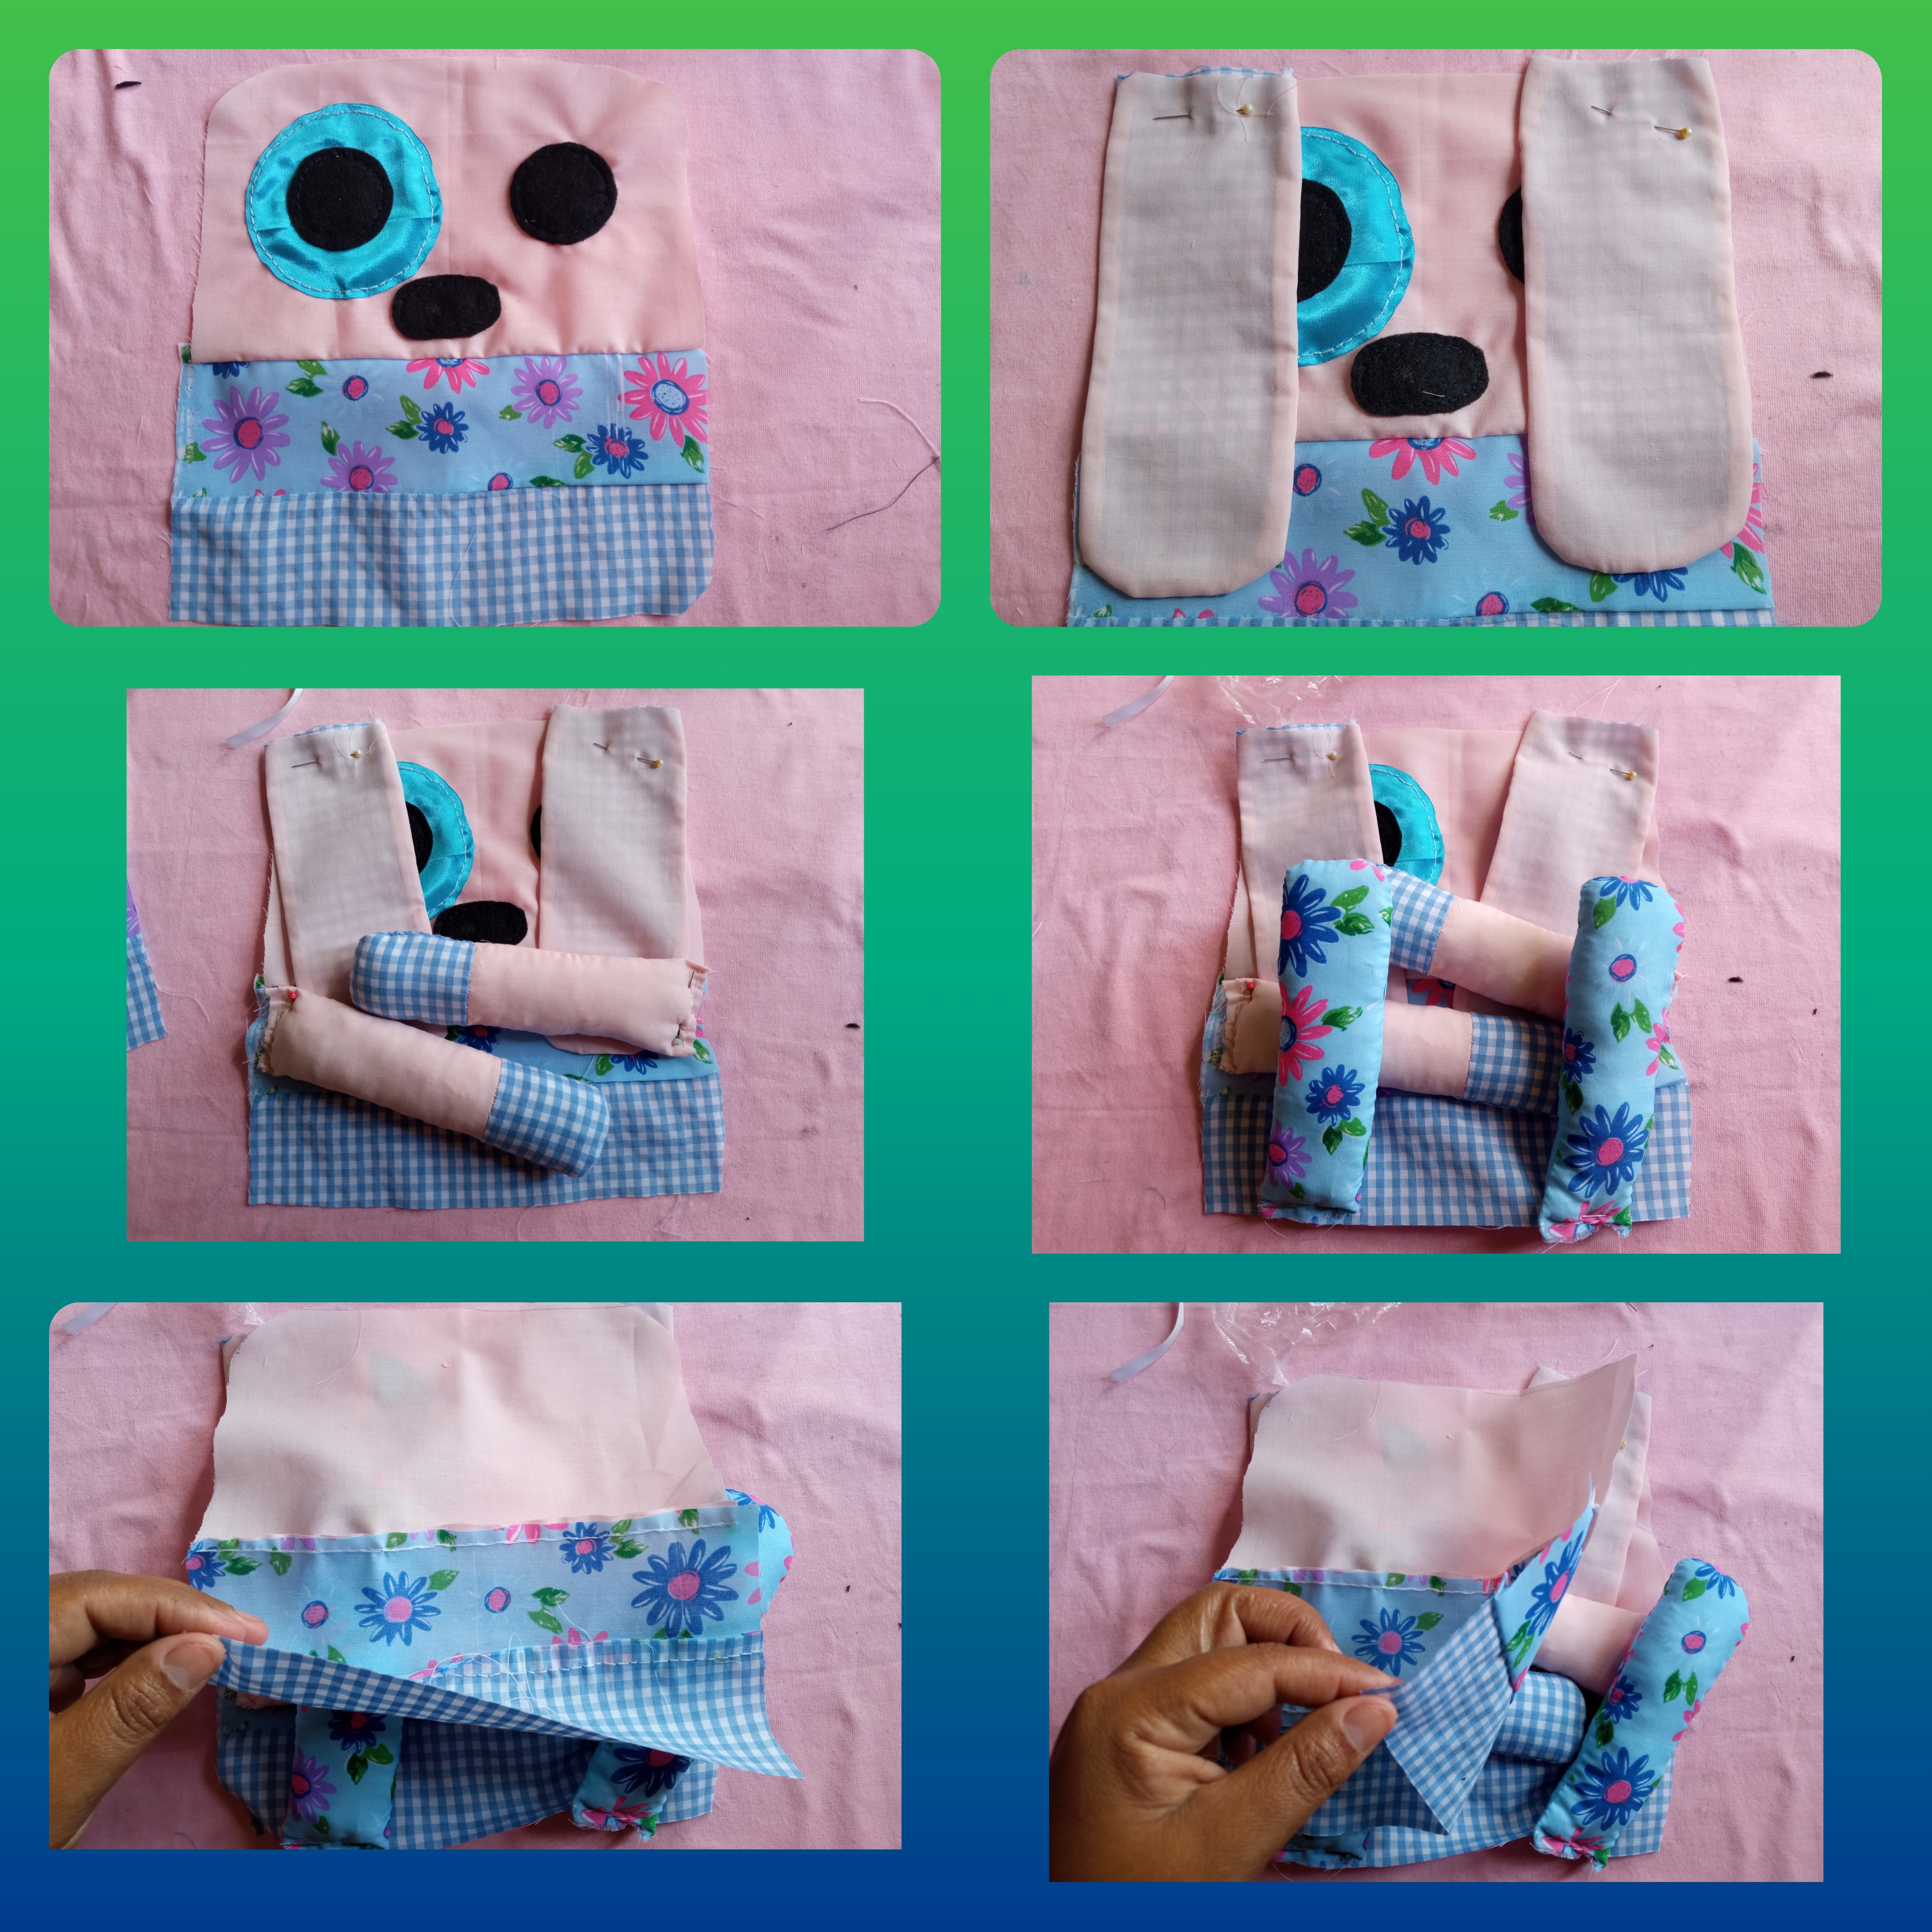
Para comenzar dibuje el cuerpo del perrito 🐕 de forma rectangular, luego dibuje sus patas y las orejas. Después en cartulina fui sacando los patrones que voy a utilizar más adelante.
Step 1:
To begin with, I drew the dog's body 🐕 in a rectangular shape, then I drew his paws and ears. Then on cardboard I drew the patterns that I will use later.
Paso 2:
Como los retazos de tela que tenía eran pequeños tuve la idea de unir dos retazos de tela con diferentes estampados, luego puse el patrón de la barriga del perro y corte dos piezas.
Step 2:
Since the scraps of fabric I had were small I had the idea of joining two scraps of fabric with different prints, then I put the pattern of the dog's belly and cut two pieces.

Paso 3:
Tome el patrón de la cabeza del perrito 🐕 y corte dos piezas en tela color rosada.
Step 3:
Take the puppy head pattern 🐕 and cut two pieces out of pink fabric.

Paso 4:
Tome la tela azul y corte una pieza de la mancha con ayuda del patrón y lo cosi a la cara del perro, luego tome la tela negra y con ayuda de los patrones corte dos ojos y una nariz que también cosi a la cara así como les muestro en la imagen.
Step 4:
Take the blue fabric and cut a piece of the spot with the help of the pattern and sew it to the face of the dog, then take the black fabric and with the help of the pattern cut two eyes and a nose that I also sewed to the face as shown in the picture.

Paso 5:
Ahora coso la barriga del perro que corte anteriormente con hilo blanco a la cabeza del perrito 🐕.
Step 5:
Now I sew the dog belly I cut earlier with white thread to the puppy's head 🐕.

Paso 6:
Ahora procedo a cortar dos piezas de la oreja en tela estampada y dos piezas en tela rosada, luego unimos con el derecho de frente hacia dentro cosemos con hilo blanco con punto atrás y dejamos un agujero volteamos.
Step 6:
Now I proceed to cut two pieces of the ear in printed fabric and two pieces in pink fabric, then we join with the right side facing inwards we sew with white thread with back stitch and leave a hole we turn over.

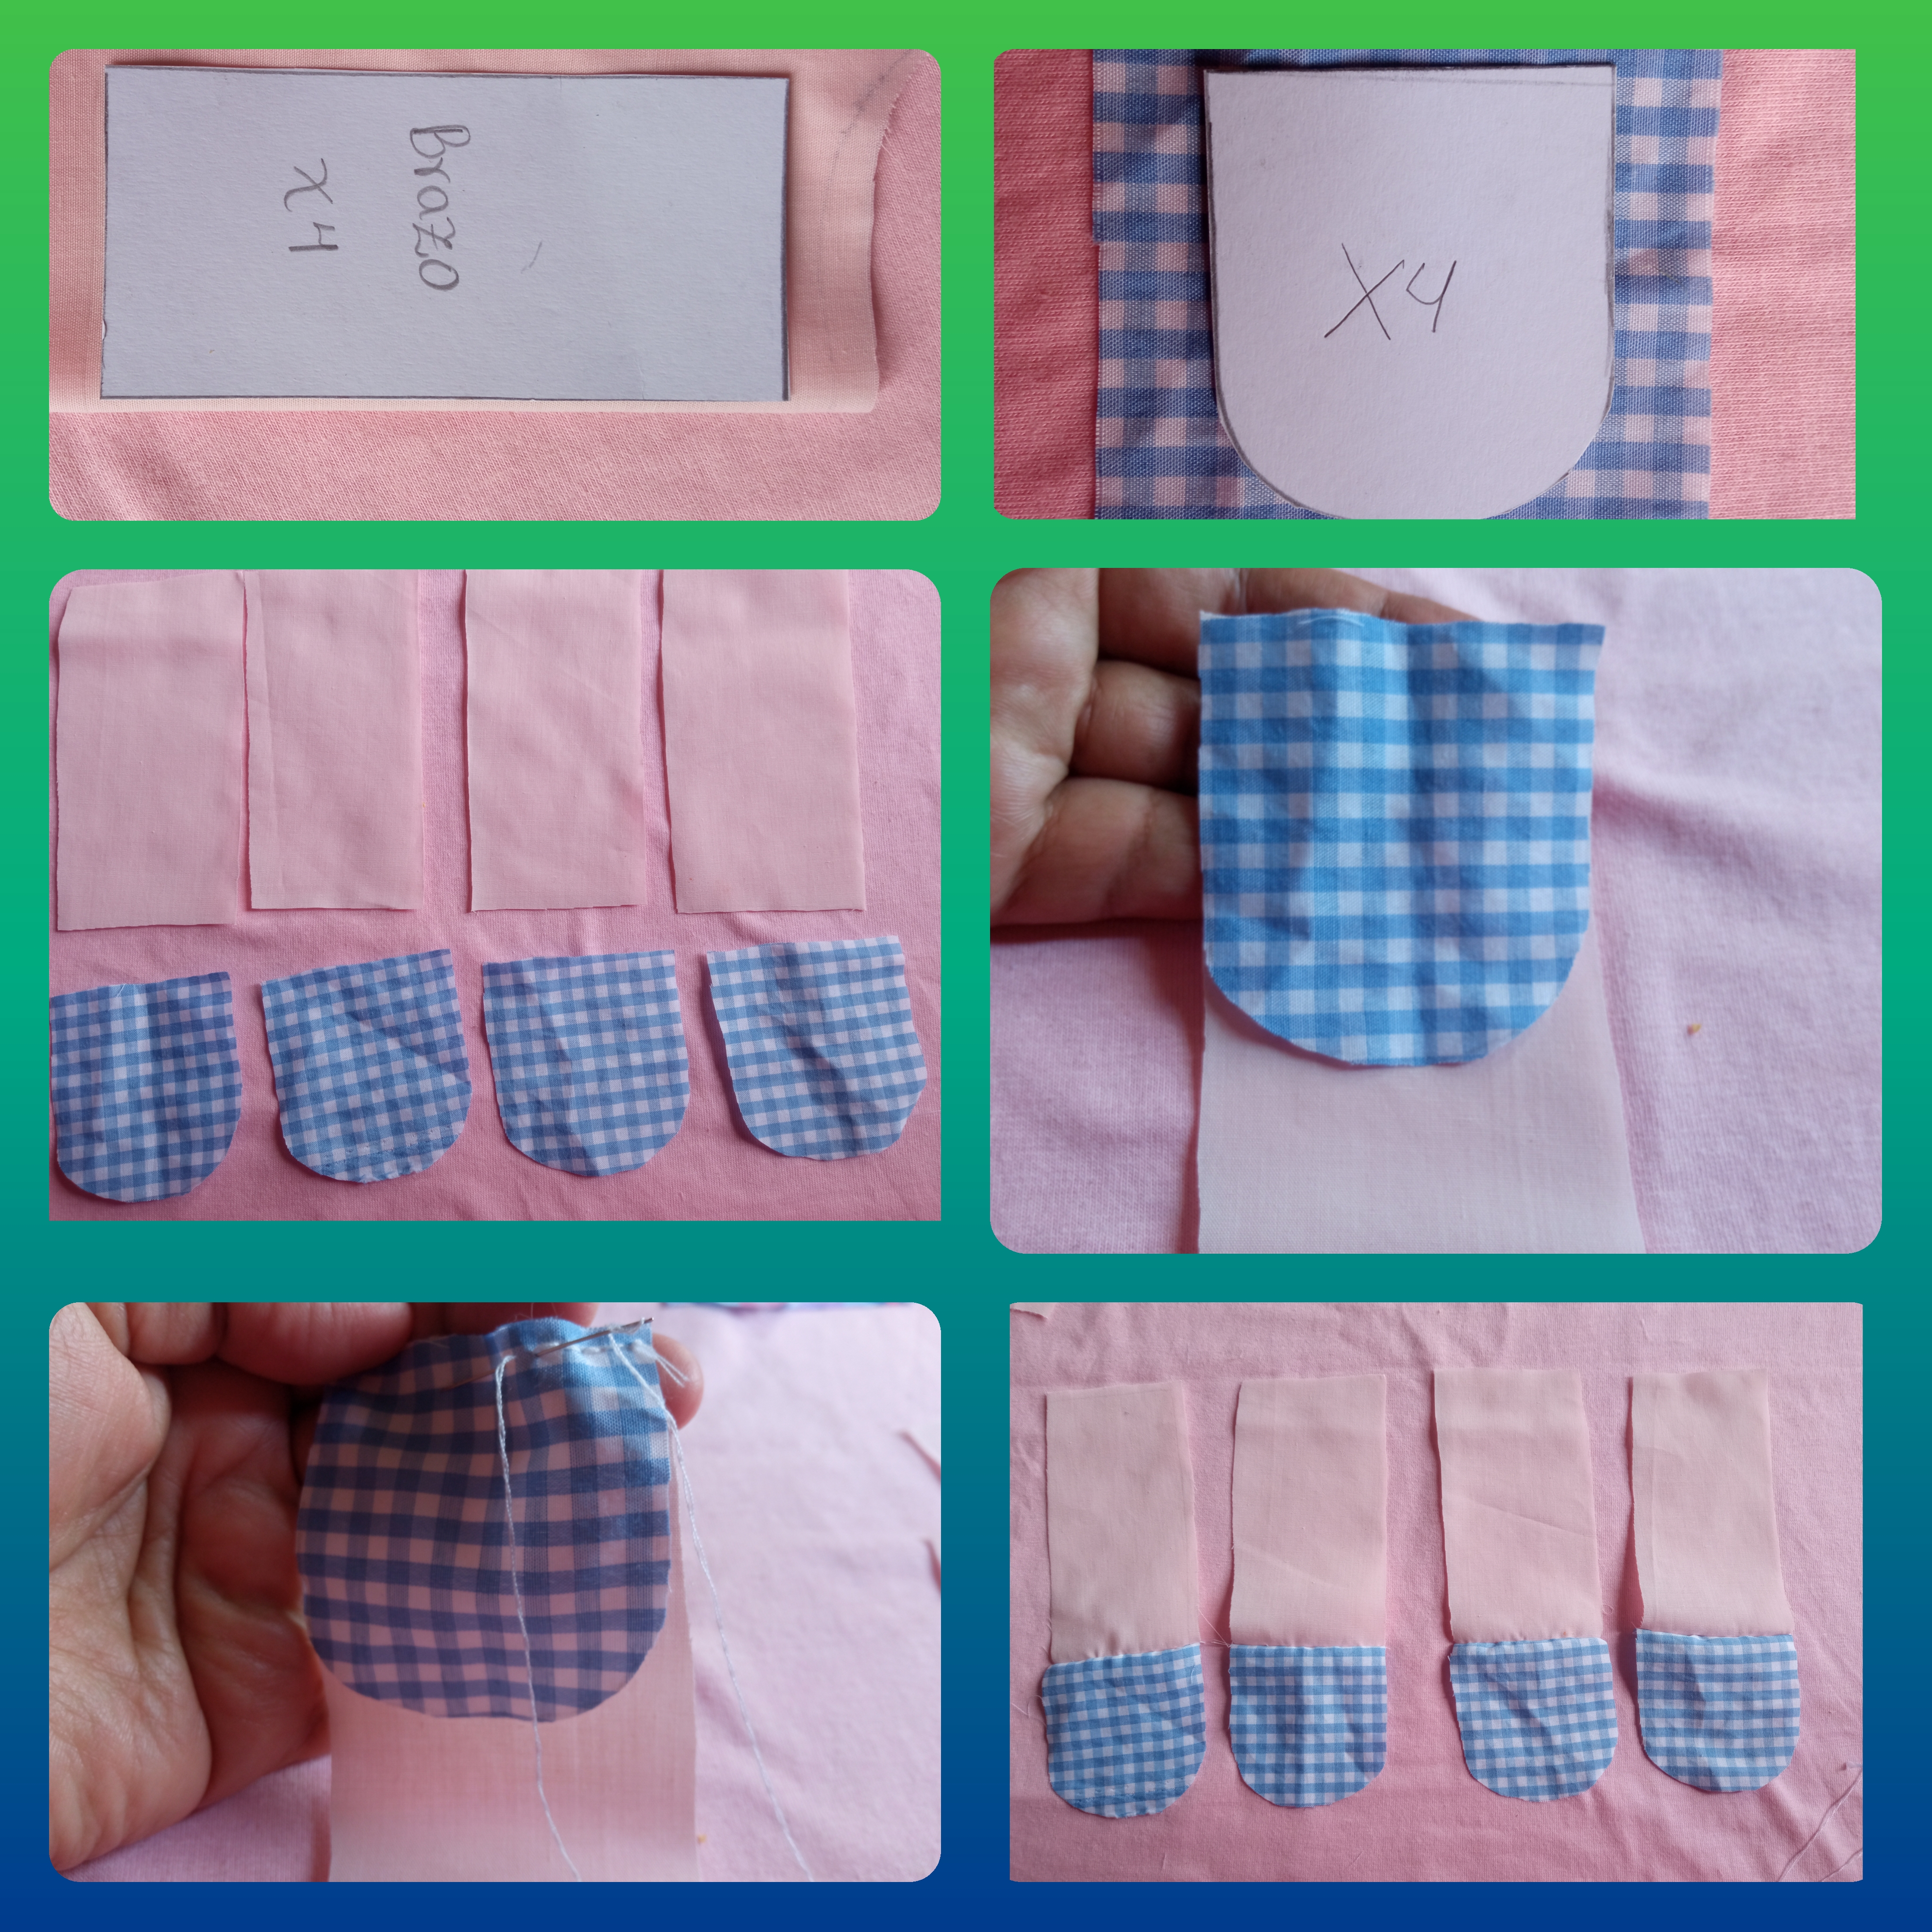
Paso 7:
Tomo el patrón de los brazos y las corto en tela rosada y en tela estampada como ven en la imagen, luego uno cociendo con hilo blanco. Ahora uno dos piezas con el derecho de frente hacia dentro y coso dejando un agujero volteo, después relleno y termino de coser.
Step 7:
I take the pattern of the arms and cut them in pink fabric and in printed fabric as you see in the picture, then one sewing with white thread. Now I sew two pieces together with the right side facing in and sew leaving a hole I turn over, then I stuff and finish sewing.

Paso 8:
Cortamos cuatro piezas de las patas con ayuda del patrón, luego uno dos piezas con el derecho de frente hacia dentro coso dejo un agujero, volteo, relleno y termino de coser.
Step 8:
Cortamos cuatro piezas de las patas con ayuda del patrón, luego uno dos piezas con el derecho de frente hacia dentro coso dejo un agujero, volteo, relleno y termino de coser.

Paso 9:
Ahora tomo una pieza del cuerpo del perrito 🐕 con ayuda de alfileres voy colocando las orejas, los brazos y las patas luego monto la otra pieza del cuerpo y coso con hilo blanco con punto atrás dejamos un agujero y volteamos nuestro perrito . Después rellenamos y terminamos de coser el agujero.
Step 9:
Now I take a piece of the body of the puppy 🐕 with the help of pins I place the ears, arms and legs then I mount the other piece of the body and sew with white thread with back stitch we leave a hole and flip our puppy . Then we fill and finish sewing the hole.

¡Ya está Hermosa 🥰 Almohadita de Perrito 🐕 está Terminada! // Beautiful 🥰 Puppy Pillow 🐕 is finished!
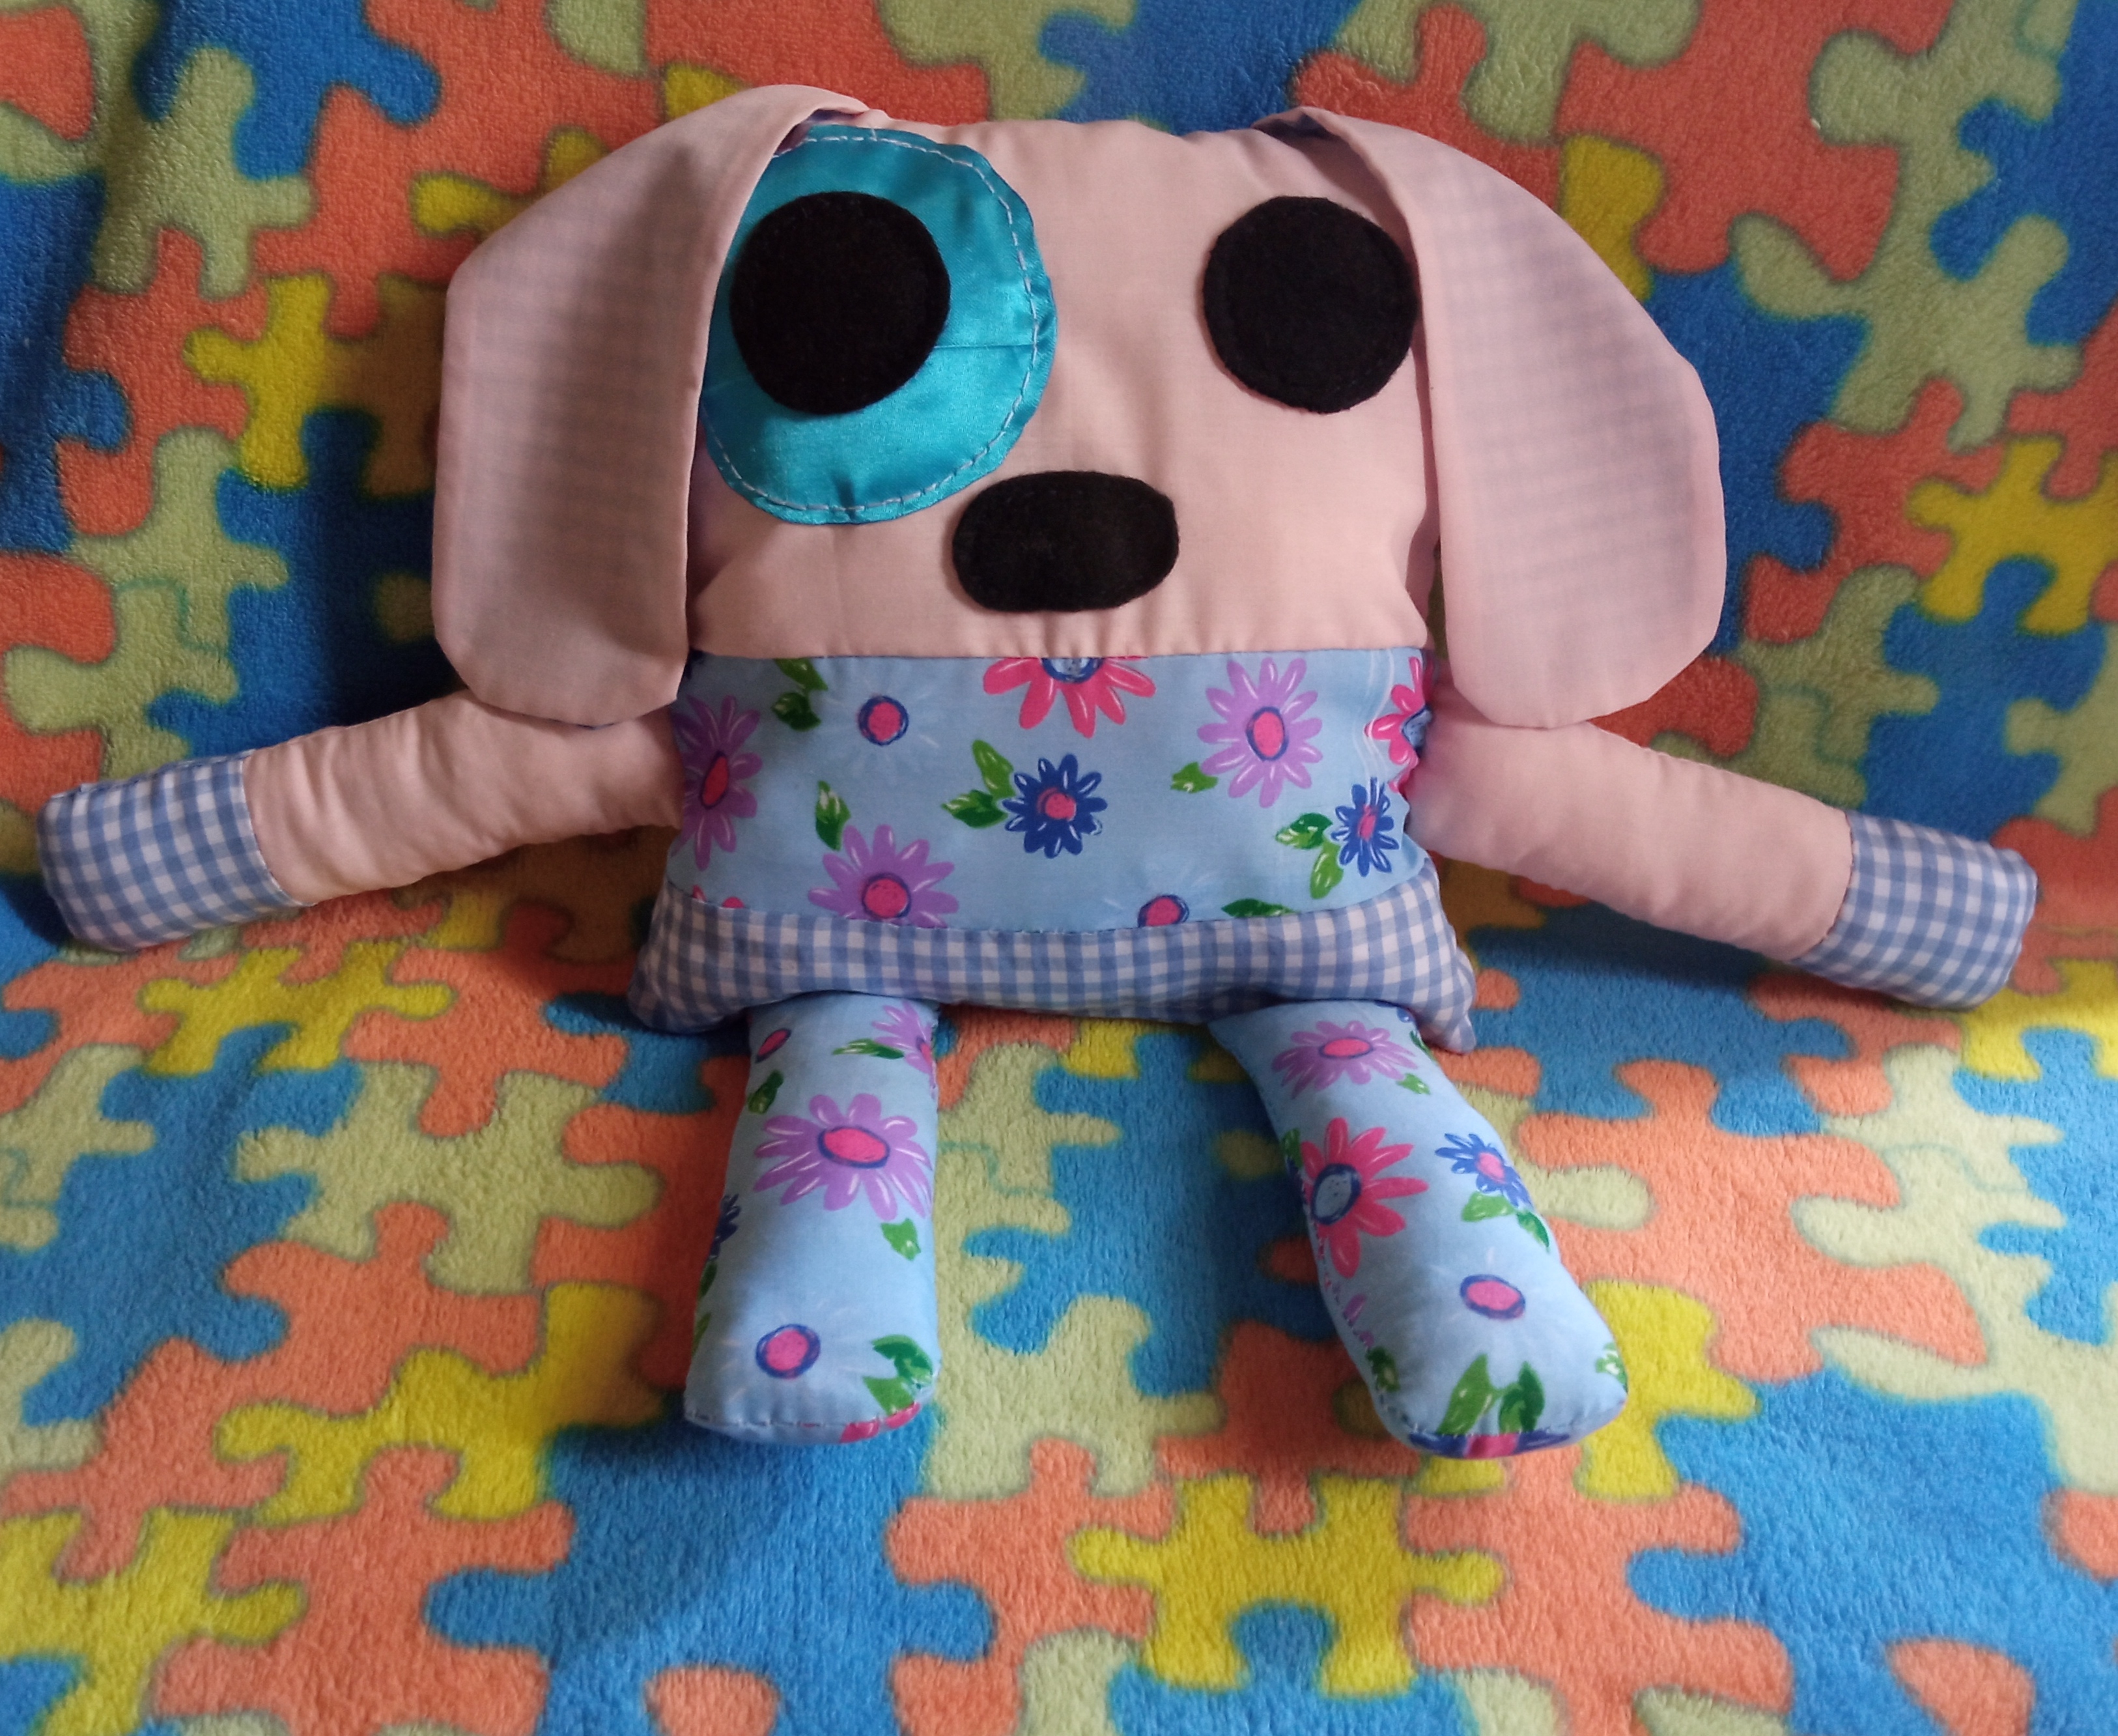
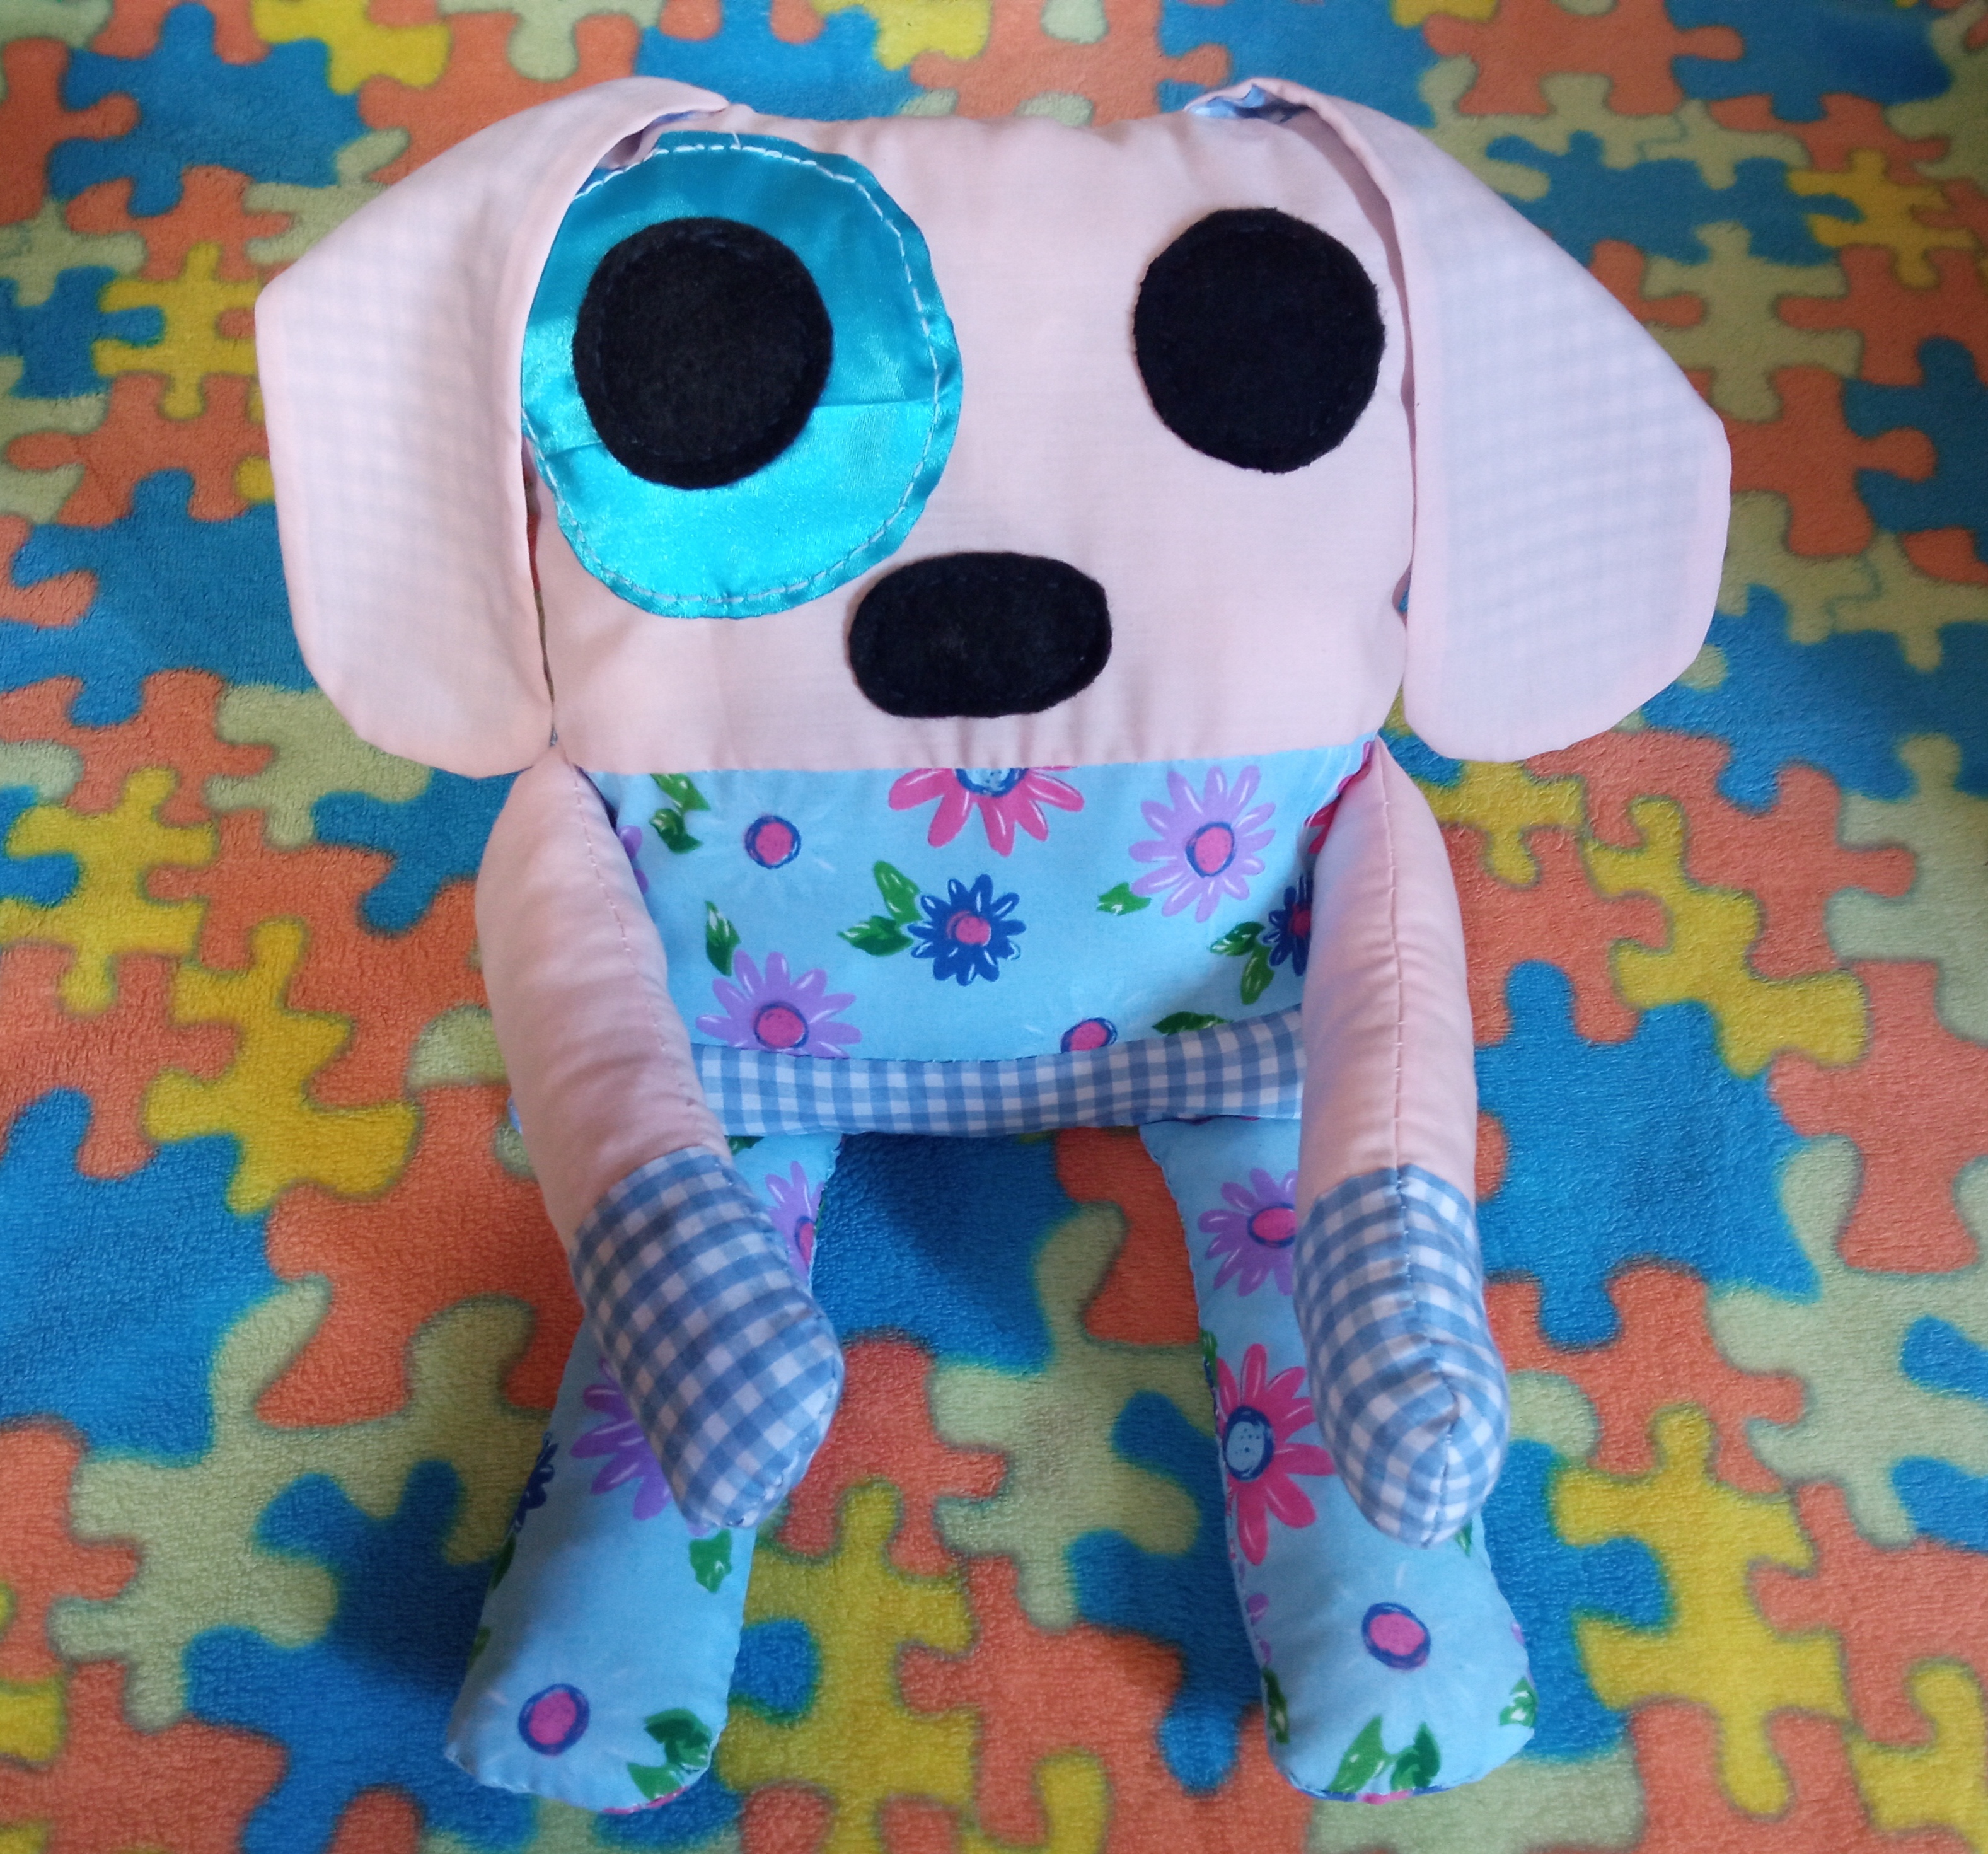
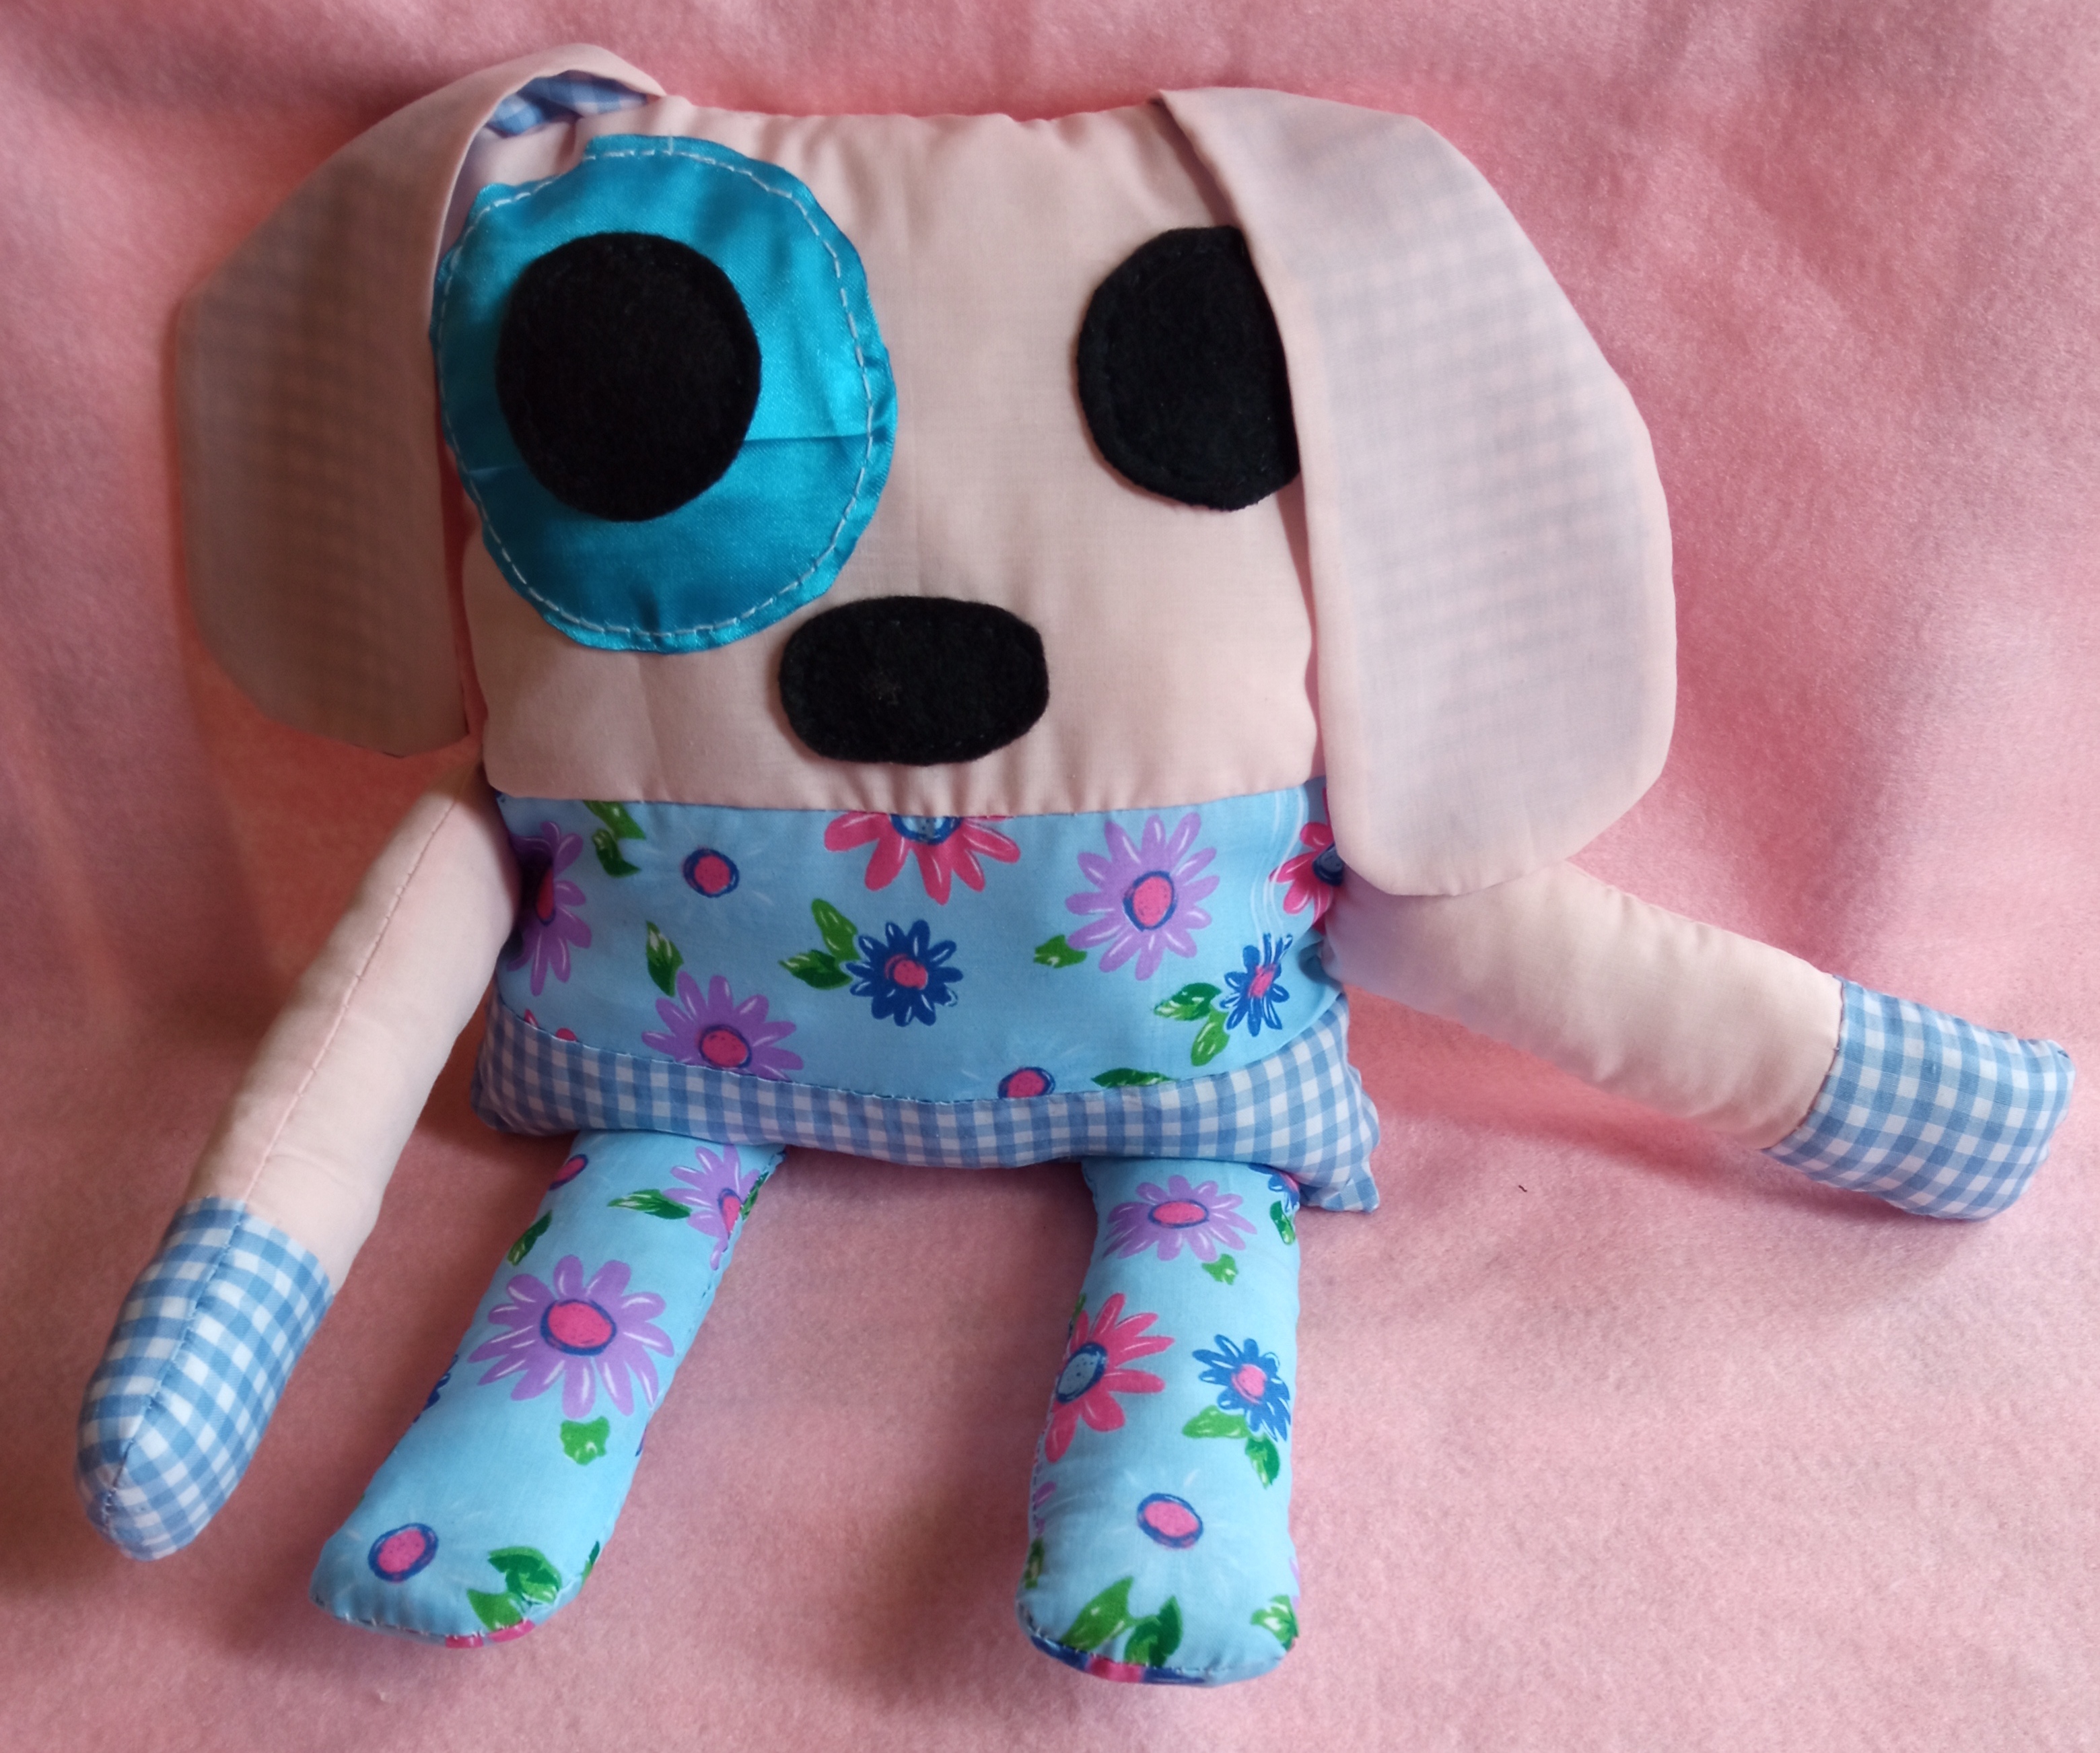

Hasta aquí llego este tutorial, espero les haya gustado y se animen en elaborar un de estás Almohadita a los pequeños de la casa recuerda que la puedes hacer del tamaño deseado. Yo quedé muy complacida con el resultado se que mi sobrina Paula la va a disfrutar al máximo 😘.
So much for this tutorial, I hope you liked it and I encourage you to make one of these pillows for the little ones in the house, remember that you can make it in any size you want. I was very pleased with the result and I know that my niece Paula will enjoy it to the fullest 😘.
Como siempre agradecida con esta maravillosa comunidad por su apoyo 😊. Me comprometo sacar un tiempo para no dejar de coser a mano muchas cosas maravillosas para mostrarle a ustedes el paso a paso.
As always grateful to this wonderful community for their support 😊. I pledge to take out some time to not stop hand sewing many wonderful things to show you step by step.
Thank you for sharing this amazing post on HIVE!
Your content got selected by our fellow curator @stevenson7 & you just received a little thank you via an upvote from our non-profit curation initiative!
You will be featured in one of our recurring curation compilations and on our pinterest boards! Both are aiming to offer you a stage to widen your audience within and outside of the DIY scene of hive.
Join the official DIYHub community on HIVE and show us more of your amazing work and feel free to connect with us and other DIYers via our discord server: https://discord.gg/mY5uCfQ !
If you want to support our goal to motivate other DIY/art/music/homesteading/... creators just delegate to us and earn 100% of your curation rewards!
Stay creative & hive on!
Gracias por el apoyo!
Muchas gracias por el apoyo!
Te quedó preciosa... 🥰❤️.
🎆🎇🎉🎊🌧️💐✨🌾🌱🌹🌙🌿🍃🥀⚡🌺☘️🍀🌈🌷⭐🪴🌵🌸🌟💮🌴🌳💫☀️💮☔🌲🌳🌍🌌🌠☄️🏵️🐝🌻🌼🍄🐞🦋💙☕💜🍍🎆🎇🎉🎊
Muchas gracias por tu visita y comentario, me alegra que te gustará.
Besos!
Congratulations @yurimar! You have completed the following achievement on the Hive blockchain and have been rewarded with new badge(s):
Your next payout target is 1000 HP.
The unit is Hive Power equivalent because post and comment rewards can be split into HP and HBD
You can view your badges on your board and compare yourself to others in the Ranking
If you no longer want to receive notifications, reply to this comment with the word
STOPSupport the HiveBuzz project. Vote for our proposal!
Dear @yurimar, we need your help!
The Hivebuzz proposal already got important support from the community. However, it lost its funding a few days ago when the HBD stabilizer proposal rose above it.
May we ask you to support it so our team can continue its work?
You can do it on Peakd, Ecency, or using HiveSigner.
https://peakd.com/me/proposals/199
All votes are helpful and yours will be much appreciated.
Thank you!