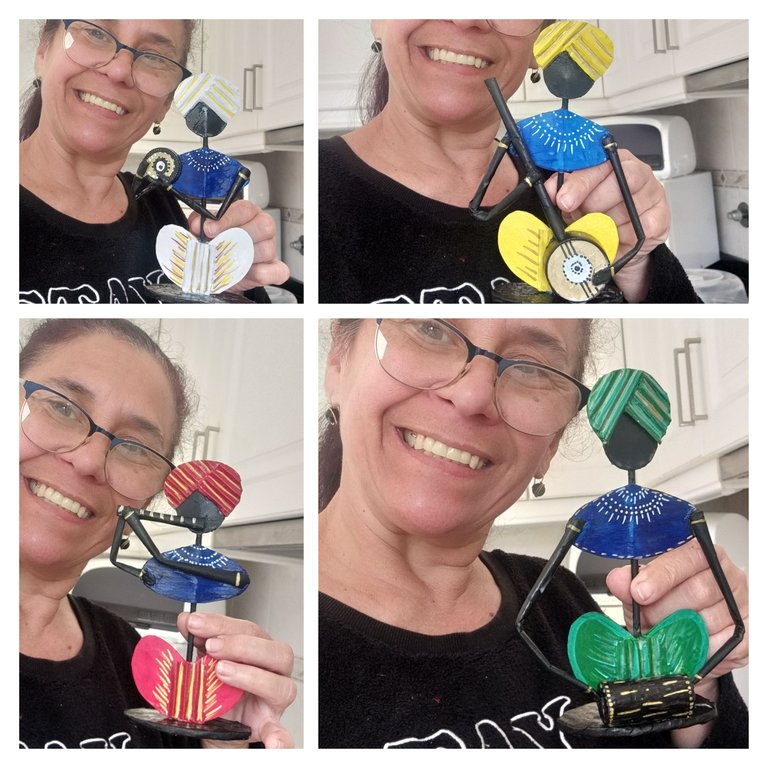

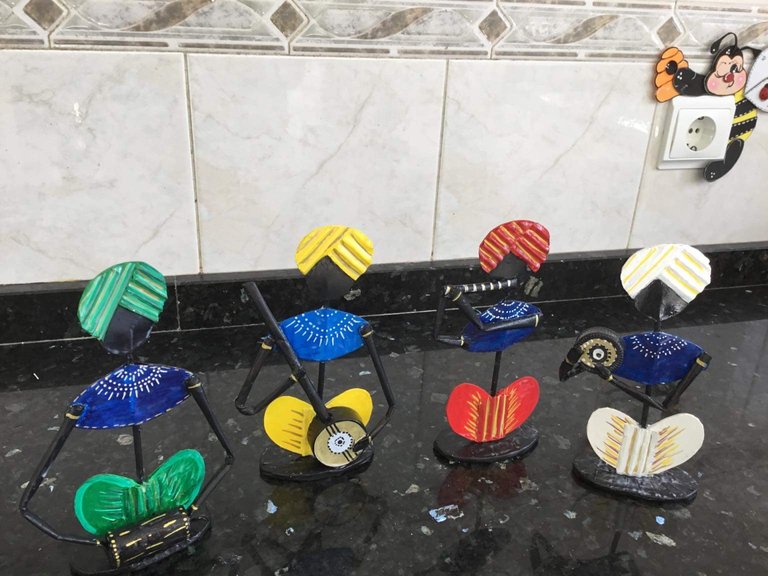
Hola hola¡¡ reciban un caluroso saludo amigos de las diferentes comunidades de esta gran colmena HIVE; he estado full de trabajo y para poder traerles mis trabajos manuales debo sacar tiempo de no tengo🙉🙈, hoy les traigo unas lindas esculturas de músicos los cuales realicé con materiales reciclables.
Los objetos que van a la basura que casi 99% de las personas desechan;pueden ser de gran utilidad, se imaginan que todo el mundo reutilizara los materiales dándole de una manera otra oportunidad🤔, el mundo sería diferente y no hubiera tanta contaminación y nos ahorrariamos mucho dinero. Como ya saben me gusta trabajar con materiales reciclables y desechos y a través de mi publicaciones les muestro mucha manera de reutilizar varios objetos. Acompañenme a realizar estas pequeñas esculturas de músicos.
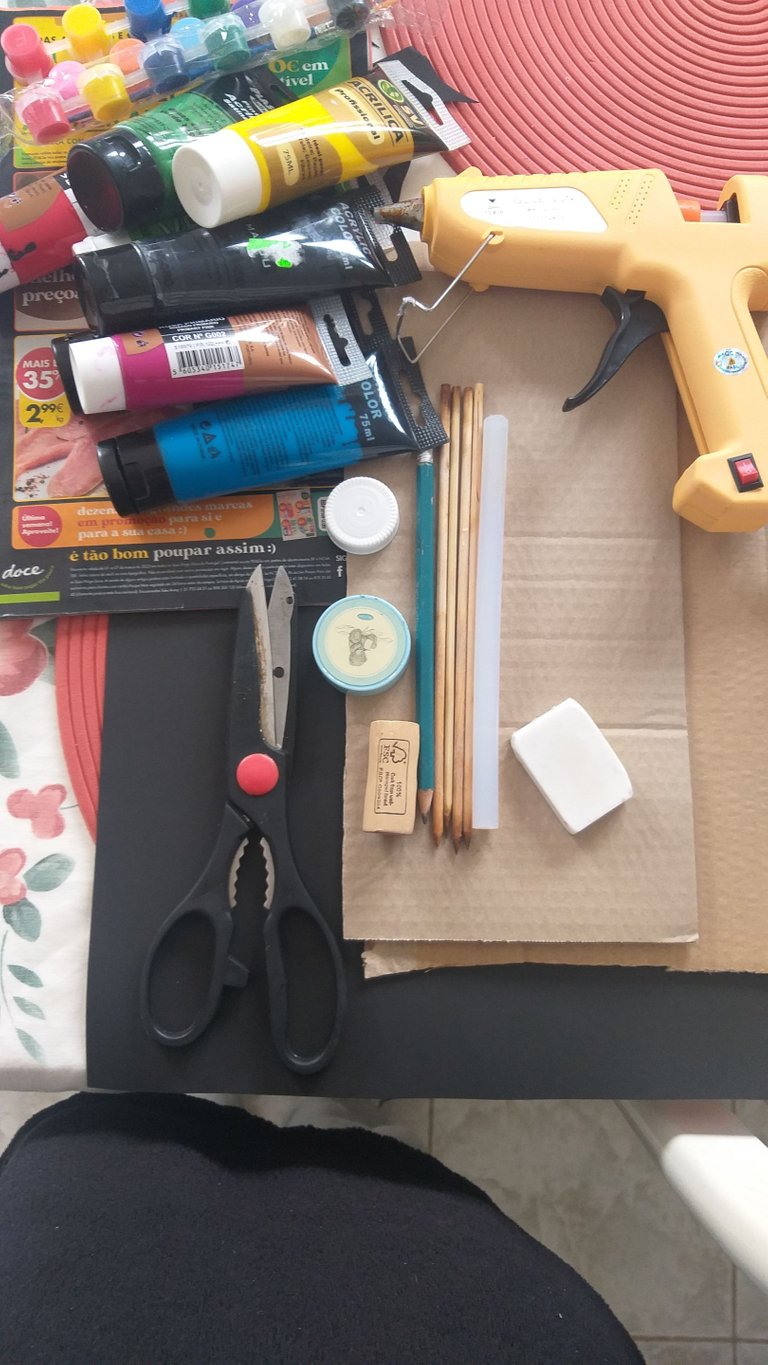
Los materiales que utilizaremos para estas esculturas son:
Cartón de dos grosor uno más fino que otro
Tijera
Pegamento blanco
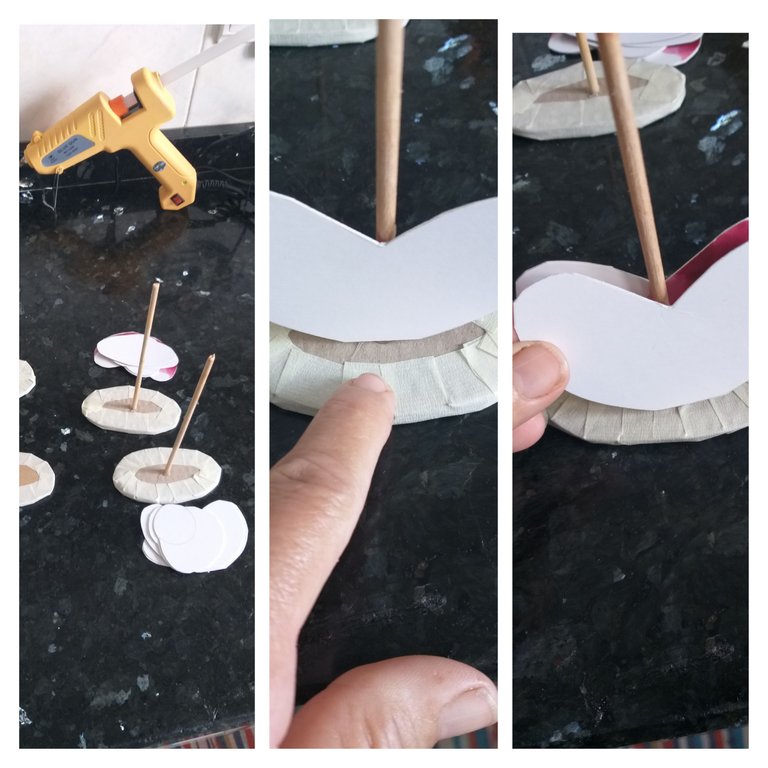
Pistola de silicona caliente y barras de silicona
Pinturas acrílicas de su preferencia o la que tenga disponible
Palos de parrilla (4)
Cinta de construcción o tirro
Revista viejas o periódicos
Pinceles
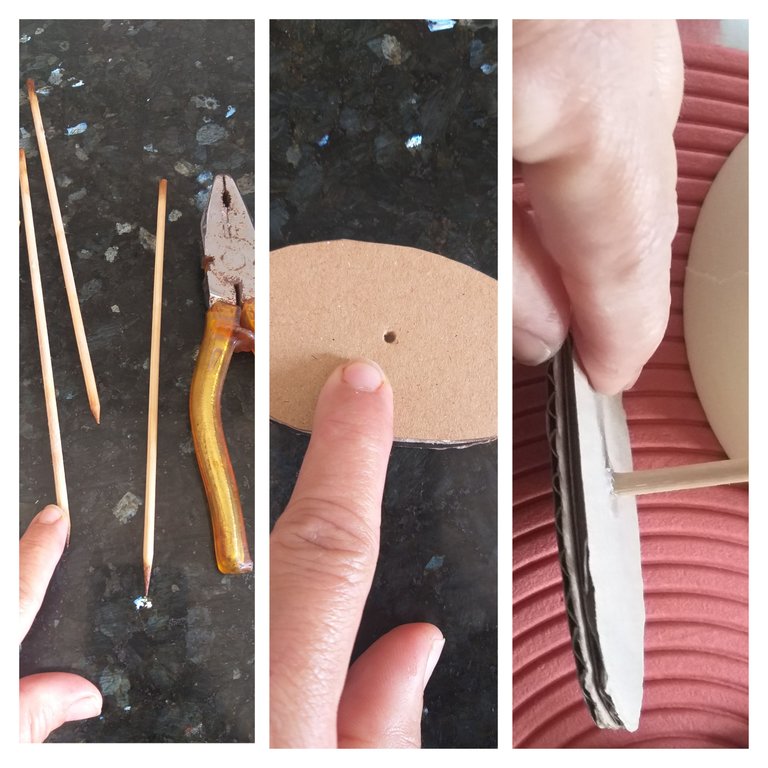
Alicate o pinza
Lápiz y borrador
Una tapa pequeña, un sacapunta viejo y un corcho
Pasos para realizar las esculturas
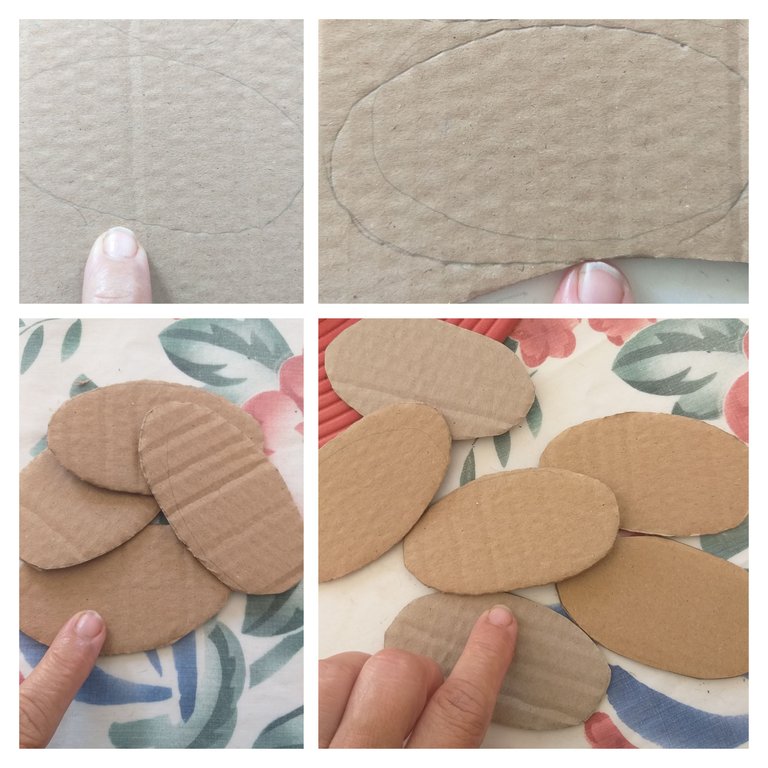
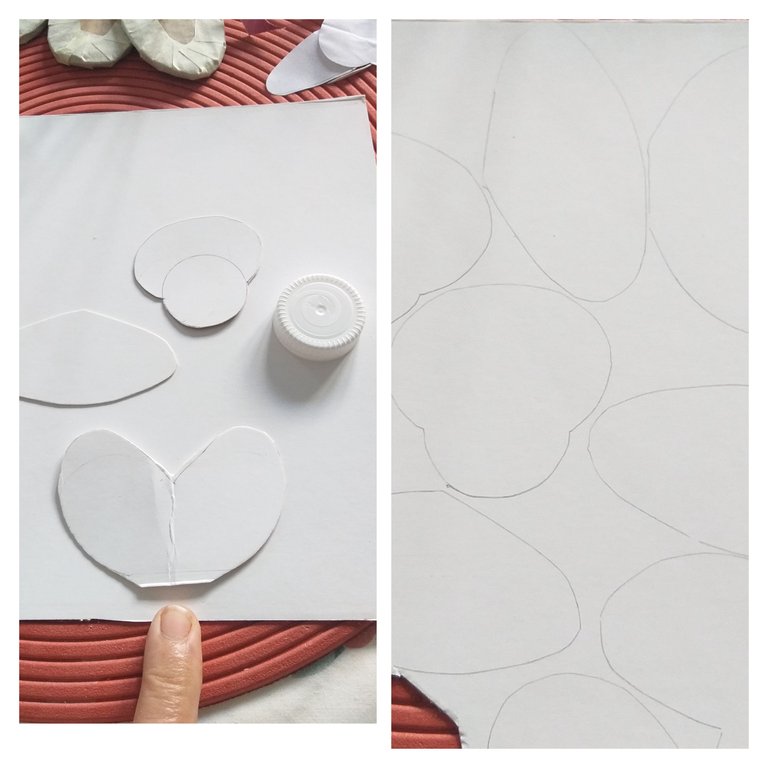
1👣. Lo primero que vamos hacer es dibujar con el lápiz en el cartón más grueso 8 figuras de forma de óvalos de 8cm de ancho por 5cm de largo y luego recortar.Observar las imágenes
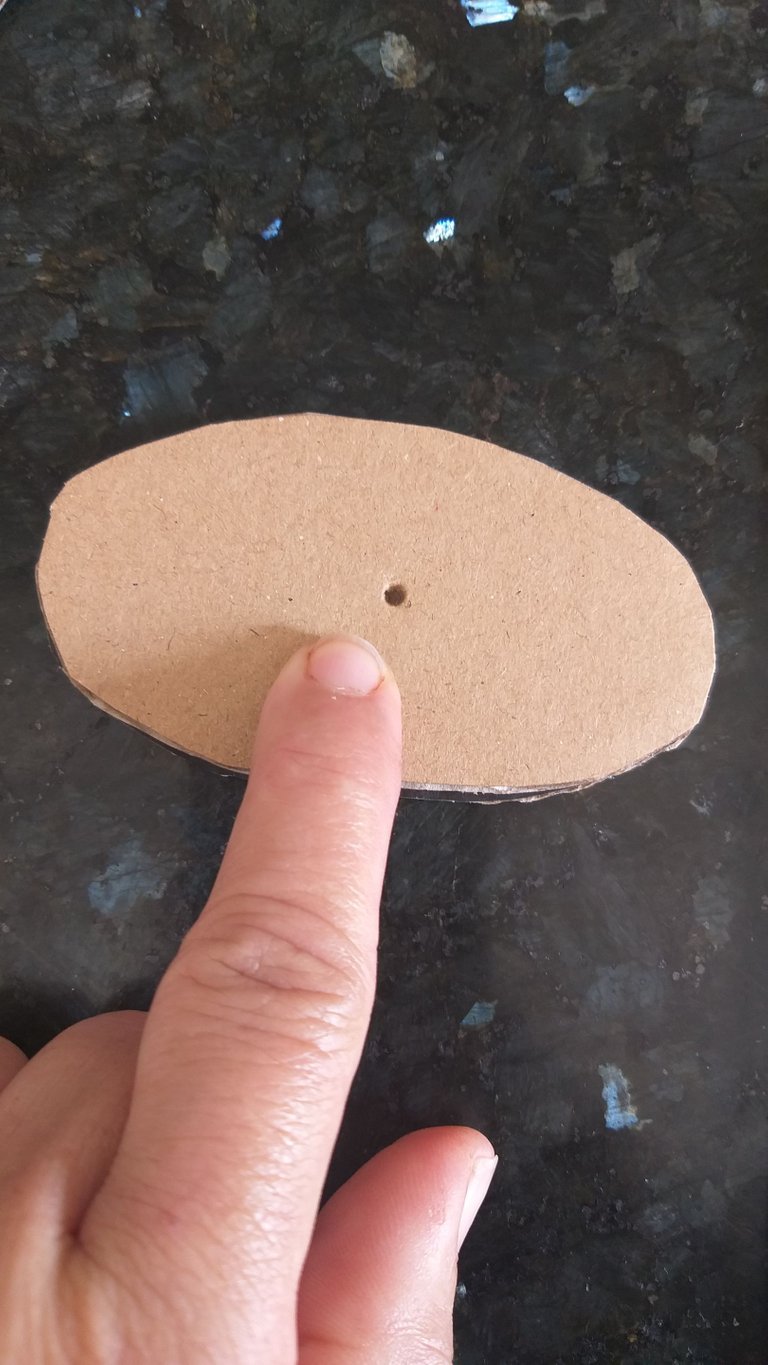
2👣. En este paso vamos a pegar con la pistola de silicona caliente dos figuras de óvalos para que queden doble y luego hacer un orificio en el medio con el palo de parrilla.
3👣. Vamos a cortar las puntas de los palos parrilleros 4cm con el alicate o pinza y luego vamos a pegar cada palo en el orificio de cada óvalo que será la base.
4👣. Con el tirro o cinta de construcción vamos a forrar todas las orillas de la base (óvalo) con la tijera cortar el tirro en tiras para doblar y así quedará mejor para forrar.

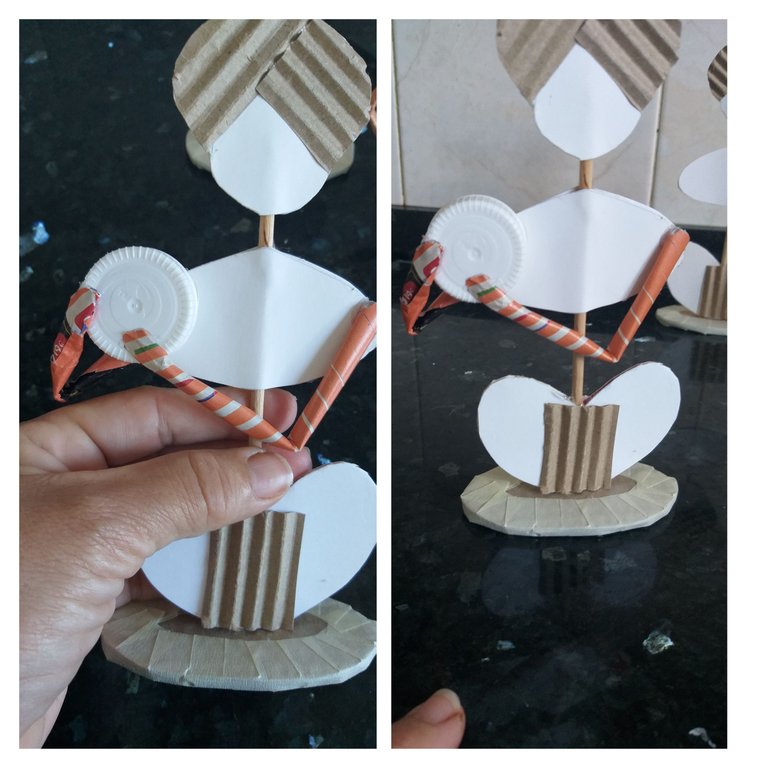
5👣. Luego de tener todas las bases forradas con el tirro o cinta de construcción; vamos a dibujar la cabeza, un turbante y el pantalón. La cabeza la dibujé con una tapa de leche y el pantalón como una figura de corazón y el turbante como un abanico.Las medidas de la camisa es de 6cm anco por 4cm de largo para el pantalón 6cm de ancho por 4cm de largo y para la cabeza 3cm de largo y 2cm ancho. Cada figura deberá hacerla doble. Observar la imágenes
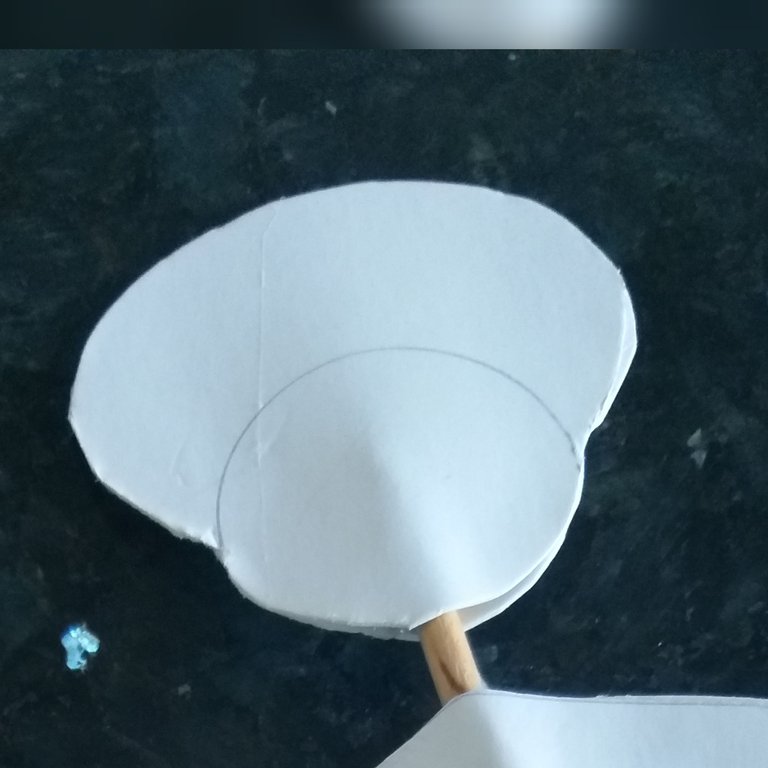
6👣. En éste paso vamos a pegar con el silicon caliente cada pieza doble; primero pegamos el pantalón la primera pieza al palo y luego la otra ajuntando las dos piezas.Observar las imágenes
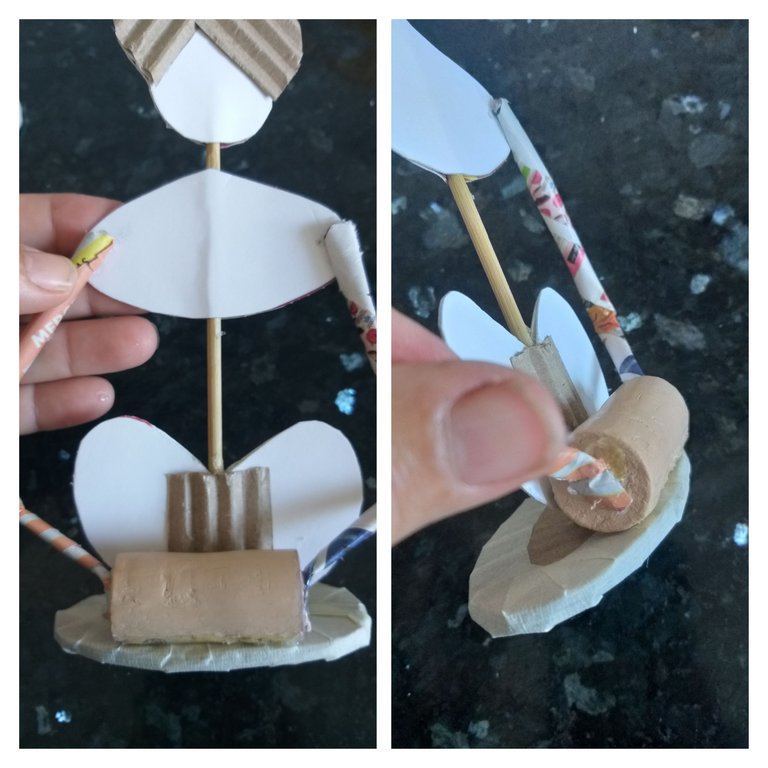
7👣. Así pegará cada pieza la cabeza y la camisa. Las piezas deben estar bien pegadas orilla con orilla para formar una sola pieza.
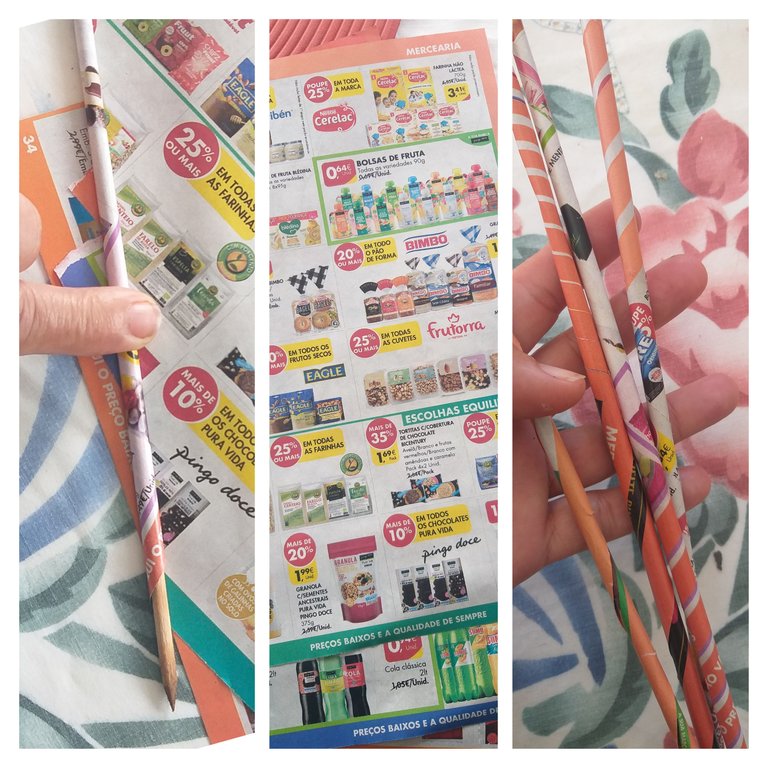
8👣. Luego de tener todas las piezas pegadas en cada palo de parrillero. Vamos a realizar 4 tiras finas con el palo de parrilla enrollando cada una en la hoja de revista.
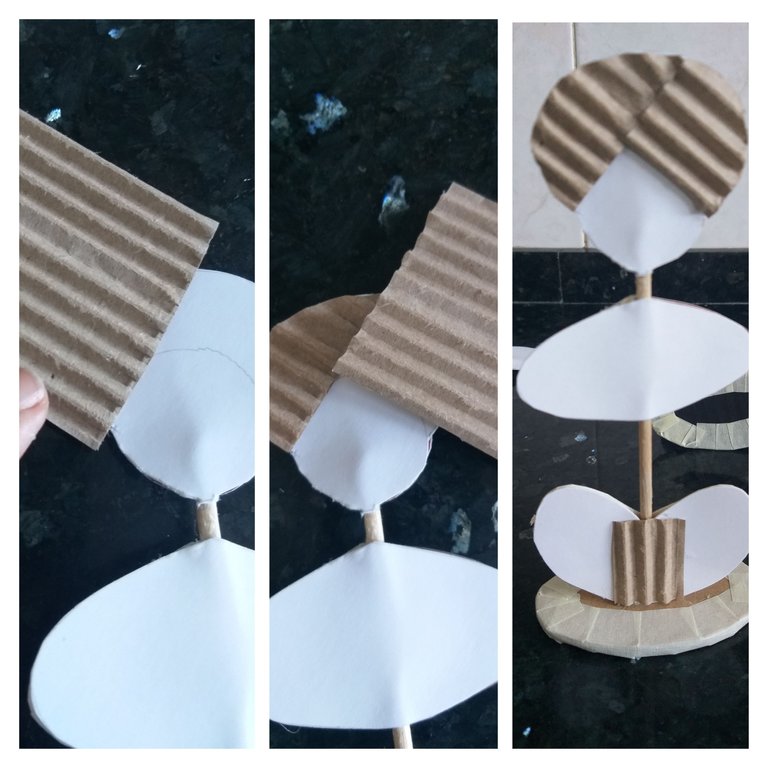
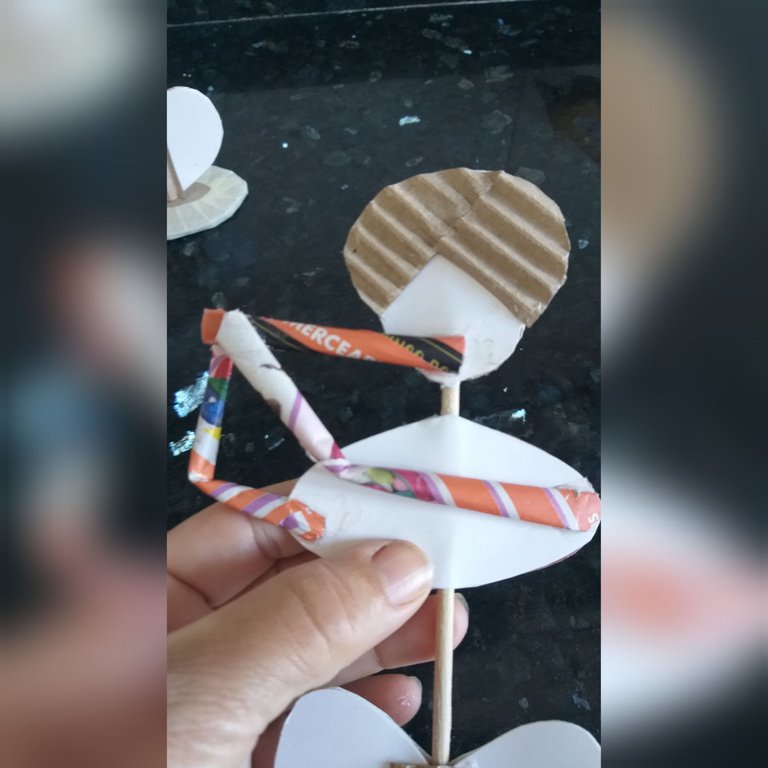
9👣. Luego de tener todas las tiras de las revistas vamos a utilizar un pedazo de cartón quitándole las capas de encima y arriba quedando cartón corrugado. Pegamos un pedazo de un lado del turbante que dibujamos en la cabeza y luego hacemos lo mismo del otro lado y también pegamos un pedazo en la parte de abajo del pantalón; así haremos contodas las piezas.Observa la imágenes
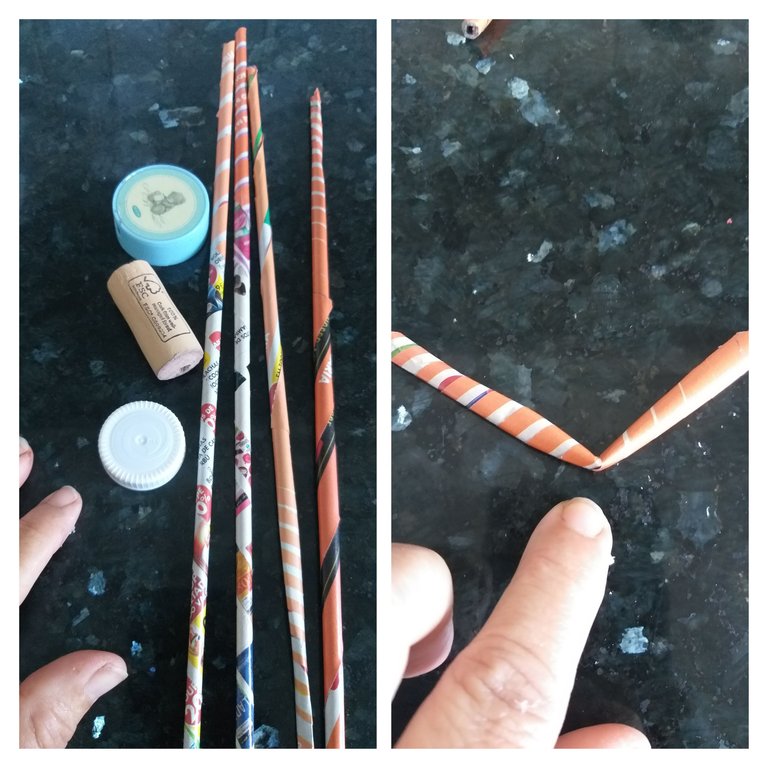
10👣. En este paso vamos armar cada instrumento musical con el sacapunta, la tapa de cartón de leche, el corcho. Las tiras que realizamos con la revistas serán los brazos.
11👣. Vamos armar la primera escultura con el sacapunta le introducimos un pedazo de la tira de la revista y la pegamos en el orificio; después pegamos ambas tiras en cada lado del camisa que serán los brazos y la otra punta al instrumento.Observar las figuras
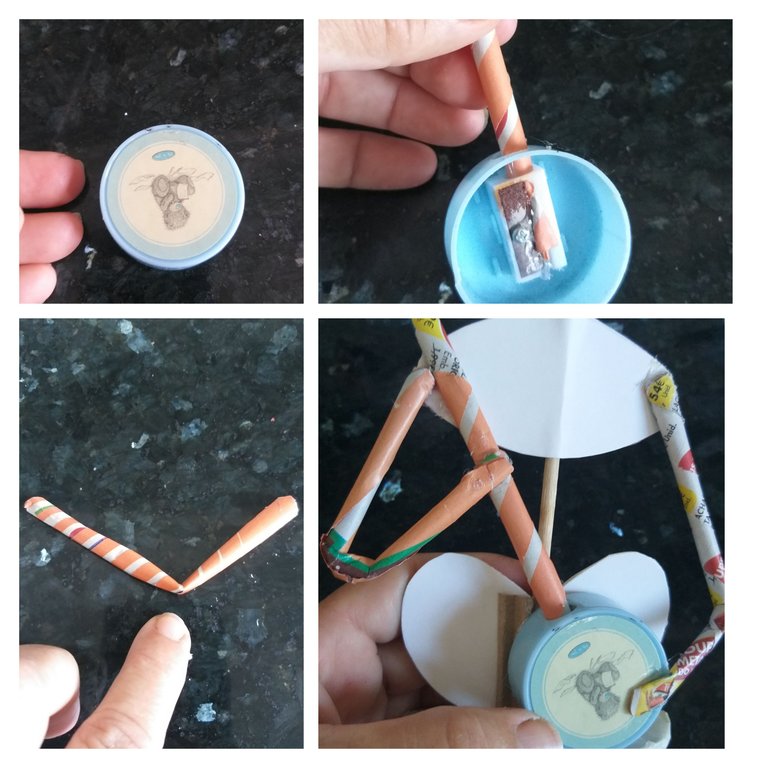
12👣. Vamos ahora armar el otro instrumento que será la tapa que vamos a pegar la camisa de un lado y los brazos al instrumento realizando un pequeño doblez a ambos brazos.
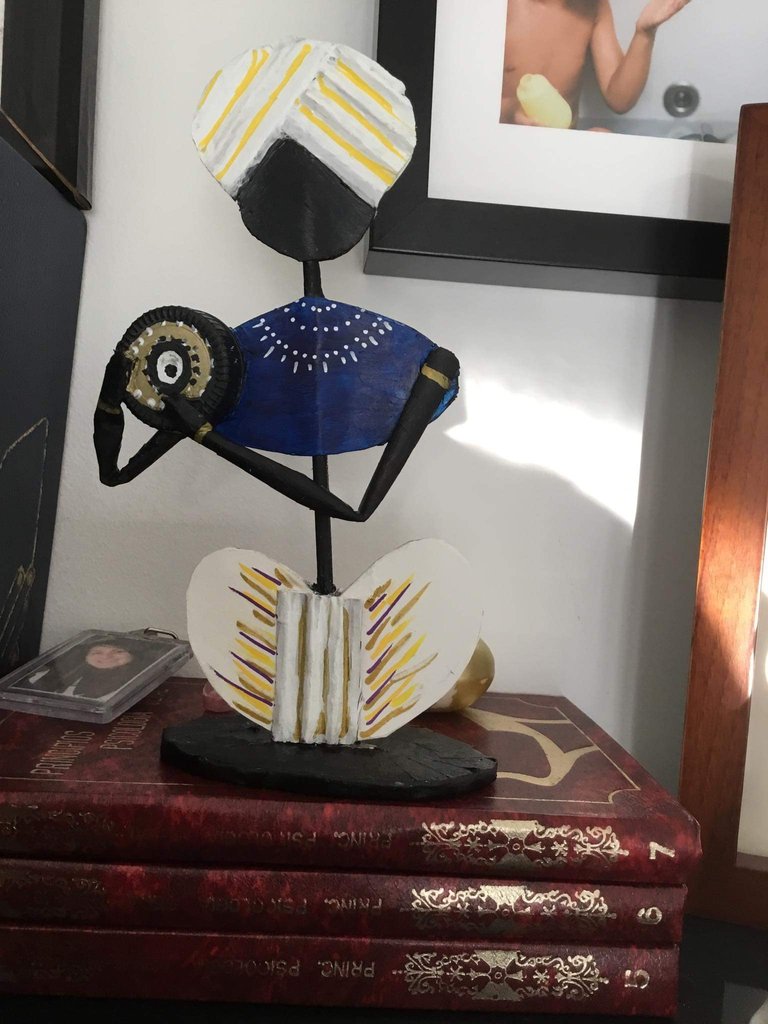
13👣. En este paso cortaremos un pedazo de tira que será una flauta y pegamos a la cara en la parte de la boca y también pegamos a los brazos. Observar las imágenes para guiarte
14👣. Con el corcho vamos a realizar un tambor, el cual pegaremos en la base y los brazos a ambos lados del corcho.
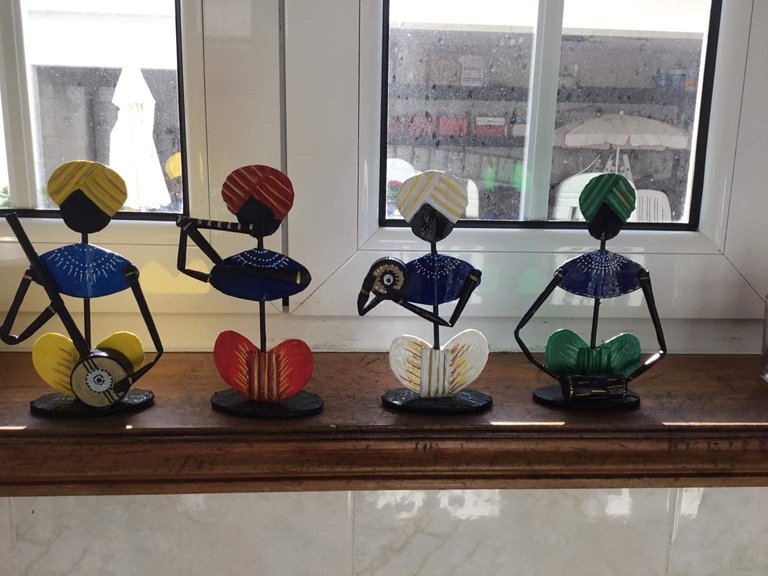
15👣. Ya lista todas las piezas vamos a pintar con la pintura acrílica cada pieza de los colores que guste. En este caso pintamos cada turbante del color azul oscuro le di dos manos y dejamos secar.Luego de amarillo pinté el turbante y el pantalón. Con pintura negra pinté brazos, cuerpo y base con la pintura dorada le pinté rayas en los brazos, y pantalón.
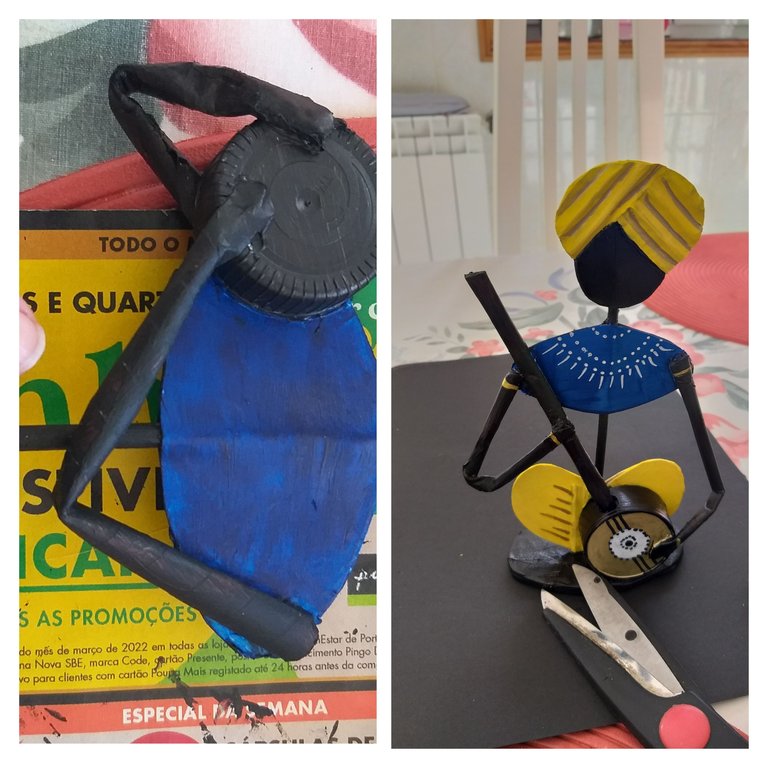
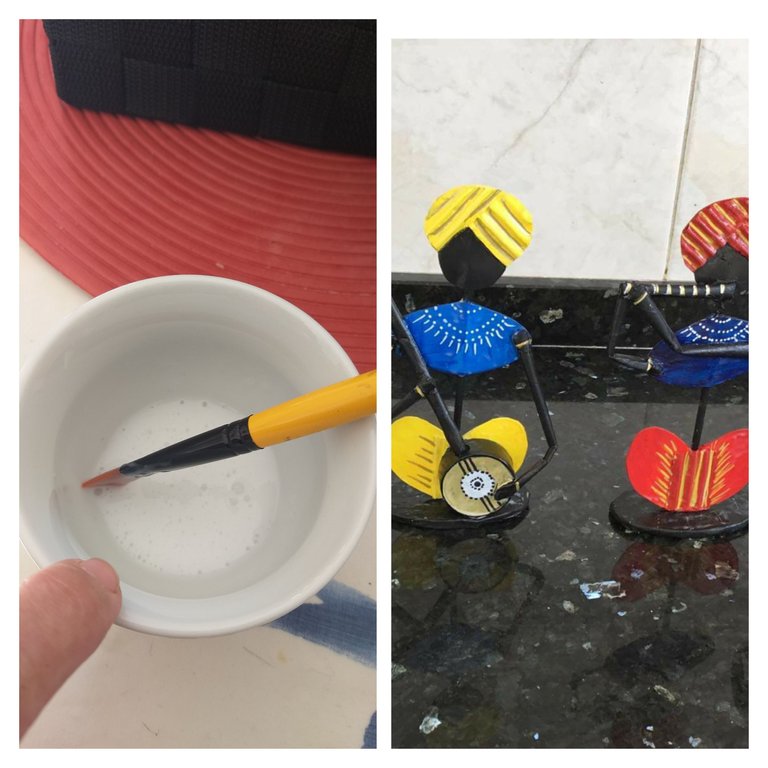
16👣. En todas las esculturas harán lo mismo pinta cada pantalón y camisa del mismo color. En esta ocasión pintamos una blanca, roja y verde. Por último le pintamos detalles como puntos, y rayas los ojos, nariz y boca y para finalizar con pegamento blanco y un poquito de agua y un pincel le pasamos por toda la escultura esto es para darle brillo y resistencia. Dejamos secar bien y a decorar.
Espero que le haya gustado las esculturas musicales con materiales reciclables, anímense hacerlo son tan fáciles de realizar. También tengo que agradecerles a todas esas personas que siempre me apoyan al igual las diferentes comunidades de Hive. Gracias y Bendecido día
Las fotos son tomadas con mi teléfono móvil Samsung Galaxy A6 y organizadas con la aplicación GridArt.
English
Hello, hello, receive a warm greeting, friends from the different communities of this great HIVE hive; I have been full of work and to be able to bring you my manual works I must take time that I don't have🙉🙈, today I bring you some beautiful sculptures of musicians which I made with recyclable materials.
The objects that go to the trash that almost 99% of people throw away, can be very useful, imagine that everyone would reuse materials by giving them another chance🤔, the world would be different and there would not be so much pollution and we would save a lot of money. As you know, I like to work with recyclable materials and waste and through my posts I show you many ways to reuse various objects. Join me to make these small sculptures of musicians.
The materials that we will use for these sculptures are:
Cardboard of two thicknesses, one thinner than the other
Scissor
White glue
Hot glue gun and hot glue sticks
Acrylic paints of your choice or the one you have available
Grill sticks (4)
Construction tape or shot
Old magazines or newspapers
Brushes
Pliers or clamp
Pencil and eraser
A small cap, an old pencil sharpener and a cork
Steps to make the sculptures
1👣. The first thing we are going to do is draw with a pencil on the thicker cardboard 8 oval shapes 8cm wide by 5cm long and then cut them out. Look at the images
2👣. In this step we are going to glue two oval figures with the hot glue gun so that they are double and then make a hole in the middle with the grill stick.
3👣. We are going to cut the ends of the grill sticks 4cm with the pliers or clamp and then we are going to stick each stick in the hole of each oval that will be the base.
4👣. With the tape or construction tape we are going to cover all the edges of the base (oval) with the scissors cut the tape into strips to fold and that way it will be better for lining.
5👣. After having all the bases covered with the shot or construction tape; we are going to draw the head, a turban and the pants. I drew the head with a milk cap and the pants as a heart shape and the turban as a fan. The measurements of the shirt is 6cm wide by 4cm long for the pants 6cm wide by 4cm long and for the head 3cm long and 2cm wide. Each figure must make it double. Observe the images
6👣. In this step we are going to glue each double piece with hot silicone; First we glue the pants, the first piece to the pole and then the other joining the two pieces. Observe the images
7👣. So he will glue each piece the head and the shirt. The pieces must be well glued edge to edge to form a single piece.
8👣. After having all the pieces glued on each grill stick. We are going to make 4 thin strips with the grill stick, rolling each one on the magazine sheet.
9👣. After having all the strips of the magazines, we are going to use a piece of cardboard, removing the layers above and above, leaving corrugated cardboard. We glue a piece on one side of the turban that we draw on the head and then we do the same on the other side and we also glue a piece on the bottom of the pants; This is how we will do with all the pieces. Observe the images
10👣. In this step we are going to assemble each musical instrument with the pencil sharpener, the milk carton lid, the cork. The strips that we make with the magazines will be the arms.
12👣. We are now going to assemble the other instrument that will be the cover that we are going to glue the shirt on one side and the arms to the instrument by making a small fold on both arms.
13👣. In this step we will cut a piece of strip that will be a flute and we will glue it to the face in the part of the mouth and we will also glue it to the arms. Look at the pictures to guide you
14👣. With the cork we are going to make a drum, which we will glue on the base and the arms on both sides of the cork.
15👣. Once all the pieces are ready, we are going to paint each piece with the acrylic paint in the colors you like. In this case we painted each turban dark blue. I gave it two coats and let it dry. Then I painted the turban and the pants yellow. With black paint I painted arms, body and base with gold paint I painted stripes on the arms, and pants.
16👣. In all the sculptures they will do the same paint each pants and shirt the same color. This time we painted a white, red and green. Finally we paint details such as dots, and stripes the eyes, nose and mouth and to finish with white glue and a little water and a brush we pass it all over the sculpture this is to give it shine and resistance. Let dry well and decorate.
I hope you liked the musical sculptures with recyclable materials, go ahead and do it, they are so easy to make. I also have to thank all those people who always support me as well as the different Hive communities. Thank you and blessed day
The photos are taken with my Samsung Galaxy A6 mobile phone and organized with the GridArt application.
Es un trabajo bastante bonito, con muy buen uso de material reciclado. Luce precioso, le deseo la mejor de las suertes en la publicación.
Muchas gracias por tu comentario y apoyo. Bendecido día
Yo quiero!!! te han quedado super geniales, son excelentes para hacer una buena colección. gracias por compartirnos tus ideas.
Gracias mi bella amiga. Sii es muy bonito para hacer una colección y puede hacerle más instrumentos como por ejemplo el furro con un corcho parado☺ Bendecido día ❤👏👏👏
Saludos @zullyarte, me encantó este proyecto que presentaste hoy, la combinación de colores entre ellos los hace ver perfectos, los imagino en una repisa de mi sala seguro lucirán espectaculares. 😘
Saludos muchas gracias por tu comentario y apoyo.
Muy bello su trabajo y limpio, me encantan.
Gracias amiga por tu comentario y apoyo
Hermosas piezas, me encantaron se ven bellísimas y elegantes. Que bien trabajo amiga @zullyarte
Gracias corazón por tu apoyo
Qué bellos!!!
Gracias y Bendecido día
Te quedaron hermosas amiga @zullyarte. Abrazos y bendiciones. 💞
Saludos mi bella muchas gracias y un fuerte abrazo.
👋 saludos prima, que hermoso trabajo me encantan te han quedado bien lindos, es una idea genial para decorar. Te felicito 👏 abrazo 🤗
Saludos prima y gracias mi bella por tu apoyo. Dios te bendiga
Excelente trabajo, muy original y hermoso, yo también pienso que debemos reciclar la mayor cantidad de material que podamos, estas figuras donde quiera que se pongan jamás nadie imaginaría que están hechas con material reciclado. Gracias por compartir esta genial idea. Saludos
Así amiga y muchas gracias por tu lindo comentario. Bendiciones
Hermosas esculturas 😍😍 me enamoré.🥰💖
Gracias bella por tu apoyo mil bendiciones 👏👏
Thank you for sharing this amazing post on HIVE!
Your content got selected by our fellow curator @rezoanulvibes & you just received a little thank you via an upvote from our non-profit curation initiative!
You will be featured in one of our recurring curation compilations and on our pinterest boards! Both are aiming to offer you a stage to widen your audience within and outside of the DIY scene of hive.
Join the official DIYHub community on HIVE and show us more of your amazing work and feel free to connect with us and other DIYers via our discord server: https://discord.gg/mY5uCfQ !
If you want to support our goal to motivate other DIY/art/music/homesteading/... creators just delegate to us and earn 100% of your curation rewards!
Stay creative & hive on!
Muy lindos tus músicos!
Me encantaron!
Saludos!
Muy original amiga 😍😍
Gracias mi bella por tu apoyo
Que belleza amiga realmente hermoso quedé encantada como con todas tus creaciones, Dios bendiga tus manos.
Gracias corazón por tu apoyo ❤. Mil bendiciones 👏👏👏
Congratulations @zullyarte! You have completed the following achievement on the Hive blockchain and have been rewarded with new badge(s):
Your next target is to reach 800 comments.
You can view your badges on your board and compare yourself to others in the Ranking
If you no longer want to receive notifications, reply to this comment with the word
STOPCheck out the last post from @hivebuzz:
These are SO cool!! I am in the process of making my own flute right now, and was looking to see if there was any advice I could find on Hive - so that search brought me here, and I thought this little decorative band was so creative and fun :)
Cool project, @zullyarte :)