Español
Buenas tarde mi querida comunidad de Hive y a todos los miembros de cada comunidad que integran ésta gran colmena que tengan un excelente y Bendecido fin de semana; es un placer para mí compartir mis tutoriales con ustedes y muy agradecida a todas esas personas que dejan un hermoso comentario y apoyo. La manualidad que les traigo hoy la realicé pensando en mi esposo; a él le gusta leer y en estos días estaba doblando la esquina de la página del libro y le dije que le iba hacer algo para que pueda identificar la página donde quedó con la lectura☺.
Cuando estudiaba en la secundaria hicimos muchos Marcapáginas o separadores de libros para recoger fondos para nuestra graduación😍 y hay muchas manera de hacer estos separadores o Marcapáginas; hoy vamos aplicar la técnica del Puntillismo para realizar varios de ellos. Estos separadores de libros sirven para darlos como un recuerdo a un amigo o familiar y si le colocamos un lindo mensaje para esa persona quedaría especial. A continuación voy a darle los materiales para hacer estos Marcapáginas o separadores.
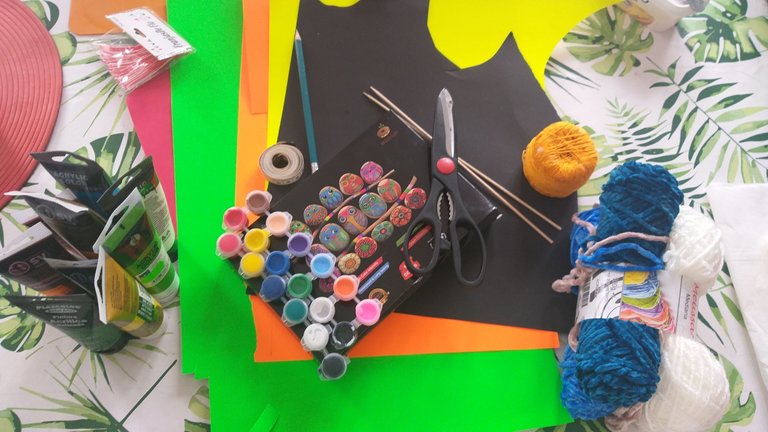
Los Materiales para realizar estos Marcapáginas son:
Cartulinas de varios colores. Los colores que vaya a utilizar es recomendable que combinen😉
Tijera
Pegamento universal
Hilos para pompones(no lo de costuras)
Marcadores para de varios colores( permanentes) o pintura acrílica
Pinceles de celdas finas(en caso de no usar los marcadores)
Lápiz
Regla o cinta métrica
Un palito de parrilla o una perforadora
Pasos para realizar los Marcapáginas o separadores:
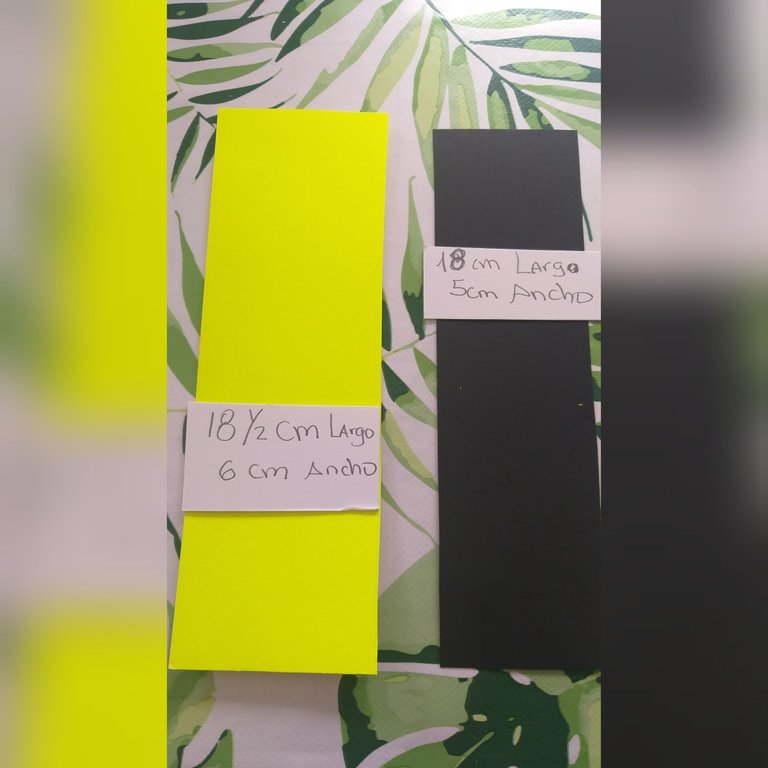
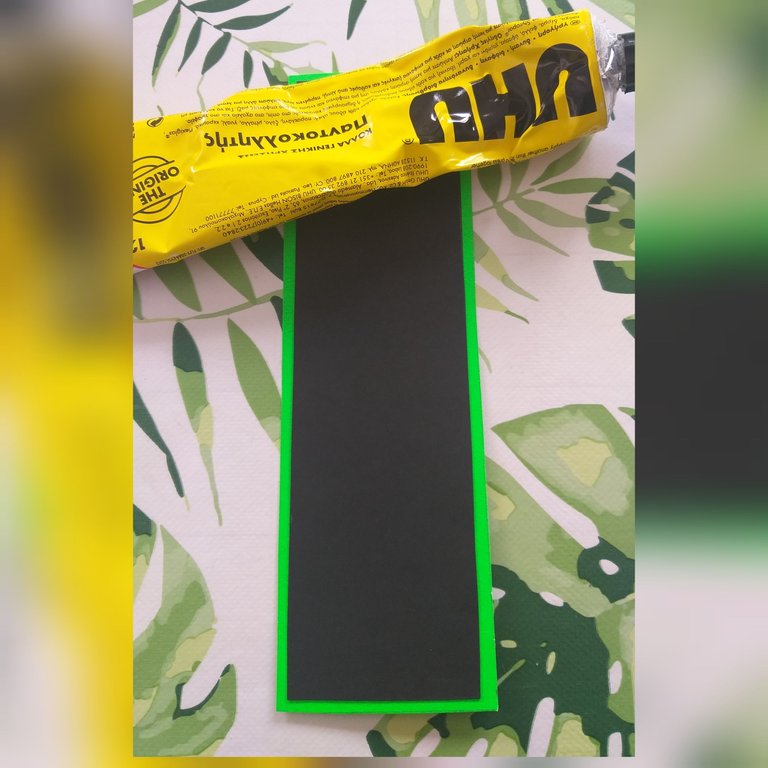
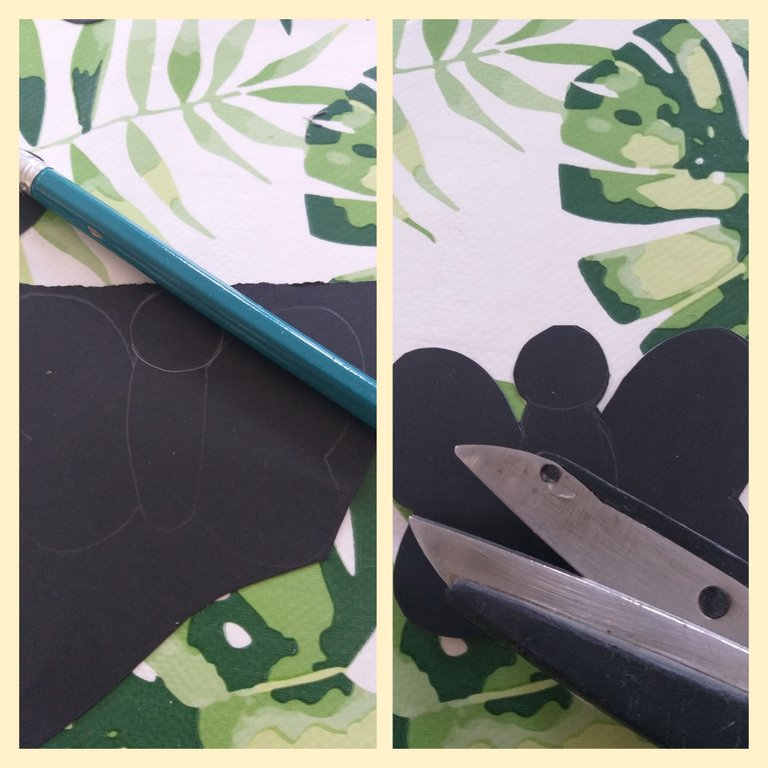
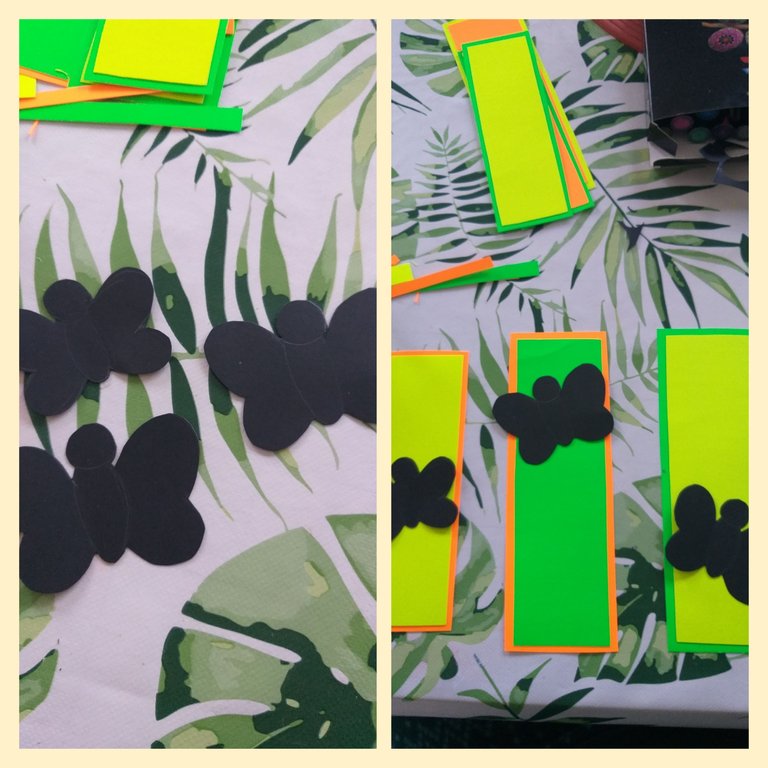
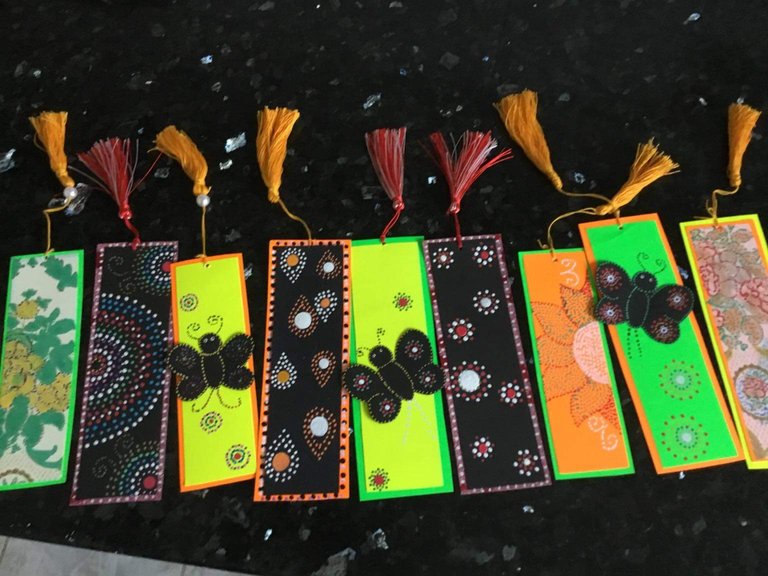
1👣📚. Lo primero que debemos de hacer, es medir dos cartulinas que combinen con las medidas de 18cm de largo por 6cm de ancho y la otra de 17cm de largo por 5cm de ancho. En la imagen aparecen las dos medidas de 18cm de largo pero son de un centímetro menos. Ya saben los colores lo pueden combinar ustedes a su gusto en éste caso vamos hacer una con base amarillo y la de encima negra, pueden hacerla con los colores invertidos👍y después recorte cada pieza.
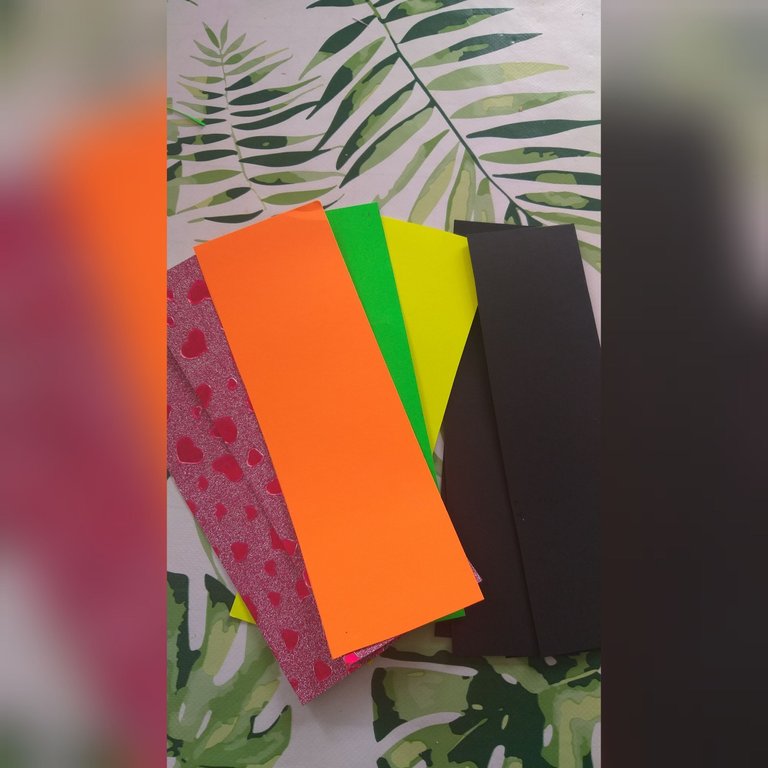
2👣📚. Ya cuando tengamos una pieza recortada esa va a servir como el molde para poder hacer otras; la cantidas depende de ustedes, acá como pueden ver en la imagen se hicieron varias. Las cartulinas que se utilizaron fueron que sobraron de otro tutorial anterior.
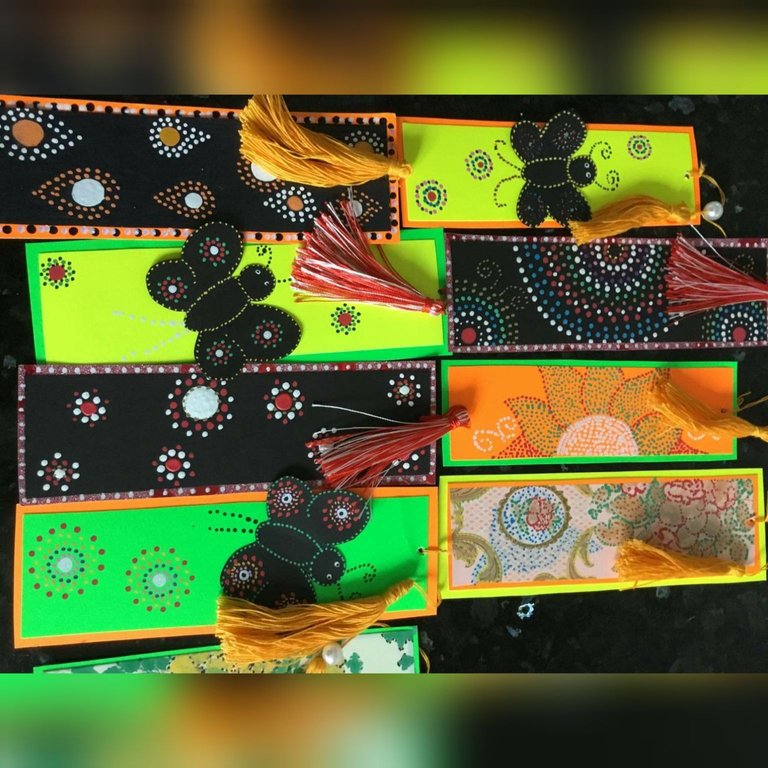
3👣📚. En éste tercer paso vamos a pegar con el pegamento universal, también pueden usar silicona fría pegamos el rectángulo más pequeño encima del grande; así van hacer con todas las piezas que pretenden hacer. Observar la imagen
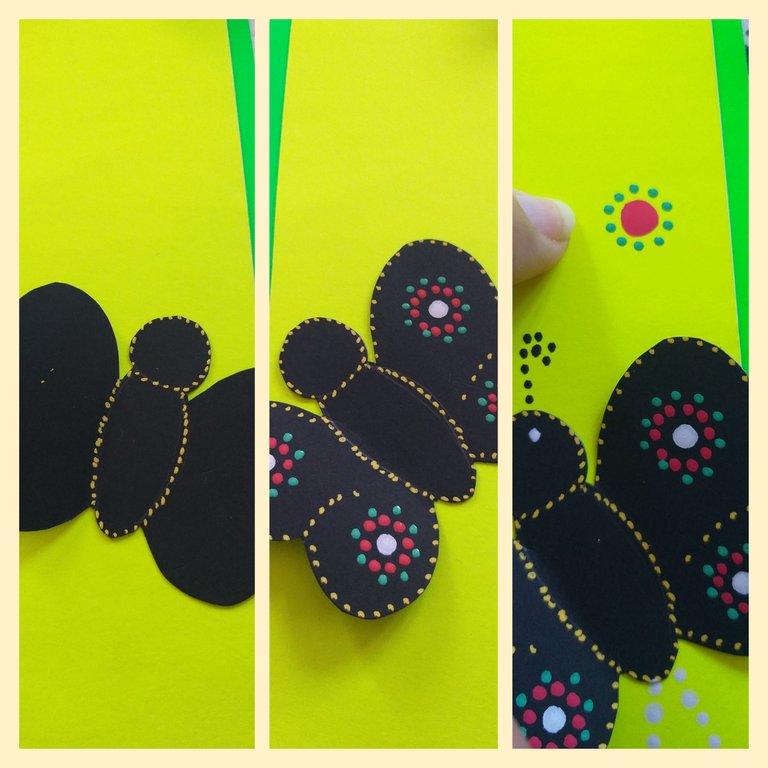
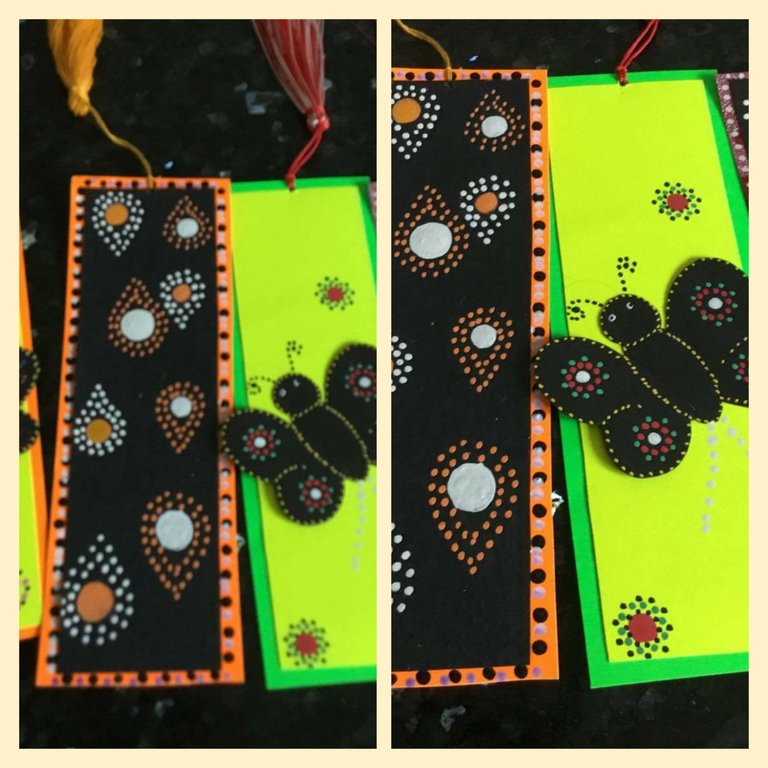
4👣📚. Luego que tengamos las dos piezas pegadas; vamos a decorarlas, hay muchas maneras de hacerlo, en ésta oportunidad haremos varios modelos. El primero es con la técnica del Puntillismo; para eso debemos tener un diseño, comenzamos hacer un punto mediano con el marcador permanente de color blanco y naranja o con pintura acrílica del mismo color.También pueden hacerle puntos pequeños por todas las orillas .
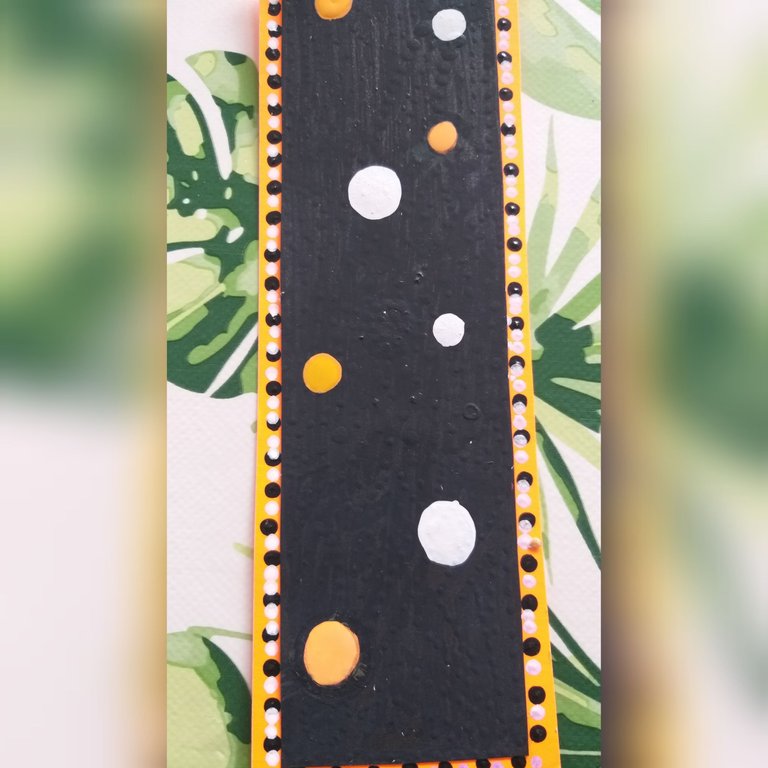
5👣📚. En este paso haremos puntos más pequeños alrededor del punto que teníamos; podemos intercalar los de los dos colores al punto blanco colocar alrededor puntos de color naranja y al de color naranja blancos. La figura que le hicimos fue como una gota de agua.Observar la imagen
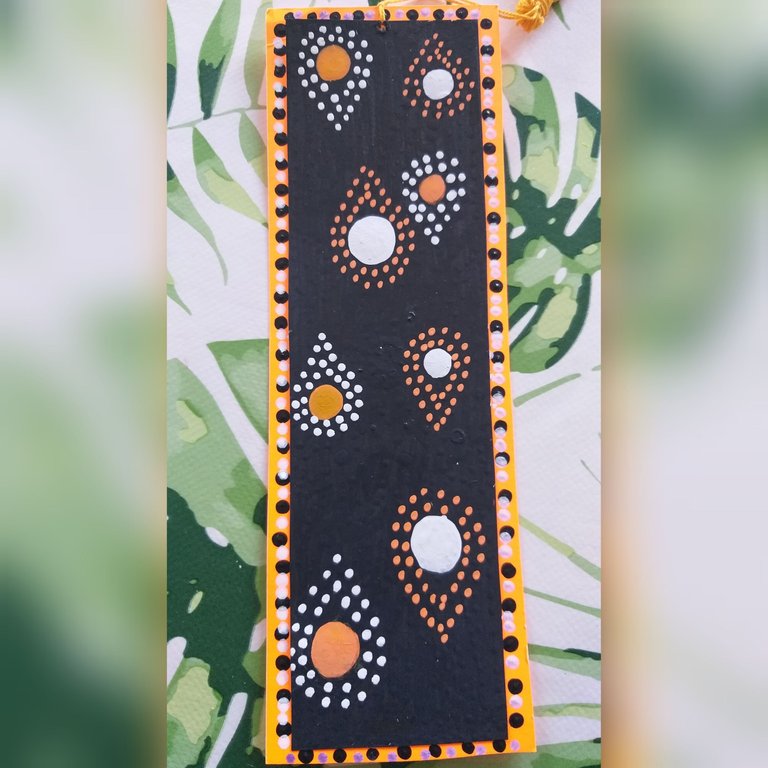
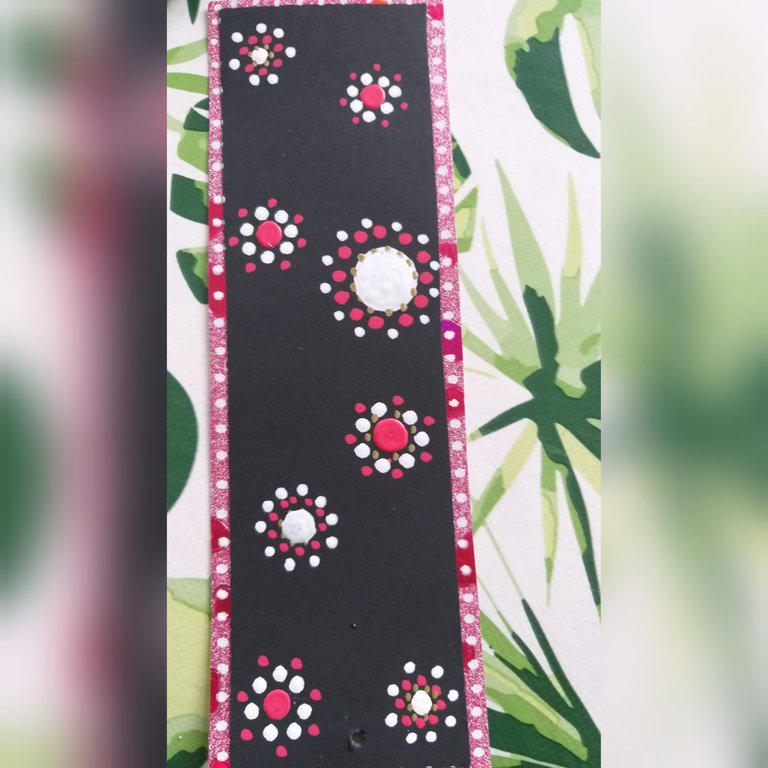
6👣📚. Puede hacer varios modelos como el que le muestro en la imagen; con un punto más grande en el medio y luego otro más pequeño alrededor y después marcar otro en el medio de cada punto anterior.
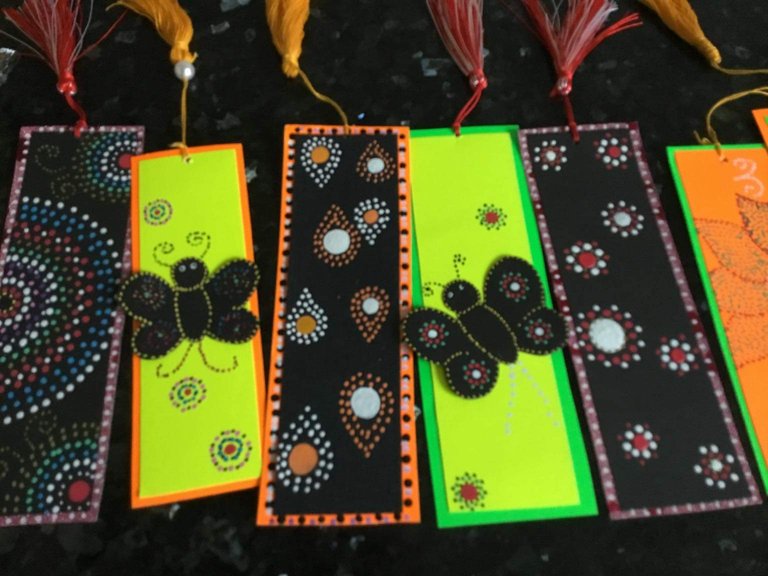
7👣📚. Una manera de hacer un separador sencillo y bonito es dibujar una imagen de su preferencia; como por ejemplo en este caso se dibujó una mariposa en la cartulina de color negra y luego se recortó y se pegó la parte del cuerpo con la pega universal, las alas no se pegaron. Después coloque puntos en la mariposa y realice flores con punto, puede guiarse por las imágenes.
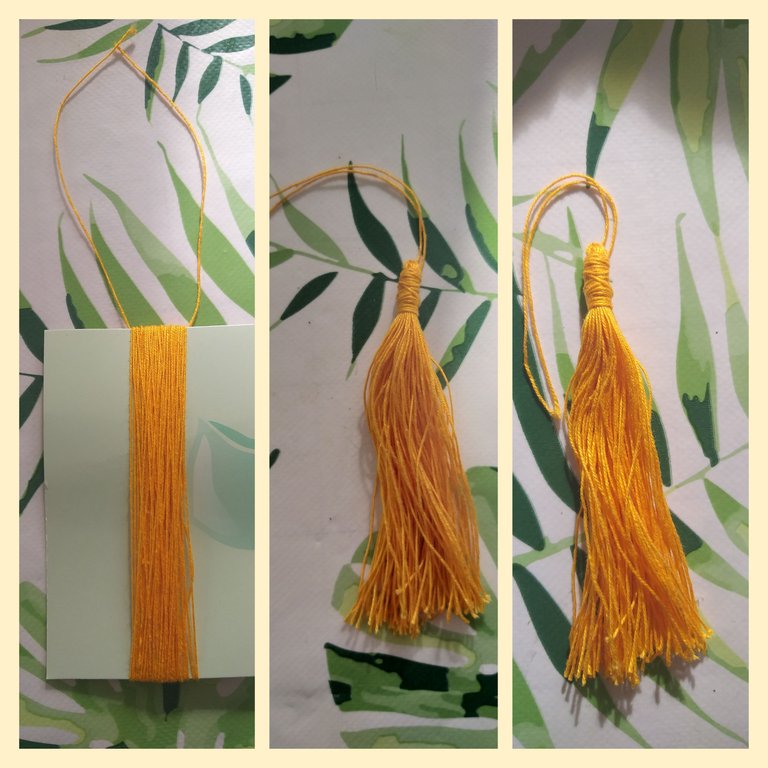
8👣📚. Después que tenga los separadores o Marcapáginas terminados con las figuras o dibujos de su preferencia; con hilo más grueso que los que se usan en la costura, vamos hacer varios pompones pequeños. Con un pedazo de cartón fino recortamos un rectángulo con las medidas de 5cm de ancho por 7 1/2 cm de largo, luego enrollamos él hilo dándole 10 vueltas y después lo amarramos con un pedazo de hilo y lo retiramos del cartón. Dejamos dos tiras de hilo y luego con 13cm del hilo amarramos en la parte de encima y por último con la tijera recortar la parte de abajo por dentro de los hilos para que queden separados como lo observan en la imagen.
9👣📚. Por último con el mismo lápiz o cualquier objeto haga un orificio para colocar el pompón que realizó; puede hacerlo de varios colores combinando con las cartulinas o imágenes.
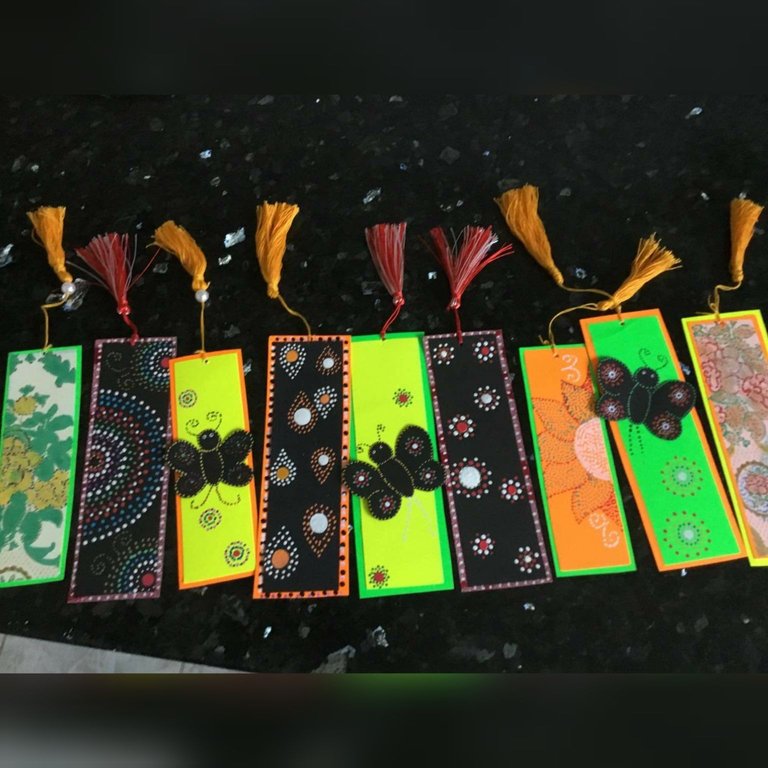
Estos Marcapáginas o separadores son una excelente y fácil manera de hacer un obsequio a cualquier persona, familia o amigos y si le escribimos un mensaje por la parte de atrás del separador sería perfecto, si es para un amigo le podemos escribir algunas de sus cualidades al igual para un familiar, yo aproveché y le escribí mensajes biblicos🥰.
Bueno mis apreciados amigos espero que este tutorial les sirva o le de idea para que se animen en hacerlo. Muchas gracias a todos aquellos que siempre me apoyan y también a las comunidades.Que tengan un Bendecido fin de semana

English
Good afternoon my dear Hive community and to all the members of each community that make up this great hive, have an excellent and blessed weekend; it is a pleasure for me to share my tutorials with you and very grateful to all those people who leave a beautiful comment and support. The craft that I bring you today was made thinking of my husband; he likes to read and these days he was turning the corner of the book page and I told him I was going to do something for him so that he could identify the page where he left off with the reading☺.
When I was in high school we made many bookmarks or bookmarks to raise funds for our graduation😍 and there are many ways to make these bookmarks or bookmarks; Today we are going to apply the Pointillism technique to make several of them. These bookmarks are used to give them as a souvenir to a friend or relative and if we put a nice message for that person it would be special. Next I am going to give you the materials to make these Bookmarks or dividers.
The Materials to make these Bookmarks are:
Cards of various colors. The colors that you are going to use are recommended to combine😉
Scissors
*Universal glue
Threads for pompoms (not the seams)
Markers for various colors (permanent) or acrylic paint
Fine cell brushes (in case you don't use the markers)
Pencil
Ruler or tape measure
A grill stick or a hole punch
Steps to make the Bookmarks or separators:
1👣📚. The first thing we must do is measure two pieces of cardboard that match the measurements of 18cm long by 6cm wide and the other 17cm long by 5cm wide. In the image the two measurements of 18cm long appear but they are one centimeter less. You already know the colors you can combine to your liking, in this case we are going to make one with a yellow base and the one on top black, you can do it with the colors inverted 👍 and then cut each piece.
2👣📚. Now when we have a cut piece that will serve as the mold to be able to make others; the amount depends on you, here as you can see in the image several were made. The cardboard that was used was left over from a previous tutorial.
3👣📚. In this third step we are going to paste with the universal glue, you can also use cold silicone, we glue the smaller rectangle on top of the larger one; This is how they will do with all the pieces they intend to make. observe the image
4👣📚. After we have the two pieces glued; we are going to decorate them, there are many ways to do it, this time we will make several models. The first is with the Pointillism technique; for that we must have a design, we begin to make a medium dot with the white and orange permanent marker or with acrylic paint of the same color. You can also make small dots on all the edges.
5👣📚. In this step we will make smaller stitches around the stitch we had; we can intersperse those of the two colors to the white dot place orange dots around and white orange dots. The figure we made was like a drop of water. Observe the image
6👣📚. You can make several models like the one I show you in the image; with a larger dot in the middle and then a smaller dot around it and then mark another in the middle of each previous dot.
7👣📚. One way to make a nice, simple bookmark is to draw an image of your choice; For example, in this case a butterfly was drawn on the black cardboard and then the body part was cut out and glued with the universal glue, the wings were not glued. Then put dots on the butterfly and make dotted flowers, you can follow the pictures.
8👣📚. After you have the dividers or bookmarks finished with the figures or drawings of your choice; With thread thicker than those used in sewing, we are going to make several small pompoms. With a piece of fine cardboard we cut out a rectangle with the measurements 5cm wide by 7 1/2 cm long, then we wind the thread giving it 10 turns and then we tie it with a piece of thread and remove it from the cardboard. We leave two strips of thread and then with 13cm of the thread we tie on the upper part and finally with the scissors cut the bottom part inside the threads so that they are separated as you can see in the image.
9👣📚. Finally, with the same pencil or any object, make a hole to place the pompom you made; You can do it in various colors combining with the cardboard or images.
These Bookmarks or bookmarks are an excellent and easy way to make a gift to anyone, family or friends and if we write a message on the back of the bookmark it would be perfect, if it is for a friend we can write some of their qualities to the the same for a family member, I took advantage and wrote him biblical messages🥰.
Well, my dear friends, I hope that this tutorial will serve you or give you an idea to encourage you to do it. Thank you very much to all those who always support me and also to the communities. Have a blessed weekend
!discovery 20
Thank🥰👏👏👏
This post was shared and voted inside the discord by the curators team of discovery-it
Join our community! hive-193212
Discovery-it is also a Witness, vote for us here
Delegate to us for passive income. Check our 80% fee-back Program
Thank very much😍👏❤
Your content has been voted as a part of Encouragement program. Keep up the good work!
Use Ecency daily to boost your growth on platform!
Support Ecency
Vote for new Proposal
Delegate HP and earn more
Congratulations @zullyarte! You received a personal badge!
You can view your badges on your board and compare yourself to others in the Ranking
Check out the last post from @hivebuzz:
Hola, prima excelentes Marcapáginas y esa técnica del puntillismo los hace ver mucho mas lindos, siempre me ha gustado esa técnica, incluso he realizado unos peces en madera con esa técnica y quedan super hermosos. Felicidades. Un gran abrazo.
Holaaa mi prima bella . Si ésta técnica queda muy bien en todas las manualidades. Saludos y un fuerte abrazo ❤🤗
Hola amiga bella @zullyarte. Que hermoso trabajo. He realizado esta técnica de puntillismo en madera, y queda muy bonita.
Un gusto en pasar por aquí, ver tu bonito trabajo y aprovechar de saludarte.
Abrazos y bendiciones para ti...
Ya te veo ☺🤭. Gracias amiga como siempre, tus comentarios hermosos . Saludo y bendiciones👏👏👏👏😍
Que bueno que pusiste solucionar. Pero aún no me apareces como seguidora. Pero tranquila luego revisas con calma jajaja. Me alarme al no verte. Me alegra poder comunicarme contigo nuevamente, para seguir viendo y comentando tus hermosos trabajos.
Abrazos @zullyarte🥰💐🌈🧚🐦💕😘