Español
Hola Hola¡¡ Saludos a todos los miembros de ésta gran comunidad Hive y especialmente a todos los compañeros de #hivediy les deseo un excelente fin de semana y con mucha imaginación para sus creaciones y éxitos en sus resultados.
Como ya todos saben que me gusta concursar y #hivediy lanzó un nuevo concurso con la técnica de Patchwork world; ésta tecnica además de dejar resultados hermosos en todas sus creaciones nos enseña también a reciclar o reutilizar🥰👏. Ésta técnica la podemos emplear en una gran variedad de trabajos manuales o creativos, como en cuadros, bolsos, agarra ollas, sábanas la primera vez que vi esa técnica fue hace más de 40 años mi abuela hizo sábanas con los retazos o recortes de tela que a mi mamá le sobraban en sus costuras🤩; con eso quiero decir que esta técnica es muy vieja, lo que no sabíamos como era su nombre. Poco a poco las personas creativas fueron dándole una gran variedad de uso y la cosian a mano o con máquina de coser; ya en otros tutoriales le he mostrado varia manera de utilizarlo esos recortes de tela y no tirarlos a la basura.
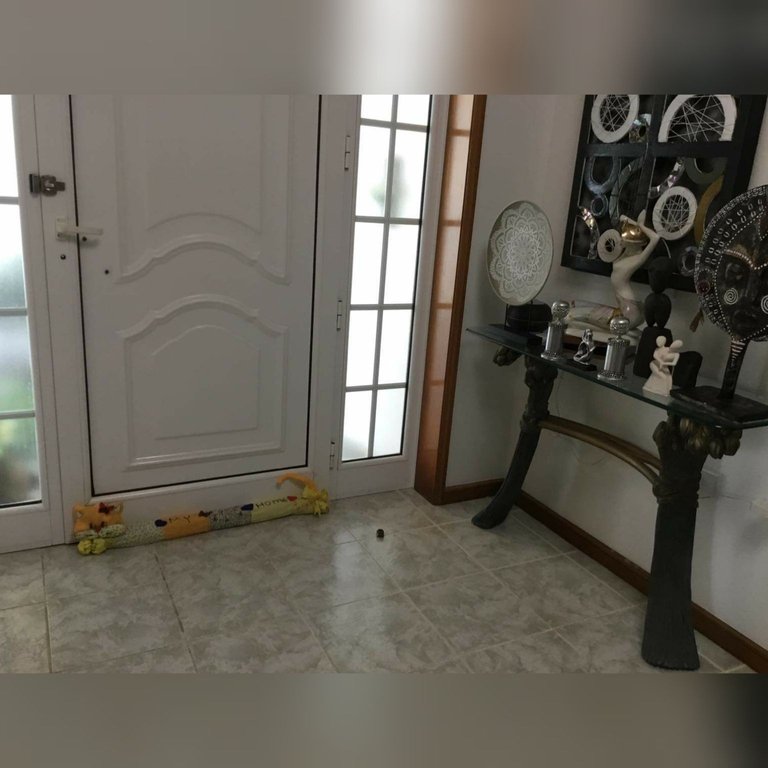
Estuve pensando que hacer con ésta hermosa técnica que el resultado es muy colorido y llegué a la conclusión de realizar un tapa polvo o frio dependiendo de los meses para las puertas; ya en casa tenemos varios pero faltaba dos puertas y entonces me dije porqué no hacer uno diferente a lo que tengo que son un poco frios, son sólo un tubo🤭.Éste tapa polvo o frío también se le puede dar otras utilidad como un peluche para nuestra mascota o para decorar una ventana o sofá👍🤗. Mí cuñada tiene un taller de costura y hace un tiempo me obsequió estos pedazos de telas para que hiciera cualquier manualidad y tenía con ellos casi un año🤭😬. Así que acompañenme a realizar éste divertido tapa polvo o frío muy fácil de hacer.
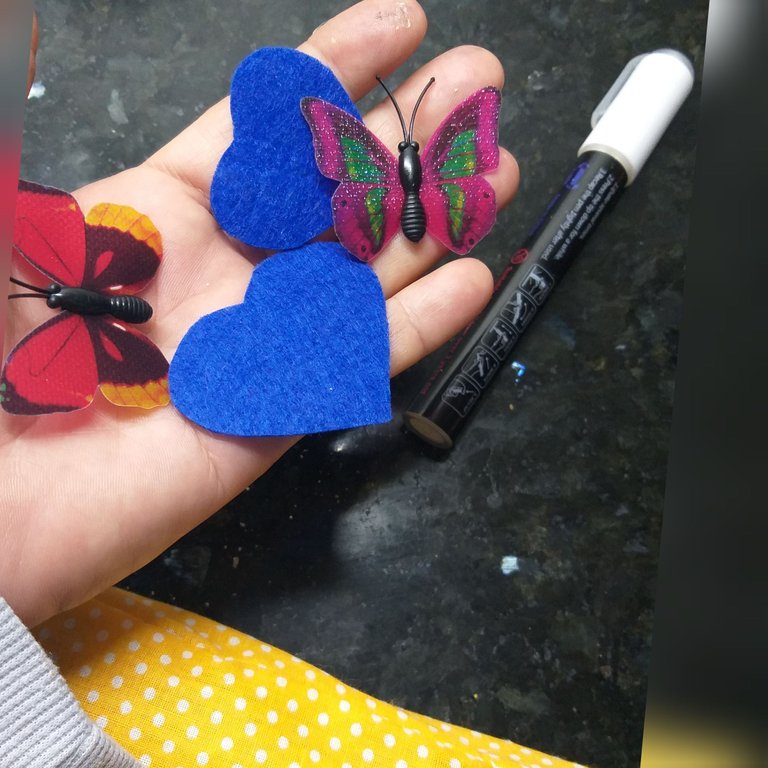
Los Materiales a utilizar son los siguientes:
Telas de varios colores que tengan en casa
Tijera para cortar tela
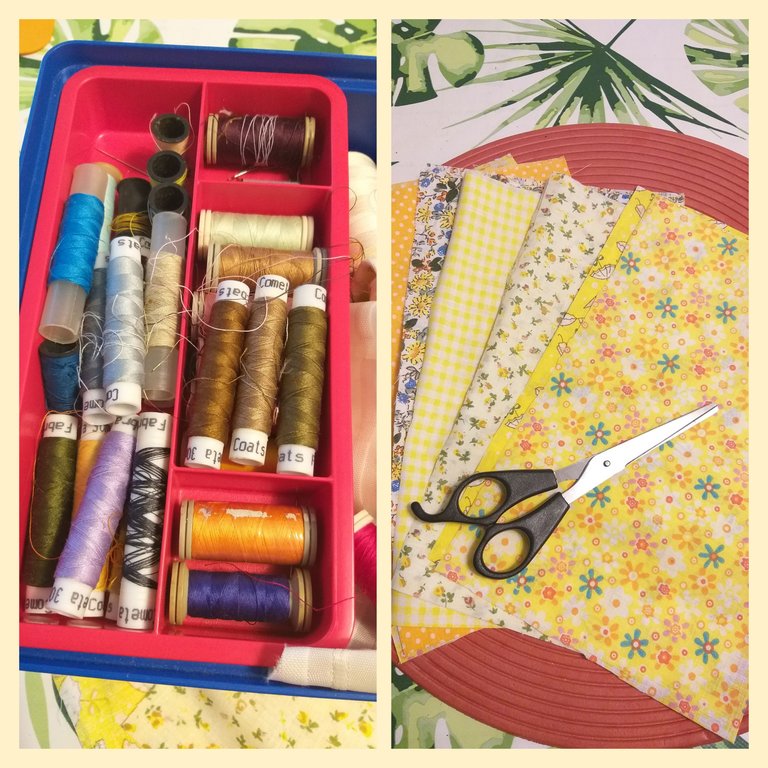
Hilo del color de su tela
Marcador permanente blanco y negro
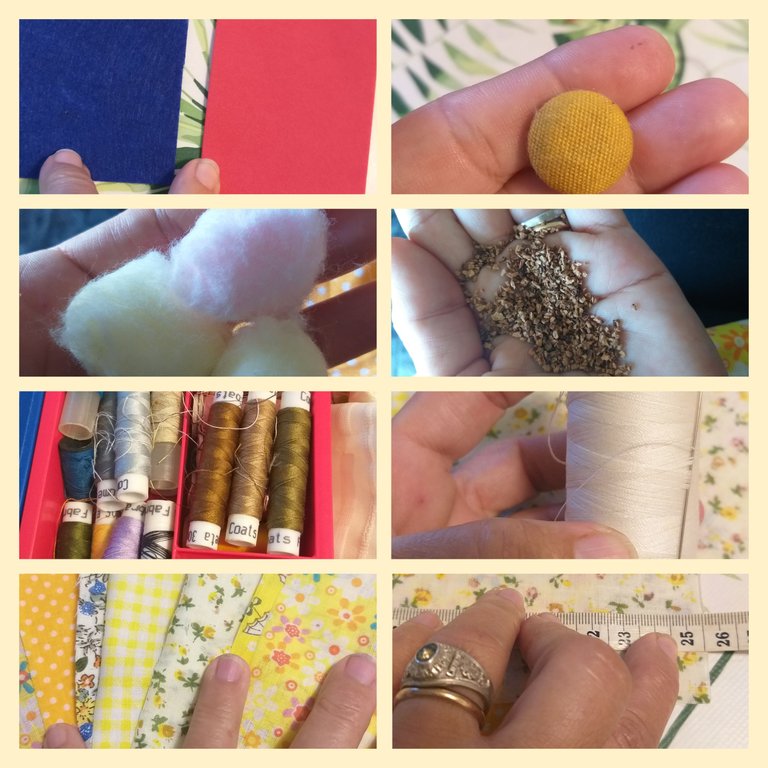
Tres botones
Aguja
Alfileres
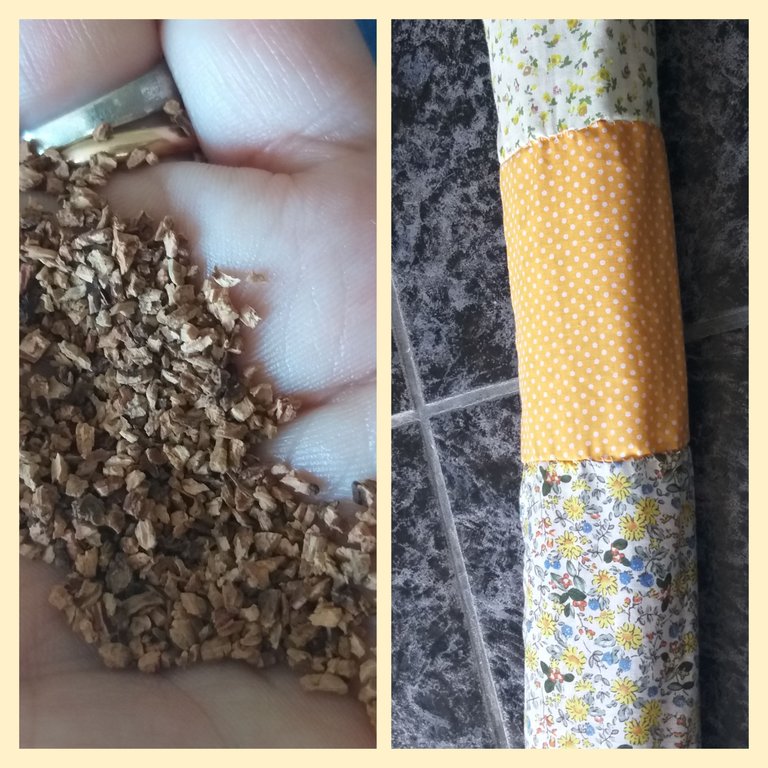
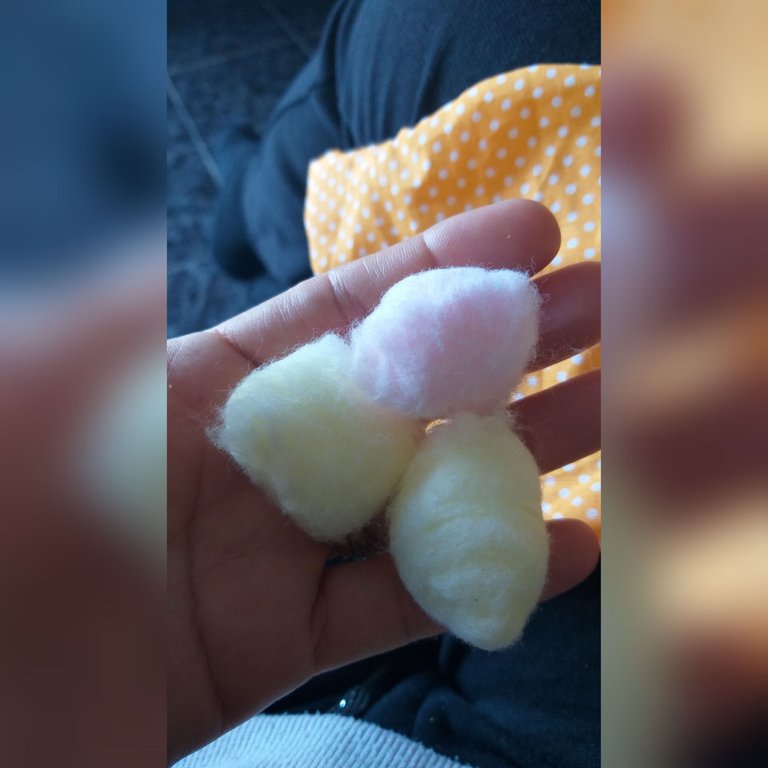
Relleno puede ser guata, algodón, arroz, tierra, bolas de polietileno o corcho rallado.
2 mariposas
Un bolígrafo o lápiz
Hoja de desecho
Algodón
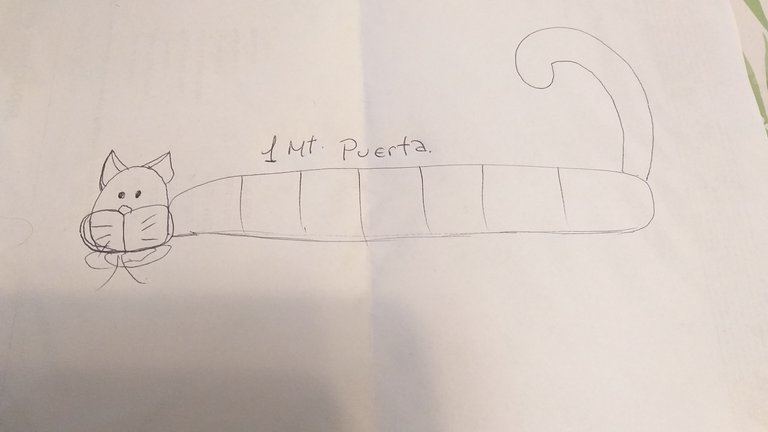
Les muestro más o menos en la que pensé realizar y lo dibujé en una hoja.
Pasos a seguir para el tapa polvo o frio con figura de un gato:
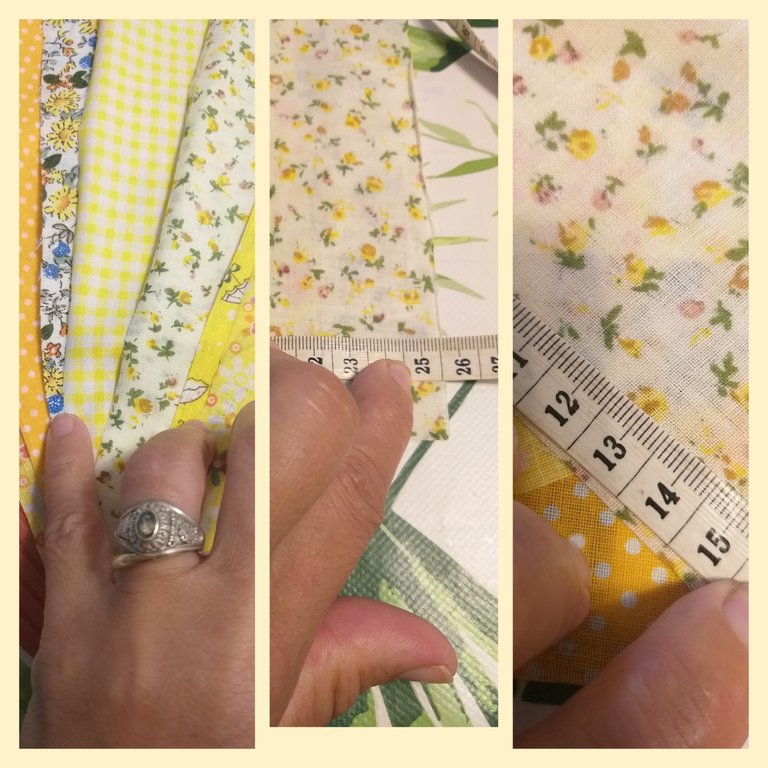
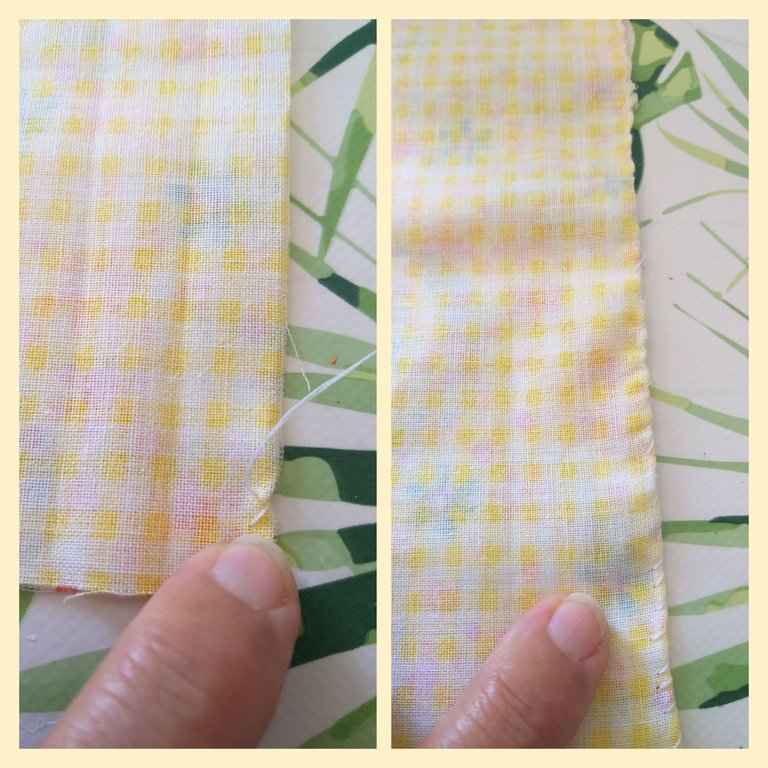
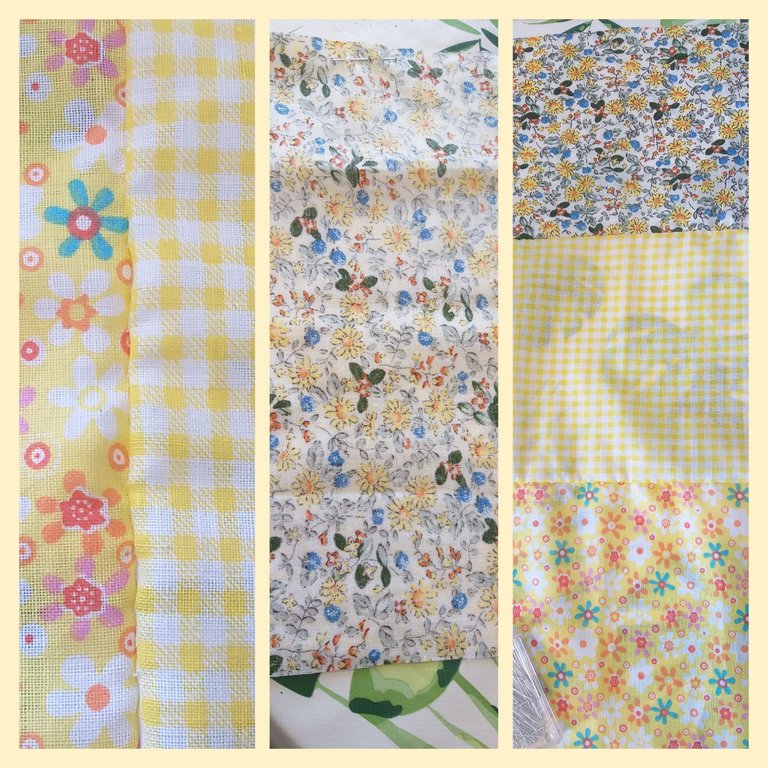
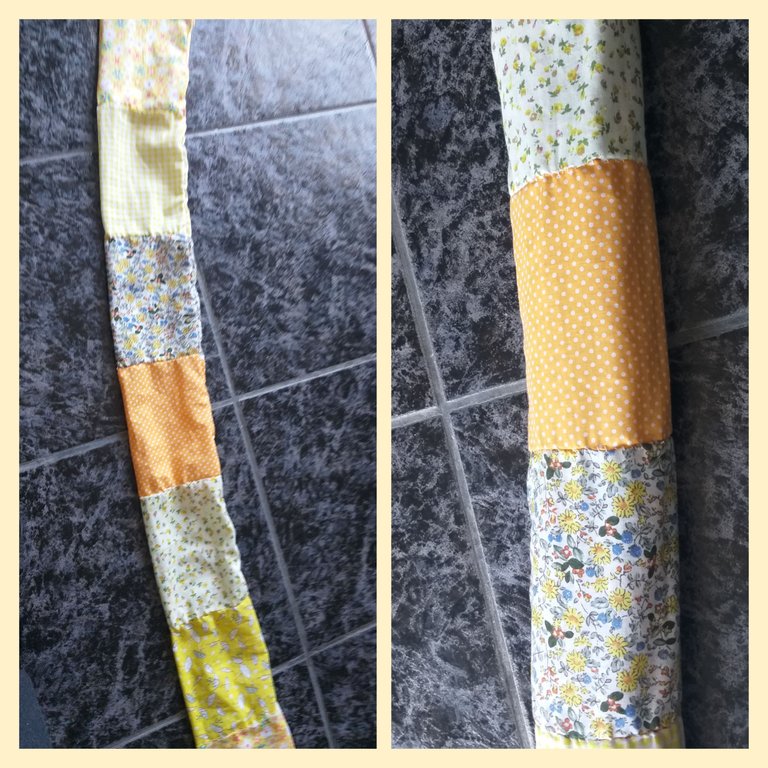
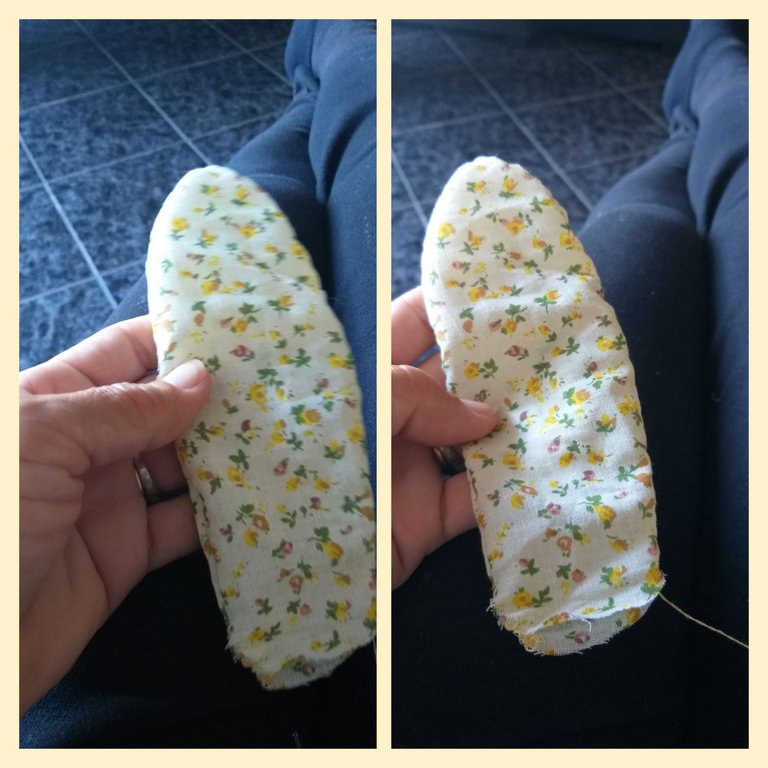
1👣. Con la cinta métrica o regla medir los recortes de tela y sacar 7 piezas de diferentes colores con las mededidas de 25cm largo por 15cm ancho, como le muestro en las imágenes. Cada recortes o pedazos de telas de diferentes motivos deberán medir lo mismo.
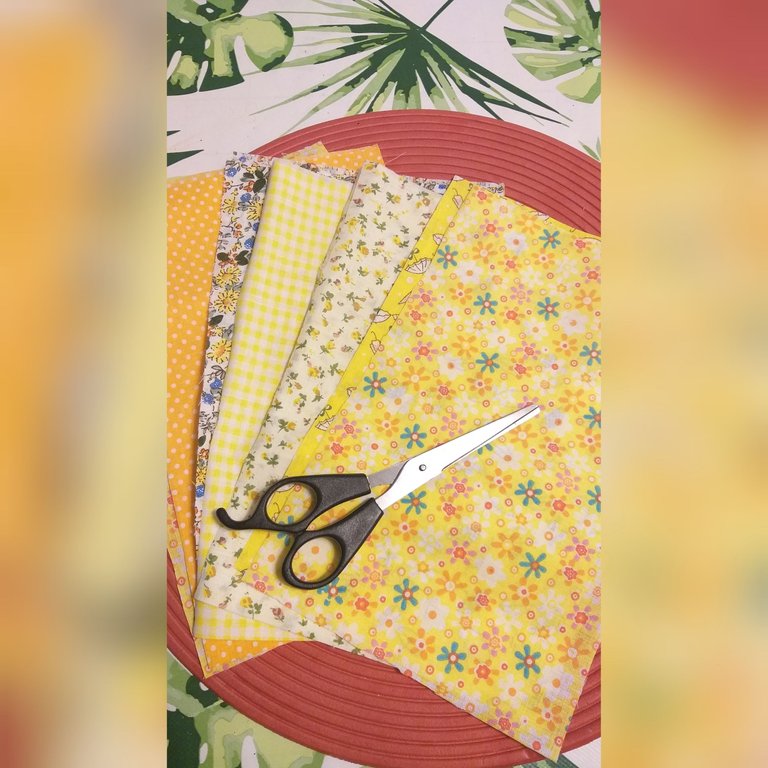
2👣. Luego que tengamos marcado todos los recortes de diferentes telas; con la tijera recortamos cada tela, procuren que las medidas queden iguales.
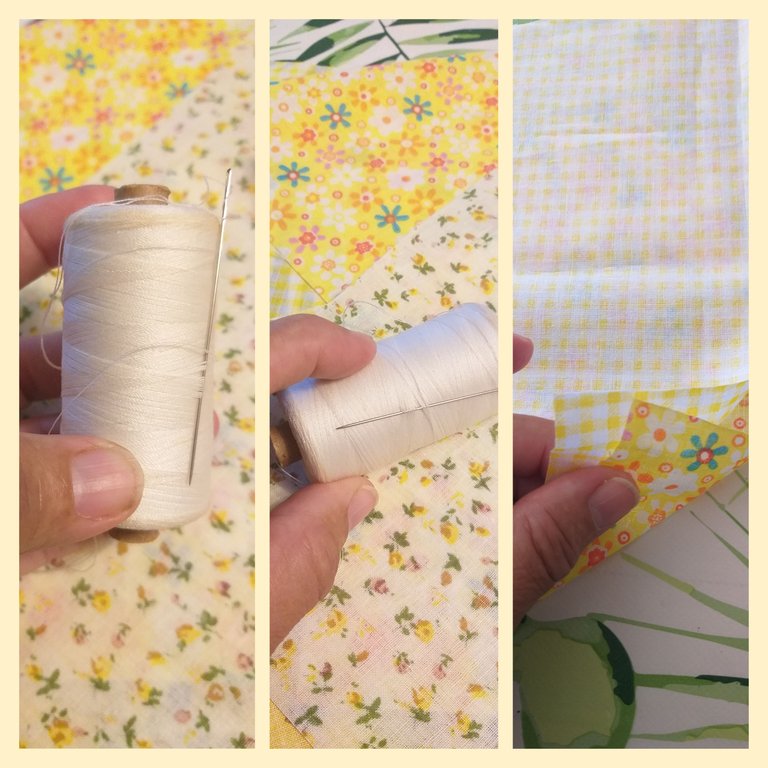
3👣. Ya teniendo los recortes listo, procederemos a coser, ahora lo haré manual que fue la primera costura antes del invento de las máquinas☺. Como pueden observar en las imágenes la aguja que estuve utilizando era un poco grande, así se me facilitará meter el hilo más fácil y rápido porque hasta con los lentes me cuesta meter el hilo por el agujero🤭🤭😬.Debemos colocar las dos piezas de tela con la cara principal y después cosemos.
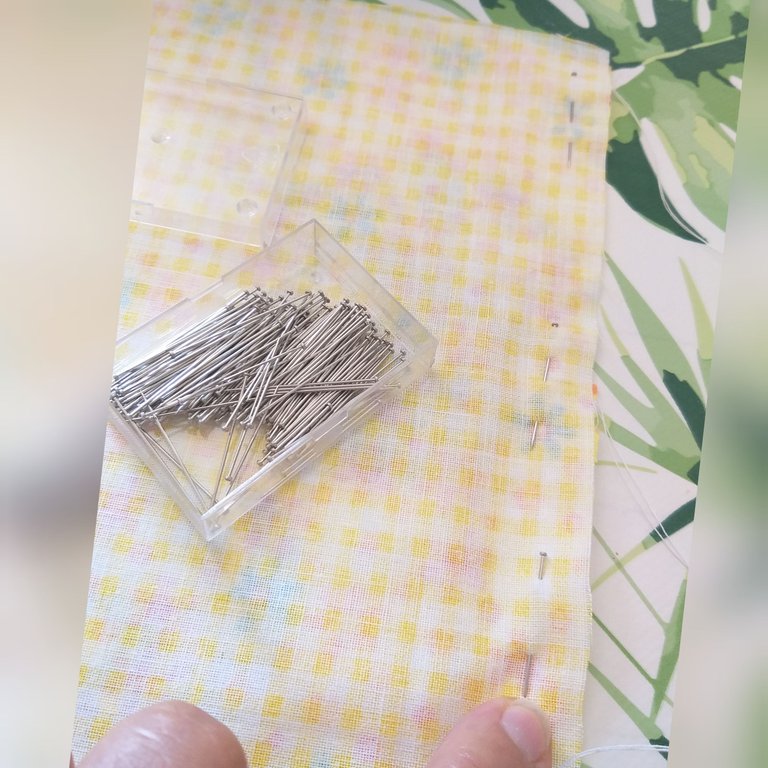
4👣. Una de las cosas que aprendí de costuras con mis viejitas fue fijar las piezas de tela con alfileres, así podrán coser mejor, ya que la tela no se moverá👍.
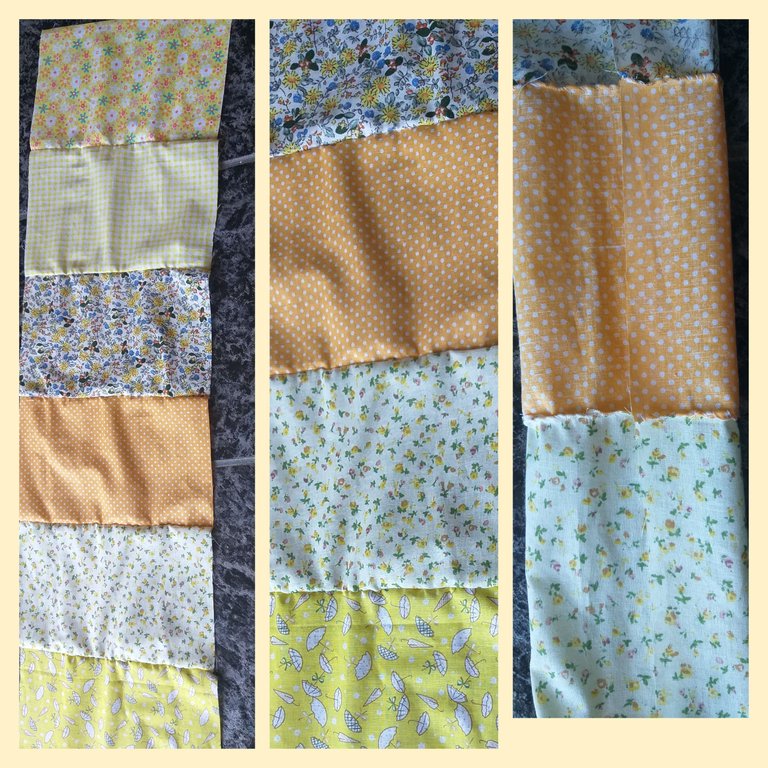
5👣. Ya teniendo las dos telas fijas con los alfileres comenzaremos a coser; un consejo cuando se realiza la costura manual hágalo con puntadas cortas; es decir cada punto que haga con la aguja y el hilo no estén muy separados, procure a coser lo más pegado posible y luego que llegue al final de las dos telas regrese a coser de nuevo hasta la otra punta y hagas minimo tres nudos con la misma aguja y el hilo aah otra cosa es que procure a coser derecho guiándose por una de las figuras de la tela.
6👣. Deberán hacer el mismo paso con todos los rectángulos de telas y uniéndonos(coser) por la parte mas anchas(25cm). Como pueden observar en la primera imagen que si hace puntadas bien pegadas queda como si fuera a máquina😊👍
7👣. Cuando tengamos todas las piezas cosidas por un lado, cosemos las dos partes más anchas, las cuales quedarán del lado contrario que luego las voltearemos para el lado derecho y también deberá coser una punta .Pueden observar las imágenes como guías.
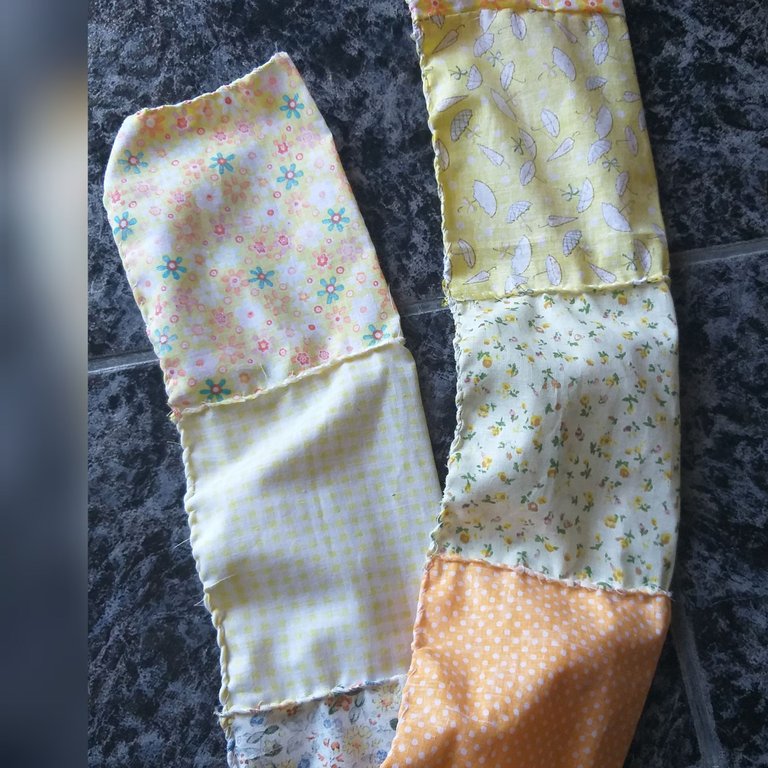
8👣. En éste paso volteamos la pieza terminada pueden usar cualquier palo, a mí se me hizo fácil hacerlo con la mano.
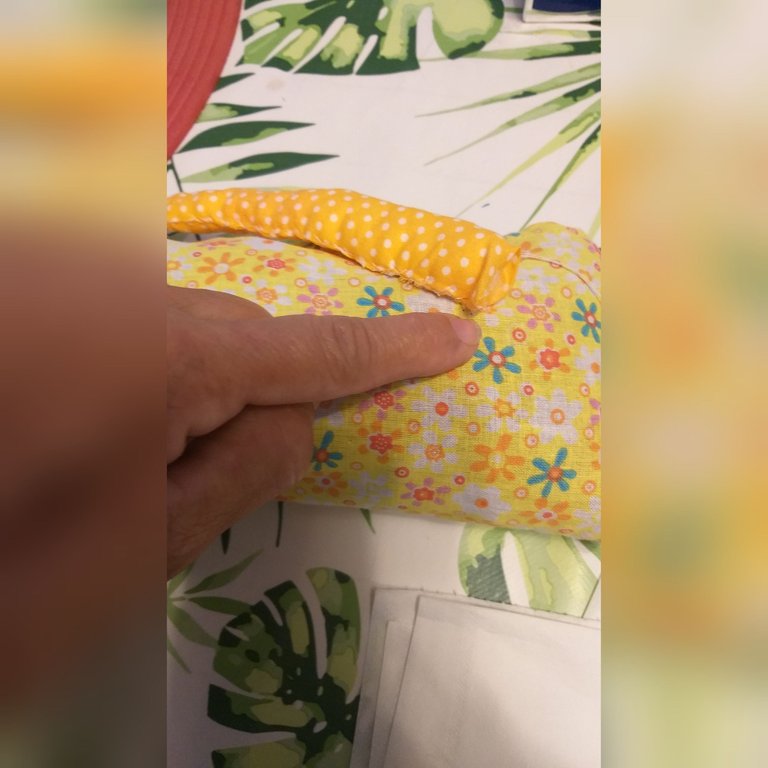
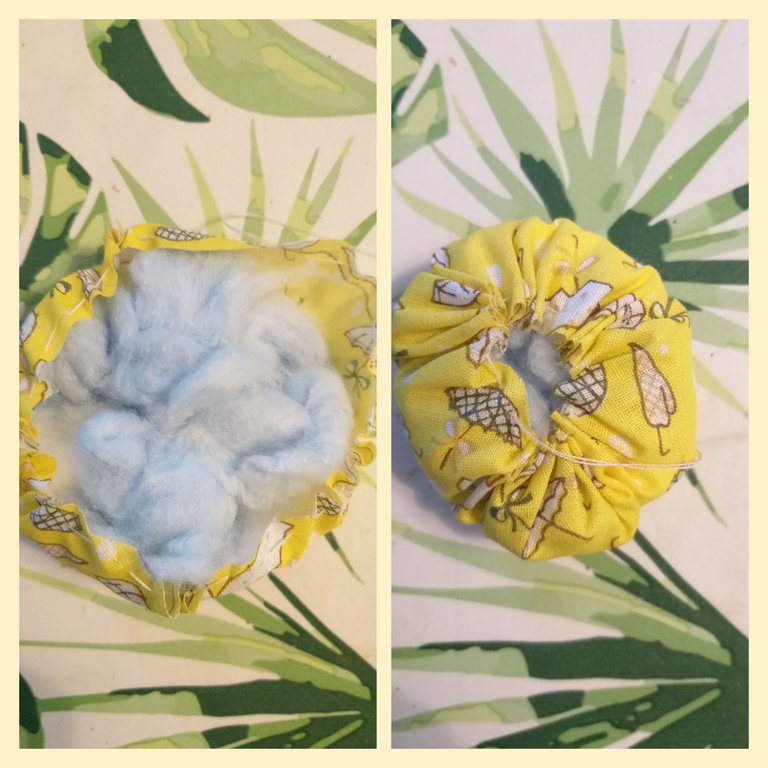
9👣. Ya tenemos terminado la parte que será el cuerpo del gato, lo que haremos después es rellenar el cuerpo con el material que le parezca mejor o tenga en casa. Ya le mencioné que lo rellené con corcho que tengo rallado que voy guardando😉. Y por último coser la otra punta por donde realizamos el relleno del cuerpo del gatico☺.
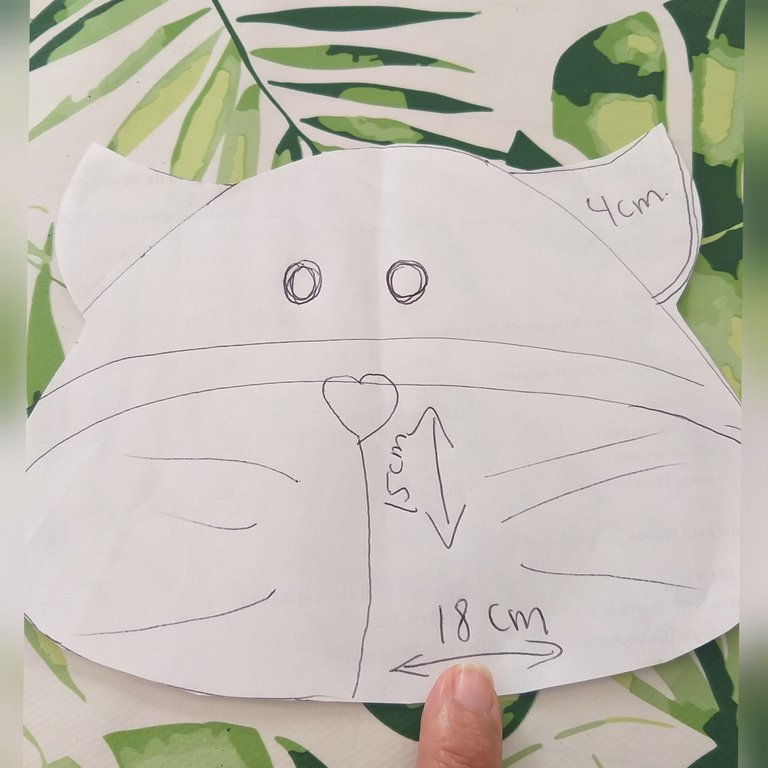
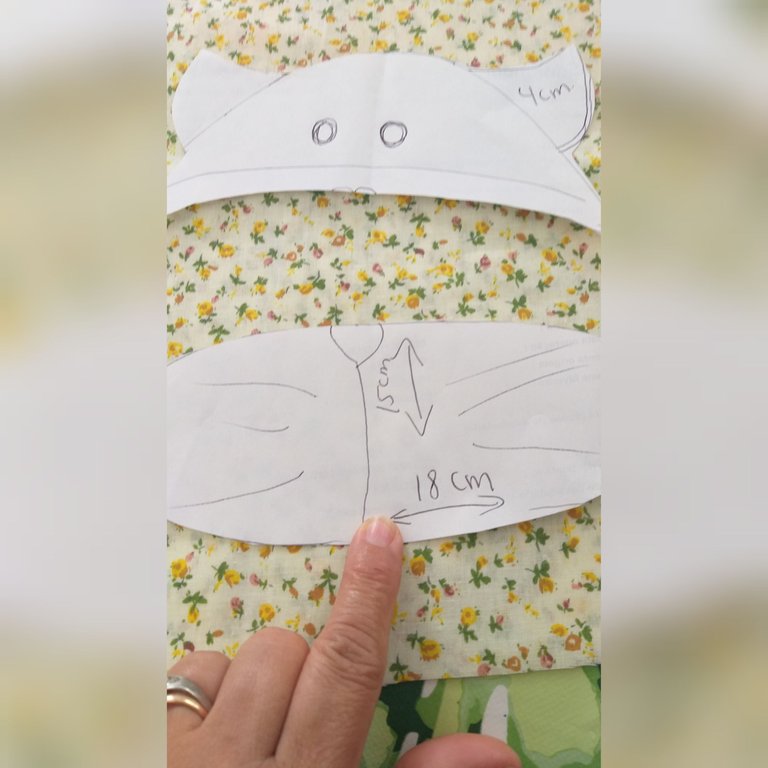
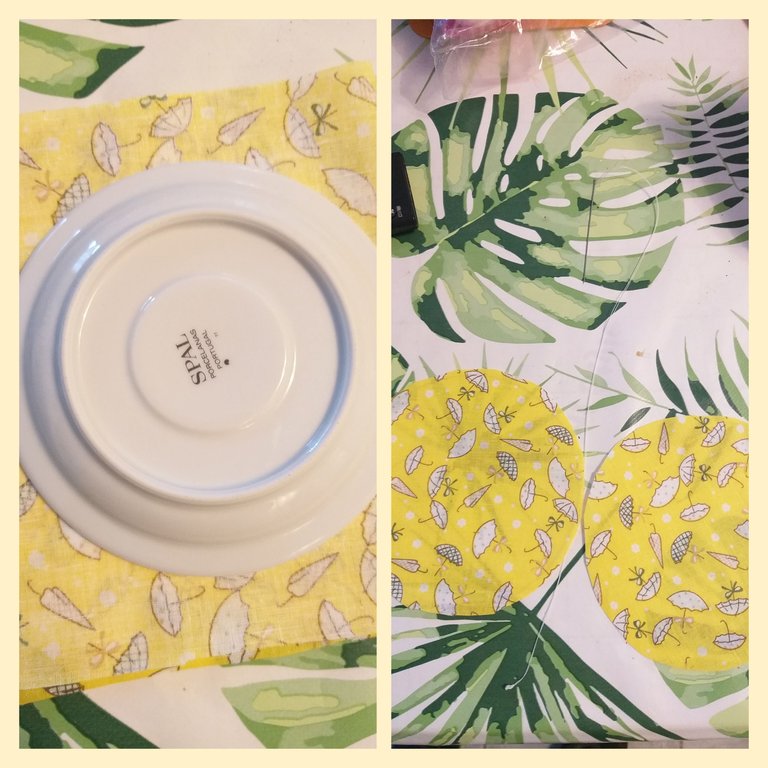
10👣. Ahora vamos a trabajar con la cabeza del gato; lo primero que haremos dibujar con el lápiz o bolígrafo la cara de un gato en el dibujo le coloqué las medidas 18cm ancho x 15cm largo cara y orejas 4cm de ancho y largo.Observar la imagen
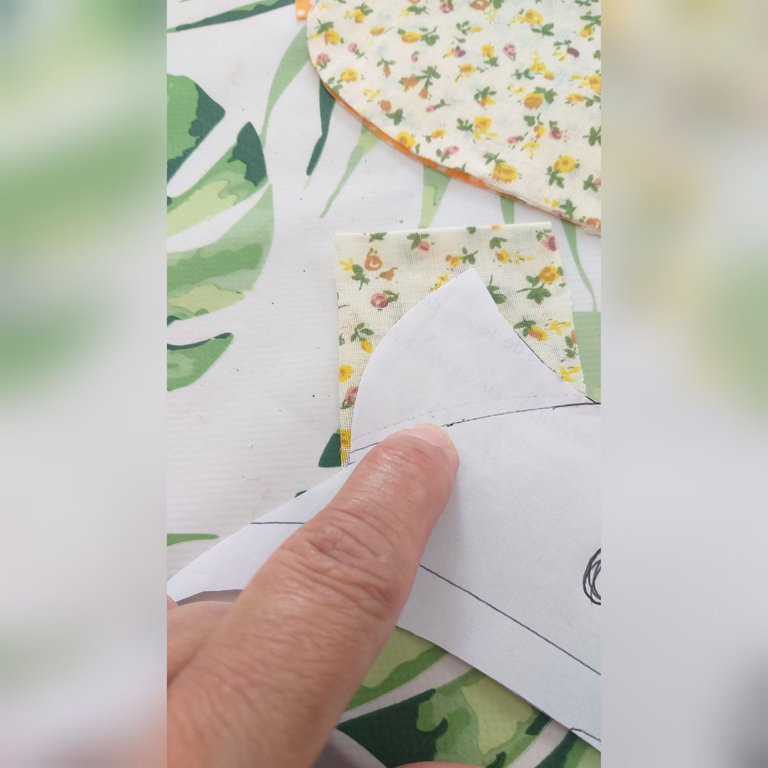
11👣. Transferimos el patrón a la tela marcandola con el lápiz o bolígrafo, deberá ser doble la tela y recortamos.
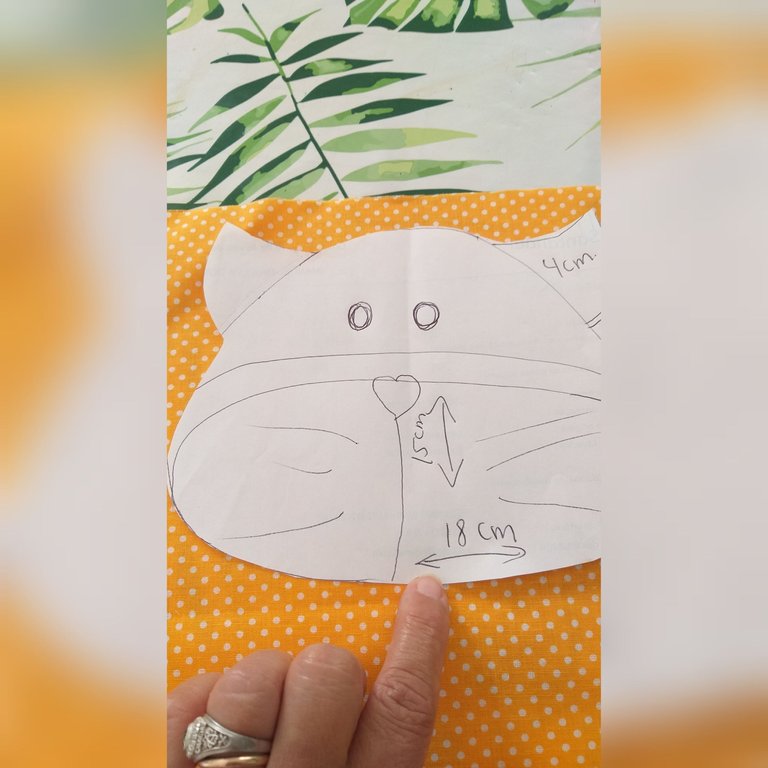
12👣. Luego corté la parte de abajo del patrón de la cara del gato y lo transferimos a otra tela de diferente color.también recortamos la pieza. Vean las imágenes
13👣. Lo mismo hacemos con la orejas realizamos una figura más pequeña que la oreja de la cara. Esta no es doble como las otras.
14👣. Luego que tengamos todas las piezas procedemos a coser y al relleno de cada pieza; para estas piezas utilizamos algodón. Para la costura utilizamos el mismo paso del que le explique al principio y dejemos un espacio sin coser que es por donde haremos el relleno, un truco yo no corto el hilo cuando relleno lo dejo ahí y después termino de coser la abertura.
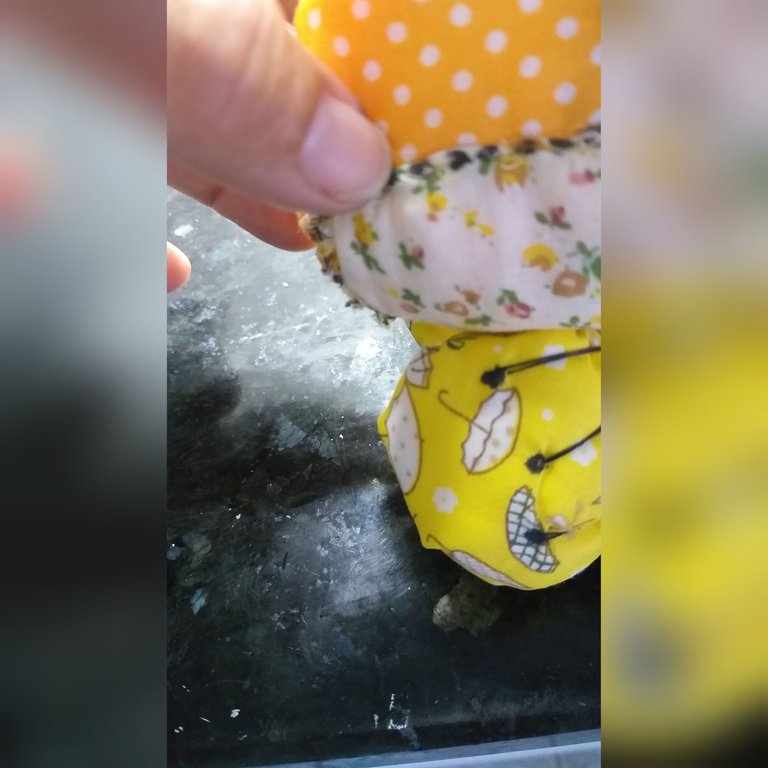
15👣. Después que rellenamos las piezas las cosemos en cada sitio que le corresponda. La cabeza en una punta y el rabo en la otra punta. La pieza que recorte de abajo de la cara la cosemos en el mismo sitio que se observa en el dibujo.
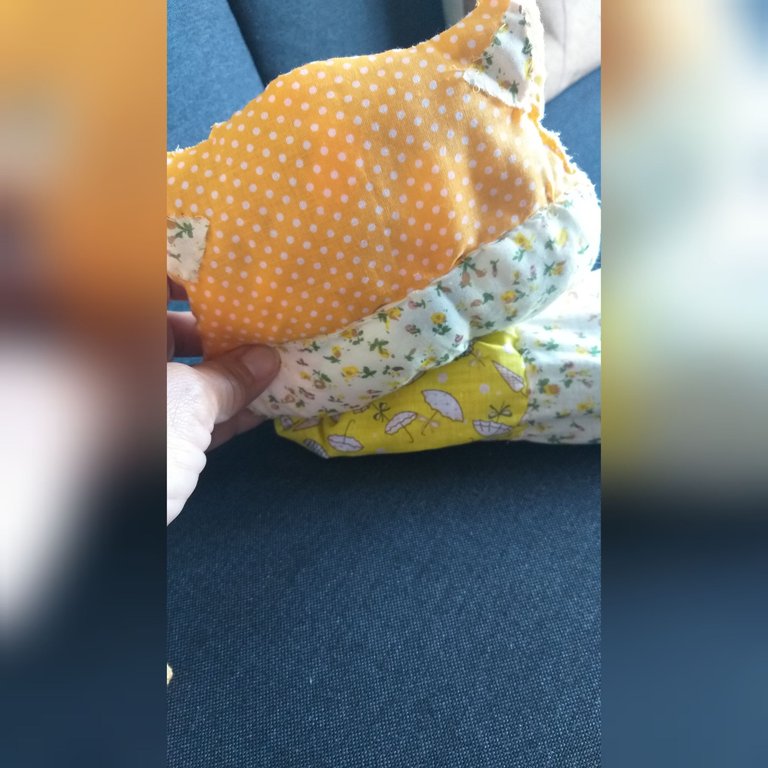

16👣. Luego se me ocurrió hacerle dos patas para colocarlas debajo de la cabeza. Con un plato pequeño de café marqué en otra tela y recorté estas no van doble.
17👣. Cosemos y rellenamos las dos paticas y después las cosemos por debajo de la cabeza.
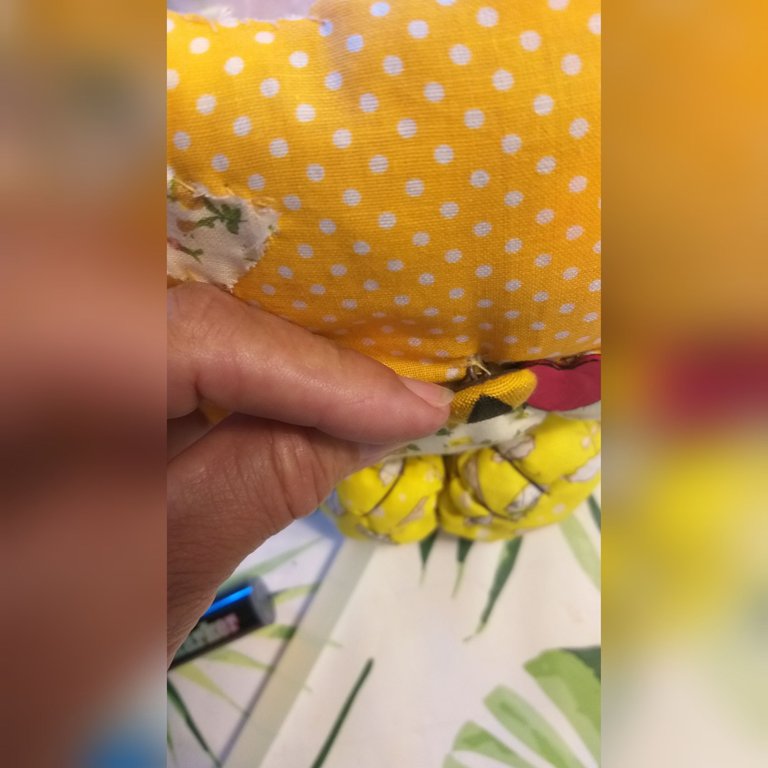
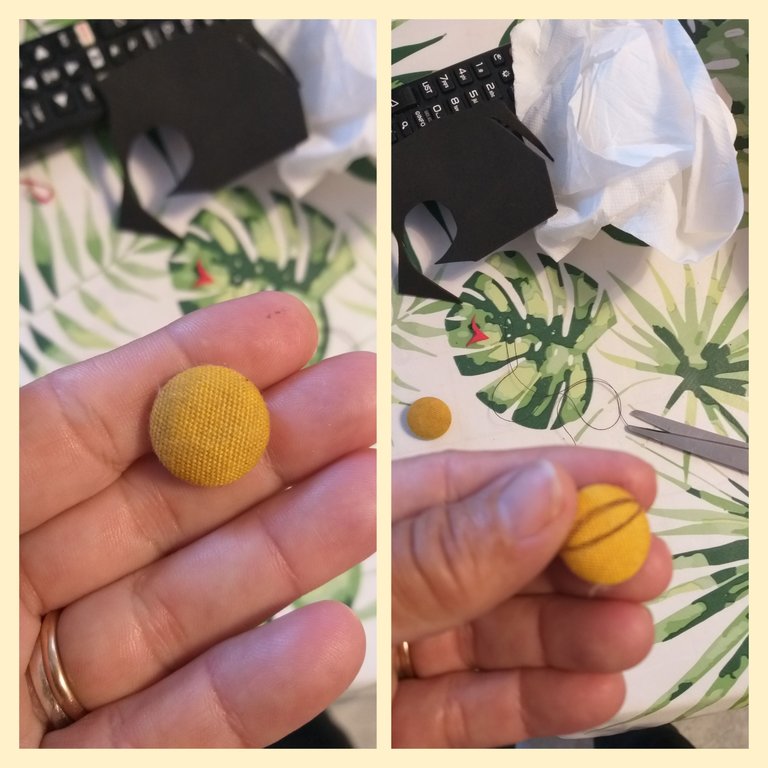
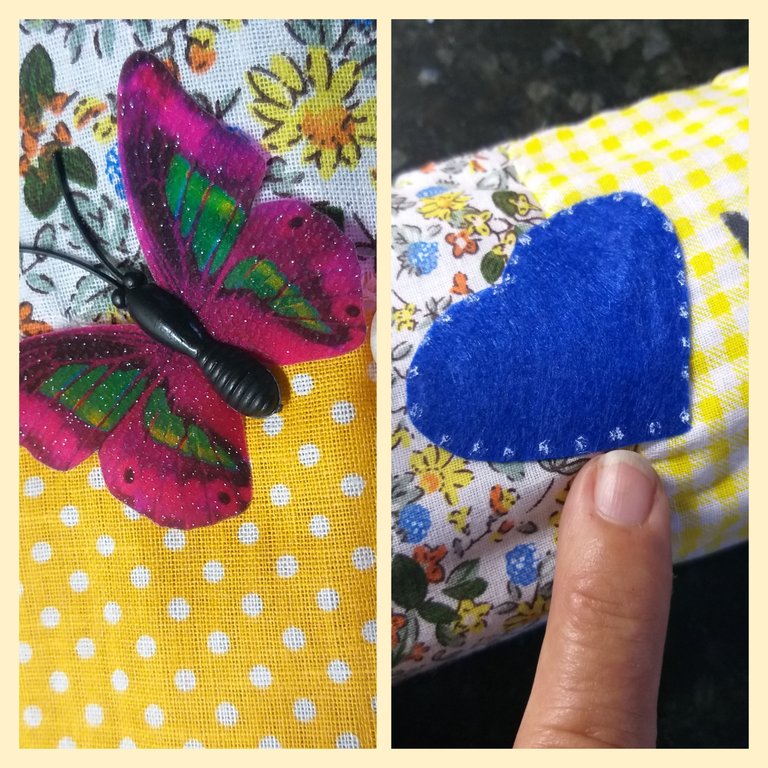
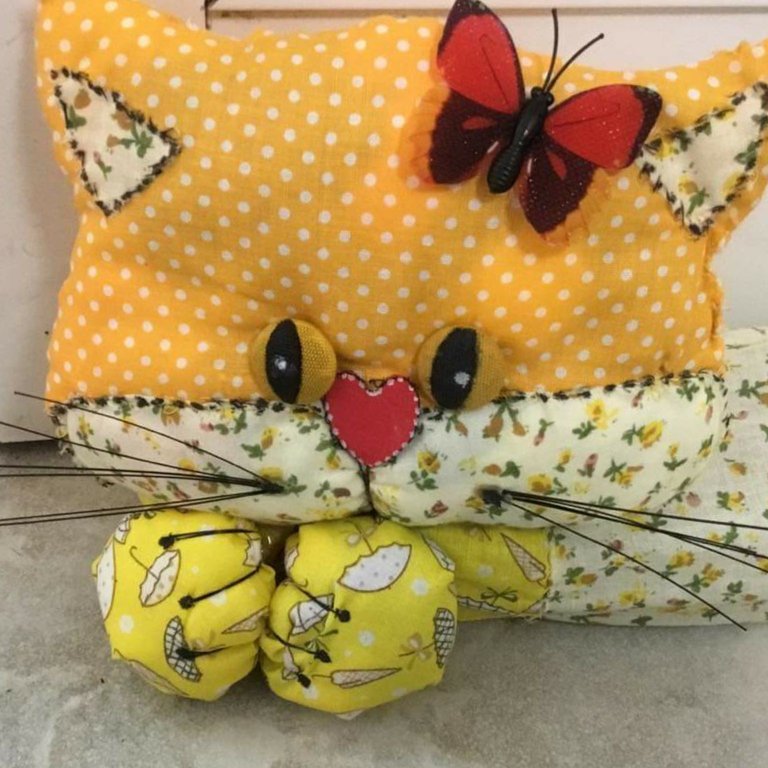
18👣. Ahora con los botones le pintamos con el marcador permanente una raya en el medio y serán los ojitos y luego lo cosemos a la cara del gato.
19👣. Con la agua y el hilo negro le realicé las marcaciones de la bocas y las patas.
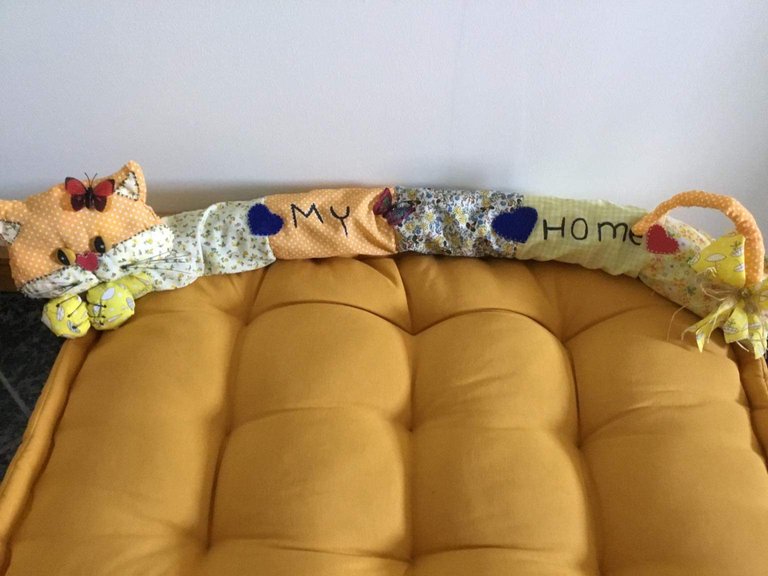
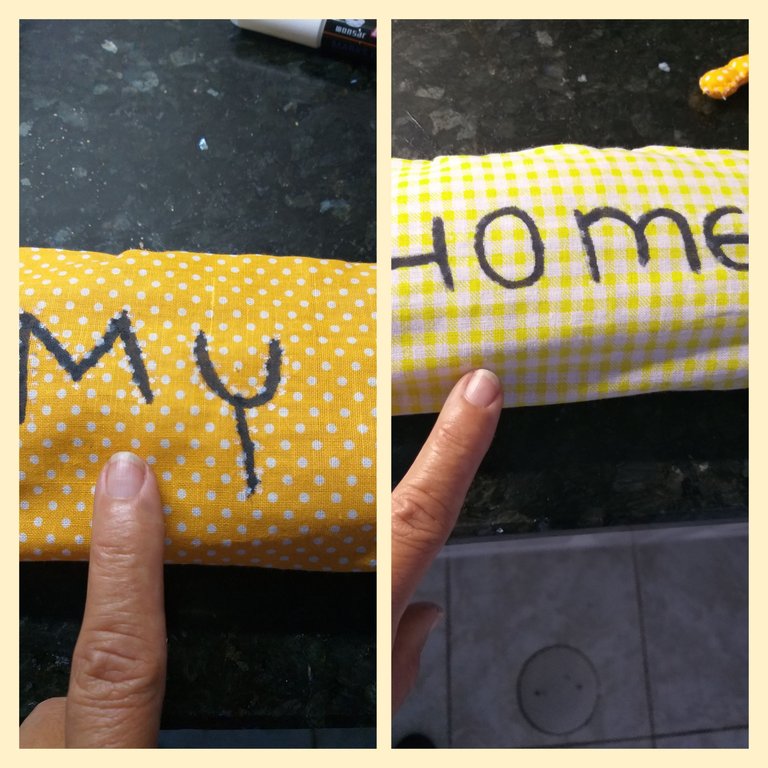
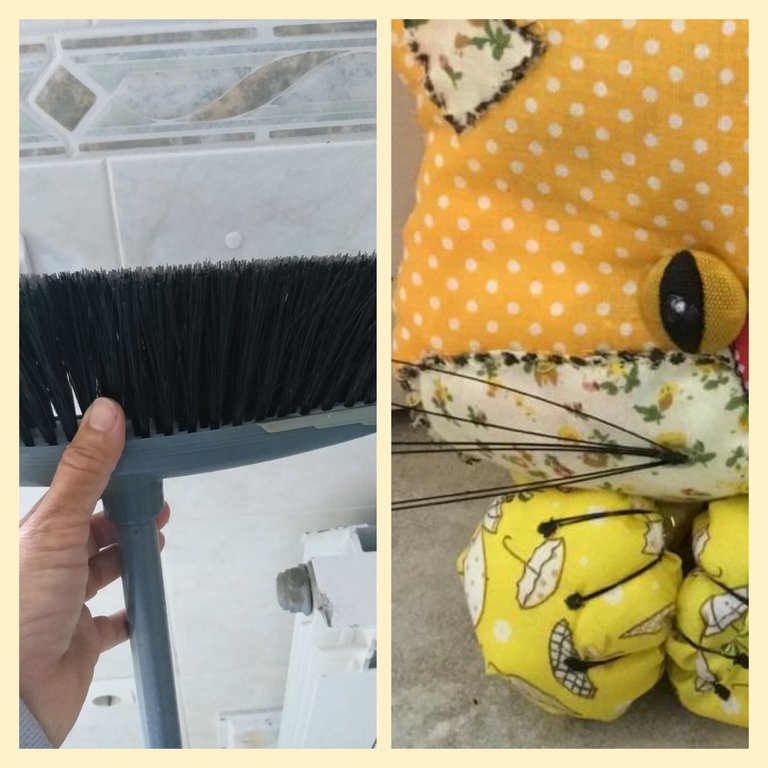
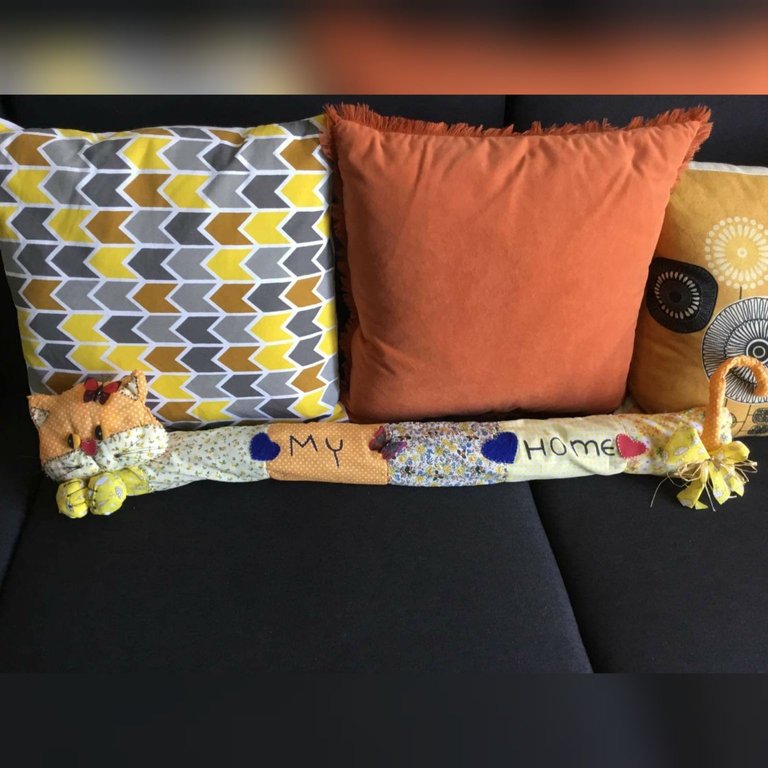
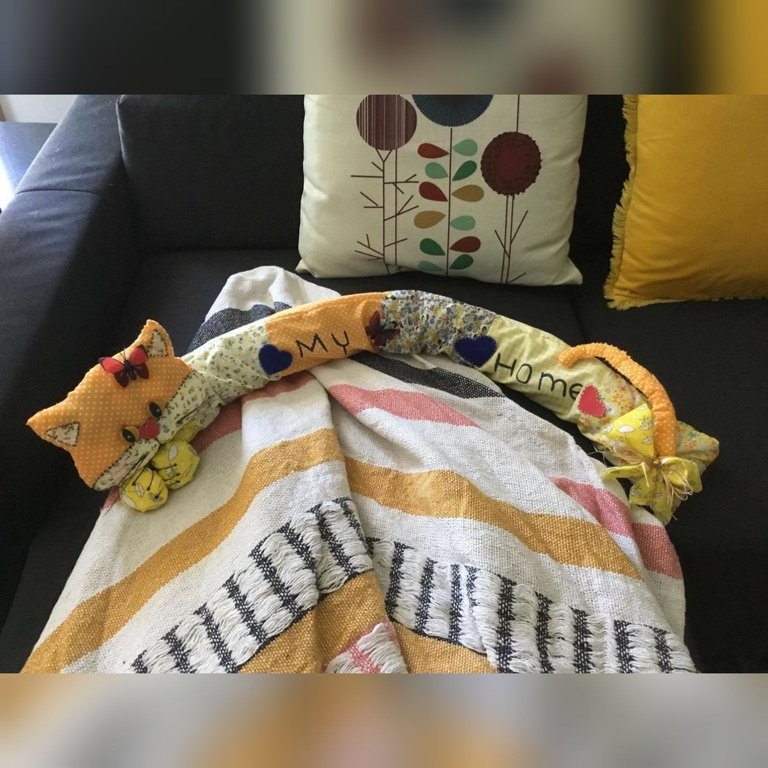
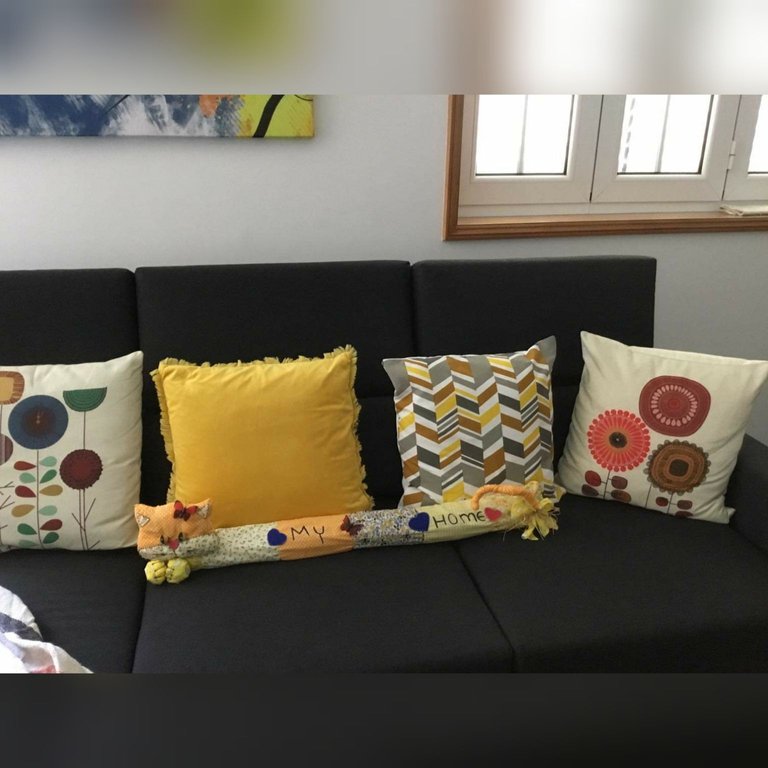
20👣. Luego viene uno de los pasos más importantes cuando hacemos una manualidad o creación los detalles.Detallar una pieza decorativa o cualquier cosa que creamos le dará el toque final y embellecimiento. Esto se lo doy como consejo, en mis creaciones termino colocando o haciendo otras cosas que después se me van ocurriendo; como por ejemplo vi la escobo de barrer y saqué de ahí los pelos de la cara del gato😋. No tengan miedo de inventar. Al cuerpo del gato lo decore con corazón y mariposa y le puse un lazo al rabo.
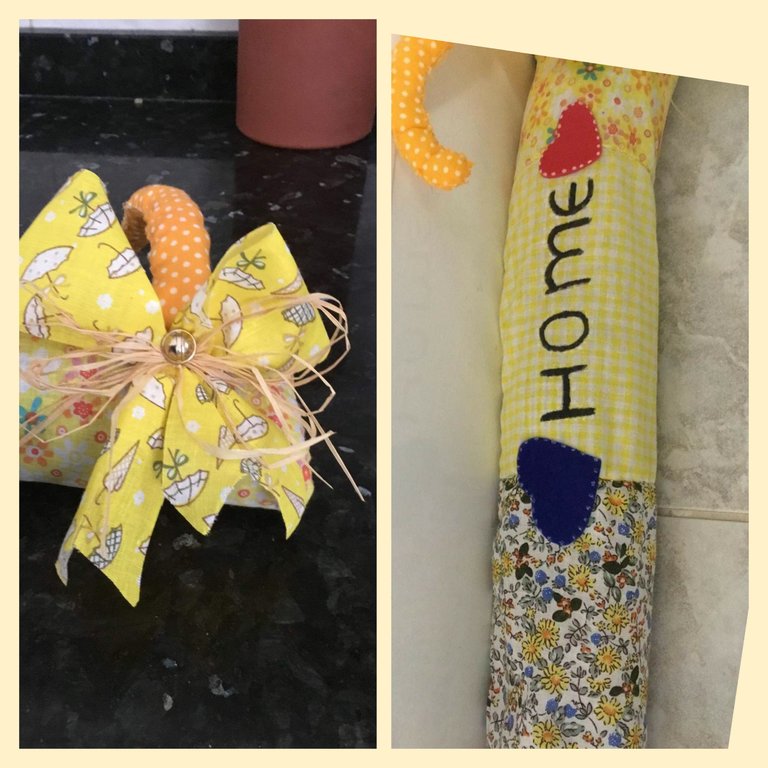
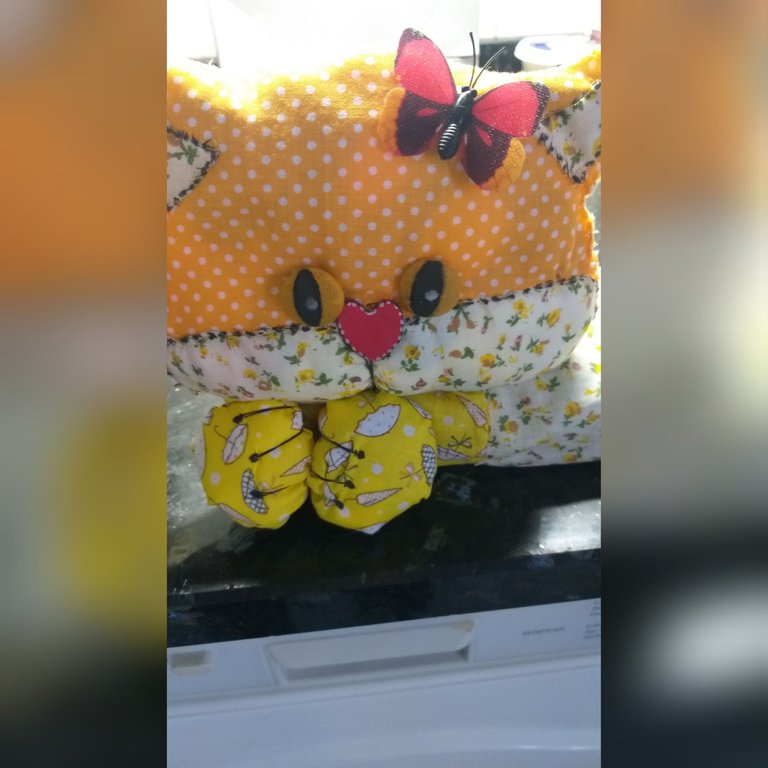
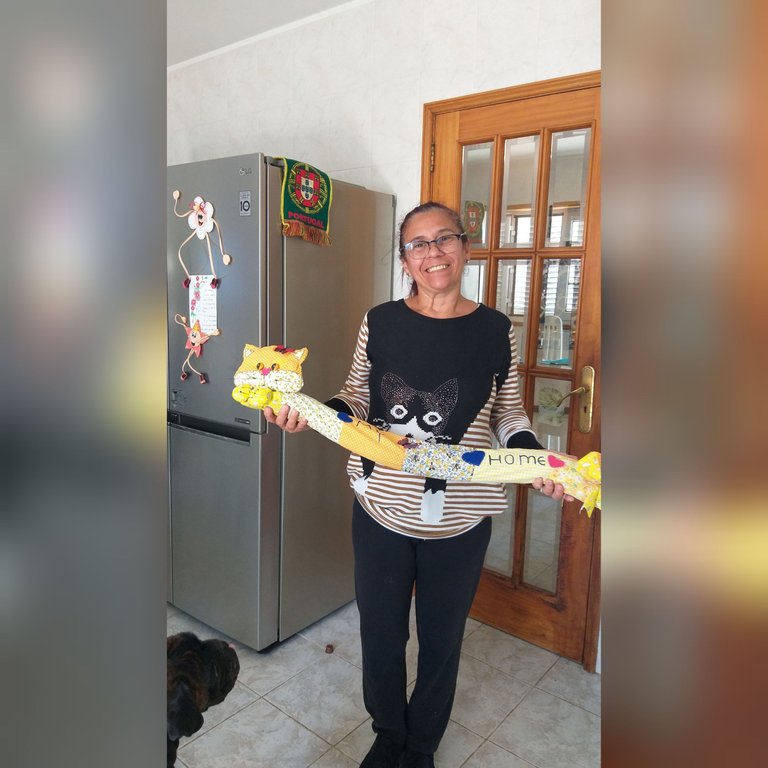
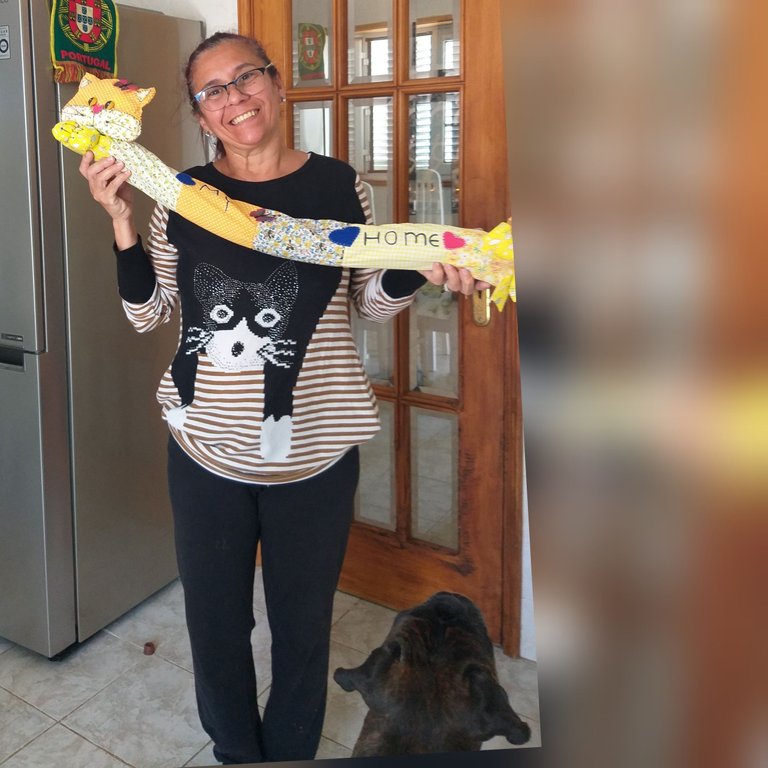
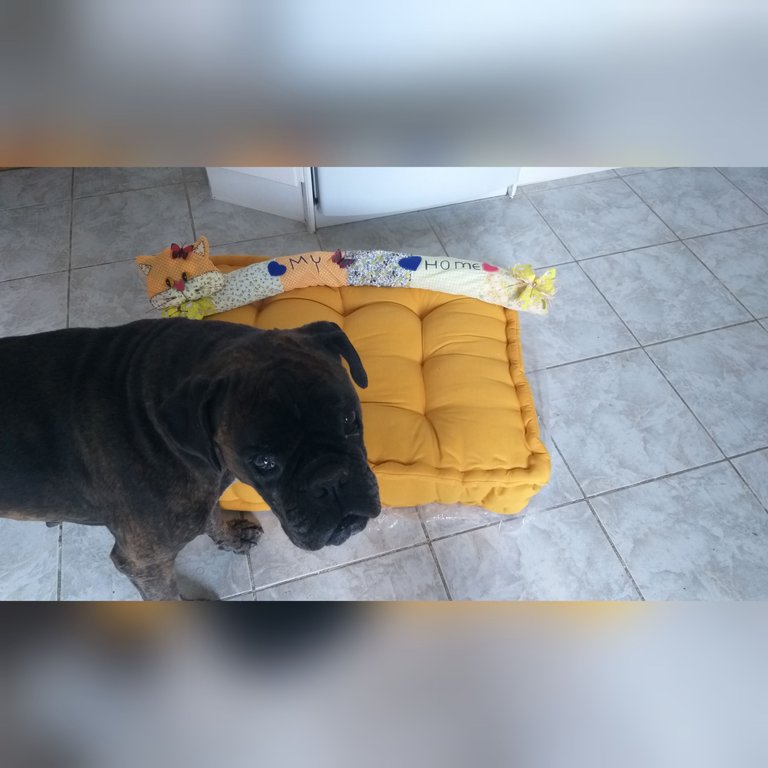
Que les pareció mi tapa polvo o frio que a la final se la dejaré a mi perra que le gustó el gatico. Y como pueden ver mi inspiración fue en mi blusa que me ven puesta en las fotos🤩🤗.
Esto es para Mi jaja 🐕
Bueno mi gente bella espero que le haya gustado mi proyecto para la participación de éste concurso que lo realice con paciencia y mucho amor. Gracias por su apoyo a todos las personas que visitan mi tutorial como a todas las comunidades que también lo hacen mil bendiciones y feliz fin de semana.
Las fotos son tomadas de mi teléfono móvil Samsung Galaxy A6 y organizadas por la aplicación GridArt.

English
Hello Hello Greetings to all the members of this great Hive community and especially to all the colleagues of #hivedi and I wish you an excellent weekend and with a lot of imagination for your creations and success in your results.
As everyone already knows that I like to compete and #hivediy launched a new contest with the Patchwork world technique; In addition to leaving beautiful results in all your creations, this technique also teaches us to recycle or reuse🥰👏. We can use this technique in a wide variety of manual or creative works, such as paintings, bags, pot holders, sheets. The first time I saw this technique was more than 40 years ago, my grandmother made sheets with the scraps or fabric cutouts that my mom had leftovers in her seams🤩; By that I mean that this technique is very old, which we did not know what its name was. Little by little, creative people gave it a wide variety of uses and sewed it by hand or with a sewing machine; In other tutorials I have already shown you several ways to use those fabric cutouts and not throw them away.
I was thinking what to do with this beautiful technique that the result is very colorful and I came to the conclusion of making a dust or cold cover depending on the months for the doors; We already have several at home but two doors were missing and so I told myself why not make one different from what I have because they are a bit cold, they are just a tube🤭. our pet or to decorate a window or sofa👍🤗. My sister-in-law has a sewing workshop and a while ago she gave me these pieces of fabric so I could do any craft and she had them for almost a year🤭😬. So come with me to make this fun dust or cold cover very easy to make.
The Materials to be used are the following:
Fabrics of various colors that you have at home
Scissors to cut fabric
Thread in the color of your fabric
Black and white permanent marker
Three buttons
Needle
pins
Filling can be wadding, cotton, rice, earth, polyethylene balls or grated cork.
2 butterflies
A pen or pencil
scrap sheet
Cotton
I show you more or less in which I thought to make and I drew it on a sheet.
Steps to follow for the dust or cold cap with a cat figure:
1👣. With the tape measure or ruler, measure the fabric cutouts and take out 7 pieces of different colors with the measurements of 25cm long by 15cm wide, as I show you in the images. Each cutouts or pieces of fabric of different motifs should measure the same.
2👣. After we have marked all the cuts of different fabrics; With the scissors we cut each fabric, make sure that the measurements are the same.
3👣. Having the cutouts ready, we will proceed to sew, now I will do it manually, which was the first seam before the invention of machines☺. As you can see in the images, the needle I was using was a bit big, so it will be easier for me to insert the thread more easily and quickly because even with my glasses it is difficult for me to insert the thread through the hole🤭🤭😬. We must place the two pieces of fabric with the main face and then sew.
4👣. One of the things I learned about sewing with my old ladies was to fix the pieces of fabric with pins, so they can sew better, since the fabric will not move👍.
5👣. Already having the two fixed fabrics with the pins we will begin to sew; a piece of advice when sewing by hand do it with short stitches; that is to say, each point that you make with the needle and the thread are not too far apart, try to sew as close as possible and then when you reach the end of the two fabrics, return to sew again to the other end and make a minimum of three knots with the same needle and thread aah another thing is to try to sew straight guided by one of the figures on the fabric.
7👣. When we have all the pieces sewn on one side, we sew the two widest parts, which will be on the opposite side, then we will turn them to the right side and you will also have to sew a point. You can see the images as guides.
8👣. In this step we flip the finished piece you can use any stick, it was easy for me to do it by hand.
9👣. We have already finished the part that will be the body of the cat, what we will do next is fill the body with the material that seems best to you or that you have at home. I already mentioned that I filled it with cork that I have grated that I keep saving😉. And finally sew the other end where we made the stuffing of the cat's body☺.
10👣. Now we are going to work with the cat's head; The first thing we will do is draw the face of a cat with a pencil or pen. In the drawing I placed the measurements 18cm wide x 15cm long, face and ears 4cm wide and long. Observe the image
11👣. We transfer the pattern to the fabric marking it with a pencil or pen, the fabric should be folded and cut out.
12👣. Then I cut out the bottom part of the cat face pattern and transferred it to another fabric of a different color. We also cut out the piece. See the images
13👣. We do the same with the ears, we make a figure smaller than the ear of the face. This one is not double like the others.
14👣. After we have all the pieces we proceed to sew and fill each piece; for these pieces we use cotton. For the seam we use the same step that I explained at the beginning and we leave a space without sewing which is where we will do the filling, a trick I do not cut the thread when I fill I leave it there and then I finish sewing the opening.
15👣. After we fill in the pieces, we sew them in each corresponding place. The head at one end and the tail at the other end. We sew the piece that we cut from the bottom of the face in the same place that can be seen in the drawing.
16👣. Then it occurred to me to make two legs to place under the head. With a small coffee plate I marked on another fabric and cut out these do not go double.
17👣. We sew and fill the two legs and then we sew them below the head.
18👣. Now with the buttons we paint a line in the middle with the permanent marker and they will be the eyes and then we sew it to the cat's face.
19👣. With the water and the black thread I made the markings of the mouths and the legs.
20👣. Next comes one of the most important steps when crafting or creating the details. Detailing a decorative piece or anything we create will give it the finishing touch and embellishment. I give this as advice, in my creations I end up placing or doing other things that later occur to me; For example, I saw the sweeping broom and I took out the hair on the cat's face from there😋. Don't be afraid to invent. I decorated the body of the cat with a heart and a butterfly and I put a bow on the tail.
What did you think of my dust or cold cover that in the end I will leave it to my dog who liked the kitten. And as you can see my inspiration was in my blouse that you see me wearing in the photos🤩🤗.
This is for me haha 🐕
Well, my beautiful people, I hope you liked my project for the participation of this contest that you carry it out with patience and a lot of love. Thank you for your support to all the people who visit my tutorial as well as to all the communities that also do it, a thousand blessings and happy weekend.
The photos are taken from my Samsung Galaxy A6 mobile phone and organized by the GridArt application.
Te quedó hermoso me encabto
Te quedó hermoso, me encantó el gatito suerte en el concurso.
Muchas gracias paovalet03 por tu apoyo y comentario me da un gusto cuando las personas me dicen que les encanta lo que hago; porque eso te inspira hacer tu tutorial cada vez mejor . Bendecido día
Buen trabajo, y mu practico. Muchas felicitaciones. Es la unica manera en que pudiera tener gatos en la casa! 😊
Jaja. A mi me gustan los gatos pero tenerlos en espacios abiertos no dentro de la casa. Gracias por tu apoyo y bendiciones amiga.
Una abrazo prima, te quedo hermoso tu tapa polvo me gusto mucho los colores que utilizaste eres muy creativa, creo que a tu mascota le gusto también. Saludos y suerte
Hola mi bella prima. Gracias como siempre por tus hermosas palabras y sii a mi perra le gustó. Un fuerte abrazo y Bendecido día. 😊😘👏👏
Que hermoso. Me encantó tu idea y cada detalle.
Felicidades.
Gracias mi bella y me alegra que te guste🤗❤
Wow amiga @zullyarte es un diseño precioso, pensaste en cada detalle y tiene una carita encantadora, los detalles de los corazones y mariposas me encantas. Felicitaciones y éxito en el concurso.
Muchas gracias jessi y me da gusto que te guste es lo más importante darle amor y detalle a lo que haces❤. Bendiciones amiga
Amiga te botaste realmente esto está increíble como todas tus creaciones.
!discovery 35
Jeje que linda!! Lindas palabras por una excelente creadora. Saludos y Bendecido día amiga
This post was shared and voted inside the discord by the curators team of discovery-it
Join our community! hive-193212
Discovery-it is also a Witness, vote for us here
Delegate to us for passive income. Check our 80% fee-back Program
Thank very much 🥰🤗
Your content has been voted as a part of Encouragement program. Keep up the good work!
Use Ecency daily to boost your growth on platform!
Support Ecency
Vote for new Proposal
Delegate HP and earn more
Thank very much for your support👏👏❤
@zullyarte quedó lindo y se ve lindo en todos lados ... Un problema saber dónde dejarlo definitivamente... Suerte en el Concurso 🤗
Jaja. Es fácil resolver ese problema lo colocamos en un sitio primero y luego lo cambiamos para otros☺🤭 . Gracias mi bella por tu apoyo. Y Amen
Quedaron muy lindos tus trabajos 😍 También está muy bien explicado el paso a paso. Gracias por compartir tu creatividad
Es un placer mi bella compartir mis creaciones con mi querido grupo. Gracias por tu apoyo. Bendecido día
Hermoso amiga @zullyarte. Siempre lo que haces es maravilloso. Mi admiración por ti. Mil bendiciones ❤️🌹😘🤗✨🥰
Que linda mi amiga.❤ es un halago viniendo de una persona tan talentosa como tu. Muchas gracias y miles de bendiciones 👏👏👏
¡Felicidades amiga @zullyarte! que buena creatividad, me gusto muchísimo tu gatito 😍 ¡es tan tierno! hiciste un buen trabajo se nota la dedicación que le distes ¡saludos y suerte en el concurso amiga! 💓 💕 💜 ¡éxitos!
Que bueno que te haya gustado eso me alegra mucho. Gracia amiga y Bendecido día
@zullyarte amiga que hermoso te quedo te felicito me fascino
Gracias mi bella❤🤗
Esoo amigaaa! Me encanta tu participación... Tu gatito está muy tierno !
Que linda🥰 muchas gracias por tu apoyo❤
Que linda🥰 muchas gracias por tu apoyo❤