
Happy and blessed day dear friends of this beautiful community @holozing, a pleasure to greet you, I feel fascinated with the little sculptures that are part of this group, today I want to share with you a tutorial of a beautiful Jewelry Organizer inspired by the penguin Zingu Sculpture made with recyclable material, which is very easy to make and useful to organize. Let's get to work, let's create, ideas blossoming... Made from the heart....
Materials used:
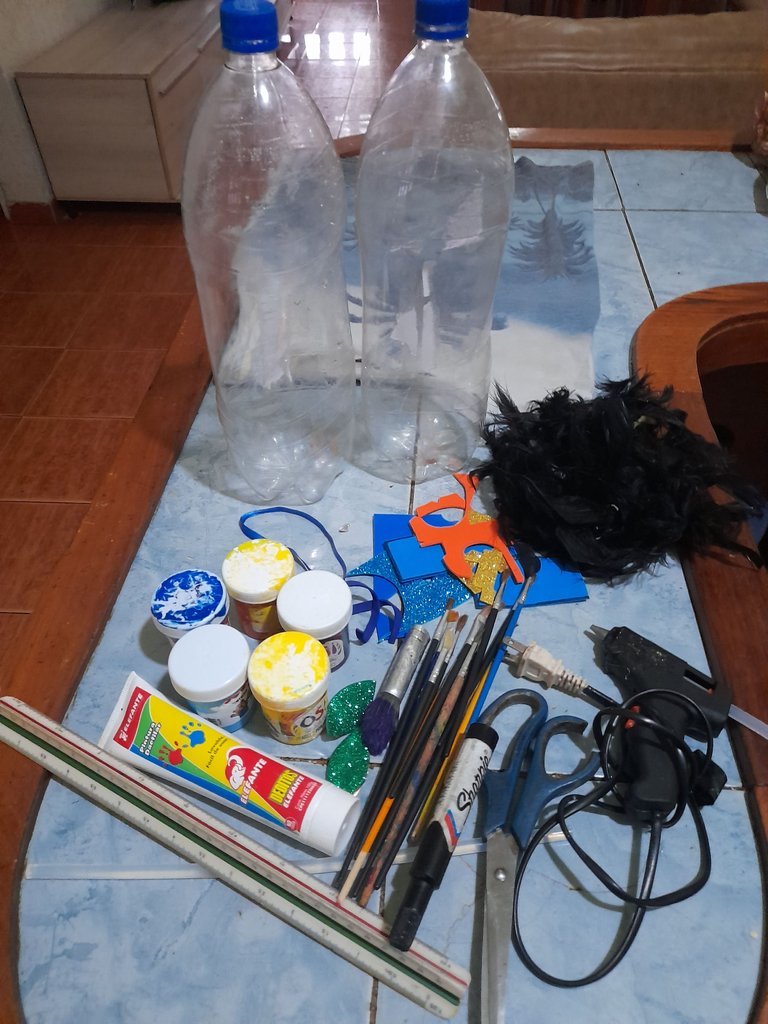
> 2 plastic soda bottles of 2 liters.
> Black, white, blue, blue and yellow cold paint.
> Thick and thin brushes.
> Black, matte blue, frosted blue, frosted blue, yellow foami.
>Black marker.
> Scissors
> Ruler.
> Silicon.
> Silicone gun.
> Steam iron.
Elaboration step by step:
Step #1
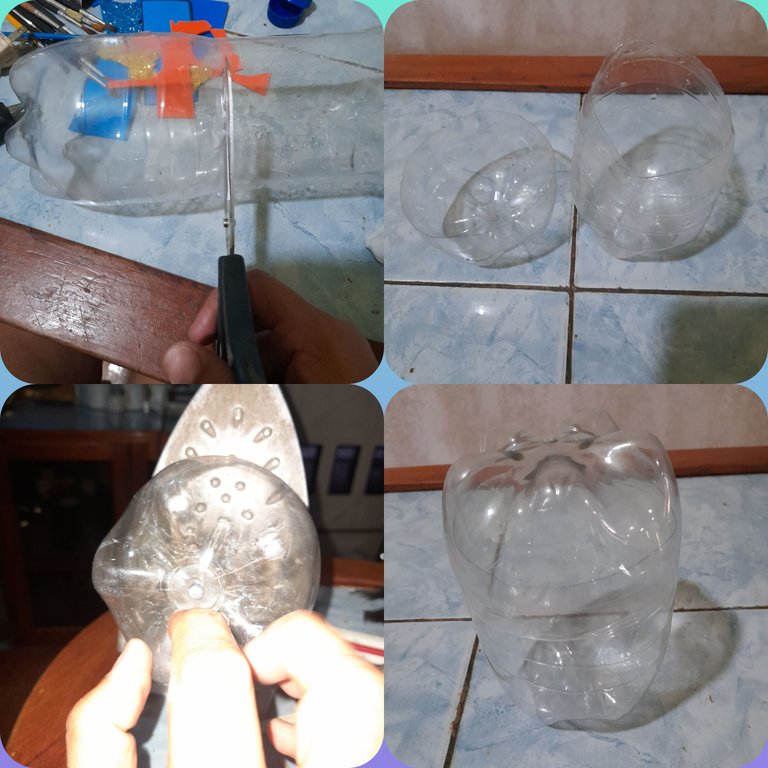
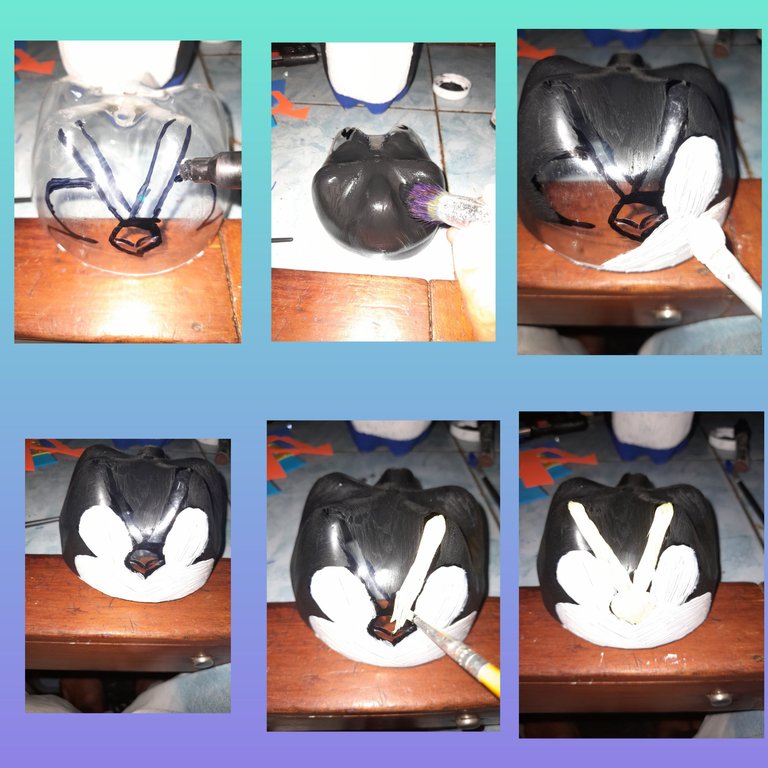
Take one of the plastic soda bottles and cut it with the scissors to the measure of 10 cm to form what would become the body of zingu, then take the other plastic soda bottle and cut it with the scissors to the measure of 5cm which will be the face of the penguin and will function as the lid of the organizer of the jewelry box, once already having the 2 plastic bottles chopped as a base, pass them through the preheated steam iron to remove the edges and imperfections and make them uniform.
Step #2: Zingu's Body (jewelry box)
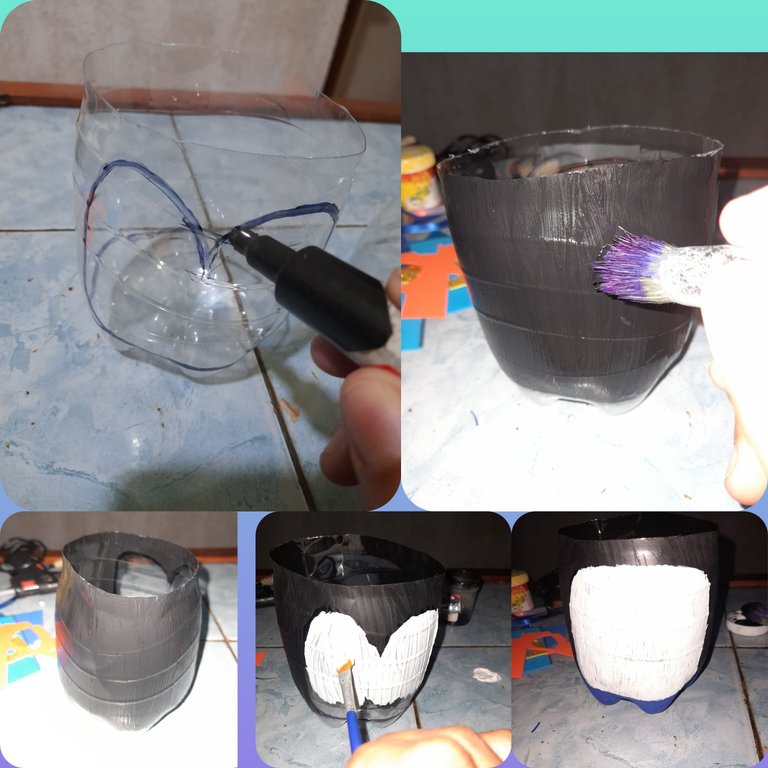
On the 10cm plastic base, mark with a black marker, the different parts of the body to proceed to paint with the brush and cold paints, i.e. the back in black, the belly in white and the feet in blue, letting them dry.
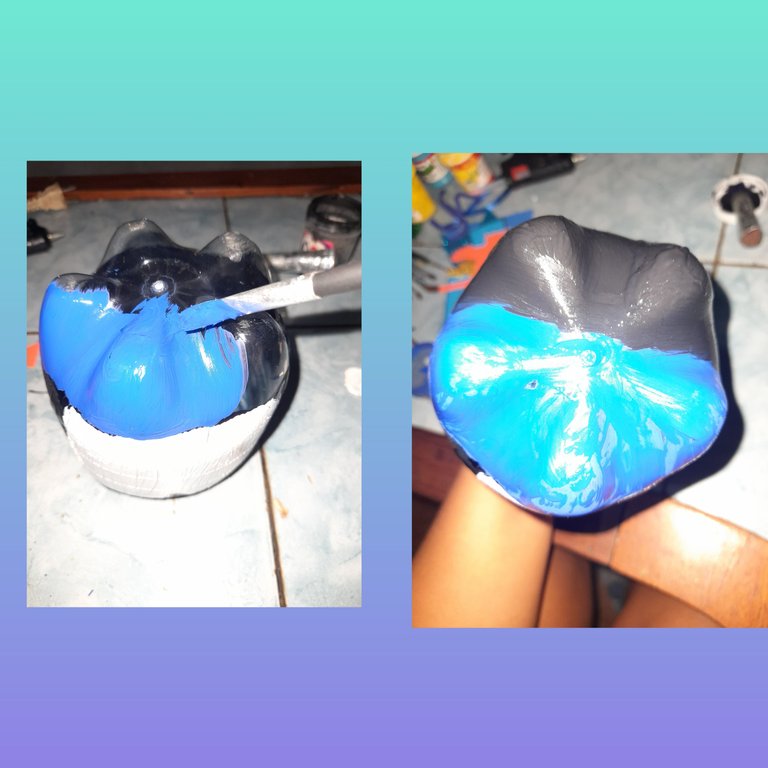
Step #3: Zingu's Face (jewelry box lid)
With a black marker mark the head, eyes, nose, cheeks and eyebrow lines on the 5cm base and then proceed to paint each part with the brush in its determined color, head in black, eyes and cheeks in white, nose and lines in yellow.
Step #4.
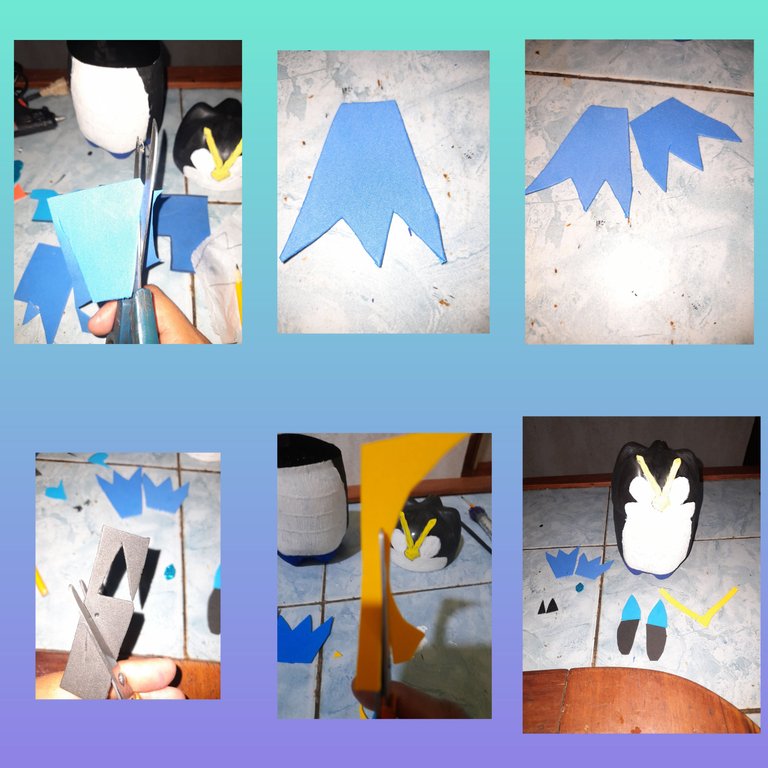
- With the blue foami mark and cut out their feet.
- With the blue matte and black foami cut to make their hands.
- With the blue frosted foami mark and cut her diamond for her forehead.
- With the yellow foami mark and cut her nose and eyebrow lines. Ready all your parts.
Step #5.
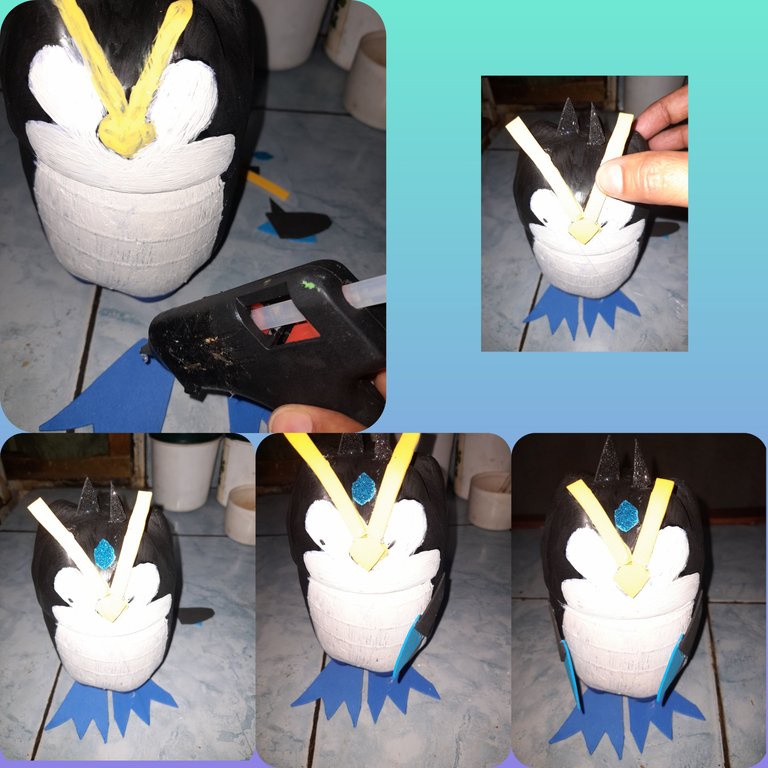
Once all her parts were ready I proceeded to glue them with the silicone gun, first I glued her feet, second her hands, third her nose and yellow eyebrow lines.
STEP #6.
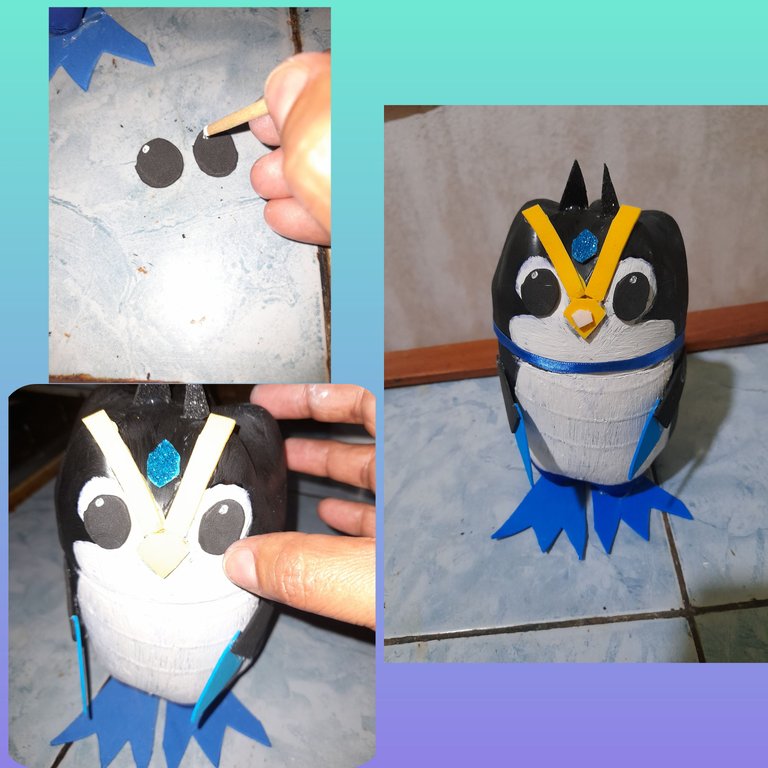
I cut 2 circles in black foami which will be his eyes and I made a white dot on each eye with paint, then I glued them and put a blue ribbon on the edge of the lid to decorate.
The cute little penguin Zingun Sculpture Holozing is ready.
I hope you like my tutorial.
See you next time.
Las imagenes me pertenecen, fueron tomadas de mi teléfono Samsung A21
Fueron editadas las fotos en el programa Polish.
traductor: Deepl Traslator.
Feliz y bendecido dia queridos amigos de esta bella comunidad @holozing, un gusto saludarles, me siento facinada con las pequeñas esculturas que forman parte de este grupo, hoy quiero compartir con ustedes un tutorial de un hermoso Organizador de Joyas inspirado en el pinguinito Zingu Sculpture hecho con material reciclable, el cual es muy facil de elaborar y util para organizar. Manos a la obra, a crear, ideas floreciendo.. Elaborado con el corazon...
Materiales Utilizados:
> 2 Botellas de refresco plasticas de 2 litros.
> Pintura al frio negra, blanca, azul y amarilla.
> Pinceles grueso y fino.
> Foami negro, azul mate, azul escarchado, amarillo.
>Marcador negro.
> Tijera.
> Regla.
> Silicon.
> Pistolita de silicon.
> Plancha al vapor.
Elaboracion paso a paso:
Paso #1:
Tome una de las botellas plasticas de refresco y la corte con la tijera a la medida de los 10 cm para formar lo que vendria hacer el cuerpo de zingu, posteriormente agarre la otra botella plastica de refresco y la corte con la tijera a la medida de los 5cm la cual sera la cara del pinguinito y funcionara como la tapa del organizador del joyero, una vez ya teniendo las 2 botellas plasticas picadas como base, las pase por la plancha a vapor precalentada para quitarle los filos e imperfeciones y ponerlas uniforme.
Paso #2: Cuerpo de Zingu (joyero)
En la base plastica de 10cm, marque con un marcador negro, las diferentes partes del cuerpo para proceder a pintar con el pincel y las pinturas al frio, es decir la espalda de negro, barriga de blanco y pies de azul, dejando secar.
Paso #3: Cara de Zingu (tapa del joyero)
Con un marcador negro marque en la base de 5cm la cabeza, los ojos, la nariz, los cachetes y las lineas de las cejaa para asi proceder a pintar con el pincel cada parte de su color determinado, cabeza de color negro, los ojos y cachete base de color blanco, la nariz y lineas de color amarillo.
Paso #4:
- Con el foami azul marque y corte sus pies.
- Con el foami azul mate y negro corte para hacer sus manos.
- Con el foami azul escarchado marque y corte su diamante para la frente.
- Con el foami amarillo marque y corte su nariz junto con las lineas de las cejas. Lista todas sus partes.
Paso #5:
Una vez listas todas sus partes procedi a pegarlas con la pistolita de silicon, primero pegue sus pies, segundo sus manos, tercero su nariz y lineas amarillas de las cejas.
PASO #6:
Corte 2 circulos en foami negro los cuales seran sus ojos y le hice un puntico blanco a cada ojo con pintura, ya luego se los pegue y le coloque un cinta azul en el borde de la tapa para decorar.
Ya listo el tierno pinguinito Zingun Sculpture Holozing.
Espero que les guste mi tutorial.
Hasta la proxima.