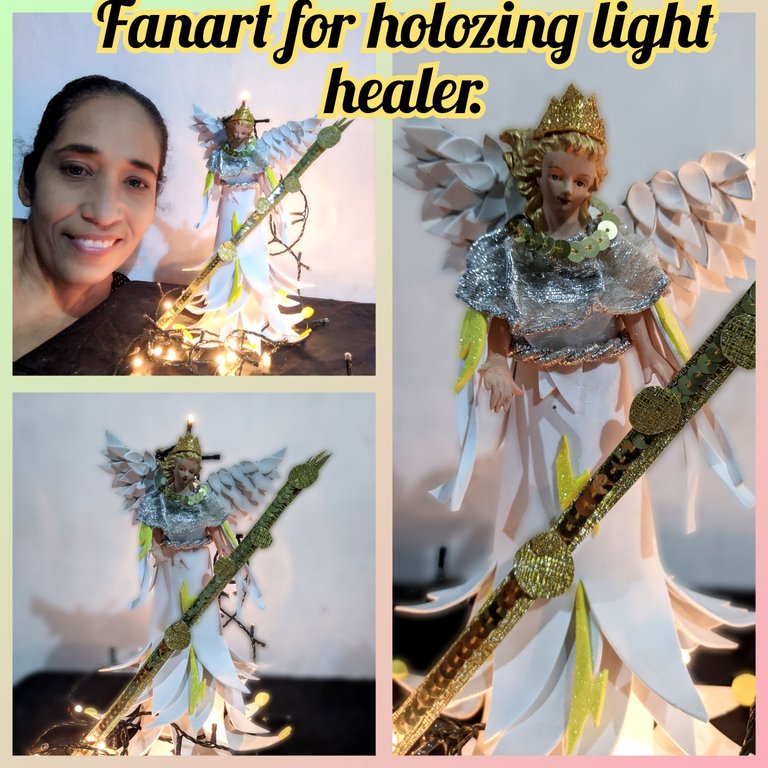

Greetings my friends of #hive today despite the adversities we continue to work for our ecosystem, for that reason I continue to support everything that is matter of dissemination of our blockchain and its benefits, and among those benefits are their games especially this #holozing that for me has enough meaning, because it is this game through its community that I can express the art in its different variants.
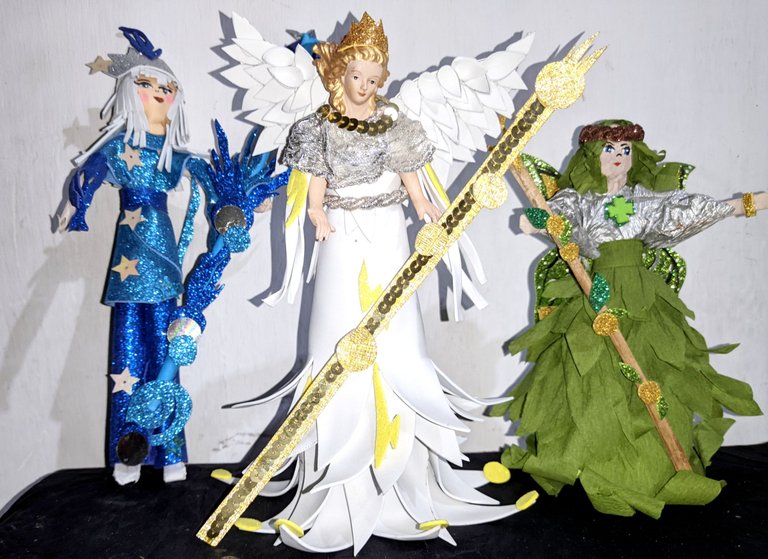
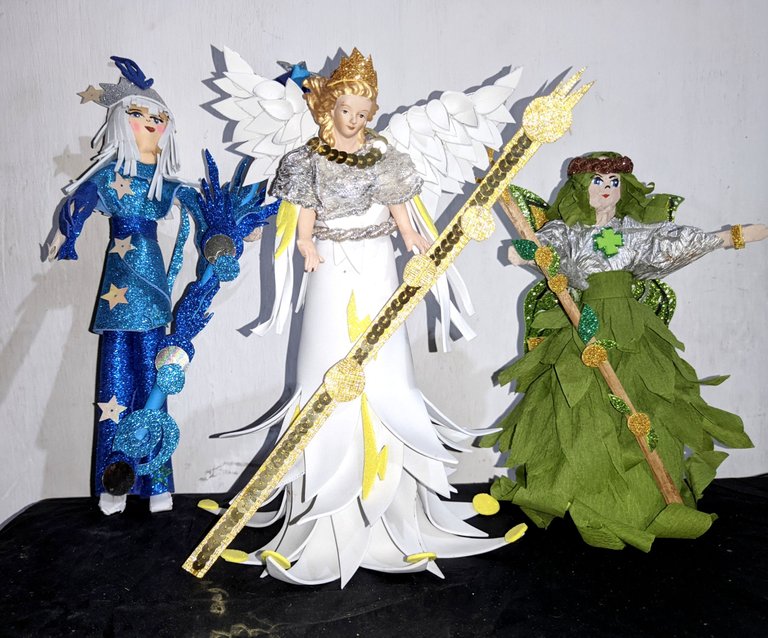
I have enjoyed every work I have brought here, and today is no exception, today I bring you a representation of the healer of light that I made, or at least a version of how I imagine him, and although it was a very hard work, I enjoyed every step and above all the final result.
⚡ MATERIALS ⚡
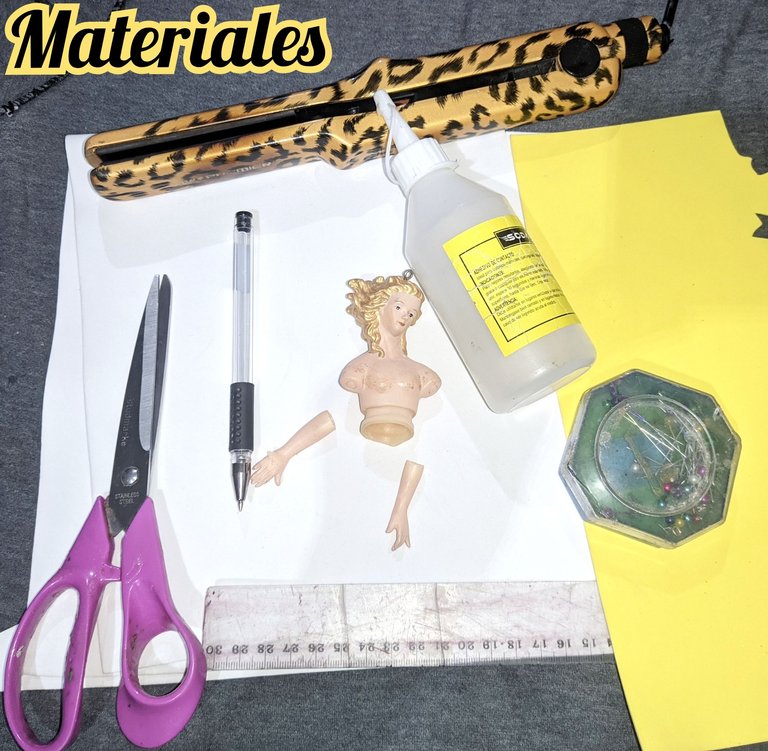
⚡ White foami.
⚡ Gold and yellow foami scraps.
⚡ Liquid silicone.
⚡ Cardboard.
⚡ Gold sequins.
⚡ stick height.
⚡ Gold cardboard.
⚡ 20 cm silver ribbon.
⚡ Body and arms for dolls.
⚡ Scissors.
⚡ Pencil.
⚡ Ruler.
⚡ Pins.
⚡ Hair iron.
⚡ CREATIVE PROCESS ⚡

⚡Start by taking the cardboard and forming a cone and gluing it with the liquid silicone, when it is dry and firm, apply liquid silicone to the body of the figure and attach it to the cardboard cone and let it dry.
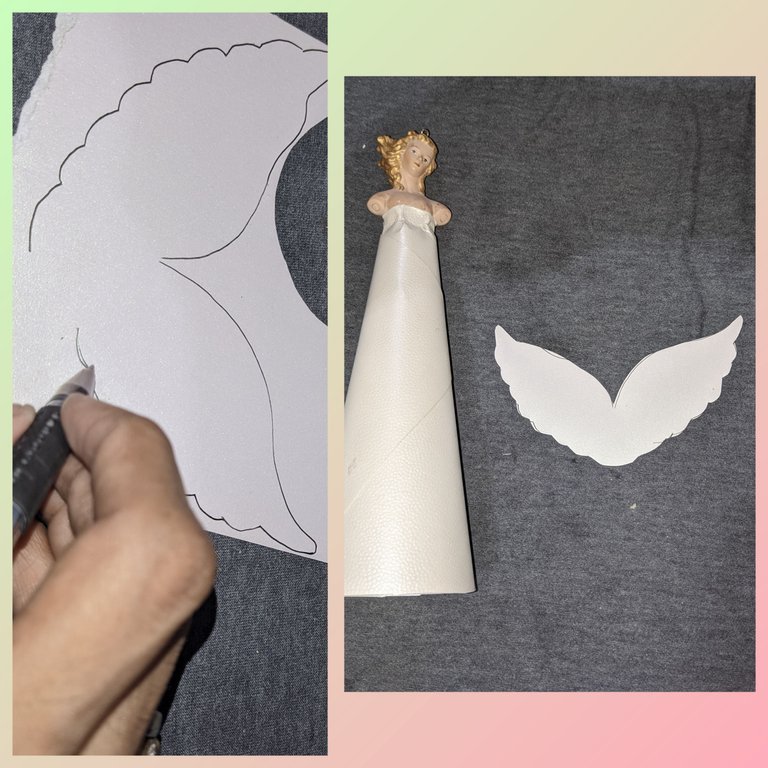
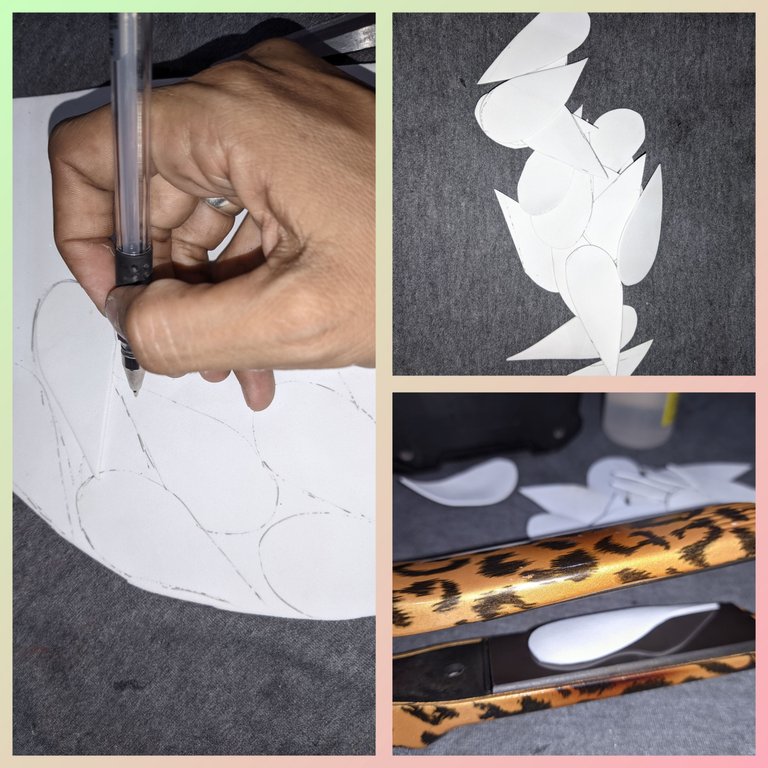
⚡ Then on the remaining cardboard I drew some wings and cut them out.
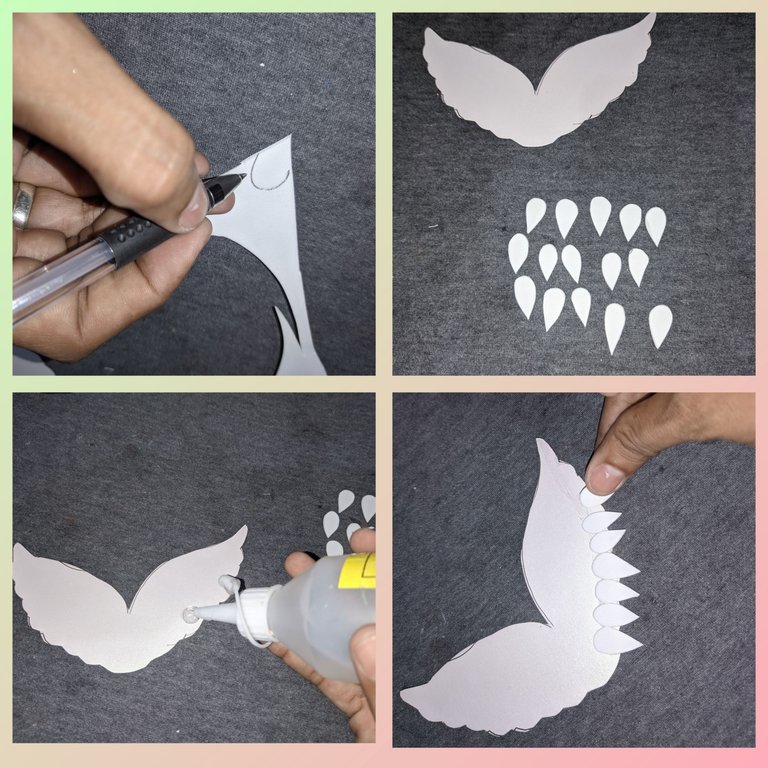
⚡ Now I took the white foami and drew little drops, cut out a lot of them, about 45 for each wing. I applied liquid silicone to the cardboard and started gluing the drops that I had already cut out, put two lines and let dry well.
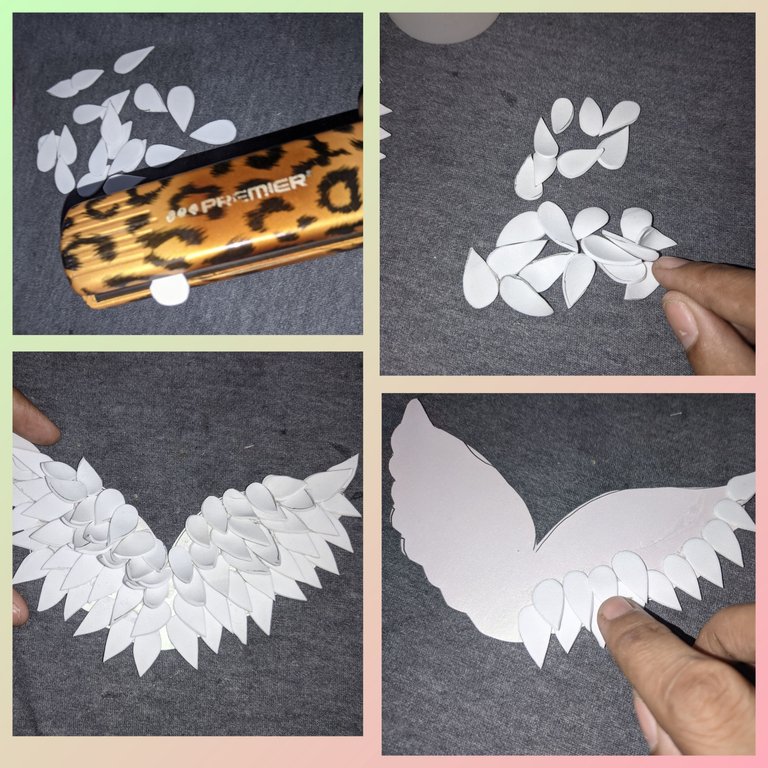
⚡ The remaining drops of foami are passed through the hot hair iron to give depth and volume to the feathers, we glue about two lines of these to complete the two wings.
⚡ Now I drew some much, much bigger drops on the white foami and cut them out, then I put them through the hot iron and we give volume to the pieces.
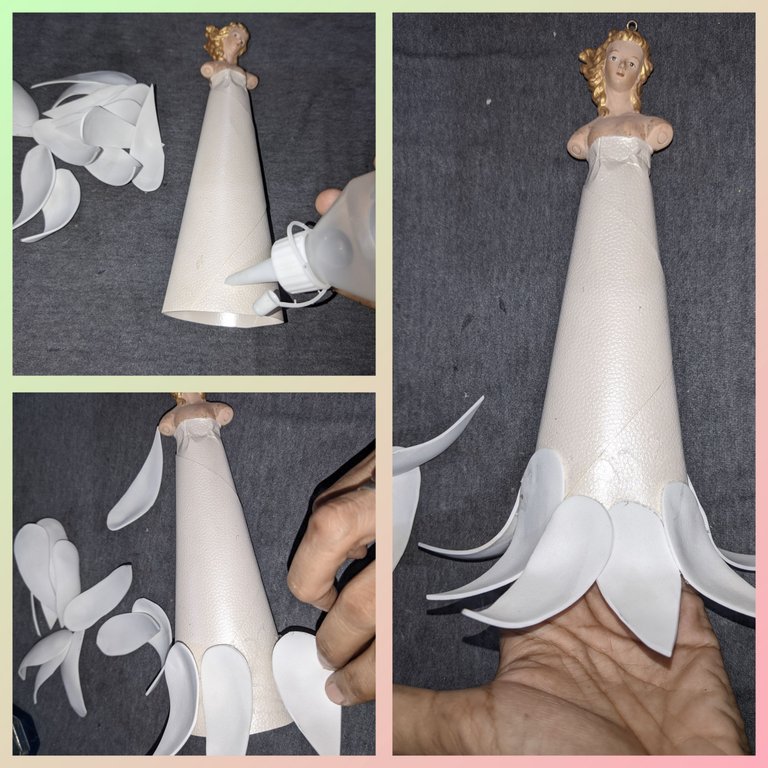
⚡ He applied liquid silicone to the base of the cone and proceeded to stick the drops one by one until three lines were covered.
⚡ Now I cut out a piece (see picture) which I also put through the iron to make it easier to handle and the coupling, applied liquid silicone and glued it onto the cone.
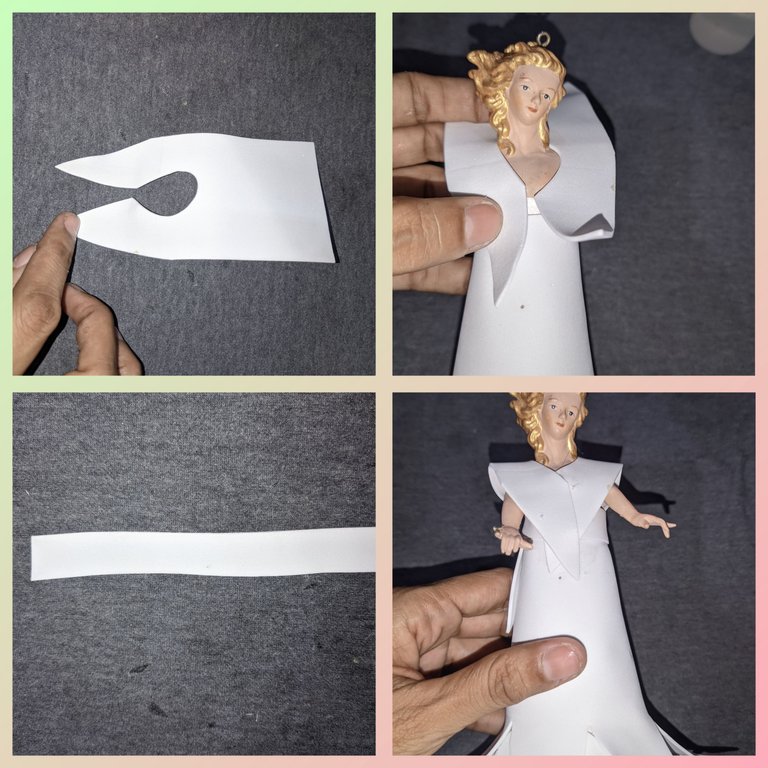
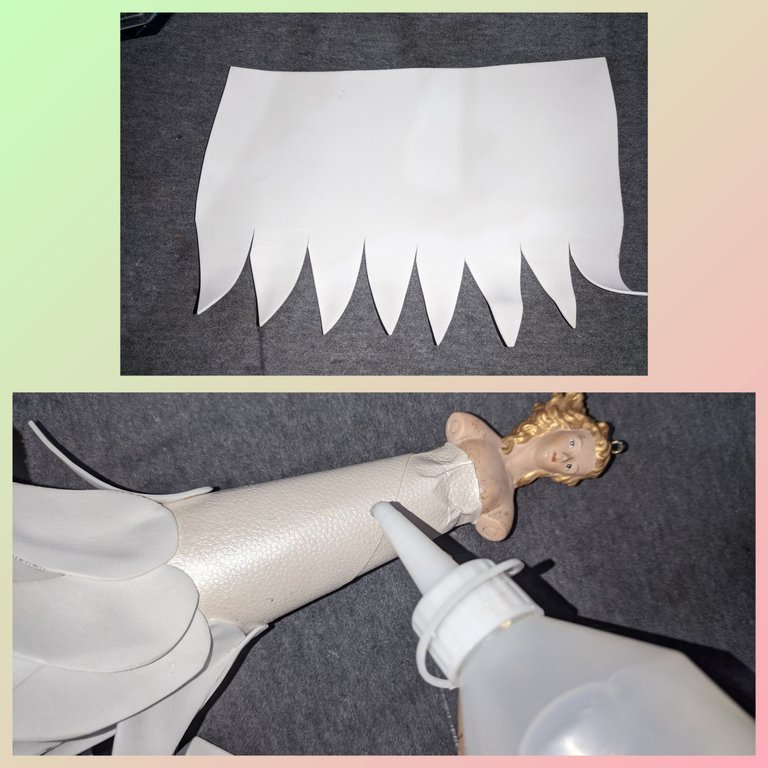
⚡ I drew and cut out the top piece of the dress and glued it with liquid silicone.
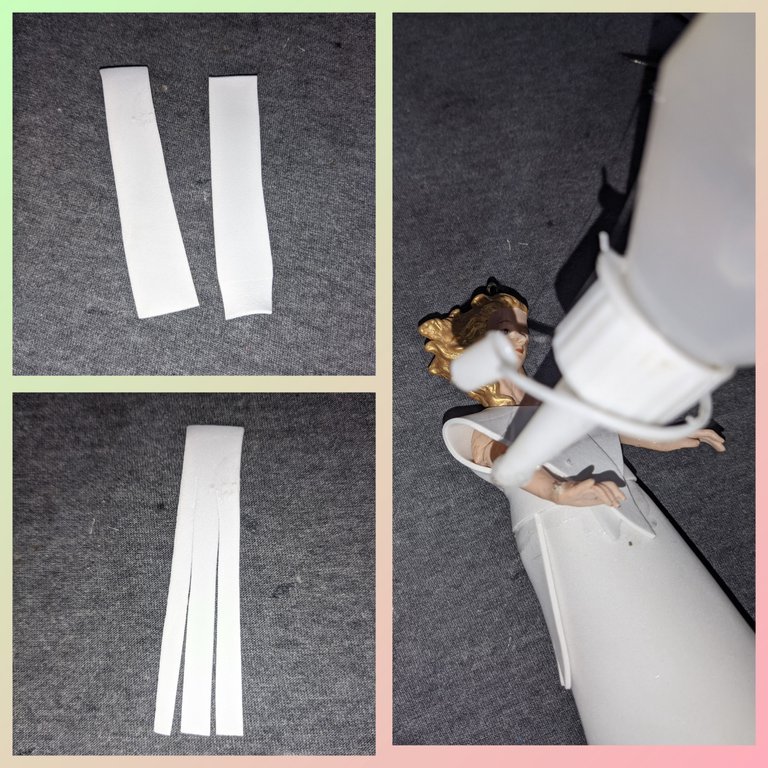
⚡ I then cut out two rectangles which I cut into strips, and glued onto the sleeves.
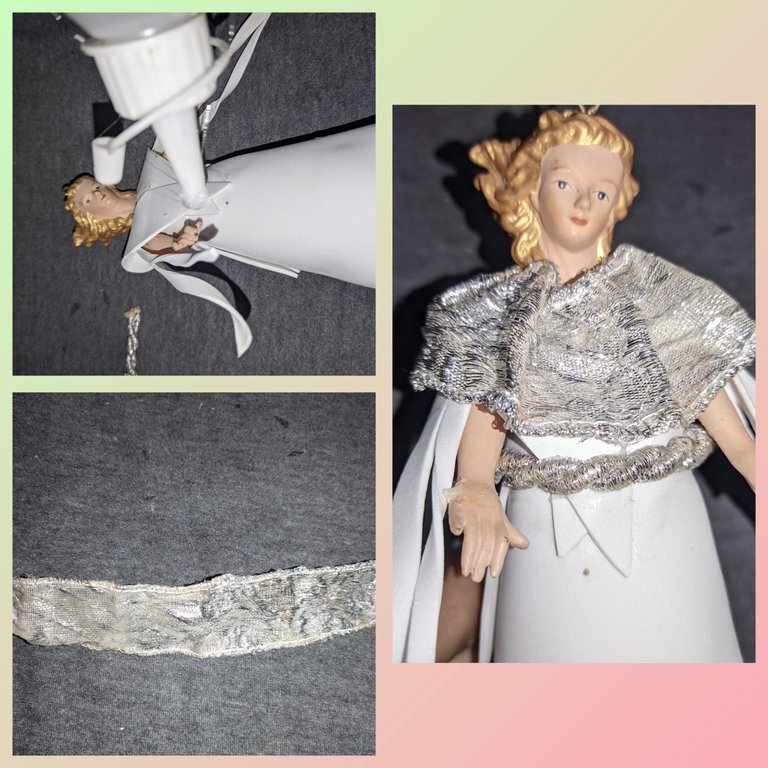
⚡ Stick on the silver ribbon and the silver cord.
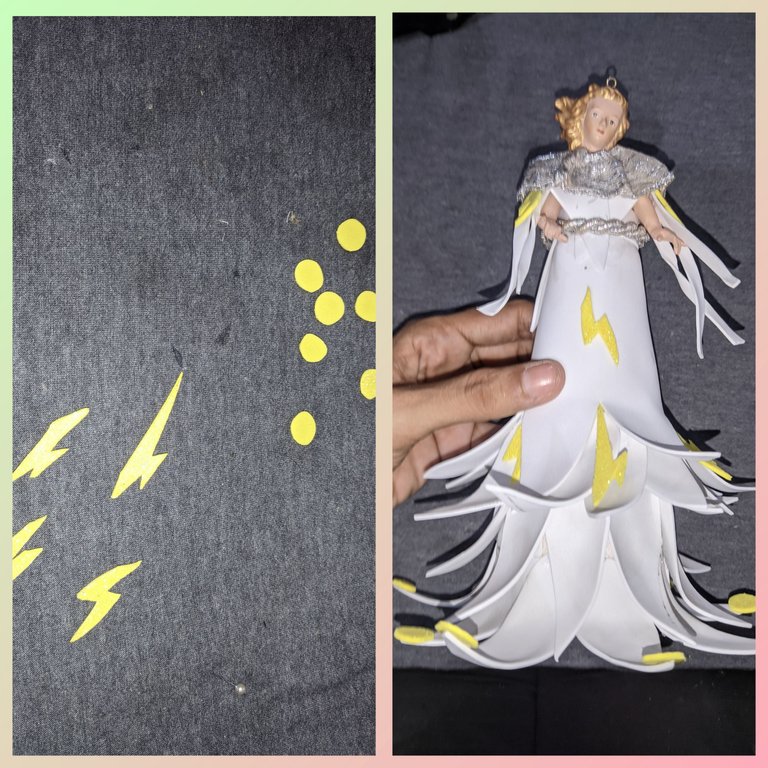
⚡ cut out some circles and rays from the yellow foami and glue them on different parts of the dress.

⚡ applied liquid silicone on the wings piece and glued it, to make them firm I fix it with a pin, then from the golden foami I drew and cut out a small crown which we glued.
⚡ THE CETRO⚡
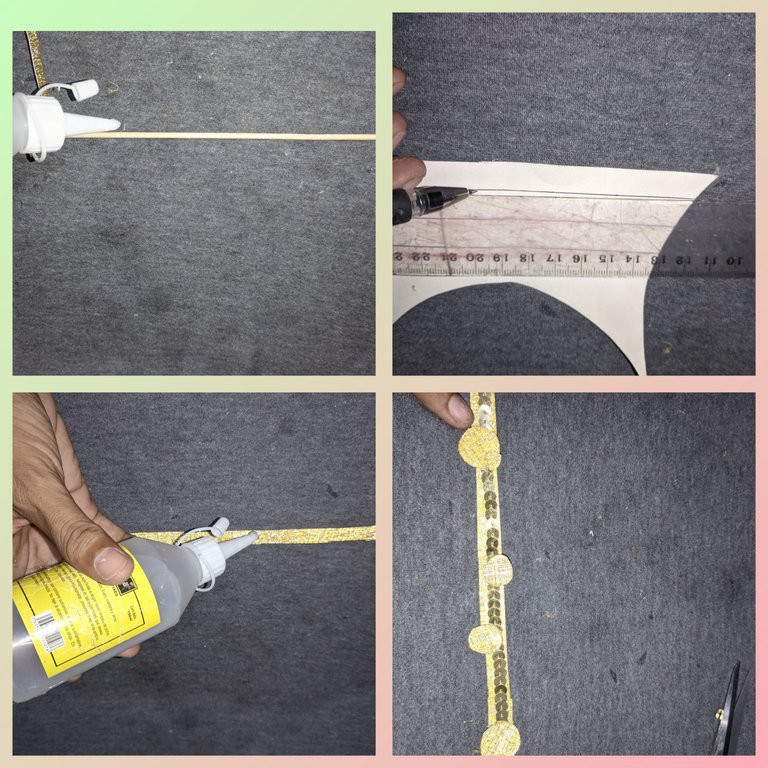
⚡ An important element for me is the healer's sceptre and I couldn't not have it so I took a little piece of gold cardboard and cut out three strips, which I glued with liquid silicone on the height stick, I also cut out some circles and glued them on and finally I glued a line of sequins and that was it.
⚡ FINAL PHOTOGRAPHS ⚡

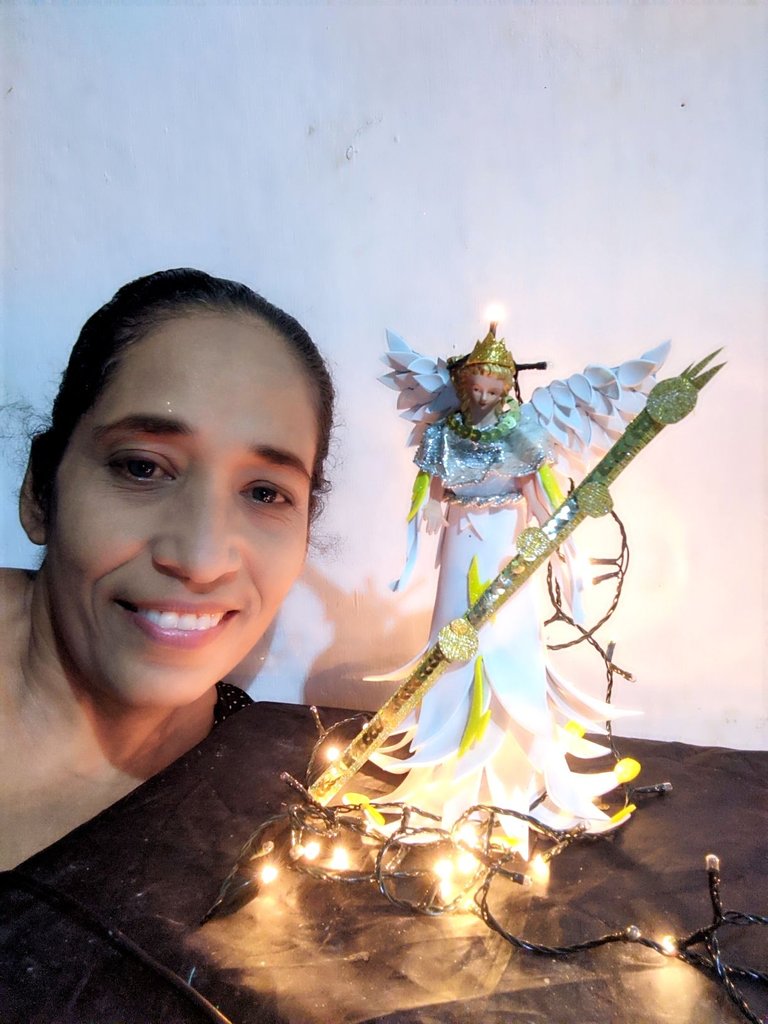

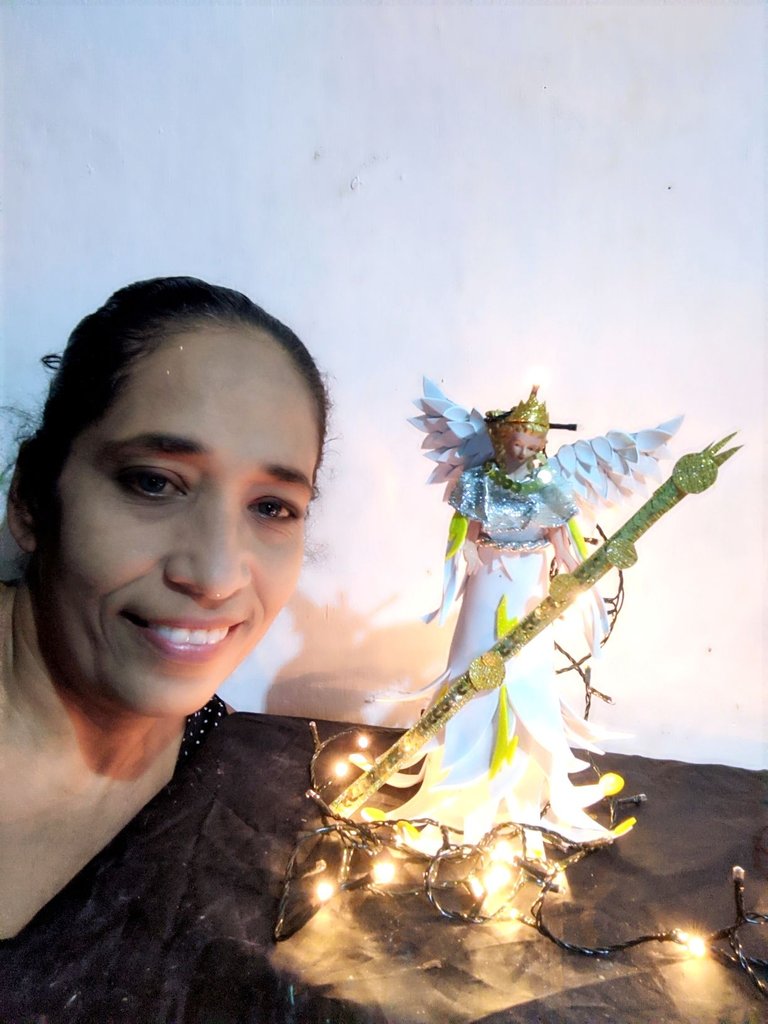
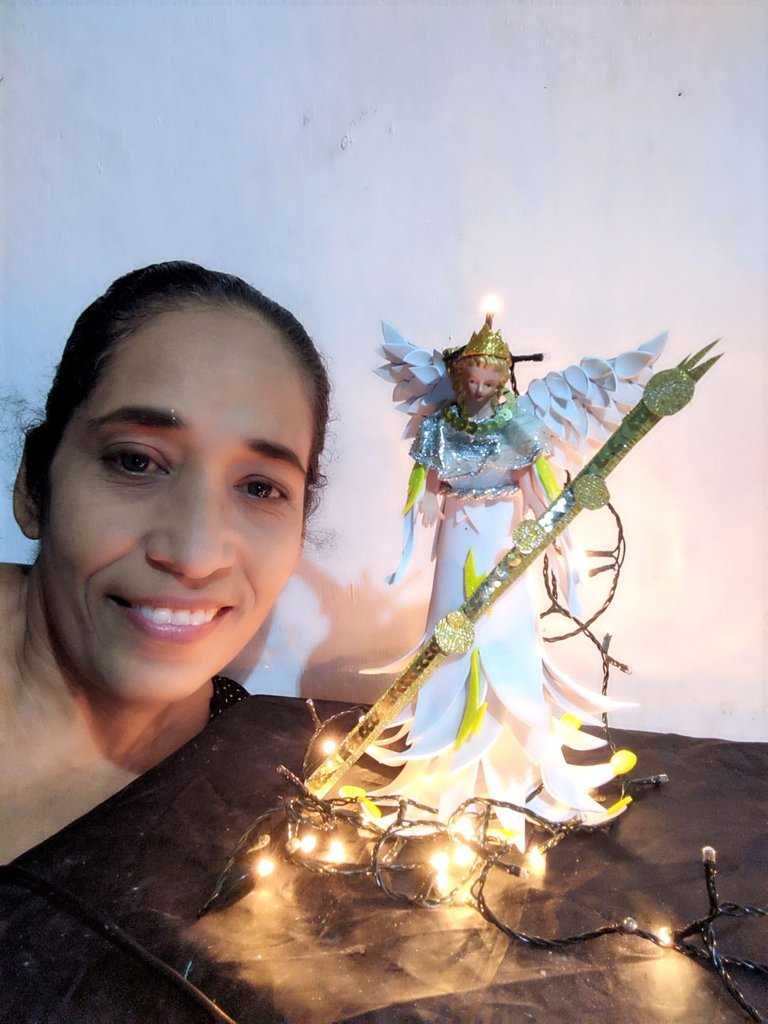
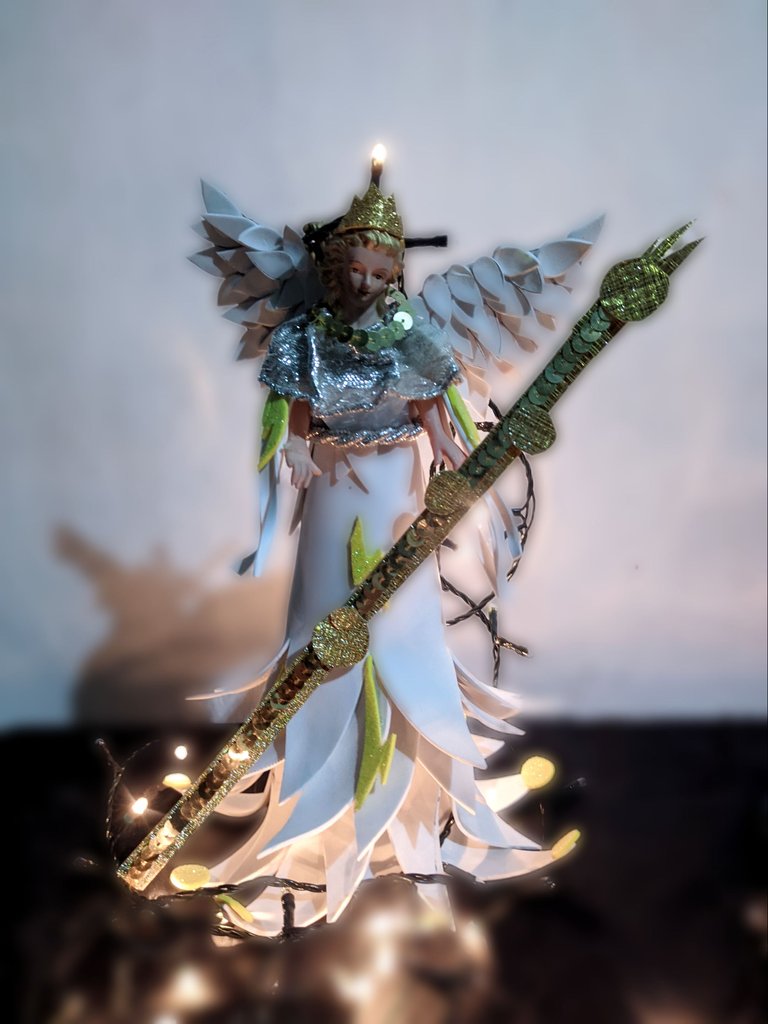
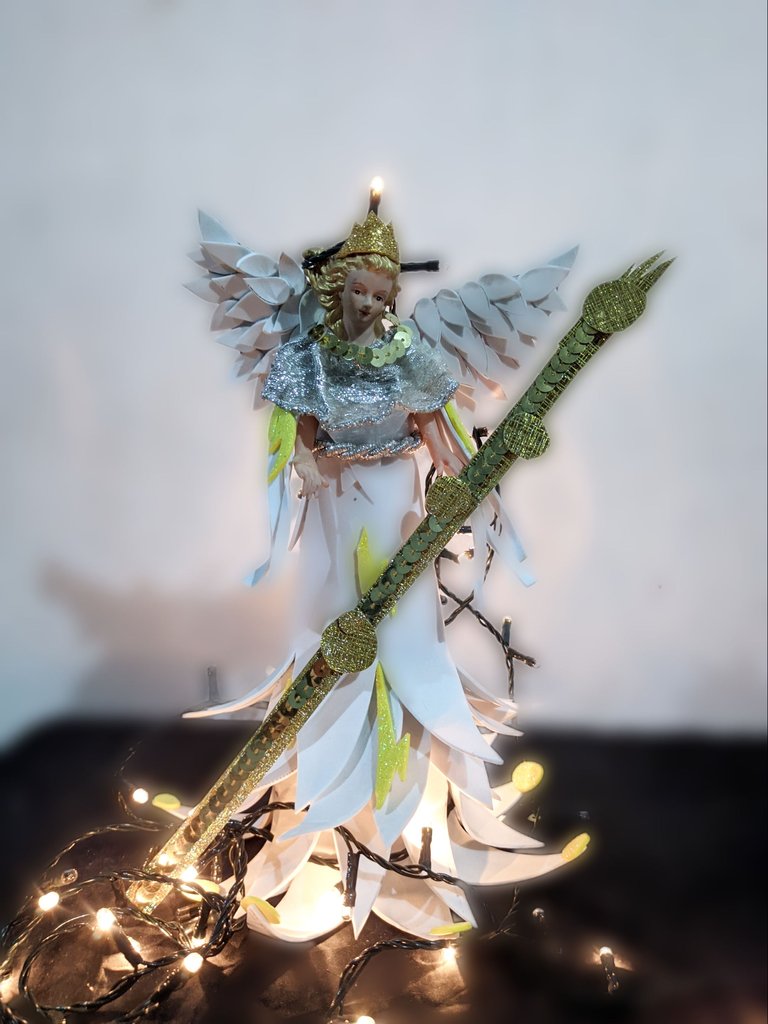
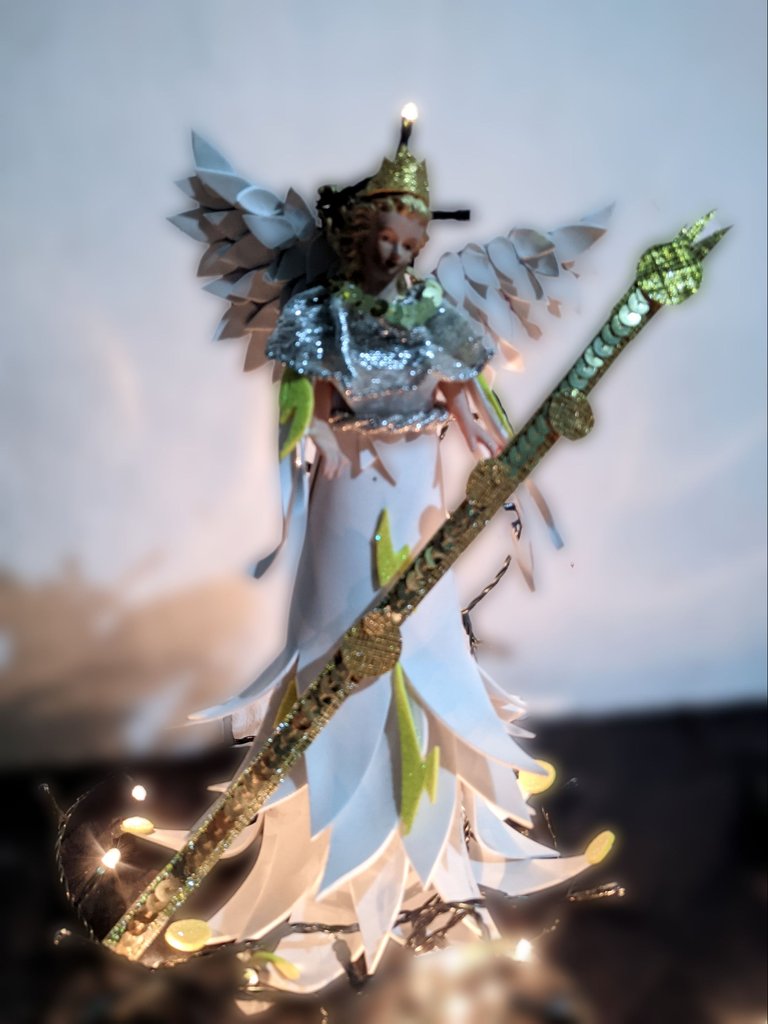
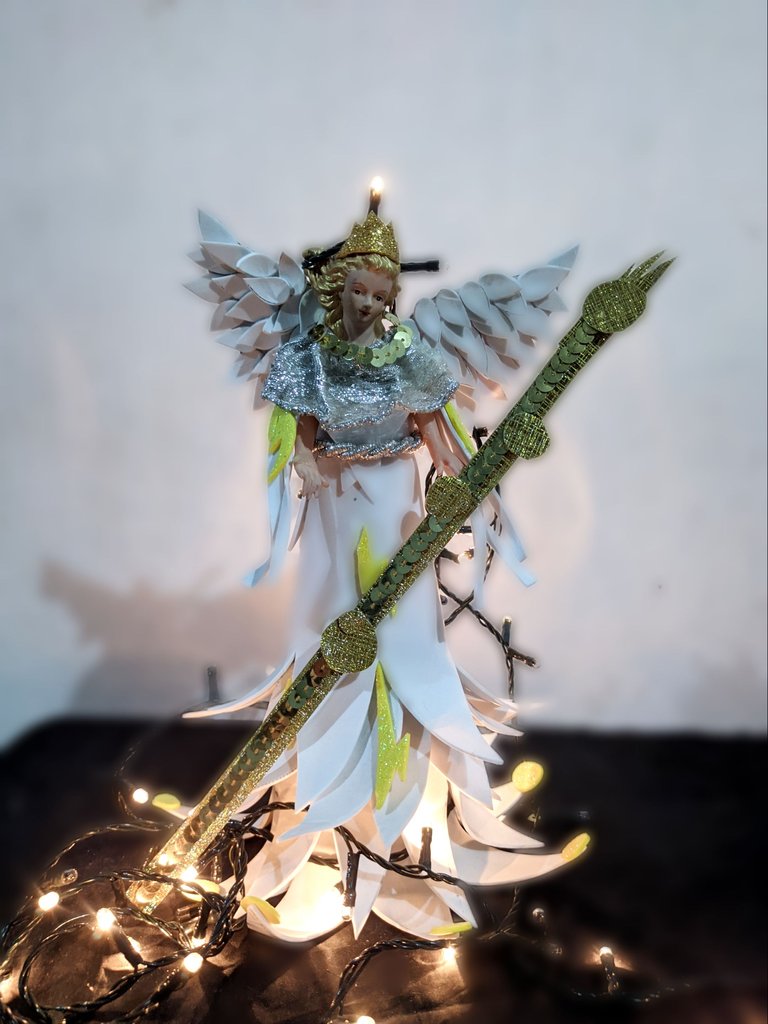
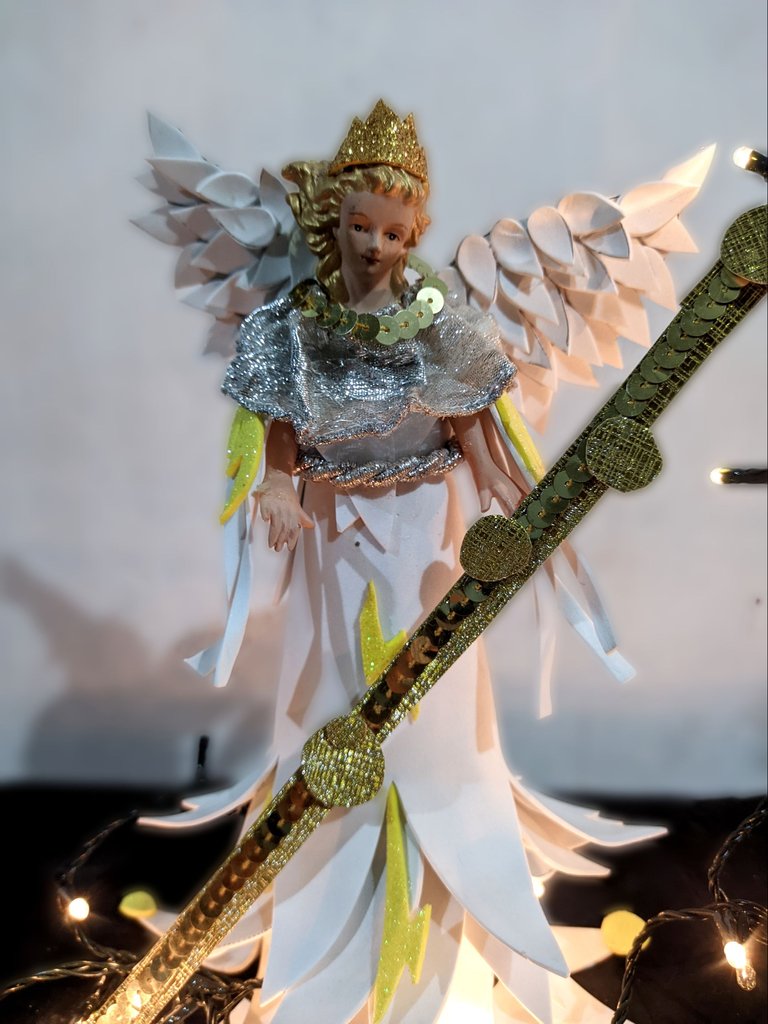
I hope that today's work has been to your liking, I was delighted with the final result, as a final touch for the photographs I put a Christmas light to make it look much more, I liked it and what did you think, let me know in the comments.
⚡ CREDITS ⚡
All pictures were taken with my Xiaomi redmi 9T phone and are my own I used the polish program and Deepl translator.
Saludos mis amigos de #hive hoy a pesar de las adversidades seguimos trabajando en pro de nuestro ecosistema, por tal motivó sigo apoyando todo lo que sea materia de difusión de nuestra blockchain y sus bondades, y entre esas bondades están sus juegos especialmente este de #holozing que para mí tiene bastante significado, ya que es este juego a través de su comunidad que puedo expresar el arte en sus diferentes variantes.
Yo me he disfrutado cada trabajo que he traído acá, y el de hoy no es la excepción, hoy les traigo una representación del sanador de la luz que elabore,o al menos una versión de cómo le imagino, y aunque fue un trabajo bien arduo, me disfrute cada paso y sobretodo el resultado final.
⚡ MATERIALES ⚡
⚡ Foami blanco.
⚡ Retazos de foami dorado y amarillo.
⚡ Silicón líquido.
⚡ Cartulina.
⚡ Lentejuelas doradas.
⚡ palito de altura.
⚡ Cartulina dorada.
⚡ 20 cm de cinta plateada.
⚡ Cuerpo y brazos para muñecas.
⚡ Tijera.
⚡ Lápiz.
⚡ Regla.
⚡ Alfileres.
⚡ Plancha de cabello.
⚡ PROCESO CREATIVO ⚡
⚡Iniciamos tomando la cartulina y formamos un cono al cual pegamos con el silicón líquido, cuando ya está seco y firme,aplicó silicón líquido al cuerpo de la figura y unimos al cono de cartón y dejó secar.
⚡ Luego en la cartulina restante dibuje unas alas las cuales recorté.
⚡ Ahora tome el foami blanco y dibuje pequeñas gotas, recorte muchas aproximadamente unas 45 para cada ala. Aplicó silicón líquido a la cartulina y comencé a pegar las gotas que ya había recortado, coloque dos líneas y deje secar bien.
⚡ Las gotas de foami restantes las pase por la plancha de cabello bien caliente,esto con el fin de darle profundidad y volumen a las plumas, pegamos unas dos líneas de estas hasta completar las dos alas.
⚡ Ahora dibujé en el foami blanco unas gotas muchísimo más grandes y recorté, luego las pasé por la plancha caliente y damos volumen a las piezas.
⚡ Aplicó silicón líquido en la base del cono y procedo a ir pegando una por una las gotas hasta cubrir tres líneas.
⚡ Ahora recorté una pieza (véase la fotografía) la cual también pase por la plancha para hacerlo más fácil manejarlo y el acoplamiento, le aplicó silicón líquido y pegamos en el cono.
⚡ Dibujé y recorté la pieza de arriba del vestido y la pegamos con silicón líquido.
⚡ Luego recorté dos rectángulos a los cuales le picamos en tiras, y pegamos en las mangas.
⚡ Pegamos la cinta plateada así como el cordón plateado.
⚡ recorte algunos círculos y rayos del foami amarillo y pegamos en diferentes partes del vestido.
⚡ aplicó silicón líquido en la pieza de las alas y pegamos, para lograr que queden firmes lo fijo con un alfiler, luego del foami dorado dibuje y recorte una pequeña corona la cual pegamos.
⚡ EL CETRO⚡
⚡ Un elemento importante para mí es el cetro del sanador y el mi no podía dejar de tenerlo así que tome un un pedacito de cartulina dorada y recorté tres tiras, las cuales pegamos con silicón líquido en el palito de altura, también recorté algunos círculos y los pegamos y finalmente le pegamos una línea de lentejuelas y listo terminamos.
⚡ FOTOGRAFÍAS FINALES ⚡
Espero que el trabajo del día de hoy haya sido de su agrado, yo quedé encantada con el resultado final, como toque final para las fotografías le coloque una luz de navidad para hacerlo lucir muchísimo más, a mí me gustó y a ti qué te pareció, déjamelo en los comentarios.
⚡ CRÉDITOS ⚡
Todas las fotografías fueron tomadas con mi teléfono Xiaomi redmi 9T y son de mi propiedad utilicé el programa polish y el traductor Deepl.
👏 Keep Up the good work on Hive ♦️ 👏
❤️ @takeru255 suggested sagarkothari88 to upvote your post ❤️
Gracias por el apoyo
@mayifiestas, you are most welcome!
Here is !ALIVE token gift for you
@mayifiestas! You Are Alive so I just staked 0.1 $ALIVE to your account on behalf of @ hivecurators. (8/10)
The tip has been paid for by the We Are Alive Tribe through the earnings on @alive.chat, feel free to swing by our daily chat any time you want, plus you can win Hive Power (2x 50 HP) and Alive Power (2x 500 AP) delegations (4 weeks), and Ecency Points (4x 50 EP), in our chat every day.

Gracias
~~~ embed:1789067225678176760?t=SHLqZiv9Iz0UGWwRO-ZP8w&s=19 twitter metadata:TWF5ZWxpbjIwMjF8fGh0dHBzOi8vdHdpdHRlci5jb20vTWF5ZWxpbjIwMjEvc3RhdHVzLzE3ODkwNjcyMjU2NzgxNzY3NjB8 ~~~
Excelente, eres una artista... Te quedó espectacular...
Muchas gracias amiga, trato de hacer lo mejor que se pueda, gracias por visitar y apoyar, saludos.
Cuanta creatividad y detalles
Felicidades
Muchas gracias amiga, se hace lo que se puede,ideas tengo muchas, lastimosamente por el estado de salud de mi esposo es poco el tiempo con el que cuento, pero para adelante siempre amiga, saludos y gracias