Hola amigos de Holozing
Esta es mi primera entrada en esta comunidad donde traigo una propuesta con un diseño de ambiente para uno de nuestros amiguitos.
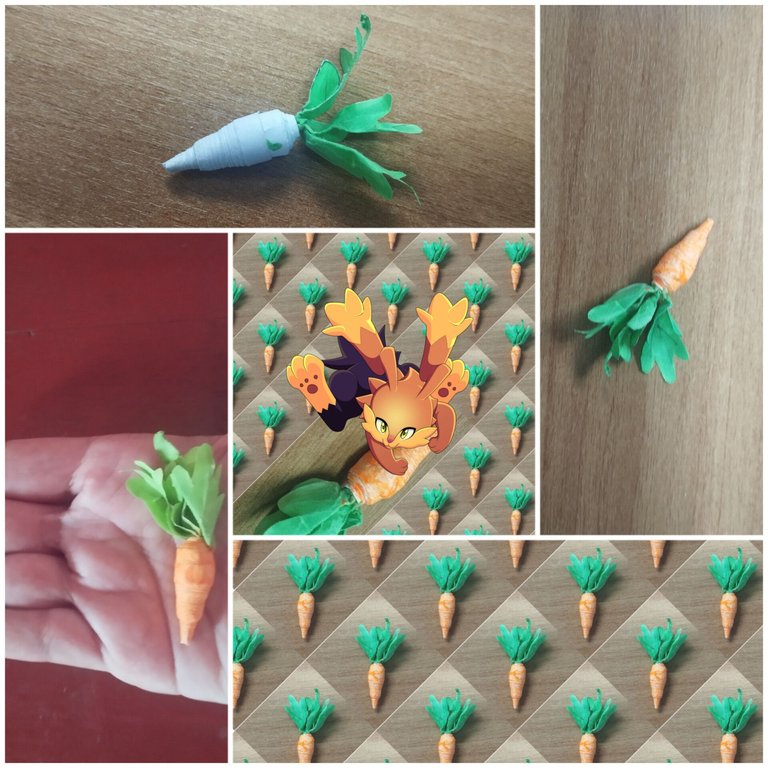
No fue fácil decidirme por uno solo para recrear un escenario donde se encontra cómodo y la vez fuera su identificación. Creo que me identifiqué mucho con el conejo eléctrico, pues se parece un poco a mí en eso de no quedarse quieto jaja.
Con esta sensación de inquietud que da la electricidad, pensé en dar a nuestro amigo un objeto que lo acompañe en sus aventuras y tal vez sea su motor impulsor, su fuente de energía. Así surgió la idea de una zanahoria gigante en la encontrara todo el apoyo y las fuerzas necesarias para vencer las batallas a las cuales se enfrentará en el juego.
Pensado esto, quise hacer una combinación entre lo digital y lo manual (lo cual me apasiona) para dejarle a nuestro amigo algo elaborado con mis propias manos.
Sin más, veamos cómo realicé el póster:
Hello Holozing friends
This is my first post in this community where I bring a proposal with an environment design for one of our little friends.
It wasn't easy to decide on just one to recreate a setting where he would be comfortable and at the same time be his identification. I think I identified myself a lot with the electric rabbit, because he looks a bit like me in that he doesn't stay still haha.
With this feeling of restlessness that electricity gives, I thought of giving our friend an object that would accompany him on his adventures and perhaps be his driving force, his source of energy. This is how I came up with the idea of a giant carrot in which he will find all the support and strength he needs to win the battles he will face in the game.
With this in mind, I wanted to make a combination between the digital and the manual (which I love) to give our friend something made with my own hands.
Without further ado, let's see how I made the poster:
Proceso de manualidad:
Materiales empleados:
Crafting process:
Materials used:
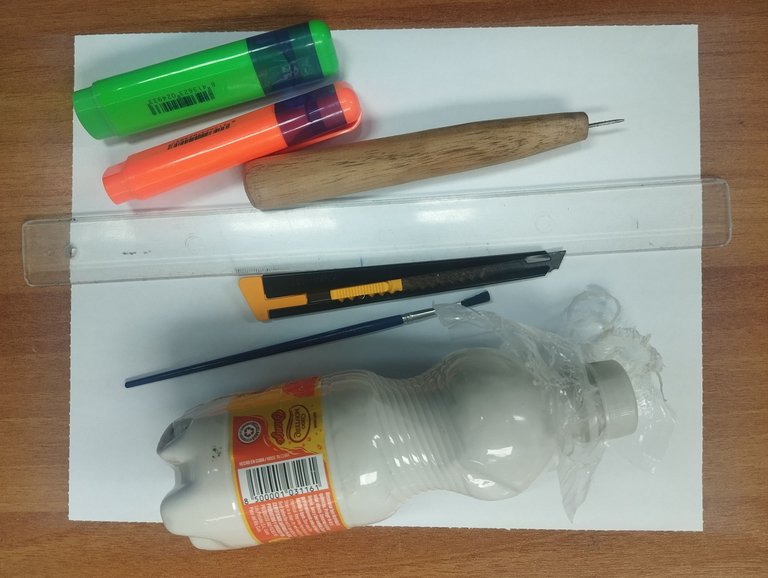
- Una hoja tamaño carta de papel blanco
- Cutter
- Regla
- Bolígrafo
- Tijeras
- Pincel
- Pegamento (cola blanca)
- Aguja para quilling
- Marcador resaltador anaranjado
- Marcador resaltador verde
- A letter-sized sheet of white paper
- Cutter
- Ruler
- Biros
- Scissors
- Paintbrush
- Glue (white glue)
- Quilling needle
- Orange highlighter
- Green highlighter

Paso a paso:
Para comenzar, corté tiras de papel de 5 centímetros.
Seguidamente comencé a enrollar en la aguja de quilling con mucho cuidado y haciendo desplazar cada vuelta un poco más hacia afuera que la anterior. De esta forma logré una especie de cono. Empleé 4 tiras.
Retiré de la aguja y hunté la cola blanca tanto por dentro como por fuera del cono.
Step by step:
To begin with, I cut 5 centimetre strips of paper.
Then I began to roll them on the quilling needle very carefully, moving each turn a little more outwards than the previous one. In this way I achieved a sort of cone shape. I used 4 strips.
I removed the needle and dipped the white glue inside and outside the cone.
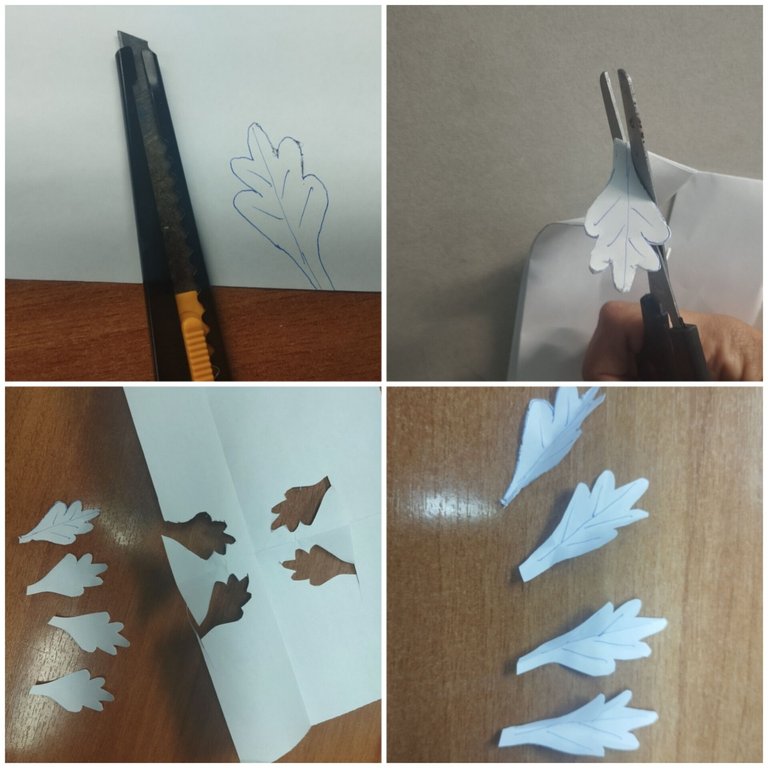
Doblé la hoja de papel en 4.
Dibujé una hoja para nuestra zanahoria.
Recorté y obtuve 4 hojas a las que les dibujé unas líneas e hice unos dobleces por estas líneas para dar movimiento.
I folded the sheet of paper in 4.
I drew a leaf for our carrot.
I cut out and obtained 4 leaves to which I drew some lines and made some folds along these lines to give movement.
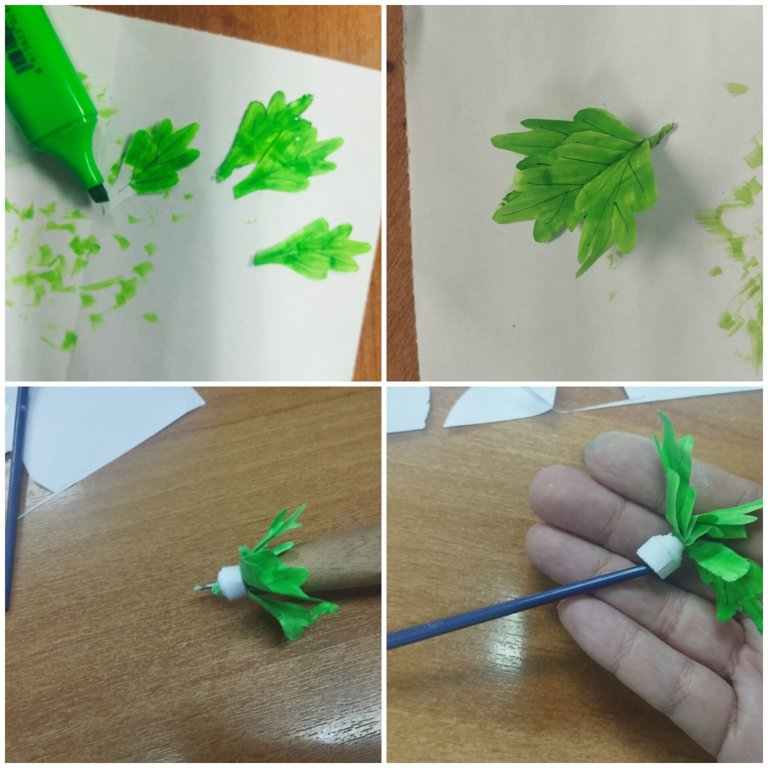
Di color a las hojas con el marcador verde.
Enrollé las 4 hojitas por la parte baja.
Luego le apliqué vueltas con las cintas blancas. Utilicé 3 cintas para ello.
Con la parte trasera del pincel desplacé un poco el rollito haciendo como una tapita.
Colour the leaves with the green marker.
Roll up the 4 leaves at the bottom.
Then I applied twists with the white ribbons. I used 3 ribbons for this.
With the back of the paintbrush I moved the roll a little bit to make a little lid.
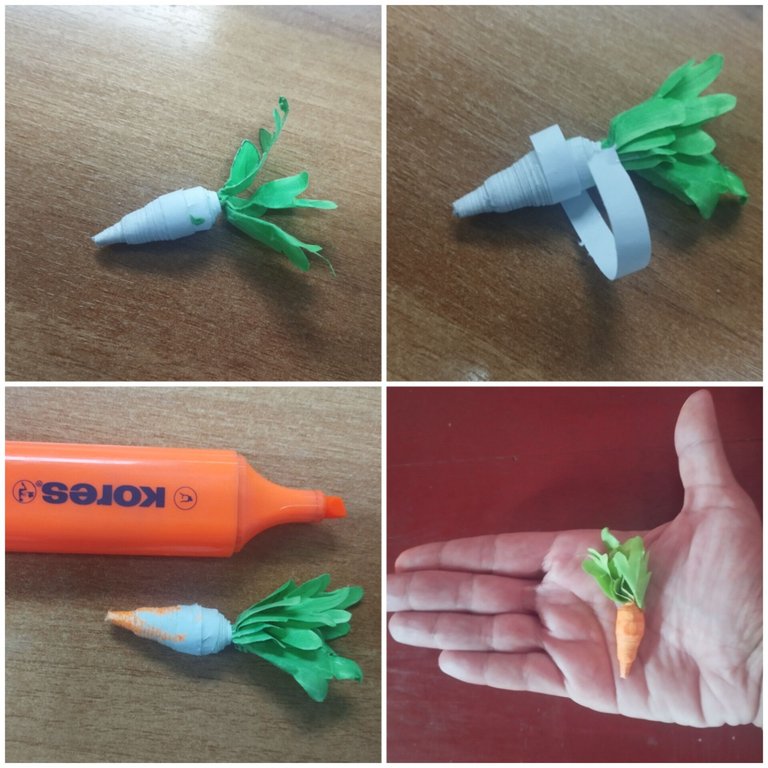
Coloqué esta pieza dentro del cono.
Con un pedazo de cinta reforcé este empate aplicando pegamento.
Con el marcador anaranjado di color a la zanahoria y luego apliqué pegamento en toda la pieza para lograr fortaleza.
I placed this piece inside the cone.
With a piece of tape I reinforced this joint by applying glue.
With the orange marker I coloured the carrot and then applied glue to the whole piece to make it strong.
Proceso digital
Digital process
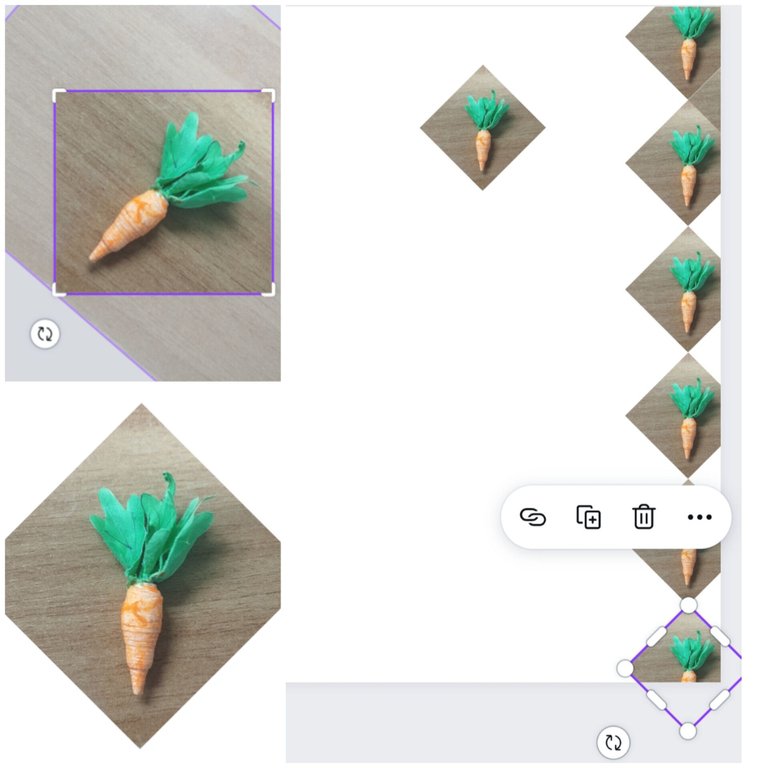
Después da hacer varias fotografías de la zanahoria terminada en diversos ángulos, escogí una foto que trabajé en Canva.
Le di una inclinación vertical a la zanahoria y recorté la imagen en forma de rombo.
Dispuse está imagen como un patrón y diseñé así el cartel base para nuestro amigo.
After taking several photographs of the finished carrot at different angles, I chose a photo that I worked on in Canva.
I gave the carrot a vertical slant and cropped the image into a diamond shape.
I arranged this image as a pattern and designed the base poster for our friend.
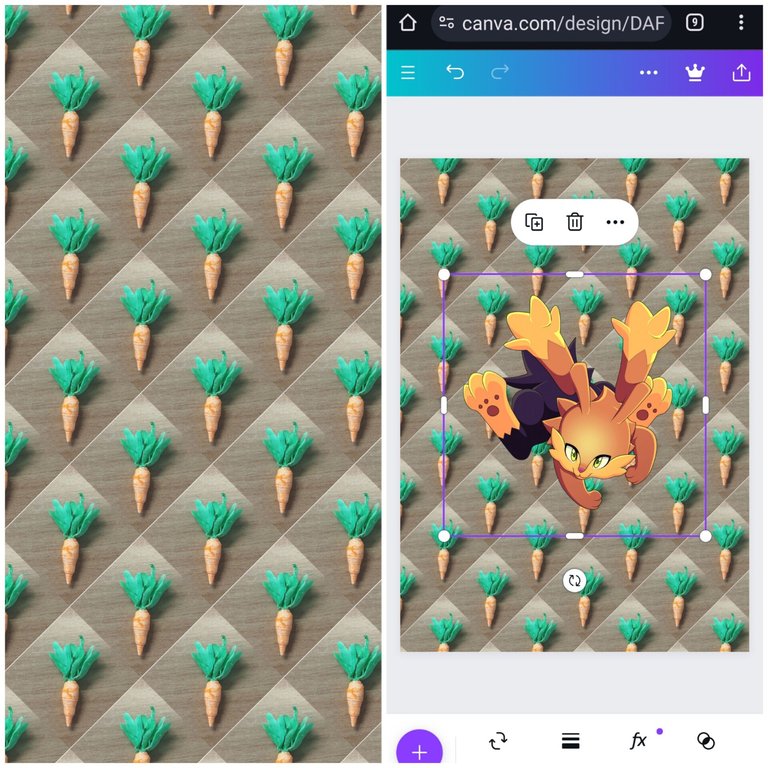
- Inserté la imagen principal de nuestro amigo para tener idea del tamaño que necesitaba poner la zanahoria gigante.
- I inserted the main image of our friend to get an idea of the size I needed to put the giant carrot.

- Inserté una nueva imagen de una zanahoria con un tamaño adecuado y posición que representara la imagen del conejo eléctrico y ya casi estaba listo, solo faltaba incorporar a nuestro amigo en el centro.
- I inserted a new image of a carrot with a suitable size and position to represent the image of the electric rabbit and I was almost ready, I just needed to incorporate our friend in the centre.
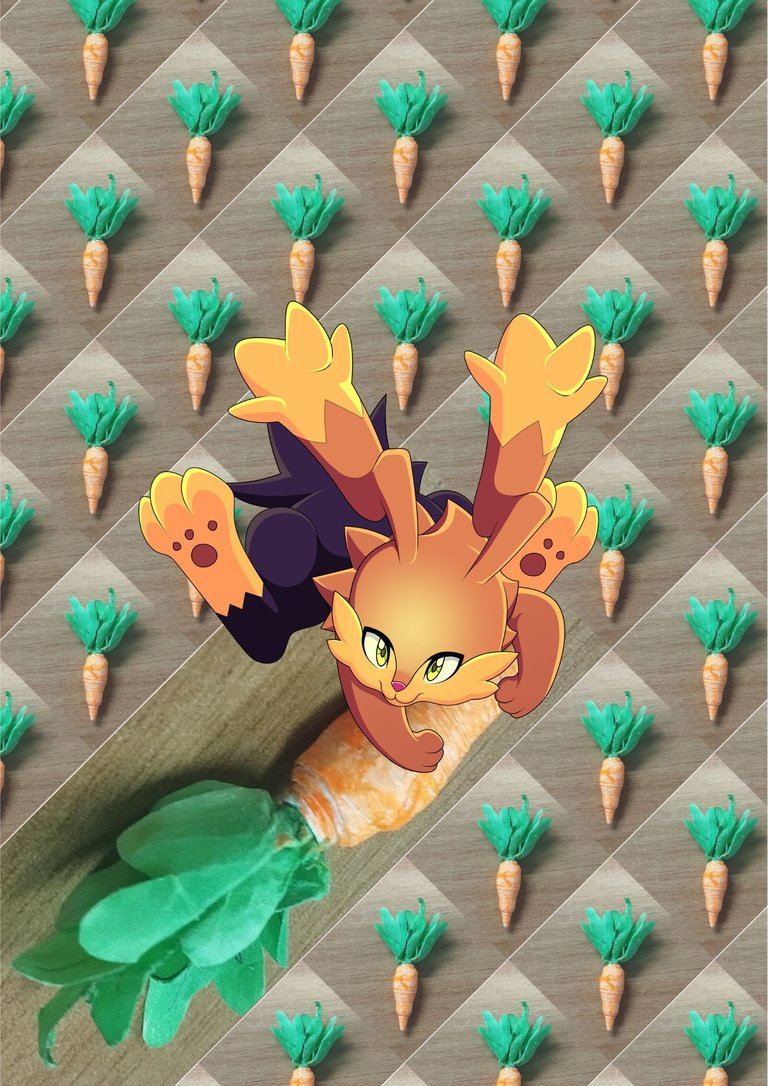
- Inserté la imagen en el centro y así resultó mi regalo para este amigo de Holozing.
Espero que a este personaje le guste mi obsequio que hice con tanto cariño. Gracias por su tiempo de lectura. Nos vemos en la próxima aventura.
Feliz navidad a todos.
- I inserted the image in the centre and this is how my gift for this Holozing friend turned out.
I hope this character likes my gift that I made with so much love. Thank you for your reading time. See you in the next adventure.
Merry Christmas to all.

Own content, translated into English by DeepL.
Twitter: @ylaffittep
Facebook: @ylaffittep
Ohh!! Amiga si que te pusiste creativa , me gustó mucho ese fondo para el conejo eléctrico, lo veo propio para esta criatura 👍
Eso te quedó muy bien, hasta yo quiero tener un campo de zanahorias así!!!
Jaja ahora mismo un mazo de zanahoria da mucha energía. 😅
That's a very nice background, I am you participated in the holozing community contest.
Thank you very much for your appreciation.
Cuanta creatividad y talento , quedó realmente hermoso,un saludo 😊
Muchas gracias por apreciar el trabajo. 🙏