
Image modified from/Imagen modificada de: @splinterlands


Hey Splinterlands and Hivers fans! Today, in our usual community engagement challenge, we're going to explore modifiers whenever we play a battle, whether in Modern, Wild, or Frontier ranked. These are essentially specific rules that change the nature of a fight and become a challenge in themselves because they force us to use certain strategies based on the cards we have and their abilities against that type of modifier. That's why it's always important to have a large and diverse deck, because there are cases where a ruleset modifies the battle so much that it can cost us the victory if we're not prepared.
Que tal amigos de Splinterlands y Hivers! Hoy en nuestro acostumbrado community engagement challenge, vamos a explorar los modificadores cada vez que ejecutamos una batalla ya sea en el modo modern, wild o frontier del ranked. Estas son en esencia reglas particulares que cambian la naturaleza de un combate y se convierten de por sí en un desafío por que nos obliga a utilizar ciertas estrategias basadas en las cartas que tengamos y las habilidades que puedan tener para ese tipo de modificador. En general por eso siempre es importante tener un mazo amplio y diversificado, porque hay casos en la que una ruleset modifica de tal manera la batalla que puede costarnos la victoria si no estamos preparados.

There's a whole variety of rulesets that modify the course of a battle, but you'll always have a maximum of three rulesets in a single battle. In many cases, certain rulesets modify a game so much that it becomes extremely difficult to devise a strategy you consider 100% effective, although generally, of the three rulesets that can be present in a battle, one almost always dominates the others and is the one that ends up defining the lineups in the battle.
Existen toda una variedad de rulesets que modifican el devenir de una batalla, pero siempre tendrás como máximo 3 rulesets en una batalla. En muchos casos ciertas rulesets modifican de tal manera una partida que vuelve extremadamente complicado plantear una estrategia que consideres 100% efectiva, aunque en general de las 3 rulesets que puede haber en una batalla casi siempre 1 domina al resto y es la que termina definiendo las alineaciones en una batalla.
What doesn´t kill you

One of the rulesets I've learned to master after so many battles, brawls, and tournaments is "What Doesn't Kill You." This is a very interesting rule because it applies the Enrage ability to all units on the battlefield. So, when an enemy unit is attacked, if it's melee, its damage and speed are increased by 50%, and if it's ranged or magic, only its speed is increased. There are generally three ways to take advantage of this ability: one is offensive, using only melee units in your lineup to double their stats; the second is to use a combination of melee and magic units to get the best of both offensive and evasive strategies; and the last, which is my favorite, is to focus almost exclusively on a strategy of evasion and suppressing the enemy's damage and speed to achieve victories where the enemy practically doesn't even touch you. That's precisely the strategy we're going to use, taking advantage of the "What Doesn't Kill You" ruleset.
Una de las Rulesets que he prendido a dominar después de tantas batallas, brawls y torneos es What doesn´t kill you. Esta es una regla muy interesante porque le aplica la habilidad Enrage a todas las unidades en el campo de batalla, por lo que al recibir un ataque enemigo, si la unidad es melé se incrementa su daso y velocidad en 50% y si es solo rango o mágico solo su velocidad se ve incrementada. Por lo general hay 3 formas de aprovechar esta habilidad: una es ofensiva, usando solo unidades melé en tu alineación para dublicar sus estadísticas, segundo la de usar unidades melé y mágicas combinadas para tener lo mejor de la estrategia ofensiva y la evasiva. Mientras que la última que es mi favorita es enfocarse casi exclusivamente en una estrategia de evasión y supresión del daño y velocidad del enemigo para lograrvictorias en las que virtualmente el enemigo nisiquiera te toque. Justo esa es la estrategia que vamos a utilizar aprovechando la ruleset What doesn´t kill you.

Battle rules!/Reglas de batalla!

Alright friends, here we have a battle with three modifiers. Some are more influential than others, but "What Doesn't Kill You" will definitely dictate the nature of this battle. Other elements help shape your strategy, such as the available splinters and mana. In this case, only the splinters that favor my strategy with Enrage are available: fire, earth, and death, with a mana limit of 39. What we're going to see now is how I'll build my strategy based on evading any type of enemy attack, explaining which abilities are best suited to maximize this modifier.
Bien amigos aquí tenemos una batalla con 3 modificadores, algunos son más influentes que otros, pero definitivamente What doesn´t kill you será el que dicte la naturaleza de esta batalla. Existen otros elementos que ayudan a perfilar la estrategia que vas a tomar como los splinters disponibles y la cantidad de mana. En este caso solo están disponibles los splinters que favorecen mi estrategia con el Enrage: fuego, tierra y muerte, con un limite de mana de 39. Lo que vamos a ver ahora es como armaré mi estrategia en base a la evasión de cualquier tipo de ataque enemigo, explicando cuales habilidades son las más convenientes para explotar al máximo este modificador.

My Strategy/Mi estrategia
After weighing the pros and cons of modifiers in this battle, I've decided to take a gamble with a strategy of boosting my stats and suppressing the opponent's. But which stats should I boost? We won't focus on damage, because the units I'll be using already have good average damage. Instead, we'll focus on speed: boosting our speed and suppressing the opponent's. Let's see which units will help us achieve this goal.
Después de evaluar los beneficios y riesgos que conllevan los modificadores en esta batalla, mi decisión ha sido arriesgarme con una estrategia de potenciar mis estadísticas y suprimir las del oponente. Pero cuales estadísticas potenciar? No nos enfocaremos en el daño, porque las unidades que usaré ya tienen un buen daño promedio, nos enfocaremos en la velocidad: potenciar nuestra velocidad y suprimir las del oponente. Veamos ahora con que unidades lograr este objetivo.
🎴Cards/Cartas
🧙♂️Archon/Arconte: Conqueror Jacek


+2 Speed, Pierce & Scattershot
I love the design of this card; it's simply brutal. Unfortunately, it was an Archon with very little use in the Chaos Legion meta, even after the release of Rebellion. Thankfully, with the addition of the Rebellion reward cards and now the Conclave Arcana, this card is finally starting to get the recognition it was unfairly denied. This Archon's modifiers will help us a lot in this battle. Let's start with the obvious: speed. We'll need it to significantly boost our speed with the Enrage ruleset. Then we have Scattershot. This ability was certainly very unpopular during Chaos Legion because it relies heavily on luck, but in this case, when there are only four enemy units on the battlefield, it's more effective and the damage isn't diluted as much. Finally, there's Pierce, which allows us to pierce through defenses, deal damage, and avoid wasting attacks.
Me encanta el diseño de esta carta es simplemente brutal, lamentablemente fue un arconte con muy poca utilidad en el meta de Chaos Legion e incluso con la aparición de Rebellion. Feliz mente con la incorporación de las cartas rewards Rebellion y ahora las Conclave Arcana, esta carta esta comenzando a tener el brillo que injustamente se le negó en su momento. Los modificadores de este arconte nos van ayudar mucho en esta batalla, comencemos por lo obvio: la velocidad, la necesitaremos para potenciar significativamente nuestra velocidad con la ruleset Enrage. Luego tenemos el scattershot, esta habilidad ciertamente fue muy impopular durante Chaos Legion porque deja todo a la suerte, pero en este caso cuando solo hay 4 unidades enemigas en el campo de batalla es más efectivo y no se diluye tanto el daño. Por último Pierce, que nos permite atravesar las defensas, hacer daño y nos evita perder inútilmente los ataques.
👾 Monsters/Monstruos: Coeurl Lurker
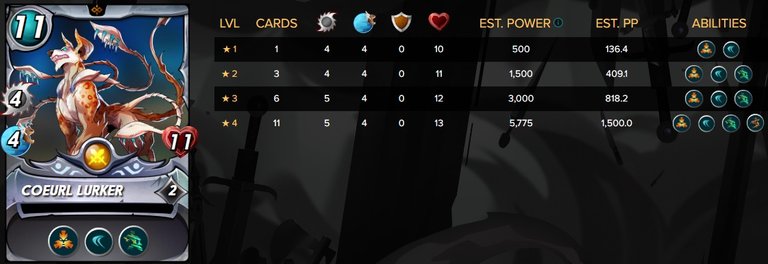

Taunt, Dodge & Phase
Let's move on to our vanguard tank and the backbone of our strategy: Coeurl Lurker. This neutral tank caught my eye the moment I saw it when Riftwatchers was released. This unit acts as a decoy, but its stats and attributes make it a unit built to evade almost every possible attack. To begin with, it has the Dodge ability, which grants it an extra 30% evasion against melee and ranged attacks. In addition, at level 2, it gains the Phase ability, which allows it to evade magic attacks. You end up with a tank that evades all types of possible attacks; if we boost its speed enough, it will practically be able to evade all attacks it receives.
Pasemos ahora a nuestro tanque de vanguardia y el que será nuestra columna vertebral de nuestra estrategia: Coeurl Lurker. Este tanque neutro me llamó la atención desde el primer momento que lo vi cuando salió Riftwatchers, esta unidad actúa como señuelo pero sus estadísticas y atributos lo convierten en una unidad hecha para evadir casi todos los ataques posible. Para comenzar tiene la habilidad Dodge, que le incorpora un 30% extra de evasión a los ataques melé y rango, a esto hay que sumarle que en el nivel 2 adquiere la habilidad phase que le permite evadir los ataques mágicos. Terminas teniendo entonces, un tanque que evade todos los tipos de ataques posibles, si potenciamos lo suficiente su velocidad prácticamente podrá evadir todos los ataques que reciba.
👾 Venator Kinjo
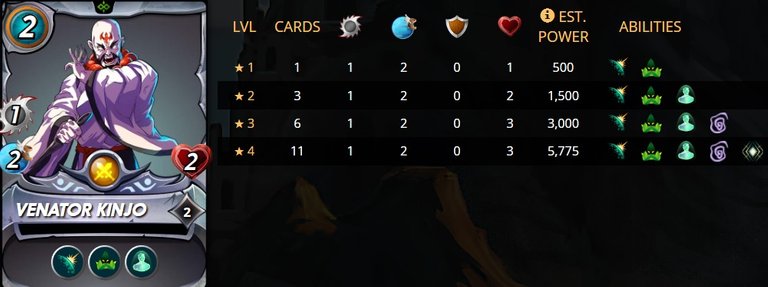

Slow & Deflect
Venator Kinjo will help us in another aspect that we need to reinforce in our strategy: suppression. As we know, the Spreading Fury ruleset applies to all units. This means that if they take damage, their attack and especially their speed will double, thus increasing the probability of their attacks hitting. To prevent this, we'll need to reduce the enemy's speed somehow, and this is where Venator is very useful. It can reduce enemy speed by -1 and also has the Deflect ability, which makes it immune to attacks from units with Blast. That's why we'll place it in the second position to suppress and contain enemy attacks.
Venator Kinjo nos va ayudar en otro aspecto que debemos reforzar en nuestra estrategia: supresión. Como sabemos la ruleset Spreading Fury se aplica a todas las unidades, eso significa que si reciben daño su ataque y sobre todo su velocidad se duplicará incrementando así la probabilidad de acertar sus ataques. Para evitarlo necesitaremos de alguna manera reducir la velocidad enemiga y aquí es donde Venator es de gran utilidad, puede reducir la velocidad enemiga en -1 y cuenta además con la habilidad Deflect que lo hace inmune a posibles ataques de unidades con Blast por eso lo ubicaremos en la segunda posición para suprimir y contener los ataques enemigos.
👾 Supply Runner & Countess Sinash
 |  |
|---|

Swiftness
The last two positions in our lineup are equally important. They will consist of two ranged units that, in addition to boosting our net speed, deal significant damage: Supply Runner and Countess Sinash. These units will add a total of +2 to the total speed and as an extra bonus they have very good damage and it doesn't matter that their attacks are random since there are few units on the battlefield, the damage of their attacks will not be dispersed as much.
Las últimas 2 posiciones de nuestra alineación son igualmente importantes, la conformaran 2 unidades rango que además de potenciar nuestra velocidad neta, hacen un daño significativo: Supply Runner & Countess Sinash. Estas unidades nos sumaran en total un +2 a la velocidad total y como añadido extra tienen un muy buen daño y no importa que sus ataques sean aleatorios como son pocas unidades en el campo de batalla, el daño de sus ataques no se dispersará tanto.

⚔️Strategy and battle lineup/Estrategia y alineación de batalla


-1 to speed/-1 a la velocidad
Once the battle began, our opponent opted for magic, thinking I wouldn't have any units capable of evading these types of attacks. Although their first three units are fast, I can already foresee that they will have a very difficult time hitting my tank. This is mainly because in this Brawl battle, I'm playing as the home unit, and therefore one of my advantages is that my opponent's speed will be reduced by -1 thanks to our barracks being upgraded to level 9. This is what finally convinced me to opt for a decoy strategy capable of evading everything.
Una vez enviada la batalla, nuestro oponente optó por la magia pensando que no tendría unidades capaces de evadir este tipo de ataques, aunque sus 3 primeras unidades son rápidas ya puedo prever que les será muy difícil acertarle a mi tanque. Principalmente porque en esta batalla Brawl yo soy casa y por tanto una de las ventajas que tengo es que mi oponente tendrá su velocidad reducida en -1 gracias a que tenemos nuestra barraca upgradeada al nivel 9. Esto fue lo que me terminó de convencer para optar por una estrategia de señuelo capaz de evadirlo todo.

🔗Link to battle/Enlace a la batalla

https://splinterlands.com/battle/sm_1dv0C59x2uD3aQmdJjI1?ref=bulkathos
⚔️Battle/Batalla⚔️
💥Rounds 1-3💥


Equalizer
We started the first round, and what we could see was that all four enemy units could attack, while we only had three units that could attack. However, we were the first to attack, and the advantage of scattershot was evident. Although it's random, with fewer units, it's more likely to target the same unit. The enemy, however, missed all their attacks. In the second round, our three offensive units attacked the enemy tank, taking it down and weakening Runemancer Florre. The advantage of Equalizer is that units like Venator gain a maximum health equivalent to that of the monster with the most health. This makes a strategy based on evasion even more advantageous than a direct offensive one.
Comenzamos el 1er round y lo que podemos ver es que todas las 4 unidades enemigas pueden atacar mientras que nosotros solo tenemos 3 unidades que podrían atacar, sin embargo somos los primeros en atacar y se puede ver la ventaja de scattershot si bien es aleatorio al ser menos unidades es más probable atacar a una misma unidad. El enemigo sin embargo falló todos sus ataques, mientras que en el segundo round nuestras 3 unidades ofensivas atacaron al tanque enemigo dándole de baja y dejándo debilitada a Runemancer Florre, la ventaja del Equalizer es que unidades como Venator adquiere un máximo de vida equivalente al del monstruo con mayor salud, esto hace aún más conveniente usar una estrategia basada en la evasión que en la ofensiva directa.
💥Rounds 4-6💥

Runemancer managed to withstand the onslaught in the 4th round, but overall, the enemy offense continued to miss its melee and magic attacks. Finally, in the 5th round, Ciuntess Sinash eliminated Runemancer Florre, and Coeurl Lurker mercilessly punished Katrelba Gobson's futile attempts to strike us. Ultimately, Djinn Biljka, with a speed rating of 1, was unable to touch us, and since he had already been taking damage since round 3, one attack from Supply Runner was all it took to dispatch him and seal the victory.
Runemancer logró soportar la embestida en el 4to round pero en general la ofensiva enegima sigue fallando sus ataques melé y mágicos. Finalmente en el 5to round Ciuntess Sinash elimina a Runemancer Florre y Coeurl Lurker castiga sin piedad los intentos inútiles de Katrelba Gobson de golpearnos. Finalmente Djinn Biljka con 1 de velocidad fue incapaz de tocarnos y como ya venía recibiendo daño desde el round 3 solo le bastó 1 ataque de Supply Runner para despacharlo y sellar la victoria.

🔥 Conclusions/Conclusiones 🔥
- This was literally a flawless victory; the enemy didn't touch any of our units. This was because they understood the limitations imposed by the ruleset and the available splinters—in this case, fire, earth, and death. But of course, there are drawbacks to this strategy, one of which is being wary of Archons like Byzantine Kitty and Risqruel Drath, who can apply the True Strike ability to their units and therefore never miss their attacks. Other units to watch out for are those with Thorns, as they can damage Coeurl Lurker, being a melee unit. Aside from that, this strategy is very effective when you have the ruleset set like Spreading Fury.
- Literalmente esta fue una victoria impecable, el enemigo no tocó ninguna de nuestras unidades, pero esto sucedió porque entendía los límites propuesto por las ruleset y los splinters disponibles, en este caso fuego, tierra y muerte. Pero por supuesto existen contras que debes considerar para esta estrategia,y una de ellas es cuidarse de los arcontes como Byzantine Kitty & Risqruel Drath que pueden aplicar la habilidad True Strike a sus unidades y por tanto jamás fallarán sus ataques. Otras unidades de las que debes tener cuidado son las unidades con Thorns porque pueden dañar a Coeurl Lurker por ser una unidad melé, fuera de eso esta estrategia es muy efectiva cuando tienes la ruleset como Spreading Fury.
 |  |
|---|
Byzantine Kitty & Risqruel Drath


Well, friends, this was my battle for the community engagement challenge. When it comes to modifiers like Spreading Fury, I always think of an evasion-based lineup with Coeurl Lurker, since it requires careful consideration of the Archon type, support units, and suppressors to achieve an optimal lineup. It's quite satisfying when you achieve victory considering all those elements. I hope you enjoyed it, and I'll see you in the next community challenge. Regards!
Bien amigos, esta fue mi batalla para el community engagement challenge. Cuando se trata de modificadores como Spreading Fury siempre pienso en una alineación con Coeurl Lurker basado en la evasión, ya que requiere de pensar muy bien el tipo de arconte, unidades de apoyo y supresores para al final lograr una alineación óptima y es bastante satisfactorio cuando logras la victoria considerando todos esos elementos. Espero que les haya gustado y nos vemos en el próximo challenge comunitario. Saludos!
If you are new to splinterlands and want to get into and get to know this game you can do it at the link below:
Si eres nuevo en splinterlands y quieres adentrarte y conocer este juego puedes hacerlo en el siguiente enlace:
Bulkathos

All images were taken from:
Todas las imagenes fueron tomadas de:
@splinterlands

Congratulations @bulkathos! You have completed the following achievement on the Hive blockchain And have been rewarded with New badge(s)
You can view your badges on your board and compare yourself to others in the Ranking
If you no longer want to receive notifications, reply to this comment with the word
STOPCheck out our last posts: