Hola mis amigos Hive creativos
Estos días han sido muy movidos para mí, no he parado ni un solo instante, creo que ya quiero vacaciones. Y es que contrario a muchas personas que han tenido un descanso obligatorio por lo del coronavirus a mí no me ha tocado la misma suerte, por un lado es bueno, no me imagino descansando todo el día o limpiando eternamente mi apartamento para ocuparme en algo.
Gracias a Dios he tenido bastante trabajo y aparte tengo que cumplir con mi responsabilidad de publicar todos los días una manualidad para mis seguidores en Hive.
Estos días he estado visitando muchos blogs en internet buscando patrones para hacer las muñecas de trapo y metiéndome en un lado y otro encontré distintos modelos de bolsos para niña ¡muy lindos!
A continuación les traje el paso a paso de uno que vi y me encantó, no tenía el paso a paso pero yo lo hice lo mejor que pude, espero lo entiendan y les guste.
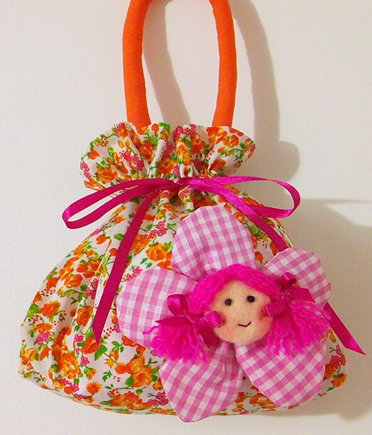
"Pasito a pasito, haremos el bolsito"
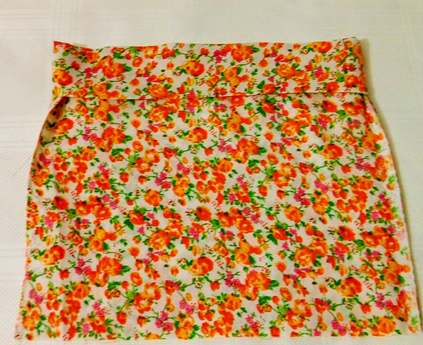
Cortamos dos cuadros de tela de 35 cm de largo por 30 cm de ancho. Cosemos a ambos lados y en la parte de abajo con costura recta y zigzag.
Planchamos en la parte superior haciendo primero un doblez de un cm por toda la orilla y luego otro dobles de 5 cm, todo esto lo hacemos por el lado revés.
Pasamos costura recta por toda la orilla y luego otra costura recta a 1 cm de distancia, para realizar el canal por donde va a pasar la cinta de arruchar.
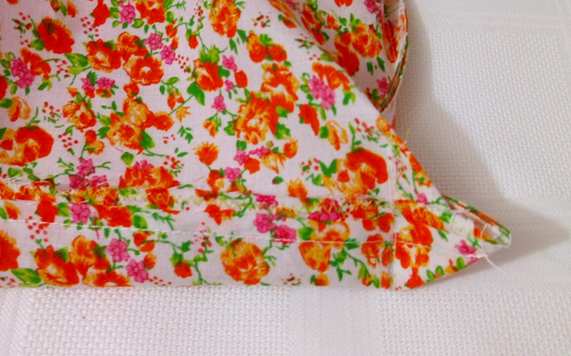
- En la parte inferior por el lado revés, doblamos las esquinas y pasamos costura recta a 2,5 cms de distancia desde la punta hacia dentro.
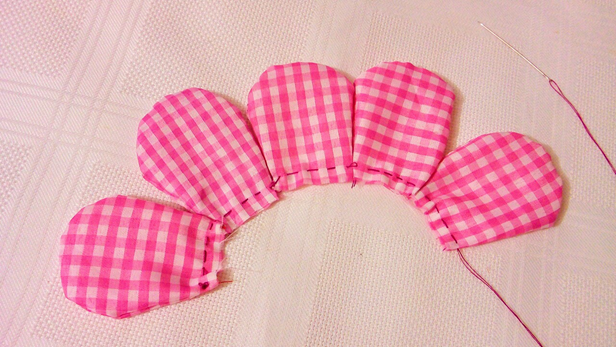
- Realizamos 5 pétalos bien grandes y hacemos una carita de muñeca con popelina o manta polar color piel.
Hacemos una pequeña abertura por el frente y pasamos una cinta o cordón por el túnel que hicimos para arruchar.
Para realizar el asa cortamos una tira en tela naranja que mida aproximadamente 40 cms de largo por 5 cms de ancho, pasamos costura recta a lo largo, volteamos, rellenamos y ubicamos en su sitio.
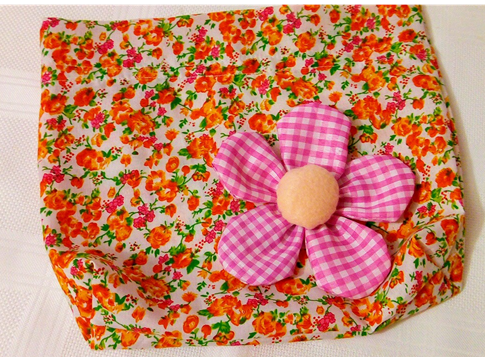
Decoramos con la flor y listo.
La FELICIDAD es... hacer las pequeñas cosas de una gran manera.

Hello my creative Hive friends
These days have been very busy for me, I haven't stopped for a single moment, I think I want a vacation. Unlike many people who have had a mandatory rest because of the coronavirus, I have not had the same luck. On the one hand, it is good, I can't imagine resting all day or cleaning my apartment forever to take care of something.
Thank God I have had enough work and I have to fulfill my responsibility to publish a manual for my followers in Hive every day.
These days I've been visiting many blogs on the internet looking for patterns to make rag dolls and getting into one side or the other I found different models of girls bags, very nice!
Next I brought you the step by step of one I saw and I loved it, I didn't have the step by step but I did the best I could, I hope you understand and like it.
Step by step we'll do the bag
We cut two fabric squares of 35 cm long by 30 cm wide. We sew on both sides and on the bottom with straight and zigzag stitching.
We iron on the upper part making first a 1 cm fold along the edge and then another 5 cm fold, all this is done on the reverse side.
Sew a straight seam all along the edge and then sew a straight seam 1 cm apart to make the channel through which the ribbon will pass.
- At the bottom, on the reverse side, we fold the corners and sew them straight in, 2.5 cm from the tip.
- We make 5 very large petals and make a doll face with poplin or skin-colored polar blanket.
We make a small opening in the front and pass a ribbon or cord through the tunnel we made to crawl through.
To make the handle, we cut a strip of orange fabric measuring approximately 40 cm long by 5 cm wide, sew it straight along, turn it over, fill it in and put it back in place.
Decorate with the flower and that's it.
HAPPINESS is... doing the little things in a big way.
Quédate en casa/Stay at home
Que lindo, y a las niñas que nos gusta estar con cositas cuchi colgando
jejeje si vale, ahora las niñas son muy coquetas.
Que hermoso bolsito, es muy cuchi y que fácil de hacer, muchas gracias por tu artículo, saludos
si es muy cuchi como tu dices, me imagino algo asi como cotillon para una fiesta o algo asi.
Precioso, como todas tus creaciones @carolinacardoza